#Aireal photography
Text
How to Make an Inexpensive Lightbox for Photography

Canna Bear's Canna Photography
by Aireal's Agenda
Whether you're just practicing your photography or taking pictures of something you want to sell online, proper lighting is key to getting that perfect shot.

One might go out and invest in expensive lighting setups or try and work with natural daylight, but nothing will be quite as easy to acquire and use as a homemade photography lightbox.By adding some diffusing panels to a sturdy box and wielding some cheap lamps properly, you can make a lightbox that'll give you great shots within an afternoon.https://youtu.be/mdJE1siDQYU
From Concept to Creation
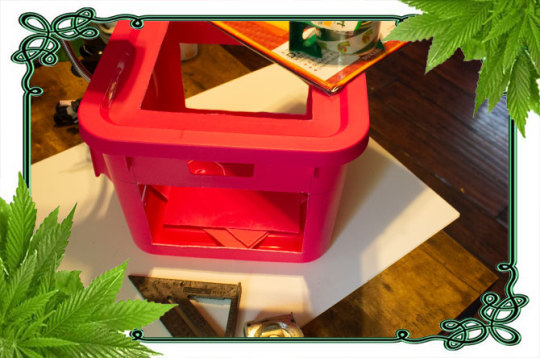
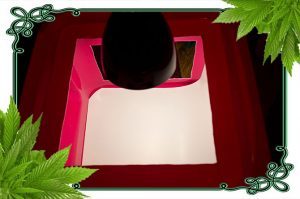
ProTip: Choose a box large enough for the object you want to photograph yet light enough to remain portable.Try and find the biggest box that you can, as this will let you take pictures of almost anything you'd need to photograph. Ask at local shops, find a box you're no longer using, or look at purchasing one from a storage company to locate the perfect light-weight box.- I wanted a lightbox that lasts longer, so choose to use a box made of more sturdy material. A large wooden box or one made of an opaque plastic might also work. Note, you'll likely need something stronger than a box cutter, such as a keyhole saw, to cut the lighting panels in the sides.

Fresh From The Farm
Secure the flaps on one side.
Turn your box over and fold the flaps down to create a flat bottom. Use packing tape, duct tape, or something similar to hold the flaps in place and keep the box steady.Pro tip: Tape down the flaps on the inside of the box also, to keep them out of your way during #workflow. Some boxes will come with one side already held together with cardboard tabs. While this should keep the box steady as you work, it might pay to tape the edges of the box together as well for extra stability.- I choose to use a plastic container with a lid in order to avoid the extra work and to provide a more solid base from which to work from. I opted to sacrifice cost in exchange for longevity. https://youtu.be/g6FBXH1QiA0
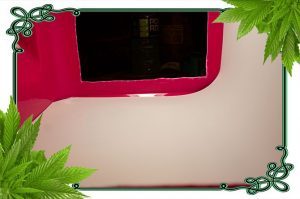
Measure out windows on either side of your box.
Place the box on its side, so that the open flaps are facing you. Then use a ruler to mark a point roughly 2 inches (5.1 cm) from each edge on one side of the box.Draw a straight line with a pencil along the edges of the box to connect these points, creating a rectangle with space around the edges. Repeat on the opposite side.

Cut out the windows in your box.
This will be the size of the window that you will cover with a piece of fabric, plastic film, or tissue. If you have a particularly big box, you might want to make the window smaller to ensure that you can still cover it with one piece the fabric, film, or paper.You can also trace a window on the top of your box as well, which will allow you to light the item you're taking a picture of from above.

Use a box cutter or a sharp pair of scissors to cut along the lines you have marked. Go around each line until you can remove a piece of cardboard in the middle, leaving you with a small window. Repeat on the other side to make another window.- To keep the lines extra straight, hold a ruler against the pencil lines, and cut along them. This won't affect the functionality of the box but will make it look better.
Buy Quality Cannabis
Trim a piece of poster board to be the same width as your box.
Place a piece of white poster board or a thick piece of white paper over the top of the box. Then use the scissors or box cutter to trim the edges, so that it fits within your box. The poster board should be the same width as the box, and around twice as long as the top side.- White poster board works excellently for this, as it will be smooth and will not easily crease inside the box. If you can't find it, any large piece of sturdy white paper or card with a matte finish should work just as well.
- ProTip: White poster board gives you an easy “infinity” look as if the item you are photographing "appears" to sit in empty space. Try using different colors to get different cool effects.
- The most important part of the material that you choose is that it has a matte surface. Anything that is too shiny will reflect the light and ruin the purpose of a lightbox.

Cut out two pieces of white fabric or tissue paper to cover the windows.
This will work to diffuse the light that shines into the lightbox, giving the whole picture even lighting. Cut out some pieces of white fabric, tissue paper, or something similar to be around 1 inch (2.5 cm) bigger on each side than the windows you have cut.

- To make this easier, you can use the piece of cardboard you cut from the box when making the windows as a guide. Place it on the fabric or tissue paper and cut around it, leaving space on each side to attach it to the box.
- A smooth white fabric, tissue paper, parchment paper, or anything similar will work for this. The material you choose just needs to be non-reflective, and let some but not all of the light through it.
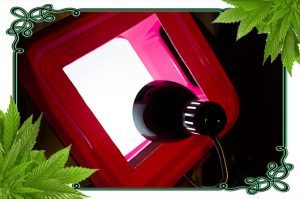
Put the item you want to photograph in the middle of your lightbox.
Place your finished lightbox on a large flat surface, leaving space to position lights on either side. Position the item you need to photograph in the center of the white surface in your lightbox.- Use the viewfinder or screen on your camera to help position the item in the lightbox. Shift the camera and the item around until you can get a clean shot without any exposed cardboard showing.
- ProTip: If you can't get the item or your camera positioned just right, you can always crop the photo to remove anything you don't want to be seen. You shouldn't need to do any other photo editing, but a simple crop can save you a lot of careful repositioning.
Our Top-Shelf Stock
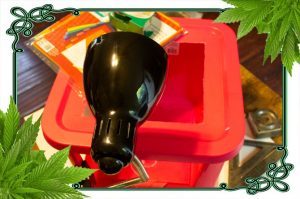
Set up a lamp on either side of the lightbox.
Lamps that provide directional lighting, rather than ambient lighting, will work best with your lightbox. Find as many desk lamps or other directional lights as you have windows on the lightbox. Position the lamps so that they are facing directly into the windows you have cut, and switch them on.

- Keep your lights at least 5 inches (13 cm) away from the windows at all time, to prevent the material covering them from getting too hot.
- Your lights should be an even distance from the lightbox when you first turn them on. Try moving different ones further away or closer to the windows to create some more interesting lighting effects inside.
- Use light bulbs with a cool white light for the best results, as other types may give your images a yellowish tinge.
- You should be able to find cheap desk lamps or lamps that can clip onto furniture for a few dollars online or at your local homeware or office stationery store.
Take the picture.
Once you've got your item lined up and your camera settings perfect, it's time to take the picture. Move the camera around so that there's nothing other than the white background in the shot, hold it steady, and snap a few pictures!Club Cannabliss Newsletter
Be inspired by the unconventional wisdom of our peers and experts as they help us get to a higher state of consciousness.Sign-in and edit your profile. Not yet a Member? Register and claim your spot among the anointed ones!


Indica vs Sativa. Which type of bud comes out on top? You can decide for yourself as we now dive deep into the world of the various types of cannabis strains.
Let's Grow Together!
Please follow our social or subscribe as well to our social channels to stay up to date!

Nirvana Farms Medical
- STONER MORNING SHOW
- D&D Cooking with Cannabutter
Instagram
Linkedin
Twitter
Tumblr
Pinterest
YouTube
- Mix
- Medium
- Flickr
- Email
Read the full article
0 notes
Text

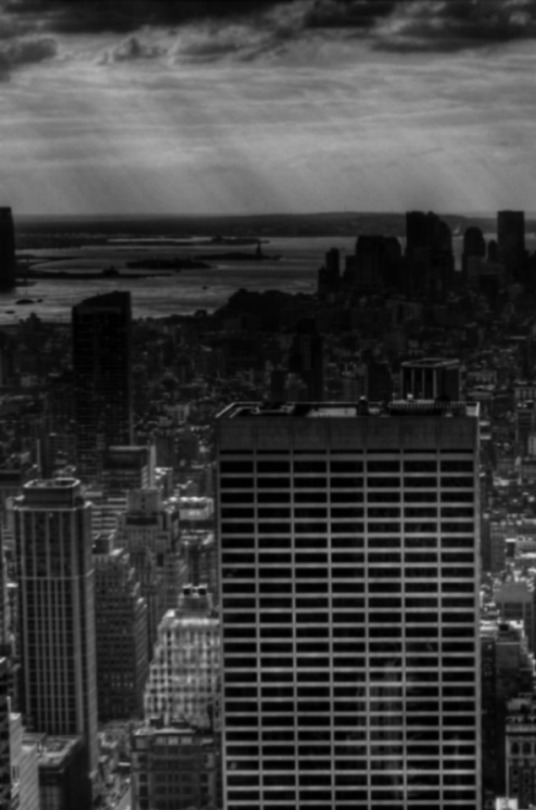
Gotham city, an aireal view.
#Photography#Aireal photography#Gotham city#Only in gotham#The city is really beautiful#And so BIG!#Danielle Dishes
3 notes
·
View notes
Photo


13 notes
·
View notes
Photo

Stephen | Corcor E-session #prenup #prewedding #preweddingphoto #esession #wedding #weddingphotography #weddingphotographer #photography #photographer #canonphoto #canonphotography #canonph #philippines #love #sweet #happy #happiness #prenupshoot #waynetmotion #thankyoulord #togodbetheglory #helicopter #red #reddress #lovestory #greengrass #aireal
#greengrass#togodbetheglory#aireal#canonphoto#photography#happy#happiness#thankyoulord#waynetmotion#lovestory#red#sweet#reddress#prewedding#prenupshoot#weddingphotographer#canonph#philippines#esession#love#preweddingphoto#helicopter#photographer#prenup#weddingphotography#canonphotography#wedding
0 notes
Photo
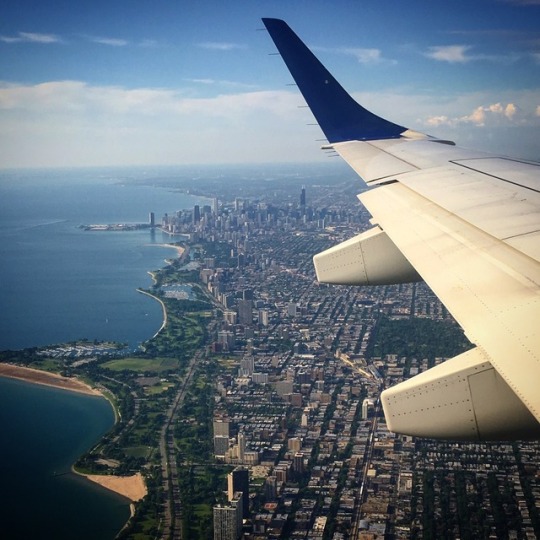
#photography#chicago#iphone#skyline#aireal#airealphotography#landscape#flying#planes#landing#taking off
0 notes
Link
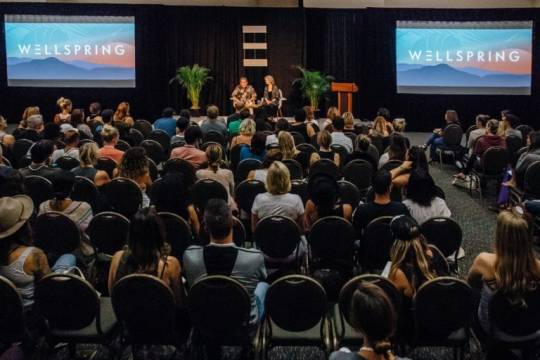
A photo is usually worth a thousand words—but we’re not sure that’s true when it comes to Wellspring. We learned, expanded our comfort zones, and came together as community in ways we never have before, and are leaving more inspired than we’ve felt in a long time. Personally, socially, and globally: We’re ready to continue the conversations and make the changes that will make us all well.
Having said that—photos are fun. Here are some of our faves from this transformative weekend.
All photography by Melissa Gayle.
There were moments we listened and absorbed the genius of luminaries.

Russell Brand with his unique hilarity.
Gary Zukav and Linda Francis breaking down real relationship advice.

Kyle Cease reminding us not to set our own limitations.
There were moments we engaged—and began to draft the blueprint for our shared future.

We embraced tough conversations, including wellness beyond whiteness.
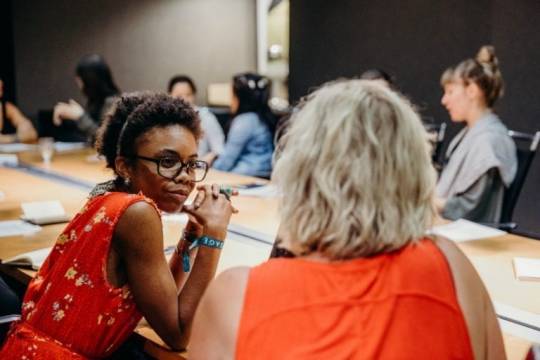
We all had wisdom to share in thought-provoking workshops.
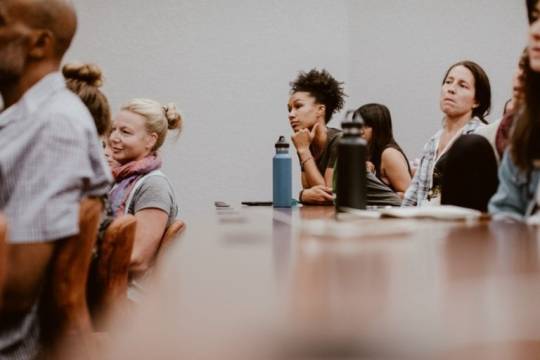
Even teachers learned. Nicole Cardoza, founder of Yoga Foster, took a break from teaching to listen.
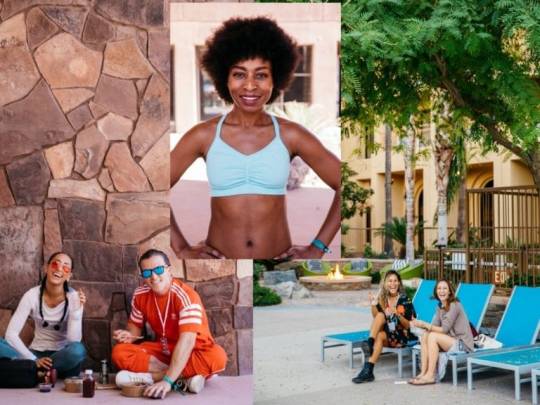
We stretched our bodies and embraced the sweat.

Gloveworx brought it.

Elena Brower helped us stretch to new heights.

Alli Forsythe encouraged us to keep going.
And we found time to absorb and center.

Soaking up rays poolside at the Renaissance.

We introduced the next generation to the healing power of soundbaths.

We flipped our perspective in AiReal Yoga.
We relearned—we remembered—that we’re always better when we come together.

Want to revisit the wisdom shared by the leaders, speakers, and teachers that made Wellspring so special? Click here for an index of talent profiles, features, and think pieces.
1
The post Wellspring in Photos appeared first on Wanderlust.
0 notes
Photo

14 notes
·
View notes
Text
New Post has been published on Broken Magazine
New Post has been published on http://brokenmagazine.com/?p=2806
Firefly
Since I got the drone and have been filming stuff with the go-pro, this put all that effort to shame.
FIREFLY from samadhi production on Vimeo.
0 notes
Text

Soo #TheDailyPlanet was easy to find. Figured some aireal photography would be cool!
Time to surprise Starry with some doughnuts 😏
#Starry#Daily planet#Only in metropolis#Don't worry I'm in the elevator#I just found the place by bat
7 notes
·
View notes
Text
How to Make an Inexpensive Lightbox for Photography

Canna Bear's Canna Photography
by Aireal's Agenda
Whether you're just practicing your photography or taking pictures of something you want to sell online, proper lighting is key to getting that perfect shot.

One might go out and invest in expensive lighting setups or try and work with natural daylight, but nothing will be quite as easy to acquire and use as a homemade photography lightbox.By adding some diffusing panels to a sturdy box and wielding some cheap lamps properly, you can make a lightbox that'll give you great shots within an afternoon.https://youtu.be/mdJE1siDQYU
From Concept to Creation
ProTip: Choose a box large enough for the object you want to photograph yet light enough to remain portable.Try and find the biggest box that you can, as this will let you take pictures of almost anything you'd need to photograph. Ask at local shops, find a box you're no longer using, or look at purchasing one from a storage company to locate the perfect light-weight box.- I wanted a lightbox that lasts longer, so choose to use a box made of more sturdy material. A large wooden box or one made of an opaque plastic might also work. Note, you'll likely need something stronger than a box cutter, such as a keyhole saw, to cut the lighting panels in the sides.
Fresh From The Farm
Secure the flaps on one side.
Turn your box over and fold the flaps down to create a flat bottom. Use packing tape, duct tape, or something similar to hold the flaps in place and keep the box steady.Pro tip: Tape down the flaps on the inside of the box also, to keep them out of your way during #workflow. Some boxes will come with one side already held together with cardboard tabs. While this should keep the box steady as you work, it might pay to tape the edges of the box together as well for extra stability.- I choose to use a plastic container with a lid in order to avoid the extra work and to provide a more solid base from which to work from. I opted to sacrifice cost in exchange for longevity. https://youtu.be/g6FBXH1QiA0
Measure out windows on either side of your box.
Place the box on its side, so that the open flaps are facing you. Then use a ruler to mark a point roughly 2 inches (5.1 cm) from each edge on one side of the box.Draw a straight line with a pencil along the edges of the box to connect these points, creating a rectangle with space around the edges. Repeat on the opposite side.

Cut out the windows in your box.
This will be the size of the window that you will cover with a piece of fabric, plastic film, or tissue. If you have a particularly big box, you might want to make the window smaller to ensure that you can still cover it with one piece the fabric, film, or paper.You can also trace a window on the top of your box as well, which will allow you to light the item you're taking a picture of from above.
Use a box cutter or a sharp pair of scissors to cut along the lines you have marked. Go around each line until you can remove a piece of cardboard in the middle, leaving you with a small window. Repeat on the other side to make another window.- To keep the lines extra straight, hold a ruler against the pencil lines, and cut along them. This won't affect the functionality of the box but will make it look better.
Buy Quality Cannabis
Trim a piece of poster board to be the same width as your box.
Place a piece of white poster board or a thick piece of white paper over the top of the box. Then use the scissors or box cutter to trim the edges, so that it fits within your box. The poster board should be the same width as the box, and around twice as long as the top side.- White poster board works excellently for this, as it will be smooth and will not easily crease inside the box. If you can't find it, any large piece of sturdy white paper or card with a matte finish should work just as well.
- ProTip: White poster board gives you an easy “infinity” look as if the item you are photographing "appears" to sit in empty space. Try using different colors to get different cool effects.
- The most important part of the material that you choose is that it has a matte surface. Anything that is too shiny will reflect the light and ruin the purpose of a lightbox.
Cut out two pieces of white fabric or tissue paper to cover the windows.
This will work to diffuse the light that shines into the lightbox, giving the whole picture even lighting. Cut out some pieces of white fabric, tissue paper, or something similar to be around 1 inch (2.5 cm) bigger on each side than the windows you have cut.
- To make this easier, you can use the piece of cardboard you cut from the box when making the windows as a guide. Place it on the fabric or tissue paper and cut around it, leaving space on each side to attach it to the box.
- A smooth white fabric, tissue paper, parchment paper, or anything similar will work for this. The material you choose just needs to be non-reflective, and let some but not all of the light through it.
Put the item you want to photograph in the middle of your lightbox.
Place your finished lightbox on a large flat surface, leaving space to position lights on either side. Position the item you need to photograph in the center of the white surface in your lightbox.- Use the viewfinder or screen on your camera to help position the item in the lightbox. Shift the camera and the item around until you can get a clean shot without any exposed cardboard showing.
- ProTip: If you can't get the item or your camera positioned just right, you can always crop the photo to remove anything you don't want to be seen. You shouldn't need to do any other photo editing, but a simple crop can save you a lot of careful repositioning.
Our Top-Shelf Stock
Set up a lamp on either side of the lightbox.
Lamps that provide directional lighting, rather than ambient lighting, will work best with your lightbox. Find as many desk lamps or other directional lights as you have windows on the lightbox. Position the lamps so that they are facing directly into the windows you have cut, and switch them on.
- Keep your lights at least 5 inches (13 cm) away from the windows at all time, to prevent the material covering them from getting too hot.
- Your lights should be an even distance from the lightbox when you first turn them on. Try moving different ones further away or closer to the windows to create some more interesting lighting effects inside.
- Use light bulbs with a cool white light for the best results, as other types may give your images a yellowish tinge.
- You should be able to find cheap desk lamps or lamps that can clip onto furniture for a few dollars online or at your local homeware or office stationery store.
Take the picture.
Once you've got your item lined up and your camera settings perfect, it's time to take the picture. Move the camera around so that there's nothing other than the white background in the shot, hold it steady, and snap a few pictures!Club Cannabliss Newsletter
Be inspired by the unconventional wisdom of our peers and experts as they help us get to a higher state of consciousness.Sign-in and edit your profile. Not yet a Member? Register and claim your spot among the anointed ones!


Indica vs Sativa. Which type of bud comes out on top? You can decide for yourself as we now dive deep into the world of the various types of cannabis strains.
Let's Grow Together!
Please follow our social or subscribe as well to our social channels to stay up to date!

Nirvana Farms Medical
- STONER MORNING SHOW
- D&D Cooking with Cannabutter
Instagram
Linkedin
Twitter
Tumblr
Pinterest
YouTube
- Mix
- Medium
- Flickr
- Email
Read the full article
0 notes
Text
How to Make an Inexpensive Lightbox for Photography
Canna Bear's Canna Photography
by Aireal's Agenda
Whether you’re just practicing your photography or taking pictures of something you want to sell online, proper lighting is key to getting that perfect shot.
One might go out and invest in expensive lighting setups or try and work with natural daylight, but nothing will be quite as easy to acquire and use as a homemade photography lightbox.
By adding some diffusing panels to a sturdy box and wielding some cheap lamps properly, you can make a lightbox that’ll give you great shots within an afternoon.
#photography#photos#lightbox#diy#inexpensive#jcruceweb#cannabis#cannacommunity#cannamom#cannafam#canna#cannalife#cannaculture#cookingwithcannabis#nirvanafarms#news
0 notes
Last Seen Blogs
i-hate-accidents
i hate accidents, a bridgerton reader fic

furiousfinnstan
some achieve greatness-
squipy
room of things

aurorahawklight
www.jackandjilltoyshop.co.uk

animeg
anime gifs