#Ansible Semaphore Configuration
Explore tagged Tumblr posts
Visit Tumblr Blog
Explore Tumblr blogs with no restrictions, modern design and the best experience.
Last Seen Tumblr Blogs


Fun Fact
Tumblr’s reach among the 26-to-35-year-olds in the US is 11%.
Text
Ansible Semaphore: Awesome Open Source Ansible GUI
Ansible Semaphore: Awesome Open Source Ansible GUI @vexpert #100daysofhomelab #AnsibleAutomation #AnsibleGUI #AnsibleSemaphoreSetup #JobTemplatesInSemaphore #AnsibleInventoryManagement #AnsibleSemaphoreConfiguration #OpenSourceAnsibleAlternatives
Ansible is an awesome automation tool that I use in the home lab and production environment regularly. However, sometimes it is nice to have a GUI to point and click around to configure jobs, inventory, etc. Ansible has a commercial product called Ansible Tower and also an open-source product AWX that you can stand up. However, these may be a bit challenging and a little non-intuitive. If you are…
View On WordPress
#Ansible and Semaphore Integration#Ansible Automation#Ansible GUI#Ansible Inventory Management#Ansible Semaphore Configuration#Ansible Semaphore Setup#Job Templates in Semaphore#Open-Source Ansible Alternatives#Running Ansible Playbooks#Semaphore Installation
0 notes
Text
In this guide, we will install Semaphore Ansible Web UI on CentOS 7|CentOS 8. Semaphore is an open source web-based solution that makes Ansible easy to use for IT teams of all kinds. It gives you a Web interface from where you can launch and manage Ansible Tasks. Install Semaphore Ansible Web UI on CentOS 7|CentOS 8 Semaphore depends on the following tools: MySQL >= 5.6.4/MariaDB >= 5.3 ansible git >= 2.x We will start the installation by ensuring these dependencies are installed on your CentOS 7|CentOS 8 server. So follow steps in the next sections to ensure all is set. Before any installation we recommend you perform an update on the OS layer: sudo yum -y update A reboot is also essential once the upgrade is made: sudo reboot -f Step 1: Install MariaDB Database Server We have a comprehensive guide on installation of MariaDB on CentOS 7|CentOS 8. Run the commands below to install the latest stable release of MariaDB database server. curl -LsS -O https://downloads.mariadb.com/MariaDB/mariadb_repo_setup sudo bash mariadb_repo_setup sudo yum install MariaDB-server MariaDB-client MariaDB-backup Start and enable mariadb database service: sudo systemctl enable --now mariadb Secure database server after installation: $ sudo mariadb-secure-installation Switch to unix_socket authentication [Y/n] n Change the root password? [Y/n] y Remove anonymous users? [Y/n] y Disallow root login remotely? [Y/n] y Remove test database and access to it? [Y/n] y Reload privilege tables now? [Y/n] y Step 2: Install git 2.x on CentOS 7|CentOS 8 Install git 2.x on your CentOS 7 server using our guide below. Install latest version of Git ( Git 2.x ) on CentOS 7 Confirm git version. $ git --version git version 2.34.1 Step 3: Install Ansible on CentOS 7|CentOS 8 Install Ansible on your CentOS 7 server. sudo yum -y install epel-release sudo yum -y install ansible Test if ansible command is available. $ ansible --version ansible 2.9.27 config file = /etc/ansible/ansible.cfg configured module search path = [u'/root/.ansible/plugins/modules', u'/usr/share/ansible/plugins/modules'] ansible python module location = /usr/lib/python2.7/site-packages/ansible executable location = /usr/bin/ansible python version = 2.7.5 (default, Nov 16 2020, 22:23:17) [GCC 4.8.5 20150623 (Red Hat 4.8.5-44)] Step 4: Download Semaphore Visit the Semaphore Releases page and copy the download link for your OS. sudo yum -y install wget curl VER=$(curl -s https://api.github.com/repos/ansible-semaphore/semaphore/releases/latest|grep tag_name | cut -d '"' -f 4|sed 's/v//g') wget https://github.com/ansible-semaphore/semaphore/releases/download/v$VER/semaphore_$VER_linux_amd64.rpm Install Semaphore package: $ sudo rpm -Uvh semaphore_$VER_linux_amd64.rpm Preparing… ################################# [100%] Updating / installing… 1:semaphore-0:2.8.53-1 ################################# [100%] Check if you have semaphore binary in your $PATH. $ which semaphore /usr/bin/semaphore $ semaphore version v2.8.53 Usage help document: $ semaphore --help Ansible Semaphore is a beautiful web UI for Ansible. Source code is available at https://github.com/ansible-semaphore/semaphore. Complete documentation is available at https://ansible-semaphore.com. Usage: semaphore [flags] semaphore [command] Available Commands: completion generate the autocompletion script for the specified shell help Help about any command migrate Execute migrations server Run in server mode setup Perform interactive setup upgrade Upgrade to latest stable version user Manage users version Print the version of Semaphore Flags: --config string Configuration file path -h, --help help for semaphore Use "semaphore [command] --help" for more information about a command. Step 5: Setup Semaphore Run the following command to start Semaphore setup in your system.
$ sudo semaphore setup Hello! You will now be guided through a setup to: 1. Set up configuration for a MySQL/MariaDB database 2. Set up a path for your playbooks (auto-created) 3. Run database Migrations 4. Set up initial semaphore user & password What database to use: 1 - MySQL 2 - BoltDB 3 - PostgreSQL (default 1): 1 DB Hostname (default 127.0.0.1:3306): DB User (default root): root DB Password: DB Name (default semaphore): semaphore Playbook path (default /tmp/semaphore): /opt/semaphore Web root URL (optional, example http://localhost:8010/): http://localhost:8010/ Enable email alerts (y/n, default n): n Enable telegram alerts (y/n, default n): n Enable LDAP authentication (y/n, default n): n Confirm these values are correct to initiate setup. Is this correct? (yes/no): yes Config output directory (default /root): WARN[0037] An input error occured:unexpected newline Running: mkdir -p /root.. Configuration written to /root/config.json.. Pinging db.. Running DB Migrations.. Checking DB migrations Creating migrations table ...... Migrations Finished Set username Username: admin Email: [email protected] WARN[0268] sql: no rows in result set level=Warn Your name: Admin User Password: StrongUserPassword You are all setup Admin User! Re-launch this program pointing to the configuration file ./semaphore -config /root/config.json To run as daemon: nohup ./semaphore -config /root/config.json & You can login with [email protected] or computingpost. You can set other configuration values on the file /root/config.json. Step 6: Configure systemd unit for Semaphore Let’s now configure Semaphore Ansible UI to be managed by systemd. Create systemd service unit file. sudo vi /etc/systemd/system/semaphore.service The add: [Unit] Description=Semaphore Ansible UI Documentation=https://github.com/ansible-semaphore/semaphore Wants=network-online.target After=network-online.target [Service] Type=simple ExecReload=/bin/kill -HUP $MAINPID ExecStart=/usr/bin/semaphore server --config /etc/semaphore/config.json SyslogIdentifier=semaphore Restart=always [Install] WantedBy=multi-user.target Create Semaphore configurations directory: sudo mkdir /etc/semaphore Copy your configuration file to created directory: sudo ln -s /root/config.json /etc/semaphore/config.json Stop running instances of Semaphore. sudo pkill semaphore Confirm: ps aux | grep semaphore Reload systemd and start semaphore service. sudo systemctl daemon-reload sudo systemctl restart semaphore Check status to see if running: $ systemctl status semaphore ● semaphore.service - Semaphore Ansible UI Loaded: loaded (/etc/systemd/system/semaphore.service; disabled; vendor preset: disabled) Active: active (running) since Tue 2022-04-19 13:29:42 UTC; 3s ago Docs: https://github.com/ansible-semaphore/semaphore Main PID: 8636 (semaphore) CGroup: /system.slice/semaphore.service └─8636 /usr/bin/semaphore server --config /etc/semaphore/config.json Apr 19 13:29:42 centos.example.com systemd[1]: Started Semaphore Ansible UI. Apr 19 13:29:42 centos.example.com semaphore[8636]: MySQL [email protected]:3306 semaphore Apr 19 13:29:42 centos.example.com semaphore[8636]: Tmp Path (projects home) /tmp/semaphore Apr 19 13:29:42 centos.example.com semaphore[8636]: Semaphore v2.8.53 Apr 19 13:29:42 centos.example.com semaphore[8636]: Interface Apr 19 13:29:42 centos.example.com semaphore[8636]: Port :3000 Apr 19 13:29:42 centos.example.com semaphore[8636]: Server is running Set Service to start at boot. $ sudo systemctl enable semaphore Created symlink /etc/systemd/system/multi-user.target.wants/semaphore.service → /etc/systemd/system/semaphore.service. Port 3000 should now be Open $ sudo ss -tunelp | grep 3000 tcp LISTEN 0 128 [::]:3000 [::]:* users:(("semaphore",pid=8636,fd=8)) ino:36321 sk:ffff8ae3b4e59080 v6only:0
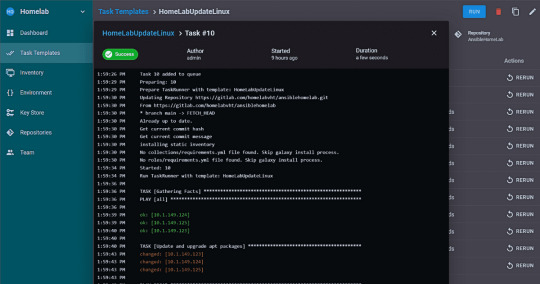
Step 7: Setup Nginx Proxy (Optional) To be able to access Semaphore Web interface with a domain name, use the guide below to setup. Configure Nginx Proxy for Semaphore Ansible Web UI Step 8: Access Semaphore Web interface On your web browser, open semaphore Server IP on port 3000 or server name. Use the username/email created earlier during installation to Sign in. Web console for semaphore should be shown after authentication. You’re ready to manage your servers with Ansible and powerful Web UI. The initial steps required are: Add SSH keys / API keys used by Ansible – Under Key Store > create key Create Inventory file with servers to manage – Under Inventory > create inventory Create users and add to Team(s) Create Environments Add Playbook repositories Create Task Templates and execute Also check a detailed guide on semaphore Web UI. For Ubuntu / Debian installation, check: Setup Semaphore Ansible Web UI on Ubuntu / Debian
0 notes
Text
In our last article, we covered installation of Semaphore Ansible Web UI on Debian/Ubuntu and CentOS Linux distributions. This guide will focus on installing and configuring Nginx as a reverse proxy for Semaphore Ansible Web UI. The only pre-requisite for this setup are: CentOS / RHEL / Ubuntu or Debian Linux distribution. Installed and working Semaphore User account with sudo privileges Step 1: Install Semaphore Ansible Web UI You should have installed Semaphore before proceeding with this setup. Use below guides for reference. Setup Semaphore Ansible Web UI on Ubuntu / Debian Install Semaphore Ansible Web UI on CentOS 7 Step 2: Install Nginx Web Server Install Nginx Web server on your Semaphore server or a difference instance which will be used as proxy server for Semaphore. # Install Nginx on Ubuntu / Debian sudo apt update sudo apt install vim nginx # Install Nginx on CentOS sudo yum -y install epel-release sudo yum -y install vim nginx Once the service is installed, start it and set to be started at system boot. sudo systemctl start nginx sudo systemctl enable nginx Verify that status of nginx service is “running“. $ systemctl status nginx ● nginx.service - A high performance web server and a reverse proxy server Loaded: loaded (/lib/systemd/system/nginx.service; enabled; vendor preset: enabled) Active: active (running) since Tue 2022-04-19 13:34:37 UTC; 6s ago Docs: man:nginx(8) Process: 12190 ExecStart=/usr/sbin/nginx -g daemon on; master_process on; (code=exited, status=0/SUCCESS) Process: 12189 ExecStartPre=/usr/sbin/nginx -t -q -g daemon on; master_process on; (code=exited, status=0/SUCCESS) Main PID: 12193 (nginx) Tasks: 2 (limit: 4915) CGroup: /system.slice/nginx.service ├─12193 nginx: master process /usr/sbin/nginx -g daemon on; master_process on; └─12194 nginx: worker process Apr 19 09:39:45 mydebian systemd[1]: Starting A high performance web server and a reverse proxy server… Apr 19 09:39:45 mydebian systemd[1]: nginx.service: Failed to read PID from file /run/nginx.pid: Invalid argument Apr 19 09:39:45 mydebian systemd[1]: Started A high performance web server and a reverse proxy server. Step 3: Configure Nginx proxy for Semaphore Create semaphore nginx configuration file. sudo vim /etc/nginx/conf.d/semaphore.conf Paste below contents to the file. upstream semaphore server 127.0.0.1:3000; server listen 80; server_name ansible.example.com; client_max_body_size 0; chunked_transfer_encoding on; location / proxy_pass http://semaphore/; proxy_set_header Host $http_host; proxy_set_header X-Real-IP $remote_addr; proxy_set_header X-Forwarded-For $proxy_add_x_forwarded_for; proxy_set_header X-Forwarded-Proto $scheme; proxy_buffering off; proxy_request_buffering off; location /api/ws proxy_pass http://semaphore/api/ws; proxy_http_version 1.1; proxy_set_header Upgrade $http_upgrade; proxy_set_header Connection "upgrade"; proxy_set_header Origin ""; ansible.example.com should be change to match the domain you want to use. Validate file syntax after the change: $ sudo nginx -t nginx: the configuration file /etc/nginx/nginx.conf syntax is ok nginx: configuration file /etc/nginx/nginx.conf test is successful Restart nginx sudo systemctl restart nginx If you don’t have DNS, add a line to your /etc/hosts file with Nginx server IP and host name. $ sudo vim /etc/hosts 192.168.10.15 ansible.example.com You should be able to access semaphore web interface with domain name configured in Nginx http://ansible.example.com. Step 4: Configure https for Nginx Proxy It is recommended to use SSL certificate in your Nginx configuration to secure access to semaphore. Let’s obtain Let’s Encrypt Certificate for this use. Install certbot tool. # Ubuntu / Debian
sudo apt update sudo apt install certbot python-certbot-nginx # Fedora sudo dnf install certbot python2-certbot-nginx sudo dnf install certbot python2-certbot-apache # RHEL 8 based systems sudo yum -y install epel-release sudo yum -y install certbot python3-certbot-nginx # CentOS 7 sudo yum -y install epel-release sudo yum -y install certbot python2-certbot-nginx Stop nginx service. sudo systemctl stop nginx Then request for Let’s Encrypt SSL certificates. sudo certbot --nginx -d ansible.example.com You should get output similar to this: Saving debug log to /var/log/letsencrypt/letsencrypt.log Plugins selected: Authenticator nginx, Installer nginx Enter email address (used for urgent renewal and security notices) (Enter 'c' to cancel): [email protected] Starting new HTTPS connection (1): acme-v02.api.letsencrypt.org - - - - - - - - - - - - - - - - - - - - - - - - - - - - - - - - - - - - - - - - Please read the Terms of Service at https://letsencrypt.org/documents/LE-SA-v1.2-November-15-2017.pdf. You must agree in order to register with the ACME server. Do you agree? - - - - - - - - - - - - - - - - - - - - - - - - - - - - - - - - - - - - - - - - (Y)es/(N)o: Y - - - - - - - - - - - - - - - - - - - - - - - - - - - - - - - - - - - - - - - - Would you be willing, once your first certificate is successfully issued, to share your email address with the Electronic Frontier Foundation, a founding partner of the Let's Encrypt project and the non-profit organization that develops Certbot? We'd like to send you email about our work encrypting the web, EFF news, campaigns, and ways to support digital freedom. - - - - - - - - - - - - - - - - - - - - - - - - - - - - - - - - - - - - - - - - (Y)es/(N)o: Y Account registered. Requesting a certificate for ansible.example.com Performing the following challenges: http-01 challenge for ansible.example.com Waiting for verification... Cleaning up challenges Deploying Certificate to VirtualHost /etc/nginx/conf.d/semaphore.conf Redirecting all traffic on port 80 to ssl in /etc/nginx/conf.d/semaphore.conf - - - - - - - - - - - - - - - - - - - - - - - - - - - - - - - - - - - - - - - - Congratulations! You have successfully enabled https://ansible.example.com - - - - - - - - - - - - - - - - - - - - - - - - - - - - - - - - - - - - - - - - Subscribe to the EFF mailing list (email: [email protected]). Starting new HTTPS connection (1): supporters.eff.org IMPORTANT NOTES: - Congratulations! Your certificate and chain have been saved at: /etc/letsencrypt/live/ansible.example.com/fullchain.pem Your key file has been saved at: /etc/letsencrypt/live/ansible.example.com/privkey.pem Your certificate will expire on 2022-07-18. To obtain a new or tweaked version of this certificate in the future, simply run certbot again with the "certonly" option. To non-interactively renew *all* of your certificates, run "certbot renew" - If you like Certbot, please consider supporting our work by: Donating to ISRG / Let's Encrypt: https://letsencrypt.org/donate Donating to EFF: https://eff.org/donate-le SSL configurations generated after command has been run. upstream semaphore server 127.0.0.1:3000; server server_name ansible.example.com; client_max_body_size 0; chunked_transfer_encoding on; location / proxy_pass http://semaphore/; proxy_set_header Host $http_host; proxy_set_header X-Real-IP $remote_addr; proxy_set_header X-Forwarded-For $proxy_add_x_forwarded_for; proxy_set_header X-Forwarded-Proto $scheme; proxy_buffering off; proxy_request_buffering off; location /api/ws proxy_pass http://semaphore/api/ws; proxy_http_version 1.1; proxy_set_header Upgrade $http_upgrade; proxy_set_header Connection "upgrade"; proxy_set_header Origin ""; listen 443 ssl; # managed by Certbot
ssl_certificate /etc/letsencrypt/live/ansible.example.com/fullchain.pem; # managed by Certbot ssl_certificate_key /etc/letsencrypt/live/ansible.example.com/privkey.pem; # managed by Certbot include /etc/letsencrypt/options-ssl-nginx.conf; # managed by Certbot ssl_dhparam /etc/letsencrypt/ssl-dhparams.pem; # managed by Certbot server if ($host = ansible.example.com) return 301 https://$host$request_uri; # managed by Certbot listen 80; server_name ansible.example.com; return 404; # managed by Certbot Replace example.com with your domain name. Validate Nginx configuration. $ sudo nginx -t nginx: the configuration file /etc/nginx/nginx.conf syntax is ok nginx: configuration file /etc/nginx/nginx.conf test is successful Restart nginx service if configurations are okay. sudo systemctl restart nginx Access Semaphore console via https://example.com: You now have a secure access to Semaphore Ansible Web UI with host name instead of access through an IP address and port 3000.
0 notes