#AutomotiveDigitalInstrumentCluster
Explore tagged Tumblr posts
Visit Tumblr Blog
Explore Tumblr blogs with no restrictions, modern design and the best experience.
Last Seen Tumblr Blogs


Fun Fact
There are dozens of funny blogs to kill time on Tumblr.
Text
A Comprehensive Guide to Instrument Cluster Repair

Your vehicle's instrument cluster—the dashboard display behind your steering wheel—plays a vital role in delivering essential driving information. From speed and RPM to fuel levels and warning lights, the instrument cluster ensures you're always in tune with your vehicle's performance and safety.
With the evolution of technology, the traditional analog displays have been replaced or supplemented by the Automotive Digital Instrument Cluster. These digital systems offer enhanced features, improved aesthetics, and better integration with vehicle electronics. However, like all electronic components, they are not immune to failure.
In this comprehensive guide, we’ll explore the intricacies of instrument cluster repair, from diagnosing common issues to steps for repair and replacement. Whether you're a DIY enthusiast or seeking guidance before visiting a repair shop, this guide will provide the clarity you need.
What is an Instrument Cluster?
The instrument cluster is the collection of displays behind the steering wheel, traditionally composed of analog gauges that show:
Speed (speedometer)
Engine RPM (tachometer)
Fuel levels
Engine temperature
Odometer and trip meter
Warning indicators (battery, oil, seatbelt, check engine)
In today’s vehicles, particularly newer and luxury models, this area has become highly digitized. Instead of analog dials, you’ll find LCD or LED displays powered by embedded software. These modern systems are referred to as the Automotive Digital Instrument Cluster, offering real-time insights, customization options, and seamless communication with other car systems.
Introduction to the Automotive Digital Instrument Cluster
An automotive digital instrument cluster replaces traditional analog gauges with sleek, high-resolution LCD or LED screens. These cutting-edge interfaces go far beyond just showing your speed or fuel level. They serve as a central hub for driving intelligence, bringing together essential data from various vehicle systems in one streamlined view.
Unlike older dashboards with fixed dials and limited functionality, digital clusters are dynamic and fully programmable. They not only provide basic driving information like speed, RPM, fuel level, and engine temperature, but also support advanced capabilities such as:
Turn-by-turn GPS navigation
Real-time traffic and weather alerts
Driver-assist system feedback
Adaptive cruise control status
Media and phone integration
Live engine diagnostics and maintenance alerts
Heads-up display (HUD) compatibility
In vehicles equipped with a fully digital cockpit, the instrument cluster often works in tandem with the infotainment system and central control unit, delivering a unified driving experience.
Common Problems in Instrument Clusters
Instrument clusters, whether traditional analogue or advanced digital, are essential for providing drivers with real-time feedback about their vehicle's performance and safety status. However, over time or due to electrical faults, they can develop various issues. Below are some of the most common problems seen in both analogue and automotive digital instrument cluster systems, along with brief explanations of their causes.
a. Dead Gauges
Gauges like the speedometer, tachometer, oil pressure, or fuel level indicators may stop responding entirely. This is usually caused by a failed stepper motor (in analogue clusters), damaged internal circuits, or faulty sensor input from the vehicle's ECU. In digital clusters, software bugs or a corrupted display controller can also cause gauges to freeze or disappear.
b. Flickering or Dim Display
This issue is prevalent in automotive digital instrument clusters with LCD or LED screens. A flickering display may point to a failing backlight inverter, degraded ribbon cables, or a fluctuating power supply. Inconsistent brightness or a completely dim screen makes the cluster unreadable and dangerous while driving at night.
c. Malfunctioning Warning Lights
The check engine, ABS, airbag, and battery lights are essential for vehicle diagnostics. These lights may illuminate falsely (when no issue exists) or fail to turn on when a real fault occurs. This could be due to a damaged cluster PCB (printed circuit board), short circuits, or corrupted firmware. In digital systems, it may also stem from software errors or CAN-bus miscommunication.
d. Pixelation or Screen Failure
In digital clusters, screen degradation may show up as missing pixels, horizontal/vertical lines, or full blackouts. This could be caused by water damage, physical impact, or a malfunctioning TFT/LCD controller. Over time, wear and tear can also degrade the screen’s contrast and refresh rate, affecting visual clarity.
e. Data Errors
Incorrect readings—such as a fuel gauge showing full when the tank is empty or a speedometer stuck at zero—can occur due to faulty sensors, damaged wiring, or software bugs in the digital processor. In automotive digital instrument clusters, improper calibration or firmware glitches can lead to frequent data inconsistencies, which not only confuse the driver but may also hinder safety system functions.
f. Power Issues
If the entire cluster doesn’t power on, randomly resets, or experiences intermittent operation, it might be due to blown fuses, shorted circuits, or a faulty power control module. In digital systems, software crashes, battery voltage drops, or grounding issues may also cause the display to reboot unexpectedly, especially during engine cranking or cold starts.
g. Communication Faults
Modern vehicles rely heavily on internal communication networks like CAN (Controller Area Network) or LIN Bus. If there’s a disruption in these networks, the Automotive Digital Instrument Cluster may lose connection to essential data sources such as the engine control unit (ECU) or transmission control unit (TCU). This often results in missing information, ghost warnings, or a completely non-functional dashboard.
Accurate Diagnosis Before Instrument Cluster Repair
Before jumping into the repair process, an accurate diagnosis is required. The automotive digital instrument cluster is a sophisticated component that integrates with various vehicle systems, meaning an issue might originate from the cluster itself—or from external sensors, wiring, or the ECU. Misdiagnosing the problem can lead to unnecessary repairs, higher costs, or recurring faults.
Here’s a step-by-step guide to correctly identifying the root cause of the problem:
Step 1: Visual Inspection
Start with a thorough visual check of the instrument cluster and its immediate surroundings. Remove the cluster housing if necessary and inspect:
Connectors: Look for loose plugs, corroded pins, or damaged locking tabs.
Burnt Components: A burnt smell or visible discoloration may indicate a short circuit on the cluster's PCB.
Cracked Solder Joints: Especially around areas where the cluster experiences vibration.
Moisture or Water Damage: This is a common cause of display issues and pixelation in digital clusters.
If the vehicle has recently undergone dashboard work or an aftermarket device was installed (e.g., stereo, alarm, GPS tracker), ensure no harnesses were tampered with or misrouted.
Step 2: Use a Diagnostic Scanner
Plug in an OBD-II (On-Board Diagnostics) scanner to retrieve fault codes related to the cluster, ECU, or communication lines. Many automotive digital instrument clusters are tied into CAN-bus or LIN-bus systems, and scanning will reveal if the cluster is receiving or transmitting incorrect data.
Look for fault codes such as:
U0155 – Lost Communication With Instrument Panel Cluster
B2601/B2603 – Display circuit failure
U0422 – Invalid Data Received From Body Control Module
Advanced scan tools (e.g., Autel, Launch, Bosch, Snap-On) may also let you run live tests on the cluster's display, gauge response, and warning lights.
Step 3: Electrical Testing
Use a digital multimeter to perform voltage, continuity, and ground checks:
Battery Voltage: Ensure the cluster is receiving the correct voltage from the fuse box. A voltage drop can cause flickering or a complete power-off.
Ground Connection: A poor ground can lead to erratic behavior, dim lights, or failure to boot.
Continuity Tests: Check the wiring harness from the cluster to the ECU and sensors for breaks, corrosion, or shorts.
Backlight Circuit Check: If backlights are dim or flickering, test for stable power supply to the LED driver circuits.
Testing the circuit at different ignition stages (ACC, ON, CRANK) can help determine if a voltage drop or power surge is causing intermittent faults.
Step 4: Observe Symptom Patterns
Pay close attention to when and how the problem manifests. Tracking symptom patterns will help narrow down the cause:
During Ignition: Flickering or rebooting during engine start may indicate weak power delivery or cluster capacitor failure.
After Hitting a Bump: Suggests a loose connector, dry solder joint, or vibration-sensitive failure.
Intermittent Glitches: Points toward failing internal components, memory corruption, or thermal sensitivity.
Only in Cold/Hot Weather: Might indicate temperature-sensitive components, particularly in LCD screens or solder joints.
Specific Driving Modes: If issues only arise in Eco/Sport modes, it could involve software conflicts or CAN-bus messaging faults.
This observational data will be especially valuable if you need to consult a technician or plan for a deeper teardown.
Step 5: Test with a Known Good Unit
If available, swap out the suspected cluster with a working, compatible instrument cluster. This is often the most direct way to isolate whether the fault lies within the unit itself or elsewhere in the vehicle system.
Important Considerations:
Ensure the test cluster matches the vehicle make, model, and trim level to prevent communication mismatches.
Some automotive digital instrument clusters require VIN-coding or immobilizer sync, so you may need dealer-level diagnostic tools (e.g., Techstream, VCDS, Forscan).
If the symptoms disappear after the swap, the original cluster is faulty. If they remain, focus on sensors, wiring, or control modules.
Repair vs. Replacement: What Should You Choose?
Depending on the issue, you may consider repairing or replacing your cluster. Here’s a breakdown:
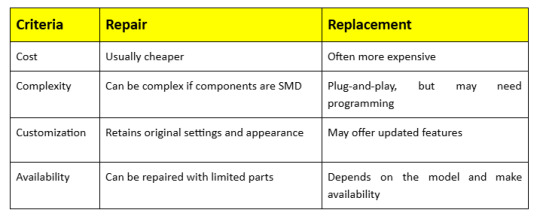
For rare or luxury vehicles with unique automotive digital instrument clusters, repair is often the only feasible option.
Step-by-Step Instrument Cluster Repair Process
Repairing an instrument cluster, especially a modern automotive digital instrument cluster, requires precision, attention to detail, and a basic understanding of electronics. Here’s a detailed breakdown of the general repair process:
Step 1: Disconnect the Battery
Safety always comes first. Before touching any part of your vehicle’s electrical system, disconnect the car battery, preferably starting with the negative terminal. This eliminates the risk of short circuits, electrical shocks, or accidentally triggering airbags when handling digital dashboard components. Let the vehicle sit for a few minutes after disconnecting to allow any residual charge to dissipate from the capacitors.
Step 2: Remove the Instrument Cluster
Carefully dismantle the dashboard.
Remove surrounding panels using a trim removal tool to avoid damaging plastic clips.
Unscrew mounting bolts holding the cluster in place—usually Torx or Phillips screws.
Gently pull out the cluster, being mindful of its size and shape.
Disconnect the wiring harnesses one by one, ensuring you don’t bend or damage the pins. Some clusters also have locking tabs on connectors that need to be depressed before removal.
Marking connector positions or photographing the setup beforehand helps during reinstallation
Step 3: Open the Cluster
Once removed, place the cluster on a clean, static-free surface. Use an anti-static wrist strap and proper tools to open the casing, which often includes plastic clips or small screws.
Take your time here—modern clusters, especially digital ones, use delicate PCB assemblies and ribbon cables that can be damaged easily. If the cluster is sealed or potted (common in some digital models), you may need specialized tools or heating methods to soften the adhesive.
Step 4: Identify Faulty Components
Visually inspect the internal components:
Look for physical damage like burnt resistors, leaking capacitors, or blackened areas.
Check solder joints, especially on high-vibration areas like connector pins and voltage regulators—cracks can cause intermittent faults.
In automotive digital instrument clusters, check the LCD driver circuits, processor ICs, and signal transceivers.
Use a magnifying glass or microscope if needed to spot fine cracks or corrosion, particularly in high-humidity environments.
If you’re unsure, a thermal camera or oscilloscope can help locate malfunctioning components.
Step 5: Repair or Replace Components
Use a fine-tip soldering iron or hot air tool to remove and replace faulty capacitors, resistors, or ICs. For LCD issues in automotive digital instrument clusters, replace the screen or driver board carefully, handling ribbon cables with caution. After repairs, clean the PCB with isopropyl alcohol to remove solder residue and ensure solid, clean solder joints.
Step 6: Test the Cluster
Before reinstalling, test the cluster using a bench simulator if available to verify gauge movements, display clarity, and warning light functionality. If no simulator is available, temporarily reconnect the cluster in the vehicle to check for errors or abnormal behavior during startup and operation.
Step 7: Reinstall and Reconnect
Reconnect all wiring harnesses securely, mount the cluster properly, and replace any dashboard panels. Reconnect the battery, start the car, and observe the instrument cluster for proper startup, gauge sweep, and accurate readings. Take a short test drive to confirm everything works correctly.
7. Tools Required for Instrument Cluster Repair
Screwdrivers (Phillips and Torx)
Soldering iron and solder
Multimeter
Anti-static mat and wrist strap
OBD-II scanner
Digital cluster simulator (optional)
Magnifying glass or microscope (for PCB inspection)
Hot air rework station (for surface-mounted devices)
Preventative Maintenance Tips
While electronic failures in instrument clusters can sometimes be unavoidable, there are several proactive steps you can take to minimize the risk and prolong the life of your automotive digital instrument cluster:
a. Avoid Electrical Surges
Install a surge protector or voltage stabilizer to shield your vehicle’s electrical system from sudden voltage spikes. Regularly maintain your battery’s health by checking terminals and charging levels to prevent unexpected surges that can damage sensitive instrument cluster components.
b. Protect From Moisture
Keep your vehicle’s interior dry by promptly fixing leaks and using moisture absorbers if necessary. Moisture can cause corrosion on circuit boards and connectors, leading to malfunction or failure of the instrument cluster’s delicate electronic parts over time.
c. Gentle Driving
Drive carefully over rough terrain, avoiding sharp bumps and potholes whenever possible. Harsh jolts and vibrations can loosen or damage internal cluster components, especially fragile solder joints and delicate sensors, which may cause intermittent faults or complete failure.
d. Software Updates
Keep the Automotive Digital Instrument Cluster’s firmware up to date by following manufacturer recommendations or visiting authorized service centers. Software updates often include bug fixes, improved system stability, and new features that enhance cluster performance and reliability.
Professional Repair Services: What to Expect
If DIY repair isn’t your style, professional services offer precision and warranty-backed repairs.
What They Offer:
Detailed diagnostics
Chip-level repairs
Screen and LED replacements
Firmware updates
Odometer correction (legal limitations apply)
Choosing a Repair Shop:
Look for specialization in digital clusters
Check online reviews
Ask for warranty terms
Ensure compliance with legal standards for odometer readings
Cost of Instrument Cluster Repairs
Costs vary depending on the vehicle make, model, and the type of cluster (analog vs. digital).
Estimated Costs:
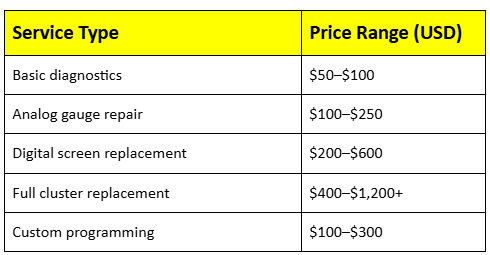
For high-end vehicles with a sophisticated Automotive Digital Instrument Cluster, prices can climb significantly.
Conclusion
Your instrument cluster is more than just a display—it’s a critical part of your vehicle’s communication system. It provides you with essential information such as speed, fuel levels, engine temperature, and warning indicators that help ensure your safety on the road. As technology advances, the automotive digital instrument cluster becomes increasingly central to the driving experience, offering customisable interfaces, navigation, and integration with driver-assist systems. However, with this increased complexity comes a higher chance of malfunction or failure, which can affect your ability to monitor vital vehicle functions accurately.
Understanding how to diagnose, repair, or replace your cluster empowers you to make informed decisions, whether you’re tackling the repair yourself or working with a professional technician. By staying proactive—performing regular maintenance, updating software, and promptly addressing warning signs—you can ensure your instrument cluster remains reliable and accurate for years to come. This not only enhances driving safety but also helps preserve your vehicle’s value and performance over time.
#InstrumentClusterRepair#CarDashboardRepair#AutomotiveRepairGuide#DashboardDisplay#CarTechFix#DigitalInstrumentCluster#VehicleDiagnostics#AutoTechTips#InstrumentPanelFix#DIYCarRepair#AutomotiveDigitalInstrumentCluster#ClusterRepairTips#CarMaintenance#AutomotiveTechnology#FixYourCar
0 notes