#Best Crochet Patterns
Explore tagged Tumblr posts
Visit Tumblr Blog
Explore Tumblr blogs with no restrictions, modern design and the best experience.
Last Seen Tumblr Blogs


Fun Fact
Average visit duration of Tumblr.com is 10 mins and 25 secs.
Text
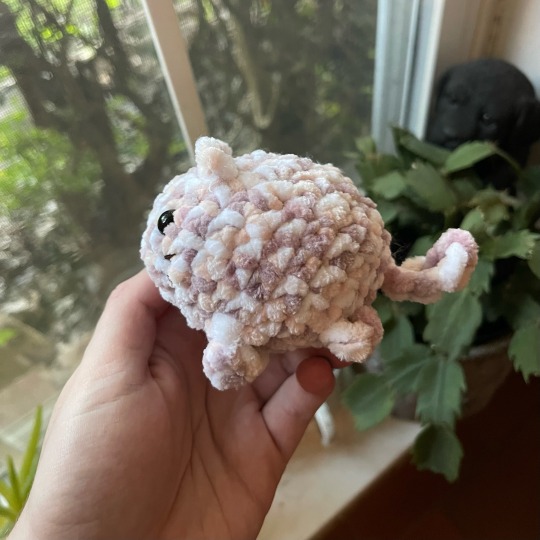
made a little guyyyyy. recently finished outer wilds, saw @eringurumi's nomai plush, and then threw myself into making the hatchling because i already had the colors on hand. i'm very happy with how it turned out, and glad i committed to making the bedding and jetpack detatchable


#outer wilds#outer wilds spoilers#crochet#twine speaks#no pattern to share unfortunately because i freehand 90% of the things i make#but if you want a basic rundown of what shapes i used and how i attached things i'll try my best to tell you lmao#also obsessed with the shoelaces i'm so proud of myself for that idea they're adorable#put shoelaces on your plushies folks trust me
108 notes
·
View notes
Text
Me, crocheting a hat from a free pattern: different yarn weight, different hook size, different Opinione on how to change rounds
Also me: mhhh i wonder if itll come out too tight 🤔🤔🤔
#crochet#not my fault that big ass yarn they always use in foreign patterns is basically a myth here#im doing my best ok??#no actually my best would be going to the other room to get the correct hook size at least#but oh well#i chose chaos today
13 notes
·
View notes
Text
friends i love crocheting so much . why does it hurt me so
#did i marathon another doily? yes.#did that make my index finger not fit for crocheting for the next few days because the thread basically caused ropeburn lite? yes.#did i learn from this experience? no#will i avoid repeating this mistake in the future? also no. i did the same exact thing for the 4th time. this one was smaller tho#i like making doilies best because the patterns are so easy to follow and i get to learn many interesting stitches#bigger things like blankets and pillowcases are fun too but not engaging enough. they're good to make when watching a movie#but i usually don't have enough yarn on me to make something big#+ it's really difficult for me to pick colors for the patterns and solid color is just so boring and bland. when i was making that bag for#ori it took me longer to figure out the color scheme than to actually make it.#i fucking hate making plushies. made 2 of the same squid (fun and cute) but making any other plushie is agony#i had SO many attempts at the manta ray. grr wrr grr. i'm not even going to try making anything else until i forget why i hate making them#crochet#whispers
15 notes
·
View notes
Text

Well I’m now halfway done with the lower border of this project it only took 1 week. We’ll get there one day believe it
The pattern pieces are all from le filet ancien from the antique library, just like the athena and frog filet crochet projects. For this one i lined up the borders of one pattern to match with the saytr pattern and removed the excess
8 notes
·
View notes
Text

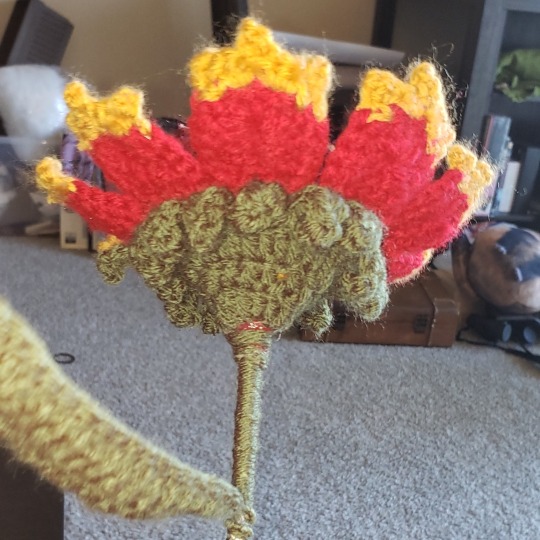
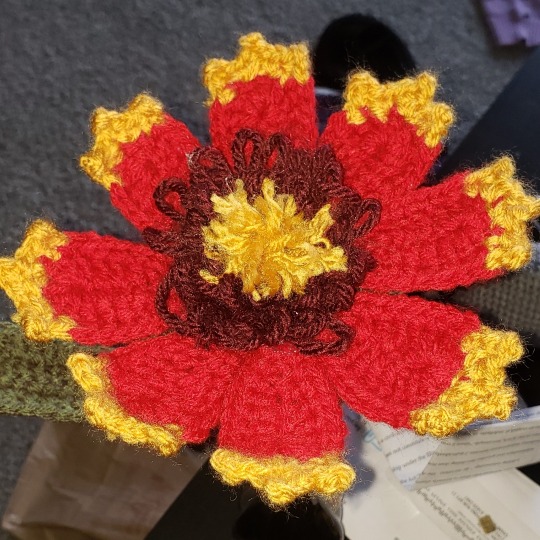
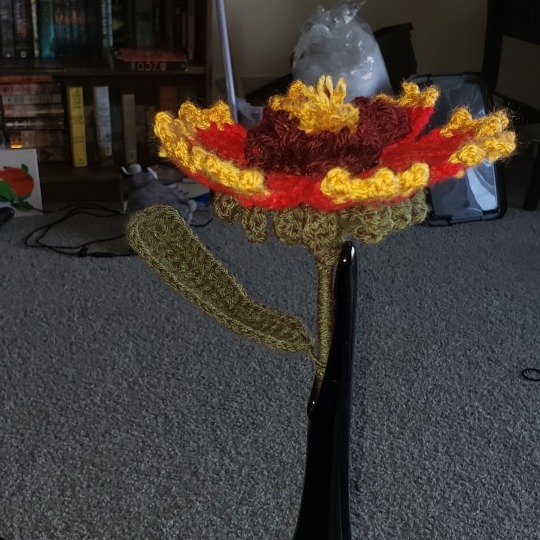
Hey its the Blanketflower, native to Texas!!!! The first of what I hope will be many native plant species projects. It didn't turn out quite right, mainly I think just due to not having a good color match but its still very nice I think :)
#i tried my best ok#my best just isnt very good yet#art#aesthetic#flower#blanket flower#texas#red#yellow#pink#native#plant#plants#flowers#crochet#crochet pattern#fiber#yarn
15 notes
·
View notes
Text

"The mixture, which was at first of a reddish hue... changed to a dark purple, which faded again more slowly to a watery green." —The Strange Case of Dr. Jekyll and Mr. Hyde
#seph crochets#jekyll and hyde#strange case of dr. jekyll and mr. hyde#fun fact! i came up with this pattern myself :D#the green one turned out best imo but i'm very proud of them all <3
99 notes
·
View notes
Text
a platypus?

PERRY THE PLATYPUS??????
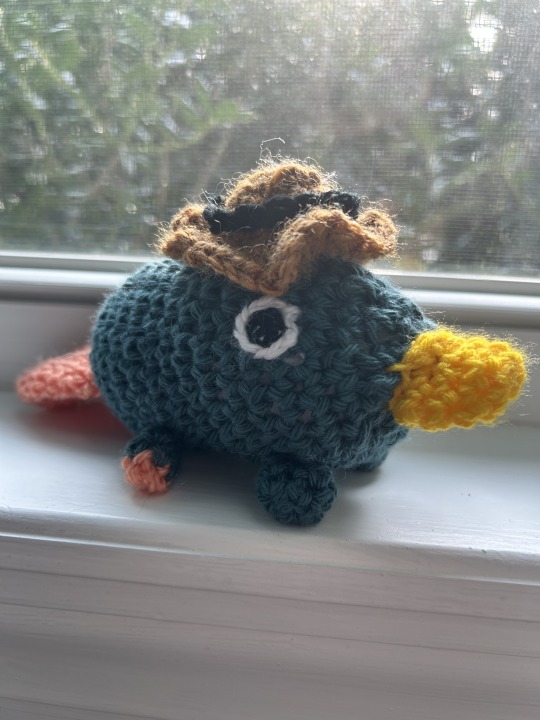
made it for my brother's graduation gift. my father immediately demanded one for himself
#this is potentially the best thing i've ever crocheted#phineas and ferb#perry the platypus#crochet amigurumi#<3#pattern from blosfome on ribblr
18 notes
·
View notes
Text
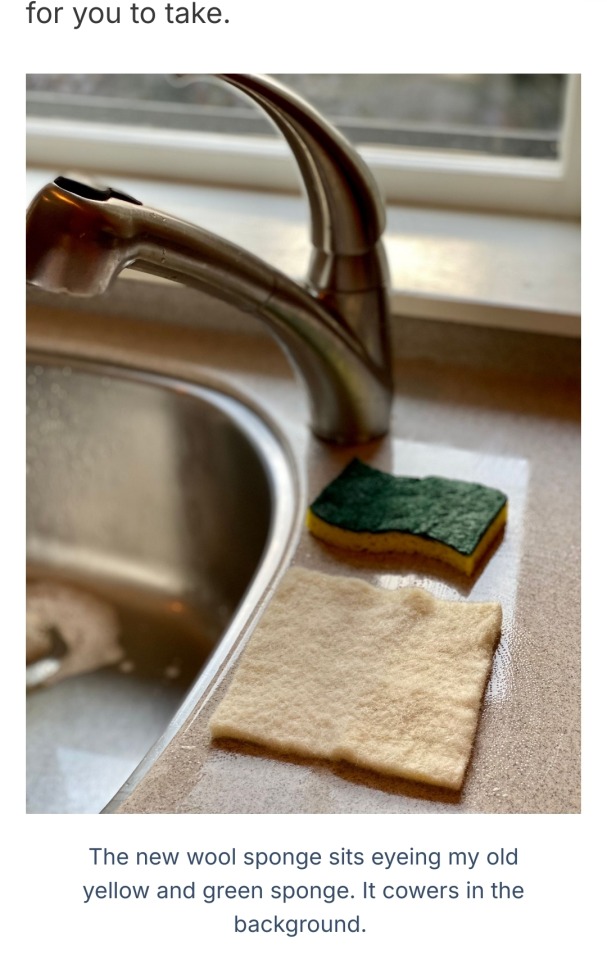
Genuinely the funniest image caption I've ever seen, gonna be honest
The layers, the drama, the implied threat of sponge-on-spinge violence, the inherent eroticism of a freshly scrubbed sink.... you want it? Well folks, we got it!
#i'm losing my shit this is so funny#i don't care if i'm the only one who laughs it's my blog and i can inflict this on my followers if i want to#i'm gonna dive back into my knitting and crochet and have been checking out different household use patterns and such#honestly fibercrafters are insane in the best ways
13 notes
·
View notes
Text
#help me decide which one is the best photo for a listing I’m so bad at this lol#crochet#amigurumi#crochet pattern
5 notes
·
View notes
Text


I finally finished crocheting myself an emotional support Chopper!!!!
Some fun details: his hair can be brushed and styled, his clothes can all be changed, and his backpack is functional (and is gonna be filled with first aid supplies lol)
#tony tony chopper#chopper#one piece chopper#my art#my crochet#I made the pattern up as I went and I did write down the parts for his head body and legs before that started to feel too tedious#but I’m gonna do my best over this next week to go back over the different parts and write up a full pattern#I will make it freely available for anyone who wants it!!#also Jfc I finished him at a good time cause I have a really really stressful CT scan on Friday#ngl y’all I’m fucking scared as hell about this one#I’ve had a CT before so I’m not scared of the test itself just the results
3 notes
·
View notes
Text
Hello people!!
A couple days ago i got inspired to crochet a manatee, so i did! And, i have a pattern for you guys too, if you want to make one yourself. I am still working on the skykid pattern, but i'm a bit out of yarn right now so there will still be a while until i can post it.
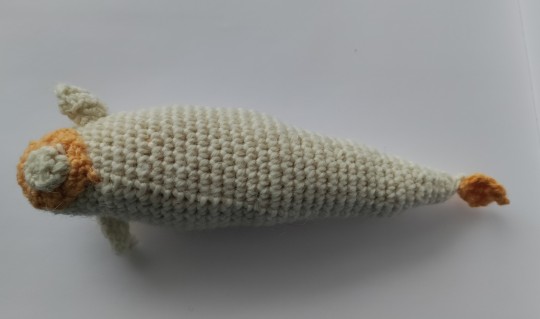

Anyways, here's the pattern!
Sky: cotl manatee crochet pattern
Yarn colors: white and yellow. You can use any size hook you want, but i used a small 2.5 hook
Body (white)
Start every new row with a chain 1, - indicates new row. The entire project is worked in single crochet.
-Crochet 6 sc into magic circle, tighten the circle
-Inc in every stitch around
-inc in every other stitch around
-do 3 regular sc rows
-5 sc, 1 inc, 2 sc, 2 inc, 2 sc, 1 inc, 5 sc
-do 3 regular sc rows
-6 sc, 1 inc, 1 sc, 1 inc, 1 sc, 2 inc, 1 sc, 1 inc, 1 sc, 1 inc, 6sc
-now you do 12 regular single crochet rows. At this point you can start stuffing
-6 sc, 1 dec, 1 sc, 1 dec, 1 sc, 2 dec, 1 sc, 1 dec, 1 sc, 1 dec, 6 sc
-3 regular single crochet rows
-5 sc, 1 dec, 2 sc, 2 dec, 2 sc, 1 dec, 5 sc
-3 regular single crochet rows
-5 sc, (1 dec, 1 sc) x2, 1 dec, 5 sc
-3 regular single crochet rows
-Decrease in every other stitch around
-Sew the end of the body shut by doing one single crochet through 2 stitches across from eachother, and then chain one, and do one single crochet on top of the securing stitch. Chain one, and break off yarn.
Fins (white)
You will do two of these.
-ch 3, start in the second st from the hook, and do an inc in both stitches (4)
-Ch 1, 4 sc
-Ch 1, 4 sc
-Ch 1, 2 sc, 1 dec
-Ch 1, 1 dec, 1 sc
-Ch 1, 1 dec
Ch 1, break off yarn.
Attatch the fins around the ninth row of the body, one on each side of the head, with the side with decreases facing back. (Hope that makes sense)
Tail piece (yellow)
-Ch 2, and do 4 sc in the first stitch
-Ch 1, 4 sc
-Ch 1, 4 sc
-Ch 1, 2 dec
-Ch 1, 1 dec, ch 1, break off yarn
Attatch to the end of the body (not exactly sure how i did it myself you'll just have to wing it a bit)
Head pattern piece (yellow)
-Ch 2, and do 3 sc in the first stitch
-Ch 1, 1 inc, 1 st, 1 inc
-Ch 1, 1 inc, 3 sc, 1 inc
-Ch 1, 1 inc, 5 sc, 1 inc
-Ch 1, 9 sc
-Ch 1, 1 dec, 5 sc, 1 dec
-Ch 1, 1 dec, 3 sc, 1 dec
-Ch 1, 1 dec, 1 sc, 1 dec
-Ch 1, dec through all 3 stitches left, so that you end up with only one stitch. Ch 1, break off yarn
Head pattern piece (white)
-Ch 2, and do 2 sc in the first stitch
-Ch 1, 2 inc
-Ch 1, 2 dec
-Ch 1, 1 dec, ch 1, break off yarn
Sew the white piece onto the yellow piece, and attatch that to the body. After that you should be done!
This didn't take too long to make, maybe an hour at most. If you're looking for something fun to do for a little while, you can make this! If you make it, please let me know, rb this post with the results or tag me, either way i would love to see how you made it!
#i hope this was somewhat clear#i'm not the best at giving instructions#if you have any questions feel free to ask#and let me know if anything was unclear#sky cotl#sky children of the light#art#sky: cotl#thatskygame#that sky game#crochet#crochet pattern
45 notes
·
View notes
Text
guys check out the thing i made

#didn't get to stretch and starch it yet because i finished it today just before 9pm so it's a bit wavy and uneven#the pattern is from a magazine i bought a few years ago :] despite the pain making it caused me i had lots of fun with it#had to go back to fix a mistake only once! truly a miracle#i made it for my coworker's mom as a thank you gift for 20 free range eggs#now i'll try to figure out how to make a gothic lace choker for that very same coworker. augh it's gonna be hard without a pattern#but i'll do my best! especially since this one won't be for free lmao#crochet#whispers
14 notes
·
View notes
Text

this is my current WIP doily btw
#i found the pattern via a digital scan of a vintage book#the best part? there are no picots in this pattern :D#WIP#doily#crochet#flameshadowart#id in alt
15 notes
·
View notes
Text
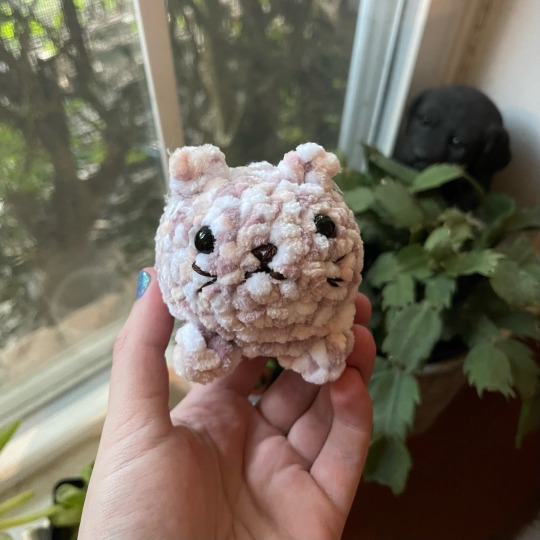
my wonderful baby son boy named brother dubious
#my art#crochet#amigurumi#he was so fun to make and he didn’t take very long at all#attaching the legs and shit and embroidering the face took the most time because i’d never done that before#but i have a lot of experience just crocheting so the body went really fast#i love him so much he’s a little wonky but he’s living his best life#littol cat….#the pattern is from crafter frog on youtube and it’s called How to crochet a CUTE CAT#fiber arts
93 notes
·
View notes
Text
crochet pixel stitch
so there may be some of you who remember the pixel tapestry crochet controversy around a certain pillow, but i have come across a stitch that seems to work well for this.
this reddit post has an example and link to a tutorial on the stitch, and i will say, this isn't where i initially found the stitch, i found it a few months ago on pinterest and modified it much like the one in the reddit post, but i still want to try and find a way to make tapestry crochet that does follow the pixels precisely.
now, this stitch is a great little learning spot for how to get the stitches to line up vertically- the issue with single crochet is that the stitches don't align. the stitch above does align vertically, however, it is hard to work, especially in the mirrored/reversed version (working back to front). but what it does show is that it's necessary to work into two stitches to align those stitches vertically. also from experience i can say that this stitch doesn't work if it's not mirrored, so it's likely that other stitches would have to be mirrored as well.
knowing this, we can go about modifying stitches in a couple different ways, and i'm currently trying it out on a small scale with some 8x8 (technically 10x10) designs.

top left: single crochet/traditional tapestry; top right: pixel stitch linked above; bottom: sc dec worked into the previous and next stitch, and also mirrored like the linked stitch
now i think there's a tension issue with my pixel stitch dino since i've worked this stitch before and it's been less gappy but i'm also using a different yarn. i think that the sc dec version is promising, and i really like the texture it creates. i will say that overall i think sc might look the nicest/most uniform, but it has all those same issues mentioned previously.
anyways that's my little ramble, here's the dino if you want to try some stuff or make him for yourself. the biggest takeaways are:
1. sc creates pixel sized stitches so we need a sc height stitch
2. whatever stitch is used has to be worked into the previous and next stitch in order to align properly
and 3. the stitch will likely have to be mirrored (i.e. worked through the back) in order to create that nice pixelated look.

#crochet#lc's crochet lab#tapestry crochet#tapestry crochet techniques#anyways im telling y'all exactly why this works because im hoping some of y'all want to mess around with it and see what you can discover#maybe we'll figure something out#there is a paid pattern i've come across as well for this pixel art but like#i wanna figure it ouuuuuutttttttt and i don't wanna payyyyyyy#anyways best of luck to anyone who tries this!#lc makin stuff
7 notes
·
View notes
Text
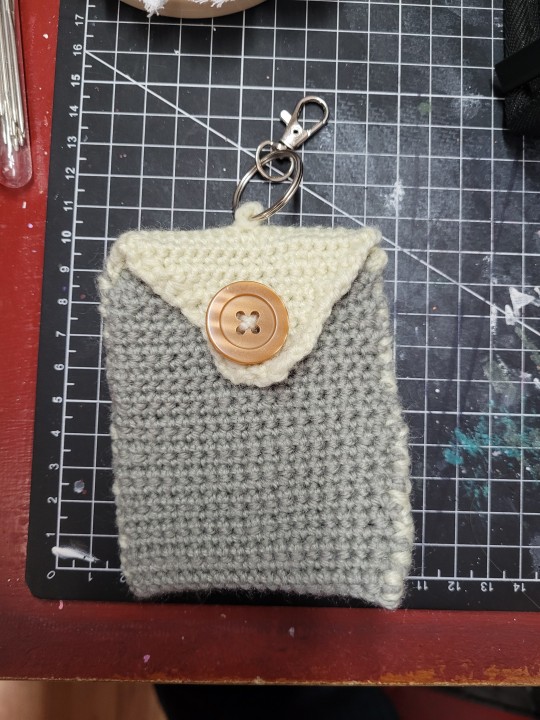
made a small keychain bag for my mother upon her request
#art#crochet#dawson's adventures in crochet#this was my first time making something without a pattern that wasnt just a rectangle#so its not the best but i think that with a few more goes i can get it down pat#i didnt bother looking for a pattern for this one as my mother needed it for work the Next Day so there was a bit of a time crunch#but maybe i should look at other patterns to see what other people are doing before trying without a pattern this time
3 notes
·
View notes