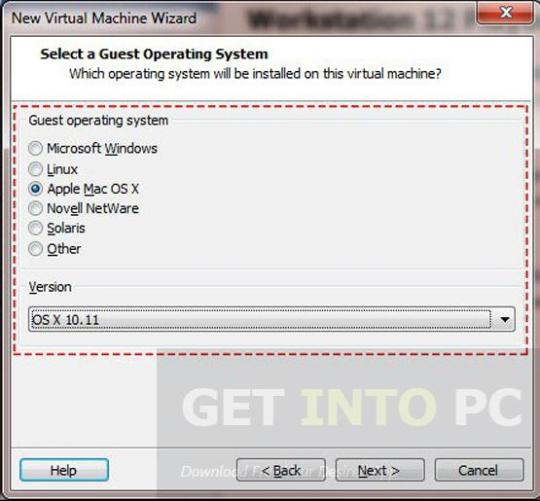
#Convert iso to bootable usb mac os disk utility
Explore tagged Tumblr posts
Visit Tumblr Blog
Explore Tumblr blogs with no restrictions, modern design and the best experience.
Last Seen Tumblr Blogs


Fun Fact
Women make up for the other 50% of Tumblr’s audience.
Text
Convert iso to bootable usb mac os disk utility

CONVERT ISO TO BOOTABLE USB MAC OS DISK UTILITY HOW TO
CONVERT ISO TO BOOTABLE USB MAC OS DISK UTILITY FOR MAC OS X
CONVERT ISO TO BOOTABLE USB MAC OS DISK UTILITY MAC OS X
PowerISO will show the progress information during conversion.Īfter the dmg file has been converted successfully, you should receive a message, 'Converting image file completes successfully'.Ĭopyright 2004-2020 Power Software Ltd. To convert it to iso file, please follow the steps,Ĭhoose the source DMG file you want to convert.Ĭlick 'OK' button to start converting dmg file to iso. You can open dmg file, convert it to iso file, or burn it to a CD / DVD disc. On Windows PC, it is very convenient to manipulate dmg files with PowerISO. Most of Mac operating systems and applications are distributed in dmg files. You are here: Tutorials > Convert DMG to ISOĭmg file is the disc image file which is widely used by Mac systems. In earlier times, all you needed to do was to convert that InstallESD.dmg into an ISO and you could install OS X in VMWare from s. For some reason, Apple decided that the InstallESD.dmg that comes with the Mavericks Install as downloaded from the App Store shouldnt be a bootable DVD image anymore. How to create a Bootable MacOS Catalina.ISO image on a Mac? Step 1: Download MacOS Catalina.app from App Store into Applications. MacOS Catalina.ISO is needed for installing Catalina into a virtual machine using VMWare and Virtual box and other purposes. This quick instruction will help any-one to make a Bootable MacOS Catalina Installer.ISO and.DMG images in MacOS and Windows. If we explain what is the DMG file briefly, the DMG file extension only is used on the Apple MacOS systems. After that, you can boot the PC that needs to install an OS from the bootable USB flash drive and then start system recovery. Just go to the Tools page, click Media Builder, choose your USB flash disk and create USB boot disk from ISO.
CONVERT ISO TO BOOTABLE USB MAC OS DISK UTILITY MAC OS X
Apple Mac OS X uses the files with.dmg extensions to install a software. After finishing the system image backup, you can go to create a bootable USB drive. Just as the ISO file use in Windows system installations, the files with DMG extension also use on Mac systems. In this case, you will need to convert it back to the DMG format for the installation. Simply pick the source (.CDR image) and destination (target USB disk. CDR image to make a working bootable USB disk drive from Windows. Attach the USB Flash drive to your Mac and open Disk Utility (found in Applications > Utilities). However, it's helpful when your own system is a Windows PC and you want to burn the DMG file to a USB drive. CDR disk image burned to USB all we need to do is to use a disk-cloner utility, for testing this I used the excellent, free HDD Raw Copy Tool to clone the Apple Mac OS bootable Disk Warrior. Remember, even if you convert the DMG to ISO, it's still Mac-compatible only, so you can't use it to install the program on a Windows system.
CONVERT ISO TO BOOTABLE USB MAC OS DISK UTILITY HOW TO
Here’s how to convert a DMG file into an ISO file that can be mounted on a Windows PC. For more information and complete instructions please see this topic. Special utility from cvad & russian MAC community for new hackintosh users.
CONVERT ISO TO BOOTABLE USB MAC OS DISK UTILITY FOR MAC OS X
The DMG image format is by far the most popular file container format used to distribute software on Mac OS X. Make bootable USB Flash Disk for MAC OS X with Latest Clover bootloader revision fast and easy by one click under OS Windows.
0 notes
Text
Create Dmg Installer For Mac

Create Dmg Installer Mac Os X
Create Dmg Installer For Mac Os
Create Dmg Installer For Mac Catalina
Nov 07, 2019 Now create a computer account for macOS Catalina. For three-times click Continue; Now select the Dark mode, Light mode or Auto mode for macOS Catalina. Wait a while till the desktop should be ready when it gets ready. Enjoy using macOS Catalina 10.15 for the first time in your PC-Hackintosh. Create Dmg Installer For Mac Download Bottom Line. Jun 23, 2020 How to Install and Open.dmg Files on a Mac. Software installation with Mac OS X is very different than in the Windows world. On a Windows PC you run an installer, tick off a few checkboxes, and wait for the progress meter to reach completion. Dec 10, 2018 If you want to use a DMG file in Windows to mount a version of Mac OS X, then Method 1 will work. However, most of the time, you'll need a DMG to install an OS version on a Mac computer. In those cases, if all you have to work with is a Windows PC, DMGGeeker is the perfect application. Are you looking for a direct download link for MacOS High Sierra ISO installer or dmg file for your Mac or Windows computer or virtual machine then you are at the right place. VirtualBox, Vmware. Dec 28, 2019 How to Make a DMG File on a Mac. One way to store or group files on a Mac is to create a Disk Image.
A DMG disk image file is Apple's container format for capturing entire drives or disks, similar to ISO for other platforms like Windows. It consists of data blocks that represent a physical disc. If you're on a Windows machine, you're limited in what you can do with DMG files. That's why you need third-party utilities to create a bootable DVD from DMG on Windows. This article explains two different methods to burn DMG files to amake bootable macOS installation DVD in Windows.
Method 1: How to Create Bootable DVD from DMG (Command Prompt)
This approach utilizes a tool called DMG2IMG, which converts DMG file into ISO, the universally more compatible archive format. This ISO file is then burned using a command line execution in Command Prompt. You don't really need any experience with disk images or command line work, but it will certainly help should something go wrong. If you're not comfortable with any of this, you can skip to Method 2, which showcases a powerful but user-friendly tool that does it all for you. But first, let's see how the Command Prompt method of creating a bootable DVD from DMG works.
Note: The older version of DMG2IMG is called DMG2ISO. Although the download is available in the link provided in Step 1 below, it is recommended that you use DMG2IMG instead. The utility has the ability to convert DMG into both ISO and IMG, based on your needs.
Step 1. Install DMG2IMG on a Windows PC after downloading the zipped win32 binary from this website. Unzip the file and run the .exe to install the program. You can also download DMG2ISO, but DMG2IMG is the recommended software to use.
Step 2. Open Command Prompt on your PC and execute the following command to convert your DMG into ISO. Be sure to change the file names as appropriate, and include the whole file path from the main directory: dmg2img.exe c:downloadsexample.dmg c:downloadsexampleconverted.iso
Step 3. Now that your ISO file is ready, you can use the Windows ISO burning utility or a free application like FreeISOBurner to create a bootable DVD.
This DVD can be used to install macOS in virtual Windows environments with tools like Virtualbox. You can't use ISO files to install software in Mac, so if this is intended for a computer running Mac OS X or macOS, you will need to convert it back to DMG before you can install the program in question. If you're not confident that you can carry out the steps properly, then continue to Method 2.
Method 2: How to Make a Bootable DVD for Mac on Windows (DMGGeeker)
Conversion processes aren't always accurate and success rate is low for the first method. Many DVD are not able to be used to install macOS due to boot errors. Although DMG2IMG is a great tool, you may find that your resulting ISO file is corrupted and therefore useless. That means doing it all over again. Instead, you can try using DMGGeeker, which allows you to directly burn DMG to a DVD in Windows without having to convert the file. Such a disk can be used to boot a Mac computer.
DMGGeeker is an emerging star in the world of disk image file management software. It allows you to edit, add files to, delete content from, rename and do a lot more with DMG files on Windows without any conversion necessary. If you've been searching for the ideal DMG handling tool for Windows, your search has just ended. Let's see how the process works for creating a bootable media from DMG in Windows. It works with all recent versions of Windows.
Step 1Prepare for Installation
You can download it from the official site here. And then install DMGGeeker on a Windows PC.
Step 2Open DMGGeeker in Windows
Launch the application and click on the 'Burn' option. You'll see the other tools available for DMG files.
Step 3Create Bootable USB from macOS Install Image
Click 'Load DMG' to import your DMG file into the program. Insert a blank DVD and click Burn against the DVD option to write the DMG to the disk.
In three simple steps, your bootable DVD is ready. You won't find that many tools that are so easy to operate. DMGGeeker also has one of the highest burn success rates in its class, which means no wasted DVDs and no wasted time.
Summary
Create Dmg Installer Mac Os X
How to choose the rignt tool depends on what the purpose is. If you want to use a DMG file in Windows to mount a version of Mac OS X, then Method 1 will work. However, most of the time, you'll need a DMG to install an OS version on a Mac computer. In those cases, if all you have to work with is a Windows PC, DMGGeeker is the perfect application. It's simple enough for a novice yet robust enough for a professional, it contains all the tools you need to manage DMG files, and it's a life-saver if you only have a Windows PC to work with.
Create Dmg Installer For Mac Os
Dec 10, 2018 16:32:11 / Posted by Candie Kates to Mac Solution
Create Dmg Installer For Mac Catalina
Related Articles & Tips
1 note
·
View note
Text
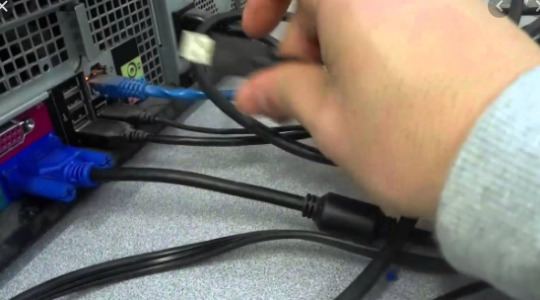
Connect The Printer And My Computer Via Usb Cable
If you’re looking to boot from a CD or DVD, follow the Booting from a CD or DVD guide instead. For Mac users, we recommend visiting Apple’s support page on USB boot media. It provides guidance that is specific to the iteration of OS X you are running (i.e. Sierra, High Sierra, Yosemite, etc.) to help you get the boot version you need. Creating USB boot media doesn’t need to be difficult either, although there are several options to consider. Regardless of the operating system you are using, booting your machine from USB media does not need to be difficult.
For more information about the cookies we use, see our Terms of Use. If you want to change your decision later on, select the 'Cookie Policy' link in the footer. Also Read Access Boot Menu
If you're looking for a flash drive with a lot of storage and fast transfer speeds, the Extreme Go by SanDisk is a solid option. The CZ800 is also affordable, costing around $32 for 128GB capacity. Connect the removable drive to your PC's USB port. If you have a flash drive with a bunch of pictures, you can quickly copy them to your computer using the import option available in the Photos app. If you have a microSD card with files, and you don't have an SD card reader slot on your computer, you can purchase a card reader to convert the microSD card into a USB storage. When an icon representing the file or files appears over the destination window, release the mouse button, and the files will be copied to that location.
Windows Basics
At boot time, press F2 or F10 or F12 to access boot menu. Once you have downloaded the ISO of Ubuntu 16.04 or 18.04, go to this page and download the latest version of Universal USB Installer. Go to Ubuntu and download the ISO image of your preferred Ubuntu version. At present, there are two LTS version available, Ubuntu 14.04 and Ubuntu 16.04. You can download whichever you prefer. Read More Usb Drive Is Not Showing Up
If a USB drive isn’t available, the computer will boot from the hard drive. Depending on your BIOS, you may be prompted with a message toPress any key to boot from external device and you will only have a few seconds to respond. If you do nothing, your computer will go to the next device in the boot sequence list, which will likely be your hard drive. If you’re booting from USB media, you must change the BIOS boot order so the USB device is listed first.
Having fears that I would not be able to find a VGA to HDMI active adapter at a local store I went on the search for the USB to HDMI adapter. I found one pretty easily at an electronics big box store. The price was quite reasonable as they are between $45 and $70. There are other brands but the J5Create is the one that the technician said I would find in the store as he also got one recently.
How To Attach A Usb Drive To Your Computer
You can also use GUI app called Etcher. Etcher seems to be faster (read/write speeds to the device directly) than other GUI apps like rufus, and it can also write RAW image files to USB drives. It's got a simple interface, give it a try. To create a bootable USB drive from Windows installation disks, use WinToFlash. What's the best way of placing a bootable ISO on a USB drive, such that the drive is bootable?
Microsoft now has a free utility that will automatically make a bootable USB flash drive from a Windows 7/8 ISO image file. Simply download the tool, specify the location of your ISO file and the wizard will do everything for you. Once the file copy has completed you are ready to plug the USB flash drive into your computer. Turn it on and hit the keyboard shortcut to bring up the boot menu for your model. After you select your USB flash drive the Windows 7/8 installation should begin to load.
USB flash drives and USB external hard drives are widespread and convenient because they are small and portable.
Not sure how to configure your USB drive?
This is a Microsoft-produced tool on CodePlex for mastering USB flash drives for Windows 7 and Server 2008 R2 from a DVD ISO.
We’ve rounded up some effective solutions that can work when you’re experiencing USB connection issues.
Connect the other end of the USB cable to the USB port on the computer. Install the printer driver and other necessary software such as P-touch Editor from the section of this websitebefore connecting the printer to your computer using a USB cable. If you want to Play music, pictures, or videos from a USB device on your TV, follow the se instructions.
How To Download Music From Youtube And Transfer To A Usb
Then open the Start menu, type “This PC,” and hit Enter. This is a direct shortcut to a list of drives attached to your PC in File Explorer. Right-click on the file you want to transfer to your removable disk. Click and drag the files you want moved over to the Removable Disk.
1 note
·
View note
Text
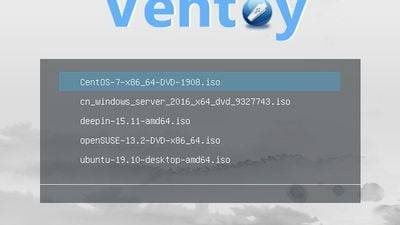
Ventoy is an open source tool to create bootable USB drive for ISO files. With ventoy, you don't need to format the disk again and again, you just need to copy the iso file to the USB drive and boot it.
Suggest and vote on features
Features
PortableVentoy can be used from a USB stick or similar with no prior installation.
Multi boot
Multiboot USB
Create Multiboot USB
UEFI Support
Persistent Storage
Multi-windows
VHD Boot
Ventoy vs Rufus opinions
Almost everyone thinks Ventoy is a great alternative to Rufus. all • positive • negative
relevance • date
onkoe
I have over 20 ISOs on one flash drive because of this utility. It's my favorite software for multiboot USBs. Keep in mind, however, that it doesn't work on any Mac hardware.
Top positive comment•about 1 year ago3
Gu
Guest
It allows simple drag & drop of ISO files to a USB drive and then offers a Grub-style menu to select which ISO to boot from, as opposed to having to outright "burn" the ISO to a drive.
Not 100% compatible, but 99.999%.
Top positive comment•12 months ago1
mblithium
Create a separate partition for booting and a special one for placing OS ".iso" files easily.
Positive comment•about 1 year ago1
umitseyhan
You don't need to reformat the stick every single time. Just a casual copy-paste operation of .iso files.
Positive comment•over 1 year ago1
Hau_Kai
It offers the option to multiboot, whilst retaining other files. Add multiple ISOs, remove or update them, all the while other files are unchanged so you can use your fastest and largest USB pendrives, without affecting their use for other tasks.
Positive comment•almost 2 years ago2
Gu
Guest
Multiple ISO image files on one drive
Positive comment•about 2 years ago2
AT
ATShields934
Allows you to easily create a multiboot drive by simply formatting a flash drive with the software and adding the .iso files. Incredibly simple to use, but a major breakthrough in simple boot drive making.
Positive comment•over 2 years ago5
Show more comments ▾
7 of 8 comments
dd
Is this a good alternative?
Yes
No
Free • Open Source
Bootable USB Creator
Mac
Linux
BSD
28 alternatives to dd
dd, that stands for ‘data duplicator’, is a command-line utility for Unix mainly used for copying and converting data.
Suggest and vote on features
Features
Command line interfacedd either have CLI support or is a CLI-only app.
Burn iso
Write ISO to SD card
Create image
dd vs Rufus opinions
Almost everyone thinks dd is a great alternative to Rufus.
Gu
Guest
It's the only one that seems to be able to create BSD flash drives
Top positive comment•almost 3 years ago2
Gu
Guest
Considering this has been developed since 1974, it is very good at what it does.
Top positive comment•over 3 years ago0
cv
cvanelli
crappy command line only program.
Negative comment•over 1 year ago-9
Gu
Guest
It works very well, only for the non Dufus.
Positive comment•over 3 years ago-4
Gu
Guest
allows use of the command line
Positive comment•almost 4 years ago0
Gu
Guest
It's not flashing automatically
Negative comment•about 4 years ago
0 notes
Text
Mac mojave 10.14.4 clover efi

#Mac mojave 10.14.4 clover efi mac os
#Mac mojave 10.14.4 clover efi install
#Mac mojave 10.14.4 clover efi update
#Mac mojave 10.14.4 clover efi install
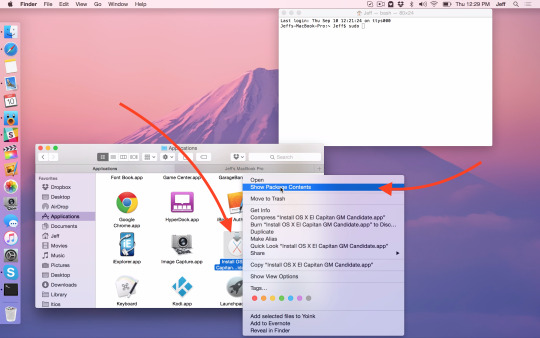
In that case, you need to install the “dmg2img” package on your system, and replace the “hdiutil” command invocation with: dmg2img BaseSystem.dmg Mojave-installer.iso Prepare a Clover image It is possible to run this download script on Linux instead. Upload the “ISO” to your Proxmox server’s ISO store (typically /var/lib/vz/template/iso). This is actually a raw disk image, not a true ISO, but Proxmox has better tools for picking and re-using ISO images than disk images. Convert that dmg into an “iso” like so: hdiutil convert BaseSystem.dmg -format UDRW -o Mojave-installer.iso This results in a ~460MB “BaseSystem.dmg” file in the current directory. On a Mac machine, download and run fetch-macOS-v2.py in a terminal to download the Mojave recovery image from the Apple software distribution server: Older CPUs will cause the finder to repeatedly crash after installation completes (with an Illegal Instruction exception in the graphics code).Īpparently modern AMD CPUs also support SSE 4.2 and can be used with this guide without any modification (maybe Bulldozer and certainly Ryzen), but I haven’t tested this myself. Your Proxmox host computer’s CPU must support SSE 4.2, so for Intel your CPU must be at least as new as Nehalem, which was the first CPU generation to bear the “Core” i5/i7 branding. You also need a real Mac available in order to fetch the OSK key. I’ll assume you already have Proxmox 5.4 installed. There is more documentation there which will help out with enabling extra features and diagnosing problems! Requirements This tutorial for installing macOS Mojave has been adapted for Proxmox 5.4 from Kholia’s GitHub project for installing into vanilla KVM. With the release of macOS Catalina 10.15, this tutorial is now obsolete! Please check out the new Catalina tutorial here. Magic Trackpad 2 causes kernel heap corruption when passed to a Proxmox guest, GPFs.Installing macOS 12 “Monterey” Developer Beta on Proxmox 6.Recovering lost GPG public keys from your YubiKey.Installing macOS 12 “Monterey” on Proxmox 7.Expanding the disk of your Proxmox macOS VM.Driving a 4-pin computer PWM fan on the BTT Octopus using Klipper.Installing macOS 13 Ventura Developer Beta on Proxmox 7.2.Installing Hackintosh Download macOS Mojave 10.14 before installing Windows 10 may then be safer.
#Mac mojave 10.14.4 clover efi update
It will happen if you will face some error if you update Windows 10 first during deployment. Because our machine is not Windows 10 compliant with macOS Mojave. You should update macOS Mojave first, there would be other situations. So there is something that you might think we would update macOS Mojave or Windows 10 first. Now everyone is set to run Mojave 10.14 macOS on your PC. The best thing I’ve had is Disk Functionality, it should be better than anyone else. You may also search there, or use balenaEtcher, Disk Utility, and Terminal to build macOS Mojave USB installer. There are ways to build macOS Mojave Bootable USB installer, as I mentioned the connection above.
#Mac mojave 10.14.4 clover efi mac os
Make Dual Boot Mac OS Bootable USB Using Pen Drive
2 Download BalenaEtcher & Mac OS Mojave ISO File freeload.
1 Make Dual Boot Mac OS Bootable USB Using Pen Drive.
0 notes
Text
Mac os x mavericks dmg download

#MAC OS X MAVERICKS DMG DOWNLOAD FOR MAC OS#
#MAC OS X MAVERICKS DMG DOWNLOAD FOR MAC#
So you can enter full-screen instead of enlarging the windows size with this feature. The windows in this Mac OS update has a green ‘Zoom’ button to enter the full-screen of the windows.Long story short, the DMG files are mostly used for the Mac OS X software and Download Yosemite DMG is one of that software. However, the Window Daemon Tools may be able to mount virtual drives from DMG images, and some other utilities may be able to convert DMG files to a Windows recognizable format. The DMG files are specific for the Mac computers, not for the Windows computers. DMG files are often used to install OS X software that is downloaded from the internet to mount a virtual disk on the Mac PC when opened. It has the raw block data normally compressed and sometimes encrypted. What is a DMG Image?Ī DMG file, which is also known as a DMG image is a mountable disk image created for the Mac OS X. MacOS X Yosemite 10.10.1 is a reliable surroundings with specific protection and stability updates.
#MAC OS X MAVERICKS DMG DOWNLOAD FOR MAC#
Description Niresh Mac OS X Yosemite Dmg For Mac + Overview.
#MAC OS X MAVERICKS DMG DOWNLOAD FOR MAC OS#
Niresh Mac OS X Yosemite 10.10.1 offline installer complete setup for mac OS with direct link. Niresh Mac OS X Yosemite 10.10.1 dmg for mac DVD ISO freeload full version. As in the case of many other operating system installations, Apple Yosemite also provides an option to upgrade from your current OS version or the option to install the new Yosemite Mac OS X from scratch. Method one for download Yosemite and install. The new download Yosemite Mac OS X supports to two installations methods. A new “Finder” to locate the stuff stored. “Photo” feature has been added to give new sliding look to your snaps. Mac OS X 10.10 Yosemite: Product’s Salient Features: A new sleek look. Mac users can also follow official Apple guide HERE. Mac OS X general public users (non-developers) and developers can manually install OS X 10.10.1 via iTunes after, Download OS X Yosemite 10.10.1 Final Setup / Update.DMG Files via Direct Links for manual installation through Bootable USB or Bootable DVD.
0 notes
Text
Usb install linux on mac

#Usb install linux on mac for mac os x#
#Usb install linux on mac full#
#Usb install linux on mac download#
After doing this the USB should then appear as a bootable device while holding in the alt or c key when you are rebooting the computer. a USB stick) to show up at all in the boot menu you also may have to reboot/turn on/off the computer a couple of times and also resync the partition tables using rEFIt. When booting of the USB device the following message or something similar will appear: "Missing operating system" and the process is auto-magically halted. Please notice: While all of the info and above commands are executed properly on a MacBook Air 3,2 (that is the 2010 version 13" version of the Air) the end result will not produce a bootable USB device, at least not with the image for Ubuntu 10.10 64-bit. Restart your Mac and press alt while the Mac is restarting to choose the USB-Stick Run diskutil eject /dev/diskN and remove your flash media when the command completes Start Disk Utility.app and unmount the volume (don't eject). If you see the error dd: /dev/diskN: Resource busy, make sure the disk is not in use. Use the same command but replace bs=1m with bs=1M. If you see the error dd: Invalid number '1m', you are using GNU dd. Using /dev/rdisk instead of /dev/disk may be faster. If you see the error "Unmount of diskN failed: at least one volume could not be unmounted", start Disk Utility.app and unmount the volume (don't eject).Įxecute sudo dd if=/path/to/downloaded.img of=/dev/diskN bs=1m (replace /path/to/downloaded.img with the path where the image file is located for example. (replace N with the disk number from the last command in the previous example, N would be 2) Run diskutil list again and determine the device node assigned to your flash media (e.g. Run diskutil list to get the current list of devices dmg ending on the output file automatically. img using the convert option of hdiutil hdiutil convert /path/to/ubuntu.iso -format UDRW -o /path/to/target.img Open the Terminal (in /Applications/Utilities/ or query Terminal in Spotlight)Ĭonvert the.
#Usb install linux on mac full#
TIP: Drag and Drop a file from Finder to Terminal to 'paste' the full path without typing and risking type errors. img file that you will be required to create from the. But if you would prefer to use a USB, please follow the instructions below.
#Usb install linux on mac download#
We would encourage Mac users to download Ubuntu Desktop Edition by burning a CD for the time being. If attempting to make a USB drive that can be booted from a Mac, follow the instructions below. The resulting USB drive, however, can be booted on PCs only.
#Usb install linux on mac for mac os x#
UNetbootin for Mac OS X can be used to automate the process of extracting the Ubuntu ISO file to USB, and making the USB drive bootable. UNetbootin (Automated, graphical approach) UNetbootin (Automated, graphical approach).
0 notes
Text
Convert dmg to iso windows

#Convert dmg to iso windows for mac
#Convert dmg to iso windows mac os
Step 2Type the file paths as below, and then press “Enter” to confirm the operation. Step 1Click “Utilities” and then “Terminal” to open “Terminal” on your Mac. You can take the following guide to do it. You can also rely on the command line to convert DMG to ISO on Mac.
#Convert dmg to iso windows for mac
Convert DMG to ISO with the command line. Aolor DMG to ISO Converter for Mac is a super easy-to-use Mac disk utility that allows users to create Windows disk image ISO file from Mac disk image file DMG in only 3 steps: import DMG, set output directory and start the DMG to ISO conversion. Please note that you can't boot your Mac from bootable USB made from an ISO file, which means you'll have to convert it back to DMG prior to that. Since ISO is a better format for Windows, you can also convert the DMG to the ISO format and then use the ISO disk image to create the bootable USB. Convert DMG to ISO and Create macOS Boot USB from Windows. Change the Output File Type property to DMG Disc Image and then click Save once more. Then, click File and then Save As to bring up the Save As dialog box. Hdiutil convert apple.dmg -format UDTO -o apple.iso. How do I convert Windows DMG to ISO Open Nero Burning ROM on your computer and click File and then Open to open your ISO file. Assuming that you have a disk image called apple.dmg in the current directory, type. Open a terminal window from Finder Applications Utilities Terminal. How To Convert DMG Files To ISO Files On Mac Method 1: Using the Mac terminal.
#Convert dmg to iso windows mac os
Forget downloading the shareware apps that promise to convert DMG files to ISO, you can do it right from Mac OS X’s command line, for free, using the. Perhaps your Mac doesn’t have a writable media drive, or it’s not up to speed, or the multitude of other reasons you’d want to have or burn an ISO from a PC rather than a DMG on your Mac.
0 notes
Text
Burn Mac Os X Dmg To Dvd On Windows

Download Os X Dmg High Sierra Macdrug - elegantever.
Burn Mac Os X Lion Dmg To Dvd Windows - missionclever.
How to Create A Bootable USB Drive from A DMG File on Windows.
Convert DMG to ISO (MacOS X, Windows or Linux) - Tweaking4A.
Burn DMG file - PowerISO.
How To Burn Mac Os X Dmg To Dvd Macworld - agbrown.
2 Ways to Burn ISO to Bootable DVD/CD Windows 10/Mac OS X.
Burn - Home.
How to Create & Burn a Bootable Mac OS X Lion Install DVD.
How to install macos from usb on windows.
Create an installation disk (USB or DVD) for MacOS X.
Mac - How to Create a DMG File from a CD/DVD.
Convert Mac Os X Dmg To Iso Windows 7 - plazaever.
Burn Dmg To Dvd Windows Nero - brownmat.
Download Os X Dmg High Sierra Macdrug - elegantever.
Re: Burn os x disc on windows Post by PortalCake » Sat Dec 04, 2010 11:42 am If it's a DMG, use DMG2IMG, then you can burn it or if you want, convert it to an ISO. DMG file is a compressed file format being used widely on Mac computer. Windows OS doesn't natively support DMG disk image files, so if you need to create a bootable USB drive from a DMG file, mostly for bootable Mac OS X or macOS installation USB, you need a special utility to help you complete the task.
Burn Mac Os X Lion Dmg To Dvd Windows - missionclever.
For the users having OS X 10.10 or lower OS versions, Disk Utility is also a decent method to burn ISO image files to DVD. Steps on how to burn an ISO to DVD on Mac using Disk Utility Step 1: Click on the magnifying glass icon, which is for Spotlight at the top-right of the screen and open Disk Utility. 1. ISO Buster 1.7 Converted DMG to bin/cue. Burnt using Nero. In Mac OS 9.2, it says Files might be corrupt. Only folder and file names are readable. The contents are not. 2. Transmac 7.0.
How to Create A Bootable USB Drive from A DMG File on Windows.
Try disk utikity, Step 1. Launch Disk Utility (Applications > Utilities). Step 2. Click Burn on the Disk Utility toolbar (upper left). Step 3. Navigate to where you saved the DVD image created in the previous section. steo 4. Click on the image file, then click the Burn button. Just download and install PowerISO, double-click the resulted desktop icon to launch the application, click "Tools," and then "Burn." Locate the DMG file that you want to burn, select it and click. How to Burn a Disk Image File (ISO, DMG, etc) from the Finder of Mac OS X. The ability to burn data and disk images has long existed in the Finder of Mac OS, but now burning images is missing from Disk Utility, it's one of the primary methods of burning a disk in Mac OS X 10.11 and later: From the Mac Finder, select a disk image file.
Convert DMG to ISO (MacOS X, Windows or Linux) - Tweaking4A.
That's because DMG is not native on Windows. It is the Mac equivalent of an ISO file that has been in use since Apple transitioned from the IMG format with Mac OS X. A DMG file, like ISO, can be used to install macOS operating system or Mac apps.... Burn Dmg To Dvd Mac. Operating System: OS X 10.5 or later; Ram (Memory): 2 GB Minimum required.
Burn DMG file - PowerISO.
A tradition/common method of crerating a DVD for OS x. Make a bootable image copy of OSX 10.8 Mountain Lion after downloading the App from the store but before installing on your drive. Copy the image to a local drive or make a bootable external disk or DVD. So you downloaded file, and now you want to burn it to CD or DVD on your Mac. No extra software is required. The delightfully useful Disk Utility built into OS X can burn. DMG files are a Mac OS X Disk Image files. Like ISO files, DMG files are essentially disk images, which are intended to be used with the Mac operating system.
How To Burn Mac Os X Dmg To Dvd Macworld - agbrown.
Next, you can burn the file onto a blank CD/DVD. Burning the DMG file. Eject the original CD/DVD from the computer and insert a blank one. If you are prompted with a pop-up window, click Ignore. Return to Disk Utility, and click the Burn button at the top of the window. Navigate to the Desktop, and highlight the file you saved. Click Burn. How to install macos from usb on windows. April 25, 2022; Click 'Utilities', then 'Terminal'. You can name. Press and hold the Option (Alt) key on the keyboard when the computer. 1. Insert a blank disc in your DVD writer. 2. Open the folder in Finder that contains your ISO or DMG file. RECOMMENDED VIDEOS FOR YOU... 3. Right-click the file and choose "Burn Disk Image" 4.
2 Ways to Burn ISO to Bootable DVD/CD Windows 10/Mac OS X.
Aicul. I'm trying to burn a.CDR disk image onto a DVD. This is quite straight forward, select the file and click burn in disk utility. However, when I insert the DVD in a mac, DVD player will not work and issue a "Supported Disk not available" message. To get around this I have to file/open DVD media... and select the DVD's VIDEO_TS folder.
Burn - Home.
A DMG file refers to a compressed number of files stored in Mac OS operating system. Think it like similar to an ISO file in Windows operating system. Unfortunately, DMG files are not supported in Windows operating system and neither could you create nor extract a DMG file in Windows operating system. From the Mac OS X Finder, locate the Mac OS X Installation file that was downloaded, right-click, and “Show Package Contents”. Find and open the “SharedSupport” folder and locate a disc image file called “InstallESD”. Copy “InstallESD” to your Mac OS X Desktop, this is the Lion disk image and what you’re going to. TransMac:- Burn Apple Mac OS/X to DVD Disc Link. TransMac. Let us see if we can burn an Apple OS DMG File onto a USB Drive. If successfully burnt, we will move to the "broken" apple computer, and try to re-install the OS via the burnt USB Dive. Outline. Locate a PC running MS Windows at least v10; Prepare MS Windows 10 computer.
How to Create & Burn a Bootable Mac OS X Lion Install DVD.
Right-click on InstallESD and paste (right-click and choose Paste Item) it to a convenient location (such as the Desktop) Click Burn, select InstallESD from your convenient location and. To mount a DMG disk image in OS X, simply drag-and-drop it to the left sidebar of Disk Utility. To burn the disk image to a CD or DVD, simply click the DMG file in the left sidebar, and then click the Burn icon at the top of Disk Utility. You will be prompted to insert your blank media, after which you can then click Burn to confirm that you.
How to install macos from usb on windows.
Burning DMG to DVD is much harder than burning ISO image becasue less tools available on the market. Fortunately, you can use DMG Editor and TransMac to burn the DMG file on Mac or Windows PC. They are the best two programs for DMG burning in 2018. So don't miss the tool when handing DMG files by yourself. Mac dmg os. Burning a CD or DVD in Windows 10 using Windows Media Player This tutorial will show you how to burn video(s), MP3, and WMA audio files and pictures to a Data CD or DVD. This tutorial will also show you how to burn MP3, WMA, and WAV files to an Audio CD that will play on any CD player and car stereo. Step 1: Download OS X Lion from the Mac App Store Burn Os X Dmg To Dvd In Windows. Press and hold down on the option key on your keyboard, load up the Mac App Store. With option key still pressed, go to “Purchased” within the Mac App Store. Click on “Install”, enter your password, OS X Lion will now begin to download.
Create an installation disk (USB or DVD) for MacOS X.
All you have to do is burn the image to a DVD, using Apple's Disk Utility (found in the /Applications/Utilities folder on any Mac OS X installation). Burn Dmg File To Dvd In Windows 7 – elegantever. Step 2. Click Burn on the Disk Utility toolbar (upper left). Notify me of new comments via email. Burn DMG files to a disk on Windows. In step one, click on the 'Browse' button to select the source file, which is your ISO file. Choose the file in the Explorer popup window and click on 'Open' to add it to the software. Step 3: The third step is to select the media type. In this case, it will be DVD or CD, so click on the button that says DVD.
Mac - How to Create a DMG File from a CD/DVD.
Burn Mac Os X Lion Dmg To Dvd Windows. From here we can either convert the Sparse Image back to a DMG or an ISO/CDR. Let's unmount both: Convert Sparse Image to DMG. We can use this command to convert our sparse image to a DMG: Just for reference here are the available formats: taken from the man page. Making a DVD ImageStep 1. Insert the retail Mac OS X Install DVD into your drive.Step 2. Launch Disk Utility (Applications > Utilities).Step 3. In Disk Utility, you will notice a white pane on the left hand side. In the pane, select the Mac OS X Install DVD by clicking on it once.Step 4. Click New Image on the Disk Utility toolbar.Step 5. A. Select the Added DMG File Access the DMG File by right-clicking on your DMG File From the drop-down menu, please choose the “ Burn to CD/DVD ” option The “Burn CD/DVD Window” window opens Choose the CD/DVD Drive Confirm the DMG File to burn The Burning process proceeds Once the burning is completed, we are informed Images Image – DMG File – Options.
Convert Mac Os X Dmg To Iso Windows 7 - plazaever.
Burn DMG file Run PowerISO, and insert a blank or rewritable optical disc in the drive. Click "Burn" button on toolbar or select the "Tools > Burn" Menu. PowerISO shows " DMG Burner " dialog. Click "Browse" button to select the DMG file you want to burn. Select the burning drive and the burning speed from the list. Da Vinci's Liquid Dmg Mac Os X 10.9.5 Dmg File The Pirate Bay Contact Burn Dmg Mac Bootable Dvd Make Bootable Yosemite Usb From Dmg Ds3 Anyway To Block Bleed Dmg Ffxiv 5.0 Mch Dmg 7.3 Ptr Dmg Sims Hypixel How To Deal A Lot Of Dmg Wow Battle Dmg Texts Addon Water Dmg Un Walls Shows Above Crown Omlding. I think it is fixable by re installing whole software again but i only got the upgrade cd not the installation cd of mac os x, however my friend is external hard drive got MAC OS X install DVD.ISO and macbook snow leopard user DVD but i don't know how to burn that using my nero on windows 7 computer any body is there to help..?.
Burn Dmg To Dvd Windows Nero - brownmat.
Once the DMG is burnt, the USB drive, now bootable can be used as an installer on any other mac System. Step 1. Navigate to the following pathway: Application>> Utilities>> Disk Utility. Step 2. Click on the Disk Utility option to run it. Step 3. Insert your USB drive and check if it appears on the left side of the Disk Utility operating Window.
0 notes
Text
El Capitan Boot Disk
Finally, after about 25 more minutes, OS X El Capitan should be successfully installed on the target drive. Boot into El Capitan via the USB Device. After the second reboot, boot from the USB device once again, but this time, select Boot OS X from El Capitan, and select verbose mode. Press Enter and cross your fingers again. If all goes well. How to create an El Capitan USB install disk. Step 1: Download El Capitan from the Mac App Store. If you’re a developer, you can redeem a download code to use via the Apple developer center. If you’re a part of Apple’s public beta program, you can likewise redeem a code for the El Capitan GM via Apple’s beta website. Once El Capitan is.
Os X El Capitan Boot Disk
Boot Disk Wiki
In this article, I will show you How to create Bootable USB for Mac OS El Capitan on Windows using Transmac. Therefore, you can create bootable USB for your Mac using Transmac on windows 10/7/8/8.1 here you will learn the easiest method of creating bootable USB. As you know that Mac OS EL Capitan is the newest version among Mac. In here just follow my steps to create a bootable USB installer for your Mac. is the twelfth major of the Mac operating system. Therefore, it has outstanding features that the previous version of Mac doesn’t have that. It is better now that we should create a bootable USB installer drive to install Mac OS.
Note that if you’re using a 8GB (or larger) USB thumb drive, it will be completely erased. DiskMaker will erase any complete volume that you signify, so if you wish to make a disk that can install Yosemite, El Capitan, and Sierra, consider using Disk Utility (found in the Applications/Utilities folder) to partition the drive into three separate volumes, one for each operating system version. To create a bootable El Capitan installer drive, you need the El Capitan installer from the Mac App Store and a Mac-formatted drive that’s big enough to hold the installer and all its data.
Nov 15, 2018 Now that the DMG file has been converted to ISO format, you can use the following command to burn it to a disk. Before that, insert a disk into the optical drive: isoburn.exe /Q E: 'C:UsersUsernameDesktopdestinationfile.iso' Step 4. This command utilizes the Windows native disk image burner to burn the ISO to the disk in your optical drive.
How to Create a OS X El Capitan Boot Installer USB Flash Drive Sep 30, 2015 - 232 Comments Many Mac users like to make a bootable installer drive for installing OS X El Capitan, whether for performing a clean install, or for making it easier to install OS X 10.11 onto multiple Macs.
You all have the information about “Transmac” software about its function that how it works, or how to download “TransMac” and how to install that on your Windows PC? However, you need the following requirements to create a great bootable USB installer for Mac OS El Capitan.

Why we use TransMac to Create bootable USB for mac os el Capitan?
TransMac is a simple application to open hard drives disk, Flash drives, CD/DVD high-density floppy disk on Windows 10/7/8/8.1 or lower version of other Windows. to use this application you just need to insert the drive you need, and one of the great function is this that it will automatically read the drives, TransMac is a great tool that you can access the Mac file on Windows operating system using TransMac.
TransMac Features
You are allowed to use the TransMac for 15 days trial, and after that, if you want to use that more then 15 days then you need to purchase that. All the features are the same for Mac.
The system requirements are you need Windows 10/7/8/8.1 or Windows Vista and XP.
The users can buy TransMac for $59.00 with the license.
Apple files system (APFS) are only supported.
Open Mac APFS/HFS/HFS+ format disk drives, flash drives, CD/DVD/Blu-ray media, HD floppies, dmg, dmg part, sparse bundle, and sparseimage files.
Copy files to Mac and image file
Format HFS to Mac
Save and restore image files to disk and USB flash.
Create, compress image files for Mac
Burn your ISO file and dmg file directly to CD/DVD Blu-ray.
View the partition layout
Now Create bootable USB for Mac OS El Capitan on Windows
Now it is the time to create a bootable USB installer using TransMac, To install Mac OS El Capitan on VirtualBox on Windows 10 you need a Bootable USB here you will learn the steps of creating a bootable USB installer for Mac OS El Capitan on Windows.
Step #1.Psx emulator for mac el capitan. Before going to create a bootable USB for Mac OS El Capitan you need to download TransMac. Therefore, you can download TransMac from the given link. After that, you are download TransMac now install that on your computer, the installation process is too much easy everyone can install that on their PC/Computer with a simple procedure. Just click on the setup file and with some click, the installation will finish. After that, Launch TransMac when TransMac is launched you will see the list of Flash drives or local disk. Then Right-click on that flash you want to create bootable USB for Mac OS El Capitan then select Restore with Disk Image.
Restore with the Disk image
Step #2. Now a warning message will pop-up after you select Restore with Disk Image, and in this step, select Yes.
Step #3. After that, you clicked on yes now a dialogue box will come just click on that and browse for VMDK file and select the file and click Open.
select Mac OS EL Capitan VMDK file
Step #4. After that, you clicked on Open in here your file will be ready to copy on USB drive click on “OK”.
Copying your File VMDK file to USB
Step #5. After that, you clicked OK now in this step, your Mac OS EL Capitan VMDK file will copy to your USB drive. Have patience and wait for some minutes that should copy your file.
Copying Mac OS EL Capitan File to USB
Conclusion
That’s all about it,Now you are totally done with creating the USB drive. Therefore, if you faced any problem regarding this you can comment on below comment box and share your ideas. Furthermore, we will discuss that and don’t forget to subscribe our website with your email address and have a notification about our latest post.
Learning how to create a bootable macOS installation disk can be helpful in a variety of situations. Rather than download and install a new OS from Apple's servers each time, it can be used for multiple installations on different machines. It can also help in situations where the operating system is corrupted or installation from app store shows errors.
To create a bootable macOS installation disk, you have to burn the DMG file to a USB drive as CD/DVD is not available for Mac computers. Here's how to do it from text commands and using a purpose-built software called WizDMG. You will first need to download the DMG file for the macOS version you wish to install. For example, if you want to create a bootable macOS Mojave installer, you will need the DMG file for macOS Mojave. Once the file has been downloaded to your PC, you can proceed with one of the bootable disk creation methods shown below.
Method 1: How to Create Bootable USB Installer for Mac via Commands
macOS (formly named Mac OS X) is just a variant of popular Unix based operating system. This means a lot of daily and advanced tasks on Mac can be done via text commands such as creating bootable USB installer for Mac. However, this could be a lot of challenges if you had no clue about commands and I suggest taking a look at the other solutions in this post to avoid messing up the computer with the wrong commands.
Create A Boot Disk For High Sierra From El Capitan Download
Step 1. Search macOS name in app store (Mojave, High Serria, EI Capitai). Click 'Get' button to download the installer image on your Mac. The downloaded file will be located in Application folder.

Step 2. When the download is completed, the installation windows opens automatically, just close the window and go to Application folder. You will find a file started Install, such as Install macOS Majave.
Step 3. Now connect an external flash drive with more than 16G free space. And backup the data in that USB drive as the installer erase all content from it. Open Disk Utility app and format the USB drive with APFS or Mac OS Extended.
Step 4. Open the Terminal app and copy-and-past the following commands to make a booatble USB installer from macOS image: For Majove: sudo /Applications/Install macOS Mojave.app/Contents/Resources/createinstallmedia --volume /Volumes/MyVolume For High Serria: sudo /Applications/Install macOS High Sierra.app/Contents/Resources/createinstallmedia --volume /Volumes/MyVolume For EI Capitan: sudo /Applications/Install OS X El Capitan.app/Contents/Resources/createinstallmedia --volume /Volumes/MyVolume --applicationpath /Applications/Install OS X El Capitan.app
Step 5. Input the admin password when being prompted. And wait for the booatable disk being created. When it is done successfully, you will receive a message shown in above screenshot.
Unconfortable with text commadns and prefer doing it in a simple way? The second suggestion is more user friendly!
Method 2: How to Make Bootable USB from macOS with WizDMG
WizDMG fills a huge gap in Windows not supporting DMG files. It is a desktop utility supporting Windows and Mac. It allows you to directly burn DMG files to disk in order to create a bootable macOS Mojave installer or a boot disk for any macOS version.
WizDMG offers an intuitive interface with no clutter and full functionality to handle DMG files. Apart from burning such disk image files to DVD/CD or USB, it also gives you edit options where you can add and remove files from within the DMG file, rename DMG files and even create DMGs from files and folders on your desktop. This software application has been created for novice users as well as experts. It is easy to use, has a very high burn success rate and will help you create a bootable macOS installer in no time. Follow the instructions below:
Step 1Install WizDMG
Download WizDMG from the official website and install it on your PC. Launch the program and select the 'Burn' option in the main interface.
Step 2Create Bootable USB from macOS Install Image
Click on Load DMG to import the macOS installation file into the application. Insert a USB (16G free space) and click on the 'Burn' button next to the appropriate media type.
The important thing to remember here is that you now know how to create a macOS installer in Windows. There aren't a lot of options out there because of the compatibility issues between Mac and Windows environments. That means converting DMG to ISO and back again to DMG leaves the door open for corrupted files and incorrectly burned bootable media, which defeats the whole purpose because it might not even work in the end.
Method 3: Create macOS High Serria/Mojave Bootable USB on Windows 10/7
Another way to create macoS bootable disk on Windows is using a tool called DMG2IMG along with Windows command prompt. It requires a bit of a workaround, but even novice users can learn to burn a DMG file to a disk to create bootable media for a macOS installation. Just make sure you follow the instructions below carefully.
Step 1. Download DMG2IMG and install it in your Windows PC. Open File Explorer and go to the folder containing the DMG2IMG program, then right-click and select 'Open command windows here.'
Create Boot Disk For High Sierra
Step 2. Type the following command and hit Enter: dmg2img (sourcefile.dmg) (destinationfile.iso)
Step 3. Now that the DMG file has been converted to ISO format, you can use the following command to burn it to a disk. Before that, insert a disk into the optical drive: isoburn.exe /Q E: 'C:UsersUsernameDesktopdestinationfile.iso'
Step 4. This command utilizes the Windows native disk image burner to burn the ISO to the disk in your optical drive. The ISO file can't be used directly in macOS, but it can be mounted as a virtual drive. Once you do this, you can convert it back to DMG using Disk Utility in Mac. You can then use this as your bootable macOS installer.
Create A Boot Disk For High Sierra From El Capitan To Factory
As you can see, this is a bit of a workaround because DMG files aren't natively supported in Windows. Likewise, ISO files aren't fully supported in macOS. However, you can use this method to create a macOS installation disk in Windows. If you want a much simpler solution, then review the next method shown here.
Summary
If you ask us how to create a bootable macOS installation disk, this is the method we recommend. There's no confusing command line work involved, you don't need a bunch of additional software utilities to get the job done, and the high accuracy of the application ensures that you won't be wasting disk after disk trying to burn the installation media for macOS onto a disk. Use WizDMG as a quick and painless way to create a macOS installation disk in a very short time.
Nov 15, 2018 16:47:20. / Posted by Candie Kates to Mac Solution
Create A High Sierra Boot Disk
Related Articles & Tips
Warning: Please follow these instructions at your own risk. I am not responsible for any damage or information loss that could result from following this guide. Also, note that installing OS X on PC is illegal. Please buy a real Mac if you're satisfied with your Hackintosh. This guide is for evaluation purposes only.
Requirements
An Intel-based PC with UEFI bios
A USB flash drive with at least 16GB capacity
A dedicated hard drive (SSD highly recommended)
A computer running OS X (10.9 or later) for preparing the installation USB flash drive
I chose to avoid the UniBeast installer (by Tonymacx86) because of its commercialized nature, as described here. Here is a vanilla guide to installing El Capitan on your PC!
Preparing the USB Installation Drive
First things first. We need to prepare a USB thumb drive that will contain the installation files as well as the bootloader and custom kexts for our specific Hackintosh build.
Download El Capitan from the Mac App Store
Head over to your existing OS X environment running 10.9 or later and open the Mac App Store.
Search for 'El Capitan' and click Download. The download is completely free if you're running OS X 10.9+.
Wait for the download to finish (this could take some time).
Format the USB Drive
Open Disk Utility in Applications/Utilities and locate your USB device. Make sure you've backed up anything important on that drive as it will be erased forever.
Select it, and then on the right, click the partition tab.
Click Curent Layout and change it to 1 Partition.
Set the Name to USB.
Set the Format to Mac OS Extended (Journaled).
Click Options and select GUID Partition Table.
Click Apply to format the drive.
Copy the Installation Files to the USB Drive
Now that we've downloaded the installation files from the Mac App Store and formatted our USB drive, let's copy the installation files to it.
Run the following command in the Terminal (Applications/Utilities):

The command will run a script inside the Install OS X El Capitan application that will copy the installation files to the USB drive.
This process takes about 15 minutes. Go out for a quick run, or a hamburger, or both. When you come back, it should have finished.
Installing a Bootloader
If you tried to boot from the USB drive as is after the previous step on a PC, it wouldn't work. We need a bootloader that makes it possible to boot OS X on x86 and x86_64 PCs.
There are 3 popular bootloaders to choose from.
Clover
Chameleon
Chimera
I went with Clover as it seems to be the most popular choice among other El Capitan installers, mostly for the following reasons:
Clover is an open-source EFI-based bootloader created on Apr 4, 2011. It has a totally different approach from Chameleon and Chimera. It can emulate the EFI portion present on real Macs and boot the OS from there instead of using the regular legacy BIOS approach used by Chameleon and Chimera. For many, Clover is considered the next-gen bootloader and soon it will become the only choice since BIOS in being replaced by UEFI in every new motherboard. One big feature of Clover is that iMessage, iCloud, the Mac App Store works along with Find My Mac, Back To My Mac and FileVault since Clover can use the EFI partition. (Read more)
Install Clover on Your USB Drive
Installing Clover on your USB drive is relatively easy. It involves running an installation wizard and selecting some options.
Download the latest Clover installer from here.
Run the installer.
Click Continue twice.
Click Change Install Location and set it to your formatted USB drive.
Click Customize and check the following options:
(x) Install for UEFI booting only
(x) Install Clover in the ESP
( ) Drivers64UEFI
(x) OsxAptioFixDrv-64 - fixes memory map created by AMI Aptio EFI. Booting OS X is impossible otherwise.
Click Install and wait for the installation to finish. It shouldn't take more than a minute.
Copy Essential Kexts to the USB Drive
Next, we'll need to copy some kexts (kernal extensions, similar to drivers on Windows) to the USB drive.
FakeSMC.kext - open source SMC device driver/emulator developed by netkas. Tricks OS X into thinking it's installed on Apple hardware. Absolutely required for Hackintosh installation.
NullCPUPowerManagement.kext - disables AppleIntelCPUPowerManagement.kext which may cause kernel panics when you try to boot from the USB drive. It's optional, copy it only if you get an AppleIntelCPUPowerManagement-related kernel panic.
ApplePS2Controller.kext and AppleACPIPS2Nub.kext - adds support for PS2 devices (such as PS2 keyboard/mouse). They're optional, copy them only if you still use PS2 devices.
Download these files from here and copy them to the EFI mounted volume at /EFI/Clover/kexts/10.11/.
Now that the installation USB drive is ready, let's install OS X El Capitan!
Boot from the USB Drive
Restart your computer and boot from the USB drive (Press Esc/F8/Del to access the boot selection menu).
Use the arrow keys to select Boot OS X Install from Install OS X El Capitan (It should be selected by default). Press the spacebar and select Boot Mac OS X in verbose mode. Verbose mode means that you'll be able to see exactly what's going on under the hood as OS X attempts to boot up its installer. You'll be able to see the exact error message if booting fails.
Press Enter and cross your fingers. Clover will now boot the installer from your USB drive. This could take some time, in my case, it takes around 5 minutes (Don't worry -- the startup time is around 5 seconds after installing on an SSD).
Did it fail?
It's more than likely that the boot will fail. Don't panic (ha-ha), as kernel panics usually mean that you forgot to copy an essential kext to the EFI partition. Look up the exact error you're getting before the boot log comes to an end and search Google for a solution.
Once you find an additional kext that your system needs, you'd attempt to copy it to the EFI volume, only to discover that it's gone! Not to worry, it's just unmounted and hidden. Follow this guide to mount the hidden partition, and then, follow the Copy Essential Kexts section above to copy it to the USB drive's EFI partition.
Format the Target Hard Drive
Once the installation wizard boots, the next step is to prepare the hard drive that you want to install OS X on.
Click Continue, followed by Disk Utility.
Select the target drive to install to (not the USB drive!) and click the Erase button. Make sure to back up anything important on that drive, as it will be deleted forever.
Set the Name to El Capitan.
Set the Format to OS X Extended (Journaled).
Set the Scheme to GUID Partition Map.
Os X El Capitan Boot Disk
Click Erase to format the drive.
Install OS X to the Target Drive
Exit the Disk Utility and click Install OS X.
Click Show All Disks and select the drive you just formatted to install OS X on it. Finally, click Install.
The process takes about 25 minutes. Be patient. For me, it hung at the end ('1 second remaining') for around 5 minutes. Don't be tempted to reset or cancel the installation.
When that's done, the system will reboot. Make sure to boot from the USB device again, and select Boot OS X Install from Install OS X El Capitan once again, in verbose mode. The installation is a two-part process that continues once you re-boot into the USB drive.
Finally, after about 25 more minutes, OS X El Capitan should be successfully installed on the target drive.
Boot into El Capitan via the USB Device
After the second reboot, boot from the USB device once again, but this time, select Boot OS X from El Capitan, and select verbose mode.
Press Enter and cross your fingers again. If all goes well, you'll be presented with the setup wizard:
Take a minute to set up your new Hackintosh. Once you're done, there are a few things you need to do to finish off the installation.
Reinstall Clover on the Hackintosh Drive
In the previous step, we used Clover on our USB drive to boot our Hackintosh. This is fine, but most of us aren't going to keep that USB drive plugged in forever. Let's make it possible to boot El Capitan independently by reinstalling Clover on it.
Go back up to the Install Clover on Your USB Drive section and follow the steps again, but this time, select your El Capitan volume instead of the USB drive.
Once again, copy the essential kexts to the EFI partition that shows up after installing Clover.
Finally, make sure to add Clover EFI boot options which is possible by pressing Clover Boot Options in the Clover boot window (if there are 2 boot options -- find the one for your SATA drive). I literally spent 3 hours figuring out why Clover would not boot when I disconnected the USB drive before I figured out that I need to manually add the EFI boot options.
Now you'll be able to boot directly from the El Capitan hard drive, as it should be!
Audio and Networking
If you're lucky, audio and networking will work right out of the box. If not, you're on your own from here. You'll need to research your exact hardware (by using System Information in Applications/Utilities) and searching Google to find the right kext or installer to make it work on El Capitan.
Clover Themes
Boot Disk Wiki
The default Clover theme is pretty ugly (no offense). Check out this theme database to improve Clover's appearance.
This is YosemiteLogin by xenatt:
Enjoy!

That's it! Enjoy your new Hackintosh, and if you absolutely love it, consider buying a Mac!
0 notes
Text
Os X 10.11 El Capitan Installer
Os X 10.11 El Capitan Installer
El Capitan Os X Download
Mac Os X 10.11 El Capitan Installer
Download Capitan 10.11 Install
Download the DMG file without app store
Download El Capitan Dmg Os X 10.11 Installer Iso Bootable
This update is recommended for all OS X El Capitan users. The OS X El Capitan v10.11.6 Update improves the stability, compatibility, and security of your Mac, and is recommended for all users. This update: Resolves an issue that may prevent settings from being saved in accounts with parental controls enabled. DVD DL, Mac OS X 10.11 El Capitan Full OS Install Reinstall Recovery Upgrade. Latest certificate (expires ). Please CHECK twice if your Mac model is compatible with this macOS!! If you are not 100% sure please check the pics or message me your mac model and year and I.
Yes it is possible. El Capitan Download for the 10.11 version dmg file is available even without the apple app store. You can download the el capitan.dmg installer from the torrent downloads. You can do this simply without using the apple store for El Capitan Download process.
Set the Name to El Capitan. Set the Format to OS X Extended (Journaled). Set the Scheme to GUID Partition Map. Click Erase to format the drive. Install OS X to the Target Drive. Exit the Disk Utility and click Install OS X. Click Show All Disks and select the drive you just formatted to install OS X on it. Finally, click Install. Mac OS X El Capitan 10.11.6 Free Download Download Mac OS X El Capitan 10.11.6 latest version DMG bootable image setup by clicking the below button. It is a reliable operating system with support for all the latest devices and different enhancements.
In case you have OS X Snow Leopard or Lion, but want to upgrade to macOS High Sierra, follow the steps below: To download Mac OS X El Capitan from the App Store, follow the link: Download OS X El Capitan. On the El Capitan, click the Download button. Next, a file Install OS X El Capitan will download into the Applications folder. Official OS X El Capitan Installer from the Mac App Store.Un-archive the zip archive and you will get the app Installer. A bootable ISO or bootable USB can be.
Download El Capitan Download
What you to do is just download the dmg file for el capitan 10.11 and convert the file to a iso file on el capitan. This is a better and a fabulous solution which is available for the both competitive operating systems the windows operating system and the apple os x.
One method is to straight away download the El Capitan Download app from the apple app store. You should download the 10.11 version for el capitan. Then as the next step is set the location on where you have to get insatllESD.dmg file from installer which is in the applications folder.
Second method is you can perform the El Capitan Download for version 10.11 which is the dmg file from the torrent server. In this method you don’t need to use the apple app store for the download process.
Download the el capitan from torrent
When you choose this method which is via the torrent servers, you should follow the below rules.
First download the dmg file from torrent.
Then convert the dmg file to an iso file. You can do this by powerISO in the windows operating system.

Next you have to make a usb installer on el capitan 10.11. follow the below steps:
Run the diskmaker x, select the el cpitan for the version on making boot disk.
Select it and then install the file.
Navigate to el capitan installer and select it.
Click on 8GB pen drive
Select for the correct pen drive and select on choose this disk.
Click erase and then create it.
Select continue, type the password.
Ok now it is completed.
Download El Capitan.dmg - Os X 10.11 Installer.iso
Os X 10.11 El Capitan Installer
If you’re bored of working macOS Catalina, macOS Mojave, and want to try a different version of macOS. But are confused which version of macOS should I choose and try, accidentally macOS X El Capitan attracts you. So let’s get to know about macOS X El Capitan and its features. Here’s how to download Mac OS X El Capitan DMG file also.
Download El Capitan Dmg Os X 10.11 Installer Iso 64-bit
macOS X El Capitan is a stable version of OS X and it is quite different and known as the advanced version of Mac. This operating system contains countless supplements and a variety of work capacities. In this launch, Apple primarily concentrated on compatibility, security, and stability. The consistent updates made El Capitan more reliable than other OS X.
From every perspective, macOS El Capitan is a powerful version of macOS. There are really much features such as numerous new updated components and fixes and updates for mailboxes in Mail, numerous issue fixes, and lots of other which carries lots of improvements for Mac operating system, and a new system font, split-screen view, changes to the mission Control Window Manager, improvements to the Spotlight search, fix mail sending problem. Let’s download Mac OS X El Capitan DMG file.
Related:Download macOS Catalina DMG File – (Direct Links)
Mac OS X El Capitan Features
Download El Capitan Dmg Os X 10.11 Installer Iso Download
The macOS Catalina features are ready to use once you install macOS X El Capitan. Then you can enjoy macOS El Capitan features and new updates. The list of features are as excellent protection, performance, and usability of OS X. Problem-solving, and improve features. Provides excel adaptability with Microsoft Office 2016. Improvements for different audio plugins and Voice Over security. Various improvements for Maps, Safari, and Notes. Over 150 new emoji styles are added.
There are also more useful features which are improved like Photo, Safari, and more. Which are only usable when you install and use this operating system. Now we will download Mac OS X El Capitan DMG file.
Related:Download macOS High Sierra DMG File – (Direct Links)
Download Mac OS X El Capitan DMG File – (Direct Links)
Download Mac OS X El Capitan DMG File – (Direct Links)
El Capitan Os X Download
However, for downloading macOS X El Capitan, if you’ve an old version of macOS X, you can probably download macOS X El Capitan from the App Store. Otherwise, you can’t download macOS X El Capitan from the Store since it’s not available there.
If you’ve installed the older version of macOS, then you can also upgrade to macOS El Capitan but requires a few things. The requirement is as at least 2GB of memory and 8.8GB of available storage space. You can also upgrade to OS X El Capitan from OS X Snow Leopard or later on, however, you can also download macOS Catalina DMG file.
One important thing which is very necessary is for the download process, to check your internet connection. If you have a stable internet connection you can easily download El Capitan DMG and the download process will not take your much time. Just download Mac OS X El Capitan DMG file.
Related:Download macOS Mojave DMG File – (Direct Links)
If you have checked and covered the requirements, you are ready to download the macOS X El Capitan DMG file. For downloading macOS X El Capitan, simply click the link below we have provided.
Mac Os X 10.11 El Capitan Installer
macOS X El Capitan Final DMG – This is the direct link for downloading macOS X El Capitan DMG which is only for Mac users and you can also download macOS X El Capitan DMG from Windows or Linux. This is download Mac OS X El Capitan DMG file.
You can download this file as easy as clicking on the link and this file isn’t available on the App Store as you typically search for macOS X El Capitan. In terms of installing, there are no specific requirements so after you’ve the file, you can install it instantly.
The reason OS X El Capitan is still in approach for Mac users. That’s not because it’s useful, but its also a way for unsupported Macs to download and install this version since they can’t install macOS Catalina and newer versions. But if your running macOS Catalina, macOS Mojave, or macOS High Sierra so you can easily download and install macOS X El Capitan on your Mac with download Mac OS X El Capitan DMG file.
Install Mac OS X El Capitan
With these up points, Mac OS X El Capitan might have made the idea of how much useful still it is like Windows 7. Though Windows stopped support for Windows 7, Windows users still like and install it as backup and even as their actual operating system to work. That’s because it’s fast, easy and doesn’t require much power, resource, high amount of disk space and other resources.
Download El Capitan Dmg Os X 10.11 Installer Iso Installer
Related:How to Install macOS Catalina on VMware on Windows PC
After finding the file, if you’re going to install Mac OS X El Capitan on your Mac, take a backup of your personal files and folders. Once you’ve that, simply head to the installation and no need to worry more. This is the direct link of the Mac OS X El Capitan DMG file. As soon as you click the link, it will start the process.
Download Capitan 10.11 Install
I hope you’ve a better perspective of El Capitan now and I hope the file is approached to you with ease. We try hard to provide the most but easiest to serve services and never upset anyone. That was download Mac OS X El Capitan DMG file.
1 note
·
View note
Text
Minitool Partition Wizard Avis

I used this software to increase the space available on my system C: partition, and reduce the space on the backup D: partition. It is very easy to use. Just a matter of dragging and clicking, and the changes are done very quickly. The program also has the ability to create a bootable CD of the Partition Wizard.
Minitool Partition Wizard Vs Easeus
Minitool Partition Wizard 12 Free
Minitool Partition Wizard Avis Deces
MiniTool Partition Wizard is a well-known partition manager. This article guides you how to make a MiniTool Partition Wizard bootable USB from its ISO file.
MiniTool Partition Wizard is one of the best disk cloning programs available for Windows. If you need to back up or upgrade hard drives, you won’t have to spend hours reinstalling operating systems. MiniTool Partition Wizard Registration Key code mac can convert disk type between MBR and GPT without data loss to support 3TB hard disk. In addition, they can convert FAT / FAT32 into NTFS without disk command and convert NTFS to FAT 32 without fixes. MiniTool Partition Wizard Technician Edition is a powerful tool designed to help professionals to easily manage multiple computers from a single interface. The application comes with a variety of. MiniTool Partition Wizard is a free to use disk partition and management tool which runs within Windows. All of the basic partitioning tools such as the creating, resizing and deleting of partitions are included in addition to many more advanced features such as specialist data and partition recovery tools.
MiniTool Partition Wizard Bootable ISO
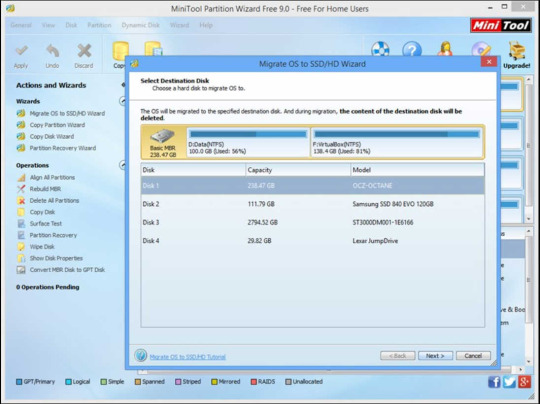
Since version 10, the MiniTool Partition Wizard Bootable version uses the WinPE platform. MiniTool Partition Wizard 9.1 and earlier versions use Linux. By using AIO Boot, you can easily integrate both versions into a single USB drive.
MiniTool Partition Wizard 9.1 Bootable ISO:
MiniTool Partition Wizard 9.1 uses Linux, quite light and boots quite fast. You can download its ISO file for free, the file names are pwfree91-x64.iso and pwfree91-x86.iso.
MiniTool Partition Wizard Bootable 10.2:
MiniTool Partition Wizard Free Edition 10.2 does not support the option of creating bootable USB and CDs as well as exporting ISO files. You need to upgrade to Professional Edition or higher version to do this.
Minitool Partition Wizard Vs Easeus
Professional + Lifetime Upgrade – Buy it.
Professional + Boot Media Builder – Buy it.
Server + Bootable Media Builder – Buy it.
Server + Lifetime Upgrade – Buy it.
Enterprise + Boot Media Builder – Buy it.
Enterprise + Lifetime Upgrade – Buy it.
Technician + Lifetime Upgrade – Buy it.
Features not supported in Free Edition:
Change Cluster Size
Recover Lost/Deleted Partition
Convert NTFS to FAT32
Convert Dynamic Disk to Basic
Copy OS from MBR to GPT Disk
Convert OS Disk to GPT Disk
Migrate OS from MBR to GPT Disk
Manage Dynamic Volume
Change Partition Serial Number
Change Partition Type ID
Win-PE Based Bootable Media
You can choose another software to use for free, AOMEI Partition Assistant with WinPE version, it’s free.

Make a MiniTool Partition Wizard bootable USB
By using AIO Boot, you can make a bootable USB easily, supporting multiple ISO file versions integration, and support both UEFI and Legacy.
Here are the simplest steps:
Minitool Partition Wizard 12 Free
Run AIOCreator.exe and switch to Integration.
For versions 10, 10.2.3, and future versions, select Windows and WinPE 7/8.1/10 in the drop-down list. For version 9.1 and above, select Disk Utilities and then select MiniTool Partition Wizard 9.1.
Click the “…” button to select the ISO file and then click OK to integrate.
Minitool Partition Wizard Avis Deces
You can integrate a lot of ISO files of the versions, just repeat the steps above if you want to integrate a new version.
1 note
·
View note
Text
Mac Os X El Capitan Bootable Usb From Windows
These advanced steps are primarily for system administrators and others who are familiar with the command line. You don't need a bootable installer to upgrade macOS or reinstall macOS, but it can be useful when you want to install on multiple computers without downloading the installer each time.
Install Mac Os On Usb
Mac Os X El Capitan Bootable Usb From Windows
Jul 12, 2021 Select Disk X (X stands for the USB drive name that appears after the previous command) Clean Convert GPT Create partition primary. Part 4: Boot Mac from macOS USB Drive for Installation. Now remove the USB drive and insert it into the Mac computer. To boot from the disk, you need to hold down the option key when you hear the boot chime. Mac OS X El Capitan ISO – Download Mac OS El Capitan ISO Setup Files Free: The MacBook and the Apple’s Mac are the second most widely used and famous portable Computers. The first place is occupied by the Family of Windows Computers, this is due to their cheaper prices, and ease of access. When the OS X El Capitan and Unibeast downloaded, open Disk Utility and click Erase then.
What you need to create a bootable installer
A USB flash drive or other secondary volume formatted as Mac OS Extended, with at least 14GB of available storage
A downloaded installer for macOS Big Sur, Catalina, Mojave, High Sierra, or El Capitan
Download macOS
Download: macOS Big Sur, macOS Catalina, macOS Mojave, or macOS High Sierra These download to your Applications folder as an app named Install macOS (version name). If the installer opens after downloading, quit it without continuing installation. To get the correct installer, download from a Mac that is using macOS Sierra 10.12.5 or later, or El Capitan 10.11.6. Enterprise administrators, please download from Apple, not a locally hosted software-update server.
Download: OS X El Capitan This downloads as a disk image named InstallMacOSX.dmg. On a Mac that is compatible with El Capitan, open the disk image and run the installer within, named InstallMacOSX.pkg. It installs an app named Install OS X El Capitan into your Applications folder. You will create the bootable installer from this app, not from the disk image or .pkg installer.
Use the 'createinstallmedia' command in Terminal
Connect the USB flash drive or other volume that you're using for the bootable installer.
Open Terminal, which is in the Utilities folder of your Applications folder.
Type or paste one of the following commands in Terminal. These assume that the installer is in your Applications folder, and MyVolume is the name of the USB flash drive or other volume you're using. If it has a different name, replace MyVolume in these commands with the name of your volume.
Big Sur:*
Catalina:*
Mojave:*
High Sierra:*
El Capitan:
* If your Mac is using macOS Sierra or earlier, include the --applicationpath argument and installer path, similar to the way this is done in the command for El Capitan.
After typing the command:

Press Return to enter the command.
When prompted, type your administrator password and press Return again. Terminal doesn't show any characters as you type your password.
When prompted, type Y to confirm that you want to erase the volume, then press Return. Terminal shows the progress as the volume is erased.
After the volume is erased, you may see an alert that Terminal would like to access files on a removable volume. Click OK to allow the copy to proceed.
When Terminal says that it's done, the volume will have the same name as the installer you downloaded, such as Install macOS Big Sur. You can now quit Terminal and eject the volume.
Use the bootable installer
Determine whether you're using a Mac with Apple silicon, then follow the appropriate steps:
Apple silicon
Plug the bootable installer into a Mac that is connected to the internet and compatible with the version of macOS you're installing.
Turn on your Mac and continue to hold the power button until you see the startup options window, which shows your bootable volumes.
Select the volume containing the bootable installer, then click Continue.
When the macOS installer opens, follow the onscreen instructions.
Intel processor
Plug the bootable installer into a Mac that is connected to the internet and compatible with the version of macOS you're installing.
Press and hold the Option (Alt) ⌥ key immediately after turning on or restarting your Mac.
Release the Option key when you see a dark screen showing your bootable volumes.
Select the volume containing the bootable installer. Then click the up arrow or press Return. If you can't start up from the bootable installer, make sure that the External Boot setting in Startup Security Utility is set to allow booting from external media.
Choose your language, if prompted.
Select Install macOS (or Install OS X) from the Utilities window, then click Continue and follow the onscreen instructions.
Learn more
A bootable installer doesn't download macOS from the internet, but it does require an internet connection to get firmware and other information specific to the Mac model.
For information about the createinstallmedia command and the arguments you can use with it, make sure that the macOS installer is in your Applications folder, then enter the appropriate path in Terminal:
If your Mac suddenly refuses to boot up properly, you might need a bootable macOS USB installer to make repairs. But how do you create such a disk if all you're left with is a Windows 10 computer? Fortunately, there's a great tool that you can use for free to create bootable macOS media on a USB drive in a Windows 10 environment. This article shows you how to download a macOS DMG file, format a USB drive using a GUID Partition Table, burn the DMG to the drive and boot your Mac from the USB. All the steps except the last one are done on a Windows 10 machine.
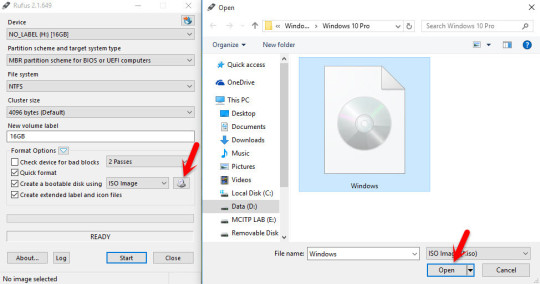
Part 1: Download macOS or Mac OS X DMG File
The first step is to get the DMG disk image file for the version of macOS that you want. You can get a copy of the latest macOS version from Apple download portal or App Store here. There are also several other direct download sites that offer various versions of Mac OS X in DMG format rather than the standard APP format that runs on Mac. Since you're working in a Windows environment, you need the DMG rather than the APP file.
macOS DMG Download Link:
Part 2: Easily Create a Bootable macOS USB from Windows 10/8/7 PC
You have now formatted the partition of USB drive. It's time to download UUByte DMG Editor for Windows. Although this is a premium software, you can use the initial free trial period to create a bootable macOS USB on Windows 10. After installing the application, follow the sequence of steps shown below:
Updates (Dec 8, 2020): The latest version of UUByte DMG Editor is able to format the USB automatically.
Step 1: Right-click the software icon on desktop and select 'Run as Administrator' from the contextual menu. Choose 'Run' when prompted.
Step 2: Insert your formatted USB drive, and click 'Burn' tab on the main screen.
Step 3: Click 'Browse' button to import macOS dmg file into the program. And select the USB drive name from the second row. You can also set a volume labe for that USB drive.
Step 4: Click 'Burn' button at the bottom to start the process. You will see a progress bar and wait around 10 minutes to get it done.
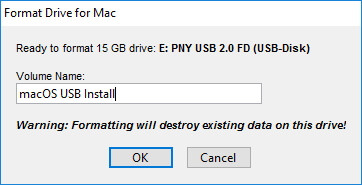
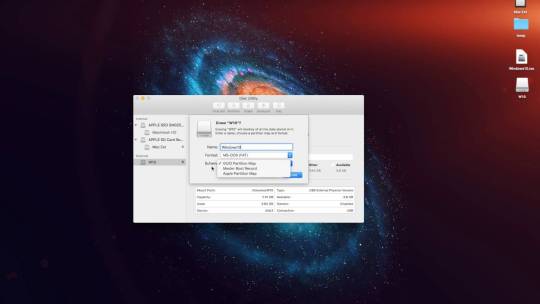
Step 5: Once the progress bar is at 100%, a bootable macOS USB is ready. After that, you can use that USB drive for installing macOS.
This is one of the easiest way to create a bootable macOS USB on a Windows PC. The steps are simple and instructions are pretty clear.
Part 3: Format USB Drive to GPT If Failed
If the USB drive created in above step was not seen as a bootable device on your Mac, then you need to take an addtional step before burning. That's formatting the USB to GPT.
Mostly, the USB drive was formmated to FAT32 in default when being shipped out from the factory. However, FAT32 can be only used for installing OS with legacy BISO, which doesn't work for macOS. So the next step is to format your USB drive in the GPT partition style in order to burn installation files to the desired USB drive. You can do this in Command Prompt as admin. In elevated Command Prompt (Ctrl+Shift+Enter), input the following series of commands followed by Enter after each line: Diskpart List disk Select Disk X (X stands for the USB drive name that appears after the previous command) Clean Convert GPT Create partition primary
Part 4: Boot Mac from macOS USB Drive for Installation
Now remove the USB drive and insert it into the Mac computer. To boot from the disk, you need to hold down the option key when you hear the boot chime. This will take you to the Startup Disk Manager, where you should be able to see the USB drive. It might have a different name, but as long as it is bootable, you'll be able to see it there. Once you select it, the computer will boot from the disk and the macOS installation will begin.
Troubleshooting
Flashing Error: You might receive a flashing error message at the end of burning process. Please don'y worry and ignore this error. The USB becomes a bootable disk and you can use it to install macOS even this error pops up.
About Official EI Capitan DMG: There has a serious bug in the official release of OS X El Capitan, which contains .pkg installer only. The burning process will fail for sure. Please use this modified EI Capitan DMG file instead, which was approved a good option.
Registration Failed: Please make sure the computer is connected to Internet and no proxy or VPB is running during registration. If the problem still exists, please send an email to support team asking for a new code.
Install Mac Os On Usb
Conclusion
Mac Os X El Capitan Bootable Usb From Windows
The whole process might look a bit complicated if this is your first time, but just follow the instructions in this article and you should be fine. That being said, you need to be careful when downloading the DMG file and formatting your USB drive. If you don't do these two steps correctly, the output drive from the UUByte DMG Editor software won't be bootable, which means you can't install macOS from that USB drive, and you may need to do the whole thing over again.
0 notes
Text
Bootable Installer Catalina
And that should be it – your old Mac should boot straight into Catalina, and this should be a persistent install. If something went wrong, though, it's worth trying a different version of the patching tool from dosdude1.com; some of these apps are quite old, and maintenance appears to be pretty patchy. To make a bootable copy of the MacOS Catalina installer follow these steps. First, use the direct download link which should open in the App Store. Click 'Get' in order to begin the download. Second, when the download finishes, you can follow the instructions if needed on how to make a bookable MacOS installer for Catalina.
In previous tutorial, we wrote a post about creating macOS Catalina bootable USB on Mac, which is a simple tool and there are a couple of free tools to complete the task. You can even use the built-in tool Disk Utility and dd command to do it without installing any third-party apps. However, the situation is much different on Windows 10 because macOS install file (end with .dmg) is not supported by Windows OS. Unlike ISO image, there are few tools on Windows that can handle .dmg files. That's the most challenging part!
So in this article, we will show you how to create macOS bootable USB on Windows 10 and targets macOS Catalina specifically, which is the latest version of Apple macOS and it is easy to download the install file. This will be a great help if there were something wrong with your Mac and a fresh install was demanded. Also if you were a Mac enthusiast and can not afford the price, then it is not a bad choice to build a hackintosh with Catalina.
Before heading to the details of each method, please make sure you have downloaded a copy of Catalina OS dmg file and a working USB drive with more than 12GB storage.
Method 1: Create macOS Catalina Bootable USB on Windows 10 via DMG Editor
Create Bootable Installer Mac Catalina

There are more than one solutions to create macOS Catalina Bootable USB on Windows 10 and we will go with easy one first. DMG Editor, a popular app developed by UUByte, is a multi-functional and cross-platform image burning tool that works on Windows, Linux and macOS. It supports creating bootable USB from popular image files, including dmg, iso, zip, img. And it has full support for Linux distros and old versions of Windows OS. macOS support was not available in previous versions. But now, the latest version of DMG Editor adds better support for macOS dmg file. Let's get a try first.
Step 1.Go to UUByte official website and download Windows version of Etcher from there.
Step 2. Run the executable file and complete the installation process. After that, insert an USB drive in Windows 10.
Step 3. Open the installed UUByte DMG Editor by double-clicking on the icon shown on your home screen. Click on the 'Burn' option then. After that, add Catalina .dmg file to the software and click on 'Change' button to choose the inserted USB device.
Step 4. Finally, click on the 'Burn' button to start the dmg burning process. At this time, a progress bar is displayed on the screen and it gives you an estimated calculation for the time remaining.
Create Bootable Catalina Installer
Step 5. Wait about 10 minutes. It will show you a pop-up message after completing the task successfully.
The process is very quick and easy to execute. But you might have issues running Etcher app on old computers with low profile hardware. Etcher GUI is built primarily on a new Javascript framework called Electron , which consumes a lot of computing resources. So if you were going to use Etcher to create macOS Catalina bootable USB, make sure testing it on a high-profile Windows 10 PC or laptop.
Method 2: Convert .dmg to .iso and Create macOS Catalina Bootable USB
Bootable Installer Catalina
macOS Catalina install image is distributed in .dmg format and Windows 10 has no support. Hen it is almost impossible to read such files in conventional ways. So in this part, we will convert macOS Catalina dmg file into ISO and create a bootable installer by burning the ISO file to USB. This can be done with the help of third-party software.
To execute the method, you need two software. First, you need a special software to convert dmg to ISO. Second, an ISO to USB burning software to make bootable USB from ISO file. To demonstrate, we have used 7 PowerISO & UUByte ISO Editor to create macOS Catalina bootable USB from Windows 10.
Step 1: Download and install PowerISO on Windows 10.
Step 2: Insert your USB drive. Right-click on this peripheral device and choose the option to format it. After a few seconds, you will get the notification of completing the format process.
Step 3: Now, open PowerISO and navigate to Tool menu. From the pop-up list, please click the 'Convert' option.
Step 4: In a pop-up window, click the folder icon to add macOS Catalina dmg file in Source file field. And set an output file name under Destination file section. Next. choose Standard ISO Images (.ISO) from Output image file format.
Step 5: When the ISO file is created successfully. Download and install UUByte ISO Editor. Then click Burn button to open ISO burning Window. Next, add ISO file to the program and select the USB name. Wait for 7 minutes, and a bootable USB is ready!
Step 6: After getting a task completion message on screen, eject the USB and then start installing macOS Catalina from the USB drive.
The solution is simple but may need to purchase a couple of tools for executing the steps. But if you will search smartly on the internet, chances are there that you can get the required tools without paying any cost. However, if you want to bypass using any of the third-party tools, you can create the Catalina OS bootable USB by accessing macOS in a virtual machine.
Method 3: Use TransMac to Create macOS Catalina Bootable USB in Windows 10
TransMac is a single-purpose utility to open Mac disk image from a Windows PC. It's one of the quickest methods to create macOS bootable USB drive from dmg file. However, the support for Catalina is not good as Mojave and High Serrira. Plus, you have to pay for 59 USD to use the burn feature. That's why we mention this app at the end of this post.
Step 1: Download TransMac from the official site and run the .exe file to complete the installation process.
Step 2: Now plug in a USB device into the port. Now right-click on TransMac icon shown on the home screen and then choose to Run as administrator.
Step 3: After landing inside the tool's window, all disk drives will be displayed on the left side automatically. Click File -> Open Disk Image to load macOS Catalina dmf file into the program.
Step 4: Before proceeding further, you need to format your USB device to make it compatible with Mac HFS or APS partition. For doing the same, click on the 'Format Diks for Mac' option. Wait for 30 seconds to complete the process.
Step 5: Right-click on the selected USB disk. From the shown list, click on 'Restore with Disk Image'. If it shows any warning message, just click on the OK button to accept.
Step 6: After that, select the location of saved Mac OS Catalina DMG file and then click on the OK button. Now stay back and look after 20 minutes. You will get ready with a bootable Catalina USB.
TransMac is one of the easiest method to create a bootable macOS Installer USB on a Windows PC. You can use this application to burn any version of macOS operating system file to USB.
Conclusion
To conclude, we would recommend going with either the first or the second method to create bootable macOS Catalina USB. Both are super easy to follow because you don't need to install multiple tools and go through a multi-layer process to meet your requirement.
These advanced steps are primarily for system administrators and others who are familiar with the command line. You don't need a bootable installer to upgrade macOS or reinstall macOS, but it can be useful when you want to install on multiple computers without downloading the installer each time.
What you need to create a bootable installer
A USB flash drive or other secondary volume formatted as Mac OS Extended, with at least 14GB of available storage
A downloaded installer for macOS Big Sur, Catalina, Mojave, High Sierra, or El Capitan
Additionally, the USB drive you expect to boot from. “Make Bootable USB Drive” click “” tab to open the iso record of the Windows working framework. Select the right USB drive from the “Goal USB Drive” list if various USB drives are associated with the PC. Pick the best possible composing strategy. “USB-HDD” is suggested. The first idea of creating macOS bootable USB from Windows using BDU isn’t like this. But there’s another author who also has the same idea but use the different tools. What I mean is the idea of using 7-Zip and Paragon Hard disk Manager, the credit of reference source is goes to OSX Arena. If you have more than one Mac you want to upgrade to macOS 10.15 Catalina but don't want to waste so much bandwidth downloading it for each machine, one option is to create a bootable installer on.
Create Bootable Usb Catalina
Download macOS
Nov 06, 2020 A bootable USB is super convenient to have on hand if you need to install or repair an operating system on your computer. You can easily make your own bootable USB that’s equipped with the operating system of your choosing. Whether you’re using Windows or a Mac, we’ll walk you through the process step-by-step.
Jul 14, 2020 Bootable USB installers offer an easy way to upgrade multiple Macs to macOS Catalina, to perform clean installs of MacOS Catalina, to perform maintenance from a boot disk like formatting disks, modifying disk partitions, and performing restorations, and much more. We’ll walk through how to create a boot USB install drive for MacOS Catalina 10.15.
Download: macOS Big Sur, macOS Catalina, macOS Mojave, or macOS High Sierra These download to your Applications folder as an app named Install macOS (version name). If the installer opens after downloading, quit it without continuing installation. To get the correct installer, download from a Mac that is using macOS Sierra 10.12.5 or later, or El Capitan 10.11.6. Enterprise administrators, please download from Apple, not a locally hosted software-update server.
Download: OS X El Capitan This downloads as a disk image named InstallMacOSX.dmg. On a Mac that is compatible with El Capitan, open the disk image and run the installer within, named InstallMacOSX.pkg. It installs an app named Install OS X El Capitan into your Applications folder. You will create the bootable installer from this app, not from the disk image or .pkg installer.
Use the 'createinstallmedia' command in Terminal
Make Bootable Catalina Installer
Connect the USB flash drive or other volume that you're using for the bootable installer.
Open Terminal, which is in the Utilities folder of your Applications folder.
Type or paste one of the following commands in Terminal. These assume that the installer is in your Applications folder, and MyVolume is the name of the USB flash drive or other volume you're using. If it has a different name, replace MyVolume in these commands with the name of your volume.
Big Sur:*
Catalina:*
Mojave:*
High Sierra:*
El Capitan:
* If your Mac is using macOS Sierra or earlier, include the --applicationpath argument and installer path, similar to the way this is done in the command for El Capitan.
After typing the command:
Press Return to enter the command.
When prompted, type your administrator password and press Return again. Terminal doesn't show any characters as you type your password.
When prompted, type Y to confirm that you want to erase the volume, then press Return. Terminal shows the progress as the volume is erased.
After the volume is erased, you may see an alert that Terminal would like to access files on a removable volume. Click OK to allow the copy to proceed.
When Terminal says that it's done, the volume will have the same name as the installer you downloaded, such as Install macOS Big Sur. You can now quit Terminal and eject the volume.
Use the bootable installer
Determine whether you're using a Mac with Apple silicon, then follow the appropriate steps:
Apple silicon
Plug the bootable installer into a Mac that is connected to the internet and compatible with the version of macOS you're installing.
Turn on your Mac and continue to hold the power button until you see the startup options window, which shows your bootable volumes and a gear icon labled Options.
Select the volume containing the bootable installer, then click Continue.
When the macOS installer opens, follow the onscreen instructions.
Intel processor
Plug the bootable installer into a Mac that is connected to the internet and compatible with the version of macOS you're installing.
Press and hold the Option (Alt) ⌥ key immediately after turning on or restarting your Mac.
Release the Option key when you see a dark screen showing your bootable volumes.
Select the volume containing the bootable installer. Then click the up arrow or press Return. If you can't start up from the bootable installer, make sure that the External Boot setting in Startup Security Utility is set to allow booting from external media.
Choose your language, if prompted.
Select Install macOS (or Install OS X) from the Utilities window, then click Continue and follow the onscreen instructions.

Learn more
For more information about the createinstallmedia command and the arguments that you can use with it, make sure that the macOS installer is in your Applications folder, then enter the appropriate path in Terminal:
Bootable Catalina Usb Not Working
Macos Catalina Bootable Installer
Big Sur: /Applications/Install macOS Big Sur.app/Contents/Resources/createinstallmedia
Catalina: /Applications/Install macOS Catalina.app/Contents/Resources/createinstallmedia
Mojave: /Applications/Install macOS Mojave.app/Contents/Resources/createinstallmedia
High Sierra: /Applications/Install macOS High Sierra.app/Contents/Resources/createinstallmedia
El Capitan: /Applications/Install OS X El Capitan.app/Contents/Resources/createinstallmedia
Bootable Usb Windows 10
A bootable installer doesn't download macOS from the internet, but it does require an internet connection to get firmware and other information specific to the Mac model.
Bootable Usb Installer Catalina
0 notes
Text
Download Mac Os Mountain Lion Dmg Free

Click on the button given below to download Mac OS X Lion 10.7.5 DMG free. It is a complete offline setup of Mac OS X Lion 10.7.5 with the direct download link. You can also download Mac OS X Mountain Lion 10.8.5 For Latest Premium Android APK Visit www.allapkworld.com.
Mac Os Mavericks
Mac Os Mountain Lion Download
quoz.netlify.com › ▄ ▄ ▄ Download Mac Os Lion Dmg ▄ ▄ ▄
May 30, 2020 Mac OS X Lion is a seventh powerful and major release of Mac OS X. It is a standalone Bootable DVD DMG Image installer of Lion OS X. Mac Os X Mountain Lion 10.8.4 Dmg Free Mac OSX Lion Overview. Apple has introduced many operating systems, Mac OS X is one of the powerful and stable releases from Apple.
Sep 18, 2017 Download Mac OS X Mountain Lion 10.8.3 DMG free standalone complete image for 32-bit and 64-bit. Mac OS X Mountain Lion V10.8.3 is a very powerful and reliable Macintosh Operating System for all the users. Sep 07, 2018 Coincidentally, the Mac OS X Mountain Lion download was the last paid upgrade to an OS X release.
Mac OS X Mountain Lion Free Download. Get the latest 10.8.5 OS X Mountain Lion the newest version of the world’s most advanced desktop operating system. It has over 200 new features that update the Mac and make it the best computer there is. Download Mac OS X Mountain Lion DMG File Installer for version 10.8. Free download and experience Apple's OS X 9th edition with brand new features.
You don't need to download Lion from the App Store because you can do a clean install starting from Recovery HD, holding Command and R keys while your Mac is starting > http://support.apple.com/kb/HT4718 After starting in Recovery, erase Macintosh HD in Disk Utility, close Disk Utility and reinstall OS X.
Oct 19, 2016 Mac OS X Lion Free Download. October 19, 2016 March 8, 2017 Muhammad. Mac OS X Lion is a seventh powerful and major release of Mac OS X. It is a standalone Bootable DVD DMG Image installer of Lion OS X. Mac OSX Lion Overview. Apple has introduced many operating systems, Mac OS X is one of the powerful and stable releases from Apple. Mar 25, 2019 Niresh Mac OSX Mountain Lion 10.8.5 ISO Category(Operating System)Niresh Mac OSX Mountain Lion 10.8.5 ISO Free Download Latest for Windows. It is full Bootable ISO Image of Niresh Mac OSX Mountain Lion for AMD & Intel. I bougth a Lion copy about a year ago. Now I want to do a clean install on my Mac so I've to download the dmg of Lion from App store. Anyway from App Store I can't no more find my Lion purchased copy.
However, it's better to make a bootable copy of your Lion installer onto a DVD or USB drive so you won't have to redownload Lion every time you want to reinstall it.
If you don't see Lion listed in purchases, check if it's hidden, and if so, unhide it > http://support.apple.com/kb/ht4928Do this before reinstalling OS X Lion from Recovery. After unhiding, go to Purchases and you will be able to download Lion. Then, use Lion Diskmaker to create a bootable DVD or USB drive with Lion > http://liondiskmaker.com
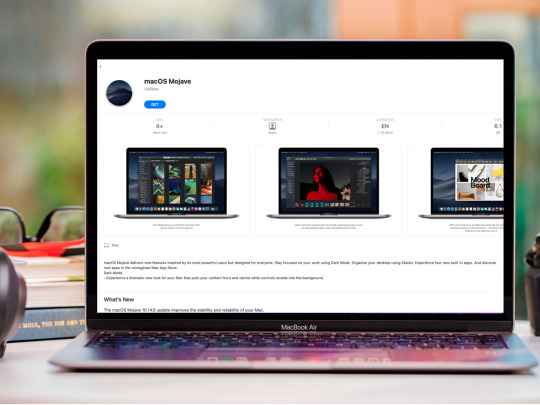
The DMG image format is by far the most popular file container format used to distribute software on Mac OS X. Here’s how to convert a DMG file into an ISO file that can be mounted on a Windows PC. Dmg file is the disc image file which is widely used by Mac systems. Most of Mac operating systems and applications are distributed in dmg files. On Windows PC, it is very convenient to manipulate dmg files with PowerISO. You can open dmg file, convert it to iso file, or burn it to a CD / DVD disc. Programs used to perform the conversion from exe file to dmg format. It looks like that the exe to dmg conversion is often sought by users that want to convert a Windows installer (usually.exe) to a Mac installer (often saved as.dmg or.app), so they can install Windows app on Mac. This is not possible. Jan 22, 2017 Well I Think I Know How To But I Need to Convert ALL The Files To A Disk Image (.dmg) And Then Package It Into A.app (Mac OS X Executable) Folder But How Would I convert Certain Files Like.bsa To A Disk Image. Aug 17, 2018 Programs used to perform the conversion from dmg file to exe format. A dmg to exe conversion is often searched by users that would like to convert an installer for macOS / OS X app (often saved as.dmg or.app) to installer usable on Windows (.exe,.msi etc.). This is not possible via some conversion utility and it is unlikely that some dmg to exe converter exists. How to convert dmg to exe.

Jul 18, 2013 5:58 AM
Download Mac Os X 10.7 Lion Installer
If you looking on the internet a Mac OS X Snow Leopard DMG File So, you come to the right place now a day shares with you a Snow Leopard DMG free download without app store direct link. Mac OS X 10.6.8 Snow Leopard is an upgrade version to the previous version of OS X Leopard. Mac OS launch many more cool features in this Snow Leopard to improve the work and enjoy Full Mac OS experience and also fixed all previous version Bugs and multimedia specially Improve to play and also recorded and as well audio and many official features listed below.
Users can use the built-in or external camera to create professional images, use backdrop effects and adjust focus, white balance and visibility. iChat comes with screen sharing and the media experience is enhanced with DVD player. This release contains many other applications to meet the day-to-day needs of users. The main thing about the operating system is that it is suitable for all the old and newest devices. In short, it’s a stable release for MAC OS X with a variety of powerful features.
Mac OS X Snow Leopard OverView:
It has come to light that an upgrade to the Mac Os X Snow Leopard would be a wise choice if your Mac is performing slowly and requires boosting, as this OS is meant to provide increased efficiency and automated drivers to the hardware you want to connect. The Mac OS X Lion system was experimented with, so this update has been eagerly awaited and OS enthusiasts are impressed to see the number of improvements they have ever wanted to see over the years. What I really like is the sophisticated user interface and the control of stacks.
Snow Leopard is one of the leading Mac systems that support all new devices and fixes. A slicker user interface that allows users to enjoy the features easily and cleanly. This multilingual operating system includes many powerful tools such as Photo Booth, Screen Sharing, Boot Camp, DVD Player, iChat, QuickTime and much more. The design of this operating system specifically pays attention to security. There are also several improvements and fixes to make this OS better than the previous versions.
Snow Leopard is one of Mac’s leading operating systems that support and fixes all latest devices. A sleeker user interfaces with a clean environment for users to enjoy the functionality without problems. This multi-lingual operating system offers several powerful instruments such as a photo booth, screen sharing, boot camp, DVD player, iChat and QuickTime. The design of this operating system is specifically based on safety. There are also several improvements and corrections to make this OS better than the previous versions. you can also check out the MacOS High Sierra DMG.
Features Of Mac Os X Snow Leopard
A vast array of improvements and technological advancements.
Equipped with hardware acceleration support.
New theme wallpapers are included.
A smoother way to control stacks.
Preview for applications and programs.
Functional enhancements are the major purpose for the release.
Documents stacking is pretty much improved.
No cap on upgrading from Mac the predecessor release.
The original finder is with much-improved functionality.
More stable and less frequent browsing system.
QuickTime X features a simplified GUI with a greater focus on codec support.
Finder has a new Cocoa Desktop Window and Contextual Menu.
Apple included a beta version of Safari 4 with Snow Leopard.
Mac users can now connect to Microsoft Exchange 2007 servers via Mail, Address Book, and iCal.
Installing Snow Leopard on multiple machines takes approx 15 minutes in comparison to around an hour for Leopard.
Much More………………/
Mac OS X Snow Leopard DMG Technical Setup Details
Software Full Name: Mac OS X Snow Leopard
Setup File Name: Mac_OS_X_Snow_Leopard_10_6_8_Official.iso
Full Setup Size: 5.07 GB
Setup Type: Offline Installer / Full Standalone Setup
Compatibility Architecture: 32 Bit (x86) / 64 Bit (x64)
Latest Version Release Added On: 14th Mar 2019
Download Mac Os X Lion Dmg
System Requirements For Mac OS X Snow Leopard v10.6
Download Mac Os Mountain Lion Dmg Free
8 GB free HDD
2GB RAM
Core 2 Duo Intel Processor
Download Free Mac OS X Snow Leopard V10.6.8 DMG
mno-ngm.netlify.com › Mac Os X Mountain Lion Installation Files Dmg Download █ █
Mac Os X Mountain Lion Installation Files Dmg Download
Download Mac OS X Mountain Lion DMG File Installer for version 10.8. Free download and experience Apple's OS X 9th edition with brand new features. Dec 18, 2019 Mac OS X Lion 10.7 ISO and DMG Files Free Download. Even though you’ve waited enough here, we know that wasn’t your genuine intent. Well, don’t worry (saying for the third time, as we mean it). On this web page you will find the Mac OS X Lion ISO files. And the best thing?
Mac Os X Mountain Lion Dmg File Download
Apple have always been impressing the crowd with their software and hardware enhancements over the year. To add a feather to that cap, Apple has redefined the operating system experience with the Mac OS X Mountain Lion 10.8.
Overview
The Mac OS X Mountain Lion released after being in the Beta version run for a very long time. The Mac OS X Mountain Lion is much more efficient and technologically sound enough to secure your data much stronger than the previous Mac OS Versions, claims Apple. The user interface is said to be improved and much sleeker in the aesthetic appeal.
License Official Installer
File Size 4.43GB
Language English
Developer Apple Inc.
Apple has made sure to take in the views and considerations of the Beta version users and the tweaks made through this update are a strong testimony to it. The environment is fabricated with a much easier user experience to tackle all the problems efficiently and smoothly. The Wi-fi performance is also tweaked up to give you seamless connectivity and improved upload and download speeds.
The Mac OS X Mountain Lion 10.8 also houses a better and stable operating system with its release so to give the user the hassle-free experience. There has been a lot of speculations that a huge amount of data can be sent over the internet before the release. Apple made that true with the release of the Mac OS X Mountain Lion 10.8.
Some of the very much looked up to feature in the Mac OS X Mountain Lion 10.8 is
1. Stable Operating System
The stability in the Operating system is a much looked upon the issue in the software framework of Apple. With tons of reviews and inputs from the user, Apple has finally cracked the code and has increased the stability of the operating system with the release of the Mac OS X Mountain Lion 10.8. The framework has been worked upon and the tiny attention to details has been given to enable the smoothest user experience for Apple.
2. Security Enhancements
There are also improved security enhancements with this update. Apple has been a company that always believes in keeping the security details and the privacy of its customers and has maintained the same till date. The more improved security enhancements in the Mac OS X Mountain Lion 10.8 update have been top-notch with more security beefed up for browsing, uploading data and as well as downloading data from the internet. The safety protocol involved with apple mail has also greatly improved.
3. Increased Performance of MacBook
Well the Mac OS X Mountain Lion 10.8 is the dawn update for MacBook users especially. Apple focused on decoding and solving the bugs that erupted among the various MacBook users with the Beta version release of the Mac OS X Mountain lion. The Mountain Lion OS also improved the user interface of the MacBook interface.
4. Sending Huge data over the internet
The Mac OS X Mountain Lion 10.8 had many expectations before its release out of which sending huge data over the internet was speculated. It was initially considered as a fan-made rumor but Apple made it a reality with the release of the Mac OS X Mountain Lion. Now wit the release of the Mac OS X Mountain lion, you can send huge amounts of data over the internet which was previously not allowed by the Apple Mac Servers as the Software couldn’t support such a feature with its previous OS versions.
5. Fixes for Screen Saver Issues and Smart Card
The issues that popped up with the previous Mac OS versions speculated a lot of commotion among the Apple users such that apple made it a top priority to make sure that they solved the issue with the next update. The screen saver framework was improved along with the issues that popped up with the Smart card as well. The improvements in these aspects made the Mac OS X Mountain Lion top of the game and well appreciated and welcomed by the users.
There are also many more features to add up to the mentioned features, the other upgrades are minute details and those improvements haven’t created a bigger impact on the user experience.
System Requirements of the Mac OS X Mountain Lion
Minimum RAM requirement of 2GB.
Free Hard Disk Drive of 8GB.
Intel Multi-Core processor.
Download Mac OS X Mountain Lion 10.8 ISO and DMG Image
The Mac OS X Mountain DMG file can be downloaded from the below link. The Mac OS X Mountain Lion is considered to be a very stable operating system and won’t be much of a trouble to the users. Make sure that the minimum system requirements are met. The File size is around 4.2 GB. You can also download the DMG file of various other operating systems from the ISO River website.
So, you’ve decided to download an older version of Mac OS X. There are many reasons that could point you to this radical decision. To begin with, some of your apps may not be working properly (or simply crash) on newer operating systems. Also, you may have noticed your Mac’s performance went down right after the last update. Finally, if you want to run a parallel copy of Mac OS X on a virtual machine, you too will need a working installation file of an older Mac OS X. Further down we’ll explain where to get one and what problems you may face down the road.
A list of all Mac OS X versions
We’ll be repeatedly referring to these Apple OS versions below, so it’s good to know the basic macOS timeline.
Cheetah 10.0Puma 10.1Jaguar 10.2Panther 10.3Tiger 10.4Leopard 10.5Snow Leopard 10.6Lion 10.7Mountain Lion 10.8Mavericks 10.9Yosemite 10.10El Capitan 10.11Sierra 10.12High Sierra 10.13Mojave 10.14Catalina 10.15
STEP 1. Prepare your Mac for installation
Given your Mac isn’t new and is filled with data, you will probably need enough free space on your Mac. This includes not just space for the OS itself but also space for other applications and your user data. One more argument is that the free space on your disk translates into virtual memory so your apps have “fuel” to operate on. The chart below tells you how much free space is needed.
Note, that it is recommended that you install OS on a clean drive. Next, you will need enough disk space available, for example, to create Recovery Partition. Here are some ideas to free up space on your drive:
Mac Os X Mountain Lion Installation Files Dmg Download Mac
Uninstall large unused apps
Empty Trash Bin and Downloads
Locate the biggest files on your computer:
Go to Finder > All My Files > Arrange by size Then you can move your space hoggers onto an external drive or a cloud storage. If you aren’t comfortable with cleaning the Mac manually, there are some nice automatic “room cleaners”. Our favorite is CleanMyMac as it’s most simple to use of all. It deletes system junk, old broken apps, and the rest of hidden junk on your drive.
Download CleanMyMac for OS 10.4 - 10.8 (free version)
Download CleanMyMac for OS 10.9 (free version)
Download CleanMyMac for OS 10.10 - 10.14 (free version)
STEP 2. Get a copy of Mac OS X download
Normally, it is assumed that updating OS is a one-way road. That’s why going back to a past Apple OS version is problematic. The main challenge is to download the OS installation file itself, because your Mac may already be running a newer version. If you succeed in downloading the OS installation, your next step is to create a bootable USB or DVD and then reinstall the OS on your computer.
How to download older Mac OS X versions via the App Store
If you once had purchased an old version of Mac OS X from the App Store, open it and go to the Purchased tab. There you’ll find all the installers you can download. However, it doesn’t always work that way. The purchased section lists only those operating systems that you had downloaded in the past. But here is the path to check it:
Mac Os Mavericks
Click the App Store icon.
Click Purchases in the top menu.
Scroll down to find the preferred OS X version.
Click Download.
This method allows you to download Mavericks and Yosemite by logging with your Apple ID — only if you previously downloaded them from the Mac App Store.
Without App Store: Download Mac OS version as Apple Developer
If you are signed with an Apple Developer account, you can get access to products that are no longer listed on the App Store. If you desperately need a lower OS X version build, consider creating a new Developer account among other options. The membership cost is $99/year and provides a bunch of perks unavailable to ordinary users.
Nevertheless, keep in mind that if you visit developer.apple.com/downloads, you can only find 10.3-10.6 OS X operating systems there. Newer versions are not available because starting Mac OS X Snow Leopard 10.7, the App Store has become the only source of updating Apple OS versions.
Purchase an older version of Mac operating system
Os X Snow Leopard
You can purchase a boxed or email version of past Mac OS X directly from Apple. Both will cost you around $20. For the reason of being rather antiquated, Snow Leopard and earlier Apple versions can only be installed from DVD.
Buy a boxed edition of Snow Leopard 10.6 Get an email copy of Lion 10.7 Get an email copy of Mountain Lion 10.8
Os X Lion
The email edition comes with a special download code you can use for the Mac App Store. Note, that to install the Lion or Mountain Lion, your Mac needs to be running Snow Leopard so you can install the newer OS on top of it.
How to get macOS El Capitan download
If you are wondering if you can run El Capitan on an older Mac, rejoice as it’s possible too. But before your Mac can run El Capitan it has to be updated to OS X 10.6.8. So, here are main steps you should take:
1. Install Snow Leopard from install DVD. 2. Update to 10.6.8 using Software Update. 3. Download El Capitan here.
“I can’t download an old version of Mac OS X”
If you have a newer Mac, there is no physical option to install Mac OS versions older than your current Mac model. For instance, if your MacBook was released in 2014, don’t expect it to run any OS released prior of that time, because older Apple OS versions simply do not include hardware drivers for your Mac.
But as it often happens, workarounds are possible. There is still a chance to download the installation file if you have an access to a Mac (or virtual machine) running that operating system. For example, to get an installer for Lion, you may ask a friend who has Lion-operated Mac or, once again, set up a virtual machine running Lion. Then you will need to prepare an external drive to download the installation file using OS X Utilities.
Burning yosemite dmg in el capitan. Apr 21, 2016 How do I burn a Disk Image in Mac OS X El Capitan? If you noticed recently, Mac OS X El Capitan has removed a lot of handy features from the Disk Utility program–one of them being the ability to burn disk images (DMG or IMG).
After you’ve completed the download, the installer should launch automatically, but you can click Cancel and copy the file you need. Below is the detailed instruction how to do it.
STEP 3. Install older OS X onto an external drive
The following method allows you to download Mac OS X Lion, Mountain Lion, and Mavericks.
Start your Mac holding down Command + R.
Prepare a clean external drive (at least 10 GB of storage).
Within OS X Utilities, choose Reinstall OS X.
Select external drive as a source.
Enter your Apple ID.
Now the OS should start downloading automatically onto the external drive. After the download is complete, your Mac will prompt you to do a restart, but at this point, you should completely shut it down. Now that the installation file is “captured” onto your external drive, you can reinstall the OS, this time running the file on your Mac.
Boot your Mac from your standard drive.
Connect the external drive.
Go to external drive > OS X Install Data.
Locate InstallESD.dmg disk image file — this is the file you need to reinstall Lion OS X. The same steps are valid for Mountain Lion and Mavericks.
How to downgrade a Mac running later macOS versions
If your Mac runs macOS Sierra 10.12 or macOS High Sierra 10.13, it is possible to revert it to the previous system if you are not satisfied with the experience. You can do it either with Time Machine or by creating a bootable USB or external drive. Instruction to downgrade from macOS Sierra
Instruction to downgrade from macOS High Sierra
A lot of efforts has been made on order to get it done. The approach towards public needs has also been the best when it comes to Apple, a good product becomes the best irrespective of the cost that some people criticize. Now go to the boot menu and install the Mac OS X TIGER ISO on your PC.There are demo videos available if any further assistance is required. Final Words.The Mac OS X TIGER is the best OS ever created by Apple as the company has admitted itself. Mac os x tiger install dvd free download windows 7.
Mac Os Mountain Lion Download
Instruction to downgrade from macOS Mojave
Instruction to downgrade from macOS Catalina
Before you do it, the best advice is to back your Mac up so your most important files stay intact. In addition to that, it makes sense to clean up your Mac from old system junk files and application leftovers. The easiest way to do it is to run CleanMyMac X on your machine (download it for free here).
Visit your local Apple Store to download older OS X version
If none of the options to get older OS X worked, pay a visit to nearest local Apple Store. They should have image installations going back to OS Leopard and earlier. You can also ask their assistance to create a bootable USB drive with the installation file. So here you are. We hope this article has helped you to download an old version of Mac OS X. Below are a few more links you may find interesting.
These might also interest you:
0 notes
Text
Mac Os Bootable Iso Download
Bootable Iso Windows 10
Mac Os Bootable Iso Download
Mac Os X Bootable Iso Download
Jul 12, 2021 This article shows you how to download a macOS DMG file, format a USB drive using a GUID Partition Table, burn the DMG to the drive and boot your Mac from the USB. All the steps except the last one are done on a Windows 10 machine. Part 1: Download macOS or Mac OS X DMG File. Mac iso bootable free download. Ventoy Ventoy is an open source tool that lets you create a bootable USB drive for ISO files.
Summary :
I was able to make a macOS Sierra external USB boot disk in a few minutes, and the installation worked without a hitch. Also works with older versions of OS X. Diskmaker X is a popular app. Jan 09, 2018 WizISO - Create Windows 10 Bootable USB on Mac OS X. Just 3 simple steps to burn ISO to USB/DVD on Mac OS X without getting errors. It combines 5 functions: Burn, Extract, Edit, Create and Copy Disc. It works for both GPT (UEFI boot) and MBR (legacy BIOS/CMS boot) modes. It supports all types of system files- FAT. FAT 32, and NTFS. Oct 17, 2019 This tutorial explains how to create a bootable Windows USB in macOS without any additional tools. The instructions are absolutely foolproof, no terminal is required and the resulting USB drive. Mac OS X provides all the tools needed to convert the ISO image to UDRW. The following command will convert the ISO image to the UDRW format. Hdiutil convert -format UDRW -o destinationfile.img sourcefile.iso You will notice that the destinationfile.img from the command will create the file destinationfile.img.dmg really. Mar 12, 2020 Use the 'createinstallmedia' command in Terminal. Connect the USB flash drive or other volume that you're using for the bootable installer. Make sure that it has at least 12GB of available storage. Open Terminal, which is in the Utilities folder of.
In order to install the Windows operating system or fix a broken Windows, a bootable USB flash drive is needed. How to create bootable USB from ISO Windows 10? A Windows 10 USB tool or USB bootable software will be introduced. Besides, the best way to protect the PC against system issues is also told to you.
It’s Necessary to Create Bootable USB from ISO Windows 10
As to Windows 10 OS, it has got more popularity due to its advantages, for example, reliability, better user experience, safety, etc. Therefore, most of you may have reserved a copy of the Windows 10 upgrade for your computers. But there may be some who may want to go for a clean install by using a Windows ISO image.
Besides, when there is something wrong with the operating system, you may also choose to reinstall Windows. Or, when getting a new PC without OS, you need to make a clean install. Additionally, to boot the non-working PC and perform a repair, you also need a Windows repair disc or USB drive.
To install the operating system or to create a rescue disc, it is a choice to burn the operating system into a CD or DVD disc. Though it is nothing hard, the method is clunky, expensive and no-so user-friendly when considering the CD/DVD writer and the cost of an actual CD/DVD disc. Thankfully, you can use a USB flash drive.
Tip: Sometimes your USB flash drive cannot be detected by Windows after connecting it to your computer. If so, refer to this article - Fix USB Flash Drive Not Recognized & Recover Data – How To Do to get the solutions.
In this post, we will show you how to download the ISO image, burn ISO to USB and create USB boot disk from ISO for Windows 10 installation. /mac-os-high-sierra-cant-eject-external-drive/.
How to Create Bootable USB from ISO Windows 10
When searching for “make bootable USB” on Google, you will find many ways. And here, we will show you 2 common ways for Windows bootable USB creation.
Way 1: Use Windows Media Creation Tool
Microsoft offers you a utility called Media Creation Tool, allowing you to download a Windows 10 ISO file compatible with your PC or directly create a bootable USB drive so as to install Windows 10. This is the easiest and reliable method. Just follow the step-by-step guide to make bootable USB from ISO.
Step 1: Go to Windows 10 download page and click Download tool now to get MediaCreationTool.exe.
Step 2: This is an independent executable file that doesn't need installation, so you can simply run the tool and create bootable USB from ISO. Just double-click on the .exe file and then accept the terms.
Step 3: Then, choose the Create installation media (USB flash drive, DVD or ISO file) for another PC option and click the Next button to continue.
Step 4: Then this tool will capture the language, Windows edition and architecture details from your Windows installation. Also, you can uncheck the option Use the recommendation for this PC and re-specify these details.
Step 5: In the following page, you can see two options: USB flash drive and ISO file. Here you can directly choose the former option and make bootable USB from ISO. Please ensure your USB has 8 GB capacity at least.
Tip: If you choose the option ISO file, it is also allowed. After clicking Next, you need to select a location to save the ISO file. And then, the tool will start to download Windows 10 and perform some operations. After that, you need to burn ISO file to USB drive and then create bootable USB from ISO.
Step 6: Select a USB flash drive and click Next to continue.
Note: The files on the USB drive will be deleted. Thus, you had better back up them to another safe location to keep these files. Here, the professional backup software, MiniTool ShadowMaker, will be helpful to back up files with ease.
Step 7: The tool is downloading Windows 10 to your selected USB. Please wait patiently.
Step 8: The tool is creating Windows 10 media, just be patient to wait.
Step 9: After a few minutes, your USB flash drive is ready. Click the Finish button at last.
Way 2: Download ISO File and Burn Windows ISO to USB
In addition, you can choose to download an ISO file of Windows 10 first of all and then use USB bootable software to burn the file to your drive.
Move 1: Download Windows 10 ISO File
To do this, you can also use Media Creation Tool. But note that this tool can only help you to download the ISO file of the latest Windows 10 version (now is 1809). In Choose which media to use page, please choose ISO file. Then, save the ISO file to a location. Next, continue the operations by following the wizard.
If you don’t want to install the latest Windows 10, you can search for the ISO file you need on the internet and then download it.
Move 2: Burn Windows 10 to USB Drive
To create bootable USB from ISO, some of you may choose to use USB bootable software like Rufus. It is thought as one of best, free, open-source and easy-to-use Windows 10 USB tool since it can create bootable USB for different kinds of operating systems.
Step 1: Start USB bootable software, free download for all Windows. Here, go to get Rufus from its official website.
Step 2: Run this ISO to USB burning tool, and then plug your USB flash drive to your PC.
Step 3: This tool will detect your USB flash drive. You need to click the SELECT button to choose the ISO file you have downloaded, specify the partition scheme and volume label. Then, click the START button to create bootable USB from ISO.
Tip: Target system, file system, and cluster size will be changed once you change the partition scheme. Besides, the burning process will also destroy all data of your flash drive, so please back up them in advance.
Step 4: Later, the tool will start to burn ISO to USB flash drive, which will take a few minutes. When the Status is ready (in green), just click the CLOSE button to exit the tool.
After you complete USB bootable drive creation, you can boot your PC from the drive and start to install Windows 10 operating system or enter PC repair environment for a fix from the repair drive.
Further reading:
Mac Os Bootable Usb Windows
In addition to making bootable USB from ISO in Windows 10, some of you may be interested in the topic: create bootable USB Windows 7. To do this work, you need to use bootable USB Windows 7 software, Windows 7 USB/DVD Download Tool. After getting the tool, follow its instructions to create a bootable USB drive.
Besides, some of you may want to know how to create bootable USB from ISO ubuntu or Mac. /roccat-mac-os-x-driver/. Here, we won’t show you steps but you can search for the corresponding methods on Google and there are some articles are about the topic.
Tip: After learning so much information about how to create USB boot disk from ISO in Windows 10, you may think it is troublesome. And it is also an annoying thing to install a new OS or perform PC repair. Thus, in the following part, we will walk you through an easy way to deploy a new OS without Windows installation or fix PC without a repair USB drive.
Suggestion: Back up Windows & Restore System
If you have created a system image, you can restore it to the PC where you need to install OS or solve system issues. By this way, you won’t deploy a new OS and you can easily restore the PC to a previous state, enjoying the previous system settings, applications, and everything.
How can you back up your Windows 10? Here, we highly recommend using a piece of professional backup software for Windows 10, MiniTool ShadowMaker.
Mac Os X Bootable Usb
This backup software is designed to back up the Windows operating system, files, the entire disk or partitions. During the backup, the selected backup source is compressed to an image. Above all, it offers a feature called Media Builder to create a bootable USB drive or CD/DVD disc to boot the crashed PC and perform a system recovery.
Before starting a backup, now you need to free download MiniTool ShadowMaker from the button below. Note that its Trial Edition only gives you 30-day free trial.
WinRAR automatically recognizes and selects the best compression method. WinRAR supports all popular compression formats (RAR, ZIP, CAB, ARJ, LZH, ACE, TAR, GZip, UUE, ISO, BZIP2, Z and 7-Zip). Mac file sync software. WinRAR is ideal for multimedia files. WinRAR allows you to split archives into separate volumes easily, making it possible to save them on several disks for example. The special compression algorithm compresses multimedia files, executables and object libraries particularly well.
Tip: In addition to the third-party software, some of you may choose the Windows built-in tool for creating system image. For more information, go to Create Windows 10 Repair Disk/Recovery Drive/System Image to Repair Win 10.
Move 1: Back up OS
Step 1: Run MiniTool ShadowMaker Trial Edition, click Keep Trial and choose the Connect button in This Computer.
Step 2: Go to the Backup interface, you see system related partitions are selected by default. To back up Windows OS, here you can go to the Destination section to specify a path like an external hard drive, USB flash drive, or NAS.
Step 3: Finally, click the Back up Now button to run the system image backup.
Move 2: Create Bootable USB from ISO
After finishing the system image backup, you can go to create a bootable USB drive. Just go to the Tools page, click Media Builder, choose your USB flash disk and create USB boot disk from ISO.
After that, you can boot the PC that needs to install an OS from the bootable USB flash drive and then start system recovery.
Related article: How to Boot from Burned MiniTool Bootable CD/DVD and USB Flash Drive/Hard Disk?
Move 3: System Image Recovery
In MiniTool Recovery Environment, you can run MiniTool ShadowMaker and then restore the system image to a hard drive which can be the system disk that has system issues or the hard drive where you want to deploy a system.
Step 1: Go to the Restore interface, find the system image file and click Restore to continue.
Step 2: Select a backup version.
Step 3: Choose the system related partitions to restore. Here, MBR and Track 0 should be selected, otherwise, Windows won’t boot normally.
Step 4: Decide which disk you want to restore the image to.
Step 5: The backup software is performing a recovery. This will take a few minutes, so wait patiently.
With MiniTool ShadowMaker, you can easily restore the PC to a previous state without reinstalling OS or easily deploy the system to a computer without OS. Compared to the above part - create bootable USB from ISO for OS installation, this way is worth recommending.
Here, you can free download MiniTool ShadowMaker for a trial or share it with your friends on Twitter to let more persons know.
Tip: Additionally, this software can help you to clone your hard drive to another disk and you can directly boot your computer from the cloned disk without reinstalling the system. Read this post - How to Clone a Hard Drive to SSD in Windows 10/8/7 to do this job.
Bottom Line
Want to make bootable USB Windows 10? Just try the above ways to create bootable USB from ISO and then you can install an operating system. To restore your computer easily to an earlier state (in case of system breakdown) or deploy a system, without installing the system, you can use MiniTool ShadowMaker to back up OS and restore it.
On the other hand, if you have any suggestion for bootable USB flash drive creation, or if you meet some questions when using MiniTool software, please leave a comment or contact (email protected).
Macbooks or iMacs hardly require reinstallation of their Mac OS, but when they do then it’s a fairly difficult process especially if your secondary computer is Windows. Reinstalling Mac OS is a time-consuming process and requires a lot of patience that’s why recommend doing this process in your free time or weekends.
To get started with you require a USB drive with at least 8GB storage (16GB recommended). Then you need a working Mac OS ISO or DMG Installation Image. You can download it from the Apps Store or you can find Mac OS Image at ISORIVER.
There are 2 Methods to Create a Bootable USB drive of Mac OS on your Windows PC.
Method 1: Using TransMac
Download TransMac’s latest version for Windows from this link.
Connect your USB drive
Right Click on your USB drive option in TransMac and select Format Disk for Mac
After that, right-click the USB Drive and select Restore with Disk Image
Point to your Mac OS .dmg or .iso file by clicking the add button.
After that TransMac will create bootable Mac OS USB within few minutes.
Then you can insert it into your Mac, hold down the option key while turn on and boot your system with this USB.

Method 2: Using PowerISO
Another disk image utility that you can use is PowerISO. It can be used for burning both ISO files and DMG files to USB to create a bootable drive. Follow the steps below to Create a Bootable Mac OS USB on Windows PC.
Step 1: Firstly Download PowerISO and install it in your Windows PC. Launch the app and insert a USB drive into your computer.
Step 2: Import the DMG / ISO file directly by clicking on ‘Burn’ in the toolbar.
Step 3: In the Burn window, select the DMG / ISO file from the Source File section.
Step 4: You can modify the settings to adjust burn speed. The default will be set to the maximum, so you can reduce that.
Step 5: You can choose to finalize the disk and verify it. Any errors in the bootable USB will show up at that point.
Step 6: Mac os x recover data hard drive. Now click on “Burn” and wait for the progress bar to reach 100%.
After the successful creation of Bootable Mac OS USB, boot your Macbook from this USB drive by clicking the option button during bootup and select this USB drive.
Watch this Video Tutorial
That’s it for the tutorial If you face any issues or had any query then please let us know in the comment section below. You can also send us an email via the contact us page for personalized support.
macOS Catalina iso download, macOS Catalina VMware image download, mac os Catalina iso download to get VirtualBox, mac os Catalina DMG picture, macOS Catalina Virtualbox, VMware, mac os Catalina bootable iso download, macOS 10.15 Catalina iso download. Installing Catalina is quite easy. It requires a few measures and some distance on the startup disc. But that is not the whole procedure that is done for the setup procedure. However, before that, there are various additional steps to take you personally at the installation place. There are some needs to be walked through.
Read More: How To Install MacOS Catalina On Unsupported Mac How To Download Macos Catalina Dmg File Ver-10.15.4 (Direct Links) How To Download Macos Catalina Iso For Vmware & Virtualbox: Direct Links How To Download Macos 10.15 Catalina Iso + Dmg + Vmdk How To Install MacOS Catalina On VirtualBox On Windows: 8 Step Ultimate Guide How to Speed Up macOS Catalina? 7 Easy Methods
These demands are less but very important and hard to achieve. Of all those things, what’s hard to reach is the Catalina file. This specific file is available on the App Store. The DMG file used to install Catalina on Mac. But that isn’t suitable to receive all of the time. It requires you to register up with your Apple ID, enroll your Mac, set up the macOS Public Beta Access section. That’s the procedure for installing Catalina on Mac, which is quite different from installing Catalina on Windows. Go on and Download macOS 10.15 Catalina ISO + DMG + VMDK.
For this job, we have covered you up with the file and some more files. Those would be the ISO and VMDK records of Catalina, a pretty handy good file for installing Catalina on machines, whether VMware or VirtualBox. They are not available everywhere, and the Catalina DMG or ISO file will not work because of this. So take your time and revel in the files!

Bootable Iso Windows 10
Disclaimer: This site is entirely copyright protected. If anything from this site is copied somewhere, the website has to be credited, obviously. Otherwise, the site that replicated the content will probably be addressed to the corresponding copyright legislation or at least some search engines such as Google and Bing. Each of these files served with us is particularly created for analyzing & instructional purposes, so we cannot be liable if the files are misused. Start with Download macOS 10.15 Catalina ISO + DMG + VMDK.
There are two methods to download macOS Catalina ISO To Get VMware & VirtualBox. The first one would be downloading a macOS Catalina ISO VMware picture from the App Store, which is from Apple but requires a couple of added things. The next one is that we provide Catalina’s latest variation to obtain macOS Catalina VirtualBox image but in a simpler and convenient system to save time and utilize more.
I am sure the process isn’t easy and works for everyone. You might face these common errors when installing MacOS X On VirtualBox On Windows- Here is a complete guide that will help you fix those errors- Complete Guide To Fix VirtualBox Errors While Installing Mac OS X How to Speed Up macOS Catalina? 7 Easy Methods
macOS Catalina VMDK file- Old files as well
Installing Catalina is pretty simple, but that’s not the case with downloading. This procedure appears very simple, requiring several clicks, that’s right, but it matters where you would catch up in the file. That is what makes it hard. So we’ve cut you to the chase and right to the stage, download macOS Catalina ISO to get VMware & VirtualBox out of here.

When there’s an issue with downloading macOS Catalina ISO for VMware & VirtualBox, you could always correct download macOS Catalina ISO or make macOS Catalina ISO to download Catalina to a virtual machine.
Whether or not you wish to make a bootable USB for Hackintosh or Mac or would like to install it on your Mac immediately, the document is ready to download. Getting the DMG file of Catalina and previous models has always been difficult. However, we have covered up you with the file with this shot, secure and working. Download macOS 10.15 Catalina DMG now.
macOS Catalina DMG File January 4, 2021 (Recently Updated)
The Catalina is accessible at the App Store app, but that requires an Apple ID. Enrolling your Mac plus a couple more staff, that’s quite frustrating. In cases like this, we have brought you that the macOS Catalina DMG file doesn’t require those unnecessary staff. Click the link to Download macOS 10.15 Catalina DMG.
Since we all get macOS Catalina ISO to get VMware & VirtualBox document to put in macOS Catalina on VMware, Catalina’s VMDK file is utilized to install Catalina on VirtualBox and install Catalina on VMware Workstation Player. This document is so essential for the setup which produces the installation possible. This document isn’t accessible on App Store neither anywhere else. We’ve created and uploaded to the servers to use it much easier for our customers.
Gilbert is a Microsoft MVP, a full-time blogger, and technology aficionado. He was awarded the 2009 MVP award from Microsoft for his contributions in forums and blogs and is enjoying the new addition to his family. When Gilbert is away from his bike and his iPad, he's busy writing technology how-to's from his home-office in Miami, Florida on the latest programs and gadgets he can get his hands on. Onyx software mac. He's locally known as 'the computer guy' and has spent the last 12 years helping family, friends, and GilsMethod.com visitors with their computer questions and problems.
Mac Os Bootable Iso Download
macOS Catalina ISO for VMware & VirtualBox (Recently Updated)
Significant: While the documents are totally secure and handy to obtain from anyplace, we will keep the pictures updated if a newer version is released. This applies to all of the documents which are served with people.
Here are some- Common macOS Catalina Problems and Solutions: 11 Key Errors and their Fix
This document works to install Catalina on VMware and VirtualBox, so have a copy of it and appreciate it.
Mac Os X Bootable Iso Download
After you have accomplished together with the tricky part, you’re now ready to step forward.
There are several places to install Catalina, including installing Catalina on Mac and installing Catalina on Windows. Mugen mac download. Since installing Catalina onto Mac is simple with the required file that takes a few straightforward wizards to proceed, there is no need to display it again. Before installing, make sure you take an entire copy of your Mac.
0 notes