#Convert.ToString()
Explore tagged Tumblr posts
Visit Tumblr Blog
Explore Tumblr blogs with no restrictions, modern design and the best experience.
Last Seen Tumblr Blogs


Fun Fact
In February 2021, Tumblr had 518.6 million blog accounts.
Text
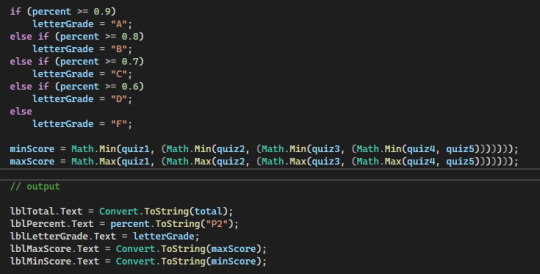
i had to rewrite it like eight times. It really didn't like the linebreaks that people were suggestting so I just wrote it in order from left to right without worrying about closing anything and when I was done I added parens at the end until the error box was empty.
When I copied the professor's code to test it I missed ");" and knew to add the semicolon but didn't realize I'd skipped over the ")" which is why his code was returning an error too.
Also for some reason until I got the minScore and maxScore lines right the "lbltTotal.Text = Convert.ToString(total);" was showing an error that said "cannot implicitly convert to string" that went away without me ever touching that line and I don't know why. I'm just. Gonna. Ignore that.
Also yeah the professor's point was that it's possible to nest arguments, that wasn't the whole purpose of the assignment, that was like a sidequest for the else if statements that were the focus of the lesson.
Have stumbled across the first thing in my programming class that made me sigh through my nose, clench my fists, and look up at the ceiling so I don't just click out of the program saying "that's fucking bullshit."
(it's a sensible thing but it is not a *readable* thing, nesting parenthesis with math.min to get the lowest number out of five variables and cool that is a neat trick but it's the first thing I've run up against in the class where my brain is refusing to parse it and I'm going to have to hold my pencil up to the screen to count)
608 notes
·
View notes
Text
Dynamically vs Statically-Typed Programming Languages
Hiya!🌍💻 I know I haven't done one of these posts in a while but now I came up with a new topic to talk about!
Today, we're going to dive into the world of programming languages and explore the differences between dynamically-typed and statically-typed ones. I actually got the idea from explaining the whole difference between languages such as C# and Java to Lua and Python! Also just wanted to talk about how various languages handle data types~! So, buckle up, and let's get started~! 🚀

The Main Difference
It all lies in how they handle data types:
In a dynamically-typed language, the type of a variable is determined at runtime, which means you don't have to specify the type explicitly when declaring a variable.
In a statically-typed language, the type of a variable is determined at compile-time, and you must declare the type explicitly when defining a variable.
Example Code
Not getting the picture of what I'm talking about? No worries, let's take a look at some code examples to illustrate the difference. I'll use my beloved Lua (a dynamically-typed language) and C# (a statically-typed language)~!
Lua
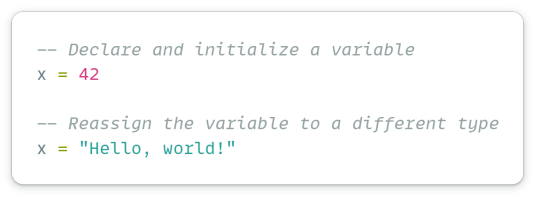
C#

In the Lua example, we can see that we don't need to specify the data type of the variable x. We can even change its type later in the code and it would still work!
In the C# example, we must specify the data type of x when declaring it, and attempting to change its type later will result in a compile-time error. Remember though, you can convert an int to string in C# via 'Convert.ToString()'!
Recap!
In dynamically-typed language, the type of a variable is determined at runtime.
Lua, Python, and JavaScript are programming languages that are dynamically typed.
In a statically-typed language, the type of a variable is determined at compile-time.
C#, Java, and Go are programming languages that are statically typed.
Obviously, there is more to know about each type as dynamically-typed and statically-typed languages each have their advantages and disadvantages - but I wanted to focus more on the data type declaration part~!
Here are some further reading pages:
Dynamic Typing vs Static Typing - LINK
Advantages and Disadvantages of Dynamic and Static Typing - LINK
That's all, thanks for reading, and hope you learned something new! Happy coding, folks~! 🌟💻🚀
#xc: programming blog post#coding#programming#studying#studyblr#codeblr#progblr#computer science#project#tech#developer#web dev#comp sci#learn how to code
83 notes
·
View notes
Text
Difference between Convert.ToString() and ToString()
Difference between Convert.ToString() and ToString()
In this post, we will explain the difference between .ToString() and Convert.ToString() methods in C#.
The basic difference between them is “Convert.ToString()” handles NULL values while “.ToString()” doesn’t. Which means if the variable being passed to Convert.ToString() is NULL, it won’t throw an exception.
Whereas, “.ToString()” does not handle NULL values and it will throw a NULL reference…
View On WordPress
1 note
·
View note
Text
Q061. What is the difference between boxing and unboxing in C#? Q062. What is the difference between boxing and conversion in C#? Q063. What is the difference between unboxing and casting? Q064. What is the difference between int.Parse(), int.TryParse() and Convert.ToInt32() methods? Q065. What is the difference between .ToString() and Convert.ToString() in C#? Q066. What is the difference between String.IsNullOrEmpty() and String.IsNullOrWhiteSpace() in C#? Q067. What is a sealed class in C#? Can you make the abstract class sealed? Q068. What is the sealed method in C#? How can you make any method sealed? Q069. What is the difference between the sealed method and the private method in C#? Q070. What is the difference between Sealed Class and Abstract Class in C#?
#CSharpInterviewQuestionsAndAnswers#CSharpInterviewQuestions2022#CSharpInterview#InterviewPreparation#InterviewQuestionsAndAnswers#techpointfundamentals#techpointfunda#techpoint
1 note
·
View note
Text
Spring Security Session Timeout Redirect Login Page

Hi, I am tried to redirect the web page to login Page after session timeout in MVC 5, my web.config is as below: timeout='1' co. Sign in Join.NET. If he clicks the browser it shoud re-direct to index page. The above secnario needs to be handled using interceptors without using Spring security & servlet filters. Interceptor is configred but it is not recognizing web.xml changes. I didnt redirect to index page after session expired.
Spring Security Redirect To Login Page After Session Timeout Example
Spring Security Session Time Out Redirect Login Page Aspx
Spring Security Session Time Out Redirect Login Page Clickbank
in Free community support
I am loading datatable while clicking button , The button click function calls the datatable function to load . So during session timeout if i click the button ,it returns error message 'Invalid JSON response' . This is because the session was timed out . How to handle this error and redirect to login page ? is there any option to check response data before loading to datatable ? Please help me in this issue.
Thanks.
Answers
Any luck on this one...I have the same problem. How do you redirect with ajax when session has timed out? My datatable keeps spinning when I tried redirecting from the server side.
In ASP.Net 2.0 applications there's a special event handler called 'Session_End' that exists in Global.asax. It is fired when the Session Timeout occurs. I use this event handler to write key Session variables (all DataTables at the moment) out to a special holding area within the associated database. The next time the user logs in, these same Session variables are restored with the previous data. In this way the user is protected from losing valuable work if they step away from their computer for a moment. I did some testing and was a little surprised to discover that when such a timeout occurs, the browser just stays on the page it was before. This is clearly a problem, both for security reasons (an unattended corporate app should log itself off) and because the Session variables were now all null. Eventually I heard from a bright developer from New England named Mike Banavige who succinctly explained the situation this way:
Spring Security Redirect To Login Page After Session Timeout Example
Session end does not occur in the context of an http request. It is simply a timeout that occurs on the server. Since there is no request involved in the timeout, there is nothing to redirect.
Put another way, the Session_End event is occurring strictly on the server - the client doesn't know a thing about it. Makes perfect sense - why didn't I think of that!
So what to do with the predicament of the web app remaining on the same page, even though the Session has timed out? Well, more research revealed the answer. Within the Page_Load event handler of my master page codefile, I added this:
Spring Security Session Time Out Redirect Login Page Aspx
Response.AddHeader('Refresh', Convert.ToString((Session.Timeout * 60) + 5)); if (Session.IsNewSession) Tools.PageRedirect('~/Login/login');
Spring Security Session Time Out Redirect Login Page Clickbank
Since every web page in my app utilizes the master page, this Refresh meta tag is inserted into each of them. And because it's in the Page_Load event handler, it gets updated (moved forward) every time a postback occurs. With a typical 5 or 10 minute session timeout, it's highly unlikely that the user would be working on something that long without a postback occurring. It thus serves as an effective way to implement a Logout due to User Inactivity feature.
0 notes
Text
How to Type conversion methods in C#
How to Type conversion methods in C#
Description:
How to Type conversion methods in C#
using System; public class Program { public static void Main() { int myInt = 100; double myDouble = 15.25; bool myBool = true; Console.WriteLine(Convert.ToString(myInt)); // Convert int to string Console.WriteLine(Convert.ToDouble(myInt)); // Convert int to double Console.WriteLine(Convert.ToInt32(myDouble)); // Convert double to…
View On WordPress
0 notes
Link
「老後資金」「2000万円」などのキーワードが話題になる中、今ある資金を増やすための投資先として、Bitcoin(ビットコイン)などの仮想通貨に興味を持っている人も少なくないことでしょう。しかし、価格変動幅が大きい仮想通貨は初心者には敷居が高いイメージがあるうえ、何より、忙しくて動向を細かくチェックしたり、取引したりするヒマがないという人がほとんどでしょう。そこでおすすめしたいのが、積み立て感覚で、一定金額を毎日コツコツと投資する方法です。「いくら簡単とはいえ、毎日、取引操作をするのは面倒……」と思うかもしれませんが、話題のRPAツールを使って購入操作を自動化すれば、あなたが寝ている間にロボットが自動的に仮想通貨を取引してくれます。 コツコツ購入で仮想通貨をはじめよう 「そろそろ仮想通貨を取引してみようかな……」 老後資金に限らず、資産形成のためにさまざまな金融商品を検討する中で、仮想通貨を1つの選択肢に考えている人も少なくないことでしょう。 しかし、仮想通貨の購入には不安もつきものです。 誕生から約十年。これまでにもさまざまな懸念材料を払拭し続けてきたBitcoinの将来性や技術には、もはや疑いを挟む余地はなさそうですが、「いざ取引」となると、価格変動幅が大きく、いつ、どのようなタイミングで、どれくらい買えばいいのかの判断がしづらいのも確かです。 株式やFXであれば、国際情勢や各国の金融政策、ニュースなどから、ある程度の「相場観」で取引ができるかもしれませんが、果たして、自らの経験やセオリーがそのまま仮想通貨でも通用するのか? という点に不安がないとは言えないでしょう。 今までと違った相場観が求められるうえ、価格変動幅が大きい仮想通貨は初心者には敷居が高いイメージ そこでおすすめしたいのが、「ドル・コスト平均法」による仮想通貨の購入です。 積立投信などでも一般的な方法で、毎日、毎週など、決まったタイミングで一定額の仮想通貨を購入し続けるという方法になります。 価格が変動しやすい金融商品は、一度に大量購入すると高値づかみをしてしまう可能性がありますが、一定額ずつコツコツと購入するドル・コスト平均法では、価格が高いときには少なく、安いときには多く購入するため、毎月一定の数を買う方法と異なり、買付単価を平準化することができます。 要するに、価格変動幅が大きいことによるリスクをなるべく小さくしようという考え方です。 金融庁のWebページで紹介されている「時間(時期)の分散」(ドル・コスト平均法)の手法。リスクを分散する取引方法の1つ 利用する仮想通貨交換所によって違いはありますが、例えば、国内ナンバーワンの取引量(※2019年5月15日CoinGecko調べ)の「bitbank」の場合、Bitcoinの最小購入単位は「0.0001」です。 本稿執筆時点(2019年9月10日)のbitbankで取引されているBitcoinの価格は1BTCあたり110万円前後ですから、110万円×0.0001=110円から購入できます。 bitbankでは、0.0001単位からBitcoinを購入可能。100円台から始められる ここで仮のシミュレーションをしてみましょう。 たとえば、現在、コーヒーなどの嗜好品にかけている費用���500円としたとき、この費用を節約しつつ、コツコツと、この方法で仮想通貨を購入したとしましょう。この場合、仮に価格が80万円に下がれば0.0006単位を購入し、価格が150万円になれば0.0003単位を購入することになります。価格が高いときは少なく、安い時には多く購入して、リスクを分散させることができます。 こうした投資をコツコツと続けることで仮想通貨で資産を形成すると同時に、その間に、価格の変動や動向などを経験していくことで、仮想通貨ならではの相場観を養ったり、自分ならではのセオリーのようなものを見つけ出したりすることができるわけです。 手動はムリ! ロボットに自動的に取引させよう このように、ドル・コスト平均法によるコツコツ投資は、仮想通貨のはじめの一歩におすすめの投資方法ですが、1つ大きな問題があります。 それは、自動的に定期購入するのが困難なことです。 株式やFXなどでは、証券会社のサイトや専用の自動取引アプリを使って自動的に売買をすることもできますが、仮想通貨では、こうしたしくみはほとんどなく、ウェブページやスマートフォンのアプリを使って、購入単位や金額を指定して手動で取引する場合がほとんどです。 このため、ドル・コスト平均法で資産形成する場合は、毎日、手動で、文字通り、コツコツと購入を繰り返さなければなりません。たとえば、相場的に夜中の方が有利そうだと思ったら、深夜に起きて取引をしなければならないことになります。 もちろん、プログラミングの知識があるなら、仮想通貨交換所が公開しているAPIを使って、自動売買用のプログラムを組んでしまえばいいことになります。 しかし、誰もがプログラミングの知識を持っているわけではありません。 現状、仮想通貨を持っている人と持ってない人、APIを使える人と使えない人で、資産形成の方法に格差が生まれてしまっているのも事実です。 そこで、提案したいのがロボットを使った自動取引です。 ロボットと言っても機械的なものではなく、「RPA(Robotic Process Automation)」と呼ばれるソフトウェアによる自動処理のことです。 業務効率化や働き方改革などで企業で急速に導入が進んでいるテクノロジーの1つで、簡単な命令書(ワークフロー)を定義するだけで、パソコン上で動作するソフトウェアのロボットが命令通りに、ブラウザーやExcelなどのアプリケーション、インターネット上の各種サービスを自動的に操作してくれる技術となります。 業務効率化などに使われるRPAツール(画面はUiPath Studio)を使えば、GUI画面でパーツを並べていくだけで、仮想通貨の売買も自動化できる RPAでは、画面上のアプリをクリックするなど、人間の操作をトレースすることもできますが、前述した仮想通貨交換所のAPIを制御することも簡単にできます。 要するに、RPAのロボットにAPIによる仮想通貨の取引を命令しておけば、毎日、コツコツと、あなたに変わってロボットが仮想通貨を自動的に購入してくれるわけです。 そう聞くと、敷居が高そうに思えますが、実はそうでもありません。 RPAツールはさまざまなものがありますが、ここでおすすめするのはUiPathの製品です。UiPath社が提供するRPAツールは、Community Editionと呼ばれる個人向けのライセンスが無償で利用できるうえ、「代入」や「繰り返し(各行)」などの日本語名のパーツ(アクティビティと呼ぶ)を画面上にドラッグして、つなげていくだけで、ロボットへの命令を記述できます。 国内で急速にユーザーを増やしているUiPath。圧倒的な多機能さと使いやすさを備えているだけでなく、個人や小規模な企業なら無料で利用できる ・UiPath Community Editionのダウンロード https://www.uipath.com/ja/developers/community-edition-download 仮想通貨交換所のAPIも、シンプルで誰でも利用ができるものなので、難しく考える必要はありません。イメージとしては、URLを指定してウェブページを見るようなものです。取引に必要なパラメーターを追加したURLを作るようなものと考えるといいでしょう。 ExcelのマクロやVB.NETで簡単なプログラムを組んだことがあれば、より話が早いところですが、その経験がなくても、少し自習するだけで、すぐに使いこなせるはずです。 早速、UiPathを使って、自動取引ロボットを作ってみましょう。 bitbank用の自動取引ツールをUiPath Studioで作ってみよう まずは、今回作るロボットのワークフロー全体像を見てみましょう。 ざっくりとした流れを見ておきましょう。基本的に上から矢印の流れに沿って処理が実行されます。 まず、接続に必要な初期パラメーターをセットし、指定した購入時刻になるまで待機(ループ)。仮想通貨交換所のステータスをチェックしてサイトに問題がなければ、現在の価格情報を取得し、あらかじめ決めた予算から購入数を計算します。 その後、ユーザーの買い付け余力をチェックして、一定レベル以上であれば、成り行きでBitcoinを購入します。最後に、5秒ほど待ってから、取引が成立しているかどうかをチェックするという流れです。 各パーツを展開すると、さらに細かな処理が並んでいます。たとえば、「シーケンス-初期パラメーターセット」には、「代入」というアクティビティがいくつも配置されています。実際に、このワークフローを実行する場合は、APIを利用するためのAPIキーやシークレット、取引する金額(この金額の範囲内で購入可能な数を計算する)などを指定します。 初期パラメーターをセットするための処理。「代入」というアクティビティを使って、変数に値をセットしておく ポイントとなる部分をいくつか紹介しておきます。 まず、「代入-現在時刻を取得」の部分ですが、ここで購入時間まで待機します。このワークフローを、パソコン上で起動後、購入時間まで時刻をチェックしながら待機します。初期パラメーターで指定した時間でなければループし、時間になればループを抜けて次の処理に移ります。 時間になるまでループさせることで、指定時間に購入処理を実行させる 続いて、APIの使い方を見てみましょう。 UiPathからbitbankのAPIを呼び出すには、「HTTPリクエスト」というアクティビティを使います。 APIの詳しい使い方は、こちらを参照していただくとして、このアクティビティのプロパティにアクセス先のエンドポイントやヘッダーなどを指定します。たとえば、取引所のステータスを取得する場合は、次のエンドポイントにGETのリクエストを送信します エンドポイント:"https://api.bitbank.cc/v1/spot/status" APIの戻り値は、JSON形式になりますので、出力を一旦、変数に格納してから、その変数を「JSONをデシリアライズ」アクティビティを使って認識できるようにしています。その上で、次のように指定することで、JSONのデータの中から「status」の値を取り出します(ここではBitcoinと円の取引のステータスを取得)。値が「normal」なら取引所が正常に動作しているということになります。 (From p In statusObject("data")("statuses") Where Convert.ToString(p("pair"))=paramPair Select Convert.ToString(p("status"))).First.ToString 「HTTPリクエスト」アクティビティを使ってAPIを呼び出す。ウィザード形式で、エンドポイントやヘッダーなどを指定するだけと簡単 とまあ、このような感じで、直近の取引価格を取得して予算から購入数を計算したり、実際に成り行きで購入したりする処理が続いていきます。 注意点としては、「シーケンス-成り行きで購入」の部分でしょうか。ここには、購入処理が記述されていますが、購入の場合は認証処理が必要になります。 詳しくは、前述したAPIのドキュメントを参照して欲しいのですが、HTTPリクエストヘッダーに対して、次の情報を付与する必要があります。 ACCESS-KEY:APIキーページで取得したAPIキー ACCESS-NONCE:整数値。リクエスト毎に数を増加させる ACCESS-SIGNATURE:nonceとリクエスト情報を連結させHMAC-SHA256形式でシークレットキーで署名したもの このため、「シーケンス-成り行きで購入」内では、タイムスタンプからnonceを生成したり、シグネチャのベースとなる情報をつなぎ合わせたり、HMAC-SHA256でハッシュ化する処理などが記述されています。 本ワークフローは、基本的に単純な「代入」と「HTTPリクエスト」の繰り返しで構成されていますが、この部分だけ、若干、ややこしい処理となっているので注意してください。 署名を作成するためにnonceを生成したり、HMAC-SHA256でハッシュする処理。こうした処理もパーツを並べるだけでOK実際に動かしてみよう 実際に動かすときは、最低限、次のパラメーターを変更します。 ●シーケンス-初期パラメーターセット 代入-APIキー:bitbankから取得したAPIキー 代入-APIシークレット:bitbankから取得したAPIシークレット 代入-購入予算:購入金額総額(定期購入1回分の予算) 代入-購入時間:購入時間 ワークフローを実行する場合は、必須のパラメーターとなる4つの情報をセットする。ワークフローのコメントに「★」が付いている部分を修正してから実行しよう これで、ワークフローを実行すると、待機状態となり、指定した時間が来ると購入処理が実行されます。 なお、このように時間まで待機するしくみとなるため、たとえば夜中の時間を指定した場合は、ワークフローを実行後、パソコンを起動しっぱなしにしておく必要があります。途中でスリープにならないように注意が必要です。 パソコンを立ち上げっぱなしにするのが非効率的だと感じる場合は、クラウド上で動作する仮想マシンを使って、時間起動するようにすることもできます。その場合は、UiPathのクラウドサービス(Orchestrator)も併用し、クラウド上の管理コンソールから時間を指定してロボットを起動します。 ワークフロー内に「Orchestrator」で使う場合��処理も残してありますので、必要に応じて変更するといいでしょう。 クラウド上の仮想マシンとUiPathのロボット管理クラウドサービス「Orchestrator」を使うとスケジュールを指定して定期的にロボットを実行することもできる仮想通貨を楽しもう このように、ここではドル・コスト平均法を使って、指定した時間に自動的にBitcoinを購入するロボットを作りました。 仮想通貨の場合、株式やFXと異なり、自動売買ツールがあまり一般的ではありませんが、bitbankのようにAPIが公開されている取引所を利用すれば、RPAツールを使って簡単に取引を自動化することができます。 今回は成り行きで購入しましたが、価格を判断したり、直前の価格などから上昇・下降などの傾向を掴んで売買を判断したりと、より複雑な処理にすることも可能です。 冒頭でも触れたように、最小単位であれば100円前後から購入できるので、思ったよりも遙かに手軽に購入できます。毎日、コツコツ買っていけば、気づいたときには大きな資産になっている可能性もあるので、ぜひ試してみるといいでしょう。
0 notes
Text
A6
using System;using System.Collections.Generic;using System.Linq;using System.Web;using System.Web.UI;using System.Web.UI.WebControls;using System.IO;using System.Text; namespace WebApplication1{ public partial class Imenik : System.Web.UI.Page { protected void Page_Load(object sender, EventArgs e) { } protected void Button1_Click(object sender, EventArgs e) { string nesto; StreamReader rdr = new StreamReader(@"E:\ReY\School\Matura\EIT-A6\WebApplication1\WebApplication1\Files\imenik.txt"); nesto = rdr.ReadToEnd(); string[] niz = nesto.Split('|'); telefoni[] t = new telefoni[niz.Length/7]; int j = 0; for (int i = 0; i < t.Length; i++) { t[i] = new telefoni(); t[i].sifra = Convert.ToInt32(niz[j + 0]); t[i].ime = niz[j + 1]; t[i].prezime = niz[j + 2]; t[i].adresa = niz[j + 3]; t[i].mesto = niz[j + 4]; t[i].broj_telefona = Convert.ToInt32(niz[j + 5]); t[i].email = niz[j + 6]; j += 7; if (t[i].ime.Contains(TextBox1.Text) && t[i].prezime.Contains(TextBox2.Text) && t[i].adresa.Contains(TextBox3.Text) && t[i].mesto.Contains(DropDownList1.SelectedItem.Text) && t[i].broj_telefona.Equals(TextBox4.Text)) { TableRow tr = new TableRow(); TableCell tc1 = new TableCell(); TableCell tc2 = new TableCell(); TableCell tc3 = new TableCell(); TableCell tc4 = new TableCell(); TableCell tc5 = new TableCell(); TableCell tc6 = new TableCell(); TableCell tc7 = new TableCell(); tc1.Text = Convert.ToString(t[i].sifra); tc2.Text = t[i].ime; tc3.Text = t[i].prezime; tc4.Text = t[i].adresa; tc5.Text = t[i].mesto; tc6.Text = Convert.ToString(t[i].broj_telefona); tc7.Text = t[i].email; tr.Cells.Add(tc1); tr.Cells.Add(tc2); tr.Cells.Add(tc3); tr.Cells.Add(tc4); tr.Cells.Add(tc5); tr.Cells.Add(tc6); tr.Cells.Add(tc7); Table1.Rows.Add(tr); } } } }}
0 notes
Text
Get paid ($$$) : What is the difference between Convert.ToString () and To String ()?
http://dlvr.it/NZJtHP
0 notes
Text
csharp combobox’ta 4 işlem ve parse motodu kullanımı
csharp’ta 4 işlemi normalde butonlarla yaptırabiliriz.Bu örnekte bunu combobox’ile yapıcaz.Combobox kullanımı ve parse metodu kavramamız için güzel bir örnek ;
Programı yazmaya başlamadan mantığımızı kuralım ;
Herzamanki gibi öncelikle değişkenlerimizi belirleyeğiz.Burda 2 tane değişken bizim ihtiyacımızı görücektir.sonuc için ayrı bir değişken tanımlamamıza gerek yoktur.
Combobox’ta ise her index numarası için ayrı bir işlem yaptırıcaz.Mesela combobox items’a topla,çıkar,çarp,böl eklediğimizde. İndex numaraları 0′dan başlar. yani 0 numaralı index numarasına sahip items topla olur kodları buna göre yazmamız gerekir.
şimdi hemen topla için gerekli olan kodları yazalım.
int sayi1, sayi2; if (comboBox1.SelectedIndex == 0) // eğer combobox'ın 0 index numaralı elemanı seçilirse sayi1 = int.Parse(textBox1.Text); // sayi1 değişkenini tür dönüştürerek textbox1'den al sayi2 = int.Parse(textBox2.Text); // sayi1 değişkenini tür dönüştürerek textbox2'den al textBox3.Text = Convert.ToString(sayi1 + sayi2); // 2 değeri toplayıp yazı türüne çevirip textbox3'te yazdır.
yukarıdaki kodlarda yazdığımız kodların karşısına ne işlem yaptığımızıda yazdım.Aynı işlemleri diğer çıkar,çarp,böl içinde yapıyoruz. if (comboBox1.SelectedIndex == 1) sayi1 = int.Parse(textBox1.Text); sayi2 = int.Parse(textBox2.Text); textBox3.Text = Convert.ToString(sayi1 - sayi2); if (comboBox1.SelectedIndex == 2) sayi1 = int.Parse(textBox1.Text); sayi2 = int.Parse(textBox2.Text); textBox3.Text = Convert.ToString(sayi1 * sayi2); if (comboBox1.SelectedIndex == 3) sayi1 = int.Parse(textBox1.Text); sayi2 = int.Parse(textBox2.Text); float bolum; bolum = (float)sayi1 / sayi2; textBox3.Text = Convert.ToString(bolum);
burda farklı bir tür dönüşümü metodu olan parse kullandık.normalde diğer uygulamalarımızda conver metodunu kullanıyorduk
csharp combobox’ta 4 işlem ve parse motodu kullanımı
0 notes
Text
Get paid ($$$) : What is the difference between Convert.ToString () and To String ()?
http://dlvr.it/N30Nbb
0 notes