#Drop_shadow
Explore tagged Tumblr posts
Visit Tumblr Blog
Explore Tumblr blogs with no restrictions, modern design and the best experience.
Last Seen Tumblr Blogs


Fun Fact
69% of Tumblr users are millennials.
Text
I will do quick background removal, clipping path with Photoshop editing See profile> Hire Now >
Hello, I provide every type of professional Photoshop editing services in a short time and low cost. I have 3+ years experience on Photoshop editing. I assure that you are going to get a perfect editor through this gig.
---- I'm providing below Photoshop editing services on this gig ----
Background removal Clipping path, retouch Background change Amazon product background remove Photo retouch Product retouching Color correction Photo resize Shadow, Natural shadow, Drop shadow, Reflection shadow Object remove File converting JPEG, PNG, and PSD
If you need any other services related to design out of the above list, please contact me. :-)
Note: If you have any questions feel free to message me I will respond asap.
Don't forget to check out extras or package with this gig.
* Unlimited Revision * Super-Fast Delivery * 100% customer satisfaction Guaranteed or Refund * 100% positive rating
#background_remove#background_removal#product_background_remove#cliping_path#photoshop_editing#background_change#photo_editing#amazon_product_background_remove#photo_retouch#product_retouching#color_correction#object_remove#photo_resize#shadow#drop_shadow
7 notes
·
View notes
Quote
Cut Out Studio Uk

Cut Out Studio Uk started the journey in 2005 and train up of a professional team proficient industry expert who is skilled enough to take care of every project professionally and perfectly. They are very subdued, dynamic, very intelligent, always mean the command of the year and many are counted to work. They are providing the best quality digital imaging services to the world at a reasonable cost.
https://cutoutstudiouk.com/

#clipping_path#background_remove#image_retouching#image_masking#clipping_Mask#Drop_Shadow#Cut_Out_Studio_UK#Image_Manipulation#Studio
1 note
·
View note
Text
Use layer masks with selections
What you learned: Create a layer mask from a selection

You can produce a layer mask supported a variety. This can be helpful after you need to isolate a fancy subject with the exactness of a variety and therefore the flexibility of a layer mask.
Make a selection
Start by making a choice variety range victimization any selection methodology. If the image encompasses solid color background, it should be easier to pick out the background than the topic. The Magic Wand tool is beneficial for choosing a solid color background. 1. Select the Magic Wand tool in the Toolbar and check Contiguous in the select image bar. 2. Click the image background to pick out it. To feature to the choice if necessary, Shift-click in the image. To calculate from the choice, select ion-click (MacOS) or Alt-click (Windows). 3. Select choose > Invert, therefore the subject is chosen rather than the background. Leave the choice active.
Add a layer mask
When you add a layer mask with a variety active, the layer mask mechanically contains white wherever there was a choice a variety a range and black wherever there was no selection. • With the choice active, click the Add layer mask button in the Layers panel. On the layer mask, there's white wherever there was a choice variety range (the subject) and black wherever there was no selection (the background). The black hides the world that wasn't hand-picked.
Copy to another image
1. You could add a brand new background to the current image on a layer below the isolated subject. Other wise you might use the subsequent methodology to repeat the isolated subject to a different image, retentive the layer mask for redaction flexibility. 1. Open another image. Every one of the open pictures has its own tab at the highest of the document window. 2. Copy the masked layer into the second image as follows: In the Layers panel of the first image, click and hold an empty part of the layer that contains the subject and layer mask. Keeping your mouse pressed down, drag from the Layers panel of the first image to the tab of the second image and then into the document window of the second image. Release the mouse. In the Layers panel of the second image, there is a new layer containing the subject and its layer mask.
3. with the topic layer still hand-picked in the second image, press Command+T (MacOS) or Control+T (Windows). A bounding box with handles seems to round the subject. 4. Drag a corner handle of the bounding box to create the topic smaller or larger. Drag from in the bounding box to maneuver the topic. 5. Click outside the bounding box to complete scaling and positioning the topic and its layer mask in the second image. 6. If you would like to edit the layer mask in the second image, click the layer mask in the Layers panel to create it active. Choose the comb tool in the Toolbar. Paint with black, white, or grey to edit the layer mask.
Save your work with layers
• Save both images in.PSD or.TIFF format to retain the layers and layer masks for future redaction.
Learn More: Use layer masks to combine images
#Adobe_Photoshop_tutorials#Photoshop_learning#image_editing#graphic_design#Image_processing#clipping_image#Photoshop_photo_editing#photo_cutout#photo_editing_services#remove_background_from_image#clipping_path#image_masking#drop_shadow
1 note
·
View note
Photo
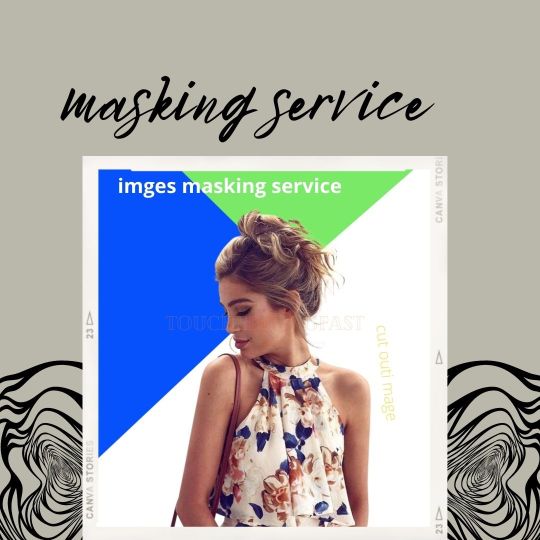
touch editing fast is one of the best graphics design provided companies.
Background removal and Image Masking needs to be done by skilled person. Because a perfect image can express many words and it easily attracts the attention of the client.
#image_masking_service#image_restoration#car_photo_editing_service.#Car_Clipping_path.#Drop_shadow#car_photo_editor#car_photo_editing#Car_Background_remove_service#cutoutimage
0 notes
Photo


Get all sorts of Image Editing Service Background Remove, Clipping path, Image Masking, Shadow making , Neck Joint and many more at the most cost efficient price !! Get your first free trial here - https://www.imageeditexpert.com/trial-now
#real estate photo editing#neck_join#drop_shadow#background_remove#shadow_making#clipping_path#ecommerce_image_editing#photo_restoration#color_correction#jewelry_retouch#image_masking
0 notes
Text
Best Shadow creation in Photoshop 2021
Live images of your product need to be made help to do client impressing and increase sales. Put deep-drawing to images of your product makes great appealing to your shoppers. I mean need image shadow creation. It can help you to impress your clients by showing product photos. You sell a product, your photo is the main attraction.
Professionally editing can make your product to realistic-life. They are using Photoshop drop shadow services to make photo-shoot products more attractive. Sometimes Photography cannot create a visual effect. Here shadow services can fulfill your requirement through natural shadow, drop shadow, reflection shadow or floating shadow.
What is Drop shadow?
Shadow is a common word. Image shadow or picture shadow is extremely necessary for the figure in the image editing platform. We can view an effect besides. Or backward of any creature or inanimate objects because of the lighting source or the sun. That impact known as a shadow. In Photoshop, a drop shadow may be a visual impact that created naturally under the object or beside it.
Drop shadow is a visual effect and a part of shadow creation. It is an art of graphics design and impact on your photo that You can use a drawing effect on your product or subject for highlighting the issue with greater precision. It is a necessary element of Photoshop that can help you to step up with your designs. You have to remember that it is not a very easy task as it requires a lot of practice and patience.

Natural shadow or Original shadow
Natural shadow service is used to make the visual effect of image shadow on the background. It is created by light. Photo editors edit it by use of his imaginer’s light source. It is called an original shadow service.
Caption: Natural Shadow Creation
To get the object’s accurate shadow from the background. You can use this shadow creation service. You remove the background from an image. Making the product’s exact shadow. It is the called Natural shadow. Learning these terms will help you find better results. You can use the software on your own, or you can take the help of a professional.
Existing shadow or cast shadow
Existing shadow or cast shadow and drop shadow are almost the same. The images have a natural shadow and you want to edit on a different background. Use existing shadow or cast a shadow and preserve normally occurring shadow. Sometimes need to the original shadow created by hand.
Caption: Existing Shadow Creation
The block of light on the object creates a cast shadow. It is a natural phenomenon. You can see the result just by keeping an item on the floor and direct light on it. You will see the existing shadow. It is an essential element to memorize as in photoshop or any editing software, shadow creation is necessary.
Floating shadow or reflection shadow
Reflection shadow means a reflection of the mirror. It also called by mirror shadow. But most of all don’t know that floating shadow and floating reflection shadow gives a different effect. The client needs a shadow of objects that are floating on the ground, not on the hard ground. E-Commerce product images are using this type of service.
Caption: Reflection Shadow Creation
When to use shadow Service
1. To removing unexpected background from the images of the product. 2. Creating a consistency of product photos for online sellers, or catalog. 3. To make your product natural. 4. To keeps existing shadows with a new background.

How to add a shadow Service to images
The shadow created a black or grey shape that the shape is according to the shape of the subject. The shadow looks like realistic. But mind it; keep the same ratio between the subject and shape. Otherwise, it makes fake.
The editor uses the imaginer’s light source to create a visual effect of image shadow on the background. Remember, shadow color may be needed to change.
Adding a drop shadow in Photoshop gives a good adjustment between the object and the background. The image will look more natural and appealing image will increase more demand for buying your products.
Low-quality images are harmful to the client. This type of image presentation is not good. The buyers may be annoyed. You need to create high-quality image shades for your business development.
Shadow services at Photo Design Expert
We know that every shadow result is completely different. Also, each brand is different too. We use the best strategies for achieving your wants and goals. That way, we are able to add shadow effects to your product images which will create your brand and products shine.
We are working since 2012. We are able to perfect every kind of job. Image quality and quantity do not matter; each of our clients will get individual attention to each of the given work.
Not sure which sort of shadow result is correct for you? Request a quote, and we’ll assess your wants, goals, and images to give the most effective solution.
At Photo Design Expert, There are 50+ skilled professional designers apply their latest tools and techniques for providing the best services. We give training to our designers for more skilled. We always think about the benefit. How can we increase his business? And the price is very affordable. We give a special facility for the bulky image. We offer a price discount for 2/3 months in every year. If any client wants to test our work, 2 images will serve without price. We are very sincere about time management. You are tension free about turnaround time. Our services open 24/7 in a year.
You can take up our shadow service.
Caption: Drop Shadow Creation
Who needs a shadow creation service?
You can put a shadow on any object for your use or business. First of all, It depends on you what you want to do. There are various places where you can use shadow creation services.
Maybe, you have a business, and you do business on buying and selling products. You need to take photos of your products before they meet the client. This service will help you make your product stand out of all by creating a shadow. A shadow usually increases the dynamic taste of an image.
Maybe you make your products as crafts, and you want them to be at their very best. In addition, you hired a good photographer. Likewise, they clicked many photos. But you want to make it stand out from all other competitors. You can use the Photoshop drop shadow tool to increase its dynamic value.
What are the benefits of Shadow Creation?
Creating a shadow is essential to work. To put it another way. The competition in the market is very high. Every business is providing something new. And with shadow creation, you can change your product. It will highlight the product adjusting it with dynamic values that will make your eyes want to see it again.
There is a scarce situation you can pull this work by yourself at home. It works for professional or specialist who has a vast experience in Photoshop or other photo editing tools. Or a service related to shadow creation.
Is there any benefit of using a Shadow creation service?
Yes, Gladly, you can have various benefits from using a shadow creation service. Many freelancer websites give a great deal. You can also work on your own. But it is best to choose from a service that is not new to the market and understands the buyer’s need. Maybe you are a beginner at photoshop, and you want to learn about how shadow service works. Go to those websites of the services that give service at a beneficial amount.
The majority of the people can not find the exact fact of why to use a shadow service. The shadow creation service is a cheap process than doing it yourself. Many websites are providing a fair amount of new work every single day. You know it is hard to create a shadow.
Some features you should not ignore.
Never try to do this risky work on your own. It can cause permanent damage to the product or image. You can use our service called photo design expert. Make sure you check all the packages we have and select one that meets your criteria.
There are so many features that are related to other services. You can compare them on your own and find a better choice for you. They offer different prices for an additional amount of needs and services. You can use our service for a great deal, and you can enjoy the results.
The shadow creation does have some initial features. Those are:
• Drop shadow • Existing shadow. • Natural shadow.
These help the product have a greater sense than just plain old photos. It will enhance the dynamic character using these three items. The benefit of getting these plans are no way near to working yourself at home.
Recommendation
It is not like this that we have a service. That is why we are promoting it. You have to know what shadow creation is. Without the proper knowledge, you can not even get an idea of what it is. Those who are new to shadow creation service can find this article very helpful.
There are occasions when you can hire a straightforward service. It will not give you the best service we are providing you. You can enjoy various features. Those are pretty much professional along with us.
You can also learn and work with Photoshop using the adobe Photoshop shadow creation service. It is not easy, but you can follow the steps and work through them. No matter what you do, experts always suggest hiring a professional for the job. It is not a simple color correction. It has many complex issues you have to understand before working. You are better off with what you did last time.
Tips and tricks
We don’t think you can use any tricks in this particular situation. You can not use any tricks as photoshop itself is pretty hard.
• Compare and choose a good site to work. • Make sure you have proper arrangements. • Use different aspect ratios and clips for every object to work.
Conclusion
It is tough to make something unique in this world. People are cheating every day for new products. Some may use your online photos also. But keep in mind that you have something else in your sleeves that can help you push yourself above all.
You can use different shadow creation services. It is efficient money saving and pretty easy to do so. Various competitors are offering these services. You can use our assistance, and you will be blown away by the considerable work our service has. So don’t waste your time by just thinking. Work on it.
0 notes
Text
Background Removal & Shadow Making ClippingDesignHome
https://clippingdesignhome.com/
#Background_Removal #Remove_Background_from_Photos #Photo_Background_Removal #eCommerce_Photo_Background_Removal #Background_Removal_Services #Shadow_Making #Shadow_Creation #Photoshop_Shadow #Image_Shadow_Making #Product_Shadow_Making_Service #Drop_Shadow #Natural_Shadow #Reflection_Shadow
[email protected] https://clippingdesignhome.com/

2 notes
·
View notes
Photo

https://www.cutoutcenter.com/
#Backgroundremoveservice
Specialties clipping path service, Photoshop image masking service, Image manipulation service, image retouching service, Color correction service, Shadow / Reflection creating service, Website image optimization service, Raster to vector, and Manipulation service
#Clipping_Path #Mullti_Path #Backgroud_Removing #Image_Masking(#Layer_Masking #Hair_Mask #Alfa_Mask #Refine_Mask) #Shadow_Creatio#Shadow_Creatio#Shadow_Creation(#Natarul_Shadow #Orginal_Shadow #Drop_Shadow #Reflection_Shadow) #Re_sizing #Image_Cropping#Retouching_Service (#Basic_Retouch #Glamour_Retouch #High_End_Retouch #Jewelry_Retouch)
1 note
·
View note
Photo

Shadows & reflections Service - Get Free Trial (2 Image) One of the most popular services we offer here independent Clipping Path - ICP is the clipping path.#Clipping #path usage requires proficiency and training, which all of our workers possess in order to provide you with the best possible #service.#drop_shadow Photoshop cc, What is Photoshop shadow effect, #drop_shadow, #shadow_creation,#Photoshop #shadow_effect, #reflection_shadow Learn More: https://www.independentclippingpath.com/
1 note
·
View note
Text
How to Add Drop Shadow Effect In Flutter?

During app development, specific modules are necessary to add to fix or insert additional features or optimize some functions. In Flutter app development, one common action that project leaders require is adding a shadow effect. For this, the DropShadow plugin of Flutter is a useful component that one can apply to pictures and widgets.
You can hire Flutter developer to handle the process of implementing the demo program for drop shadow in Flutter projects and properly apply this plugin. Flutter development company have experience with handling the drop shadow packages within Flutter apps. But first, knowing what it means is important. Here, you will read about all the necessary details on this Effect.
Short Overview of Drop Shadow Effect The Drop Shadow is an effect that can apply to widgets or any image during the development process. Flutter programmers use the drop_shadow package to apply this coding in Flutter-made apps and optimize the UI quality. With this, a shadow effect is noticeable in different types of elements, like asset images, networking images, text widgets, and container widgets.
Example of Drop Shadow Types Here are some examples of different types of coding that go into specific types of drop shadow implementation.
Solution 1: Box.Decoration.boxShadow This type of code would help prepare a type of amber box using the drop shadow. The benefit of using the BoxDecoration.boxShadow is that one can monitor and control multiple shadow characteristics carefully. Here are some of these characteristics:
BlurRadius- This sets the shadow radius. color- Specifically for the shadow color. Offset- Sets the shadow offset. blurStyle- This sets the blurring style and holds the default value of BlurStyle.normal. spreadRadius- Before applying blur, the box should inflate for a specific limit. This is that amount. The code: Scaffold( appBar: AppBar(title: const Text(‘Dropshadow'),), body: Center( child: Container( width: 300, height: 300, decoration: BoxDecoration( color: Colors.amber.shade300, borderRadius: BorderRadius.circular(5), // implement shadow effect boxShadow: const [ BoxShadow( color: Colors.black54, // shadow color blurRadius: 20, // shadow radius offset: Offset(5, 10), // shadow offset spreadRadius: 0.1, // The amount the box should be inflated prior to applying the blur blurStyle: BlurStyle.normal // set blur style ), ], ), ), )); Output: solution 1 dropshadow Solution 2: Material Widget Developers can create the drop shadow effect with the help of a Material widget.
The code: Scaffold( appBar: AppBar(title: const Text('Dropshadow')), body: Center( child: Material( elevation: 20, shadowColor: Colors.black, color: Colors.pink, shape: RoundedRectangleBorder(borderRadius: BorderRadius.circular(150)), child: const SizedBox( width: 300, height: 300, ), ))); Output: solution 2 dropshadow Solution 3: Card Widget Developers can add drop shadow by using a Card widget to wrap the primary widget. This is one of the quickest and simplest solutions to try, and one can customize this drop shadow type further. The elements for that include:
shadowColor- This signifies the shadow color. elevation- This customization helps control shadow size behind the Card widget. The code: Scaffold( appBar: AppBar(title: const Text('Dropshadow')), body: const Center( child: Card( elevation: 16, // the size of the shadow shadowColor: Colors.black, // shadow color color: Colors.lightGreen, child: SizedBox( width: 320, height: 240, ), ), )); Output: solution 3 dropshadow Solution 4: PhysicalModel Widget It is possible to use the PhysicalModel widget for implementing the drop shadow effect in Flutter apps.
The code: Scaffold( appBar: AppBar(title: const Text(‘Dropshadow')), body: const Center( child: PhysicalModel( color: Colors.blueAccent, elevation: 10, shadowColor: Colors.blue, child: SizedBox( width: 320, height: 280, ), ), )); Output: solution 4 dropshadow Solution 5: Drop Shadows for Text You can use the simple_shadow plugin type to insert a drop shadow effect within text components.
The code: Widget build(BuildContext context) { return Scaffold( appBar: AppBar( title: const Text('Dropshadow'), ), body: Center( child: Text( 'flutteragency', style: TextStyle(fontSize: 60, fontWeight: FontWeight.bold, shadows: [ Shadow( color: Colors.black.withOpacity(0.3), offset: const Offset(15, 15), blurRadius: 15), ]), ), ), ); } Output: solution 5 dropshadow Constructor Notably, it is important to call for the constructor element underneath to utilize the DropShadow plugin properly.
The code for this is as follows: const DropShadow({ Key? key, required this.child, this.blurRadius = 10.0, this.borderRadius = 0.0, this.offset = const Offset(0.0, 8.0), this.opacity = 1.0, this.spread = 1.0, }) Make sure the required fields must not be empty when the constructor called.
Implementation of DropShadow The sequence is explained hereafter for implementing the DropShadow effect accurately. It is important to understand and follow the steps accurately to avoid coding errors.
Step 1: Insert the dependencies In the pubspec-yaml file, add the available dependencies. e.g., dependencies: flutter: sdk: Flutter drop_shadow: ^0.0.1+4
Step 2: Include the assets Following the dependencies, add the available assets to the file. assets: – assets/
Step 3: Handling the importing steps Run the following sequence: import ‘package:drop_shadow/drop_shadow.dart’;
Step 4: Run package Finally, you can run the Flutter packages within the app’s root directory.
Sample Code: class HomePage extends StatelessWidget { const HomePage({Key? key}) : super(key: key); @override Widget build(BuildContext context) { return Scaffold( body: Center( child: SingleChildScrollView( child: Column( mainAxisSize: MainAxisSize.min, children: [ DropShadow( child: Image.network( 'https://images.pexels.com/photos/1191639/pexels-photo-1191639.jpeg', width: 250, ), ), const SizedBox(height: 35), DropShadow( child: Container( height: 150, width: 250, decoration: BoxDecoration( borderRadius: BorderRadius.circular(20), gradient: const LinearGradient( colors: [Color(0xFF3366FF), Color(0xFF00CCFF)], ), ), ), ), const SizedBox(height: 35), const DropShadow( child: Text( 'Sample Text', style: TextStyle(fontSize: 35, color: Colors.orange), ), ), ], ), ), ), ); } } Output: constructor dropshadow Wrapping up: Ultimately, this approach will prove beneficial if you carry out the steps properly.
Frequently Asked Questions (FAQs) 1. What is a material widget in Flutter? The material widget is liable for Clipping if clip behavior is not Clip. none, then the material clips its widgets sub-tree to the shape already defined by shape, type, and borderRadius.
2. How many types of widgets are in Flutter development? There are usually two types of widgets in Flutter: The stateful widget and the Stateless widget.
3. Why is a widget used in a Flutter application? Flutter widgets are used to create a modern framework that has taken inspiration from React. The main idea is to develop the UI out of the widgets. It describes what their view will look like with the current configuration and state.
Content Source: https://flutteragency.com/add-drop-shadow-effect-in-flutter/
0 notes
Text
Movement Briefing/Media Conference Wednesday 6pm: The Bus Riders Union Calls on Mayor Garcetti to Drop The Apartheid Bus Pass
Movement Briefing/Media Conference Wednesday 6pm: The Bus Riders Union Calls on Mayor Garcetti to Drop The Apartheid Bus Pass
[vc_row][vc_column][vc_single_image image=”6082″ img_size=”large” alignment=”center”][mk_fancy_title font_family=”none” drop_shadow=”true”] Movement Briefing & Media Conference The Bus Riders Union Calls on MTA to end its Apartheid Pass Fareless Transportation for All Wednesday May 26th 2021 6pm PST Via Zoom [/mk_fancy_title][vc_column_text css=”.vc_custom_1621897125839{margin-bottom: 0px…
View On WordPress
#Barbara Lott Holland#bus riders union#Channing Martinez#Eric Garcetti#Eric Mann#fareless transportation#Fight for the Soul of the Cities#Free Public Transit#Free Public Transportation#Holly Mitchell#Labor Community Strategy Center#LACMTA#Metro#Metropolitan transportation Authority#MTA#MTA Board Meeting#no cars in l.a.#Phil Washington#Stop MTA Attacks on Black Passengers#Supervisor Hilda Solis#Supervisor Holly Mitchell#The Strategy Center#Urban Transportation
0 notes
Text
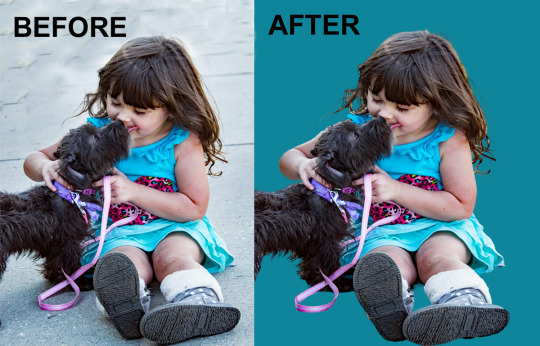
Background Cut-out
Why does your e-commerce site seem to be less sales volume than others? Well, you need to edit the photo before uploading the website image. Customers do not buy product viewing images, not real products. It does not matter how well your product is until you better represent them.
In an e-commerce business, background removal is one of the most popular services. Almost all photos require this service for you. Cut out Studio UK clipping path provides a reasonable cost-reduction fee, providing background removal services. See https://cutoutstudiouk.com for more information.
#clipping_path#background_remove#image_retouching#image_masking#clipping_Mask#Cut_Out_Studio_UK#Image_Manipulation#Studio#Drop_Shadow
1 note
·
View note
Text
Use layer masks to combine images
What you learned: Make a creative composite by combining images using a layer mask
Add a layer mask

1. Start with a document that has a minimum of 2 pictures, every on a separate layer. Choose the highest image layer in the Layers panel. 2. Click the Add layer mask button in the Layers panel. This adds a white layer mask to the chosen layer. You’ll be able to still see everything on the layer with the mask, as a result of the mask is white.
Paint on the layer mask with black, white, and gray
1. In the Layers panel, confirm there's a white border around the layer mask fingernail. If there's not a white border, click the layer mask fingernail. 2. Select the comb tool in the Toolbar. in the select photo bar, open the comb Picker to line brush size and hardness. Drag the Hardness slider toward the left to make a soft brush tip. 3. Press D then press X on the keyboard to line the foreground color to black and therefore the background color to white. 4. Paint over the image in the document window to feature black to a part of the layer mask. The black hides the corresponding a part of the layer that contains the mask, that the image on the layer beneath shows through. Soft edges of the comb apply grey to the layer mask, making a gradual transition between the stratified pictures. 5. If you hide additional of a layer than you supposed to, press X on the keyboard to modify the foreground color to white. Then paint over hidden areas of the layer that contains the mask. This adds white to the mask, transfer those areas back to read.
Tip: a fast thanks to amendment brush size as you paint is to press the correct bracket key on the keyboard to extend brush size or press the left bracket key to decrease brush size. Tip: Reducing the comb Flow worth in the select image bar permits you to create up reminder grey as you paint with black on a layer mask. Reminder grey on a layer mask part hides the layer that contains the mask. Save your work with layers • Save the image in.PSD or.TIFF format to retain layers and layer masks for a future piece of writing.
Learn more: Create your first layer mask
#Adobe_Photoshop_tutorials#Photoshop_learning#image_editing#graphic_design#Image_processing#clipping_image#Photoshop_photo_editing#photo_cutout#photo_editing_services#remove_background_from_image#clipping_path#image_masking#drop_shadow
1 note
·
View note
Text
Best car editing service for dealers
Finding the best image editing company can be a daunting task for a car dealer. I urge all car dealers to find the best site for you.
With long working experience you can also give your client a dubious job.
You need more than luck to succeed in affiliate business. You need more than luck to succeed in affiliate business. This is very important for the image.
We can understand the demand of Clander with satisfactory work samples of dealers. So Touch Editing Fast is going with this work service. You can visit our website for details: car photo editing service
#car_photo_editing#car_photo_editor#Car_Clipping_path.#Drop_shadow.#retouching_service#image_clipping_service#photo_editor_for_cars#Background_remove_services.#backgroundremoval
0 notes
Photo


Get all sorts of Image Editing Service Background Remove, Clipping path, Image Masking, Shadow making , Neck Joint and many more at the most cost efficient price !! Get your first free trial here - https://www.imageeditexpert.com/trial-now
#image_masking#jewelry_retouch#color_correction#photo_restoration#ecommerce_image_editing#clipping_path#shadow_making#background_remove#drop_shadow#neck_join#real estate photo editing
0 notes
Text
Check out my Gig on Fiverr: do background removal and photoshop editing bulk photo https://fiverr.com/share/K32XAV #background_removal #Image_Resizing #Drop_Shadow #Retouching_image #logo_design
0 notes