#Golf Alignment Sticks Target
Explore tagged Tumblr posts
Visit Tumblr Blog
Explore Tumblr blogs with no restrictions, modern design and the best experience.
Last Seen Tumblr Blogs


Fun Fact
Mobile US users spent an average of 115.8 minutes on Tumblr app monthly.
Text
Unlocking Elite Ball Striking: The Ultimate Blueprint for Creating Lag in Your Golf Swing
Introduction:
There’s little better than compressing an iron shot perfectly in the golfing world. That sharp “thump” sound you hear when the golf club hits the ball. That soaring, penetrating ball flight. The control and power that appear to come from nowhere with no effort. What’s behind this magic?
The answer is lag.
Lag is what helps produce the strongest, most accurate, and most consistent swings in golf. It is what you don’t see that creates distance and precision for tour pros. It’s also what separates the good ball strikers from those who struggle with contact, control and confidence. In this ultimate guide, you will get to know about creating lag, useful lag and exactly how to train it so you can crush your irons and improve your game.
What Is Lag and Why Does It Matter?
The Definition of Lag.
Lag is the angle formed during the downswing between the shaft of the club and your lead arm. Keeping this angle until the last possible instant boosts energy in the golf swing, allowing you to unleash the energy through impact.
Imagine a whip. The handle begins to move, then the rope follows, and finally, the tip cracks. That’s lag. The body initiates the downswing, followed by the hands as the clubhead lags before a full-speed, precise release.
Why Lag Transforms Your Iron Game.
Lag can be used to increase clubhead speed. The later the release, the more explosive the impact.
More Clubhead Speed: Lag stores energy like a spring. The later the release, the more explosive the impact.
Pure Compression: It promotes ball-first contact and de-lofts the clubface at impact.
Better Trajectory Control: Shots launch lower, spin more consistently, and hold greens.
Consistency Across the Bag: Lag improves timing, sequencing, and reduces flipping or scooping at impact.
Pure Compression: It encourages ball-first contact and de-lofts the clubhead on impact
Shots will launch lower with better spin consistency and hold greens better.
Lag helps with timing and sequencing. Also, reuses flipping or scooping at impact.
Lag vs Casting: A Game-Changer
Most amateurs cast the club, releasing the wrists too early. This “early throw” kills lag, leading to weak, high shots that lack spin and control. When you learn to maintain lag, your swing becomes more efficient, powerful, and accurate.
The Mechanics of Creating Lag
Wrist Angles and Hinge
To build lag, you must first hinge the wrists properly in the backswing, maintaining roughly a 90° angle between the lead forearm and the club. But hinging is only part of the puzzle. The real magic happens in transition.
Downswing Sequencing
The downswing must begin from the ground up:
Lower body initiates: Hips rotate and shift toward the target.
Torso follows: Your upper body stays back while the arms stay passive.
Hands and wrists retain the angle: Only in the last few feet before impact do you release it.
This kinetic sequence is the engine of power and timing, and it’s what allows lag to build naturally.
Stability and Balance
Without lower body stability, you can’t create or maintain lag. Swaying, sliding, or standing up during transition disrupts timing and leaks power. Strengthening your core and improving balance will make it easier to hold your leg.
The Best Drills to Create and Train Lag
Drill #1: The Exaggerated Lag Feel Drill
Setup: Use a 7-iron and place an alignment stick along your stance line.
Execution: Make half swings. Focus on dragging the handle toward the ball, keeping the wrists hinged and holding the lag angle well into the downswing.
Purpose: Ingrains the sensation of retaining lag and delaying release.
Pro Tip: Video yourself to check shaft lean at impact.
Drill #2: No-Cast Resistance Drill
Setup: Hold the club out in front of you with extended arms.
Execution: Move the club back and forth, feeling the clubhead trail your hands naturally.
Purpose: Reprograms the mind-body connection to eliminate early release.
Feels: Light wrists, heavy clubhead.
Drill #3: Towel Compression Drill
Setup: Place a folded towel 6 inches behind the ball.
Execution: Hit balls without touching the towel. Focus on ball-first, ground-second contact.
Purpose: Encourages shaft lean, downward strike, and forward weight shift.
Drill #4: Pump Drill (Tour Pro Favourite)
Setup: Address the ball and take your club to the top of your backswing.
Execution: Pump the club halfway down two to three times before swinging through.
Purpose: Trains timing and transition without early release.
Drill #5: Wall Lag Drill
Setup: Stand facing a wall with the butt end of your club against it.
Execution: Rehearse your downswing without the clubhead hitting the wall.
Purpose: Encourages a shallower path and retained lag.
Advanced Concepts to Reinforce Lag
Compress, Don’t Scoop
Compression is the result of lag and shaft lean. Instead of trying to “help” the ball into the air, focus on hitting down on the ball and letting the loft of the club do the work.
Drag the Handle
Think of dragging the grip through the impact zone while the clubhead lags. This simple thought instantly improves impact dynamics.
Use the Bounce, Not the Hands
Let your body rotation andd gravity create the release. Avoid trying to manually flip the club at the ball.
Strength and Mobility Training for Lag
Core and Rotational Power
Medicine Ball Rotational Throws
Russian Twists
Cable Woodchoppers
Forearm and Grip Strength
Wrist Curls
Farmer’s Carry
Rice Bucket Drills
Shoulder and Spine Mobility
Band Pull-Aparts
Wall Angels
Thoracic Rotations
Stability and Balance
Single-Leg Swings
Bosu Ball Drills
Plank Variations
You can’t create lag if your body can’t handle the forces. Training off the course is just as important as what you do on it.
Mastering the Mental Game of Lag
Trust the Transition
The majority of golfers accelerate their downswing to prevent power loss. Ironically, lag requires patience. Trust that the clubhead will arrive late.
One Thought Only
Overthinking kills lag. Try these mental cues:
“Lead with the grip.”
“Drag the handle.”
“Let it fall.”
Choose one and stick with it.
Embrace the Process
You won’t master lag overnight. It takes reps, ffeedback, and feel. Acknowledge your progress by recognising moments of crisp contact and lower ball flights.
Training Aids to Accelerate Lag Mastery
Introducing the Lag Shot Swing Trainer
The Lag Shot represents a groundbreaking swing trainer that utilises a flexible shaft to maximise lag development and sequencing during practice.
Why It Works
Promotes a smooth transition
Forces correct body rotation
Prevents casting
Builds lag muscle memory
How to Use It
Begin your training session by performing ten swings with the Lag Shot.
Perform five swings with the Lag Shot Swing Trainer, followed by five swings with a regular iron.
Concentrate on maintaining tempo while experiencing the clubhead “snap” at the moment of impact.
Real-World Results
Instructors Adam Bazalgette and Andrew Rice trust the LAG Shot to quickly transform their ball striking, as do bother coaches and students.
Practice Routines to Build and Sustain Lag
Weekly Practice Plan
Day 1 – Lag Awareness:
Exaggerated Lag Drill: 10 reps
Lag Shot swings: 10 reps
Short iron shots: 30 balls with focus on compression
Day 2 – Impact Zone Mastery:
Towel Drill: 15 reps
Wall Drill: 10 reps
Slow-motion swings: 10 reps
Day 3 – Strength and Motion:
30 minutes of mobility and stability training
20 swings with Lag Shot
Hit 10 shots focusing only on swing feel.
Track Progress
Use video to check for shaft lean.n
Launch monitor: look for lower dynamic loft, increased ball speed
Journal your feelings and outcomes.
Taking Your Lag to the Course
On-Course Strategies
Begin your practice using 9-irons and wedges to establish your confidence level.
Utilise knockdown shots in windy conditions to develop a sense of lag.
Keep your swing thought simple: “Handle first”
Measure Improvement
Are you hitting more greens?
Is your ball flight more penetrating?
Is your contact more consistent?
Even without an immediate drop in your score, these observations demonstrate that your lag performance has improved.
Conclusion:
The concept of lag extends beyond technical terminology to become the essential component for elite ball striking in golf. Any golfer who understands proper mechanics while developing strength and mental focus can learn this powerful move through practice.You don’t need to be a pro. This blueprint provides exactly what you need. Commit to these drills. Trust the process. Use tools like the Lag Shot. Aim for the sensation of striking an iron shot perfectly instead of seeking perfection. After experiencing the natural power of authentic lag, you will not desire to return.
#golf#golf swing training aid#golf training#shiftgolf#golf helth#golf swing trainer#golf tips#golfers#golf lag#golf lagshot trainer#golf lag drill#Golf Lag Drill
0 notes
Text
Mastering the Green: The Ultimate Guide to Reaching Golf's High Points and Sustaining Success


Golf is much more than a game of hitting a ball into a hole; it’s a journey of precision, strategy, mental fortitude, and relentless self-improvement. Achieving high points in golf—moments of peak performance and success—requires a blend of physical skills, mental discipline, and a deep understanding of the game. Here’s a detailed exploration of how to reach and sustain success in golf.


1. Master the Fundamentals
Every great golfer starts with a solid foundation. The basics of grip, stance, posture, and alignment are critical to a consistent and effective swing. Dedicate time to:
Grip: Ensure your grip is neither too tight nor too loose. Experiment with different styles, such as the interlocking or overlapping grip, to find what suits you best.
Stance: Maintain a balanced stance with feet shoulder-width apart and weight distributed evenly.
Posture: Keep a straight back, bend slightly at the hips, and keep your eyes on the ball.
Alignment: Use alignment aids like clubs or alignment sticks during practice to ensure your body and clubface are aimed at the target.
2. Develop a Practice Routine
Success in golf demands structured practice. Focus on different aspects of your game during each session:
Driving: Work on maximizing distance while maintaining accuracy. Use a launch monitor to analyze your swing path and ball trajectory.
Short Game: Spend significant time on chipping, pitching, and bunker shots. A strong short game can save strokes and make up for inaccuracies in long shots.
Putting: Practice both distance control and accuracy. Use drills like the clock drill to improve consistency.
Course Management: Simulate real-game scenarios during practice rounds to improve decision-making.
3. Strengthen Your Mental Game
Golf is as much a mental challenge as it is a physical one. Techniques to enhance mental strength include:
Visualization: Picture successful shots in your mind before executing them.
Focus: Stay present in the moment and avoid dwelling on past mistakes or future outcomes.
Resilience: Accept bad shots gracefully and move on to the next challenge with confidence.
Routine: Establish a pre-shot routine to create consistency and reduce anxiety.
4. Invest in Physical Fitness
A strong, flexible, and fit body can significantly enhance your golf performance. Focus on:
Core Strength: Essential for stability and power in your swing.
Flexibility: Improves your range of motion and reduces the risk of injury. Yoga and dynamic stretching are excellent practices.
Cardiovascular Fitness: Walking 18 holes requires stamina. Regular aerobic exercises like running or cycling can help.
Balance and Coordination: Incorporate exercises that improve balance, such as single-leg squats or stability ball workouts.
5. Seek Expert Guidance
Even the most successful golfers rely on coaches to refine their skills. Consider hiring a professional instructor to:
Analyze your swing mechanics.
Identify and correct flaws.
Provide personalized drills and strategies.
6. Leverage Technology
Modern technology offers tools to improve every aspect of your game. Popular options include:
Swing Analyzers: Devices that track swing speed, angle, and impact to offer actionable feedback.
Golf Simulators: Practice and play on virtual courses from the comfort of your home.
GPS Rangefinders: Help with accurate distance measurement on the course.
7. Cultivate a Competitive Edge
Playing in tournaments hones your skills and builds confidence. Start with local club events and gradually advance to regional and national competitions. Treat each tournament as a learning experience, regardless of the outcome.
8. Learn from High Points
Reflect on your best performances to identify what worked. Analyze:
Technical Skills: What techniques were particularly effective?
Mental State: How did you handle pressure?
Preparation: What aspects of your training contributed most to your success?
9. Network and Collaborate
Surround yourself with other passionate golfers. Join a golf club, participate in social games, and seek mentorship from experienced players. Sharing insights and experiences can accelerate your growth.
10. Stay Passionate and Patient
Golf is a game of lifelong learning. Embrace the challenges, celebrate small victories, and maintain a growth mindset. Patience and perseverance are essential as progress often comes in incremental steps.
Conclusion
Reaching high points in golf and sustaining success requires a harmonious blend of technical proficiency, mental strength, and strategic practice. By mastering the fundamentals, committing to continuous improvement, and staying resilient, any golfer can unlock their full potential and enjoy the rewarding journey that this game offers.
1 note
·
View note
Text
Golf Lessons for Beginners: Avoid These Common Mistakes
Golf combines skill, strategy, and patience. It's a sport that can be incredibly rewarding, offering a unique blend of mental and physical challenges.
Learning golf, however, can feel overwhelming. There are techniques, rules, and etiquette to grasp, and it is easy to become discouraged, but learning is part of the fun.
One of the best ways to enhance your game is to learn from the mistakes of others. Recognizing and understanding common pitfalls can empower you to avoid them, leading to more enjoyable play and quicker progress. Every round presents an opportunity to learn, and each lesson helps build a solid foundation for your golfing skills.
In this post, we will discuss common mistakes newcomers make during their beginner golf lessons. We will also provide practical tips on how to avoid them. By focusing on these key areas, you can set yourself up for success.

Beginners Golf Lessons: Avoid These Common Mistakes
Explore the common mistakes made when learning golf and how to avoid them.
Poor Grip Technique
One of the first things beginners struggle with is the grip technique. A poor grip can affect your swing and result in inconsistent shots. Many people, during their beginner golf lessons, grip the club too tightly or hold it incorrectly, which can lead to tension in your arms.
How to Avoid It:
Focus on holding the club gently; firm enough not to drop it but not so hard that you squeeze it. Try different grip styles (like the interlocking or overlapping grip) to find which feels comfortable for you. Practicing your grip with a coach or more experienced player can also help reinforce good habits.
Improper Stance and Alignment
Another common mistake is having an improper stance and alignment. Beginners often stand too close or too far from the ball, or they aim in the wrong direction. This can lead to poor shots and frustration.
How to Avoid It:Make sure your feet are shoulder-width apart and that you are standing at a comfortable distance from the ball. Use alignment sticks or clubs on the ground to help you visualize your target line. Practice your stance in front of a mirror to ensure you're lined up correctly. Always double-check your alignment before taking a swing.
Overthinking the Swing
Many people overthink their swing mechanics during their beginner golf lessons. They get caught up in trying to remember all the technical aspects, which can lead to hesitation and poor execution. Golf is as much about feeling as it is about technique.
How to Avoid It:Instead of focusing on every detail of your swing, simplify your thoughts. Pick one or two key points to concentrate on, such as your grip and follow-through. Visualize your shot before you swing, and trust your body to do the work. Over time, as you become more comfortable, you will naturally develop a smoother swing.
Neglecting the Short Game
While many beginners focus heavily on driving the ball from the tee, they often neglect their short game, chipping and putting. This can be a significant mistake, as the short game is crucial for lowering your score.
How to Avoid It: Dedicate time to practicing your short game. Spend at least half of your practice time on chipping and putting. Learn to read the greens and understand how to control the speed of your putts. Start with short putts and gradually move back to longer ones. A strong short game can save you strokes and boost your confidence.
Ignoring Course Management
Beginners sometimes make the mistake of playing too aggressively. They aim for the flag on every shot, regardless of the hazards in the way. This can lead to higher scores and frustration.
How to Avoid It:Learn to play smart golf. Assess the course and identify safe spots to aim for. If you see a hazard, consider taking a safer route. Focus on making strategic decisions rather than just trying to hit the ball as far as possible. Good course management can lead to lower scores and a more enjoyable experience.
Avoiding common mistakes in golf is essential for newcomers who want to improve their game during beginner golf lessons. By focusing on your grip, stance, swing, short game, and course management, you can make significant progress. Remember that everyone makes mistakes, and the key is to learn from them. With practice and patience, you'll find yourself enjoying the game more and playing better, making each round more rewarding. Find a professional golf academy that charges reasonable rates for their golf lessons and is well-rated by previous students. Then, enroll to enjoy the game.
0 notes
Text
Top Drills and Techniques from Houston’s Best Golf Lessons
Golf is a game of skill, strategy, and consistency, but mastering it requires focused practice and expert guidance. Houston’s top golf instructors have honed a variety of drills and techniques designed to help golfers of all skill levels sharpen their abilities. Whether you're trying to improve your driving, fine-tune your putting, or correct your swing, incorporating proven drills into your routine can make a big difference.
In this post, we’ll highlight some of the most effective drills and techniques taught in golf lessons in Houston to help you take your game to the next level.
1. The Alignment Drill
Proper alignment is one of the most important aspects of a consistent and powerful golf swing. Misalignment, even by a few degrees, can drastically alter the direction of your shots.
How It Works:
Lay two clubs or alignment sticks on the ground. One stick should point directly at your target, while the other should be placed parallel to it, representing where your feet should be positioned.
Practice setting up your body with your feet, hips, and shoulders aligned parallel to the target line. This ensures your entire body is aiming correctly before each shot.
Benefits:
This drill helps train your body to naturally align with the target, reducing the likelihood of wayward shots caused by poor positioning. Houston’s instructors often emphasize this drill to create muscle memory for proper alignment, so over time, it becomes second nature.
2. The One-Handed Putting Drill
Putting is often regarded as the most important aspect of golf, as it’s where the majority of scoring happens. However, putting can be challenging, and it requires a combination of precision and touch. Houston’s top golf instructors frequently use the one-handed putting drill to improve both feel and control.
How It Works:
Use your dominant hand only to putt from a short distance (3-5 feet).
Focus on a smooth, pendulum-like stroke, aiming to control the speed and accuracy of the putt.
After hitting a few balls, switch to your non-dominant hand for several putts, as this helps develop a better feel for the clubface.
Benefits:
This drill improves hand-eye coordination, refines your feel for the ball, and teaches you how to release the putter head smoothly. It’s especially effective for golfers who struggle with controlling the speed of their putts.
3. The 9-3 Drill (Half-Swing Drill)
Many golfers struggle with over-swinging, leading to loss of control and inconsistency. The 9-3 drill, which focuses on a controlled half-swing, is often recommended by Houston’s best instructors to develop a more compact and repeatable motion.
How It Works:
Set up as you normally would for a full swing.
Focus on swinging back to a position where your arms are at 9 o'clock (hands waist-high) and then finish at 3 o'clock (again, hands waist-high).
Keep your movements smooth and controlled, emphasizing balance and weight transfer during the drill.
Benefits:
The 9-3 drill encourages better tempo and rhythm while reducing excessive arm movements. It’s especially useful for improving ball striking and accuracy, as it forces golfers to focus on maintaining control rather than trying to generate maximum power.
4. The Impact Bag Drill
Solid ball contact is crucial for driving distance and accuracy. The Impact Bag Drill is designed to help golfers focus on achieving the ideal impact position for cleaner, crisper shots.
How It Works:
Place an impact bag (or a padded object) just ahead of where the ball would be in your stance.
Practice making half or full swings with the goal of hitting the bag with a square clubface at the moment of impact.
Focus on the position of your hands and body at impact, ensuring that your hands are ahead of the clubhead at contact, creating the necessary lag.
Benefits:
This drill promotes proper hand positioning and weight transfer at impact, helping you compress the ball and generate more distance. It’s frequently used in golf lessons in Houston to fix issues like flipping the wrists or coming in too shallow at impact.
5. The Gate Drill for Putting
To improve accuracy on the greens, Houston’s top instructors often recommend the Gate Drill, which is excellent for practicing straight putts and controlling the putter’s path.
How It Works:
Place two tees just outside the width of your putter head, forming a “gate.”
Position the ball about a foot or two from the hole and practice putting through the gate without touching the tees.
Start with short putts and gradually increase the distance as your accuracy improves.
Benefits:
The Gate Drill helps you develop a straight putting stroke, eliminating side spin or pushing and pulling of the putt. This drill is perfect for golfers who struggle with consistency on short putts and is widely used to build confidence in making solid, straight strokes.
6. The Bunker Shot Technique
Bunker shots can be intimidating, but with the right technique, they become much easier to manage. Houston’s top golf coaches break down bunker shots into simple steps to help golfers escape the sand with confidence.
How It Works:
Focus on an open stance and clubface, aiming to slide the club under the ball.
Place the ball slightly forward in your stance and aim to hit the sand about 2 inches behind the ball.
Use a smooth, full swing with follow-through, allowing the sand to carry the ball onto the green.
Benefits:
This technique helps you get comfortable with the concept of hitting sand rather than trying to make direct contact with the ball. With repetition, this approach reduces fear and hesitation when faced with bunker shots, leading to better results in tricky situations.
7. The Clock Drill for Chipping
Chipping around the green is one of the most crucial skills for lowering your scores. The Clock Drill is often employed by Houston’s instructors to help golfers improve their distance control and accuracy with chips.
How It Works:
Picture the hands of a clock surrounding the hole.
Place balls at the 12, 3, 6, and 9 o'clock positions, each about 3 to 5 feet away from the hole.
Chip from each position, aiming to get the ball as close to the hole as possible.
Once you can consistently chip each ball close, gradually move farther away from the hole and repeat the drill.
Benefits:
This drill sharpens your ability to judge distances and hit accurate chips from all angles around the green. It’s an excellent way to simulate real-game situations and build confidence with short-game shots.
8. The Mirror Drill for Swing Plane
Maintaining the correct swing plane is essential for consistent ball striking. The Mirror Drill, widely used in Houston’s golf lessons, helps you monitor and correct your swing plane in real-time.
How It Works:
Stand in front of a full-length mirror with a golf club.
Take slow practice swings, watching your reflection to ensure that your club follows the correct swing path.
Focus on keeping the club on-plane during both the backswing and follow-through.
Benefits:
The Mirror Drill provides immediate visual feedback, allowing you to see whether your club is on the proper swing plane. Over time, this drill helps correct over-the-top swings or steep angles, leading to more consistent and straighter shots.
Conclusion
Houston’s top golf instructors rely on a combination of proven drills and techniques to help golfers improve every aspect of their game. Whether you’re struggling with your putting, chipping, or full-swing mechanics, these drills provide practical solutions for making significant improvements. Incorporating these exercises into your practice routine can help you develop better fundamentals, boost your confidence, and see tangible results on the course.
0 notes
Text
𝐒𝐤𝐲𝐓𝐫𝐚𝐤 𝐒𝐈𝐆𝟖 𝐆𝐨𝐥𝐟 𝐒𝐢𝐦𝐮𝐥𝐚𝐭𝐨𝐫

The Indoor Golf Shop’s SIG8 SkyTrak Package is the best of both worlds…
With an 8'W screen it's a smaller screen option that's packed with features to deliver the perfect mix of entertainment and accuracy - all the while still hanging around in our more affordable simulator class!
With absolutely everything you need to get your home golf simulator set up and host a golf party, it's no wonder the SkyTrak SIG8 is one our most popular golf simulators.
What's Included In The SkyTrak SIG8 PackageSkyTrak Golf Launch Monitor Metal Protective Case Play & Improve Software SIG8 Golf Simulator Enclosure Landing Pad Turf Choice of Golf Hitting Mat Golf Simulator Projector Ceiling Mount 15' HDMI Cable and HDMI to Lightning Cable Charging Cable for SkyTrak
Here's What You're Getting
SkyTrak Golf Launch Monitor
The SkyTrak is among the most accurate launch monitors available to everyday golfers. Head to head studies show SkyTrak is 98% as accurate as the Trackman, at a fraction the cost.
What We Like About The SkyTrak:Amazing Accuracy Ability To Provide Numerous Measurements Such As: Launch Angle, Back Spin, Carry Distance Great Game Improvement Tool Easy To Use. Review Our Quick Setup Guide Works With iOS, Android, and PC. Full list of compatible devices
SkyTrak Metal Protective Case
The SkyTrak Protective Metal Case is the official metal case authorized for use with SkyTrak, and is a great way to protect your investment.
Features:Laser cut from 13-gauge steel Offers protection from light drops, scratches and bumps Can plug SkyTrak into wall charger while in the case Easy access to the power button Ability to view the LEDs through the case Adjustable legs for leveling or raising SkyTrak Integrated alignment stick channel
SkyTrak Play & Improve Software (Yearly Subscription)
15 E6 Courses (iOS & PC) - Aviara, Belfry, Sanctuary, Wade Hampton, Stone Canyon, Bandon Dunes, Oakmont, Torrey Pines, Troon North, Prairie Dunes, Banff, Barton Creek, Loch Lomond, Pelican Hill, Cabo Del Sol
15 WGT Courses (iOS) - PGA National, Pebble Beach, St Andrews, Bethpage Black, Olympic Club, Ocean Course at Kiawah, Chambers Bay, Erin Hills, Pinehurst #2, Congressional CC, Merion GC, Wolf Creek, Royal St Georges
6 Nine Shot Challenge Courses - Edgewood Tahoe Celtic Manor, Valhalla, Harbor Town, Pinehurst #8, Bandon Dunes – Best of Par 3, Lanai GC3D Driving Range with Shot Tracer Technology Instant Ball Performance Data & Shot replay Target practice (single or multiplayer) Skills assessment feature Bag mapping Progress Tracking Custom Environmental Settings (humidity, wind, etc.) 5 Different Camera Views
SIG8 Golf Simulator Enclosure
The SIG8 screen and enclosure pairs beautifully with the SkyTrak. Built tough, the SIG8 screen can withstand the hardest of golf shots time after time. Unlike other screen systems, we designed the SIG8 so that it can fit within compact spaces with as little as 9'W. Due to the squareness of the screen, the image will fill in 80% of the screen - there will be some white space above and below the image.
Features:Image Fills In 80% Of The Screen in HD Premium, Handcrafted, Made in the USA Powder Coated Aluminum Frame Tight Knit Polyester Impact Screen Protective Foam Padding Around The Screen Dimensions: 8'4"H x 8'4"W x 5' D
Golf Simulator Projector
With WUXGA (1920×1200) resolution and 6,000 Lumens, your golf simulator projector will have the best image and color quality for your indoor golfing experience.
Landing Pad Turf
The landing pad is made specifically for the SIG8 golf simulator. It fills in the area between the screen and the hitting mat making it aesthetically pleasing and protects your floor from golf ball strikes.
Ceiling Mount
The Ceiling Mount is a permanent option that ensures your projector is out of the way and safe from any stray golf shots.
Cables and Adapters
A 50' HDMI cable is included! If your launch monitor has IOS compatibility a Lightning to HDMI Adapter will also be included.
Choice of Golf Mat
Fairway Series 5' x 5' Golf Mat
Our Fairway Series mat is 5' x 5', roughly one inch thick and can hold a real tee. Ideal for those seeking realistic feel.
SIGPRO Softy 4' x 7' Golf Mat
The SIGPRO 4' x 7' is easy on the joints, and has enough space to set the SkyTrak on the mat so it is level with the ball.
SIG8 Golf Simulator Flooring
The Indoor Golf Shop's simulator flooring is a great option for those seeking the clean, professional look of a custom install - with the convenience of a done for you, easy to assemble kit.
It combines the best of two worlds: an integrated hitting strip embedded into the floor for full swing shots, surrounded by a putting green with four cups for dialing in your short game.
Not only does this look great, but it also conserves space by reducing the footprint of the hitting surface and maximizing the putting and chipping surface.
That's the beauty of SIGPRO's golf simulator flooring.
Shopping Link
#improveyourswing#gamechanger#golf#golfing#golfmat#swingturf#golf accessories#golf equipment#sports#golfer#golfpractice#golftime#golfersofinstagram#instagolfer#golfdigest#golfinstruction#golfcart#golferslife#golflove#golflessons#golfball#taylormade#golfinglife#golfgods#golfclubs#golfbabes#golfcourses#lpga#juniorgolf#golfgame
0 notes
Text
How To Improve Golf Swing At Home?

How To Improve Golf Swing At Home?
Introduction
Improving your golf swing at home can be a convenient and effective way to enhance. Your performance on the golf course. Whether you are a beginner looking to develop fundamental skills or an experienced golfer aiming to refine your technique or practicing at home provides valuable opportunities for improvement.
For more: How To Improve Golf Swing At Home?
In this guide we will explore a range of exercises or drills and tips that you can easily incorporate into your daily routine to enhance. Your golf swing and ultimately lower your scores on the course. So grab your golf clubs or find a suitable space in your home or yard and let’s get started on the journey to a better golf swing.
How Can I Make My Swing Perfect at Home?
Perfecting your golf swing at home is achievable with consistent .Here are steps to help you improve your golf swing
Understand the Basics:
Start by understanding the fundamental components of a golf swing. This includes grip or stance, posture and alignment. Online tutorials and instructional videos can provide valuable insights.
Mirror Work:
Use a full length mirror or record videos of your swing. This allows you to visually assess your posture or alignment and swing mechanics. Compare your movements to professional golfers to identify areas for improvement.
Balance and Stability:
Balance is crucial in golf. Practice balance exercises like standing on one foot or performing yoga poses. This will improve stability during your swing.
Swing Plane:
Create a makeshift swing plane by using a broomstick or alignment sticks. Swing the club along the plane to develop a more consistent and on target swing path.
Strength and Flexibility:
Incorporate exercises that enhance your core strength and flexibility. Focus on your lower back hips and abdominal muscles as they play a significant role in your swing.
Indoor Putting Practice:
Set up a putting mat or create a putting area with a cup and practice your putting indoors. This helps develop your putting stroke. which is essential for a lower score.
Impact Bag or Pillow Drill:
An impact bag or a heavy pillow can simulate the impact position of your golf swing. Practice making solid contact with the bag to improve your ball striking skills.
Slow Motion Swings:
Practice your swing in slow motion to break it down into its components. This allows you to focus on specific aspects.Like takeaway backswing, downswing, and follow through.
Alignment Sticks:
Use alignment sticks to ensure your clubface or body and target are properly aligned. This helps develop a more consistent setup.
Mental Visualization:
Spend time visualizing a perfect swing. This mental practice can improve your swing consistency and effectiveness.
Grip and Posture Drills:
Work on your grip and posture regularly. Proper grip and posture are the foundation of a good golf swing.
Review Professional Instruction:
Seek online lessons or instructional from professional golf instructors. They can provide personalized feedback and guidance based on your swing.
Practice Routines:
Develop a structured practice routine. Dedicate time to different aspects of your swing such as pitching and driving during each session.
Golf Simulators:
If you have access to a golf simulator.It can be a valuable tool for practicing your swing indoors with realistic feedback.
Stay Fit:
Maintain overall fitness through cardio and strength training exercises. Being physically fit can enhance your golf swing power and endurance.
Remember that consistent and deliberate practice is key to improving your golf swing. It is also beneficial to periodically seek feedback from a golf professional to fine tune your technique. With determination and the proper approach. You can make significant strides in perfecting your golf swing from the comfort of your home.
What Drills can I do to improve my golf swing?
Improving your golf swing involves practicing specific drills that target different aspects of your swing mechanics.
Alignment Stick Drill:
The Alignment Stick Drill is a golf training exercise or drill used by golfers to improve. Their alignment and consistency in their swing. It involves the use of alignment sticks. Which are typically long slender rods or sticks. That can be placed on the ground to help golfers set up and maintain the correct alignment. Their body and clubface in relation to the tar.
The Alignment Stick Drill is a valuable tool for golfers of all skill levels to improve. Their alignment which is crucial for hitting accurate and consistent shots. It helps golfers develop muscle memory for the correct setup and swing path ultimately leading to better performance on the golf course.
Slow Motion Swing Drill:
A Slow Motion Swing Drill is a golf practice technique. Where a golfer deliberately swings the golf club in slow motion. A much slower pace than their regular swing. The purpose of this drill is to break down the golf swing into its individual components. The golfer focuses on proper form balance and mechanics. It can be a valuable training method to improve swing consistency and identify and correct flaws in one technique.
Once you have practiced the slow motion swing drill and feel comfortable with the correct mechanics. You can gradually increase the speed of your swing to transition back to your regular full speed swing while maintaining. The improvements in your form and technique.
Impact Bag Drill:
The Impact Bag Drill is a training exercise commonly used in sports like golf and martial arts to improve technique and develop muscle memory. It involves striking or swinging at a target, typically a soft bag or cushion, to work on specific aspects of form or power, and control.
The Impact Bag Drill is beneficial because it allows golfers to work. Their impact position without the pressure of hitting an actual golf ball. This helps in building muscle memory and improving the mechanics of the golf swing. It is often used as part of a broader training regimen to enhance golfer overall performance on the course. Golfers of all skill levels can benefit from this drill to refine. Their swing and achieve better results in their golf game.
Swing Speed Training:
Swing speed training is a golf specific training method aimed at increasing a golfer’s clubhead speed during their golf swing. This training is designed to help golfers hit the ball farther off the tee and achieve greater distances with their clubs. Ultimately improving their performance on the golf course. Increasing swing speed can be particularly beneficial for golfers looking to gain more distance and be competitive in various golf formats.
It’s important to note that swing speed training should be approached with caution and under the guidance of a golf professional or fitness expert. Overexertion or improper training techniques can lead to injury. Golfers should aim for a balance between power and control in their swings as simply. Increasing speed without maintaining accuracy can lead to inconsistent results on the golf course.
How Can I Increase My Golf Swing Power?
Increasing your golf swing power requires a combination of physical conditioning, improved technique, and consistent practice. Here are some tips to help you enhance your golf swing power.
Strength Training:
Strength training also known as resistance training or weight training is a form of exercise.That aims to increase an individual. Physical strength by using resistance or weights to overcome muscular resistance. The primary goal of strength training is to develop and enhance the muscles ability to generate force. Which can lead to improvements in muscle size or endurance and overall functional capacity.
Remember that increasing golf swing power is a gradual process. It is essential to strike a balance between power and control. Work with a golf professional to assess your swing and provide personalized guidance on how to enhance your power. While maintaining accuracy and consistency in your game.
For more: How To Improve Golf Swing At Home?
0 notes
Text
Mastering Your Golf Swing: Tips for Improving Accuracy and Distance
The golf swing is the cornerstone of your game, and mastering it is essential for achieving accuracy, distance, and consistency. As a golfer, understanding the mechanics of a proper golf swing and honing your technique can significantly impact your performance. In this article, we will explore valuable tips and drills to help you improve your golf swing, allowing you to unleash your game's full potential and elevate your golfing experience.
Perfecting Your Grip
A proper grip is fundamental to a successful golf swing. Place the club in your left hand for a right-handed golfer, ensuring that the grip rests diagonally across your palm. Close your hand around the club, creating a "V" shape between your thumb and index finger, pointing towards your right shoulder. Now, place your right hand on the club, ensuring your palms face each other. A neutral grip sets the foundation for a controlled and consistent swing.
Stance and Alignment
A proper stance and alignment are crucial for generating power and accuracy in your swing. Stand with your feet shoulder-width apart and position the ball in line with your lead foot (left foot for right-handed golfers). Keep your knees slightly flexed and your weight evenly distributed on both feet. Align your body parallel to the target line, with your shoulders, hips, and feet pointing in the same direction.
Backswing and Takeaway
During the backswing, initiate the movement by turning your shoulders away from the target while maintaining a stable lower body. Keep your left arm straight and your wrists firm, avoiding excessive bending or cupping. As you complete the backswing, your wrists should be fully hinged, forming a 90-degree angle between the club shaft and left arm.
Downswing and Impact
The downswing is a critical phase where energy is transferred to the ball for maximum distance and accuracy. Initiate the downswing by rotating your hips and shifting your weight onto your lead foot. Maintain a smooth transition from the backswing to the downswing, avoiding abrupt movements. As you approach impact, focus on maintaining a square clubface to the target line, allowing for a solid strike on the ball.
Follow-Through and Finish
A proper follow-through is a natural extension of a well-executed downswing. After making contact with the ball, continue the motion by extending your arms fully and rotating your body towards the target. Your hips and shoulders should face the target, and your weight should be balanced on your lead foot. A balanced and fluid finish is indicative of a well-controlled swing.
Practicing with Alignment Aids
Alignment aids, such as alignment sticks or golf training aids, can be immensely helpful in improving your swing mechanics. Set up these aids on the ground to ensure your feet, hips, and shoulders are aligned correctly. Regularly practicing with alignment aids reinforces proper alignment and helps develop muscle memory for consistent swings.
Video Analysis
Recording your swing on video is a valuable practice for analyzing your technique. Use a smartphone or camera to capture your swing from different angles. Analyze your grip, stance, backswing, and downswing to identify areas for improvement. You can also compare your swing to professional golfers or seek feedback from a golf instructor.
Tempo and Rhythm
A smooth and consistent tempo is essential for a controlled swing. Avoid rushing your swing, and maintain a steady rhythm throughout. Practicing with a metronome or counting a consistent cadence in your head can help you develop a balanced and rhythmic swing.
Mastering your golf swing is a continuous journey that requires patience, dedication, and practice. Focus on perfecting your grip, stance, and alignment to set the foundation for a successful swing. Pay close attention to your backswing and downswing, ensuring a fluid transition and a square clubface at impact. Utilize alignment aids and video analysis to refine your technique and develop muscle memory. Consistency is essential; practicing with a steady tempo and rhythm will contribute to your overall success. Incorporating these tips and drills into your practice routine will undoubtedly improve your golf swing, leading to enhanced accuracy, increased distance, and a more enjoyable golfing experience.
0 notes
Text
BIKEHAND Bike Bicycle Professional Wheel Alignment Gauge Dish Dishing Tool
BIKEHAND Bike Bicycle Professional Wheel Alignment Gauge Dish Dishing Tool
The very best Golf Alignment Sticks Pro. BIKEHAND Bike Bicycle Professional Wheel Alignment Gauge Dish Dishing Tool.
Golf Alignment Sticks Pro – Shop for Discount Price [price_with_discount]
Pick your Colours Golf Alignment Sticks Pro, BIKEHAND Bike Bicycle Professional Wheel Alignment Gauge Dish Dishing Tool.
USD$39.00

[ad_1]
BIKEHAND Bike Bicycle Professional Wheel Alignment Gauge Dish…
View On WordPress
#Adjustable Golf Alignment Sticks#Alignment Stick Golf Phone Attachment#Alignment Sticks Golf Amazon#Callaway Golf Alignment Stick Cover#Folding Golf Alignment Stick#Golf Alignment Sticks Blue#Golf Alignment Sticks Bubbawhips#Golf Alignment Sticks Free#Golf Alignment Sticks Target#Golf Rules Alignment Sticks#Golf Sticks for Alignment#Golf Swing Drills With Alignment Sticks#Golf Takeaway Alignment Sticks#Green Golf Alignment Sticks#How Do Golf Alignment Sticks Work#Pro Alignment Sticks Golf#Set up Golf Alignment Sticks#Taylormade Golf Alignment Stick Cover#Using Golf Alignment Sticks
0 notes
Text
Three Portable Golf Launch Monitor Models Reviewed
How do you find the best golf launch monitor? There are so many different variables that go into the best golf launch monitor: size, technology, data points and affordability are just a few of them. In this post, we'll review and compare different options for your best golf launch monitor, across an assortment of different budgets.
A golf launch monitor is designed to measure the distance, rotation speed and direction of the club-head on impact with the ball. They are useful for personal golf instruction and training as well as by golfers who are keen to increase their accuracy and consistency. One common scenario for using one of these devices is to use it to train or improve your swing mechanics, by measuring the club-head angle and distance as you hit the ball. However, it can also be used by golfers who play regularly on a golf course and would like to check their accuracy from the comfort of their own homes. The device has evolved over the years to the point where it is now quite reasonably priced.
But that golf launch monitor should you buy? Our tests found that there were several devices that provided good value for money, but none of them offered the level of accuracy that most golfers require. Most of the ones that offer decent value for money either have poor display resolution or don't offer very accurate measurements. Worse still, many of the devices that didn't rate very highly in terms of their performance actually cost more to use than their competitors. Our verdict? Stick with business enterprise solutions like the Trackman.
Despite their limitations, our tests did find that there are some features that are absolutely essential for any golf game monitoring device. This includes a way to clearly see the club face at all angles during your swing and one that provides maximum distance readings. To find out which offers the best golf launch monitor, we conducted three separate tests to find out. Our conclusion? If you want a golf game monitoring device with all three elements, the Trackman is the one to choose.
Portable golf launch monitor devices using the Trackman ES12 technology aren't just useful for golf players. They are useful for anyone who wants to accurately measure the distance they swing the club. One of the best elements of these portable golf launch monitor tools is the distance measurements provided by the backlit display. While not as precise as a foot pod or airless radar gun, it's still better than nothing.
The final two portable golf launch monitors we tested were the Rapsodo mobile golf and the Spira rangefinder. Our reviewers had nothing good to say about the Rapsodo, in fact, the most common complaint of users of these golf launch monitors is that the backlit display provided by the unit is inaccurate. The other two testers also had similar complaints. Spira, however, did score better on overall accuracy and, when used with the recommended accessories, offered the best value for its price.
The third portable golf monitor we tested was from the pros, the Yardley Pro Pod. This brand of release rate tool offers high-tech features in a lightweight and convenient package. The best thing about this golf release monitor is that its dual-axis optical system is calibrated for true ball flight and offers great distance measurements. Best of all, it includes an alignment target to help measure the alignment of the club head and the ball itself. In addition to that, this unit has an electronic speed control with a manual release speed that allows users to get up close and personal with their golf shots.
Overall, our testers found that most of the golfers who used these monitors found them to be highly useful and accurate. One of the key things they appreciated was that they were easy to use even for novices. Some of the other metrics included distance readings, club speed and other metrics were easy to read and provide precise feedback. With the numerous brands of golf launch monitors out there, it's important for golfers to consider which brands and models offer the right combination of features and functionality. All of these brands are making good products, but only Spira delivered the maximum amount of value and performance.
1 note
·
View note
Text
On the Ridiculous Hobby of Quilting
For those of you who find the idea of cutting materials up into small pieces and fastening them all together again, otherwise known as Quilting, a ridiculous idea, just bear in mind that to some of us the very idea of walking around trying to hit a small hard ball into a small bucket with variously shaped sticks, a wasted effort known as Golf, equally preposterous. But I will concede that both require patience and accuracy and a good deal of skill.
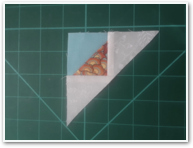
Having cut a large number of small triangles from three different materials, one starts by sewing two together to form 216 squares! At this point one adds triangles of the third material on either side, and then a bigger triangle of a fourth material to form a bigger square. I hope you are paying attention and following closely.
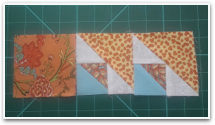
The next step involves sewing two of these squares and an equal sized square cut from a fifth material, into a line of three squares, twelve of them in number. While this may sound fairly straight forward, bear in mind that every effort must be made to maintain a perpendicular relationship between up and down seams, and the point of all those triangles should, ideally, meet exactly at the seams. This is a form of geometric nightmare of which Pythagoras never dreamed.
Now, three lines of those three sewn together squares are sewn to form a square block of nine. Again, those seams must be parallel, or the square will easily become deformed into a sort of curving parallelogram, that will defy any subsequent attempt at joining to another square. At this point one has four big blocks, all of which are supposed to be square, an achievement that borders on the unlikely unless one is a master quilter or just plain lucky.

To complete the quilt top, these four big blocks must be sewn together. Let me tell you, those are l o n g seams to sew on the sewing machine, and a BA in material handling and feeding would perhaps be a good preparation for this task. Should one succeed in such a way that all the up and down seams are actually perpendicular to each other, a congratulatory glass of wine is in order. Now one has a quilt “top”. But it is not yet a quilt.

Quilts have a “backing” material, which though perhaps not often seen, needs to have some pleasant coordination with the pattern and colouring of the quilt top. Quilts also have “batting” between the top and the backing, a spongy, soft material that gives quilts their “poof”. Of course, the only way of holding these three layers together is to “quilt” them together. To be totally utilitarian, a series of straight lines across the whole thing would achieve this mechanical necessity. But, that would be no fun at all, would it? Why not make it challenging and sew all sorts of patterns and crazy feather or spiral shapes instead. Why not indeed.
For this part of the process, one leaves one’s tabletop sewing machine and goes to the quilting machine. Consisting of a big sewing machine mounted on two sets of rollers, at right angles to each other, such that the machine has a full range of movement, it also has a set of three (or more) long rollers on which to carefully mount the backing, the batting and the quilt top. This can involve a lot of pins and the attendant risk of finger pricking and bleeding on the material, which is a poor start. Once mounted, the three layers are rolled up so that only about an eighteen inch strip is actually showing and available to begin quilting with the sewing machine.

What and how should one quilt? If one is brave, foolhardy or already skilled, one can “freehand” quilt. This means one stands at the front of the machine, holding both handles and one moves the sewing machine in patterns that come into your head, carefully filling in the space as one slowly moves along the exposed strip of materials. If less brave, one follows a pattern, and there are thousands of possible patterns, and hundreds of quilt books with suggested patterns in them. One catch. The patterns have, ingeniously, to be continuous, the end point of one repetition being the start point of the next. Try drawing one of those freehand, I dare you.
So, having chosen a pattern, how does one follow it? Ah! Attached to the travelling sewing machine is a device made of two adjustable arms, that carries a small laser flashlight on its end. The selected pattern is taped or otherwise fastened to the flat strip of board that forms the back of the quilt machine. The sewing machine is moved such that the small laser beam falls on the beginning point of the pattern. Oh, did I mention that one has to simultaneously ensure that when the laser beam is on target, the needle end of the machine must be positioned such that the first stitch will be a quarter of an inch into the corner of the quilt top. Damn, reposition the pattern and start again. Sooner or later this celestial alignment can be achieved, hopefully with greater regularity than most astronomical coincidences.

Now, to follow the pattern, one works from the back of the machine. Never fear, the sewing machine has the same set of controls at front and rear, a little like those vehicles made for driving instruction in which both driver and passenger have controls. However, in this case, there is no emergency brake.
Take deep breaths and do countless exercises to relax (as if one can actually relax at the point at which one is going to start piercing the layers of material with the first few stitches). Stand, feet a little apart, and in line with the side of the machine of the direction in which it will be moved. One must learn the “Quilt side step”, by which, without faltering with the upper body, one slowly walks along the length of the quilt, somewhat like a stealthy cat coming up on its prey. Now grip the two handles of the machine. Can you see the laser light point on the pattern? No. One’s arm is now in the way. Start again. Adjust the laser holder arms so that one can see the point of light. That helps a lot.
Deep breath, press the button on the handle and start trying to move the machine such that the laser point follows the line of the pattern. At this point one is fiercely concentrating on the pattern, and apart from the clattering of the machine, one has no idea what is actually happening at the front where stitches are being stabbed into the three layers. Let’s just hope that all is going well over there. If it isn’t, and there are numerous reasons, such as thread tension, lack of alignment or needle/bobbin timing, one can look forward to a back bending and eye aching task of picking all that thread out of the material, using a tiny pointed tool, a few inches at a time. You didn’t have anything else to do, did you?
So, let’s be optimistic, and say that all is going well. Printed patterns can be taped together to make a useable length, but sooner or later one comes to the end of the pattern, at which point the needle can be stopped in the down position, thereby holding the point temporarily. The pattern can now be moved and re-taped such that the starting point of the pattern is under the laser light again. That sounds easy.

Repetition is the foundation of land surveying techniques, the British Ordnance Survey picturing the ideal surveyor as standing by his theodolite on some windswept hill top, on which, with infinite patience, he repeats his ‘round of angles’ sixteen times in order to meet the exacting standards of first order surveying. Quilting is not much different, though not windswept.
When the first row of quilting is finished at the far end of the quilt, the three layers are unrolled enough to expose the next eighteen inch strip, the machine is moved back to the beginning end, and the process is repeated. While quilters are notorious for having fifteen projects on the go at once and rarely actually completing one, once the machine quilting process is started there is no stopping. As one quilt book author notes, all other aspects of life cease until the work is done.
Did you think that you now have a completed quilt? No, not quite. One now has a quilted quilt with rough edges around the square or rectangle. The final task is now to “bind” the edges with a border of some kind, at least a half inch simple edge if not something a bit more attractive such as a double or multiple strip border. Back to the table top sewing machine and those material handling and feeding skills.
At last! The quilt is complete.
Now what? Well, if you add up the hours that you have spent on this marathon project and multiply it by the dollars per hour you would like to think that your quality of work deserves, you will quickly conclude that only billionaires can actually afford to purchase your quilt at the net cost of your time and materials. So, unless you have an immediate use for this “magnus et opus magnifico” yourself (and there are only so many beds in a house), you will likely be seeking a friend who would like to be given a quilt, or you will end up taking it down to the Shelter to give to someone who could make good use of it.
Well now, what am I going to do for my next quilt?
senior70 April 2020
107
8 notes
·
View notes
Text
Best Drills to Fix a Slice in Golf: Take Control of Your Ball Flight


Best Drills to Fix a Slice in Golf: Take Control of Your Ball Flight
The dreaded slice is one of the most common problems in golf, particularly for beginners and high-handicap players. A slice occurs when the ball curves dramatically from left to right (for right-handed golfers), often causing a loss of distance and accuracy. Fixing a slice requires addressing the root causes, which typically involve improper grip, swing path, and clubface alignment. Here are some of the best drills to help you fix your slice and improve your game.
1. The Alignment Stick Drill
Why It Works:
One of the main causes of a slice is an outside-to-inside swing path. The Alignment Stick Drill encourages a more neutral swing path, helping to reduce the likelihood of slicing the ball.
How to Do It:
Place an alignment stick or a golf club on the ground, pointing slightly to the right of your target (for right-handed golfers). This will guide your club on an inside-to-out swing path.
Take your regular stance, ensuring the clubface is square to the target.
Swing your club along the path of the stick, focusing on keeping the club on the inside of the target line as you swing through.
This drill helps to encourage an in-to-out swing path, which can help close the clubface at impact, reducing the slice.
2. The Half-Swing Drill
Why It Works:
A slice can often result from trying to hit the ball too hard, leading to a poor swing path and an open clubface. The Half-Swing Drill focuses on making a controlled, compact swing that can improve your strike and accuracy.
How to Do It:
Start by taking a half swing (about shoulder height) with a short iron or wedge.
Focus on a smooth, controlled swing. The goal is to avoid overswinging and to maintain solid contact with the ball.
Once you’re comfortable with the half-swing, gradually lengthen your backswing, but continue to emphasize control and proper alignment.
This drill will help you focus on a more consistent and accurate swing path while preventing an overactive hand action that causes a slice.
3. The Clubface Control Drill
Why It Works:
An open clubface at impact is a primary cause of slicing. This drill helps you develop better control over the clubface, promoting a square or slightly closed position at impact.
How to Do It:
Take your regular stance, but place a tee or object just outside the toe of your club.
As you swing, make sure the clubface remains square to the target line (or slightly closed) throughout the swing.
Focus on turning your forearms naturally as you make contact with the ball.
If the clubface is square, you’ll notice a straighter ball flight or even a slight draw. If you’re still slicing, check for excessive hand rotation or an open clubface at impact.
4. The Grip Drill
Why It Works:
A weak grip (where your hands are turned too much to the left on the club) is another common culprit behind the slice. Adjusting your grip can help you square the clubface at impact, which is crucial to fixing a slice.
How to Do It:
Begin by holding the club with your normal grip.
Focus on making sure that the “V” formed by your thumb and index finger on both hands is pointing toward your right shoulder (for right-handed golfers).
Your hands should feel more neutral or slightly stronger (rotated slightly to the right) to prevent the clubface from opening too much during the swing.
Once you’ve adjusted your grip, practice hitting shots while paying attention to whether the ball starts to fly straighter.
5. The Pump Drill
Why It Works:
The Pump Drill helps you build muscle memory for the correct swing path and sequence. It’s especially useful for preventing an over-the-top swing that causes a slice.
How to Do It:
Take your normal stance and set up to the ball with a short iron.
Begin by swinging the club back as you normally would, but stop when the club is parallel to the ground.
From this position, “pump” the club forward by bringing it down toward the ball, but don’t hit it yet. Pause about halfway down and check your swing path.
Continue to pump the club for several repetitions, focusing on swinging from the inside and keeping your clubface square.
After several pumps, complete the full swing, making sure the club stays on the correct path and the ball flies straighter.
6. The Towel Drill
Why It Works:
The Towel Drill focuses on ensuring that you’re not coming over the top with your swing, which can often lead to a slice. By promoting an in-to-out swing path, you’ll learn to make contact with the ball more effectively.
How to Do It:
Place a towel or object just outside your right foot (for right-handed golfers) and about a foot behind the ball.
The goal is to swing the club without hitting the towel as you make contact with the ball. If you hit the towel, it means your swing is too steep and coming over the top, which can promote a slice.
This drill helps you focus on an inside-out swing path, which is critical for correcting a slice.
Focus on swinging the club in such a way that it moves on a more natural arc, avoiding an over-the-top motion.
7. The Feet Together Drill
Why It Works:
The Feet Together Drill promotes better balance and rhythm in your swing, which can help you avoid the common error of spinning out and slicing the ball.
How to Do It:
Take your normal stance but place your feet close together so that your heels are almost touching.
Swing the club in a controlled motion, focusing on maintaining balance as you make contact with the ball.
This drill encourages proper weight transfer and helps you avoid swaying or spinning, which can lead to a slice.
Once you’re comfortable with this, slowly widen your stance and continue to focus on smooth, controlled swings.
8. The Weighted Club Drill
Why It Works:
A slice often occurs due to a lack of strength or control over the club, especially in the lower body and arms. The Weighted Club Drill helps build strength and improves your swing tempo.
How to Do It:
Take a weighted club or attach a swing weight to your regular club.
Practice hitting shots with the weighted club, focusing on a smooth and controlled swing.
The added weight helps you develop strength and encourages a more fluid motion, which can reduce the chances of slicing.
Gradually return to your regular club, and you’ll notice an improvement in both your swing speed and accuracy.
Conclusion:
Fixing a slice requires a combination of technical adjustments, consistent practice, and patience. The key is to focus on the root causes of the slice—whether it's an incorrect grip, swing path, or clubface alignment—and work systematically to address them. Incorporating these drills into your practice routine will help you make substantial improvements in your game, and over time, you’ll see your slice diminish, leading to straighter, more accurate shots.
Start practicing these drills today, and you'll be on your way to conquering that slice for good! 🏌️♂️
0 notes
Text
Golf Alignment Stick Secrets
Who would have ever thought that an alignment stick would become a golfer’s must-have accessory? You can now find an alignment stick in almost everyone’s bag, regardless of their handicap.
But alignment sticks are not just for alignment. An alignment stick can be used for improving a golfer’s swing and ball flight. So if you don’t have one, you’re missing out on a sure fire way to improve your game.
Here are my 10 best drills using an alignment stick for something other than aiming.
Swing Plane Drill
Swing plane is a commonly used term in golf but often misunderstood. Swing plane simply means controlling the club shaft position during the swing. To swing on-plane, the shaft needs to swing back and down on an angle that matches the club’s lie angle (the shaft angle with the club soled flat on the ground).
If you can swing on plane, your shots will be more consis-tent, more accurate and more powerful, while an off-plane swing will lead to a host of problems including an incorrect swing path, missing the center of the face and a poor Angle of Attack (AOA).
To set up this drill, match the alignment stick to the club’s lie angle, and then shove it in the ground (as pictured). Place another alignment stick on the ground so you are swinging toward a specific target. Then take several practice swings trying to match the club shaft’s position with the alignment stick on the backswing or downswing.
The post Golf Alignment Stick Secrets appeared first on Golf Tips Magazine.
from Golf Tips Magazine https://ift.tt/2Okpx5W
8 notes
·
View notes
Text
James Michael Furyk
Alignment Sticks – What Are They? How to Use Golf Alignment Sticks
Think of bright-colored fiberglass sticks 4-feet long – that’s what alignment sticks used for golf look like. The material, fiberglass, is pretty durable. Thus, strong enough to not bend or break despite being subjected to heavy beating.
And all types of golfers are using them – amateurs, Tour players, and even junior golfers. After all, alignment sticks have proven to be incredibly versatile since you can use them for more than just improving alignment. And despite being so versatile and productive, the cost is quite inexpensive (professional golf swing lessons will definitely cost you more).
The design is lightweight, hence easy to swing/handle and also carry with you anywhere (practice on the range, course, backyard, wherever you like).
A minimum of 2 alignment sticks seems to be enough but then you can carry a 3-piece set as well if what you want from it is more flexibility in terms of working on more than just one or two drills at the same time.
Alignment Sticks – Why You Should Use Them? A flawless golf swing sequence is only beneficial if it can be performed consistently throughout your round of golf. Consistency, no matter what, is always a useful thing in golf. But, unfortunately, it’s also the most difficult to achieve. And one of the primary reasons for that is not being able to get the alignment done right.
Struggling with alignment almost always leads to messing up consistency. When you don’t measure your alignment and instead just imagine it, the end result is inevitably going to take the form of mis-hits, incorrect stance width, and inconsistent swings.
So, at such times, alignment sticks can really help when it comes to creating actual physical lines you can see that provide consistency. With them, perfecting your golf swing becomes much, much easier. Along with compelling you to take the right stance width. Think of them as visual gates you use for hitting your shots.
Alignment Sticks – Basics of Using Them Properly for Practice How to Use Golf Alignment Sticks You can play as many real golf rounds as you want. This particular approach, no denying, does help as far as practice sessions are concerned.
But have you thought about how that can just as well be encouraging bad swing mechanics or any other mistakes you may have gotten used to? Just because you’re practicing doesn’t mean you’re practicing the right techniques, right?
On the other hand, practicing with alignment sticks genuinely encourages significant improvements. The most basic or common way of going about it is to place the sticks down onto the ground for visually displaying your alignment. This is the most effective (and more importantly, the correct) way of going about practice sessions.
You’re actually creating that target line as well. Just lay them down – one alignment stick facing the intended target, behind the golf ball of course, and then the other stick lined up in a parallel position to that first one closer to the feet. Hence, your feet have been correctly lined up in the direction of your target.
All that’s left to do now is remove the stick trailing the ball, then simply just swing away!
Learn more: https://jimfuryk.com/
0 notes
Text
These Three Golf Swing Fundamentals are The Key to Building a Repeatable Swing.
Most golfers have no chance to hit the ball well because they lack the proper golf swing fundamentals. These are the three things you need to do check BEFORE you swing to hit the ball well.
Three Fundamentals
1. The Grip 2. The Stance 3. Relax!
Golf Swing Fundamental #1: The Grip
You don’t have a chance to hit the ball solidly if you have a bad grip, but most people never check their grip.
High handicappers make two errors concerning the grip. They hold is wrong, and they hold it too tight!
No matter what grip you use (overlap, interlock, baseball), the key to a correct grip is to hold the club more in the fingers and not in the palm. This is especially true for the right hand, but goes for the left hand as well. The left hand applies most of the pressure. The left hand “holds” the club, and the right hand “steers” the club. Most of the pressure on the right hand should come from the third and fourth fingers. I like to barely have my thumb, index, and pinkie fingers of my right hand on the club.

Most golfers hold the club way too tight, and this causes all kinds of problems. First, it makes you tense up, and tension is the #1 killer in a great golf swing. Second, it makes you want to swing harder. You want to swing the club faster, not harder. Trying to swing the club hard will actually cause you to swing slower. Third, a tight grip will not allow you to fully cock and release your wrists on the backswing and the downswing.
Here’s what you can do to make sure your grip is not too tight. First, take a normal grip. First, always make sure the club handle is in the fingers of each hand more than the palm. Then, make sure your hands are comfortable together. When you are ready to take a practice swing, squeeze your hands very tightly. This will help you to relax your grip.
Always do this before hitting a ball. This will train you to feel what a relaxed grip is, and it is the first key golf swing fundamental you must master. No one who holds the club like their going to choke it can swing easy and fast. Tight grips usually mean tight swings. You can tell who these golfers are because of their lumberjack hacks at the ball. (Nothing against lumberjacks here, just don’t swing like them.)
You should also try to stay relaxed throughout the backswing and downswing.
Golf Swing Fundamental #2: The Stance
The next golf swing fundamental is the stance. You must have good alignment to the target and good posture to hit the ball well. If you don't have a good setup, you have almost no chance of achieving a good swing plane and hitting the ball solidly. Do this to align your body correctly:
Stand behind the ball facing the target and draw an imaginary line from the target to your ball. Pick a spot, a blade of grass, a leaf, a speck of dirt, etc. that is on the line just a few feet in front of the ball. Next, get into your stance with your toes parallel to that line.

A great drill that’s easy to do at home or anywhere is to pick something that is straight, like a wall or edge of the carpet, then practice lining up your toes parallel to it. Look left (for right handed golfers) at the imaginary target, and try to memorize that sensation. This drill gets you to feel what perfect alignment is like so that when you don’t have these visual cues on the course, you can know if you’re o.k. by muscle memory. Remember, for golfers who are not near scratch, often what feels “right” and what feels “good” are two different things. Train yourself to feel “right”, and soon enough it will feel “good”.
There are all kinds of ways and advice on how to setup with the correct posture. It really comes down to this: you have to be comfortable and balanced. No matter how fundamentally correct you might be, if you’re not comfortable over the club, you won’t hit it well.
Take about a shoulder width stance (no more) and stick your butt out until your knees are bent a few inches. If your weight is on the balls of your feet, you’ve bent your knees too far. Let your hands hang naturally from the sides and always keep your chin up!
Letting your hands hang naturally tells you if you are the correct distance away from the ball. When you grip the club from here, if you have to pull your hands in towards your body, then you are too close. If you have to extend your hands out, then you are too far. (Once you get more consistent, you can use the distance from the ball to help hit a fade or draw, but just keep it simple for now and stand at the same distance from the ball every time.)
Golf Swing Fundamental #3: Relax
Out of all the golf swing fundamentals that I could talk about, this is probably the key. If you don’t relax, you don’t have a prayer of hitting the ball consistently.
The problem with most golfers is that they look at the pros and think that they are swinging out of their minds, when in fact, they really aren’t. You see John Daly take a huge backswing and you think he’s all tensed up trying to kill it. Tiger doesn’t look all that relaxed especially when he hits a bad shot. Don’t let this fool you! Pros are relaxed when the hit the ball, but they swing so fast we mistake that for tension.
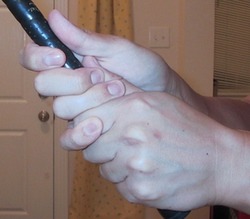
The difference between a relaxed shot and a tense one is like cracking a whip and swinging an ax. The whip cracks in the air with one flick of the wrist, with every little effort. No matter how hard you swing that ax, it’s not going to crack in the air!
Be the whip, not the ax!
What’s the best way to relax over the ball? Outside of meditating (which will really annoy your playing partners) every time you get ready to swing, there is one tip that has really helped me. Set up to the ball, and just like the relaxation drill for the grip, intentionally tense up every part of your body for three seconds. Try to tighten up your hands, arms, and shoulders as much as you can without hurting yourself.
After three seconds of intense tension, let it go. You should feel immediately much more loose and relaxed. Focus, and hit the ball without delay while you’re still in that relaxed state. This golf swing fundamental is probably the hardest to master for new golfers since the tendency is to try and hit it too hard.
Practicing without a ball helps here because you’re not trying to swing for the moon. Do this drill while taking practice swings focusing on being as relaxed as possible. Remember to always pick a spot on the grass that is your pretend ball and brush through it on the downswing. Never just swing on the grass without trying to brush a spot where your ball would be. You’ve got to make practice as real as possible, and you never take a real swing on the golf course without trying to hit a ball.
Golf Swing Fundamentals Revisited
These three golf swing fundamentals will get you started on the right foot to building a solid swing. Just like a skyscraper needs a deep, solid foundation, so does a good golf swing need a great setup.
Once you can “feel” a good setup, once you know how proper golf swing fundamentals feel, you’ll know when you’re off and be able to stop yourself and readjust before hitting a ball. That’s when golf becomes less mechanical and more intuitive, and that’s when the scores begin to drop like January temperatures in Minnesota! Click Here Freizeit Hamburg and Freizeitaktivitäten Hamburg
0 notes
Text
The Golf Instructor

The golf instructor, golf teacher, PGA instructor, and golf coach are fundamental to the growth and maintenance of the game of golf. Playing golf is not an obviously easy thing to do. By that I mean that most people when they first pick up a golf club do not immediately strike the ball well. In some ways the golf swing is counterintuitive, whether that is due to the design of golf clubs I am not entirely sure. A small, faced head, on the end of a relatively long pole, is taken back behind your human head via your arms and turning torso. It is then returned with force in a bid to solidly strike a small, dimpled ball sitting on the ground roughly in line with a spot between your legs. Hey, what could be easier!

Photo by Kampus Production on Pexels.com
Teaching The Game of Golf
The golf instructor deciphers the biomechanical complexity inherent in the golf swing and attempts to communicate the key moves and sequencing to the student and uninitiated. The golf teacher conveys the essential actions, which must be undertaken by the golfer, in striking the golf ball effectively around the golf course. I have watched many lessons with rank beginners and observed the challenging task it involves. Patience is a key component for any PGA professional instructing newbies to the game of golf.

Essential Elements For The Golf Coach To Instruct I asked golf instructor, Chad Jeevitee, what were the most important elements in the teaching of golf? What in, in his view, were the non-negotiables when it came to instructing golfers, according to his approach? Chad has been teaching the game to golfers of all standards for more than 12 years. Chad is a PGA professional and passionate promoter of the game of golf. “As a golf instructor, I believe that the most important fundamentals in the golf swing are proper grip, alignment, and stance. Grip, Alignment, and Stance – I call it GAS. You gotta have GAS to play good golf.Chad Jeevitee

Photo by Jopwell on Pexels.com First, let's talk about grip. The grip is the only point of contact between the golfer and the club. Think about that, it is where you and the golf club intersect. It is the only direct contact you have with the stick that hits the ball. A proper grip is essential for a consistent and accurate swing. There are three main grip types: the Vardon, the overlap, and the interlock. It's important to choose the one that feels most comfortable for you. Once you have chosen your grip, make sure that the V's formed by your thumb and index finger on both hands are pointing towards your right shoulder (for right-handed golfers) and towards your left shoulder (for left-handed golfers). Grips are probably the most contentious aspect of the golf swing because it messes with people’s comfort zones. Human beings love to feel comfortable and swinging a golf club at the beginning is not a comfortable experience for most. Golfers just starting out dig the leading edge into the ground, often, hitting fat shots. This makes people feel like fools. They focus all that bad feeling on the grip holding the handle of the club. Because they find it difficult to manoeuvre the club everything feels horribly uncomfortable. I tell them to get a grip LOL.

Photo by Kindel Media on Pexels.com Next, let's talk about alignment. Alignment refers to the position of the golfer's body in relation to the target. Proper alignment is crucial for a straight and accurate shot. To align your body properly, stand behind the ball and imagine a line running from your target to your feet. Your feet, hips, shoulders, and eyes should all be parallel to this line. This will help ensure that your clubface is square to the target at impact. Alignment is the next most frustrating thing in a new golfer’s experience. Spacial awareness is not natural to the great majority of human beings. We live at a time, where we sit in front of screens all day. We push buttons and touch screens, whilst sitting on our behinds. Golf is not like that. No, the game of golf demands something completely different. You must stand to the golf ball side on, looking down the target line to the flagstick in the distance. You, then, have to take the club back behind you, before bringing it back to the ball at speed. Lots can go wrong and often does. It is a crazy game when you think about it. I don’t know who invented it, some drunk Scot, I imagine. The average golfer struggles with alignment for much of their golfing life. The game of golf is incredibly process orientated and many folk are just too casual about their set up. They walk into a shot without really aligning themselves to the target in relation to the position of the golf ball. There is little chance of hitting it in the correct direction under these circumstances. Not very often anyway. Obviously, the golf instructor help his students, but it is something you have to be constantly vigilant about, even, in your own game.

Lastly, let's talk about stance. A proper stance is essential for balance and power in the golf swing. To achieve a proper stance, stand with your feet shoulder-width apart and your weight evenly distributed between both feet. Your knees should be slightly flexed and your hips should be slightly tilted forward. This will help you maintain balance throughout your swing. Obviously, we stand with narrower stances for wedges and shorter irons. The golf ball is positioned just forward of centre for most iron shots. I like to bump my lead hip slightly toward the target, this allows the torso to rotate around the spine in the backswing. Adam Porzak taught me this important set up move. I recommend slightly more weight on your lead side for iron shots, as we are hitting the ball with a descending blow going through. This helps us create compression when we are swinging well, which improves spin and launch. The only way to really improve at golf is to practice and practice under tutelage every now and then to ensure you are on the right track with your swing. The golf swing can be broken down into 3 key components and you need to make sure that you are in the right position for each of these. Sequencing the biomechanical moves via drills will make you stronger in the execution of them. Tempo is the glue that holds the golf swing together. It is very easy to lose your rhythm out on the golf course mid-round. Regathering it is sometimes much harder. The golf instructor knows the perils of the game, all too well.

It's also important to keep in mind that these fundamentals are interrelated and one affects the other. For example, if your grip is incorrect, it will affect your alignment and stance. Similarly, if your alignment is off, it will affect your grip and stance. Therefore, it is important to regularly check and adjust all three fundamentals to ensure a consistent and accurate swing. GAS. Remember to GAS up your golf swing prior to hitting any shot. In addition to these fundamentals, it is important to have a good understanding of the basic mechanics of the golf swing. This includes the proper sequencing of the backswing, downswing, and follow-through. It also includes understanding the role of the different parts of the body, such as the hips, shoulders, and wrists, in the swing. The golf swing is a mysterious beast at times, just ask any longtime golfer. You will have bad days out on the links no matter how good a golfer you may be. Grin and bear it, my friend, that is all we can do. Keeping your cool when things are disintegrating is not always easy. However, we all struggle every now and then, that is the nature of golf. I would tell any beginner, you will have stinkers and do not get too disheartened, especially at the start of your golfing journey. We have all been there, it is part of the initiation. Golf has protocols and lots of rules to abide by and these are necessary to maintain civility when playing such a challenging bloody game. Overall, a consistent and repeatable swing is the key to shooting lower scores. By focusing on the proper grip, alignment, and stance, as well as understanding the basic mechanics of the golf swing, you will be well on your way to improving your game. Remember to always focus on the fundamentals and practice consistently. With time and practice, you will see improvement in your golf game.

Photo by cottonbro studio on Pexels.com As a PGA professional, I have received extensive training on the golf swing and how to teach it to students of all skill levels. My training included both classroom instruction and hands-on training on the golf course and practice tee. The golf instructor must be committed to the progress of his students. In return, the student must likewise commit to the learning process. One lesson will not be enough. A minimum of 6 lessons, each of around 30 minutes, is a good starting point to introduce the basics of swinging 14 different clubs to a beginner. One of the most important aspects of my training was learning how to effectively communicate the fundamentals of the golf swing to my students. This includes being able to demonstrate proper grip, alignment, and stance, as well as explaining the mechanics of the swing in a clear and easy-to-understand manner. Additionally, I learned how to observe and analyse a student's swing to identify specific areas that need improvement and how to provide customized drills and exercises to address those areas. Another key aspect of my training was learning how to teach the golf swing to students of different skill levels and abilities. This includes understanding how to adjust my teaching methods and drills to suit the needs of beginner, intermediate, and advanced players. I also learned how to teach golfers with physical limitations and how to adapt the swing to accommodate those limitations. I also received training on the latest technology and equipment used in the golf industry, such as launch monitors and swing analysis software, which helps me to provide accurate and valuable feedback to my students. Additionally, I have received training in the coaching of the mental game, which is an essential aspect of the golf game. The mental game is often overlooked, but it's crucial for a golfer to have a clear and focused mind to perform at their best. I learned how to help my students develop a positive mindset, manage their emotions, and stay focused during their round. What goes through your head, as you stand over the ball can really impact your shot - both for good and bad! Throughout my PGA training, I have had the opportunity to work with some of the best golf instructors and coaches in the industry, who have shared their knowledge and experience with me. I continue to learn and grow as an instructor through ongoing education and attending professional development events.

In summary, my PGA training has provided me with a thorough understanding of the golf swing and how to teach it effectively to students of all skill levels. It also equipped me with the latest technology and techniques to help my students improve their game. My training in mental game coaching also helps me to provide a well-rounded coaching to my students. I am committed to continuously improving my skills as an instructor to help my students reach their full potential.” Thanks Chad Jeevitee Chad promises to keep us up-to-date with future insights and trends in the golf instruction realm. ©GolfDom Read the full article
1 note
·
View note
Text
Top 10 Best putter for side saddle putting [2022]
Top 10 Best putter for side saddle putting [2022]
1. PuttOut Premium Pressure Putt Trainer – Perfect Your Golf Putting (Stone) Buy On Amazon PuttOUT have taken their original pressure putt trainer to another level with improved features, including; multi targets, high visibility micro target and alignment stick support. The three smaller dot targets allow the player to focus in and use them either as another common target — especially for…

View On WordPress
0 notes