#HVAC Damper Frame Machine
Explore tagged Tumblr posts
Visit Tumblr Blog
Explore Tumblr blogs with no restrictions, modern design and the best experience.
Last Seen Tumblr Blogs


Fun Fact
130K people were victims of a chain letter scam that affected Tumblr in May 2011.
Text
Revolutionizing HVAC Manufacturing with JUGMUG HVAC Damper Frame Roll Forming Machine
The HVAC industry plays a crucial role in ensuring efficient heating, ventilation, and air conditioning systems in residential, commercial, and industrial spaces. One essential component of these systems is the HVAC damper, which helps regulate airflow and optimize performance. To meet the growing demand for high-quality dampers, manufacturers require precision-engineered machinery. This is where JUGMUG RollForming's HVAC damper frame roll forming machine comes into play, revolutionizing damper production with cutting-edge roll forming technology.

Understanding HVAC Damper Frames
HVAC dampers are vital components in air control systems. They help regulate airflow within ductwork, improve energy efficiency, and enhance indoor air quality. The frames that support these dampers must be strong, durable, and accurately formed to ensure seamless integration into HVAC systems. Traditional manufacturing methods for damper frames can be time-consuming and inconsistent. However, with advanced roll forming technology, manufacturers can achieve higher efficiency, precision, and consistency.
What is an HVAC Damper Frame Roll Forming Machine?
A HVAC damper frame roll forming machine is a specialized piece of equipment designed to produce damper frames with high accuracy and efficiency. Roll forming is a continuous bending process in which a metal sheet passes through multiple rollers to achieve the desired shape. This process ensures consistent quality and high-speed production, making it the preferred method for manufacturing HVAC damper frames.
JUGMUG RollForming has developed an advanced roll forming machine tailored specifically for HVAC applications. Their machines are known for their precision engineering, robust construction, and seamless automation, making them an industry leader in HVAC component manufacturing.
Features and Benefits of JUGMUG RollForming's HVAC Damper Roll Forming Machine
fire damper blade roll forming machine
1. High Precision and Consistency
JUGMUG RollForming's HVAC damper roll forming machine ensures precise and consistent output, reducing material waste and enhancing product quality. The machine is equipped with state-of-the-art rollers and cutting mechanisms that guarantee uniform frame dimensions.
2. Automated Operation
Automation is a key feature of JUGMUG RollForming's machinery. Their machines come with advanced PLC (Programmable Logic Controller) systems that allow for seamless operation, reducing the need for manual intervention. This leads to increased productivity and reduced labor costs.
3. Durable and Robust Construction
The HVAC damper frame machine is built with high-grade materials to withstand continuous industrial use. The durable frame and precision-engineered components ensure long-term reliability and minimal maintenance requirements.
4. Customizable Configurations
JUGMUG RollForming understands that every manufacturer has unique production requirements. Their HVAC damper roll forming machine can be customized to accommodate different frame sizes, thicknesses, and profiles, ensuring versatility in production.
5. Energy Efficiency
With rising energy costs, manufacturers are looking for energy-efficient solutions. JUGMUG RollForming’s machines are designed to optimize power consumption while maintaining high-speed production, resulting in cost savings.
6. High-Speed Production
One of the biggest advantages of roll forming technology is its ability to produce parts at high speeds. JUGMUG RollForming’s HVAC damper frame roll forming machine significantly reduces production time, allowing manufacturers to meet large-scale demands with ease.
Applications of HVAC Damper Frame Machines

1. Commercial HVAC Systems
The need for reliable and efficient dampers in commercial buildings such as offices, malls, and hotels is growing. JUGMUG RollForming’s machine ensures that HVAC systems in these establishments function optimally.
2. Industrial Ventilation Systems
Factories and warehouses require robust ventilation systems to maintain air quality and temperature control. The precision of JUGMUG RollForming’s HVAC damper roll forming machine ensures high-quality damper frames suitable for industrial applications.
3. Residential HVAC Solutions
Modern homes are designed for energy efficiency, and high-quality dampers play a key role in this. With JUGMUG RollForming’s machine, manufacturers can produce reliable damper frames for residential HVAC applications.
Why Choose JUGMUG RollForming?
JUGMUG RollForming has established itself as a trusted name in the roll forming industry. Their expertise in designing and manufacturing HVAC damper frame machines has made them a preferred choice for HVAC component manufacturers worldwide. Here are some reasons why JUGMUG RollForming stands out:
Industry Expertise: Years of experience in roll forming technology.
Cutting-Edge Technology: Machines equipped with the latest automation and precision engineering.
Customer Support: Dedicated technical support to assist with installation, maintenance, and troubleshooting.
Customization: Ability to tailor machines to specific customer requirements.
Cost-Effective Solutions: High efficiency and low operational costs.
Conclusion
The HVAC industry demands precision, efficiency, and reliability in damper frame manufacturing. JUGMUG RollForming’s HVAC damper frame machine offers the perfect solution to meet these requirements. With its high-speed production capabilities, automation, and energy efficiency, this machine is a game-changer for HVAC manufacturers looking to enhance productivity and quality.
If you’re in the HVAC manufacturing business and want to stay ahead of the competition, investing in JUGMUG RollForming’s advanced roll forming technology is the way forward. Contact JUGMUG RollForming today to learn more about their innovative solutions and take your production to the next level!
0 notes
Text
HVAC Fire Damper Frame Roll Forming Machine – Built for Safety & Precision
Jugmug Roll Forming has long been a pioneer in delivering cutting-edge solutions for the roll forming industry. Among their wide array of machines, the HVAC Fire Damper Frame Roll Forming Machine stands out as a powerful and highly precise tool designed specifically for the HVAC sector. With the growing need for fire safety and controlled airflow in commercial and industrial buildings, the demand for durable and accurately built fire damper frames is higher than ever. Jugmug Roll Forming has engineered a machine that not only meets but exceeds industry expectations in this domain.

What is a Fire Damper Frame and Why is it Important?
A fire damper frame is a critical component in HVAC (Heating, Ventilation, and Air Conditioning) systems. It houses the fire damper, which is designed to prevent the spread of fire and smoke through ductwork. In the event of a fire, the damper automatically closes when high temperatures are detected, blocking the fire from traveling through the ventilation system.
The efficiency and safety of a fire damper system heavily depend on the quality and accuracy of the damper frame. An ill-fitted frame can compromise the whole system, putting lives and property at risk. That’s why a roll forming machine designed for the production of these frames must deliver exceptional performance in terms of accuracy, repeatability, and durability. Jugmug’s solution delivers exactly that.
Why Choose Jugmug Roll Forming for Fire Damper Frame Manufacturing?
Jugmug Roll Forming is known for its commitment to excellence in design, manufacturing precision, and client-focused innovation. Here are some key reasons to choose Jugmug’s Fire Damper Frame Roll Forming Machine:
Precision engineering ensures tight tolerances in profile dimensions
High-speed production for efficient output and reduced operational costs
Rugged construction for long machine life and continuous operation
Easy to operate, with minimal maintenance requirements
Designed to work seamlessly with different gauges and material types
Customization available to meet specific profile and size requirements
Machine Features and Technical Advantages
Jugmug Roll Forming’s Fire Damper Frame Roll Forming Machine comes packed with a range of technical benefits that make it a top choice in the market:
Fully automated system with material decoiler, roll forming unit, cutting unit, and output table
PLC control system for accurate and programmable settings
Servo motor-driven cutter for clean and burr-free cuts
High-tensile roller material for long-lasting performance
Inline punching options for precise holes and slots required in fire damper frame assembly
Profile tolerance within +/- 0.5mm for consistent output
Applications of Fire Damper Frames
The fire damper frames manufactured using Jugmug’s roll forming machine are extensively used in:
Commercial building ventilation systems
Industrial plants and manufacturing units
Shopping malls, hospitals, and office complexes
Warehouses and logistics hubs
Airports and high-rise residential projects
Customized Roll Forming Solutions
One of the biggest advantages of working with Jugmug Roll Forming is the level of customization they offer. Each fire damper frame design can vary depending on the project requirement, local building codes, and HVAC system layout. Jugmug understands these nuances and offers tailored roll forming machines to accommodate different profiles, material thicknesses, widths, and structural designs.
Custom profile tooling based on drawings or physical samples
Material compatibility with GI, aluminum, and mild steel
Flexible length control through programmable logic
Quick changeover design for switching between different sizes or profiles
Manufacturing Excellence and Quality Assurance
Jugmug Roll Forming adheres to strict quality control measures during every phase of machine production. Each component is crafted using high-grade materials, and all machines undergo rigorous testing before dispatch. This ensures that every customer receives a high-performing and reliable roll forming machine that continues to deliver for years.
Quality benchmarks followed include:
ISO-certified production practices
In-house design and tooling
CNC precision machining for roller dies
Inspection protocols for alignment, cut accuracy, and surface finish
Customer Support and Global Reach
Jugmug Roll Forming doesn’t just sell machines – they build long-term partnerships. Their support services include installation assistance, on-site training, technical troubleshooting, and spare parts availability. With customers across India and growing international demand, Jugmug has proven itself as a trusted name in the global roll forming industry.
Their customer-centric approach includes:
Pre-sales consultation to define the right machine specs
Post-sales support with a dedicated service team
Remote diagnostics and maintenance help
Fast response time for parts and servicing
Industries Benefiting from Jugmug Fire Damper Frame Machines
The demand for HVAC fire protection solutions is rising globally due to stricter building regulations and a heightened focus on fire safety. Jugmug’s machines are being used by:
HVAC component manufacturers
Fire safety system suppliers
Sheet metal fabricators
Construction equipment suppliers
Turnkey HVAC solution providers
The Jugmug Advantage
What sets Jugmug Roll Forming apart from competitors is their vision of long-term value and commitment to innovation. Each machine is a result of deep industry insight, technical know-how, and a clear focus on helping businesses grow with better production capabilities.
Key advantages of working with Jugmug:
Over a decade of experience in roll forming technology
In-house R&D and tooling design team
Strong portfolio of successful installations
Unmatched technical support and service
Conclusion
The HVAC Fire Damper Frame Roll Forming Machine by Jugmug Roll Forming is more than just a machine – it is a productivity powerhouse that combines safety, efficiency, and durability in one robust solution. For businesses that manufacture fire damper systems, investing in Jugmug’s advanced roll forming technology ensures a competitive edge in the market, full compliance with safety standards, and the ability to scale up production with confidence.
Whether you are starting a new HVAC product line or upgrading your existing setup, Jugmug Roll Forming offers the perfect machine and unmatched support to ensure your success.
#Fire damper frame#HVAC Fire Damper Frame Machine#Roll Forming Machine#rollforming#roll forming industry
0 notes
Text
Why Jugmug’s Innovative Roll Forming Machine Models Transforming Manufacturing in India?
Jugmug Roll Forming Company is a prominent player in the roll forming industry in India, known for its innovative solutions and high-quality machines. Here’s an overview of the company and its contributions to the manufacturing sector:

Jugmug Roll Forming Company
Overview
Founded in 1982 as Joginder Singh Birdi & Sons, Jugmug Roll Forming has evolved into a leading manufacturer of roll forming machines in India. The company is headquartered in Punjab and has expanded its reach to over 15 countries worldwide, showcasing its commitment to quality and innovation in roll forming technology.
Innovative Technology
Jugmug specializes in advanced roll forming machines that incorporate the latest technology, ensuring high efficiency and precision. Their machines are designed for various applications, including:
Rolling Shutter Machines: Ideal for manufacturing rolling shutters, these machines offer flexibility and customization to meet specific client needs.
HVAC Solutions: Jugmug has developed automated roll forming mills for HVAC damper frames, which have received accolades for their innovative design.
Din Rail Channel Roll Forming Machines
Jugmug's D40 series Automated roll forming mills are capable of producing DIN rail 35 × 7.5 & 35 × 15. These mills are available with value-added features like online printing and perforation
units.
Unistrut Steel Channel Roll Forming Machine
Jugmug offers Unistrut roll forming machines in India that include features such as PLC and HMI touch screen controls, hydraulic decoilers, and the ability to perform multiple operations like punching and embossing.
Door Window Frame Roll Forming Machine
The company specializes in roll forming machines for manufacturing door and window frames, ensuring flexibility and customization to meet specific client needs.
Customer-Centric Approach
Jugmug emphasizes customer satisfaction by providing tailored solutions and exceptional after-sales support. Their willingness to customize machines based on client specifications has garnered positive reviews, highlighting their dedication to addressing unique manufacturing challenges.
Commitment to Quality
The company prides itself on producing robust and reliable machines that undergo rigorous quality testing. Jugmug's focus on quality has established it as a trusted name in the roll forming industry in India, with a reputation for delivering machines that enhance productivity and reduce operational costs.
Awards and Recognition
In 2019, Jugmug Roll Forming was honored with the Best Innovative Award by The Times of India for its contributions to the roll forming sector, particularly for its advancements in automated machinery.
Conclusion
Jugmug Roll Forming Company stands out in the Indian as well north east roll forming manufacturing landscape, combining decades of experience with a forward-thinking approach to technology. Their commitment to quality, innovation, and customer satisfaction positions them as a leader in the roll forming industry, making them a preferred choice for businesses looking to invest in reliable manufacturing solutions.
1 note
·
View note
Text
My Homelab/Office 2020 - DFW Quarantine Edition
Moved into our first home almost a year ago (October 2019), I picked out a room that had 2 closets for my media/game/office area. Since the room isn't massive, I decided to build a desk into closet #1 to save on space. Here 1 of 2 shelves was ripped off, the back area was repainted gray. A piece of card board was hung to represent my 49 inch monitor and this setup also gave an idea how high I needed the desk.

On my top shelf this was the initial drop for all my Cat6 cabling in the house, I did 5 more runs after this (WAN is dropped here as well).
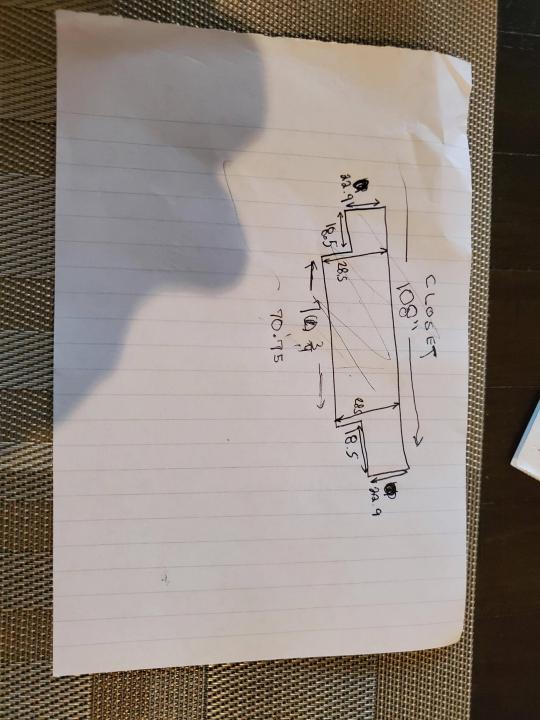
I measured the closet and then went to Home Depot to grab a countertop. Based on the dimensions, it needed to be cut into an object shape you would see on Tetris.

Getting to work, cutting the countertop.
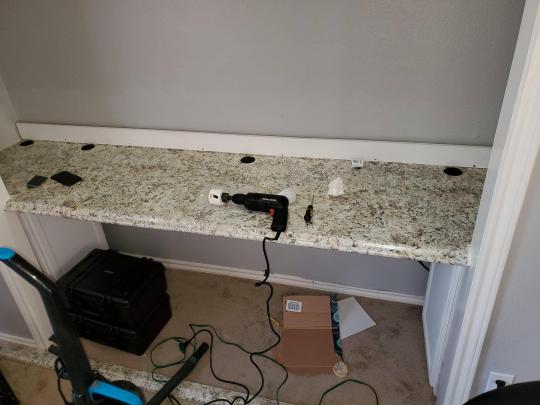
My father-in-law helped me cut it to size in the driveway and then we framed the closet, added in kitchen cabinets to the bottom (used for storage and to hide a UPS). We ran electrical sockets inside the closet. I bought and painted 2 kitchen cabinets which I use for storage under my desk as well.

The holes allowed me to run cables under my desk much easier, I learned many of these techniques on Battlestations subreddit and Setup Wars on Youtube. My daughter was a good helper when it came to finding studs.

Some of my cousins are networking engineers, they advised me to go with Unifi devices. Here I mounted my Unifi 16 port switch, my Unifi Security Gateway (I'll try out pfSense sometime down the line), and my HD Homerun (big antenna is in the attic). I have Cat6 drops in each room in the house, so everything runs here. On my USG, I have both a LAN #2 and a LAN #1 line running to the 2nd closet in this room (server room). This shot is before the cable management.

Cable management completed in closet #1. Added an access point and connected 3 old Raspberry Pi devices I had laying around (1 for PiHole - Adblocker, 1 for Unbound - Recursive DNS server, and 1 for Privoxy - Non Caching web proxy).

Rats nest of wires under my desk. I mounted an amplifier, optical DVD ROM drive, a USB hub that takes input from up to 4 computers (allows me to switch between servers in closet #2 with my USB mic, camera, keyboard, headset always functioning), and a small pull out drawer.

Cable management complete, night shot with with Nanoleaf wall lights. Unifi controller is mounted under the bookshelf, allows me to keep tabs on the network. I have a tablet on each side of the door frame (apps run on there that monitor my self hosted web services). I drilled a 3 inch hole on my desk to fit a grommet wireless phone charger. All my smart lights are either running on a schedule or turn on/off via an Alexa command. All of our smart devices across the house and outside, run on its on VLAN for segmentation purposes.

Quick shot with desk light off. I'm thinking in the future of doing a build that will mount to the wall (where "game over" is shown).

Wooting One keyboard with custom keycaps and Swiftpoint Z mouse, plus Stream Deck (I'm going to make a gaming comeback one day!).

Good wallpapers are hard to find with this resolution so pieced together my own.

Speakers and books at inside corner of desk.

Speakers and books at inside corner of desk.
Closet #2, first look (this is in the same room but off to the other side). Ran a few CAT6 cables from closet #1, into the attic and dropped here (one on LAN #1, the other on LAN #2 for USG). Had to add electrical sockets as well.

I have owned a ton of Thinkpads since my IBM days, I figured I could test hooking them all up and having them all specialize in different functions (yes, I have a Proxmox box but it's a decommissioned HP Microserver on the top shelf which is getting repurposed with TrueNAS_core). If you're wondering what OSes run on these laptops: Windows 10, Ubuntu, CentOS, AntiX. All of these units are hardwired into my managed Netgear 10gigabit switch (only my servers on the floor have 10 gigabit NICs useful to pass data between the two). Power strip is also mounted on the right side, next to another tablet used for monitoring. These laptop screens are usually turned off.
Computing inventory in image:
Lenovo Yoga Y500, Lenovo Thinkpad T420, Lenovo Thinkpad T430s, Lenovo Thinkpad Yoga 12, Lenovo Thinkpad Yoga 14, Lenovo Thinkpad W541 (used to self host my webservices), Lenovo S10-3T, and HP Microserver N54L
Left side of closet #2

**moved these Pis and unmanaged switch to outside part of closet**

Since I have a bunch of Raspberry Pi 3s, I decided recently to get started with Kubernetes clusters (my time is limited but hoping to have everything going by the holidays 2020) via Rancher, headless. The next image will show the rest of the Pis but in total:
9x Raspberry Pi 3 and 2x Raspberry Pi 4

2nd shot with cable management. The idea is to get K3s going, there's Blinkt installed on each Pi, lights will indicate how many pods per node. The Pis are hardwired into a switch which is on LAN #2 (USG). I might also try out Docker Swarm simultaneously on my x86/x64 laptops. Here's my compose generic template (have to re-do the configs at a later data) but gives you an idea of the type of web services I am looking to run: https://gist.github.com/antoinesylvia/3af241cbfa1179ed7806d2cc1c67bd31
20 percent of my web services today run on Docker, the other 80 percent are native installs on Linux and or Windows. Looking to get that up to 90 percent by the summer of 2021.
Basic flow to call web services:
User <--> my.domain (Cloudflare 1st level) <--> (NGINX on-prem, using Auth_Request module with 2FA to unlock backend services) <--> App <--> DB.
If you ever need ideas for what apps to self-host: https://github.com/awesome-selfhosted/awesome-selfhosted

Homelabs get hot, so I had the HVAC folks to come out and install an exhaust in the ceiling and dampers in the attic.
I built my servers in the garage this past winter/spring, a little each night when my daughter allowed me to. The SLI build is actually for Parsec (think of it as a self hosted Stadia but authentication servers are still controlled by a 3rd party), I had the GPUs for years and never really used them until now.

Completed image of my 2 recent builds and old build from 2011.
Retroplex (left machine) - Intel 6850 i7 (6 core, 12 thread), GTX 1080, and 96GB DDR4 RAM. Powers the gaming experience.
Metroplex (middle machine) - AMD Threadripper 1950x (16 core, 32 thread), p2000 GPU, 128GB DDR4 RAM.
HQ 2011 (right machine) - AMD Bulldozer 8150 (8 cores), generic GPU (just so it can boot), 32GB DDR3 RAM.

I've been working and labbing so much, I haven't even connected my projector or installed a TV since moving in here 11 months ago. I'm also looking to get some VR going, headset and sensors are connected to my gaming server in closet #2. Anyhow, you see all my PS4 and retro consoles I had growing up such as Atari 2600, NES, Sega Genesis/32X, PS1, Dreamcast, PS2, PS3 and Game Gear. The joysticks are for emulation projects, I use a Front End called AttractMode and script out my own themes (building out a digital history gaming museum).

My longest CAT6 drop, from closet #1 to the opposite side of the room. Had to get in a very tight space in my attic to make this happen, I'm 6'8" for context. This allows me to connect this cord to my Unifi Flex Mini, so I can hardware my consoles (PS4, PS5 soon)

Homelab area includes a space for my daughter. She loves pressing power buttons on my servers on the floor, so I had to install decoy buttons and move the real buttons to the backside.
Next project, a bartop with a Raspberry Pi (Retropie project) which will be housed in an iCade shell, swapping out all the buttons. Always have tech projects going on. Small steps each day with limited time.
6 notes
·
View notes
Text
Things to know about the PE Mechanical Exam Structure
As per a previously published report by the National Science Foundation, there are approximately 7.5 million engineering and science graduates globally. And this data is old! Every year, more students choose different engineering disciplines. The catch here is that there are not enough engineering jobs for everyone. This is one of the pressing concerns for newly graduated engineers. We do not want to be discouraging, but facts are facts. Getting an extra qualification on top of your engineering degree will set you apart from the rest of your colleagues. People will choose students with additional knowledge when the competition is this intense. That is why professional courses, practical exams, and review programs exist.
Today, we will give details about one such exam for a specific engineering discipline called Mechanical Engineering. First, we will talk about the Mechanical PE exam, an exam test for a minimum level of competency in the mechanical engineering discipline. The Principles and Practice of Engineering (PE) exam is designed for engineers who have gained a minimum of four years’ post-studies work experience in their chosen engineering discipline. As we mentioned earlier, these exams are designed to provide professionals with an extra edge to shine in their careers. When we talk about professional exam courses, numerous institutions conduct them. But the ones with real credibility are hard to find. One such institute is NCEES - advancing licensure for engineers and surveyors.
The PE Mechanical Exam is a step-up for working professionals who want to add extra feathers to their hats. However, you must keep in mind that these exams are no joke. According to their curriculum, the PE and FE exams, i.e., practical and fundamental exams, cater to specific engineering disciplines. However, the NCEES conducts exams for three of its sub-disciplines:
1) Exam for HVAC and Refrigeration field
2) Exam for Machine Design and Materials field
3) Exam for Thermal and Fluid Systems field
The PE Mechanical Exams for these sub-disciplines focus on assorted topics related to the field. The subjects covered will enhance your practical and fundamental knowledge for the mechanical engineering test. The exam appointment time for any of these is 9 hours. It is a computer-based exam comprising eighty multiple-choice and alternative item type questions. Let us now discuss the subject specifications for HVAC, Machine Design and Materials, and Thermal and Fluid Systems PE mechanical exams.
1) HVAC and Refrigeration PE Mechanical Exam
The exam has questions that require various approaches and methodologies, including design, analysis, and application.
The following is the exam structure for HVAC (Heating, ventilation, and air conditioning) PE Exam:
Topics
Principles
A. Basic Engineering Practice
1. Units and conversions
2. Economic analysis
3. Electrical concepts (e.g., power consumption, motor ratings, heat output, amperage)
B. Thermodynamics
1. Cycles
2. Properties
3. Compression processes
C. Psychometrics (e.g., sea level, 5,000-ft elevation)
1. Heating/cooling processes
2. Humidification/dehumidification processes
D. Heat Transfer
E. Fluid Mechanics
F. Energy/Mass Balances
Applications
A. Heating/Cooling Loads
B. Equipment and Components
1. Cooling towers and fluid coolers
2. Boilers and furnaces (e.g., efficiencies, fuel types, combustion)
3. Heat exchangers (e.g., shell and tube, plate, and frame)
4. Condensers/evaporators (e.g., chillers, variable refrigerant flow, heat pumps)
5. Pumps/compressors/fans (e.g., laws, efficiency, selection)
6. Cooling/heating coils
7. Control systems components (e.g., valves, dampers)
8. Refrigerants (e.g., properties, types)
9. Refrigeration components (e.g., expansion valves, accumulators)
C. Systems and Components
1. Air distribution (e.g., air handlers, duct design, system type, terminal devices)
2. Fluid distribution/piping (e.g., hydronic, oil, fuel gas, compressed air, steam, system type)
3. Refrigeration (e.g., food storage, cooling, and freezing)
4. Energy recovery (e.g., enthalpy wheels, heat pipes, run-around systems) 5. Basic control concepts (e.g., economizer, temperature reset)
D. Supportive Knowledge
1. Codes and standards
2. Air quality and ventilation (e.g., filtration, dilution)
3. Vibration control (e.g., transmission effect, isolation)
4. Acoustics (e.g., sound control, absorption, attenuators, noise-level criteria)
The exam structure stays the same for both other fields’ exams except for the subjects.
It is essential to be thorough before taking any of these exams. To do so, there are numerous online and personal courses available. Sign-up for these courses and take the Mechanical PE practice exam before the actual one to know where you stand in terms of your readiness.
Hope this helps you understand the course and exam structure of your PE Mechanical test. Good luck!
For more information visit: https://www.schoolofpe.com/pe-mechanical/
0 notes
Text
STEYR 6175 CVT Tractor Service Repair Manual
Download Link
https://www.aservicemanualpdf.com/downloads/steyr-6150-cvt-6165-cvt-6175-cvt-tractor-service-repair-manual
This is the Highly Detailed factory service repair manual for theSTEYR 6175 CVT TRACTOR , this Service Manual has detailed illustrations as well as step by step instructions,It is 100 percents complete and intact. they are specifically written for the do-it-yourself-er as well as the experienced mechanic.STEYR 6175 CVT TRACTOR Service Repair Workshop Manual provides step-by-step instructions based on the complete dis-assembly of the machine. It is this level of detail, along with hundreds of photos and illustrations, that guide the reader through each service and repair procedure. Complete download comes in pdf format which can work under all PC based windows operating system and Mac also, All pages are printable. Using this repair manual is an inexpensive way to keep your vehicle working properly. Service Repair Manual Covers: INTRODUCTION
Engine
Engine and crankcase
Cylinder heads
Fuel tanks
Lift pump and lines
Fuel injection system
Air cleaners and lines
Turbocharger and lines
Intake and exhaust manifolds and muffler
Selective Catalytic Reduction (SCR) exhaust treatment
Engine cooling system
Fan and drive
Oil cooler and lines
Clutch
Slip clutch or flywheel damper
Transmission
Continuously Variable Transmission (CVT)
Continuously Variable Transmission (CVT) external controls
Continuously Variable Transmission (CVT) lubrication system
Continuously Variable Transmission (CVT) internal components
Creeper
Four-Wheel Drive (4WD) system
Electro-hydraulic control
Drive shaft
Front axle system
Powered front axle
Front bevel gear set and differential
Final drive hub, steering knuckles, and shafts
Axle suspension control
Rear axle system
Powered rear axle
Rear bevel gear set and differential
Planetary and final drives
Spur gear and final drives
Power Take-Off (PTO)
Rear mechanical control
Rear electro-hydraulic control
Two-speed rear Power Take-Off (PTO)
Three-speed rear Power Take-Off (PTO)
Front Power Take-Off (PTO)
Brakes and controls
Hydraulic service brakes
Pneumatic service brakes
Parking brake or parking lock
Trailer brake hydraulic control
Trailer brake pneumatic control
Hydraulic systems
Hydraulic systems
Reservoir, cooler, and filters
Variable displacement pump
Charge pump
Auxiliary hydraulic pump
Regulated/Low pressure system
Remote control valves
Three-point hitch control valve
Front hitch controls and lines
Front hitch cylinders and lines
Pneumatic system
Hitches, drawbars, and implement couplings
Rear three-point hitch
Rear three-point hitch linkage
Front hitch
Frames and ballasting
Frame
Steering
Steering control
Tie rods
Hydraulic control components
Cylinders
Autoguidance steering
Wheels
Front wheels
Rear wheels
Cab climate control
Heating
Ventilation
Air conditioning
Electrical systems
Electrical system
Harnesses and connectors
Engine control system
Alternator
Battery
Fuel tank system
Fuel injection system
Selective Catalytic Reduction (SCR) electrical system
Electronic modules
Transmission speed sensors
Transmission pressure sensors
ransmission temperature sensors
ransmission position sensors
Ground speed control
Front axle control system
Rear Power Take-Off (PTO) control system
Service brake electrical system
Parking brake electrical system
Cab controls
Remote control valve electric control
Cab Heating, Ventilation, and Air-Conditioning (HVAC) controls
Heating, Ventilation, and Air-Conditioning (HVAC) control system
Steering control system
Rear three-point hitch electronic control system
Global Positioning System (GPS)
Cab or platform harnesses and connectors
Warning indicators, alarms, and instruments
FAULT CODES
Platform, cab, bodywork, and decals
Cab
Engine hood and panels
Fenders and guards
File Format: PDF Compatible: All Versions of Windows & Mac Language: English Requirements: Adobe PDF Reader NO waiting, Buy from responsible seller and get INSTANT DOWNLOAD, Without wasting your hard-owned money on uncertainty or surprise! All pages are is great to haveSTEYR 6175 CVT TRACTOR Service Repair Workshop Manual.
Thanks for visiting!
0 notes
Text
Street Beast Big-Block–Powered 1967 Chevelle
You might forget a birthday. You might forget your third girlfriend’s name. You might even forget what you had for breakfast yesterday. But you’ll never forget the day you were sucked into the car thing and trapped in it like a beast in a tar pit.
Mark Young’s slow, inevitable ascent up the chain didn’t begin on concrete or asphalt. His feet were in the dirt, every Friday night in Chesterfield, Virginia, at Southside Speedway, the fecund short-track in his home burg. When he was 17 he’d had enough of the prosaic, he pulled stakes and went where the money was, in the north, to Chicago.
Seven years in he quit the car scene, married Jenny and they had a couple of kids. As his oldest son came of age, the kinship was undeniable; Mark rejoined the mystical ranks. Along about 1997, he was working alongside someone who had a 1967 Chevelle SS equipped with the juice lifter L35 that mustered 325 horsepower.
Mark lusted openly. “I told him all the time how much I liked it. I would visit him, you know, just to see the car. I kept at it. Three years later, he sold it to me and shortly after that, he decided to move. My wife and I bought his house. It had a 30×36 garage, but more important, it was heated. A new chapter in my life started.”
The Chevelle had been someone’s twist for a long time, so long that no one could remember the original painter or what paint was used (it looks pretty black to us). In its early life, it had suffered a frame-on resto that included replacing sketchy floorpans. Lately, though, Mark performed a body-off stint, mainly to rehab the chassis. JJ Powdercoat in Zion, Illinois, preserved it with Monarch Black semi-gloss. Mark counts a few close friends as co-conspirators; they poured in two years of grunts, curses, cases of beer, likely stentorious aromatherapy (from all that beer), and fun until it was well enough to drive.
Mark was after a combination: old-school looks and styling cues clapped with a bigger big-block orchestrated by modern fuel delivery. The engine’s a forged “crate” short-block built by BluePrint Engines. Opel Engineering, a local enterprise, staged the headers, camshaft, intake manifold, and ignition. The goal was a fat, unctuous torque curve, nearly 540 lb-ft of it all in at a piddling 2,800 rpm. To complement, the Doug’s primary tubes are undersize (for this displacement) at 1 3/4 inches and provide a modicum of backpressure.
Rather than a fool’s carburetor, Mark would mark time with a FAST XFI 2.0 system driving eight individual fuel injectors. He’d bridge the oval-port Edelbrock cylinder heads by a Victor Jr. intake plate and, to keep the appearance original with a fullsize air cleaner, he fixed a mass air meter to the Victor where a carburetor would normally go. Anyway, more horsepower and grunt than Mark really needs is absorbed by a Turbo 400 fronting a Saturday Night Special converter with a 2,800-stall speed. The 9-inch carries a 3.70 gear and 31-spline axleshafts. To think about this tire-squalling bad boy tends to raise hair in sensitive places.
Setting up the chassis was a breeze. Mark didn’t feel the need for tubular stuff or hydroformed anything. His Chevelle was gonna make it in a straight line. His concession up front was limited to QA1 adjustable dampers. In back, he got more adventuresome: QA1 adjustables working with Hotchkis upper and lower control arms. He put 12-inch rotors and four-piston clampers at each corner squeezed by the OE master cylinder.
Then he blasted his A-body right back to the day; old-school cues that work, gathered the signature around wheels with a 15-inch diameter. Weld hoops with modest 7- and 8-inch stretch, as they would have been yesteryear, capture tall 60-series 235 and 275 aspect Mickey Thompson treads. Hey Mark, thanks for not even thinking about the S/S or Americans cliché; the forged Welds frame your Chevelle right.
So, yeah, the project is really one from the archives, one that began long before Mark picked it. He knew that it had a frame-on resto somewhere along the line but really nothing more than that had been done in 1993. Two years ago, when Mark embarked on the project, the quality of the work was still stand-up, so he was free to concentrate on the customizing cues.
For the interior, he saw no reason to go beyond the original theme, tapping YearOne for the bucket seats, Classic Dash for the slick dashboard insert, and the array of AutoMeter Phantom dials. That good-looking SS steering wheel is original, too. Everything else is reproduction stuff or original.
From all indications, Mark’s old A-body is an absolute gold magnet. At shows. “All together,” he crowed, “I have collected 23 trophies—eight from the Chevy-Vette Fest and six from the World of Wheels in Chicago, and nine trophies from around town. I plan to retire in five years and this Chevelle will be driven daily so long as weather permits.” Mark, after listening to you and your oil burner habit, we think you’d drive it in a rainstorm if the mood struck. CHP
Tech Check Owner: Mark Young, Streamwood, Illinois Vehicle: 1967 Chevelle SS Engine Type: Mark IV Displacement: 496 ci Compression Ratio: 10.8:1 Bore: 4.310 inches Stroke: 4.250 inches Cylinder Heads: Edelbrock RPM 454-0, 110cc combustion chambers, 2.19/1.88 valves Rotating Assembly: Scat steel crankshaft, forged H-beam rods, forged flat-top pistons Valvetrain: Comp 1.7:1 rocker arms, roller lifters, 3/8-inch pushrods, Comp springs Camshaft: Comp Xtreme Energy (0.560/0.580-inch lift; 300/306-deg. duration at 0.050), Proform rocker covers Induction: Victor Jr. intake manifold, FAST EFI, mass air meter, Proform air cleaner, 22-gal. Holley Sniper EFI tank Ignition: FAST XFI 2.0 controller, MSD Pro-Billet distributor, Blaster coil, MSD 8.5 primary wires Exhaust: Doug’s headers, 1 3/4-inch primaries, 3-inch collector; 2 1/2-inch stainless system, Flowmaster mufflers Ancillaries: Edelbrock water pump, Be Cool four-core radiator, Powermaster 110-amp alternator, Billet Specialties accessory drive, YearOne pedal assemblies Machine Work: BluePrint Engines (Kearney, NE) Built By: Short-block by BluePrint Engines; heads, cam, intake system, ignition coordinated by Ted at Opel Engineering (Streamwood, IL) Output: 543 hp at 5,500 rpm, 538 lb-ft at 2,800 rpm Drivetrain Transmission: Turbo 400, TCI flexplate and 2,800-stall converter, assembled by Higgins Transmission (Elk Grove, IL) Rear Axle: Currie 9-inch, 3.73:1 gears, 31-spline axles, 3.0×0.083-inch chromoly driveshaft w/ 1350 U-joints Chassis Front Suspension: OE, QA1 adjustable shocks Rear Suspension: Hotchkis upper and lower control arms, QA1 adjustable shocks Brakes: Right Stuff 12-inch rotors, four-piston calipers, front and rear; OE master cylinder Wheels & Tires Wheels: Weld Weldstar 15×7 front, 15×8 rear Tires: Mickey Thompson Sportsman S/R 235/60 front, ET Street 275/60 rear Interior Upholstery: YearOne Material: Vinyl Seats: YearOne Steering: OE column, OE wheel Shifter: Hurst Quarter Stick Dash: Original w/ Classic Dash insert Instrumentation: AutoMeter Phantom Audio: Ken Harrison head unit, 6-inch MTX front speakers HVAC: Windows down Exterior Bodywork: N/A, floorpans replaced Paint By: N/A Paint: N/A Hood: OE SS Grille: Parts Place Bumpers: OE
The post Street Beast Big-Block–Powered 1967 Chevelle appeared first on Hot Rod Network.
from Hot Rod Network https://www.hotrod.com/articles/street-beast-big-block-powered-1967-chevelle/ via IFTTT
0 notes
Text
STEYR 6165 CVT Tractor Service Repair Manual
Download Link
https://www.aservicemanualpdf.com/downloads/steyr-6150-cvt-6165-cvt-6175-cvt-tractor-service-repair-manual
This is the Highly Detailed factory service repair manual for theSTEYR 6165 CVT TRACTOR , this Service Manual has detailed illustrations as well as step by step instructions,It is 100 percents complete and intact. they are specifically written for the do-it-yourself-er as well as the experienced mechanic.STEYR 6165 CVT TRACTOR Service Repair Workshop Manual provides step-by-step instructions based on the complete dis-assembly of the machine. It is this level of detail, along with hundreds of photos and illustrations, that guide the reader through each service and repair procedure. Complete download comes in pdf format which can work under all PC based windows operating system and Mac also, All pages are printable. Using this repair manual is an inexpensive way to keep your vehicle working properly. Service Repair Manual Covers: INTRODUCTION
Engine
Engine and crankcase
Cylinder heads
Fuel tanks
Lift pump and lines
Fuel injection system
Air cleaners and lines
Turbocharger and lines
Intake and exhaust manifolds and muffler
Selective Catalytic Reduction (SCR) exhaust treatment
Engine cooling system
Fan and drive
Oil cooler and lines
Clutch
Slip clutch or flywheel damper
Transmission
Continuously Variable Transmission (CVT)
Continuously Variable Transmission (CVT) external controls
Continuously Variable Transmission (CVT) lubrication system
Continuously Variable Transmission (CVT) internal components
Creeper
Four-Wheel Drive (4WD) system
Electro-hydraulic control
Drive shaft
Front axle system
Powered front axle
Front bevel gear set and differential
Final drive hub, steering knuckles, and shafts
Axle suspension control
Rear axle system
Powered rear axle
Rear bevel gear set and differential
Planetary and final drives
Spur gear and final drives
Power Take-Off (PTO)
Rear mechanical control
Rear electro-hydraulic control
Two-speed rear Power Take-Off (PTO)
Three-speed rear Power Take-Off (PTO)
Front Power Take-Off (PTO)
Brakes and controls
Hydraulic service brakes
Pneumatic service brakes
Parking brake or parking lock
Trailer brake hydraulic control
Trailer brake pneumatic control
Hydraulic systems
Hydraulic systems
Reservoir, cooler, and filters
Variable displacement pump
Charge pump
Auxiliary hydraulic pump
Regulated/Low pressure system
Remote control valves
Three-point hitch control valve
Front hitch controls and lines
Front hitch cylinders and lines
Pneumatic system
Hitches, drawbars, and implement couplings
Rear three-point hitch
Rear three-point hitch linkage
Front hitch
Frames and ballasting
Frame
Steering
Steering control
Tie rods
Hydraulic control components
Cylinders
Autoguidance steering
Wheels
Front wheels
Rear wheels
Cab climate control
Heating
Ventilation
Air conditioning
Electrical systems
Electrical system
Harnesses and connectors
Engine control system
Alternator
Battery
Fuel tank system
Fuel injection system
Selective Catalytic Reduction (SCR) electrical system
Electronic modules
Transmission speed sensors
Transmission pressure sensors
ransmission temperature sensors
ransmission position sensors
Ground speed control
Front axle control system
Rear Power Take-Off (PTO) control system
Service brake electrical system
Parking brake electrical system
Cab controls
Remote control valve electric control
Cab Heating, Ventilation, and Air-Conditioning (HVAC) controls
Heating, Ventilation, and Air-Conditioning (HVAC) control system
Steering control system
Rear three-point hitch electronic control system
Global Positioning System (GPS)
Cab or platform harnesses and connectors
Warning indicators, alarms, and instruments
FAULT CODES
Platform, cab, bodywork, and decals
Cab
Engine hood and panels
Fenders and guards
File Format: PDF Compatible: All Versions of Windows & Mac Language: English Requirements: Adobe PDF Reader NO waiting, Buy from responsible seller and get INSTANT DOWNLOAD, Without wasting your hard-owned money on uncertainty or surprise! All pages are is great to haveSTEYR 6165 CVT TRACTOR Service Repair Workshop Manual.
Thanks for visiting!
0 notes
Text
STEYR 6150 CVT Tractor Service Repair Manual
Download Link
https://www.aservicemanualpdf.com/downloads/steyr-6150-cvt-6165-cvt-6175-cvt-tractor-service-repair-manual
This is the Highly Detailed factory service repair manual for theSTEYR 6150 CVT TRACTOR, this Service Manual has detailed illustrations as well as step by step instructions,It is 100 percents complete and intact. they are specifically written for the do-it-yourself-er as well as the experienced mechanic.STEYR 6150 CVT TRACTOR Service Repair Workshop Manual provides step-by-step instructions based on the complete dis-assembly of the machine. It is this level of detail, along with hundreds of photos and illustrations, that guide the reader through each service and repair procedure. Complete download comes in pdf format which can work under all PC based windows operating system and Mac also, All pages are printable. Using this repair manual is an inexpensive way to keep your vehicle working properly. Service Repair Manual Covers: INTRODUCTION
Engine
Engine and crankcase
Cylinder heads
Fuel tanks
Lift pump and lines
Fuel injection system
Air cleaners and lines
Turbocharger and lines
Intake and exhaust manifolds and muffler
Selective Catalytic Reduction (SCR) exhaust treatment
Engine cooling system
Fan and drive
Oil cooler and lines
Clutch
Slip clutch or flywheel damper
Transmission
Continuously Variable Transmission (CVT)
Continuously Variable Transmission (CVT) external controls
Continuously Variable Transmission (CVT) lubrication system
Continuously Variable Transmission (CVT) internal components
Creeper
Four-Wheel Drive (4WD) system
Electro-hydraulic control
Drive shaft
Front axle system
Powered front axle
Front bevel gear set and differential
Final drive hub, steering knuckles, and shafts
Axle suspension control
Rear axle system
Powered rear axle
Rear bevel gear set and differential
Planetary and final drives
Spur gear and final drives
Power Take-Off (PTO)
Rear mechanical control
Rear electro-hydraulic control
Two-speed rear Power Take-Off (PTO)
Three-speed rear Power Take-Off (PTO)
Front Power Take-Off (PTO)
Brakes and controls
Hydraulic service brakes
Pneumatic service brakes
Parking brake or parking lock
Trailer brake hydraulic control
Trailer brake pneumatic control
Hydraulic systems
Hydraulic systems
Reservoir, cooler, and filters
Variable displacement pump
Charge pump
Auxiliary hydraulic pump
Regulated/Low pressure system
Remote control valves
Three-point hitch control valve
Front hitch controls and lines
Front hitch cylinders and lines
Pneumatic system
Hitches, drawbars, and implement couplings
Rear three-point hitch
Rear three-point hitch linkage
Front hitch
Frames and ballasting
Frame
Steering
Steering control
Tie rods
Hydraulic control components
Cylinders
Autoguidance steering
Wheels
Front wheels
Rear wheels
Cab climate control
Heating
Ventilation
Air conditioning
Electrical systems
Electrical system
Harnesses and connectors
Engine control system
Alternator
Battery
Fuel tank system
Fuel injection system
Selective Catalytic Reduction (SCR) electrical system
Electronic modules
Transmission speed sensors
Transmission pressure sensors
ransmission temperature sensors
ransmission position sensors
Ground speed control
Front axle control system
Rear Power Take-Off (PTO) control system
Service brake electrical system
Parking brake electrical system
Cab controls
Remote control valve electric control
Cab Heating, Ventilation, and Air-Conditioning (HVAC) controls
Heating, Ventilation, and Air-Conditioning (HVAC) control system
Steering control system
Rear three-point hitch electronic control system
Global Positioning System (GPS)
Cab or platform harnesses and connectors
Warning indicators, alarms, and instruments
FAULT CODES
Platform, cab, bodywork, and decals
Cab
Engine hood and panels
Fenders and guards
File Format: PDF Compatible: All Versions of Windows & Mac Language: English Requirements: Adobe PDF Reader NO waiting, Buy from responsible seller and get INSTANT DOWNLOAD, Without wasting your hard-owned money on uncertainty or surprise! All pages are is great to haveSTEYR 6150 CVT TRACTOR Service Repair Workshop Manual.
Thanks for visiting!
0 notes
Text
1970 Monte Carlo with 1,000-Plus Horsepower
In ancient times, Detroit Raw supplied the youth market with hot cars, defined it with them, but they easily handed off the muscle car powertrain to a bunch of mature sheetmetal, including the Monte Carlo, a car that wasn’t necessarily meant to be a hot rod of any stripe. In the weed-smoky ’70s, our pal Berserko Bob had one. Not some small-block/slushbox wheezer, either. His Monte had a 454 backed by a Turbo 400. No one we knew had anything like it. But Berserko didn’t hot rod it. He just drove it every day.
Rich McLeod (a mechanic and welder by experience) got his Monte way back in ’98. He didn’t want it for the daily grind. He turned his unique sheetmetal into a drag racer, a hot rod that gets serious second looks. When he bought it off some soul at an Arizona Air Force base it was in solid shape. Must have been the dry air that preserved it.
Rich didn’t stall. Though he might pedal the car once in a while on the street, he went right for the throat. Straightaway, he pulled his NMCA Easy Street hat on and got busy with the future. He began his industry on the north side of Milwaukee in a two-and-a-half car garage. Talk about putting yourself in debt. At the same time he got married and bought a house. But some humans need to operate under that kind of pressure—keeps it all relative.
He had a couple of reliable hands on the project, Dennis Equitz and Rick O’Shea (is that like “ricochet”?) Equitz is the man at Blitzkrieg Motorsports, whom Rich got to know when he worked there from 1998 to ’12. O’Shea can weld or fabricate anything; his fertile mind finds pertinent use for parts and bits that most wouldn’t likely even consider.
Rich is a modest man. To him, the Monte Carlo represents small victories. It took a little bit more than a year to complete, he said. Ask him what he thinks is most unique about it and he’ll tell you that it still has a back seat and that it looks fairly stock. Most memorable? “Taking my kids for a ride.” Rich is a modest man.
The lads tweaked the NMCA rules a tad. They got the frame on a jig and pushed the rear ’rails in 4 inches. They welded everything back in to look factory, then they boxed the frame. They installed the wheeltubs and widened and raised the transmission tunnel to accept the transmission and driveshaft for a lower stance with the newly lowered body. They replaced the firewall with a piece of flat steel. Then Equitz raised the chrome-moly ’cage and started to work on the 9-inch axlehousing. He built the ladder bars to support it. The two mapped out the front suspension, welded upper and lower control arms over Fatman spindles that would be pointed by Mustang rack steering.
Rich bought a 454 out of a ’70 Impala along with a pair of closed-chamber heads that he spent two months porting and polishing by hand. Warren Automotive in Beaver Dam, Wisconsin, opened the 454 to 500 cubic inches with a cylinder poke and the stroke of a billet Eagle crankshaft, which was part of an assembly that came from a fierce shop up in Bohemia, New York. Equitz made the waste collectors with 2 3/8-inch primary tubes that merge with a 4.5-inch collector.
Then reality set in: Rich didn’t have enough money to go racing … so he drove the car on the street for a few years. Then children appeared. He bedded the Monte down in the pole barn for a nine-year nap. During that hibernation some of its parts got sold or simply wandered off. When he got on the case again, he wanted respectable power, and that required a power-adder: in fact, an intercooled ProCharger D3CR supercharger.
Rick O’Shea and Rich crafted a sheetmetal intake manifold and a spacer plate for sensors and then put a Wilson 95mm throttle body on it. They built the system with Bosch 160 lb/hr injectors and fed it with a Holley pump. O’Shea fashioned the throttle lever and used a bicycle gear selector cable to make it work. Rich ran air intake tubes through the framerails. Accommodating the intercooler required a hood release system that he made from a Dodge pickup truck spring with the hood handle release inside of it. Again, he and O’Shea repurposed a bicycle gear selector cable to actuate it.
To soak up the torque and make that Turbo 400 shift like a machine gun, TPI Performance Transmission hopped it up with a Transmission Design 3,500-stall converter, Hughes reverse pattern valvebody, and Hipster transbrake. A JW Ultra-Bell hooks it to the engine. All the grunt ropes down a Strange Engineering chrome-moly prop shaft that stops at the fabricated housing, Strange spool, 3.40:1 cogs, and 35-spline axleshafts.
Modest Rich then told us of a slightly immodest proposal: “I’ve had this car for 19 years and I think I’m out of the debt of the car. That’s why I’m building a ’60 bubbletop Impala to be able to take my family on long cruises. If you have any questions just call or email me.”
Tech Check Owner Richard McLeod, Allenton, Wisconsin Vehicle 1970 Monte Carlo Engine Type 1970 454 Displacement 500 ci Compression Ratio 10.0:1 Bore 4.460 inches Stroke 4.000 inches Cylinder Heads Iron rectangular port closed-chamber, hand-ported, 2.18/1.88 valves, 118cc combustion chambers Rotating Assembly Eagle billet crankshaft and H-beam connecting rods, Wiseco custom-coated pistons, Hellfire ring packs, Stef’s oil pan, Moroso oil pump Valvetrain Crane 1.7:1 roller rockers, Comp Cams roller lifters, Smith Brothers pushrods, Jesel beltdrive Camshaft Steve Morris custom solid roller (specs proprietary) Induction Aluminum sheetmetal manifold by Rick O’Shea/Rich McLeod, Wilson 95mm throttle body, Bosch 160 lb/hr injectors, Holley Dominator EFI, ProCharger D3CR supercharger, custom intercooler Ignition Holley AL7 Exhaust Blitzkrieg Motorsports headers (Caledonia, WI), 2 3/8-inch primary pipes, Jet-Hot–coated 4-inch mild steel system, Flowmaster mufflers, DynoMax Top 10 Shootout tips Ancillaries Powermaster alternator, Derale oil cooler, Jones Racing pulleys, Meziere water pump, Moroso vacuum pump Output 1,000-plus hp Machine Work Warren Automotive (Beaver Dam, WI) Built By Warren Automotive Drivetrain Transmission TPI Performance Transmission (South Chicago Heights, IL) Turbo 400, JW Performance Ultra-Bell bellhousing, Hipster transbrake, Transmission Design 3,500-4,200–stall converter, Hughes reverse shift pattern manual valvebody Rear Axle Moser 9-inch, Strange Engineering spool, 3.40:1 gears, 35-spline axles (unit assembled by Blitzkrieg Motorsports), Strange Engineering chrome-moly prop shaft Chassis Front Suspension Fatman 2-inch drop spindles, Blitzkrieg upper and lower tubular control arms, AFCO double-adjustable coilover dampers, AFCO springs; Blitzkrieg chrome-moly rollcage Rear Suspension Frame boxed and narrowed 4 inches per side, Blitzkrieg ladder bars, AFCO double-adjustable coilover dampers Brakes Wilwood Forged Dynalite 10.75-inch rotors, two-piston calipers, front; Wilwood 11.44-inch rotors, Dynalite two-piston calipers, rear; Wilwood master cylinder Wheels & Tires Wheels Weld Racing Magnum 2.0 15×3.5 front, 15×10 rear Tires Mickey Thompson ET Street Front, 27.5/4.5 front, ET Street 30×13.50 rear Interior Upholstery Rich McLeod Material Cloth/vinyl Seats Procar, Simpson five-point harnesses Steering Factory column, GM wheel Shifter Turbo Action Cheetah Dash Stock with gauge insert Instrumentation AutoMeter Pro-Comp Audio Sony head unit, CD, cassette, Sony 6-inch front speakers, 12×9 rear HVAC Vents open, windows down, mouth open Exterior Bodywork Authentic Automotive (Cudahy, WI) Paint By Jim Plimpton (Authentic Automotive) Paint PPG 1999 Chrysler Concorde Platinum Hood VFN fiberglass Grille GM Bumpers GM (chromed by Parts Place)
Photography by Dominick Damato
The post 1970 Monte Carlo with 1,000-Plus Horsepower appeared first on Hot Rod Network.
from Hot Rod Network http://www.hotrod.com/articles/835238/ via IFTTT
0 notes