#I love comparing every other SW show to its standards
Text
I love being an annoying Andor fan actually.
#I love acting like it’s the best thing since sliced bread (it is)#I love comparing every other SW show to its standards#we’re probably not getting anything as good again after season 2#and they won’t give us a bts documentary or any decent merch#so I think I can be a little annoying about it…as a treat
22 notes
·
View notes
Text
Short Reflection: Yama no Susume, Season 1
It can be hard to accurately judge short anime sometimes. The difference between what can be accomplished in 24-minute episodes, 12-minute episodes, 6-minute episodes and 3-minute episodes is so extraordinary that it’s unfair to hold one to another’s standards. But because most anime are 24-minute episodes, you tend to have far less context for judging the quality of shows shorter episode lengths. I have not seen very many short anime, least of all anime with episodes as short as the first season of Yama no Susume. So I don’t really have much to compare it against at its level. All I can do it take it on its own terms and appreciate what it gives me. And on that level, I’m glad to say that I really enjoyed this show. At three minutes an episode, there’s only so much it can get done, but it makes each and every one of those minutes count. If this is the quality I can look forward to when the following seasons trade up for 12 minutes an episode, I think I’m gonna be in very good hands.
The story follows Aoi and Hinata, childhood friends back in elementary school who separated for a few years before finding each other again in high school. Hinata’s big into mountain climbing, and her dad used to take her and Aoi on hikes back when they were kids. In typical cute girls fashion, they made a promise that someday, they would climb a mountain together by themselves. But then Aoi broke her leg by falling off a tall place, leaving her with an intense fear of heights and turning her into a much more introverted person. Now, she’s big into solo activities like cooking and crafts, things she can enjoy on her own without having to risk the mortifying ordeal of social interaction. But Hinata hasn’t forgotten their promise for a second. She’s gonna take Aoi mountain climbing even if she has to drag her along to do it. And despite Aoi’s protestations, she can’t help but enjoy getting swept up in her friend’s passion all over again.
Thus, the stage is set for cute comedy and wholesome bonding moments, and Yama no Susue has them aplenty. You can tell the writers did their research on mountain climbing; there’s a lot of detailed information on what equipment the characters use, what you can expect from different mountains, all the considerations that go in to embarking upon a hike. But the information never gets too dense that it overwhelms the characters. Aoi and Hinata have fantastic chemistry, and it was around episode 4 that I realized I was once again watching Yuka Iguchi play a shy girl who’s best friends with a more energetic, playful doofus. And then I realized that the show’s ED is near identical to the ED from the Symphogear OVAs, and god dammit I don’t care how much of an easy mark I am. That said, Aoi’s a more sarcastic character than Miku, and the way her banter with Hinata naturally segues from bickering to one-upsmanship to comfy companionship is endlessly charming. The whole show feels very much like a precursor to Yuru Camp, balancing character-driven gags with a genuine love for outdoor activities. You feel like you’re learning how you could enjoy mountain climbing by watching Aoi and Hinata go about it. I should also shout out the production from 8-Bit, because they do such a good job selling the moments of beautiful whimsy and snappy goofs alike. This is a damn good-looking show no matter what angle you look at it from.
But I think the real heart of this show is how it handles Aoi’s social anxiety. As a socially awkward introvert myself, I’ve seen too many shows that make alone time out to be some crippling social defect that needs to be “fixed” rather than a natural part of human interaction (looking at you, Uzaki-chan). But Yama no Susume never shames Aoi for her alone-time activities. It’s totally cool that she’s in to cooking and arts and crafts. Her journey isn’t about leaving introversion behind, it’s about learning to be more comfortable in social situations. And it’s really sweet watching her slowly break out of her shell. For such short episodes, the show packs a lot of character development into the cracks. You can actually feel Aoi become more comfortable talking to other people as the show goes on, each new experience adding new confidence to her soft-spoken voice. By the time it’s over, you can’t help but feel proud at the progress she’s made. And that’s from less than an hour of show. That, folks, is talent.
So while I’m still waiting to really fall in love with Yama no Susume, it’s definitely made a very strong first impression. I love the characters, I like the comedy, I appreciate learning about mountain climbing, and it just puts me in a very good mood. Therefore, I give the first season a score of:
7/10
And now to look forward to what future seasons will bring. See you next time!
4 notes
·
View notes
Text
SWTLJ, A Condensed Review
(No major spoilers for TLJ, though there are some general expectation spoilers; read at your own risk)
I’m still really confused as to how I feel about TLJ. It wasn’t an inherently bad movie and I appreciate that it didn’t pander to viewers as blatantly as TFA did, but it didn’t feel like an organic continuation of TFA, either. I may be wrong, but TLJ gave me the impression that RJ wasn’t particularly interested in making a sequel to someone else’s film. In fact, the disconnect between TFA and TLJ was significant enough that I feel like JJA and RJ either didn’t communicate with one another at all or RJ seriously disagreed with the direction that JJA was taking the series and decided to ignore everything that happened in TFA except for the most glaring of plot points (i.e. Han is killed by Kylo/Ben, Luke is incommunicado off on Ach-To and Rey has been sent to retrieve him, etc.). So even though TLJ ostensibly takes place directly after the end of TFA, they don’t feel like they belong together... and it isn’t just due to different directorial styles.
There were lots of concepts and themes (and a few major characterization/narrative choices, particularly w/r/t Luke, Leia, & Poe) in the film that I think could have worked for me if they’d been done a bit differently and/or built to properly, but their execution was such that I couldn’t fully get behind them. This irks me for two main reasons: #1. Stories are all about the characters for me, so when I can’t buy a characterization choice, it throws me out of the story, and #2. I like some of the themes underlying TLJ, which means that I really wish they had been executed in a manner that worked for me.
While I suspect it was unintentional, there were some weird double-standards with regards to how protagonists of color were narratively treated in TLJ when compared to their white counterparts (both in this film and in past films) that made me rather uncomfortable. I think part of the problem is that TLJ tried to turn the Loose Cannon/Military Maverick trope on its head and show why that sort of behavior is usually A Bad Thing in RL---and this is a totally worthy cause IMO!---but forgot that: A. the SW universe has, up until now, generally rewarded characters for this sort of behavior; what does it say that the characters who aren’t white are the only ones we see narratively punished for it?, and B. You can’t always treat characters of color the same way that you treat white characters, because characters of color have never been treated the same as their white counterparts. You have to be careful that in averting one trope you don’t fall into/reinforce another one that has its roots in racism, and so on.
On a similar note, I rarely feel comfortable with violence being played for laughs or ‘empowerment’ or being used by one character in order to ‘teach’ another character a ‘lesson’---especially when the perpetrators are meant to be the Good Guys, and doubly especially when it’s being leveled against characters of color by white characters---and this film was no exception to that.
Having said all of the above, I did love all of the visual diversity we got in the movie… in particular, the fact that there were lots of women of different ages and races (and, to a considerably lesser degree, species) shown to be part of the Resistance!!
Oh, and I <3 Rose Tico. The end.
I understand and greatly appreciate the point(s) of the Canto Bight subplot, but... there was something missing there for me, especially w/r/t Finn’s role in it. I don’t know. I can’t seem to fully articulate my thoughts on this right now. *shrugs*
TLJ’s pacing could have used some work, IMO, but that’s A. not unusual for a Star Wars film in the slightest and B. nothing that a good editor or two couldn’t have fixed. There were some gorgeous visual shots and some odd plot holes but, like poor pacing and use of cutting-edge technology, both of these are also more or less par for the course for your average Star Wars film. ;-)
Last but not least, for a film with the word “Jedi” in its title, I didn’t get the impression that RJ thought very deeply about the Force or the Jedi, let alone managed to decide what the film should do with them outside of cool fight scenes and Luke-related angst. The film was trying to make a statement about the Jedi, but---although the film brought up some good points---its message didn’t come across as a very coherent statement. (Also, I remain eternally bitter about that stupid Chosen One prophecy that was introduced in the prequels. No one in or out of universe can agree on what “balance” in the Force looks like, so it seems to change with every film/book/etc. and I groan almost every time.)
However, all of these are simply my initial impressions. My thoughts may well change on a rewatch and/or after SW IX comes out. I probably missed some things and misinterpreted others on my first viewing of the movie, after all. And it can be difficult to judge a middle film on its own merits; this is doubly true when you don’t have the final film to hand to know which pieces of foreshadowing and plot threads are simply being delayed for the finale vs. which have been dropped altogether, etc.
¯\_(ツ)_/¯
#YMMV and that's OK#if you want to know my thoughts on anything specific feel free to ask!#to be fair i have my issues w/ TFA too... and w/ nearly every SW movie... doesn't stop me from loving the characters & universe tho#phos watches#things done by phos#swtlj#star wars sequels#star wars
14 notes
·
View notes
Text
The Duplex Is Tiled! Here’s What We Loved & What We Wouldn’t Do Again
Tiling was one of the most daunting tasks on our duplex to-do list this year (four bathrooms! two mudrooms! and there are still two backsplashes on the list) so it’s a HUGE relief to say that all of those floors and showers and tub surrounds are officially done (well, like 95% done – more on that later). So today we wanted to show you how they’ve all turned out and share some of the lessons we learned along the way, including which tiles we’d buy again in a heartbeat… and the ones we’d think twice about attempting ever again.
floor tile | wall tile | shower floor | grout: frost | door: SW Oyster Bay
Listeners of last week’s podcast know that after two long weekends spent tiling the duplex, we completed all six of the floors ourselves (two mudrooms and four bathrooms!) but we decided to hire out the four remaining shower surrounds in order to keep things on schedule. What would’ve taken me and Sherry several more weekends to accomplish was knocked out by our contractor’s crew in less than a week. For each of the four shower/tub surrounds we chose white subway tile for the walls (simple, classic, affordable, and it’s a tile that falls back and won’t compete with the bolder patterned floor tile that we chose for each room). So this post is mostly going to focus on the floors in each space since we’ve covered our adventures in subway tile here and here already.
floor tile | wall tile | shower floor | grout: warm gray | door: SW White Truffle
But as for the subway tile we used, we went with this affordable 3 x 6″ subway tile installed in a standard running bond pattern (the same stuff we used and loved on the beach house’s kitchen backsplash). And the two master showers got this white herringbone on the floor, which added a hint of interest to that surface without being too crazy busy.
We showed you all of the floor tile selections in this post about how we chose our tile, cabinets, and paint colors. But we did make one last minute change to the plan from that post: we swapped the two master bathroom tile choices (seen in the two photos above) because the marble-looking tile ended up pairing better with the blue-green doors than the pink ones. As much planning as you do beforehand, there’s really nothing like seeing the tile in the space next to the items that are in there, hence that last minute swap.
We mentioned in that same post that we limited ourselves to larger tiles with interesting patterns, rather than smaller mosaics because we knew it would help the process go faster (we LOVE our pink house master bathroom floor, but it took us forever and a day). But even within that larger-tile parameter, we learned that some tiles were faster, easier, and more foolproof to lay than others. We LOVE how all of them turned out in the end, but there are some that gave us more difficulty (and took much longer to install) than others. So if speed and ease are an important factor when it comes to picking tile, or if you’re a newbie tiler and want to choose something that’s simple & straightforward, this post should help.
So let’s start with the easiest ones:
The Square Patterned Tiles
floor tile | grout: warm gray | door: SW White Truffle
The blue patterned tiles that we laid in the bathrooms on the left side were the fastest and the most straightforward to install. Why? Because (1) they were square and (2) the pattern was symmetrical on all sides, meaning you could put the tile down in any orientation and it would line up. The combination of those two factors made it much easier to lay out, cut, and install because we were always working with right angles (we’ll talk about hex tile in a moment!). And because the pattern was the same on every edge, we had less waste because we could use both sides of a cut tile again in another smaller spot (like around any edge).
floor tile | grout: warm gray | door: SW White Truffle | wall: SW Spare White
The size of these tiles was also really easy to work with. The master bath tile (above) was around an 8 x 8″ square while the hall bath tile (below) was 9 x 9″, so they weren’t heavy or unruly like larger tiles can be, but they filled the space more quickly than a smaller mosaic would have. I think each room took us about two hours to lay, which felt like nothing compared to some of the others.
floor tile |grout: frost | door: SW White Truffle
And even though they were just simple square tiles that went down easily, the final floor still looks interesting and intricate – which was the goal. So we’re thrilled with these. Ten stars. Would recommend. Final verdict: If you’re looking to achieve something similar and keep your project as simple as possible, I would choose square tiles like these and these. They’re both porcelain too, so they don’t need to be sealed and cared for like more finicky materials do (we’re looking at you cement tile).
floor tile | wall tile | grout: frost | door: SW White Truffle | drop-in tub
The only thing we’d do differently next time is we’d use a darker gray grout in the room above. We were trying to streamline everything and keep cost down by not buying different grout colors for each room (and whatever color went on the floors also went in the shower – some of which weren’t grouted at the time of these photos). But Sherry thinks a darker gray would’ve made the grout lines recede a bit more, helping the diamond pattern show through stronger. Anything for a diamond, right?
Let’s move on to the next simplest tile to install…
The Marble Hex Tile
floor tile | grout: frost | door: SW Oyster Bay
Now, this tile isn’t actually marble (it’s porcelain, just like everything else – because they’re extra durable and never need to be sealed) but it may be our favorite in the entire house. The marble-like finish is classic and bright, but the geometric pattern that’s layered on top makes it unique and unusual. We’ve actually talked about maybe using the same tile in our own bathroom here in Richmond – thats how much we like it.
(Note: the space between the tile & the tub or the tile & the baseboard in various shots throughout this post will get white quarter round molding, so it all looks seamless in the end)
floor tile | wall tile | grout: frost | door: SW Oyster Bay | wall: SW Spare White
Like the square tiles, this hex was about 8 x 8″ so the size was very manageable to work with and it provided fast coverage in the room. I think this one maybe took us 3-4 hours instead of 2. And that’s mainly because (1) the hex shape took more care to cut and lay and (2) the asymmetrical pattern took more concentration to not screw up. Speaking of which, there are two different looks you can get with this tile. See how the triangles are all the same color in the left picture below and they’re shaded differently in the right picture because we rotated the hexes? We laid out both options and picked the one on the right – but you could lay it the other way if your eyes like that better.
In addition to having to concentrate on not screwing up the pattern, hex tiles are a bit more finicky when it comes to spacing and not letting your layout drift. One tile laid too close to another in your first corner can cause big headaches down the line as that little inconsistency gets magnified in each subsequent row. So we actually laid out lots of tile BEFORE mixing Thinset to check how everything lined up and to ensure that we didn’t end up with slivers of tile anywhere. This may seem like overkill, but it made things go much faster once we actually started setting things for good.
Final Verdict: Ultimately this tile was noticeably (but not dramatically) harder than the square tiles, and with enough spacers (we used 1/16th spacers) we were able to keep everything lined up and spaced similarly. Even if our spacing had drifted a little, the grout color we used disguised the spacing pretty well anyways.
Sidenote: we love this Mapei grout because it comes premixed AND doesn’t need to be sealed and is durable/flexible/stain resistant. So once it’s dried and any grout haze is buffed off, it’s totally good to go. Our contractor swears by it and won’t use anything else, so we tried it throughout the pink house and after over a year of heavy use, all the grout in the bathrooms & the mudroom still looks mint (no grout scrubbing in over a year, folks!)
But just because this hex tile went down smoothly, doesn’t mean it all will…
The Patterned Hex Tile
This other hex tile went in hall bathroom on the same side as the one above and, well, it’s a good thing we love how this tile turned out because it felt straight up cursed when we were installing it.
floor tile | grout: warm gray | door: SW Oyster Bay
First, it presented some of the same challenges as the last hex tile – a non-square shape and an asymmetrical pattern. But this pattern was even trickier to keep straight, which caused a few bad cuts along the way (plus, it was much harder to reuse cut pieces because the pattern was so particular). I actually laid one tile in the WRONG direction and we didn’t notice it until a week later when it was time to grout. Can you spot it below?
It wasn’t a big deal to fix. I just broke it up with a hammer, removed the shattered pieces of that single tile, and installed a new piece in its place – but it did set my grouting back a day because we had to wait for that new thinset to cure before grouting. And of course, this happened AFTER we had run out of tile during the actual installation. Yep, we were like 80% done and had to order another box. So this room had two pretty frustrating setbacks. But eventually we got it done.
floor tile | grout: warm gray | door: SW Oyster Bay | wall: SW Spare White | drop-in tub
We actually think the square footage calculations on the website are wrong because a couple of our readers reported being short on these same tiles as well. And even without any bad cuts, we don’t think we would have had enough (again: it’s really really hard to reuse your scraps with a pattern like this). So if you use these tiles, I’d recommend getting around 25% extra (not just your typical 10-15% recommended overage).
Final Verdict: If ease and speed are important factors for you when you’re choosing a tile, I would NOT recommend this one. The result was great, but keeping the pattern straight kinda made our brains hurt, this specific tile ran short for us based on the square footage listed on the site (and we heard it did for a few other people), and now we know that we can get interesting patterns with simpler square tiles.
The Chevron Mudroom Tile
Let’s move downstairs to the two mudrooms / laundry rooms. I don’t have “after” photos of these because we haven’t grouted them quite yet (since the back doors act as the main entrances for the crew, the mudrooms are still seeing a lot of foot traffic and grime). So right now they’re both covered in protective paper and we’ll grout once things calm down over there. That means my best photos are mostly progress photos.
floor tile | spacers |wall: SW Spare White | trim: SW Extra White
We really liked installing this chevron tile because the rectangular shape made it easy to lay out and cut, plus the size (17″ x 35″) meant the room – which is nearly the size of all four bathrooms combined – filled up very quickly. The only downside to the size was that they were a bit heavy and cumbersome to maneuver, and I had to get creative with how I rested them on the guide of my wet saw to get them to fit under the blade while I cut them. Plus, keeping big tiles level can be challenging so we always recommend using these LASH spacers, which you can read more about in this post.
My only beef with this tile is that ideally, your spacing between tiles would match the spacing of the zigzags within the tile itself. However, to do that, the manufacturer recommends a (wait for it) … 2/17th spacer. WHO THE HECK SELLS A TWO-SEVENTEENTHS SPACER?! Fortunately, a standard 1/8th or 1/16th (which is what we did) is pretty close to 2/17ths. But still, I feel like it’s an unnecessary complication that could make your chevron not line up perfectly. But even still, for a big room, I would definitely choose this tile again.
Final Verdict: Larger tiles can be harder to handle, cut, and to get level, but these tiles were worth the trouble and we finished the room quickly since they were so large. It’s also one our favorite tiles looks-wise (this room gets the most in-person compliments) and it’s extremely durable (porcelain again) so we would recommend this for sure, especially with the LASH spacers we used.
The Herringbone Mudroom Tile
I’ve saved the best for last. And by the best, I mean hands-down-the-hardest. Yes folks, this is the one we probably would NOT do again… which is hard to say because it’s so darn cool to look at (even here, when it’s still ungrouted). Reminder: the space between the tile & the baseboard in various shots throughout this post will get white quarter round molding, so it’ll all look seamless in the end.
floor tiles: pink, white, and taupe | wall: SW Spare White | trim: SW Extra White
To create this floor we laid three different colors of long porcelain tiles (pink, white, and taupe) in a herringbone pattern, making it a perfect storm of all the challenges of the previous rooms combined:
The tri-color pattern took lots of concentration to keep straight
Despite being long rectangular tiles, laying a herringbone meant LOTS of angled cuts, which are less forgiving
It was difficult to reuse cut pieces because of the alternating colors and angled cuts
A herringbone pattern needs meticulous spacing to keep your pattern from drifting
Because of all of those factors – and because it was such a large room – this is the only space that took us an entire day to complete. Heck, it took us more than two hours just to get our pattern planned and the initial pieces cut. Maybe we were just tired (this was room five of six that we did across two consecutive weekends) but it took nearly all of our mental energy to precisely measure all of these angled cuts, to keep things square to the walls, and to not screw up the color sequence in the process.
Final Verdict: This was by far the hardest tile choice and it took the longest and required the most mental calculations (angled cuts, creating the pattern ourselves with three different colored tiles, etc). I think it could’ve been simpler had it been a smaller room (or frankly, just a wider room with more full pieces) or if we hadn’t done the herringbone pattern, so I don’t want to totally dissuade anyone from recreating this. Because again, we’re REALLY happy with the result. But I do want you guys to know what you’re getting yourselves into.
And One More Thing… About Toilet Holes
This post didn’t cover a lot of “how to” because tiling is something we’ve talked a lot about over the years (I’ll link to some of our previous tutorials at the bottom of this post). But I did want to cover one thing that lots of people asked about on Instagram: cutting around the toilet flange in the floor. See that nice round cut below? Who knew so many people would notice and ask us how it’s done. So here ya go.
I didn’t document this process and we were already done by the time the requests for tips arose, so I’ve tried to illustrate below what I do to make the round cuts around the flange. Most people use an angle grinder to get a really pretty circle cut, but I don’t own one, so my process involves my wet saw and it’s decidedly less pretty, but here it goes…
Basically once I’ve marked the area that needs to be cut, I make a two long cuts from each side at the shallowest angles I can manage (marked in red and purple in the top right picture). This removes a few big chunks and makes the next cuts easier.
Then I make a bunch of short cuts very close together – almost like making teeth – along the edge of the circle (marked in purple and red in the bottom left picture above). The “teeth” usually break off in the process, or if they’re too thick I just run my blade against them again. The final result is rarely a perfect circle and often has little indentations where I made the teeth cuts. But it’ll all be covered by a toilet anyways, so it doesn’t need to be perfect.
In fact, I probably don’t need to be as meticulous as I am since it’ll be hidden under the toilet. But you don’t want to get too lazy because your toilet needs a flat solid surface to rest on and if your chosen porcelain throne has an especially small base, a larger cut could end up peeking out.
Speaking of which, the upstairs toilets and vanities got installed last week so we’re hoping to make a trip out there this weekend to check it all out! Things are really coming together!!
More Tiling Projects & How To’s:
If you’re interested in more tutorials on tiling or want to check out some of our previous tile projects, here you go:
How to install a subway tile backsplash (with video!)
How to mix thinset and how to install penny tile
How to install subway tile in a herringbone pattern
How to install cement board and large floor tiles
How to install a herringbone marble backsplash using mastic
How to install oversized tile in an outdoor area
How we customized a hex mosaic in the beach house
*This post contains affiliate links*
The post The Duplex Is Tiled! Here’s What We Loved & What We Wouldn’t Do Again appeared first on Young House Love.
The Duplex Is Tiled! Here’s What We Loved & What We Wouldn’t Do Again published first on https://bakerskitchenslimited.tumblr.com/
0 notes
Text
The Duplex Is Tiled! Here’s What We Loved & What We Wouldn’t Do Again
Tiling was one of the most daunting tasks on our duplex to-do list this year (four bathrooms! two mudrooms! and there are still two backsplashes on the list) so it’s a HUGE relief to say that all of those floors and showers and tub surrounds are officially done (well, like 95% done – more on that later). So today we wanted to show you how they’ve all turned out and share some of the lessons we learned along the way, including which tiles we’d buy again in a heartbeat… and the ones we’d think twice about attempting ever again.
floor tile | wall tile | shower floor | grout: frost | door: SW Oyster Bay
Listeners of last week’s podcast know that after two long weekends spent tiling the duplex, we completed all six of the floors ourselves (two mudrooms and four bathrooms!) but we decided to hire out the four remaining shower surrounds in order to keep things on schedule. What would’ve taken me and Sherry several more weekends to accomplish was knocked out by our contractor’s crew in less than a week. For each of the four shower/tub surrounds we chose white subway tile for the walls (simple, classic, affordable, and it’s a tile that falls back and won’t compete with the bolder patterned floor tile that we chose for each room). So this post is mostly going to focus on the floors in each space since we’ve covered our adventures in subway tile here and here already.
floor tile | wall tile | shower floor | grout: warm gray | door: SW White Truffle
But as for the subway tile we used, we went with this affordable 3 x 6″ subway tile installed in a standard running bond pattern (the same stuff we used and loved on the beach house’s kitchen backsplash). And the two master showers got this white herringbone on the floor, which added a hint of interest to that surface without being too crazy busy.
We showed you all of the floor tile selections in this post about how we chose our tile, cabinets, and paint colors. But we did make one last minute change to the plan from that post: we swapped the two master bathroom tile choices (seen in the two photos above) because the marble-looking tile ended up pairing better with the blue-green doors than the pink ones. As much planning as you do beforehand, there’s really nothing like seeing the tile in the space next to the items that are in there, hence that last minute swap.
We mentioned in that same post that we limited ourselves to larger tiles with interesting patterns, rather than smaller mosaics because we knew it would help the process go faster (we LOVE our pink house master bathroom floor, but it took us forever and a day). But even within that larger-tile parameter, we learned that some tiles were faster, easier, and more foolproof to lay than others. We LOVE how all of them turned out in the end, but there are some that gave us more difficulty (and took much longer to install) than others. So if speed and ease are an important factor when it comes to picking tile, or if you’re a newbie tiler and want to choose something that’s simple & straightforward, this post should help.
So let’s start with the easiest ones:
The Square Patterned Tiles
floor tile | grout: warm gray | door: SW White Truffle
The blue patterned tiles that we laid in the bathrooms on the left side were the fastest and the most straightforward to install. Why? Because (1) they were square and (2) the pattern was symmetrical on all sides, meaning you could put the tile down in any orientation and it would line up. The combination of those two factors made it much easier to lay out, cut, and install because we were always working with right angles (we’ll talk about hex tile in a moment!). And because the pattern was the same on every edge, we had less waste because we could use both sides of a cut tile again in another smaller spot (like around any edge).
floor tile | grout: warm gray | door: SW White Truffle | wall: SW Spare White
The size of these tiles was also really easy to work with. The master bath tile (above) was around an 8 x 8″ square while the hall bath tile (below) was 9 x 9″, so they weren’t heavy or unruly like larger tiles can be, but they filled the space more quickly than a smaller mosaic would have. I think each room took us about two hours to lay, which felt like nothing compared to some of the others.
floor tile |grout: frost | door: SW White Truffle
And even though they were just simple square tiles that went down easily, the final floor still looks interesting and intricate – which was the goal. So we’re thrilled with these. Ten stars. Would recommend. Final verdict: If you’re looking to achieve something similar and keep your project as simple as possible, I would choose square tiles like these and these. They’re both porcelain too, so they don’t need to be sealed and cared for like more finicky materials do (we’re looking at you cement tile).
floor tile | wall tile | grout: frost | door: SW White Truffle | drop-in tub
The only thing we’d do differently next time is we’d use a darker gray grout in the room above. We were trying to streamline everything and keep cost down by not buying different grout colors for each room (and whatever color went on the floors also went in the shower – some of which weren’t grouted at the time of these photos). But Sherry thinks a darker gray would’ve made the grout lines recede a bit more, helping the diamond pattern show through stronger. Anything for a diamond, right?
Let’s move on to the next simplest tile to install…
The Marble Hex Tile
floor tile | grout: frost | door: SW Oyster Bay
Now, this tile isn’t actually marble (it’s porcelain, just like everything else – because they’re extra durable and never need to be sealed) but it may be our favorite in the entire house. The marble-like finish is classic and bright, but the geometric pattern that’s layered on top makes it unique and unusual. We’ve actually talked about maybe using the same tile in our own bathroom here in Richmond – thats how much we like it.
(Note: the space between the tile & the tub or the tile & the baseboard in various shots throughout this post will get white quarter round molding, so it all looks seamless in the end)
floor tile | wall tile | grout: frost | door: SW Oyster Bay | wall: SW Spare White
Like the square tiles, this hex was about 8 x 8″ so the size was very manageable to work with and it provided fast coverage in the room. I think this one maybe took us 3-4 hours instead of 2. And that’s mainly because (1) the hex shape took more care to cut and lay and (2) the asymmetrical pattern took more concentration to not screw up. Speaking of which, there are two different looks you can get with this tile. See how the triangles are all the same color in the left picture below and they’re shaded differently in the right picture because we rotated the hexes? We laid out both options and picked the one on the right – but you could lay it the other way if your eyes like that better.
In addition to having to concentrate on not screwing up the pattern, hex tiles are a bit more finicky when it comes to spacing and not letting your layout drift. One tile laid too close to another in your first corner can cause big headaches down the line as that little inconsistency gets magnified in each subsequent row. So we actually laid out lots of tile BEFORE mixing Thinset to check how everything lined up and to ensure that we didn’t end up with slivers of tile anywhere. This may seem like overkill, but it made things go much faster once we actually started setting things for good.
Final Verdict: Ultimately this tile was noticeably (but not dramatically) harder than the square tiles, and with enough spacers (we used 1/16th spacers) we were able to keep everything lined up and spaced similarly. Even if our spacing had drifted a little, the grout color we used disguised the spacing pretty well anyways.
Sidenote: we love this Mapei grout because it comes premixed AND doesn’t need to be sealed and is durable/flexible/stain resistant. So once it’s dried and any grout haze is buffed off, it’s totally good to go. Our contractor swears by it and won’t use anything else, so we tried it throughout the pink house and after over a year of heavy use, all the grout in the bathrooms & the mudroom still looks mint (no grout scrubbing in over a year, folks!)
But just because this hex tile went down smoothly, doesn’t mean it all will…
The Patterned Hex Tile
This other hex tile went in hall bathroom on the same side as the one above and, well, it’s a good thing we love how this tile turned out because it felt straight up cursed when we were installing it.
floor tile | grout: warm gray | door: SW Oyster Bay
First, it presented some of the same challenges as the last hex tile – a non-square shape and an asymmetrical pattern. But this pattern was even trickier to keep straight, which caused a few bad cuts along the way (plus, it was much harder to reuse cut pieces because the pattern was so particular). I actually laid one tile in the WRONG direction and we didn’t notice it until a week later when it was time to grout. Can you spot it below?
It wasn’t a big deal to fix. I just broke it up with a hammer, removed the shattered pieces of that single tile, and installed a new piece in its place – but it did set my grouting back a day because we had to wait for that new thinset to cure before grouting. And of course, this happened AFTER we had run out of tile during the actual installation. Yep, we were like 80% done and had to order another box. So this room had two pretty frustrating setbacks. But eventually we got it done.
floor tile | grout: warm gray | door: SW Oyster Bay | wall: SW Spare White | drop-in tub
We actually think the square footage calculations on the website are wrong because a couple of our readers reported being short on these same tiles as well. And even without any bad cuts, we don’t think we would have had enough (again: it’s really really hard to reuse your scraps with a pattern like this). So if you use these tiles, I’d recommend getting around 25% extra (not just your typical 10-15% recommended overage).
Final Verdict: If ease and speed are important factors for you when you’re choosing a tile, I would NOT recommend this one. The result was great, but keeping the pattern straight kinda made our brains hurt, this specific tile ran short for us based on the square footage listed on the site (and we heard it did for a few other people), and now we know that we can get interesting patterns with simpler square tiles.
The Chevron Mudroom Tile
Let’s move downstairs to the two mudrooms / laundry rooms. I don’t have “after” photos of these because we haven’t grouted them quite yet (since the back doors act as the main entrances for the crew, the mudrooms are still seeing a lot of foot traffic and grime). So right now they’re both covered in protective paper and we’ll grout once things calm down over there. That means my best photos are mostly progress photos.
floor tile | spacers |wall: SW Spare White | trim: SW Extra White
We really liked installing this chevron tile because the rectangular shape made it easy to lay out and cut, plus the size (17″ x 35″) meant the room – which is nearly the size of all four bathrooms combined – filled up very quickly. The only downside to the size was that they were a bit heavy and cumbersome to maneuver, and I had to get creative with how I rested them on the guide of my wet saw to get them to fit under the blade while I cut them. Plus, keeping big tiles level can be challenging so we always recommend using these LASH spacers, which you can read more about in this post.
My only beef with this tile is that ideally, your spacing between tiles would match the spacing of the zigzags within the tile itself. However, to do that, the manufacturer recommends a (wait for it) … 2/17th spacer. WHO THE HECK SELLS A TWO-SEVENTEENTHS SPACER?! Fortunately, a standard 1/8th or 1/16th (which is what we did) is pretty close to 2/17ths. But still, I feel like it’s an unnecessary complication that could make your chevron not line up perfectly. But even still, for a big room, I would definitely choose this tile again.
Final Verdict: Larger tiles can be harder to handle, cut, and to get level, but these tiles were worth the trouble and we finished the room quickly since they were so large. It’s also one our favorite tiles looks-wise (this room gets the most in-person compliments) and it’s extremely durable (porcelain again) so we would recommend this for sure, especially with the LASH spacers we used.
The Herringbone Mudroom Tile
I’ve saved the best for last. And by the best, I mean hands-down-the-hardest. Yes folks, this is the one we probably would NOT do again… which is hard to say because it’s so darn cool to look at (even here, when it’s still ungrouted). Reminder: the space between the tile & the baseboard in various shots throughout this post will get white quarter round molding, so it’ll all look seamless in the end.
floor tiles: pink, white, and taupe | wall: SW Spare White | trim: SW Extra White
To create this floor we laid three different colors of long porcelain tiles (pink, white, and taupe) in a herringbone pattern, making it a perfect storm of all the challenges of the previous rooms combined:
The tri-color pattern took lots of concentration to keep straight
Despite being long rectangular tiles, laying a herringbone meant LOTS of angled cuts, which are less forgiving
It was difficult to reuse cut pieces because of the alternating colors and angled cuts
A herringbone pattern needs meticulous spacing to keep your pattern from drifting
Because of all of those factors – and because it was such a large room – this is the only space that took us an entire day to complete. Heck, it took us more than two hours just to get our pattern planned and the initial pieces cut. Maybe we were just tired (this was room five of six that we did across two consecutive weekends) but it took nearly all of our mental energy to precisely measure all of these angled cuts, to keep things square to the walls, and to not screw up the color sequence in the process.
Final Verdict: This was by far the hardest tile choice and it took the longest and required the most mental calculations (angled cuts, creating the pattern ourselves with three different colored tiles, etc). I think it could’ve been simpler had it been a smaller room (or frankly, just a wider room with more full pieces) or if we hadn’t done the herringbone pattern, so I don’t want to totally dissuade anyone from recreating this. Because again, we’re REALLY happy with the result. But I do want you guys to know what you’re getting yourselves into.
And One More Thing… About Toilet Holes
This post didn’t cover a lot of “how to” because tiling is something we’ve talked a lot about over the years (I’ll link to some of our previous tutorials at the bottom of this post). But I did want to cover one thing that lots of people asked about on Instagram: cutting around the toilet flange in the floor. See that nice round cut below? Who knew so many people would notice and ask us how it’s done. So here ya go.
I didn’t document this process and we were already done by the time the requests for tips arose, so I’ve tried to illustrate below what I do to make the round cuts around the flange. Most people use an angle grinder to get a really pretty circle cut, but I don’t own one, so my process involves my wet saw and it’s decidedly less pretty, but here it goes…
Basically once I’ve marked the area that needs to be cut, I make a two long cuts from each side at the shallowest angles I can manage (marked in red and purple in the top right picture). This removes a few big chunks and makes the next cuts easier.
Then I make a bunch of short cuts very close together – almost like making teeth – along the edge of the circle (marked in purple and red in the bottom left picture above). The “teeth” usually break off in the process, or if they’re too thick I just run my blade against them again. The final result is rarely a perfect circle and often has little indentations where I made the teeth cuts. But it’ll all be covered by a toilet anyways, so it doesn’t need to be perfect.
In fact, I probably don’t need to be as meticulous as I am since it’ll be hidden under the toilet. But you don’t want to get too lazy because your toilet needs a flat solid surface to rest on and if your chosen porcelain throne has an especially small base, a larger cut could end up peeking out.
Speaking of which, the upstairs toilets and vanities got installed last week so we’re hoping to make a trip out there this weekend to check it all out! Things are really coming together!!
More Tiling Projects & How To’s:
If you’re interested in more tutorials on tiling or want to check out some of our previous tile projects, here you go:
How to install a subway tile backsplash (with video!)
How to mix thinset and how to install penny tile
How to install subway tile in a herringbone pattern
How to install cement board and large floor tiles
How to install a herringbone marble backsplash using mastic
How to install oversized tile in an outdoor area
How we customized a hex mosaic in the beach house
*This post contains affiliate links*
The post The Duplex Is Tiled! Here’s What We Loved & What We Wouldn’t Do Again appeared first on Young House Love.
The Duplex Is Tiled! Here’s What We Loved & What We Wouldn’t Do Again published first on https://aireloomreview.tumblr.com/
0 notes
Text
The Duplex Is Tiled! Here’s What We Loved & What We Wouldn’t Do Again
Tiling was one of the most daunting tasks on our duplex to-do list this year (four bathrooms! two mudrooms! and there are still two backsplashes on the list) so it’s a HUGE relief to say that all of those floors and showers and tub surrounds are officially done (well, like 95% done – more on that later). So today we wanted to show you how they’ve all turned out and share some of the lessons we learned along the way, including which tiles we’d buy again in a heartbeat… and the ones we’d think twice about attempting ever again.
floor tile | wall tile | shower floor | grout: frost | door: SW Oyster Bay
Listeners of last week’s podcast know that after two long weekends spent tiling the duplex, we completed all six of the floors ourselves (two mudrooms and four bathrooms!) but we decided to hire out the four remaining shower surrounds in order to keep things on schedule. What would’ve taken me and Sherry several more weekends to accomplish was knocked out by our contractor’s crew in less than a week. For each of the four shower/tub surrounds we chose white subway tile for the walls (simple, classic, affordable, and it’s a tile that falls back and won’t compete with the bolder patterned floor tile that we chose for each room). So this post is mostly going to focus on the floors in each space since we’ve covered our adventures in subway tile here and here already.
floor tile | wall tile | shower floor | grout: warm gray | door: SW White Truffle
But as for the subway tile we used, we went with this affordable 3 x 6″ subway tile installed in a standard running bond pattern (the same stuff we used and loved on the beach house’s kitchen backsplash). And the two master showers got this white herringbone on the floor, which added a hint of interest to that surface without being too crazy busy.
We showed you all of the floor tile selections in this post about how we chose our tile, cabinets, and paint colors. But we did make one last minute change to the plan from that post: we swapped the two master bathroom tile choices (seen in the two photos above) because the marble-looking tile ended up pairing better with the blue-green doors than the pink ones. As much planning as you do beforehand, there’s really nothing like seeing the tile in the space next to the items that are in there, hence that last minute swap.
We mentioned in that same post that we limited ourselves to larger tiles with interesting patterns, rather than smaller mosaics because we knew it would help the process go faster (we LOVE our pink house master bathroom floor, but it took us forever and a day). But even within that larger-tile parameter, we learned that some tiles were faster, easier, and more foolproof to lay than others. We LOVE how all of them turned out in the end, but there are some that gave us more difficulty (and took much longer to install) than others. So if speed and ease are an important factor when it comes to picking tile, or if you’re a newbie tiler and want to choose something that’s simple & straightforward, this post should help.
So let’s start with the easiest ones:
The Square Patterned Tiles
floor tile | grout: warm gray | door: SW White Truffle
The blue patterned tiles that we laid in the bathrooms on the left side were the fastest and the most straightforward to install. Why? Because (1) they were square and (2) the pattern was symmetrical on all sides, meaning you could put the tile down in any orientation and it would line up. The combination of those two factors made it much easier to lay out, cut, and install because we were always working with right angles (we’ll talk about hex tile in a moment!). And because the pattern was the same on every edge, we had less waste because we could use both sides of a cut tile again in another smaller spot (like around any edge).
floor tile | grout: warm gray | door: SW White Truffle | wall: SW Spare White
The size of these tiles was also really easy to work with. The master bath tile (above) was around an 8 x 8″ square while the hall bath tile (below) was 9 x 9″, so they weren’t heavy or unruly like larger tiles can be, but they filled the space more quickly than a smaller mosaic would have. I think each room took us about two hours to lay, which felt like nothing compared to some of the others.
floor tile |grout: frost | door: SW White Truffle
And even though they were just simple square tiles that went down easily, the final floor still looks interesting and intricate – which was the goal. So we’re thrilled with these. Ten stars. Would recommend. Final verdict: If you’re looking to achieve something similar and keep your project as simple as possible, I would choose square tiles like these and these. They’re both porcelain too, so they don’t need to be sealed and cared for like more finicky materials do (we’re looking at you cement tile).
floor tile | wall tile | grout: frost | door: SW White Truffle | drop-in tub
The only thing we’d do differently next time is we’d use a darker gray grout in the room above. We were trying to streamline everything and keep cost down by not buying different grout colors for each room (and whatever color went on the floors also went in the shower – some of which weren’t grouted at the time of these photos). But Sherry thinks a darker gray would’ve made the grout lines recede a bit more, helping the diamond pattern show through stronger. Anything for a diamond, right?
Let’s move on to the next simplest tile to install…
The Marble Hex Tile
floor tile | grout: frost | door: SW Oyster Bay
Now, this tile isn’t actually marble (it’s porcelain, just like everything else – because they’re extra durable and never need to be sealed) but it may be our favorite in the entire house. The marble-like finish is classic and bright, but the geometric pattern that’s layered on top makes it unique and unusual. We’ve actually talked about maybe using the same tile in our own bathroom here in Richmond – thats how much we like it.
(Note: the space between the tile & the tub or the tile & the baseboard in various shots throughout this post will get white quarter round molding, so it all looks seamless in the end)
floor tile | wall tile | grout: frost | door: SW Oyster Bay | wall: SW Spare White
Like the square tiles, this hex was about 8 x 8″ so the size was very manageable to work with and it provided fast coverage in the room. I think this one maybe took us 3-4 hours instead of 2. And that’s mainly because (1) the hex shape took more care to cut and lay and (2) the asymmetrical pattern took more concentration to not screw up. Speaking of which, there are two different looks you can get with this tile. See how the triangles are all the same color in the left picture below and they’re shaded differently in the right picture because we rotated the hexes? We laid out both options and picked the one on the right – but you could lay it the other way if your eyes like that better.
In addition to having to concentrate on not screwing up the pattern, hex tiles are a bit more finicky when it comes to spacing and not letting your layout drift. One tile laid too close to another in your first corner can cause big headaches down the line as that little inconsistency gets magnified in each subsequent row. So we actually laid out lots of tile BEFORE mixing Thinset to check how everything lined up and to ensure that we didn’t end up with slivers of tile anywhere. This may seem like overkill, but it made things go much faster once we actually started setting things for good.
Final Verdict: Ultimately this tile was noticeably (but not dramatically) harder than the square tiles, and with enough spacers (we used 1/16th spacers) we were able to keep everything lined up and spaced similarly. Even if our spacing had drifted a little, the grout color we used disguised the spacing pretty well anyways.
Sidenote: we love this Mapei grout because it comes premixed AND doesn’t need to be sealed and is durable/flexible/stain resistant. So once it’s dried and any grout haze is buffed off, it’s totally good to go. Our contractor swears by it and won’t use anything else, so we tried it throughout the pink house and after over a year of heavy use, all the grout in the bathrooms & the mudroom still looks mint (no grout scrubbing in over a year, folks!)
But just because this hex tile went down smoothly, doesn’t mean it all will…
The Patterned Hex Tile
This other hex tile went in hall bathroom on the same side as the one above and, well, it’s a good thing we love how this tile turned out because it felt straight up cursed when we were installing it.
floor tile | grout: warm gray | door: SW Oyster Bay
First, it presented some of the same challenges as the last hex tile – a non-square shape and an asymmetrical pattern. But this pattern was even trickier to keep straight, which caused a few bad cuts along the way (plus, it was much harder to reuse cut pieces because the pattern was so particular). I actually laid one tile in the WRONG direction and we didn’t notice it until a week later when it was time to grout. Can you spot it below?
It wasn’t a big deal to fix. I just broke it up with a hammer, removed the shattered pieces of that single tile, and installed a new piece in its place – but it did set my grouting back a day because we had to wait for that new thinset to cure before grouting. And of course, this happened AFTER we had run out of tile during the actual installation. Yep, we were like 80% done and had to order another box. So this room had two pretty frustrating setbacks. But eventually we got it done.
floor tile | grout: warm gray | door: SW Oyster Bay | wall: SW Spare White | drop-in tub
We actually think the square footage calculations on the website are wrong because a couple of our readers reported being short on these same tiles as well. And even without any bad cuts, we don’t think we would have had enough (again: it’s really really hard to reuse your scraps with a pattern like this). So if you use these tiles, I’d recommend getting around 25% extra (not just your typical 10-15% recommended overage).
Final Verdict: If ease and speed are important factors for you when you’re choosing a tile, I would NOT recommend this one. The result was great, but keeping the pattern straight kinda made our brains hurt, this specific tile ran short for us based on the square footage listed on the site (and we heard it did for a few other people), and now we know that we can get interesting patterns with simpler square tiles.
The Chevron Mudroom Tile
Let’s move downstairs to the two mudrooms / laundry rooms. I don’t have “after” photos of these because we haven’t grouted them quite yet (since the back doors act as the main entrances for the crew, the mudrooms are still seeing a lot of foot traffic and grime). So right now they’re both covered in protective paper and we’ll grout once things calm down over there. That means my best photos are mostly progress photos.
floor tile | spacers |wall: SW Spare White | trim: SW Extra White
We really liked installing this chevron tile because the rectangular shape made it easy to lay out and cut, plus the size (17″ x 35″) meant the room – which is nearly the size of all four bathrooms combined – filled up very quickly. The only downside to the size was that they were a bit heavy and cumbersome to maneuver, and I had to get creative with how I rested them on the guide of my wet saw to get them to fit under the blade while I cut them. Plus, keeping big tiles level can be challenging so we always recommend using these LASH spacers, which you can read more about in this post.
My only beef with this tile is that ideally, your spacing between tiles would match the spacing of the zigzags within the tile itself. However, to do that, the manufacturer recommends a (wait for it) … 2/17th spacer. WHO THE HECK SELLS A TWO-SEVENTEENTHS SPACER?! Fortunately, a standard 1/8th or 1/16th (which is what we did) is pretty close to 2/17ths. But still, I feel like it’s an unnecessary complication that could make your chevron not line up perfectly. But even still, for a big room, I would definitely choose this tile again.
Final Verdict: Larger tiles can be harder to handle, cut, and to get level, but these tiles were worth the trouble and we finished the room quickly since they were so large. It’s also one our favorite tiles looks-wise (this room gets the most in-person compliments) and it’s extremely durable (porcelain again) so we would recommend this for sure, especially with the LASH spacers we used.
The Herringbone Mudroom Tile
I’ve saved the best for last. And by the best, I mean hands-down-the-hardest. Yes folks, this is the one we probably would NOT do again… which is hard to say because it’s so darn cool to look at (even here, when it’s still ungrouted). Reminder: the space between the tile & the baseboard in various shots throughout this post will get white quarter round molding, so it’ll all look seamless in the end.
floor tiles: pink, white, and taupe | wall: SW Spare White | trim: SW Extra White
To create this floor we laid three different colors of long porcelain tiles (pink, white, and taupe) in a herringbone pattern, making it a perfect storm of all the challenges of the previous rooms combined:
The tri-color pattern took lots of concentration to keep straight
Despite being long rectangular tiles, laying a herringbone meant LOTS of angled cuts, which are less forgiving
It was difficult to reuse cut pieces because of the alternating colors and angled cuts
A herringbone pattern needs meticulous spacing to keep your pattern from drifting
Because of all of those factors – and because it was such a large room – this is the only space that took us an entire day to complete. Heck, it took us more than two hours just to get our pattern planned and the initial pieces cut. Maybe we were just tired (this was room five of six that we did across two consecutive weekends) but it took nearly all of our mental energy to precisely measure all of these angled cuts, to keep things square to the walls, and to not screw up the color sequence in the process.
Final Verdict: This was by far the hardest tile choice and it took the longest and required the most mental calculations (angled cuts, creating the pattern ourselves with three different colored tiles, etc). I think it could’ve been simpler had it been a smaller room (or frankly, just a wider room with more full pieces) or if we hadn’t done the herringbone pattern, so I don’t want to totally dissuade anyone from recreating this. Because again, we’re REALLY happy with the result. But I do want you guys to know what you’re getting yourselves into.
And One More Thing… About Toilet Holes
This post didn’t cover a lot of “how to” because tiling is something we’ve talked a lot about over the years (I’ll link to some of our previous tutorials at the bottom of this post). But I did want to cover one thing that lots of people asked about on Instagram: cutting around the toilet flange in the floor. See that nice round cut below? Who knew so many people would notice and ask us how it’s done. So here ya go.
I didn’t document this process and we were already done by the time the requests for tips arose, so I’ve tried to illustrate below what I do to make the round cuts around the flange. Most people use an angle grinder to get a really pretty circle cut, but I don’t own one, so my process involves my wet saw and it’s decidedly less pretty, but here it goes…
Basically once I’ve marked the area that needs to be cut, I make a two long cuts from each side at the shallowest angles I can manage (marked in red and purple in the top right picture). This removes a few big chunks and makes the next cuts easier.
Then I make a bunch of short cuts very close together – almost like making teeth – along the edge of the circle (marked in purple and red in the bottom left picture above). The “teeth” usually break off in the process, or if they’re too thick I just run my blade against them again. The final result is rarely a perfect circle and often has little indentations where I made the teeth cuts. But it’ll all be covered by a toilet anyways, so it doesn’t need to be perfect.
In fact, I probably don’t need to be as meticulous as I am since it’ll be hidden under the toilet. But you don’t want to get too lazy because your toilet needs a flat solid surface to rest on and if your chosen porcelain throne has an especially small base, a larger cut could end up peeking out.
Speaking of which, the upstairs toilets and vanities got installed last week so we’re hoping to make a trip out there this weekend to check it all out! Things are really coming together!!
More Tiling Projects & How To’s:
If you’re interested in more tutorials on tiling or want to check out some of our previous tile projects, here you go:
How to install a subway tile backsplash (with video!)
How to mix thinset and how to install penny tile
How to install subway tile in a herringbone pattern
How to install cement board and large floor tiles
How to install a herringbone marble backsplash using mastic
How to install oversized tile in an outdoor area
How we customized a hex mosaic in the beach house
*This post contains affiliate links*
The post The Duplex Is Tiled! Here’s What We Loved & What We Wouldn’t Do Again appeared first on Young House Love.
The Duplex Is Tiled! Here’s What We Loved & What We Wouldn’t Do Again published first on https://ssmattress.tumblr.com/
0 notes
Text
The Duplex Is Tiled! Here’s What We Loved & What We Wouldn’t Do Again
Tiling was one of the most daunting tasks on our duplex to-do list this year (four bathrooms! two mudrooms! and there are still two backsplashes on the list) so it’s a HUGE relief to say that all of those floors and showers and tub surrounds are officially done (well, like 95% done – more on that later). So today we wanted to show you how they’ve all turned out and share some of the lessons we learned along the way, including which tiles we’d buy again in a heartbeat… and the ones we’d think twice about attempting ever again.
floor tile | wall tile | shower floor | grout: frost | door: SW Oyster Bay
Listeners of last week’s podcast know that after two long weekends spent tiling the duplex, we completed all six of the floors ourselves (two mudrooms and four bathrooms!) but we decided to hire out the four remaining shower surrounds in order to keep things on schedule. What would’ve taken me and Sherry several more weekends to accomplish was knocked out by our contractor’s crew in less than a week. For each of the four shower/tub surrounds we chose white subway tile for the walls (simple, classic, affordable, and it’s a tile that falls back and won’t compete with the bolder patterned floor tile that we chose for each room). So this post is mostly going to focus on the floors in each space since we’ve covered our adventures in subway tile here and here already.
floor tile | wall tile | shower floor | grout: warm gray | door: SW White Truffle
But as for the subway tile we used, we went with this affordable 3 x 6″ subway tile installed in a standard running bond pattern (the same stuff we used and loved on the beach house’s kitchen backsplash). And the two master showers got this white herringbone on the floor, which added a hint of interest to that surface without being too crazy busy.
We showed you all of the floor tile selections in this post about how we chose our tile, cabinets, and paint colors. But we did make one last minute change to the plan from that post: we swapped the two master bathroom tile choices (seen in the two photos above) because the marble-looking tile ended up pairing better with the blue-green doors than the pink ones. As much planning as you do beforehand, there’s really nothing like seeing the tile in the space next to the items that are in there, hence that last minute swap.
We mentioned in that same post that we limited ourselves to larger tiles with interesting patterns, rather than smaller mosaics because we knew it would help the process go faster (we LOVE our pink house master bathroom floor, but it took us forever and a day). But even within that larger-tile parameter, we learned that some tiles were faster, easier, and more foolproof to lay than others. We LOVE how all of them turned out in the end, but there are some that gave us more difficulty (and took much longer to install) than others. So if speed and ease are an important factor when it comes to picking tile, or if you’re a newbie tiler and want to choose something that’s simple & straightforward, this post should help.
So let’s start with the easiest ones:
The Square Patterned Tiles
floor tile | grout: warm gray | door: SW White Truffle
The blue patterned tiles that we laid in the bathrooms on the left side were the fastest and the most straightforward to install. Why? Because (1) they were square and (2) the pattern was symmetrical on all sides, meaning you could put the tile down in any orientation and it would line up. The combination of those two factors made it much easier to lay out, cut, and install because we were always working with right angles (we’ll talk about hex tile in a moment!). And because the pattern was the same on every edge, we had less waste because we could use both sides of a cut tile again in another smaller spot (like around any edge).
floor tile | grout: warm gray | door: SW White Truffle | wall: SW Spare White
The size of these tiles was also really easy to work with. The master bath tile (above) was around an 8 x 8″ square while the hall bath tile (below) was 9 x 9″, so they weren’t heavy or unruly like larger tiles can be, but they filled the space more quickly than a smaller mosaic would have. I think each room took us about two hours to lay, which felt like nothing compared to some of the others.
floor tile |grout: frost | door: SW White Truffle
And even though they were just simple square tiles that went down easily, the final floor still looks interesting and intricate – which was the goal. So we’re thrilled with these. Ten stars. Would recommend. Final verdict: If you’re looking to achieve something similar and keep your project as simple as possible, I would choose square tiles like these and these. They’re both porcelain too, so they don’t need to be sealed and cared for like more finicky materials do (we’re looking at you cement tile).
floor tile | wall tile | grout: frost | door: SW White Truffle | drop-in tub
The only thing we’d do differently next time is we’d use a darker gray grout in the room above. We were trying to streamline everything and keep cost down by not buying different grout colors for each room (and whatever color went on the floors also went in the shower – some of which weren’t grouted at the time of these photos). But Sherry thinks a darker gray would’ve made the grout lines recede a bit more, helping the diamond pattern show through stronger. Anything for a diamond, right?
Let’s move on to the next simplest tile to install…
The Marble Hex Tile
floor tile | grout: frost | door: SW Oyster Bay
Now, this tile isn’t actually marble (it’s porcelain, just like everything else – because they’re extra durable and never need to be sealed) but it may be our favorite in the entire house. The marble-like finish is classic and bright, but the geometric pattern that’s layered on top makes it unique and unusual. We’ve actually talked about maybe using the same tile in our own bathroom here in Richmond – thats how much we like it.
(Note: the space between the tile & the tub or the tile & the baseboard in various shots throughout this post will get white quarter round molding, so it all looks seamless in the end)
floor tile | wall tile | grout: frost | door: SW Oyster Bay | wall: SW Spare White
Like the square tiles, this hex was about 8 x 8″ so the size was very manageable to work with and it provided fast coverage in the room. I think this one maybe took us 3-4 hours instead of 2. And that’s mainly because (1) the hex shape took more care to cut and lay and (2) the asymmetrical pattern took more concentration to not screw up. Speaking of which, there are two different looks you can get with this tile. See how the triangles are all the same color in the left picture below and they’re shaded differently in the right picture because we rotated the hexes? We laid out both options and picked the one on the right – but you could lay it the other way if your eyes like that better.
In addition to having to concentrate on not screwing up the pattern, hex tiles are a bit more finicky when it comes to spacing and not letting your layout drift. One tile laid too close to another in your first corner can cause big headaches down the line as that little inconsistency gets magnified in each subsequent row. So we actually laid out lots of tile BEFORE mixing Thinset to check how everything lined up and to ensure that we didn’t end up with slivers of tile anywhere. This may seem like overkill, but it made things go much faster once we actually started setting things for good.
Final Verdict: Ultimately this tile was noticeably (but not dramatically) harder than the square tiles, and with enough spacers (we used 1/16th spacers) we were able to keep everything lined up and spaced similarly. Even if our spacing had drifted a little, the grout color we used disguised the spacing pretty well anyways.
Sidenote: we love this Mapei grout because it comes premixed AND doesn’t need to be sealed and is durable/flexible/stain resistant. So once it’s dried and any grout haze is buffed off, it’s totally good to go. Our contractor swears by it and won’t use anything else, so we tried it throughout the pink house and after over a year of heavy use, all the grout in the bathrooms & the mudroom still looks mint (no grout scrubbing in over a year, folks!)
But just because this hex tile went down smoothly, doesn’t mean it all will…
The Patterned Hex Tile
This other hex tile went in hall bathroom on the same side as the one above and, well, it’s a good thing we love how this tile turned out because it felt straight up cursed when we were installing it.
floor tile | grout: warm gray | door: SW Oyster Bay
First, it presented some of the same challenges as the last hex tile – a non-square shape and an asymmetrical pattern. But this pattern was even trickier to keep straight, which caused a few bad cuts along the way (plus, it was much harder to reuse cut pieces because the pattern was so particular). I actually laid one tile in the WRONG direction and we didn’t notice it until a week later when it was time to grout. Can you spot it below?
It wasn’t a big deal to fix. I just broke it up with a hammer, removed the shattered pieces of that single tile, and installed a new piece in its place – but it did set my grouting back a day because we had to wait for that new thinset to cure before grouting. And of course, this happened AFTER we had run out of tile during the actual installation. Yep, we were like 80% done and had to order another box. So this room had two pretty frustrating setbacks. But eventually we got it done.
floor tile | grout: warm gray | door: SW Oyster Bay | wall: SW Spare White | drop-in tub
We actually think the square footage calculations on the website are wrong because a couple of our readers reported being short on these same tiles as well. And even without any bad cuts, we don’t think we would have had enough (again: it’s really really hard to reuse your scraps with a pattern like this). So if you use these tiles, I’d recommend getting around 25% extra (not just your typical 10-15% recommended overage).
Final Verdict: If ease and speed are important factors for you when you’re choosing a tile, I would NOT recommend this one. The result was great, but keeping the pattern straight kinda made our brains hurt, this specific tile ran short for us based on the square footage listed on the site (and we heard it did for a few other people), and now we know that we can get interesting patterns with simpler square tiles.
The Chevron Mudroom Tile
Let’s move downstairs to the two mudrooms / laundry rooms. I don’t have “after” photos of these because we haven’t grouted them quite yet (since the back doors act as the main entrances for the crew, the mudrooms are still seeing a lot of foot traffic and grime). So right now they’re both covered in protective paper and we’ll grout once things calm down over there. That means my best photos are mostly progress photos.
floor tile | spacers |wall: SW Spare White | trim: SW Extra White
We really liked installing this chevron tile because the rectangular shape made it easy to lay out and cut, plus the size (17″ x 35″) meant the room – which is nearly the size of all four bathrooms combined – filled up very quickly. The only downside to the size was that they were a bit heavy and cumbersome to maneuver, and I had to get creative with how I rested them on the guide of my wet saw to get them to fit under the blade while I cut them. Plus, keeping big tiles level can be challenging so we always recommend using these LASH spacers, which you can read more about in this post.
My only beef with this tile is that ideally, your spacing between tiles would match the spacing of the zigzags within the tile itself. However, to do that, the manufacturer recommends a (wait for it) … 2/17th spacer. WHO THE HECK SELLS A TWO-SEVENTEENTHS SPACER?! Fortunately, a standard 1/8th or 1/16th (which is what we did) is pretty close to 2/17ths. But still, I feel like it’s an unnecessary complication that could make your chevron not line up perfectly. But even still, for a big room, I would definitely choose this tile again.
Final Verdict: Larger tiles can be harder to handle, cut, and to get level, but these tiles were worth the trouble and we finished the room quickly since they were so large. It’s also one our favorite tiles looks-wise (this room gets the most in-person compliments) and it’s extremely durable (porcelain again) so we would recommend this for sure, especially with the LASH spacers we used.
The Herringbone Mudroom Tile
I’ve saved the best for last. And by the best, I mean hands-down-the-hardest. Yes folks, this is the one we probably would NOT do again… which is hard to say because it’s so darn cool to look at (even here, when it’s still ungrouted). Reminder: the space between the tile & the baseboard in various shots throughout this post will get white quarter round molding, so it’ll all look seamless in the end.
floor tiles: pink, white, and taupe | wall: SW Spare White | trim: SW Extra White
To create this floor we laid three different colors of long porcelain tiles (pink, white, and taupe) in a herringbone pattern, making it a perfect storm of all the challenges of the previous rooms combined:
The tri-color pattern took lots of concentration to keep straight
Despite being long rectangular tiles, laying a herringbone meant LOTS of angled cuts, which are less forgiving
It was difficult to reuse cut pieces because of the alternating colors and angled cuts
A herringbone pattern needs meticulous spacing to keep your pattern from drifting
Because of all of those factors – and because it was such a large room – this is the only space that took us an entire day to complete. Heck, it took us more than two hours just to get our pattern planned and the initial pieces cut. Maybe we were just tired (this was room five of six that we did across two consecutive weekends) but it took nearly all of our mental energy to precisely measure all of these angled cuts, to keep things square to the walls, and to not screw up the color sequence in the process.
Final Verdict: This was by far the hardest tile choice and it took the longest and required the most mental calculations (angled cuts, creating the pattern ourselves with three different colored tiles, etc). I think it could’ve been simpler had it been a smaller room (or frankly, just a wider room with more full pieces) or if we hadn’t done the herringbone pattern, so I don’t want to totally dissuade anyone from recreating this. Because again, we’re REALLY happy with the result. But I do want you guys to know what you’re getting yourselves into.
And One More Thing… About Toilet Holes
This post didn’t cover a lot of “how to” because tiling is something we’ve talked a lot about over the years (I’ll link to some of our previous tutorials at the bottom of this post). But I did want to cover one thing that lots of people asked about on Instagram: cutting around the toilet flange in the floor. See that nice round cut below? Who knew so many people would notice and ask us how it’s done. So here ya go.
I didn’t document this process and we were already done by the time the requests for tips arose, so I’ve tried to illustrate below what I do to make the round cuts around the flange. Most people use an angle grinder to get a really pretty circle cut, but I don’t own one, so my process involves my wet saw and it’s decidedly less pretty, but here it goes…
Basically once I’ve marked the area that needs to be cut, I make a two long cuts from each side at the shallowest angles I can manage (marked in red and purple in the top right picture). This removes a few big chunks and makes the next cuts easier.
Then I make a bunch of short cuts very close together – almost like making teeth – along the edge of the circle (marked in purple and red in the bottom left picture above). The “teeth” usually break off in the process, or if they’re too thick I just run my blade against them again. The final result is rarely a perfect circle and often has little indentations where I made the teeth cuts. But it’ll all be covered by a toilet anyways, so it doesn’t need to be perfect.
In fact, I probably don’t need to be as meticulous as I am since it’ll be hidden under the toilet. But you don’t want to get too lazy because your toilet needs a flat solid surface to rest on and if your chosen porcelain throne has an especially small base, a larger cut could end up peeking out.
Speaking of which, the upstairs toilets and vanities got installed last week so we’re hoping to make a trip out there this weekend to check it all out! Things are really coming together!!
More Tiling Projects & How To’s:
If you’re interested in more tutorials on tiling or want to check out some of our previous tile projects, here you go:
How to install a subway tile backsplash (with video!)
How to mix thinset and how to install penny tile
How to install subway tile in a herringbone pattern
How to install cement board and large floor tiles
How to install a herringbone marble backsplash using mastic
How to install oversized tile in an outdoor area
How we customized a hex mosaic in the beach house
*This post contains affiliate links*
The post The Duplex Is Tiled! Here’s What We Loved & What We Wouldn’t Do Again appeared first on Young House Love.
The Duplex Is Tiled! Here’s What We Loved & What We Wouldn’t Do Again published first on https://novaformmattressreview.tumblr.com/
0 notes
Photo
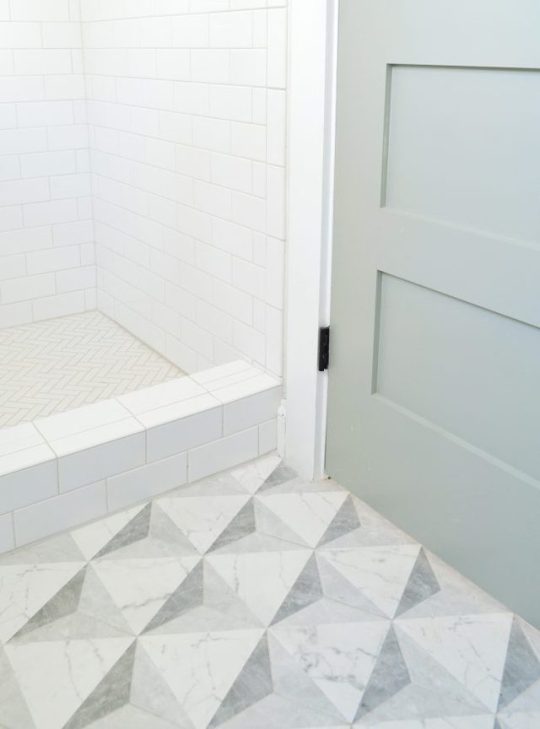
The Duplex Is Tiled! Here’s What We Loved & What We Wouldn’t Do Again https://ift.tt/2TSQyzF
Tiling was one of the most daunting tasks on our duplex to-do list this year (four bathrooms! two mudrooms! and there are still two backsplashes on the list) so it’s a HUGE relief to say that all of those floors and showers and tub surrounds are officially done (well, like 95% done – more on that later). So today we wanted to show you how they’ve all turned out and share some of the lessons we learned along the way, including which tiles we’d buy again in a heartbeat… and the ones we’d think twice about attempting ever again.
floor tile | wall tile | shower floor | grout: frost | door: SW Oyster Bay
Listeners of last week’s podcast know that after two long weekends spent tiling the duplex, we completed all six of the floors ourselves (two mudrooms and four bathrooms!) but we decided to hire out the four remaining shower surrounds in order to keep things on schedule. What would’ve taken me and Sherry several more weekends to accomplish was knocked out by our contractor’s crew in less than a week – which means we got to spend all that time we saved doing actual work that we get paid for, so it worked out well.
For each of the four shower/tub surrounds we chose white subway tile for the walls (simple, classic, affordable, and it’s a tile that lets the more interesting floor tile in each room be the star). So this post is mostly going to focus on the floors in each space since we’ve covered our adventures in subway tile here and here already.
floor tile | wall tile | shower floor | grout: warm gray | door: SW White Truffle
But as for the subway tile we used, we went with this affordable 3 x 6″ subway tile installed in a standard running bond pattern (the same stuff we used and loved on the beach house’s kitchen backsplash). And the two master showers got this white herringbone on the floor, which added a hint of interest to that surface without being too crazy busy.
We showed you all of the floor tile selections in this post about how we chose our tile, cabinets, and paint colors. But we did make one last minute change to the plan from that post: we swapped the two master bathroom tile choices (seen in the two photos above) because the marble-esque tile ended up looking better with the blue-green doors than the pink ones. As much planning as you do beforehand, there’s really nothing like seeing the tile in the space next to the items that are in there, hence that last minute swap.
We mentioned in that same post that we limited ourselves to larger tiles with interesting patterns, rather than smaller mosaics because we knew it would help the process go faster (we LOVE our pink house master bathroom floor, but it took us forever and a day). But even within that larger-tile parameter, we learned that some tiles were faster, easier, and more foolproof to lay than others. We LOVE how all of them turned out in the end, but there are some that gave us more difficulty (and took much longer to install) than others. So if speed and ease are an important factor when it comes to picking tile, or if you’re a newbie tiler and want to choose something that’s simple and straightforward… this post should help.
So let’s start with the easiest ones:
The Square Patterned Tiles
floor tile | grout: warm gray | door: SW White Truffle
The blue patterned tiles that we laid in the bathrooms on the left side were the fastest and the most straightforward to install. Why? Because (1) they were square and (2) the pattern was symmetrical on all sides, meaning you could put the tile down in any orientation and it would line up. The combination of those two factors made it much easier to lay out, cut, and install because we were always working with right angles (we’ll talk about hex tile in a moment!). And because the pattern was the same on every edge, we had less waste because we could use both sides of a cut tile again in another smaller spot (like around any edge).
floor tile | grout: warm gray | door: SW White Truffle | wall: SW Spare White
The size of these tiles was also really easy to work with. The master bath tile (above) was around an 8 x 8″ square while the hall bath tile (below) was 9 x 9″, so they weren’t heavy or unruly like larger tiles can be, but they filled the space more quickly than a smaller mosaic would have. I think each room took us about two hours to lay, which felt like nothing compared to some of the others.
floor tile |grout: frost | door: SW White Truffle
And even though they were just simple square tiles that went down easily, the final floor still looks interesting and intricate – which was the goal. So we’re thrilled with these. Ten stars. Would recommend. Final verdict: If you’re looking to achieve something similar and keep your project as simple as possible, I would choose square tiles like these and these. They’re both porcelain too, so they don’t need to be sealed and cared for like more finicky materials do (we’re looking at you cement tile).
floor tile | wall tile | grout: frost | door: SW White Truffle | drop-in tub
The only thing we’d do differently next time is we’d use a darker gray grout in the room above. We were trying to streamline everything and keep cost down by not buying different grout colors for each room (and whatever color went on the floors also went in the shower – some of which weren’t grouted at the time of these photos). But Sherry thinks a darker gray would’ve made the grout lines recede a bit more, helping the diamond pattern show through stronger. Anything for a diamond, right?
Let’s move on to the next simplest tile to install…
The Marble Hex Tile
floor tile | grout: frost | door: SW Oyster Bay
Now, this tile isn’t actually marble (it’s porcelain, just like everything else – because they’re extra durable and never need to be sealed) but it may be our favorite in the entire house. The marble finish is classic and bright, but the pattern on top makes it unique and unusual. We’ve actually talked about maybe using the same tile in our own bathroom here in Richmond – thats how much we like it.
(Note: the space between the tile & the tub or the tile & the baseboard in various shots throughout this post will get white quarter round molding, so it all looks seamless in the end)
floor tile | wall tile | grout: frost | door: SW Oyster Bay | wall: SW Spare White
Like the square tiles, this hex was about 8 x 8″ so the size was very manageable to work with and it provided fast coverage in the room. I think this one maybe took us 3-4 hours instead of 2. And that’s mainly because (1) the hex shape took more care to cut and lay and (2) the asymmetrical pattern took more concentration to not screw up. Speaking of which, there are two different looks you can get with this tile. See how the triangles are all the same color in the left picture below and they’re shaded differently in the right picture because we rotated the hexes? We laid out both options and picked the one on the right.
In addition to having to concentrate on not screwing up the pattern, hex tiles are a bit more finicky when it comes to spacing and not letting your layout drift. One tile laid too close to another in your first corner can cause big headaches down the line as that little inconsistency gets magnified in each subsequent row. So we actually laid out lots of tile BEFORE mixing Thinset to check how everything lined up and to ensure that we didn’t end up with slivers of tile anywhere. This may seem like overkill, but it made things go much faster once we actually started setting things for good.
Final Verdict: Ultimately this tile was noticeably (but not dramatically) harder than the square tiles, and with enough spacers (we used 1/16th spacers) we were able to keep everything lined up and spaced similarly. Even if our spacing had drifted a little, the grout color we used disguised the spacing pretty well anyways. Sidenote: we love this Mapei grout because it comes premixed AND doesn’t need to be sealed and is durable/flexible/stain resistant. So once it’s dried and any grout haze is buffed off, it’s totally good to go. Our contractor swears by it and won’t use anything else, so we tried it throughout the pink house and after over a year of heavy use, all the grout in the bathrooms/mudroom still look mint (no grout scrubbing in over a year, folks!)
But just because this hex tile went down smoothly, doesn’t mean it all will…
The Patterned Hex Tile
This other hex tile went in hall bathroom on the same side as the one above and, well, it’s a good thing we love how this tile turned out because it felt straight up cursed when we were installing it.
floor tile | grout: warm gray | door: SW Oyster Bay
First, it presented some of the same challenges as the last hex tile – a non-square shape and an asymmetrical pattern. But this pattern was even trickier to keep straight, which caused a few bad cuts along the way (plus, it was much harder to reuse cut pieces because the pattern was so particular). I actually laid one tile in the WRONG direction and we didn’t notice it until a week later when it was time to grout. Can you spot it below?
It wasn’t a big deal to fix. I just broke it up with a hammer, removed the shattered pieces of that single tile, and installed a new piece in its place – but it did set my grouting back a day because we had to wait for that new thinset to cure before grouting. And of course, this happened AFTER we had run out of tile during the actual installation. Yep, we were like 80% done and had to order another box. So this room had two pretty frustrating setbacks. But eventually we got it done.
floor tile | grout: warm gray | door: SW Oyster Bay | wall: SW Spare White | drop-in tub
We actually think the square footage calculations on the website are wrong because a couple of our readers reported being short on these same tiles as well. And even without any bad cuts, we don’t think we would have had enough (again: it’s really really hard to reuse your scraps with a pattern like this). So if you use these tiles, I’d recommend getting around 25% extra (not just your typical 10-15% recommended overage).
Final Verdict: If ease and speed are important factors for you when you’re choosing a tile, I would NOT recommend this one. The result was great, but keeping the pattern straight kinda made our brains hurt, this specific tile ran short for us based on the square footage listed on the site (and we heard it did for a few other people), and now we know that we can get interesting patterns with simpler square tiles.
The Chevron Mudroom Tile
Let’s move downstairs to the two mudrooms / laundry rooms. I don’t have “after” photos of these because we haven’t grouted them quite yet (since the back doors act as the main entrances for the crew, the mudrooms are still seeing a lot of foot traffic and grime). So right now they’re both covered in protective paper and we’ll grout once things calm down over there. That means my best photos are mostly progress photos.
floor tile | spacers |wall: SW Spare White | trim: SW Extra White
We really liked installing this chevron tile because the rectangular shape made it easy to lay out and cut, plus the size (17″ x 35″) meant the room – which is nearly the size of all four bathrooms combined – filled up very quickly. The only downside to the size was that they were a bit heavy and cumbersome to maneuver, and I had to get creative with how I rested them on the guide of my wet saw to get them to fit under the blade while I cut them. Plus, keeping big tiles level can be challenging so we always recommend using these LASH spacers, which you can read more about in this post.
My only beef with this tile is that ideally, your spacing between tiles would match the spacing of the zigzags within the tile itself. However, to do that, the manufacturer recommends a (wait for it) … 2/17th spacer. WHO THE HECK SELLS A TWO-SEVENTEENTHS SPACER?! Fortunately, a standard 1/8th or 1/16th (which is what we did) is pretty close to 2/17ths. But still, I feel like it’s an unnecessary complication that could make your chevron not line up perfectly. But even still, for a big room, I would definitely choose this tile again.
Final Verdict: Larger tiles can be harder to handle, cut, and to get level, but these tiles were worth the trouble and we finished the room quickly since they were so large. It’s also one our favorite tiles looks-wise (this room gets the most in-person compliments) and it’s extremely durable (porcelain again) so we would recommend this for sure, especially with the LASH spacers we used.
The Herringbone Mudroom Tile
I’ve saved the best for last. And by the best, I mean hands-down-the-hardest. Yes folks, this is the one we probably would NOT do again… which is hard to say because it’s so darn cool to look at (even here, when it’s still ungrouted). Reminder: the space between the tile & the baseboard in various shots throughout this post will get white quarter round molding, so it’ll all look seamless in the end.
floor tiles: pink, white, and taupe | wall: SW Spare White | trim: SW Extra White
To create this floor we laid three different colors of long porcelain tiles (pink, white, and taupe) in a herringbone pattern, making it a perfect storm of all the challenges of the previous rooms combined:
The tri-color pattern took lots of concentration to keep straight
Despite being long rectangular tiles, laying a herringbone meant LOTS of angled cuts, which are less forgiving
It was difficult to reuse cut pieces because of the alternating colors and angled cuts
A herringbone pattern needs meticulous spacing to keep your pattern from drifting
Because of all of those factors – and because it was such a large room – this is the only space that took us an entire day to complete. Heck, it took us more than two hours just to get our pattern planned and the initial pieces cut. Maybe we were just tired (this was room five of six that we did across two consecutive weekends) but it took nearly all of our mental energy to precisely measure all of these angled cuts, to keep things square to the walls, and to not screw up the color sequence in the process.
Final Verdict: This was by far the hardest tile choice and it took the longest and required the most mental calculations (angled cuts, creating the pattern ourselves with three different colored tiles, etc). I think it could’ve been simpler had it been a smaller room (or frankly, just a wider room with more full pieces) or if we hadn’t done the herringbone pattern, so I don’t want to totally dissuade anyone from recreating this. Because again, we’re REALLY happy with the result. But I do want you guys to know what you’re getting yourselves into.
And One More Thing… About Toilet Holes
This post didn’t cover a lot of “how to” because tiling is something we’ve talked a lot about over the years (I’ll link to some of our previous tutorials at the bottom of this post). But I did want to cover one thing that lots of people asked about on Instagram: cutting around the toilet flange in the floor. See that nice round cut below? Who knew so many people would notice and ask us how it’s done. So here ya go.
I didn’t document this process and we were already done by the time the process arose, so I’ve tried to illustrate below what I do to make the round cuts around the flange. Most people use an angle grinder to get a really pretty circle cut, but I don’t own one, so my process involves my wet saw and it’s decidedly less pretty, but here it goes…
Basically once I’ve marked the area that needs to be cut, I make a two long cuts from each side at the shallowest angles I can manage (marked in red and purple in the top right picture). This removes a few big chunks and makes the next cuts easier.
Then I make a bunch of short cuts very close together – almost like making teeth – along the edge of the circle (marked in purple and red in the bottom left picture above). The “teeth” usually break off in the process, or if they’re too thick I just run my blade against them again. The final result is rarely a perfect circle and often has little indentations where I made the teeth cuts. But it’ll all be covered by a toilet anyways, so it doesn’t need to be perfect.
In fact, I probably don’t need to be as meticulous as I am since it’ll be hidden under the toilet. But you don’t want to get too lazy because your toilet needs a flat solid surface to rest on and if your chosen porcelain throne has an especially small base, a larger cut could end up peeking out.
Speaking of which, the upstairs toilets and vanities got installed last week so we’re hoping to make a trip out there this weekend to check it all out! Things are really coming together!!
More Tiling Projects & How To’s:
If you’re interested in more tutorials on tiling or to check out some of our previous tile projects, check out some of the links below:
How to install a subway tile backsplash (with video!)
How to mix thinset and how to install penny tile
How to install subway tile in a herringbone pattern
How to install cement board and large floor tiles
How to install a herringbone marble backsplash using mastic
How to install oversized tile in an outdoor area
How we customized a hex mosaic in the beach house
*This post contains affiliate links*
The post The Duplex Is Tiled! Here’s What We Loved & What We Wouldn’t Do Again appeared first on Young House Love.
0 notes
Text
The Duplex Is Tiled! Here’s What We Loved & What We Wouldn’t Do Again
Tiling was one of the most daunting tasks on our duplex to-do list this year (four bathrooms! two mudrooms! and there are still two backsplashes on the list) so it’s a HUGE relief to say that all of those floors and showers and tub surrounds are officially done (well, like 95% done – more on that later). So today we wanted to show you how they’ve all turned out and share some of the lessons we learned along the way, including which tiles we’d buy again in a heartbeat… and the ones we’d think twice about attempting ever again.
floor tile | wall tile | shower floor | grout: frost | door: SW Oyster Bay
Listeners of last week’s podcast know that after two long weekends spent tiling the duplex, we completed all six of the floors ourselves (two mudrooms and four bathrooms!) but we decided to hire out the four remaining shower surrounds in order to keep things on schedule. What would’ve taken me and Sherry several more weekends to accomplish was knocked out by our contractor’s crew in less than a week. For each of the four shower/tub surrounds we chose white subway tile for the walls (simple, classic, affordable, and it’s a tile that falls back and won’t compete with the bolder patterned floor tile that we chose for each room). So this post is mostly going to focus on the floors in each space since we’ve covered our adventures in subway tile here and here already.
floor tile | wall tile | shower floor | grout: warm gray | door: SW White Truffle
But as for the subway tile we used, we went with this affordable 3 x 6″ subway tile installed in a standard running bond pattern (the same stuff we used and loved on the beach house’s kitchen backsplash). And the two master showers got this white herringbone on the floor, which added a hint of interest to that surface without being too crazy busy.
We showed you all of the floor tile selections in this post about how we chose our tile, cabinets, and paint colors. But we did make one last minute change to the plan from that post: we swapped the two master bathroom tile choices (seen in the two photos above) because the marble-looking tile ended up pairing better with the blue-green doors than the pink ones. As much planning as you do beforehand, there’s really nothing like seeing the tile in the space next to the items that are in there, hence that last minute swap.
We mentioned in that same post that we limited ourselves to larger tiles with interesting patterns, rather than smaller mosaics because we knew it would help the process go faster (we LOVE our pink house master bathroom floor, but it took us forever and a day). But even within that larger-tile parameter, we learned that some tiles were faster, easier, and more foolproof to lay than others. We LOVE how all of them turned out in the end, but there are some that gave us more difficulty (and took much longer to install) than others. So if speed and ease are an important factor when it comes to picking tile, or if you’re a newbie tiler and want to choose something that’s simple & straightforward, this post should help.
So let’s start with the easiest ones:
The Square Patterned Tiles
floor tile | grout: warm gray | door: SW White Truffle
The blue patterned tiles that we laid in the bathrooms on the left side were the fastest and the most straightforward to install. Why? Because (1) they were square and (2) the pattern was symmetrical on all sides, meaning you could put the tile down in any orientation and it would line up. The combination of those two factors made it much easier to lay out, cut, and install because we were always working with right angles (we’ll talk about hex tile in a moment!). And because the pattern was the same on every edge, we had less waste because we could use both sides of a cut tile again in another smaller spot (like around any edge).
floor tile | grout: warm gray | door: SW White Truffle | wall: SW Spare White
The size of these tiles was also really easy to work with. The master bath tile (above) was around an 8 x 8″ square while the hall bath tile (below) was 9 x 9″, so they weren’t heavy or unruly like larger tiles can be, but they filled the space more quickly than a smaller mosaic would have. I think each room took us about two hours to lay, which felt like nothing compared to some of the others.
floor tile |grout: frost | door: SW White Truffle
And even though they were just simple square tiles that went down easily, the final floor still looks interesting and intricate – which was the goal. So we’re thrilled with these. Ten stars. Would recommend. Final verdict: If you’re looking to achieve something similar and keep your project as simple as possible, I would choose square tiles like these and these. They’re both porcelain too, so they don’t need to be sealed and cared for like more finicky materials do (we’re looking at you cement tile).
floor tile | wall tile | grout: frost | door: SW White Truffle | drop-in tub
The only thing we’d do differently next time is we’d use a darker gray grout in the room above. We were trying to streamline everything and keep cost down by not buying different grout colors for each room (and whatever color went on the floors also went in the shower – some of which weren’t grouted at the time of these photos). But Sherry thinks a darker gray would’ve made the grout lines recede a bit more, helping the diamond pattern show through stronger. Anything for a diamond, right?
Let’s move on to the next simplest tile to install…
The Marble Hex Tile
floor tile | grout: frost | door: SW Oyster Bay
Now, this tile isn’t actually marble (it’s porcelain, just like everything else – because they’re extra durable and never need to be sealed) but it may be our favorite in the entire house. The marble-like finish is classic and bright, but the geometric pattern that’s layered on top makes it unique and unusual. We’ve actually talked about maybe using the same tile in our own bathroom here in Richmond – thats how much we like it.
(Note: the space between the tile & the tub or the tile & the baseboard in various shots throughout this post will get white quarter round molding, so it all looks seamless in the end)
floor tile | wall tile | grout: frost | door: SW Oyster Bay | wall: SW Spare White
Like the square tiles, this hex was about 8 x 8″ so the size was very manageable to work with and it provided fast coverage in the room. I think this one maybe took us 3-4 hours instead of 2. And that’s mainly because (1) the hex shape took more care to cut and lay and (2) the asymmetrical pattern took more concentration to not screw up. Speaking of which, there are two different looks you can get with this tile. See how the triangles are all the same color in the left picture below and they’re shaded differently in the right picture because we rotated the hexes? We laid out both options and picked the one on the right – but you could lay it the other way if your eyes like that better.
In addition to having to concentrate on not screwing up the pattern, hex tiles are a bit more finicky when it comes to spacing and not letting your layout drift. One tile laid too close to another in your first corner can cause big headaches down the line as that little inconsistency gets magnified in each subsequent row. So we actually laid out lots of tile BEFORE mixing Thinset to check how everything lined up and to ensure that we didn’t end up with slivers of tile anywhere. This may seem like overkill, but it made things go much faster once we actually started setting things for good.
Final Verdict: Ultimately this tile was noticeably (but not dramatically) harder than the square tiles, and with enough spacers (we used 1/16th spacers) we were able to keep everything lined up and spaced similarly. Even if our spacing had drifted a little, the grout color we used disguised the spacing pretty well anyways.
Sidenote: we love this Mapei grout because it comes premixed AND doesn’t need to be sealed and is durable/flexible/stain resistant. So once it’s dried and any grout haze is buffed off, it’s totally good to go. Our contractor swears by it and won’t use anything else, so we tried it throughout the pink house and after over a year of heavy use, all the grout in the bathrooms & the mudroom still looks mint (no grout scrubbing in over a year, folks!)
But just because this hex tile went down smoothly, doesn’t mean it all will…
The Patterned Hex Tile
This other hex tile went in hall bathroom on the same side as the one above and, well, it’s a good thing we love how this tile turned out because it felt straight up cursed when we were installing it.
floor tile | grout: warm gray | door: SW Oyster Bay
First, it presented some of the same challenges as the last hex tile – a non-square shape and an asymmetrical pattern. But this pattern was even trickier to keep straight, which caused a few bad cuts along the way (plus, it was much harder to reuse cut pieces because the pattern was so particular). I actually laid one tile in the WRONG direction and we didn’t notice it until a week later when it was time to grout. Can you spot it below?
It wasn’t a big deal to fix. I just broke it up with a hammer, removed the shattered pieces of that single tile, and installed a new piece in its place – but it did set my grouting back a day because we had to wait for that new thinset to cure before grouting. And of course, this happened AFTER we had run out of tile during the actual installation. Yep, we were like 80% done and had to order another box. So this room had two pretty frustrating setbacks. But eventually we got it done.
floor tile | grout: warm gray | door: SW Oyster Bay | wall: SW Spare White | drop-in tub
We actually think the square footage calculations on the website are wrong because a couple of our readers reported being short on these same tiles as well. And even without any bad cuts, we don’t think we would have had enough (again: it’s really really hard to reuse your scraps with a pattern like this). So if you use these tiles, I’d recommend getting around 25% extra (not just your typical 10-15% recommended overage).
Final Verdict: If ease and speed are important factors for you when you’re choosing a tile, I would NOT recommend this one. The result was great, but keeping the pattern straight kinda made our brains hurt, this specific tile ran short for us based on the square footage listed on the site (and we heard it did for a few other people), and now we know that we can get interesting patterns with simpler square tiles.
The Chevron Mudroom Tile
Let’s move downstairs to the two mudrooms / laundry rooms. I don’t have “after” photos of these because we haven’t grouted them quite yet (since the back doors act as the main entrances for the crew, the mudrooms are still seeing a lot of foot traffic and grime). So right now they’re both covered in protective paper and we’ll grout once things calm down over there. That means my best photos are mostly progress photos.
floor tile | spacers |wall: SW Spare White | trim: SW Extra White
We really liked installing this chevron tile because the rectangular shape made it easy to lay out and cut, plus the size (17″ x 35″) meant the room – which is nearly the size of all four bathrooms combined – filled up very quickly. The only downside to the size was that they were a bit heavy and cumbersome to maneuver, and I had to get creative with how I rested them on the guide of my wet saw to get them to fit under the blade while I cut them. Plus, keeping big tiles level can be challenging so we always recommend using these LASH spacers, which you can read more about in this post.
My only beef with this tile is that ideally, your spacing between tiles would match the spacing of the zigzags within the tile itself. However, to do that, the manufacturer recommends a (wait for it) … 2/17th spacer. WHO THE HECK SELLS A TWO-SEVENTEENTHS SPACER?! Fortunately, a standard 1/8th or 1/16th (which is what we did) is pretty close to 2/17ths. But still, I feel like it’s an unnecessary complication that could make your chevron not line up perfectly. But even still, for a big room, I would definitely choose this tile again.
Final Verdict: Larger tiles can be harder to handle, cut, and to get level, but these tiles were worth the trouble and we finished the room quickly since they were so large. It’s also one our favorite tiles looks-wise (this room gets the most in-person compliments) and it’s extremely durable (porcelain again) so we would recommend this for sure, especially with the LASH spacers we used.
The Herringbone Mudroom Tile
I’ve saved the best for last. And by the best, I mean hands-down-the-hardest. Yes folks, this is the one we probably would NOT do again… which is hard to say because it’s so darn cool to look at (even here, when it’s still ungrouted). Reminder: the space between the tile & the baseboard in various shots throughout this post will get white quarter round molding, so it’ll all look seamless in the end.
floor tiles: pink, white, and taupe | wall: SW Spare White | trim: SW Extra White
To create this floor we laid three different colors of long porcelain tiles (pink, white, and taupe) in a herringbone pattern, making it a perfect storm of all the challenges of the previous rooms combined:
The tri-color pattern took lots of concentration to keep straight
Despite being long rectangular tiles, laying a herringbone meant LOTS of angled cuts, which are less forgiving
It was difficult to reuse cut pieces because of the alternating colors and angled cuts
A herringbone pattern needs meticulous spacing to keep your pattern from drifting
Because of all of those factors – and because it was such a large room – this is the only space that took us an entire day to complete. Heck, it took us more than two hours just to get our pattern planned and the initial pieces cut. Maybe we were just tired (this was room five of six that we did across two consecutive weekends) but it took nearly all of our mental energy to precisely measure all of these angled cuts, to keep things square to the walls, and to not screw up the color sequence in the process.
Final Verdict: This was by far the hardest tile choice and it took the longest and required the most mental calculations (angled cuts, creating the pattern ourselves with three different colored tiles, etc). I think it could’ve been simpler had it been a smaller room (or frankly, just a wider room with more full pieces) or if we hadn’t done the herringbone pattern, so I don’t want to totally dissuade anyone from recreating this. Because again, we’re REALLY happy with the result. But I do want you guys to know what you’re getting yourselves into.
And One More Thing… About Toilet Holes
This post didn’t cover a lot of “how to” because tiling is something we’ve talked a lot about over the years (I’ll link to some of our previous tutorials at the bottom of this post). But I did want to cover one thing that lots of people asked about on Instagram: cutting around the toilet flange in the floor. See that nice round cut below? Who knew so many people would notice and ask us how it’s done. So here ya go.
I didn’t document this process and we were already done by the time the requests for tips arose, so I’ve tried to illustrate below what I do to make the round cuts around the flange. Most people use an angle grinder to get a really pretty circle cut, but I don’t own one, so my process involves my wet saw and it’s decidedly less pretty, but here it goes…
Basically once I’ve marked the area that needs to be cut, I make a two long cuts from each side at the shallowest angles I can manage (marked in red and purple in the top right picture). This removes a few big chunks and makes the next cuts easier.
Then I make a bunch of short cuts very close together – almost like making teeth – along the edge of the circle (marked in purple and red in the bottom left picture above). The “teeth” usually break off in the process, or if they’re too thick I just run my blade against them again. The final result is rarely a perfect circle and often has little indentations where I made the teeth cuts. But it’ll all be covered by a toilet anyways, so it doesn’t need to be perfect.
In fact, I probably don’t need to be as meticulous as I am since it’ll be hidden under the toilet. But you don’t want to get too lazy because your toilet needs a flat solid surface to rest on and if your chosen porcelain throne has an especially small base, a larger cut could end up peeking out.
Speaking of which, the upstairs toilets and vanities got installed last week so we’re hoping to make a trip out there this weekend to check it all out! Things are really coming together!!
More Tiling Projects & How To’s:
If you’re interested in more tutorials on tiling or want to check out some of our previous tile projects, here you go:
How to install a subway tile backsplash (with video!)
How to mix thinset and how to install penny tile
How to install subway tile in a herringbone pattern
How to install cement board and large floor tiles
How to install a herringbone marble backsplash using mastic
How to install oversized tile in an outdoor area
How we customized a hex mosaic in the beach house
*This post contains affiliate links*
The post The Duplex Is Tiled! Here’s What We Loved & What We Wouldn’t Do Again appeared first on Young House Love.
The Duplex Is Tiled! Here’s What We Loved & What We Wouldn’t Do Again published first on https://bakerskitchenslimited.tumblr.com/
0 notes
Text
The Duplex Is Tiled! Here’s What We Loved & What We Wouldn’t Do Again
Tiling was one of the most daunting tasks on our duplex to-do list this year (four bathrooms! two mudrooms! and there are still two backsplashes on the list) so it’s a HUGE relief to say that all of those floors and showers and tub surrounds are officially done (well, like 95% done – more on that later). So today we wanted to show you how they’ve all turned out and share some of the lessons we learned along the way, including which tiles we’d buy again in a heartbeat… and the ones we’d think twice about attempting ever again.
floor tile | wall tile | shower floor | grout: frost | door: SW Oyster Bay
Listeners of last week’s podcast know that after two long weekends spent tiling the duplex, we completed all six of the floors ourselves (two mudrooms and four bathrooms!) but we decided to hire out the four remaining shower surrounds in order to keep things on schedule. What would’ve taken me and Sherry several more weekends to accomplish was knocked out by our contractor’s crew in less than a week. For each of the four shower/tub surrounds we chose white subway tile for the walls (simple, classic, affordable, and it’s a tile that falls back and won’t compete with the bolder patterned floor tile that we chose for each room). So this post is mostly going to focus on the floors in each space since we’ve covered our adventures in subway tile here and here already.
floor tile | wall tile | shower floor | grout: warm gray | door: SW White Truffle
But as for the subway tile we used, we went with this affordable 3 x 6″ subway tile installed in a standard running bond pattern (the same stuff we used and loved on the beach house’s kitchen backsplash). And the two master showers got this white herringbone on the floor, which added a hint of interest to that surface without being too crazy busy.
We showed you all of the floor tile selections in this post about how we chose our tile, cabinets, and paint colors. But we did make one last minute change to the plan from that post: we swapped the two master bathroom tile choices (seen in the two photos above) because the marble-looking tile ended up pairing better with the blue-green doors than the pink ones. As much planning as you do beforehand, there’s really nothing like seeing the tile in the space next to the items that are in there, hence that last minute swap.
We mentioned in that same post that we limited ourselves to larger tiles with interesting patterns, rather than smaller mosaics because we knew it would help the process go faster (we LOVE our pink house master bathroom floor, but it took us forever and a day). But even within that larger-tile parameter, we learned that some tiles were faster, easier, and more foolproof to lay than others. We LOVE how all of them turned out in the end, but there are some that gave us more difficulty (and took much longer to install) than others. So if speed and ease are an important factor when it comes to picking tile, or if you’re a newbie tiler and want to choose something that’s simple & straightforward, this post should help.
So let’s start with the easiest ones:
The Square Patterned Tiles
floor tile | grout: warm gray | door: SW White Truffle
The blue patterned tiles that we laid in the bathrooms on the left side were the fastest and the most straightforward to install. Why? Because (1) they were square and (2) the pattern was symmetrical on all sides, meaning you could put the tile down in any orientation and it would line up. The combination of those two factors made it much easier to lay out, cut, and install because we were always working with right angles (we’ll talk about hex tile in a moment!). And because the pattern was the same on every edge, we had less waste because we could use both sides of a cut tile again in another smaller spot (like around any edge).
floor tile | grout: warm gray | door: SW White Truffle | wall: SW Spare White
The size of these tiles was also really easy to work with. The master bath tile (above) was around an 8 x 8″ square while the hall bath tile (below) was 9 x 9″, so they weren’t heavy or unruly like larger tiles can be, but they filled the space more quickly than a smaller mosaic would have. I think each room took us about two hours to lay, which felt like nothing compared to some of the others.
floor tile |grout: frost | door: SW White Truffle
And even though they were just simple square tiles that went down easily, the final floor still looks interesting and intricate – which was the goal. So we’re thrilled with these. Ten stars. Would recommend. Final verdict: If you’re looking to achieve something similar and keep your project as simple as possible, I would choose square tiles like these and these. They’re both porcelain too, so they don’t need to be sealed and cared for like more finicky materials do (we’re looking at you cement tile).
floor tile | wall tile | grout: frost | door: SW White Truffle | drop-in tub
The only thing we’d do differently next time is we’d use a darker gray grout in the room above. We were trying to streamline everything and keep cost down by not buying different grout colors for each room (and whatever color went on the floors also went in the shower – some of which weren’t grouted at the time of these photos). But Sherry thinks a darker gray would’ve made the grout lines recede a bit more, helping the diamond pattern show through stronger. Anything for a diamond, right?
Let’s move on to the next simplest tile to install…
The Marble Hex Tile
floor tile | grout: frost | door: SW Oyster Bay
Now, this tile isn’t actually marble (it’s porcelain, just like everything else – because they’re extra durable and never need to be sealed) but it may be our favorite in the entire house. The marble-like finish is classic and bright, but the geometric pattern that’s layered on top makes it unique and unusual. We’ve actually talked about maybe using the same tile in our own bathroom here in Richmond – thats how much we like it.
(Note: the space between the tile & the tub or the tile & the baseboard in various shots throughout this post will get white quarter round molding, so it all looks seamless in the end)
floor tile | wall tile | grout: frost | door: SW Oyster Bay | wall: SW Spare White
Like the square tiles, this hex was about 8 x 8″ so the size was very manageable to work with and it provided fast coverage in the room. I think this one maybe took us 3-4 hours instead of 2. And that’s mainly because (1) the hex shape took more care to cut and lay and (2) the asymmetrical pattern took more concentration to not screw up. Speaking of which, there are two different looks you can get with this tile. See how the triangles are all the same color in the left picture below and they’re shaded differently in the right picture because we rotated the hexes? We laid out both options and picked the one on the right – but you could lay it the other way if your eyes like that better.
In addition to having to concentrate on not screwing up the pattern, hex tiles are a bit more finicky when it comes to spacing and not letting your layout drift. One tile laid too close to another in your first corner can cause big headaches down the line as that little inconsistency gets magnified in each subsequent row. So we actually laid out lots of tile BEFORE mixing Thinset to check how everything lined up and to ensure that we didn’t end up with slivers of tile anywhere. This may seem like overkill, but it made things go much faster once we actually started setting things for good.
Final Verdict: Ultimately this tile was noticeably (but not dramatically) harder than the square tiles, and with enough spacers (we used 1/16th spacers) we were able to keep everything lined up and spaced similarly. Even if our spacing had drifted a little, the grout color we used disguised the spacing pretty well anyways.
Sidenote: we love this Mapei grout because it comes premixed AND doesn’t need to be sealed and is durable/flexible/stain resistant. So once it’s dried and any grout haze is buffed off, it���s totally good to go. Our contractor swears by it and won’t use anything else, so we tried it throughout the pink house and after over a year of heavy use, all the grout in the bathrooms & the mudroom still looks mint (no grout scrubbing in over a year, folks!)
But just because this hex tile went down smoothly, doesn’t mean it all will…
The Patterned Hex Tile
This other hex tile went in hall bathroom on the same side as the one above and, well, it’s a good thing we love how this tile turned out because it felt straight up cursed when we were installing it.
floor tile | grout: warm gray | door: SW Oyster Bay
First, it presented some of the same challenges as the last hex tile – a non-square shape and an asymmetrical pattern. But this pattern was even trickier to keep straight, which caused a few bad cuts along the way (plus, it was much harder to reuse cut pieces because the pattern was so particular). I actually laid one tile in the WRONG direction and we didn’t notice it until a week later when it was time to grout. Can you spot it below?
It wasn’t a big deal to fix. I just broke it up with a hammer, removed the shattered pieces of that single tile, and installed a new piece in its place – but it did set my grouting back a day because we had to wait for that new thinset to cure before grouting. And of course, this happened AFTER we had run out of tile during the actual installation. Yep, we were like 80% done and had to order another box. So this room had two pretty frustrating setbacks. But eventually we got it done.
floor tile | grout: warm gray | door: SW Oyster Bay | wall: SW Spare White | drop-in tub
We actually think the square footage calculations on the website are wrong because a couple of our readers reported being short on these same tiles as well. And even without any bad cuts, we don’t think we would have had enough (again: it’s really really hard to reuse your scraps with a pattern like this). So if you use these tiles, I’d recommend getting around 25% extra (not just your typical 10-15% recommended overage).
Final Verdict: If ease and speed are important factors for you when you’re choosing a tile, I would NOT recommend this one. The result was great, but keeping the pattern straight kinda made our brains hurt, this specific tile ran short for us based on the square footage listed on the site (and we heard it did for a few other people), and now we know that we can get interesting patterns with simpler square tiles.
The Chevron Mudroom Tile
Let’s move downstairs to the two mudrooms / laundry rooms. I don’t have “after” photos of these because we haven’t grouted them quite yet (since the back doors act as the main entrances for the crew, the mudrooms are still seeing a lot of foot traffic and grime). So right now they’re both covered in protective paper and we’ll grout once things calm down over there. That means my best photos are mostly progress photos.
floor tile | spacers |wall: SW Spare White | trim: SW Extra White
We really liked installing this chevron tile because the rectangular shape made it easy to lay out and cut, plus the size (17″ x 35″) meant the room – which is nearly the size of all four bathrooms combined – filled up very quickly. The only downside to the size was that they were a bit heavy and cumbersome to maneuver, and I had to get creative with how I rested them on the guide of my wet saw to get them to fit under the blade while I cut them. Plus, keeping big tiles level can be challenging so we always recommend using these LASH spacers, which you can read more about in this post.
My only beef with this tile is that ideally, your spacing between tiles would match the spacing of the zigzags within the tile itself. However, to do that, the manufacturer recommends a (wait for it) … 2/17th spacer. WHO THE HECK SELLS A TWO-SEVENTEENTHS SPACER?! Fortunately, a standard 1/8th or 1/16th (which is what we did) is pretty close to 2/17ths. But still, I feel like it’s an unnecessary complication that could make your chevron not line up perfectly. But even still, for a big room, I would definitely choose this tile again.
Final Verdict: Larger tiles can be harder to handle, cut, and to get level, but these tiles were worth the trouble and we finished the room quickly since they were so large. It’s also one our favorite tiles looks-wise (this room gets the most in-person compliments) and it’s extremely durable (porcelain again) so we would recommend this for sure, especially with the LASH spacers we used.
The Herringbone Mudroom Tile
I’ve saved the best for last. And by the best, I mean hands-down-the-hardest. Yes folks, this is the one we probably would NOT do again… which is hard to say because it’s so darn cool to look at (even here, when it’s still ungrouted). Reminder: the space between the tile & the baseboard in various shots throughout this post will get white quarter round molding, so it’ll all look seamless in the end.
floor tiles: pink, white, and taupe | wall: SW Spare White | trim: SW Extra White
To create this floor we laid three different colors of long porcelain tiles (pink, white, and taupe) in a herringbone pattern, making it a perfect storm of all the challenges of the previous rooms combined:
The tri-color pattern took lots of concentration to keep straight
Despite being long rectangular tiles, laying a herringbone meant LOTS of angled cuts, which are less forgiving
It was difficult to reuse cut pieces because of the alternating colors and angled cuts
A herringbone pattern needs meticulous spacing to keep your pattern from drifting
Because of all of those factors – and because it was such a large room – this is the only space that took us an entire day to complete. Heck, it took us more than two hours just to get our pattern planned and the initial pieces cut. Maybe we were just tired (this was room five of six that we did across two consecutive weekends) but it took nearly all of our mental energy to precisely measure all of these angled cuts, to keep things square to the walls, and to not screw up the color sequence in the process.
Final Verdict: This was by far the hardest tile choice and it took the longest and required the most mental calculations (angled cuts, creating the pattern ourselves with three different colored tiles, etc). I think it could’ve been simpler had it been a smaller room (or frankly, just a wider room with more full pieces) or if we hadn’t done the herringbone pattern, so I don’t want to totally dissuade anyone from recreating this. Because again, we’re REALLY happy with the result. But I do want you guys to know what you’re getting yourselves into.
And One More Thing… About Toilet Holes
This post didn’t cover a lot of “how to” because tiling is something we’ve talked a lot about over the years (I’ll link to some of our previous tutorials at the bottom of this post). But I did want to cover one thing that lots of people asked about on Instagram: cutting around the toilet flange in the floor. See that nice round cut below? Who knew so many people would notice and ask us how it’s done. So here ya go.
I didn’t document this process and we were already done by the time the requests for tips arose, so I’ve tried to illustrate below what I do to make the round cuts around the flange. Most people use an angle grinder to get a really pretty circle cut, but I don’t own one, so my process involves my wet saw and it’s decidedly less pretty, but here it goes…
Basically once I’ve marked the area that needs to be cut, I make a two long cuts from each side at the shallowest angles I can manage (marked in red and purple in the top right picture). This removes a few big chunks and makes the next cuts easier.
Then I make a bunch of short cuts very close together – almost like making teeth – along the edge of the circle (marked in purple and red in the bottom left picture above). The “teeth” usually break off in the process, or if they’re too thick I just run my blade against them again. The final result is rarely a perfect circle and often has little indentations where I made the teeth cuts. But it’ll all be covered by a toilet anyways, so it doesn’t need to be perfect.
In fact, I probably don’t need to be as meticulous as I am since it’ll be hidden under the toilet. But you don’t want to get too lazy because your toilet needs a flat solid surface to rest on and if your chosen porcelain throne has an especially small base, a larger cut could end up peeking out.
Speaking of which, the upstairs toilets and vanities got installed last week so we’re hoping to make a trip out there this weekend to check it all out! Things are really coming together!!
More Tiling Projects & How To’s:
If you’re interested in more tutorials on tiling or want to check out some of our previous tile projects, here you go:
How to install a subway tile backsplash (with video!)
How to mix thinset and how to install penny tile
How to install subway tile in a herringbone pattern
How to install cement board and large floor tiles
How to install a herringbone marble backsplash using mastic
How to install oversized tile in an outdoor area
How we customized a hex mosaic in the beach house
*This post contains affiliate links*
The post The Duplex Is Tiled! Here’s What We Loved & What We Wouldn’t Do Again appeared first on Young House Love.
The Duplex Is Tiled! Here’s What We Loved & What We Wouldn’t Do Again published first on https://bakerskitchenslimited.tumblr.com/
0 notes
Text
The Duplex Is Tiled! Here’s What We Loved & What We Wouldn’t Do Again
Tiling was one of the most daunting tasks on our duplex to-do list this year (four bathrooms! two mudrooms! and there are still two backsplashes on the list) so it’s a HUGE relief to say that all of those floors and showers and tub surrounds are officially done (well, like 95% done – more on that later). So today we wanted to show you how they’ve all turned out and share some of the lessons we learned along the way, including which tiles we’d buy again in a heartbeat… and the ones we’d think twice about attempting ever again.
floor tile | wall tile | shower floor | grout: frost | door: SW Oyster Bay
Listeners of last week’s podcast know that after two long weekends spent tiling the duplex, we completed all six of the floors ourselves (two mudrooms and four bathrooms!) but we decided to hire out the four remaining shower surrounds in order to keep things on schedule. What would’ve taken me and Sherry several more weekends to accomplish was knocked out by our contractor’s crew in less than a week – which means we got to spend all that time we saved doing actual work that we get paid for, so it worked out well.
For each of the four shower/tub surrounds we chose white subway tile for the walls (simple, classic, affordable, and it’s a tile that lets the more interesting floor tile in each room be the star). So this post is mostly going to focus on the floors in each space since we’ve covered our adventures in subway tile here and here already.
floor tile | wall tile | shower floor | grout: warm gray | door: SW White Truffle
But as for the subway tile we used, we went with this affordable 3 x 6″ subway tile installed in a standard running bond pattern (the same stuff we used and loved on the beach house’s kitchen backsplash). And the two master showers got this white herringbone on the floor, which added a hint of interest to that surface without being too crazy busy.
We showed you all of the floor tile selections in this post about how we chose our tile, cabinets, and paint colors. But we did make one last minute change to the plan from that post: we swapped the two master bathroom tile choices (seen in the two photos above) because the marble-esque tile ended up looking better with the blue-green doors than the pink ones. As much planning as you do beforehand, there’s really nothing like seeing the tile in the space next to the items that are in there, hence that last minute swap.
We mentioned in that same post that we limited ourselves to larger tiles with interesting patterns, rather than smaller mosaics because we knew it would help the process go faster (we LOVE our pink house master bathroom floor, but it took us forever and a day). But even within that larger-tile parameter, we learned that some tiles were faster, easier, and more foolproof to lay than others. We LOVE how all of them turned out in the end, but there are some that gave us more difficulty (and took much longer to install) than others. So if speed and ease are an important factor when it comes to picking tile, or if you’re a newbie tiler and want to choose something that’s simple and straightforward… this post should help.
So let’s start with the easiest ones:
The Square Patterned Tiles
floor tile | grout: warm gray | door: SW White Truffle
The blue patterned tiles that we laid in the bathrooms on the left side were the fastest and the most straightforward to install. Why? Because (1) they were square and (2) the pattern was symmetrical on all sides, meaning you could put the tile down in any orientation and it would line up. The combination of those two factors made it much easier to lay out, cut, and install because we were always working with right angles (we’ll talk about hex tile in a moment!). And because the pattern was the same on every edge, we had less waste because we could use both sides of a cut tile again in another smaller spot (like around any edge).
floor tile | grout: warm gray | door: SW White Truffle | wall: SW Spare White
The size of these tiles was also really easy to work with. The master bath tile (above) was around an 8 x 8″ square while the hall bath tile (below) was 9 x 9″, so they weren’t heavy or unruly like larger tiles can be, but they filled the space more quickly than a smaller mosaic would have. I think each room took us about two hours to lay, which felt like nothing compared to some of the others.
floor tile |grout: frost | door: SW White Truffle
And even though they were just simple square tiles that went down easily, the final floor still looks interesting and intricate – which was the goal. So we’re thrilled with these. Ten stars. Would recommend. Final verdict: If you’re looking to achieve something similar and keep your project as simple as possible, I would choose square tiles like these and these. They’re both porcelain too, so they don’t need to be sealed and cared for like more finicky materials do (we’re looking at you cement tile).
floor tile | wall tile | grout: frost | door: SW White Truffle | drop-in tub
The only thing we’d do differently next time is we’d use a darker gray grout in the room above. We were trying to streamline everything and keep cost down by not buying different grout colors for each room (and whatever color went on the floors also went in the shower – some of which weren’t grouted at the time of these photos). But Sherry thinks a darker gray would’ve made the grout lines recede a bit more, helping the diamond pattern show through stronger. Anything for a diamond, right?
Let’s move on to the next simplest tile to install…
The Marble Hex Tile
floor tile | grout: frost | door: SW Oyster Bay
Now, this tile isn’t actually marble (it’s porcelain, just like everything else – because they’re extra durable and never need to be sealed) but it may be our favorite in the entire house. The marble finish is classic and bright, but the pattern on top makes it unique and unusual. We’ve actually talked about maybe using the same tile in our own bathroom here in Richmond – thats how much we like it.
(Note: the space between the tile & the tub or the tile & the baseboard in various shots throughout this post will get white quarter round molding, so it all looks seamless in the end)
floor tile | wall tile | grout: frost | door: SW Oyster Bay | wall: SW Spare White
Like the square tiles, this hex was about 8 x 8″ so the size was very manageable to work with and it provided fast coverage in the room. I think this one maybe took us 3-4 hours instead of 2. And that’s mainly because (1) the hex shape took more care to cut and lay and (2) the asymmetrical pattern took more concentration to not screw up. Speaking of which, there are two different looks you can get with this tile. See how the triangles are all the same color in the left picture below and they’re shaded differently in the right picture because we rotated the hexes? We laid out both options and picked the one on the right.
In addition to having to concentrate on not screwing up the pattern, hex tiles are a bit more finicky when it comes to spacing and not letting your layout drift. One tile laid too close to another in your first corner can cause big headaches down the line as that little inconsistency gets magnified in each subsequent row. So we actually laid out lots of tile BEFORE mixing Thinset to check how everything lined up and to ensure that we didn’t end up with slivers of tile anywhere. This may seem like overkill, but it made things go much faster once we actually started setting things for good.
Final Verdict: Ultimately this tile was noticeably (but not dramatically) harder than the square tiles, and with enough spacers (we used 1/16th spacers) we were able to keep everything lined up and spaced similarly. Even if our spacing had drifted a little, the grout color we used disguised the spacing pretty well anyways. Sidenote: we love this Mapei grout because it comes premixed AND doesn’t need to be sealed and is durable/flexible/stain resistant. So once it’s dried and any grout haze is buffed off, it’s totally good to go. Our contractor swears by it and won’t use anything else, so we tried it throughout the pink house and after over a year of heavy use, all the grout in the bathrooms/mudroom still look mint (no grout scrubbing in over a year, folks!)
But just because this hex tile went down smoothly, doesn’t mean it all will…
The Patterned Hex Tile
This other hex tile went in hall bathroom on the same side as the one above and, well, it’s a good thing we love how this tile turned out because it felt straight up cursed when we were installing it.
floor tile | grout: warm gray | door: SW Oyster Bay
First, it presented some of the same challenges as the last hex tile – a non-square shape and an asymmetrical pattern. But this pattern was even trickier to keep straight, which caused a few bad cuts along the way (plus, it was much harder to reuse cut pieces because the pattern was so particular). I actually laid one tile in the WRONG direction and we didn’t notice it until a week later when it was time to grout. Can you spot it below?
It wasn’t a big deal to fix. I just broke it up with a hammer, removed the shattered pieces of that single tile, and installed a new piece in its place – but it did set my grouting back a day because we had to wait for that new thinset to cure before grouting. And of course, this happened AFTER we had run out of tile during the actual installation. Yep, we were like 80% done and had to order another box. So this room had two pretty frustrating setbacks. But eventually we got it done.
floor tile | grout: warm gray | door: SW Oyster Bay | wall: SW Spare White | drop-in tub
We actually think the square footage calculations on the website are wrong because a couple of our readers reported being short on these same tiles as well. And even without any bad cuts, we don’t think we would have had enough (again: it’s really really hard to reuse your scraps with a pattern like this). So if you use these tiles, I’d recommend getting around 25% extra (not just your typical 10-15% recommended overage).
Final Verdict: If ease and speed are important factors for you when you’re choosing a tile, I would NOT recommend this one. The result was great, but keeping the pattern straight kinda made our brains hurt, this specific tile ran short for us based on the square footage listed on the site (and we heard it did for a few other people), and now we know that we can get interesting patterns with simpler square tiles.
The Chevron Mudroom Tile
Let’s move downstairs to the two mudrooms / laundry rooms. I don’t have “after” photos of these because we haven’t grouted them quite yet (since the back doors act as the main entrances for the crew, the mudrooms are still seeing a lot of foot traffic and grime). So right now they’re both covered in protective paper and we’ll grout once things calm down over there. That means my best photos are mostly progress photos.
floor tile | spacers |wall: SW Spare White | trim: SW Extra White
We really liked installing this chevron tile because the rectangular shape made it easy to lay out and cut, plus the size (17″ x 35″) meant the room – which is nearly the size of all four bathrooms combined – filled up very quickly. The only downside to the size was that they were a bit heavy and cumbersome to maneuver, and I had to get creative with how I rested them on the guide of my wet saw to get them to fit under the blade while I cut them. Plus, keeping big tiles level can be challenging so we always recommend using these LASH spacers, which you can read more about in this post.
My only beef with this tile is that ideally, your spacing between tiles would match the spacing of the zigzags within the tile itself. However, to do that, the manufacturer recommends a (wait for it) … 2/17th spacer. WHO THE HECK SELLS A TWO-SEVENTEENTHS SPACER?! Fortunately, a standard 1/8th or 1/16th (which is what we did) is pretty close to 2/17ths. But still, I feel like it’s an unnecessary complication that could make your chevron not line up perfectly. But even still, for a big room, I would definitely choose this tile again.
Final Verdict: Larger tiles can be harder to handle, cut, and to get level, but these tiles were worth the trouble and we finished the room quickly since they were so large. It’s also one our favorite tiles looks-wise (this room gets the most in-person compliments) and it’s extremely durable (porcelain again) so we would recommend this for sure, especially with the LASH spacers we used.
The Herringbone Mudroom Tile
I’ve saved the best for last. And by the best, I mean hands-down-the-hardest. Yes folks, this is the one we probably would NOT do again… which is hard to say because it’s so darn cool to look at (even here, when it’s still ungrouted). Reminder: the space between the tile & the baseboard in various shots throughout this post will get white quarter round molding, so it’ll all look seamless in the end.
floor tiles: pink, white, and taupe | wall: SW Spare White | trim: SW Extra White
To create this floor we laid three different colors of long porcelain tiles (pink, white, and taupe) in a herringbone pattern, making it a perfect storm of all the challenges of the previous rooms combined:
The tri-color pattern took lots of concentration to keep straight
Despite being long rectangular tiles, laying a herringbone meant LOTS of angled cuts, which are less forgiving
It was difficult to reuse cut pieces because of the alternating colors and angled cuts
A herringbone pattern needs meticulous spacing to keep your pattern from drifting
Because of all of those factors – and because it was such a large room – this is the only space that took us an entire day to complete. Heck, it took us more than two hours just to get our pattern planned and the initial pieces cut. Maybe we were just tired (this was room five of six that we did across two consecutive weekends) but it took nearly all of our mental energy to precisely measure all of these angled cuts, to keep things square to the walls, and to not screw up the color sequence in the process.
Final Verdict: This was by far the hardest tile choice and it took the longest and required the most mental calculations (angled cuts, creating the pattern ourselves with three different colored tiles, etc). I think it could’ve been simpler had it been a smaller room (or frankly, just a wider room with more full pieces) or if we hadn’t done the herringbone pattern, so I don’t want to totally dissuade anyone from recreating this. Because again, we’re REALLY happy with the result. But I do want you guys to know what you’re getting yourselves into.
And One More Thing… About Toilet Holes
This post didn’t cover a lot of “how to” because tiling is something we’ve talked a lot about over the years (I’ll link to some of our previous tutorials at the bottom of this post). But I did want to cover one thing that lots of people asked about on Instagram: cutting around the toilet flange in the floor. See that nice round cut below? Who knew so many people would notice and ask us how it’s done. So here ya go.
I didn’t document this process and we were already done by the time the process arose, so I’ve tried to illustrate below what I do to make the round cuts around the flange. Most people use an angle grinder to get a really pretty circle cut, but I don’t own one, so my process involves my wet saw and it’s decidedly less pretty, but here it goes…
Basically once I’ve marked the area that needs to be cut, I make a two long cuts from each side at the shallowest angles I can manage (marked in red and purple in the top right picture). This removes a few big chunks and makes the next cuts easier.
Then I make a bunch of short cuts very close together – almost like making teeth – along the edge of the circle (marked in purple and red in the bottom left picture above). The “teeth” usually break off in the process, or if they’re too thick I just run my blade against them again. The final result is rarely a perfect circle and often has little indentations where I made the teeth cuts. But it’ll all be covered by a toilet anyways, so it doesn’t need to be perfect.
In fact, I probably don’t need to be as meticulous as I am since it’ll be hidden under the toilet. But you don’t want to get too lazy because your toilet needs a flat solid surface to rest on and if your chosen porcelain throne has an especially small base, a larger cut could end up peeking out.
Speaking of which, the upstairs toilets and vanities got installed last week so we’re hoping to make a trip out there this weekend to check it all out! Things are really coming together!!
More Tiling Projects & How To’s:
If you’re interested in more tutorials on tiling or to check out some of our previous tile projects, check out some of the links below:
How to install a subway tile backsplash (with video!)
How to mix thinset and how to install penny tile
How to install subway tile in a herringbone pattern
How to install cement board and large floor tiles
How to install a herringbone marble backsplash using mastic
How to install oversized tile in an outdoor area
How we customized a hex mosaic in the beach house
*This post contains affiliate links*
The post The Duplex Is Tiled! Here’s What We Loved & What We Wouldn’t Do Again appeared first on Young House Love.
The Duplex Is Tiled! Here’s What We Loved & What We Wouldn’t Do Again published first on https://aireloomreview.tumblr.com/
0 notes
Text
The Duplex Is Tiled! Here’s What We Loved & What We Wouldn’t Do Again
Tiling was one of the most daunting tasks on our duplex to-do list this year (four bathrooms! two mudrooms! and there are still two backsplashes on the list) so it’s a HUGE relief to say that all of those floors and showers and tub surrounds are officially done (well, like 95% done – more on that later). So today we wanted to show you how they’ve all turned out and share some of the lessons we learned along the way, including which tiles we’d buy again in a heartbeat… and the ones we’d think twice about attempting ever again.
floor tile | wall tile | shower floor | grout: frost | door: SW Oyster Bay
Listeners of last week’s podcast know that after two long weekends spent tiling the duplex, we completed all six of the floors ourselves (two mudrooms and four bathrooms!) but we decided to hire out the four remaining shower surrounds in order to keep things on schedule. What would’ve taken me and Sherry several more weekends to accomplish was knocked out by our contractor’s crew in less than a week – which means we got to spend all that time we saved doing actual work that we get paid for, so it worked out well.
For each of the four shower/tub surrounds we chose white subway tile for the walls (simple, classic, affordable, and it’s a tile that lets the more interesting floor tile in each room be the star). So this post is mostly going to focus on the floors in each space since we’ve covered our adventures in subway tile here and here already.
floor tile | wall tile | shower floor | grout: warm gray | door: SW White Truffle
But as for the subway tile we used, we went with this affordable 3 x 6″ subway tile installed in a standard running bond pattern (the same stuff we used and loved on the beach house’s kitchen backsplash). And the two master showers got this white herringbone on the floor, which added a hint of interest to that surface without being too crazy busy.
We showed you all of the floor tile selections in this post about how we chose our tile, cabinets, and paint colors. But we did make one last minute change to the plan from that post: we swapped the two master bathroom tile choices (seen in the two photos above) because the marble-esque tile ended up looking better with the blue-green doors than the pink ones. As much planning as you do beforehand, there’s really nothing like seeing the tile in the space next to the items that are in there, hence that last minute swap.
We mentioned in that same post that we limited ourselves to larger tiles with interesting patterns, rather than smaller mosaics because we knew it would help the process go faster (we LOVE our pink house master bathroom floor, but it took us forever and a day). But even within that larger-tile parameter, we learned that some tiles were faster, easier, and more foolproof to lay than others. We LOVE how all of them turned out in the end, but there are some that gave us more difficulty (and took much longer to install) than others. So if speed and ease are an important factor when it comes to picking tile, or if you’re a newbie tiler and want to choose something that’s simple and straightforward… this post should help.
So let’s start with the easiest ones:
The Square Patterned Tiles
floor tile | grout: warm gray | door: SW White Truffle
The blue patterned tiles that we laid in the bathrooms on the left side were the fastest and the most straightforward to install. Why? Because (1) they were square and (2) the pattern was symmetrical on all sides, meaning you could put the tile down in any orientation and it would line up. The combination of those two factors made it much easier to lay out, cut, and install because we were always working with right angles (we’ll talk about hex tile in a moment!). And because the pattern was the same on every edge, we had less waste because we could use both sides of a cut tile again in another smaller spot (like around any edge).
floor tile | grout: warm gray | door: SW White Truffle | wall: SW Spare White
The size of these tiles was also really easy to work with. The master bath tile (above) was around an 8 x 8″ square while the hall bath tile (below) was 9 x 9″, so they weren’t heavy or unruly like larger tiles can be, but they filled the space more quickly than a smaller mosaic would have. I think each room took us about two hours to lay, which felt like nothing compared to some of the others.
floor tile |grout: frost | door: SW White Truffle
And even though they were just simple square tiles that went down easily, the final floor still looks interesting and intricate – which was the goal. So we’re thrilled with these. Ten stars. Would recommend. Final verdict: If you’re looking to achieve something similar and keep your project as simple as possible, I would choose square tiles like these and these. They’re both porcelain too, so they don’t need to be sealed and cared for like more finicky materials do (we’re looking at you cement tile).
floor tile | wall tile | grout: frost | door: SW White Truffle | drop-in tub
The only thing we’d do differently next time is we’d use a darker gray grout in the room above. We were trying to streamline everything and keep cost down by not buying different grout colors for each room (and whatever color went on the floors also went in the shower – some of which weren’t grouted at the time of these photos). But Sherry thinks a darker gray would’ve made the grout lines recede a bit more, helping the diamond pattern show through stronger. Anything for a diamond, right?
Let’s move on to the next simplest tile to install…
The Marble Hex Tile
floor tile | grout: frost | door: SW Oyster Bay
Now, this tile isn’t actually marble (it’s porcelain, just like everything else – because they’re extra durable and never need to be sealed) but it may be our favorite in the entire house. The marble finish is classic and bright, but the pattern on top makes it unique and unusual. We’ve actually talked about maybe using the same tile in our own bathroom here in Richmond – thats how much we like it.
(Note: the space between the tile & the tub or the tile & the baseboard in various shots throughout this post will get white quarter round molding, so it all looks seamless in the end)
floor tile | wall tile | grout: frost | door: SW Oyster Bay | wall: SW Spare White
Like the square tiles, this hex was about 8 x 8″ so the size was very manageable to work with and it provided fast coverage in the room. I think this one maybe took us 3-4 hours instead of 2. And that’s mainly because (1) the hex shape took more care to cut and lay and (2) the asymmetrical pattern took more concentration to not screw up. Speaking of which, there are two different looks you can get with this tile. See how the triangles are all the same color in the left picture below and they’re shaded differently in the right picture because we rotated the hexes? We laid out both options and picked the one on the right.
In addition to having to concentrate on not screwing up the pattern, hex tiles are a bit more finicky when it comes to spacing and not letting your layout drift. One tile laid too close to another in your first corner can cause big headaches down the line as that little inconsistency gets magnified in each subsequent row. So we actually laid out lots of tile BEFORE mixing Thinset to check how everything lined up and to ensure that we didn’t end up with slivers of tile anywhere. This may seem like overkill, but it made things go much faster once we actually started setting things for good.
Final Verdict: Ultimately this tile was noticeably (but not dramatically) harder than the square tiles, and with enough spacers (we used 1/16th spacers) we were able to keep everything lined up and spaced similarly. Even if our spacing had drifted a little, the grout color we used disguised the spacing pretty well anyways. Sidenote: we love this Mapei grout because it comes premixed AND doesn’t need to be sealed and is durable/flexible/stain resistant. So once it’s dried and any grout haze is buffed off, it’s totally good to go. Our contractor swears by it and won’t use anything else, so we tried it throughout the pink house and after over a year of heavy use, all the grout in the bathrooms/mudroom still look mint (no grout scrubbing in over a year, folks!)
But just because this hex tile went down smoothly, doesn’t mean it all will…
The Patterned Hex Tile
This other hex tile went in hall bathroom on the same side as the one above and, well, it’s a good thing we love how this tile turned out because it felt straight up cursed when we were installing it.
floor tile | grout: warm gray | door: SW Oyster Bay
First, it presented some of the same challenges as the last hex tile – a non-square shape and an asymmetrical pattern. But this pattern was even trickier to keep straight, which caused a few bad cuts along the way (plus, it was much harder to reuse cut pieces because the pattern was so particular). I actually laid one tile in the WRONG direction and we didn’t notice it until a week later when it was time to grout. Can you spot it below?
It wasn’t a big deal to fix. I just broke it up with a hammer, removed the shattered pieces of that single tile, and installed a new piece in its place – but it did set my grouting back a day because we had to wait for that new thinset to cure before grouting. And of course, this happened AFTER we had run out of tile during the actual installation. Yep, we were like 80% done and had to order another box. So this room had two pretty frustrating setbacks. But eventually we got it done.
floor tile | grout: warm gray | door: SW Oyster Bay | wall: SW Spare White | drop-in tub
We actually think the square footage calculations on the website are wrong because a couple of our readers reported being short on these same tiles as well. And even without any bad cuts, we don’t think we would have had enough (again: it’s really really hard to reuse your scraps with a pattern like this). So if you use these tiles, I’d recommend getting around 25% extra (not just your typical 10-15% recommended overage).
Final Verdict: If ease and speed are important factors for you when you’re choosing a tile, I would NOT recommend this one. The result was great, but keeping the pattern straight kinda made our brains hurt, this specific tile ran short for us based on the square footage listed on the site (and we heard it did for a few other people), and now we know that we can get interesting patterns with simpler square tiles.
The Chevron Mudroom Tile
Let’s move downstairs to the two mudrooms / laundry rooms. I don’t have “after” photos of these because we haven’t grouted them quite yet (since the back doors act as the main entrances for the crew, the mudrooms are still seeing a lot of foot traffic and grime). So right now they’re both covered in protective paper and we’ll grout once things calm down over there. That means my best photos are mostly progress photos.
floor tile | spacers |wall: SW Spare White | trim: SW Extra White
We really liked installing this chevron tile because the rectangular shape made it easy to lay out and cut, plus the size (17″ x 35″) meant the room – which is nearly the size of all four bathrooms combined – filled up very quickly. The only downside to the size was that they were a bit heavy and cumbersome to maneuver, and I had to get creative with how I rested them on the guide of my wet saw to get them to fit under the blade while I cut them. Plus, keeping big tiles level can be challenging so we always recommend using these LASH spacers, which you can read more about in this post.
My only beef with this tile is that ideally, your spacing between tiles would match the spacing of the zigzags within the tile itself. However, to do that, the manufacturer recommends a (wait for it) … 2/17th spacer. WHO THE HECK SELLS A TWO-SEVENTEENTHS SPACER?! Fortunately, a standard 1/8th or 1/16th (which is what we did) is pretty close to 2/17ths. But still, I feel like it’s an unnecessary complication that could make your chevron not line up perfectly. But even still, for a big room, I would definitely choose this tile again.
Final Verdict: Larger tiles can be harder to handle, cut, and to get level, but these tiles were worth the trouble and we finished the room quickly since they were so large. It’s also one our favorite tiles looks-wise (this room gets the most in-person compliments) and it’s extremely durable (porcelain again) so we would recommend this for sure, especially with the LASH spacers we used.
The Herringbone Mudroom Tile
I’ve saved the best for last. And by the best, I mean hands-down-the-hardest. Yes folks, this is the one we probably would NOT do again… which is hard to say because it’s so darn cool to look at (even here, when it’s still ungrouted). Reminder: the space between the tile & the baseboard in various shots throughout this post will get white quarter round molding, so it’ll all look seamless in the end.
floor tiles: pink, white, and taupe | wall: SW Spare White | trim: SW Extra White
To create this floor we laid three different colors of long porcelain tiles (pink, white, and taupe) in a herringbone pattern, making it a perfect storm of all the challenges of the previous rooms combined:
The tri-color pattern took lots of concentration to keep straight
Despite being long rectangular tiles, laying a herringbone meant LOTS of angled cuts, which are less forgiving
It was difficult to reuse cut pieces because of the alternating colors and angled cuts
A herringbone pattern needs meticulous spacing to keep your pattern from drifting
Because of all of those factors – and because it was such a large room – this is the only space that took us an entire day to complete. Heck, it took us more than two hours just to get our pattern planned and the initial pieces cut. Maybe we were just tired (this was room five of six that we did across two consecutive weekends) but it took nearly all of our mental energy to precisely measure all of these angled cuts, to keep things square to the walls, and to not screw up the color sequence in the process.
Final Verdict: This was by far the hardest tile choice and it took the longest and required the most mental calculations (angled cuts, creating the pattern ourselves with three different colored tiles, etc). I think it could’ve been simpler had it been a smaller room (or frankly, just a wider room with more full pieces) or if we hadn’t done the herringbone pattern, so I don’t want to totally dissuade anyone from recreating this. Because again, we’re REALLY happy with the result. But I do want you guys to know what you’re getting yourselves into.
And One More Thing… About Toilet Holes
This post didn’t cover a lot of “how to” because tiling is something we’ve talked a lot about over the years (I’ll link to some of our previous tutorials at the bottom of this post). But I did want to cover one thing that lots of people asked about on Instagram: cutting around the toilet flange in the floor. See that nice round cut below? Who knew so many people would notice and ask us how it’s done. So here ya go.
I didn’t document this process and we were already done by the time the process arose, so I’ve tried to illustrate below what I do to make the round cuts around the flange. Most people use an angle grinder to get a really pretty circle cut, but I don’t own one, so my process involves my wet saw and it’s decidedly less pretty, but here it goes…
Basically once I’ve marked the area that needs to be cut, I make a two long cuts from each side at the shallowest angles I can manage (marked in red and purple in the top right picture). This removes a few big chunks and makes the next cuts easier.
Then I make a bunch of short cuts very close together – almost like making teeth – along the edge of the circle (marked in purple and red in the bottom left picture above). The “teeth” usually break off in the process, or if they’re too thick I just run my blade against them again. The final result is rarely a perfect circle and often has little indentations where I made the teeth cuts. But it’ll all be covered by a toilet anyways, so it doesn’t need to be perfect.
In fact, I probably don’t need to be as meticulous as I am since it’ll be hidden under the toilet. But you don’t want to get too lazy because your toilet needs a flat solid surface to rest on and if your chosen porcelain throne has an especially small base, a larger cut could end up peeking out.
Speaking of which, the upstairs toilets and vanities got installed last week so we’re hoping to make a trip out there this weekend to check it all out! Things are really coming together!!
More Tiling Projects & How To’s:
If you’re interested in more tutorials on tiling or to check out some of our previous tile projects, check out some of the links below:
How to install a subway tile backsplash (with video!)
How to mix thinset and how to install penny tile
How to install subway tile in a herringbone pattern
How to install cement board and large floor tiles
How to install a herringbone marble backsplash using mastic
How to install oversized tile in an outdoor area
How we customized a hex mosaic in the beach house
*This post contains affiliate links*
The post The Duplex Is Tiled! Here’s What We Loved & What We Wouldn’t Do Again appeared first on Young House Love.
The Duplex Is Tiled! Here’s What We Loved & What We Wouldn’t Do Again published first on https://bakerskitchenslimited.tumblr.com/
0 notes
Text
The Duplex Is Tiled! Here’s What We Loved & What We Wouldn’t Do Again
Tiling was one of the most daunting tasks on our duplex to-do list this year (four bathrooms! two mudrooms! and there are still two backsplashes on the list) so it’s a HUGE relief to say that all of those floors and showers and tub surrounds are officially done (well, like 95% done – more on that later). So today we wanted to show you how they’ve all turned out and share some of the lessons we learned along the way, including which tiles we’d buy again in a heartbeat… and the ones we’d think twice about attempting ever again.
floor tile | wall tile | shower floor | grout: frost | door: SW Oyster Bay
Listeners of last week’s podcast know that after two long weekends spent tiling the duplex, we completed all six of the floors ourselves (two mudrooms and four bathrooms!) but we decided to hire out the four remaining shower surrounds in order to keep things on schedule. What would’ve taken me and Sherry several more weekends to accomplish was knocked out by our contractor’s crew in less than a week – which means we got to spend all that time we saved doing actual work that we get paid for, so it worked out well.
For each of the four shower/tub surrounds we chose white subway tile for the walls (simple, classic, affordable, and it’s a tile that lets the more interesting floor tile in each room be the star). So this post is mostly going to focus on the floors in each space since we’ve covered our adventures in subway tile here and here already.
floor tile | wall tile | shower floor | grout: warm gray | door: SW White Truffle
But as for the subway tile we used, we went with this affordable 3 x 6″ subway tile installed in a standard running bond pattern (the same stuff we used and loved on the beach house’s kitchen backsplash). And the two master showers got this white herringbone on the floor, which added a hint of interest to that surface without being too crazy busy.
We showed you all of the floor tile selections in this post about how we chose our tile, cabinets, and paint colors. But we did make one last minute change to the plan from that post: we swapped the two master bathroom tile choices (seen in the two photos above) because the marble-esque tile ended up looking better with the blue-green doors than the pink ones. As much planning as you do beforehand, there’s really nothing like seeing the tile in the space next to the items that are in there, hence that last minute swap.
We mentioned in that same post that we limited ourselves to larger tiles with interesting patterns, rather than smaller mosaics because we knew it would help the process go faster (we LOVE our pink house master bathroom floor, but it took us forever and a day). But even within that larger-tile parameter, we learned that some tiles were faster, easier, and more foolproof to lay than others. We LOVE how all of them turned out in the end, but there are some that gave us more difficulty (and took much longer to install) than others. So if speed and ease are an important factor when it comes to picking tile, or if you’re a newbie tiler and want to choose something that’s simple and straightforward… this post should help.
So let’s start with the easiest ones:
The Square Patterned Tiles
floor tile | grout: warm gray | door: SW White Truffle
The blue patterned tiles that we laid in the bathrooms on the left side were the fastest and the most straightforward to install. Why? Because (1) they were square and (2) the pattern was symmetrical on all sides, meaning you could put the tile down in any orientation and it would line up. The combination of those two factors made it much easier to lay out, cut, and install because we were always working with right angles (we’ll talk about hex tile in a moment!). And because the pattern was the same on every edge, we had less waste because we could use both sides of a cut tile again in another smaller spot (like around any edge).
floor tile | grout: warm gray | door: SW White Truffle | wall: SW Spare White
The size of these tiles was also really easy to work with. The master bath tile (above) was around an 8 x 8″ square while the hall bath tile (below) was 9 x 9″, so they weren’t heavy or unruly like larger tiles can be, but they filled the space more quickly than a smaller mosaic would have. I think each room took us about two hours to lay, which felt like nothing compared to some of the others.
floor tile |grout: frost | door: SW White Truffle
And even though they were just simple square tiles that went down easily, the final floor still looks interesting and intricate – which was the goal. So we’re thrilled with these. Ten stars. Would recommend. Final verdict: If you’re looking to achieve something similar and keep your project as simple as possible, I would choose square tiles like these and these. They’re both porcelain too, so they don’t need to be sealed and cared for like more finicky materials do (we’re looking at you cement tile).
floor tile | wall tile | grout: frost | door: SW White Truffle | drop-in tub
The only thing we’d do differently next time is we’d use a darker gray grout in the room above. We were trying to streamline everything and keep cost down by not buying different grout colors for each room (and whatever color went on the floors also went in the shower – some of which weren’t grouted at the time of these photos). But Sherry thinks a darker gray would’ve made the grout lines recede a bit more, helping the diamond pattern show through stronger. Anything for a diamond, right?
Let’s move on to the next simplest tile to install…
The Marble Hex Tile
floor tile | grout: frost | door: SW Oyster Bay
Now, this tile isn’t actually marble (it’s porcelain, just like everything else – because they’re extra durable and never need to be sealed) but it may be our favorite in the entire house. The marble finish is classic and bright, but the pattern on top makes it unique and unusual. We’ve actually talked about maybe using the same tile in our own bathroom here in Richmond – thats how much we like it.
(Note: the space between the tile & the tub or the tile & the baseboard in various shots throughout this post will get white quarter round molding, so it all looks seamless in the end)
floor tile | wall tile | grout: frost | door: SW Oyster Bay | wall: SW Spare White
Like the square tiles, this hex was about 8 x 8″ so the size was very manageable to work with and it provided fast coverage in the room. I think this one maybe took us 3-4 hours instead of 2. And that’s mainly because (1) the hex shape took more care to cut and lay and (2) the asymmetrical pattern took more concentration to not screw up. Speaking of which, there are two different looks you can get with this tile. See how the triangles are all the same color in the left picture below and they’re shaded differently in the right picture because we rotated the hexes? We laid out both options and picked the one on the right.
In addition to having to concentrate on not screwing up the pattern, hex tiles are a bit more finicky when it comes to spacing and not letting your layout drift. One tile laid too close to another in your first corner can cause big headaches down the line as that little inconsistency gets magnified in each subsequent row. So we actually laid out lots of tile BEFORE mixing Thinset to check how everything lined up and to ensure that we didn’t end up with slivers of tile anywhere. This may seem like overkill, but it made things go much faster once we actually started setting things for good.
Final Verdict: Ultimately this tile was noticeably (but not dramatically) harder than the square tiles, and with enough spacers (we used 1/16th spacers) we were able to keep everything lined up and spaced similarly. Even if our spacing had drifted a little, the grout color we used disguised the spacing pretty well anyways. Sidenote: we love this Mapei grout because it comes premixed AND doesn’t need to be sealed and is durable/flexible/stain resistant. So once it’s dried and any grout haze is buffed off, it’s totally good to go. Our contractor swears by it and won’t use anything else, so we tried it throughout the pink house and after over a year of heavy use, all the grout in the bathrooms/mudroom still look mint (no grout scrubbing in over a year, folks!)
But just because this hex tile went down smoothly, doesn’t mean it all will…
The Patterned Hex Tile
This other hex tile went in hall bathroom on the same side as the one above and, well, it’s a good thing we love how this tile turned out because it felt straight up cursed when we were installing it.
floor tile | grout: warm gray | door: SW Oyster Bay
First, it presented some of the same challenges as the last hex tile – a non-square shape and an asymmetrical pattern. But this pattern was even trickier to keep straight, which caused a few bad cuts along the way (plus, it was much harder to reuse cut pieces because the pattern was so particular). I actually laid one tile in the WRONG direction and we didn’t notice it until a week later when it was time to grout. Can you spot it below?
It wasn’t a big deal to fix. I just broke it up with a hammer, removed the shattered pieces of that single tile, and installed a new piece in its place – but it did set my grouting back a day because we had to wait for that new thinset to cure before grouting. And of course, this happened AFTER we had run out of tile during the actual installation. Yep, we were like 80% done and had to order another box. So this room had two pretty frustrating setbacks. But eventually we got it done.
floor tile | grout: warm gray | door: SW Oyster Bay | wall: SW Spare White | drop-in tub
We actually think the square footage calculations on the website are wrong because a couple of our readers reported being short on these same tiles as well. And even without any bad cuts, we don’t think we would have had enough (again: it’s really really hard to reuse your scraps with a pattern like this). So if you use these tiles, I’d recommend getting around 25% extra (not just your typical 10-15% recommended overage).
Final Verdict: If ease and speed are important factors for you when you’re choosing a tile, I would NOT recommend this one. The result was great, but keeping the pattern straight kinda made our brains hurt, this specific tile ran short for us based on the square footage listed on the site (and we heard it did for a few other people), and now we know that we can get interesting patterns with simpler square tiles.
The Chevron Mudroom Tile
Let’s move downstairs to the two mudrooms / laundry rooms. I don’t have “after” photos of these because we haven’t grouted them quite yet (since the back doors act as the main entrances for the crew, the mudrooms are still seeing a lot of foot traffic and grime). So right now they’re both covered in protective paper and we’ll grout once things calm down over there. That means my best photos are mostly progress photos.
floor tile | spacers |wall: SW Spare White | trim: SW Extra White
We really liked installing this chevron tile because the rectangular shape made it easy to lay out and cut, plus the size (17″ x 35″) meant the room – which is nearly the size of all four bathrooms combined – filled up very quickly. The only downside to the size was that they were a bit heavy and cumbersome to maneuver, and I had to get creative with how I rested them on the guide of my wet saw to get them to fit under the blade while I cut them. Plus, keeping big tiles level can be challenging so we always recommend using these LASH spacers, which you can read more about in this post.
My only beef with this tile is that ideally, your spacing between tiles would match the spacing of the zigzags within the tile itself. However, to do that, the manufacturer recommends a (wait for it) … 2/17th spacer. WHO THE HECK SELLS A TWO-SEVENTEENTHS SPACER?! Fortunately, a standard 1/8th or 1/16th (which is what we did) is pretty close to 2/17ths. But still, I feel like it’s an unnecessary complication that could make your chevron not line up perfectly. But even still, for a big room, I would definitely choose this tile again.
Final Verdict: Larger tiles can be harder to handle, cut, and to get level, but these tiles were worth the trouble and we finished the room quickly since they were so large. It’s also one our favorite tiles looks-wise (this room gets the most in-person compliments) and it’s extremely durable (porcelain again) so we would recommend this for sure, especially with the LASH spacers we used.
The Herringbone Mudroom Tile
I’ve saved the best for last. And by the best, I mean hands-down-the-hardest. Yes folks, this is the one we probably would NOT do again… which is hard to say because it’s so darn cool to look at (even here, when it’s still ungrouted). Reminder: the space between the tile & the baseboard in various shots throughout this post will get white quarter round molding, so it’ll all look seamless in the end.
floor tiles: pink, white, and taupe | wall: SW Spare White | trim: SW Extra White
To create this floor we laid three different colors of long porcelain tiles (pink, white, and taupe) in a herringbone pattern, making it a perfect storm of all the challenges of the previous rooms combined:
The tri-color pattern took lots of concentration to keep straight
Despite being long rectangular tiles, laying a herringbone meant LOTS of angled cuts, which are less forgiving
It was difficult to reuse cut pieces because of the alternating colors and angled cuts
A herringbone pattern needs meticulous spacing to keep your pattern from drifting
Because of all of those factors – and because it was such a large room – this is the only space that took us an entire day to complete. Heck, it took us more than two hours just to get our pattern planned and the initial pieces cut. Maybe we were just tired (this was room five of six that we did across two consecutive weekends) but it took nearly all of our mental energy to precisely measure all of these angled cuts, to keep things square to the walls, and to not screw up the color sequence in the process.
Final Verdict: This was by far the hardest tile choice and it took the longest and required the most mental calculations (angled cuts, creating the pattern ourselves with three different colored tiles, etc). I think it could’ve been simpler had it been a smaller room (or frankly, just a wider room with more full pieces) or if we hadn’t done the herringbone pattern, so I don’t want to totally dissuade anyone from recreating this. Because again, we’re REALLY happy with the result. But I do want you guys to know what you’re getting yourselves into.
And One More Thing… About Toilet Holes
This post didn’t cover a lot of “how to” because tiling is something we’ve talked a lot about over the years (I’ll link to some of our previous tutorials at the bottom of this post). But I did want to cover one thing that lots of people asked about on Instagram: cutting around the toilet flange in the floor. See that nice round cut below? Who knew so many people would notice and ask us how it’s done. So here ya go.
I didn’t document this process and we were already done by the time the process arose, so I’ve tried to illustrate below what I do to make the round cuts around the flange. Most people use an angle grinder to get a really pretty circle cut, but I don’t own one, so my process involves my wet saw and it’s decidedly less pretty, but here it goes…
Basically once I’ve marked the area that needs to be cut, I make a two long cuts from each side at the shallowest angles I can manage (marked in red and purple in the top right picture). This removes a few big chunks and makes the next cuts easier.
Then I make a bunch of short cuts very close together – almost like making teeth – along the edge of the circle (marked in purple and red in the bottom left picture above). The “teeth” usually break off in the process, or if they’re too thick I just run my blade against them again. The final result is rarely a perfect circle and often has little indentations where I made the teeth cuts. But it’ll all be covered by a toilet anyways, so it doesn’t need to be perfect.
In fact, I probably don’t need to be as meticulous as I am since it’ll be hidden under the toilet. But you don’t want to get too lazy because your toilet needs a flat solid surface to rest on and if your chosen porcelain throne has an especially small base, a larger cut could end up peeking out.
Speaking of which, the upstairs toilets and vanities got installed last week so we’re hoping to make a trip out there this weekend to check it all out! Things are really coming together!!
More Tiling Projects & How To’s:
If you’re interested in more tutorials on tiling or to check out some of our previous tile projects, check out some of the links below:
How to install a subway tile backsplash (with video!)
How to mix thinset and how to install penny tile
How to install subway tile in a herringbone pattern
How to install cement board and large floor tiles
How to install a herringbone marble backsplash using mastic
How to install oversized tile in an outdoor area
How we customized a hex mosaic in the beach house
*This post contains affiliate links*
The post The Duplex Is Tiled! Here’s What We Loved & What We Wouldn’t Do Again appeared first on Young House Love.
0 notes
Last Seen Blogs

serendipitouswoman
Of all the things to be...

yorstudenttv
Why is TV?

wineaid-blog
WINEAID

rebiiion
"My goal is to destroy those with both the power and will to fig

taoist-water
TableTop Warrior