#JSONModel
Explore tagged Tumblr posts
Visit Tumblr Blog
Explore Tumblr blogs with no restrictions, modern design and the best experience.
Last Seen Tumblr Blogs


Fun Fact
Tumblr posted its first advertisements in May 2012 and subsequently earned $13M in revenue.
Text
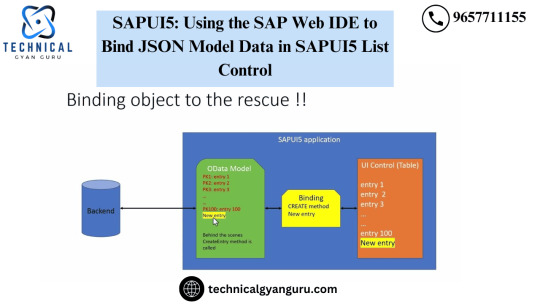
Binding JSON Data in SAPUI5 List Control using Web IDE
Binding JSON Data in SAPUI5 List Control using Web IDE" explains how to bind JSON model data to the SAPUI5 List Control with SAP Web IDE. This tutorial helps developers create dynamic, responsive UIs by integrating data seamlessly into SAPUI5 applications. Learn the step-by-step process of setting up the JSON model, binding it to the List Control, and optimizing the user experience in your SAPUI5 project.
#SAPUI5#WebIDE#JSONBinding#SAPDevelopment#UI5Development#SAPTech#FrontendDevelopment#SAPListControl#JSONModel#SAPIntegration#WebDevelopment
0 notes
Text
Demystifying the art of component reuse in SAPUI5
One of the things I’ve always found being really complex was component reuse. This means to use one app inside another. In this blog series, I will try my best to demystify this, as it really isn’t that hard at all. First of all, why would you even want to do this? Well let me try to explain. As you probably know, developers are lazy and if we can reuse previous generated code for other apps, not only is it smarter, because we only change in one place, but also much more effective of our precious lazy time. As an example, I am working for a customer right now, where the search helps we use in the app are other independent apps and also we are building extensions to My Inbox workflow items, that will be consisting of about 6 different apps, one for each tab in the app. Sounds complicated right, but hopefully by the end of this blog series, you’ll realise that it really isn’t. My first blog will be a basic example on how to use one app within another and also a library. A library is a set of custom made controls or javascript files, that makes sense to share among multiple apps to create a modular application landscape. There is already a good blog about this stuff, but i thought i’d try to simplify and explain in a bit more detail of the important parts of this. First I have created two independent apps using the SAPUI5 application template. One named MyParentApp and the other MyChildApp (Classy right!) MyChildApp doesn’t really have anything special, but I’ve added a view with a hard coded text for now. Now deploy our first app to SAP Cloud Platform, otherwise this won’t work. Also keep in mind that for your reuse applications, you need to deploy your changes to see them, WebIde can’t pick them up from an undeployed app. MyParentApp also has a simple view with a similar text and then I’ve added a component container. When you read the documentation about component reuse, you will realise that you can’t initialise another component without a component container. Now the magic happens in two specific files, when you are working in SAP Cloud Platform (SCP), the component.js file and the neo-app.json file. The component.js file is initialised and this is where we declare the path and namespace for our child application. This is done with two lines of code: jQuery.sap.registerModulePath("bourneMyChildApp", "../../mychildapp/"); jQuery.sap.require("bourneMyChildApp.Component"); The first registers the namespace and name of my child application and the path to the app. The second initialises the component. The namespace and name of my child application is also what you add in the component container of your view, see a pattern here? Now for the neo-app.json file, the way SCP works is really via this file, you use it already for pointing odata calls through your cloud connector to your backend system. Now we have to do a similar thing, so when SCP sees that particular URL pattern, it will be routed to where we point it to. In my example it is the path for /mychildapp/ that is pointing to an application deployed on SCP named mychildapp. { "path": "/mychildapp/", "target": { "type": "application", "name": "mychildapp" }, "description": "My Child App" } That is it, when you run the app, you should see something similar to this. Neat right! Alright now for our second course of actions, which is slightly more tricky, how to use a shared library. For more info on that topic, have a look at this blog. The idea for a shared library is that if you have custom controls or maybe a formatter or other shared functions, you can store them in a shared library that can be used by multiple apps. In my example I will show both usecases. Firstly I have added another textfield to my view in the parent app, where I want to use a formatter. Secondly I have initialised a jsonmodel that I am binding my field to. I have added a new jsonmodel to my parent application and added the following data to the model var oModel = this.getModel(), oJsonData = { MyNumber: 100000.1234 }; oModel.setData(oJsonData); Now in the view controller is where i declare my formatter. sap.ui.define([ "sap/ui/core/mvc/Controller", "mysharedlibrary/SharedFormatter" ], function(Controller, SharedFormatter) { "use strict"; return Controller.extend("bourneMyParentApp.controller.View1", { sharedFormatter: SharedFormatter }); }); This is done by the mysharedlibrary/SharedFormatter to declare the path to th efile and then I initialise the javascript file in the sharedFormatter: SharedFormatter line. Now we need to make SCP recognise that path, we do this again in the neo-app.json file. { "path": "/resources/mysharedlibrary/", "target": { "type": "application", "name": "mysharedlibrary", "entryPath": "/" }, "description": "My shared library" } Please notice that we need to use the resources path here, as SAPUI5 automatically will look in that folder to try and find our library. Also we need to set the entrypath of our library to the root. I’ll explain why later. Alright, to extend the example I will now add a custom control into the child applications view. For that we declare the namespace in the XML view, similar to how you do it normally, and then you refer to that namespace, when declaring your control Also add the following to the neo-app.json file in the child component { "path": "/resources/mysharedlibrary/", "target": { "type": "application", "name": "mysharedlibrary", "entryPath": "/" }, "description": "My shared library" } REMEMBER to redeploy your application. Otherwise you won’t see the changes. Now for the library. Create a new folder in your workspace and name it “MySharedLibrary”. Copy a neo-app.json file from your parent app as well as a manifest.json file to the folder. Remove all references except the vanilla ones in the neo-app.json file, so it looks like this: { "routes": [ { "path": "/resources", "target": { "type": "service", "name": "sapui5", "entryPath": "/resources" }, "description": "SAPUI5 Resources" }, { "path": "/test-resources", "target": { "type": "service", "name": "sapui5", "entryPath": "/test-resources" }, "description": "SAPUI5 Test Resources" } ] } Now for the manifest.json file, we need change the type to be of “library” instead of “application” { "_version": "1.7.0", "sap.app": { "id": "mysharedlibrary", "type": "library", "i18n": "i18n/i18n.properties", "applicationVersion": { "version": "1.0.0" }, "title": "{{appTitle}}", "description": "{{appDescription}}", "sourceTemplate": { "id": "ui5template.basicSAPUI5ApplicationProject", "version": "1.40.12" } }, "sap.ui": { "technology": "UI5", "icons": { "icon": "", "favIcon": "", "phone": "", "phone@2": "", "tablet": "", "tablet@2": "" }, "deviceTypes": { "desktop": true, "tablet": true, "phone": true }, "supportedThemes": ["sap_hcb", "sap_belize"] }, "sap.ui5": { "dependencies": { "minUI5Version": "1.30.0", "libs": { "sap.ui.core": {}, "sap.m": {}, "sap.ui.layout": {}, "sap.ushell": {}, "sap.collaboration": {}, "sap.ui.comp": {}, "sap.uxap": {} } }, "contentDensities": { "compact": true, "cozy": true }, "models": { "i18n": { "type": "sap.ui.model.resource.ResourceModel", "settings": { "bundleName": "BournemySharedLibrary.i18n.i18n" } } }, "resources": { "css": [{ "uri": "css/style.css" }] } } } Everything else is also vanilla. Now create we need to create the library file, which tells SAPUI5 that this is a library. So create a .library file Copy in the following sap.ui.unified SAP SE ${copyright} ${version} Unified controls intended for both, mobile and desktop scenarios sap.ui.core Next create a library.js file and load the following /* global my:true */ sap.ui.define([ "jquery.sap.global", "sap/ui/core/library" ], // library dependency function(jQuery) { "use strict"; sap.ui.getCore().initLibrary({ name: "mysharedlibrary", version: "1.0.0", dependencies: ["sap.ui.core"], types: [], interfaces: [], controls: [ "mysharedlibrary.ProductRating" ], elements: [] }); return my.custom.control; }, /* bExport= */ false); In here, we keep a reference to our ProductRating custom control, the formatter is independently referenced. Create a ProductRating.js file and add the following: sap.ui.define([ "sap/ui/core/Control", "sap/m/RatingIndicator", "sap/m/Label", "sap/m/Button" ], function (Control, RatingIndicator, Label, Button) { "use strict"; return Control.extend("mysharedlibrary.ProductRating", { metadata : { properties : { value: {type : "float", defaultValue : 0} }, aggregations : { _rating : {type : "sap.m.RatingIndicator", multiple: false, visibility : "hidden"}, _label : {type : "sap.m.Label", multiple: false, visibility : "hidden"}, _button : {type : "sap.m.Button", multiple: false, visibility : "hidden"} }, events : { change : { parameters : { value : {type : "int"} } } } }, init : function () { this.setAggregation("_rating", new RatingIndicator({ value: this.getValue(), iconSize: "2rem", visualMode: "Half", liveChange: this._onRate.bind(this) })); this.setAggregation("_label", new Label({ text: "{i18n>productRatingLabelInitial}" }).addStyleClass("sapUiTinyMargin")); this.setAggregation("_button", new Button({ text: "{i18n>productRatingButton}", press: this._onSubmit.bind(this) })); }, setValue: function (iValue) { this.setProperty("value", iValue, true); this.getAggregation("_rating").setValue(iValue); }, _onRate : function (oEvent) { var oRessourceBundle = this.getModel("i18n").getResourceBundle(); var fValue = oEvent.getParameter("value"); this.setValue(fValue); this.getAggregation("_label").setText(oRessourceBundle.getText("productRatingLabelIndicator", [fValue, oEvent.getSource().getMaxValue()])); this.getAggregation("_label").setDesign("Bold"); }, _onSubmit : function (oEvent) { var oResourceBundle = this.getModel("i18n").getResourceBundle(); this.getAggregation("_rating").setEnabled(false); this.getAggregation("_label").setText(oResourceBundle.getText("productRatingLabelFinal")); this.getAggregation("_button").setEnabled(false); this.fireEvent("change", { value: this.getValue() }); }, renderer : function (oRM, oControl) { oRM.write(""); oRM.renderControl(oControl.getAggregation("_rating")); oRM.renderControl(oControl.getAggregation("_label")); oRM.renderControl(oControl.getAggregation("_button")); oRM.write(""); } }); }); And lastly create a SharedFormatter.js file and paste the following: sap.ui.define(["sap/ui/core/format/DateFormat"], function(DateFormat) { "use strict"; return { /** * Rounds the number unit value to 2 digits * @public * @param {string} sValue the number string to be rounded * @returns {string} sValue with 2 digits rounded */ numberUnit: function(sValue) { if (!sValue) { return ""; } return sValue.toLocaleString(); } }; }); Now deploy your application to SCP and try and test your parent application. Hopefully you get a similar result to this: It isn’t pretty, but that wasn’t the intention. Hopefully this gives you the necessary explanation of how you do component reuse. So to summarise, the important factors is * your jquery calls to register your nested component. * Your neo-app.json file to get SCP to recognise the URL pattern and point to seperate applications * Component container inside your parent app, to nest another application * The library.js and .library file as well as declaring a library as type in the manifest.json file of a library. Please give feedback on the blog or post questions to me via twitter on @uxkjaer My next blog will be about how we can now share data between our applications, because right now they are running independently of each other. http://bit.ly/2jXA8IX #SAP #SAPCloud #AI
0 notes
Text
Release 2.18.3: QML JSON ListModel and Todo List App
V-Play 2.18.3 adds the JsonListModel as a performant and feature-rich QML ListModel enhancement for Qt. It helps you transform your JSON data to a model and enables you to detect changes to individual items in your model. You can then only update the changed items in your UI instead of updating the full list. This update also adds several improvements and fixes.
Improved Data Manipulation and ListView Performance
You can now use JsonListModel to transform your JSON data into a QML ListModel for usage with e.g. an AppListView.
The JsonListModel type implements the full QML ListModel API and fires individual events for all changes in the data. The list view can thus only update relevant entries or apply transition animations. This is super useful, as you can e.g. fetch new data and simply replace the old JSON. The JsonListModel will detect all changes, and the ListView updates its items accordingly – without a full redraw.
You thus get much better performance and scrolling stays smooth when the list is updated:
The JsonListModel is backed by a performant QSyncable model in Qt C++ and exposed to QML for easy usage. With the JsonListModel you can:
Fetch JSON data from REST APIs with QML and JavaScript.
Pass the data to your C++ list model, which synchronizes the JSON data and prepares it for usage in your view.
Show the model data with a list view in QML, which only renders list items that have changed.
With the JsonListModel you do not require to implement a custom model in C++ anymore. The JsonListModel itself is your C++ model, which is fully usable from QML and can work with JSON list items of any format.
Apart from list views, the model also supports the GridView and Repeater types to display model data.
The following example shows how to use JsonListModel together with AppListView. When adding a new item to the JSON, the JsonListModel detects the change. The AppListView can thus use a transition animation when adding the entry. It is not required to fully redraw the list and existing items in the view are not affected.
import VPlayApps 1.0 import QtQuick 2.0 App { NavigationStack { Page { id: page title: "JSONListModel" // property with json data property var jsonData: [ { "id": 1, "title": "Entry 1" }, { "id": 2, "title": "Entry 2" }, { "id": 3, "title": "Entry 3" } ] // list model for json data JsonListModel { id: jsonModel source: page.jsonData keyField: "id" } // list view AppListView { anchors.fill: parent model: jsonModel delegate: SimpleRow { text: model.title } // transition animation for adding items add: Transition { NumberAnimation { property: "opacity"; from: 0; to: 1; duration: 1000 easing.type: Easing.OutQuad; } } } // Button to add a new entry AppButton { anchors.horizontalCenter: parent.horizontalCenter anchors.bottom: parent.bottom text: "Add Entry" onClicked: { var newItem = { "id": jsonModel.count + 1, "title": "Entry "+(jsonModel.count + 1) } page.jsonData.push(newItem) // manually emit signal that jsonData property changed // JsonListModel thus synchronizes the list with the new jsonData page.jsonDataChanged() } } } // Page } }
Please see the documentation of JsonListModel for more information and examples. The JsonListModel is now also used for all JSON models of the V-Play SDK app demos.
New App Example with Core App Components
You can find a new app demo which incorporates all core elements that you need in a basic app. It is based on the principles of the Separation of Model, View and Logic Code guide. The demo includes login, app navigation, controls, REST API access, offline caching and also uses the JsonListModel.
You can find the Basic Demo App along with other app demos in the V-Play SDK and as a project wizard in Qt Creator. The basic app is the best starting point for new applications and combines many features that used to be part of individual wizards before. It is also available for you on GitHub.
Todo List App with Sort and Filter Options
To further demonstrate the power of JsonListModel, we also prepared an advanced Todo List Demo App.
It uses list transition animations and shows how to integrate PullToRefreshHandler, VisibilityRefreshHandler or SortFilterProxyModel. The demo supports fetching of todos, creation and storing of drafts, offline caching, paging, sorting and filtering.
Use Custom Page Transitions
You can now configure the used NavigationStack page transition with NavigationStack::transitionDelegate property. By default, the NavigationStack uses NavigationStack::transitionDelegateiOS on iOS and NavigationStack::transitionDelegateAndroid on Android.
You can also specify a custom transition using StackViewDelegate.
More Features, Improvements and Fixes
Here is a compressed list of further improvements with this update:
The NavigationStack transition for Android now better matches the default Android platform transition.
VisibilityRefreshHandler now also refreshes if it gets visible after the content height of the list changes (for example when filtering).
Fix animation of AppActivityIndicator and ActivityIndicatorBarItem to loop infinitely.
The AppTextEdit::cursorInView feature does no longer require the AppTextEdit to use id: textEdit.
For a list of additional fixes, please check out the changelog.
How to Update V-Play
Test out these new features by following these steps:
Open the V-Play SDK Maintenance Tool in your V-Play SDK directory.
Choose “Update components” and finish the update process to get this release as described in the V-Play Update Guide.
If you haven’t installed V-Play yet, you can do so now with the latest installer from here. Now you can explore all of the new features included in this release!
For a full list of improvements and fixes to V-Play in this update, please check out the change log!
More Posts Like This
youtube
Machine Learning: Add Image Classification for iOS and Android with Qt and TensorFlow
Qt AR: Why and How to Add Augmented Reality to Your Mobile App
Release 2.18.2: Guide for MVC, MVVM, Flux with QML
Release 2.18.1: Use JavaScript Promises with Qt, Material Cards and an Improved API to Connect to REST Services
Release 2.18.0: Update to Qt 5.11.1 with QML Compiler and Massive Performance Improvements
How to Make Cross-Platform Mobile Apps with Qt – V-Play Apps
The post Release 2.18.3: QML JSON ListModel and Todo List App appeared first on V-Play Engine.
Release 2.18.3: QML JSON ListModel and Todo List App published first on https://medium.com/@TheTruthSpy
0 notes
Text
Reactive state management in SAPUI5 via MobX
This blog post is about using the state management library MobX together with UI5 to manage state in complex UI5 applications (as alternative to UI5 JSONModel). The benefits of this approach are a better separation between UI and business logic, easier testable code, eventually less number of bugs and in some cases even better performance of your app.
[source: https://blogs.sap.com/2017/01/30/advanced-state-management-in-sapui5-via-mobx/]
[author: Christian Theilemann]
[authorLlink: https://people.sap.com/ctheilemann]
0 notes
Text
Passing MVC model to jquery ajax post
Put this in some .js file
function PostToController(url, inputData,scbfn ) {
$.ajax({ url: url, type: 'POST', data: inputData, dataType:'json', contentType: 'application/json; charset=utf-8', success: function (data) { alert("success"); scbfn(data); }, error: function () { alert("error"); } }); }
java script in your view
<script> $(document).ready(function() {
var submitButtonId; $('input[type=submit]').click(function(event) { submitButtonId = event.target.id; //alert(submitButtonId); });
$('form').submit(function(event) {
//alert('inside template button clicked'); //alert(document.activeElement); //alert(document.activeElement.getAttribute('id')); //var btn = $(this).find("input[type=submit]:focus");
//if (btn[0].id === 'btnCreateTemplate') { // alert('create template button clicked'); //}
//if (btn[0].id === 'btnAddQuestion') { // alert('Add question button clicked'); //}
//var model = $('form').serialize(); //alert(model);
//var myModel = JSON.stringify(model); //alert(myModel);
//var modelArray = $('form').serializeArray(); //alert(modelArray);
var newTemplate = { TemplateName: $('#NewTemplate_TemplateName').val() };
var formModel = { NewTemplate: newTemplate, TemplateQuestions: [], NewQuestion: []
}; var jsonModel = JSON.stringify(formModel); alert(jsonModel); if (submitButtonId === 'btnCreateTemplate') { PostToController('/Template/CreateNewTemplate', jsonModel, RefreshTemplateDropdown); event.preventDefault(); }
//if (submitButtonId === 'btnAddQuestion') { // PostToController('/Template/AddNewQuestion', jsonModel); //}
}); });
function RefreshTemplateDropdown(data) { var select = $('#NewQuestion_Template_TemplateKey'); select.empty(); //if (addEmpty) { // select.append($('<option/>', { // value: " ", // text: " " // })); //} $.each(data, function (index, itemData) { select.append($('<option/>', { value: itemData.Value, text: itemData.Text })); }); } </script>
Models:
public class TemplateQuestionsViewModel { public TemplateQuestionsViewModel() { NewTemplate=new TemplateViewModel(); TemplateQuestions=new List<QuestionsViewModel>(); NewQuestion=new QuestionsViewModel(); } public TemplateViewModel NewTemplate { get; set; } public List<QuestionsViewModel> TemplateQuestions { get; set; } public QuestionsViewModel NewQuestion { get; set; }
}
public TemplateViewModel() { TemplateQuestions=new List<QuestionsViewModel>(); TemplateTypes=new List<SelectListItem>(); }
public string TemplateName { get; set; } public Guid TemplateKey { get; set; } public List<QuestionsViewModel> TemplateQuestions { get; set; } public List<SelectListItem> TemplateTypes { get; set; }
public Guid SelectedTemplateType { get; set; }
0 notes
Text
Demystifying the art of component reuse in SAPUI5
One of the things I’ve always found being really complex was component reuse. This means to use one app inside another. In this blog series, I will try my best to demystify this, as it really isn’t that hard at all. First of all, why would you even want to do this? Well let me try to explain. As you probably know, developers are lazy and if we can reuse previous generated code for other apps, not only is it smarter, because we only change in one place, but also much more effective of our precious lazy time. As an example, I am working for a customer right now, where the search helps we use in the app are other independent apps and also we are building extensions to My Inbox workflow items, that will be consisting of about 6 different apps, one for each tab in the app. Sounds complicated right, but hopefully by the end of this blog series, you’ll realise that it really isn’t. My first blog will be a basic example on how to use one app within another and also a library. A library is a set of custom made controls or javascript files, that makes sense to share among multiple apps to create a modular application landscape. There is already a good blog about this stuff, but i thought i’d try to simplify and explain in a bit more detail of the important parts of this. First I have created two independent apps using the SAPUI5 application template. One named MyParentApp and the other MyChildApp (Classy right!) MyChildApp doesn’t really have anything special, but I’ve added a view with a hard coded text for now. Now deploy our first app to SAP Cloud Platform, otherwise this won’t work. Also keep in mind that for your reuse applications, you need to deploy your changes to see them, WebIde can’t pick them up from an undeployed app. MyParentApp also has a simple view with a similar text and then I’ve added a component container. When you read the documentation about component reuse, you will realise that you can’t initialise another component without a component container. Now the magic happens in two specific files, when you are working in SAP Cloud Platform (SCP), the component.js file and the neo-app.json file. The component.js file is initialised and this is where we declare the path and namespace for our child application. This is done with two lines of code: jQuery.sap.registerModulePath("bourneMyChildApp", "../../mychildapp/"); jQuery.sap.require("bourneMyChildApp.Component"); The first registers the namespace and name of my child application and the path to the app. The second initialises the component. The namespace and name of my child application is also what you add in the component container of your view, see a pattern here? Now for the neo-app.json file, the way SCP works is really via this file, you use it already for pointing odata calls through your cloud connector to your backend system. Now we have to do a similar thing, so when SCP sees that particular URL pattern, it will be routed to where we point it to. In my example it is the path for /mychildapp/ that is pointing to an application deployed on SCP named mychildapp. { "path": "/mychildapp/", "target": { "type": "application", "name": "mychildapp" }, "description": "My Child App" } That is it, when you run the app, you should see something similar to this. Neat right! Alright now for our second course of actions, which is slightly more tricky, how to use a shared library. For more info on that topic, have a look at this blog. The idea for a shared library is that if you have custom controls or maybe a formatter or other shared functions, you can store them in a shared library that can be used by multiple apps. In my example I will show both usecases. Firstly I have added another textfield to my view in the parent app, where I want to use a formatter. Secondly I have initialised a jsonmodel that I am binding my field to. I have added a new jsonmodel to my parent application and added the following data to the model var oModel = this.getModel(), oJsonData = { MyNumber: 100000.1234 }; oModel.setData(oJsonData); Now in the view controller is where i declare my formatter. sap.ui.define([ "sap/ui/core/mvc/Controller", "mysharedlibrary/SharedFormatter" ], function(Controller, SharedFormatter) { "use strict"; return Controller.extend("bourneMyParentApp.controller.View1", { sharedFormatter: SharedFormatter }); }); This is done by the mysharedlibrary/SharedFormatter to declare the path to th efile and then I initialise the javascript file in the sharedFormatter: SharedFormatter line. Now we need to make SCP recognise that path, we do this again in the neo-app.json file. { "path": "/resources/mysharedlibrary/", "target": { "type": "application", "name": "mysharedlibrary", "entryPath": "/" }, "description": "My shared library" } Please notice that we need to use the resources path here, as SAPUI5 automatically will look in that folder to try and find our library. Also we need to set the entrypath of our library to the root. I’ll explain why later. Alright, to extend the example I will now add a custom control into the child applications view. For that we declare the namespace in the XML view, similar to how you do it normally, and then you refer to that namespace, when declaring your control Also add the following to the neo-app.json file in the child component { "path": "/resources/mysharedlibrary/", "target": { "type": "application", "name": "mysharedlibrary", "entryPath": "/" }, "description": "My shared library" } REMEMBER to redeploy your application. Otherwise you won’t see the changes. Now for the library. Create a new folder in your workspace and name it “MySharedLibrary”. Copy a neo-app.json file from your parent app as well as a manifest.json file to the folder. Remove all references except the vanilla ones in the neo-app.json file, so it looks like this: { "routes": [ { "path": "/resources", "target": { "type": "service", "name": "sapui5", "entryPath": "/resources" }, "description": "SAPUI5 Resources" }, { "path": "/test-resources", "target": { "type": "service", "name": "sapui5", "entryPath": "/test-resources" }, "description": "SAPUI5 Test Resources" } ] } Now for the manifest.json file, we need change the type to be of “library” instead of “application” { "_version": "1.7.0", "sap.app": { "id": "mysharedlibrary", "type": "library", "i18n": "i18n/i18n.properties", "applicationVersion": { "version": "1.0.0" }, "title": "{{appTitle}}", "description": "{{appDescription}}", "sourceTemplate": { "id": "ui5template.basicSAPUI5ApplicationProject", "version": "1.40.12" } }, "sap.ui": { "technology": "UI5", "icons": { "icon": "", "favIcon": "", "phone": "", "phone@2": "", "tablet": "", "tablet@2": "" }, "deviceTypes": { "desktop": true, "tablet": true, "phone": true }, "supportedThemes": ["sap_hcb", "sap_belize"] }, "sap.ui5": { "dependencies": { "minUI5Version": "1.30.0", "libs": { "sap.ui.core": {}, "sap.m": {}, "sap.ui.layout": {}, "sap.ushell": {}, "sap.collaboration": {}, "sap.ui.comp": {}, "sap.uxap": {} } }, "contentDensities": { "compact": true, "cozy": true }, "models": { "i18n": { "type": "sap.ui.model.resource.ResourceModel", "settings": { "bundleName": "BournemySharedLibrary.i18n.i18n" } } }, "resources": { "css": [{ "uri": "css/style.css" }] } } } Everything else is also vanilla. Now create we need to create the library file, which tells SAPUI5 that this is a library. So create a .library file Copy in the following sap.ui.unified SAP SE ${copyright} ${version} Unified controls intended for both, mobile and desktop scenarios sap.ui.core Next create a library.js file and load the following /* global my:true */ sap.ui.define([ "jquery.sap.global", "sap/ui/core/library" ], // library dependency function(jQuery) { "use strict"; sap.ui.getCore().initLibrary({ name: "mysharedlibrary", version: "1.0.0", dependencies: ["sap.ui.core"], types: [], interfaces: [], controls: [ "mysharedlibrary.ProductRating" ], elements: [] }); return my.custom.control; }, /* bExport= */ false); In here, we keep a reference to our ProductRating custom control, the formatter is independently referenced. Create a ProductRating.js file and add the following: sap.ui.define([ "sap/ui/core/Control", "sap/m/RatingIndicator", "sap/m/Label", "sap/m/Button" ], function (Control, RatingIndicator, Label, Button) { "use strict"; return Control.extend("mysharedlibrary.ProductRating", { metadata : { properties : { value: {type : "float", defaultValue : 0} }, aggregations : { _rating : {type : "sap.m.RatingIndicator", multiple: false, visibility : "hidden"}, _label : {type : "sap.m.Label", multiple: false, visibility : "hidden"}, _button : {type : "sap.m.Button", multiple: false, visibility : "hidden"} }, events : { change : { parameters : { value : {type : "int"} } } } }, init : function () { this.setAggregation("_rating", new RatingIndicator({ value: this.getValue(), iconSize: "2rem", visualMode: "Half", liveChange: this._onRate.bind(this) })); this.setAggregation("_label", new Label({ text: "{i18n>productRatingLabelInitial}" }).addStyleClass("sapUiTinyMargin")); this.setAggregation("_button", new Button({ text: "{i18n>productRatingButton}", press: this._onSubmit.bind(this) })); }, setValue: function (iValue) { this.setProperty("value", iValue, true); this.getAggregation("_rating").setValue(iValue); }, _onRate : function (oEvent) { var oRessourceBundle = this.getModel("i18n").getResourceBundle(); var fValue = oEvent.getParameter("value"); this.setValue(fValue); this.getAggregation("_label").setText(oRessourceBundle.getText("productRatingLabelIndicator", [fValue, oEvent.getSource().getMaxValue()])); this.getAggregation("_label").setDesign("Bold"); }, _onSubmit : function (oEvent) { var oResourceBundle = this.getModel("i18n").getResourceBundle(); this.getAggregation("_rating").setEnabled(false); this.getAggregation("_label").setText(oResourceBundle.getText("productRatingLabelFinal")); this.getAggregation("_button").setEnabled(false); this.fireEvent("change", { value: this.getValue() }); }, renderer : function (oRM, oControl) { oRM.write(""); oRM.renderControl(oControl.getAggregation("_rating")); oRM.renderControl(oControl.getAggregation("_label")); oRM.renderControl(oControl.getAggregation("_button")); oRM.write(""); } }); }); And lastly create a SharedFormatter.js file and paste the following: sap.ui.define(["sap/ui/core/format/DateFormat"], function(DateFormat) { "use strict"; return { /** * Rounds the number unit value to 2 digits * @public * @param {string} sValue the number string to be rounded * @returns {string} sValue with 2 digits rounded */ numberUnit: function(sValue) { if (!sValue) { return ""; } return sValue.toLocaleString(); } }; }); Now deploy your application to SCP and try and test your parent application. Hopefully you get a similar result to this: It isn’t pretty, but that wasn’t the intention. Hopefully this gives you the necessary explanation of how you do component reuse. So to summarise, the important factors is * your jquery calls to register your nested component. * Your neo-app.json file to get SCP to recognise the URL pattern and point to seperate applications * Component container inside your parent app, to nest another application * The library.js and .library file as well as declaring a library as type in the manifest.json file of a library. Please give feedback on the blog or post questions to me via twitter on @uxkjaer My next blog will be about how we can now share data between our applications, because right now they are running independently of each other. http://bit.ly/2hUhvVI #SAP #SAPCloud #AI
0 notes
Text
Part 1C: Working with Task APIs in your Custom HTML5 application
In this concluding section of Part1, let us know how-to update the user interface to show the task data and workflow context. The whole objective here is to use task APIs to (a) get task related data and enhance the workflow context (b) add task action button implementation and (c) bind the UI elements with the workflow context data. So, when you want to use your custom UI application as a user task-interface of workflow then these steps need to be performed to ensure that workflow context and task context is seamlessly connected. Each step mentioned below is not mandatory, you can choose to use them at your discretion and based on your requirement. But in most of the cases, for our internal showcase scenario, I have more or less followed the same steps and the integration of user interfaces works like butter. Get started now: * Open the Web IDE * Open Controller.js file of your project * Add the following code snippets in init function to: * Get the task instance data // Step 1: get task data var startupParameters = this.getComponentData().startupParameters; var taskModel = startupParameters.taskModel; var taskData = taskModel.getData(); var taskId = taskData.InstanceID; * Get the workflow context and enhance it with the task data var processContext = new sap.ui.model.json.JSONModel(); $.ajax({ url: "/bpmworkflowruntime/rest/v1/task-instances/" + taskId + "/context", method: "GET", contentType: "application/json", dataType: "json", success: function(result, xhr, data) { //Get the process context processContext.context = data.responseJSON; //Get task related data to be set in ObjectHeader processContext.context.task = {}; processContext.context.task.Title = taskData.TaskTitle; processContext.context.task.Priority = taskData.Priority; processContext.context.task.Status = taskData.Status; if (taskData.Priority === "HIGH") { processContext.context.task.PriorityState = "Warning"; } else if (taskData.Priority === "VERY HIGH") { processContext.context.task.PriorityState = "Error"; } else { processContext.context.task.PriorityState = "Success"; } processContext.context.task.CreatedOn = taskData.CreatedOn.toDateString(); } }); * Get the task description and add it to UI model //get task description and add it to the UI model var jsonModel = new sap.ui.model.json.JSONModel(); startupParameters.inboxAPI.getDescription("NA", taskData.InstanceID).done(function(dataDescr) { processContext.context.task.Description = dataDescr.Description; jsonModel.setProperty("/context/task/Description", dataDescr.Description); }). fail(function(errorText) { jQuery.sap.require("sap.m.MessageBox"); sap.m.MessageBox.error(errorText, { title: "Error" }); }); jsonModel.setData(processContext); this.setModel(jsonModel); * Next, add buttons and their implementation in the task interface. Here in this example, I have just added one button, you can choose to create other buttons based on your project requirement like button to Reject or Confirm etc. //Implementation for the approve button action var oPositiveAction = { sBtnTxt: "Approve", onBtnPressed: function(e) { var model = that.getModel(); model.refresh(true); //Call a local method to perform further action that._triggerComplete(that.oComponentData.inboxHandle.attachmentHandle.detailModel.getData().InstanceID, true, jQuery.proxy( //on successful competion, call a local method to refresh the task list in My Inbox that._refreshTask, that)); } }; //Add 'Approve’ action to the task startupParameters.inboxAPI.addAction({ action: oPositiveAction.sBtnTxt, label: oPositiveAction.sBtnTxt, type: "Accept" //Set the onClick function }, oPositiveAction.onBtnPressed); — All the above code snippet is added to the init function of the Controller.js file —- * Now, add few more functions in the Controller.js file to: * Trigger action to complete the task.You need to implement this function for the button, whose click would complete the task. In this, you call task API to set the status as completed.You can find more details on the API here: https://help.sap.com/doc/40db36d987084ab09e496381090e9a2e/Cloud/en-US/wfs-core-api-docu.html //This method is called when the confirm button is click by the end user _triggerComplete: function(taskId, approvalStatus, refreshTask) { $.ajax({ //Call workflow API to get the xsrf token url: "/bpmworkflowruntime/rest/v1/xsrf-token", method: "GET", headers: { "X-CSRF-Token": "Fetch" }, success: function(result, xhr, data) { //After retrieving the xsrf token successfully var token = data.getResponseHeader("X-CSRF-Token"); var dataText; //form the context that will be updated - approval status and the equipment list dataText = "{ \"status\":\"COMPLETED\",\"context\": {\"workplaceConfirmed\": \"" + approvalStatus + "\" }}"; $.ajax({ //Call workflow API to complete the task url:"/bpmworkflowruntime/rest/v1/task-instances/"+taskId, method: "PATCH", contentType: "application/json", //pass the updated context to the API data: dataText, headers: { //pass the xsrf token retrieved earlier "X-CSRF-Token": token }, //refreshTask needs to be called on successful completion success: refreshTask }); } }); }, * Finally, write a function to refresh the inbox once the task is completed //Request Inbox to refresh the control once the task is completed _refreshTask: function() { var taskId = this.getComponentData().startupParameters.taskModel.getData().InstanceID; this.getComponentData().startupParameters.inboxAPI.updateTask("NA", taskId); } This completes the updates to Component.js file. Now let us modify the view.xml file to bind the UI element of the user interface such that they fetch the respective value from the workflow context * Open the view.xml and change the Text field of FirstName label element to {/context/user/FirstName} where {/context} reads the data from the workflow context and remaining path is the relative payload path as passed to the workflow.Similarly do the same for other elements as shown below. * Save and Deploy the SAPUI5 application * Start a new workflow instance with the following payload and open the task in My Inbox { "user":{ "FirstName":"Kate", "LastName":"Beckett", "city":"London", "country":"United Kingdom" } } Now you will see the data in the form data from the workflow context With this we complete Part1 of our learning. In this part you learnt how to create an HTML5 application and modify the application artefacts so that it can be successfully integrated in user task of SAP Cloud Platform Workflow. You also learnt about task APIs and how they can be used to associate task data with workflow context, so that the text in the UI element are shown appropriately when the task in opened in MyInbox application. In the upcoming Part2 and Part3 you will learn some advanced options which might help you while using your custom UI5 application as user-task or to start the workflow. http://bit.ly/2hcDWlj #SAP #SAPCloud #AI
0 notes
Text
Part 1C: Working with Task APIs in your Custom HTML5 application
In this concluding section of Part1, let us know how-to update the user interface to show the task data and workflow context. The whole objective here is to use task APIs to (a) get task related data and enhance the workflow context (b) add task action button implementation and (c) bind the UI elements with the workflow context data. So, when you want to use your custom UI application as a user task-interface of workflow then these steps need to be performed to ensure that workflow context and task context is seamlessly connected. Each step mentioned below is not mandatory, you can choose to use them at your discretion and based on your requirement. But in most of the cases, for our internal showcase scenario, I have more or less followed the same steps and the integration of user interfaces works like butter. Get started now: * Open the Web IDE * Open Controller.js file of your project * Add the following code snippets in init function to: * Get the task instance data // Step 1: get task data var startupParameters = this.getComponentData().startupParameters; var taskModel = startupParameters.taskModel; var taskData = taskModel.getData(); var taskId = taskData.InstanceID; * Get the workflow context and enhance it with the task data var processContext = new sap.ui.model.json.JSONModel(); $.ajax({ url: "/bpmworkflowruntime/rest/v1/task-instances/" + taskId + "/context", method: "GET", contentType: "application/json", dataType: "json", success: function(result, xhr, data) { //Get the process context processContext.context = data.responseJSON; //Get task related data to be set in ObjectHeader processContext.context.task = {}; processContext.context.task.Title = taskData.TaskTitle; processContext.context.task.Priority = taskData.Priority; processContext.context.task.Status = taskData.Status; if (taskData.Priority === "HIGH") { processContext.context.task.PriorityState = "Warning"; } else if (taskData.Priority === "VERY HIGH") { processContext.context.task.PriorityState = "Error"; } else { processContext.context.task.PriorityState = "Success"; } processContext.context.task.CreatedOn = taskData.CreatedOn.toDateString(); } }); * Get the task description and add it to UI model //get task description and add it to the UI model var jsonModel = new sap.ui.model.json.JSONModel(); startupParameters.inboxAPI.getDescription("NA", taskData.InstanceID).done(function(dataDescr) { processContext.context.task.Description = dataDescr.Description; jsonModel.setProperty("/context/task/Description", dataDescr.Description); }). fail(function(errorText) { jQuery.sap.require("sap.m.MessageBox"); sap.m.MessageBox.error(errorText, { title: "Error" }); }); jsonModel.setData(processContext); this.setModel(jsonModel); * Next, add buttons and their implementation in the task interface. Here in this example, I have just added one button, you can choose to create other buttons based on your project requirement like button to Reject or Confirm etc. //Implementation for the approve button action var oPositiveAction = { sBtnTxt: "Approve", onBtnPressed: function(e) { var model = that.getModel(); model.refresh(true); //Call a local method to perform further action that._triggerComplete(that.oComponentData.inboxHandle.attachmentHandle.detailModel.getData().InstanceID, true, jQuery.proxy( //on successful competion, call a local method to refresh the task list in My Inbox that._refreshTask, that)); } }; //Add 'Approve’ action to the task startupParameters.inboxAPI.addAction({ action: oPositiveAction.sBtnTxt, label: oPositiveAction.sBtnTxt, type: "Accept" //Set the onClick function }, oPositiveAction.onBtnPressed); — All the above code snippet is added to the init function of the Controller.js file —- * Now, add few more functions in the Controller.js file to: * Trigger action to complete the task.You need to implement this function for the button, whose click would complete the task. In this, you call task API to set the status as completed.You can find more details on the API here: https://help.sap.com/doc/40db36d987084ab09e496381090e9a2e/Cloud/en-US/wfs-core-api-docu.html //This method is called when the confirm button is click by the end user _triggerComplete: function(taskId, approvalStatus, refreshTask) { $.ajax({ //Call workflow API to get the xsrf token url: "/bpmworkflowruntime/rest/v1/xsrf-token", method: "GET", headers: { "X-CSRF-Token": "Fetch" }, success: function(result, xhr, data) { //After retrieving the xsrf token successfully var token = data.getResponseHeader("X-CSRF-Token"); var dataText; //form the context that will be updated - approval status and the equipment list dataText = "{ \"status\":\"COMPLETED\",\"context\": {\"workplaceConfirmed\": \"" + approvalStatus + "\" }}"; $.ajax({ //Call workflow API to complete the task url:"/bpmworkflowruntime/rest/v1/task-instances/"+taskId, method: "PATCH", contentType: "application/json", //pass the updated context to the API data: dataText, headers: { //pass the xsrf token retrieved earlier "X-CSRF-Token": token }, //refreshTask needs to be called on successful completion success: refreshTask }); } }); }, * Finally, write a function to refresh the inbox once the task is completed //Request Inbox to refresh the control once the task is completed _refreshTask: function() { var taskId = this.getComponentData().startupParameters.taskModel.getData().InstanceID; this.getComponentData().startupParameters.inboxAPI.updateTask("NA", taskId); } This completes the updates to Component.js file. Now let us modify the view.xml file to bind the UI element of the user interface such that they fetch the respective value from the workflow context * Open the view.xml and change the Text field of FirstName label element to {/context/user/FirstName} where {/context} reads the data from the workflow context and remaining path is the relative payload path as passed to the workflow.Similarly do the same for other elements as shown below. * Save and Deploy the SAPUI5 application * Start a new workflow instance with the following payload and open the task in My Inbox { "user":{ "FirstName":"Kate", "LastName":"Beckett", "city":"London", "country":"United Kingdom" } } Now you will see the data in the form data from the workflow context With this we complete Part1 of our learning. In this part you learnt how to create an HTML5 application and modify the application artefacts so that it can be successfully integrated in user task of SAP Cloud Platform Workflow. You also learnt about task APIs and how they can be used to associate task data with workflow context, so that the text in the UI element are shown appropriately when the task in opened in MyInbox application. In the upcoming Part2 and Part3 you will learn some advanced options which might help you while using your custom UI5 application as user-task or to start the workflow. http://bit.ly/2yEhz20 #SAP #SAPCloud #AI
0 notes
Text
Part 1C: Working with Task APIs in your Custom HTML5 application
In this concluding section of Part1, let us know how-to update the user interface to show the task data and workflow context. The whole objective here is to use task APIs to (a) get task related data and enhance the workflow context (b) add task action button implementation and (c) bind the UI elements with the workflow context data. So, when you want to use your custom UI application as a user task-interface of workflow then these steps need to be performed to ensure that workflow context and task context is seamlessly connected. Each step mentioned below is not mandatory, you can choose to use them at your discretion and based on your requirement. But in most of the cases, for our internal showcase scenario, I have more or less followed the same steps and the integration of user interfaces works like butter. Get started now: * Open the Web IDE * Open Controller.js file of your project * Add the following code snippets in init function to: * Get the task instance data // Step 1: get task data var startupParameters = this.getComponentData().startupParameters; var taskModel = startupParameters.taskModel; var taskData = taskModel.getData(); var taskId = taskData.InstanceID; * Get the workflow context and enhance it with the task data var processContext = new sap.ui.model.json.JSONModel(); $.ajax({ url: "/bpmworkflowruntime/rest/v1/task-instances/" + taskId + "/context", method: "GET", contentType: "application/json", dataType: "json", success: function(result, xhr, data) { //Get the process context processContext.context = data.responseJSON; //Get task related data to be set in ObjectHeader processContext.context.task = {}; processContext.context.task.Title = taskData.TaskTitle; processContext.context.task.Priority = taskData.Priority; processContext.context.task.Status = taskData.Status; if (taskData.Priority === "HIGH") { processContext.context.task.PriorityState = "Warning"; } else if (taskData.Priority === "VERY HIGH") { processContext.context.task.PriorityState = "Error"; } else { processContext.context.task.PriorityState = "Success"; } processContext.context.task.CreatedOn = taskData.CreatedOn.toDateString(); } }); * Get the task description and add it to UI model //get task description and add it to the UI model var jsonModel = new sap.ui.model.json.JSONModel(); startupParameters.inboxAPI.getDescription("NA", taskData.InstanceID).done(function(dataDescr) { processContext.context.task.Description = dataDescr.Description; jsonModel.setProperty("/context/task/Description", dataDescr.Description); }). fail(function(errorText) { jQuery.sap.require("sap.m.MessageBox"); sap.m.MessageBox.error(errorText, { title: "Error" }); }); jsonModel.setData(processContext); this.setModel(jsonModel); * Next, add buttons and their implementation in the task interface. Here in this example, I have just added one button, you can choose to create other buttons based on your project requirement like button to Reject or Confirm etc. //Implementation for the approve button action var oPositiveAction = { sBtnTxt: "Approve", onBtnPressed: function(e) { var model = that.getModel(); model.refresh(true); //Call a local method to perform further action that._triggerComplete(that.oComponentData.inboxHandle.attachmentHandle.detailModel.getData().InstanceID, true, jQuery.proxy( //on successful competion, call a local method to refresh the task list in My Inbox that._refreshTask, that)); } }; //Add 'Approve’ action to the task startupParameters.inboxAPI.addAction({ action: oPositiveAction.sBtnTxt, label: oPositiveAction.sBtnTxt, type: "Accept" //Set the onClick function }, oPositiveAction.onBtnPressed); — All the above code snippet is added to the init function of the Controller.js file —- * Now, add few more functions in the Controller.js file to: * Trigger action to complete the task.You need to implement this function for the button, whose click would complete the task. In this, you call task API to set the status as completed.You can find more details on the API here: https://help.sap.com/doc/40db36d987084ab09e496381090e9a2e/Cloud/en-US/wfs-core-api-docu.html //This method is called when the confirm button is click by the end user _triggerComplete: function(taskId, approvalStatus, refreshTask) { $.ajax({ //Call workflow API to get the xsrf token url: "/bpmworkflowruntime/rest/v1/xsrf-token", method: "GET", headers: { "X-CSRF-Token": "Fetch" }, success: function(result, xhr, data) { //After retrieving the xsrf token successfully var token = data.getResponseHeader("X-CSRF-Token"); var dataText; //form the context that will be updated - approval status and the equipment list dataText = "{ \"status\":\"COMPLETED\",\"context\": {\"workplaceConfirmed\": \"" + approvalStatus + "\" }}"; $.ajax({ //Call workflow API to complete the task url:"/bpmworkflowruntime/rest/v1/task-instances/"+taskId, method: "PATCH", contentType: "application/json", //pass the updated context to the API data: dataText, headers: { //pass the xsrf token retrieved earlier "X-CSRF-Token": token }, //refreshTask needs to be called on successful completion success: refreshTask }); } }); }, * Finally, write a function to refresh the inbox once the task is completed //Request Inbox to refresh the control once the task is completed _refreshTask: function() { var taskId = this.getComponentData().startupParameters.taskModel.getData().InstanceID; this.getComponentData().startupParameters.inboxAPI.updateTask("NA", taskId); } This completes the updates to Component.js file. Now let us modify the view.xml file to bind the UI element of the user interface such that they fetch the respective value from the workflow context * Open the view.xml and change the Text field of FirstName label element to {/context/user/FirstName} where {/context} reads the data from the workflow context and remaining path is the relative payload path as passed to the workflow.Similarly do the same for other elements as shown below. * Save and Deploy the SAPUI5 application * Start a new workflow instance with the following payload and open the task in My Inbox { "user":{ "FirstName":"Kate", "LastName":"Beckett", "city":"London", "country":"United Kingdom" } } Now you will see the data in the form data from the workflow context With this we complete Part1 of our learning. In this part you learnt how to create an HTML5 application and modify the application artefacts so that it can be successfully integrated in user task of SAP Cloud Platform Workflow. You also learnt about task APIs and how they can be used to associate task data with workflow context, so that the text in the UI element are shown appropriately when the task in opened in MyInbox application. In the upcoming Part2 and Part3 you will learn some advanced options which might help you while using your custom UI5 application as user-task or to start the workflow. http://bit.ly/2gWg6dc #SAP #SAPCloud #AI
0 notes