#Rail clip manufacturer
Text
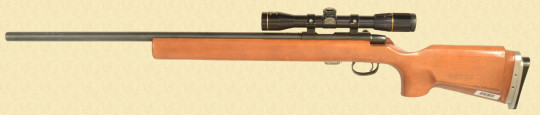
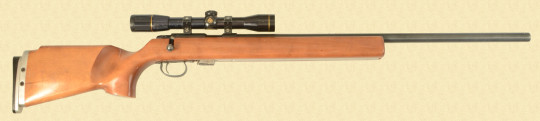


Remington 540X TARGET
22 LONG RIFLE; 26'' barrel, Manufactured in 1973. This example has been modifed to a repeater with the rear of the accessory rail cut for an installed magazine well and a modified 5-shot clip which appears to be from a Voere 22 rifle Grooved receiver with a Nikko-Sterling 4x32 scope mounted.
2 notes
·
View notes
Text
I am currently playing Baldur’s Gate 3. I have just reached Rivington. I have spent what is probably thousands of hours playing the original Baldur’s Gate series and pretty much every other isometric style RPG to come out in the last 30 years. That also includes other Larian games. I played the Beta of BG3 extensively when it was available. Having now put in a significant chunk of time into this game I'm logging some thoughts as I go. I admit all this may change once I roll credits. Thoughts below the jump.
• It’s beautiful. It looks so damn good.
• The number of little details that are unnecessary but make the world feel fuller and help with the environmental storytelling are astounding.
• I’m not near end game, but the story feels like it’s retreading some beats from the previous games. ie coronation of a grand duke who rose quickly to power and prominence. A manufactured crisis that is created by the villains. The villains harnessing or attempting to harness a greater power than their own. Doppelgangers.
• jumping is so fucking annoying.
• Larian games all feel the same, and I don’t like that feel. It has to do with it being a 3d game but also being isometric. So, lots of camera rotation and weird clipping, and having to angle the camera right in order to see something or use something.
• Let me have a camera rotate up or down. Not just zoom and left and right. I want to appreciate the world and the work that went into this thing. Let me fucking look around.
• Too many dice rolls. Fuck. Dealing with a trapped dungeon or basement is so tedious.
• Passive perception. Let me have some. That’s why it exists so I don’t need to have a dice roll happen all the damn time whenever there is a trap or someone hiding in the shadows. That's the whole point.
• Need some better situational DC. If I just persuaded someone of something significant then maybe I shouldn’t have to then persuade them of something right after that follows the same line of reasoning.
• I would die for all the origin companions. God. I love them so much.
• Looting is not fun. It should be. It’s tedious. Pathfinder Kingmaker has possibly the best auto-loot function, which wouldn’t entirely work here, but figure it out!
• Up until this point, while there is lots to do, and a vast number of choices, things feel on the rails. Which…I don’t know…not good or bad. It’s not open world, which it doesn’t claim to be, but there is pretty much always just one way to go.
• sexy time!
• I like the lack of time constraints. While I like day/night cycles, I can see why it wouldn't work here and I appreciate that.
• I do not go to camp enough, or take long rests enough, so I think I am missing out on some nice party interactions. As to why, see above. In other games, time matters and taking rests when you don't need to can screw you over.
• This is true for all RPGs with lots of characters, but once you find a good party composition it is tough to swap out for other characters, so Wyll and Gale are whiling away the time at camp.
• I enjoy how it just drops you in. Not a lot of hand holding, some quick tips, but you're just in it. The use of the prologue as "tutorial" is a tried and tested mechanic in BG games and it works.
1 note
·
View note
Text
Railway Component Manufacturers in India: Aceforge Leading the Way
India's railway network, one of the largest in the world, relies on a vast array of high-quality components to ensure safe, efficient, and reliable operations. At the heart of this industry are the manufacturers who produce these critical components, and Aceforge Pvt Ltd is at the forefront of this domain. As a leading railway component manufacturer in India, Aceforge plays a pivotal role in supporting the nation’s rail infrastructure with its top-notch products and expertise.

Expertise in Railway Component Manufacturing
Aceforge has established itself as a key player in the railway sector by specializing in the production of a wide range of components essential for the smooth functioning of trains and rail systems. Their expertise spans across multiple categories, including mechanical, electrical, and safety components, all of which are manufactured with the highest standards of quality and precision.
Diverse Product Range
Aceforge’s product portfolio is extensive, catering to the diverse needs of the railway industry. Some of the critical components they manufacture include:
Bogie Components: Aceforge produces robust bogie frames, axle boxes, and suspension systems that are vital for the stability and smooth movement of trains on tracks.
Coupling and Draft Gear: High-strength couplers and draft gears designed by Aceforge ensure secure and reliable connections between railway cars, enhancing safety during operations.
Brake Systems: The company manufactures a range of braking components, such as brake shoes, discs, and cylinders, that are crucial for the effective control and stopping of trains.
Track Components: Aceforge also provides components like fishplates, tie bars, and rail clips that are essential for maintaining the integrity and alignment of railway tracks.
Electrical Components: From wiring harnesses to signaling equipment, Aceforge supplies the electrical components necessary for the operation and safety of modern trains.
Commitment to Quality and Innovation
Aceforge’s commitment to quality is unwavering. Each component is subjected to rigorous testing and quality control measures to ensure it meets the stringent standards required by the railway industry. The company’s dedication to innovation is evident in its continuous investment in research and development, allowing them to introduce new and improved components that meet the evolving needs of the railway sector.
Sustainable Manufacturing Practices
Recognizing the importance of sustainability, Aceforge integrates eco-friendly practices into their manufacturing processes. This includes reducing energy consumption, minimizing waste, and using environmentally responsible materials. Their commitment to sustainability not only helps protect the environment but also aligns with global trends towards greener and more efficient rail transportation.
Strategic Partnerships and Global Presence
Aceforge’s success is bolstered by its strategic partnerships with key stakeholders in the railway industry. These collaborations allow them to stay ahead of industry trends, adopt best practices, and meet the specific requirements of their clients. Additionally, their global reach ensures that Aceforge’s high-quality railway components are used not only in India but also in international markets.
Conclusion
As one of the leading railway component manufacturers in India, Aceforge Pvt Ltd is synonymous with quality, innovation, and reliability. Their comprehensive product range, commitment to excellence, and sustainable practices make them a trusted partner for railway operators and manufacturers across the country and beyond.
For any railway company looking to enhance the performance and safety of their operations, Aceforge stands ready to provide world-class components that meet the highest industry standards. With Aceforge, the future of railway transportation is on the right track.
0 notes
Text
A Guide to Installing Horse Fences
Setting up a horse fence is one of the most important duties when doing with horses or managing a horse farm. Having a well-constructed fence gives ample security to the horses and, at the same time, gives a definite line between the zones where the horses are to stay.
Below are some of the architectural guidelines that can assist you in installing a horse fence:
Plan Your Fence Layout
Starting with the design; you should be able to map out how your horse fencing is going to be erected. Determine the area you wish to fence off, this will depend on the size of the pasture, number of the horses and the layout of the land.
Stake and string before constructing the fence so that the fence outline will serve as the guideline. Make sure you have positions all over the roads and other strategic areas for easy access to gates.
Which Fence Material To Use
Choosing the correct material will be the foundation of a good horse fence. Common materials include:
Wood
Viny
Electric
Wire
It is possible to select a material that will be affordable for you, also convenient for maintenance and meet all the needs of your horses.
Install Fence Posts
Start immediately with corner posts because they are going to form the point of the fence in question. Drill the holes for the posts using a post hole digger, or an auger in this case, depending on the depth that has been recommended to be enough deep in this case is 2—3 feet.
Place the posts on the holes before placing the concrete mix to increase the stability of the fence. Level the posts to guarantee that they are straight. Early the next morning remove the form-work and leave the concrete to cure based on the manufacturer’s recommendation.
Install Line Posts
When arriving at the exact positions of the corner posts, fix the line posts there along the laid fence line.
Space the posts evenly, usually, this ranges between 8 to 12 feet based on the type of material used and the pattern that has been prepared on the fence. Lay the same manner as you dig a hole and set the post and reinforce it with concrete.
Secure the Fence Rails or Wire
The next step involves fixing the fence rails or wire once the fence posts are firmly stuck. When using wooden fences, you should screw or nail the boards to the posts following bottom-to-top order. Check that it is level and properly packed.
For wire fences erect the wire alongside the fence and fix it on to the wires using a staple or wire clip. Ensure that the wire is very straight and never sags to avoid compromise of the flow of electricity.
Conclusion
To put up a horse fence, there is a need to plan, make sure you have the right materials, and work as a professional despite the fact that it is an easy project.
0 notes
Text
How to Install Bird Netting on Your Balcony: Tips and Tricks
To ensure the successful installation of bird netting on your balcony with Fast Safety Nets Chennai, here are some essential tips and tricks:

1. Assess Your Balcony:
Measure the dimensions of your balcony to determine the amount of netting required.
Identify potential entry points for birds, such as gaps between railings or open spaces.
2. Choose the Right Netting:
Select high-quality bird netting that is durable and UV-resistant, suitable for outdoor use.
Fast Safety Nets Chennai offers a variety of netting options including transparent nets that maintain visibility.
3. Gather Tools and Equipment:
Prepare tools such as scissors, zip ties, a measuring tape, and a ladder if needed.
Ensure all tools are in good condition to facilitate smooth installation.
4. Clean the Balcony:
Remove any debris, objects, or plants that could obstruct the installation process.
Clean surfaces where the netting will be attached to ensure a secure fit.
5. Plan the Installation:
Start from one end of the balcony and work towards the other.
Begin at the highest point and gradually move downwards to ensure proper tension and alignment.
6. Secure the Netting:
Use zip ties or netting clips to secure the net to balcony railings, walls, or other fixtures.
Ensure the netting is taut and free from sagging to prevent birds from accessing the area.
7. Seal Entry Points:
Close off gaps or openings where birds could potentially enter.
Use additional netting or sealants as necessary to reinforce protection.
8. Regular Maintenance:
Inspect the netting periodically for any tears, loose areas, or signs of wear.
Clean the netting with mild soap and water to remove dust and debris.
9. Safety Considerations:
Prioritize safety during installation, especially if using a ladder or working at heights.
Follow manufacturer guidelines and installation instructions provided by Fast Safety Nets Chennai.
10. Consult Professionals if Needed:
If unsure about installation or for large balconies, seek assistance from Fast Safety Nets Chennai's professional installation services.
They can ensure precise fitting and effective bird prevention tailored to your balcony's specific needs.
By following these tips and utilizing quality bird netting from Fast Safety Nets Chennai, you can effectively protect your balcony from birds while maintaining safety and aesthetics.
#Bird Netting Installation#Balcony Bird Netting#Fast Safety Nets Chennai#Bird Control Solutions#DIY Bird Netting#Balcony Protection#Urban Bird Prevention#Pigeon Net Installation#Bird Proofing#Outdoor Netting#Home Improvement#DIY Home Projects#Urban Living Solutions#Safety Nets#Balcony Safety#Pest Control#Chennai Safety Nets#DIY Tips#Home Maintenance#Secure Balcony
1 note
·
View note
Text
Outdoor LED strip lights
Outdoor LED strip lights are a popular choice for enhancing the ambiance and functionality of outdoor spaces. Here are some key features and considerations for choosing outdoor LED strip lights:
Key Features
Weatherproofing: Look for waterproof or weatherproof LED strip lights (rated IP65, IP67, or IP68) to ensure they can withstand rain, snow, and other outdoor conditions.
Brightness: Consider the lumens rating to ensure the lights are bright enough for your needs. Some applications may require brighter lights, while others might benefit from a softer glow.
Color Options: LED strip lights come in various colors, including single-color and RGB (color-changing) options. RGB lights often come with remote controls or smartphone apps for easy customization.

Length and Flexibility: Ensure the strip lights are long enough to cover the desired area. They should also be flexible to conform to different shapes and surfaces.
Power Source: Check whether the lights are battery-operated, solar-powered, or need to be plugged into an electrical outlet. Solar-powered options are eco-friendly and can be easier to install.
Installation: Look for strip lights that come with adhesive backing or mounting clips for easy installation. Some products may also include additional hardware for more secure mounting.
Applications
Deck and Patio Lighting: Enhance the ambiance and safety of your deck or patio by installing LED strip lights along railings, under seating, or around the perimeter.
Garden and Pathway Lighting: Illuminate pathways, garden beds, or landscape features to create a beautiful nighttime garden.
Outdoor Events and Parties: Use color-changing LED strip lights to add a festive touch to outdoor gatherings and events.
Architectural Accents: Highlight architectural features like columns, steps, or pergolas with discreet and elegant lighting.
Tips for Installation
Plan the Layout: Measure the area and plan the layout before purchasing to ensure you get the right length and number of strips.
Secure Connections: Use waterproof connectors and ensure all connections are secure to prevent water damage and ensure reliable operation.
Test Before Installing: Test the lights to ensure they work properly before final installation.
Follow Safety Guidelines: Adhere to the manufacturer's installation guidelines and local electrical codes to ensure safe installation.
Our website is an excellent source for additional details.
battery led strip lights
moon and stars night light
0 notes
Text
How to fix bird net in balcony without screws?

Are you eager to bird-proof your balcony but hesitant to drill holes or use screws? No problem! Discover hassle-free methods for fixing bird netting in your balcony with Super Fast Safety Nets Bangalore. Follow these steps for a secure and screw-free installation:
Materials You'll Need:
Bird Netting: Visit Super Fast Safety Nets Bangalore to acquire high-quality bird netting tailored to your balcony dimensions. Ensure the netting is durable and comes with reinforced edges for added strength.
Cable Ties: Opt for heavy-duty cable ties or zip ties to secure the netting in place. These provide a reliable alternative to screws and are easy to use.
Adhesive Hooks or Clips: Choose adhesive hooks or clips designed for outdoor use. These will allow you to attach the netting to your balcony railing or structure without drilling holes.
Scissors or Cutting Tool: You'll need these to trim the netting to fit your balcony dimensions accurately.
Ladder or Step Stool: Depending on the height of your balcony, have a ladder or step stool on hand to reach the installation area safely.
Step-by-Step Installation:
Measure Your Balcony: Use a measuring tape to determine the length and width of your balcony. Take precise measurements to ensure you purchase the correct size of bird netting.
Purchase Netting: Head to Super Fast Safety Nets Bangalore and select the appropriate size and type of bird netting for your balcony. Seek assistance from their knowledgeable staff if needed.
Prepare the Area: Clear your balcony of any obstacles and debris. Ensure the surface is clean and dry for optimal adhesion.
Attach Adhesive Hooks or Clips: Place adhesive hooks or clips along the edges of your balcony railing or structure, spacing them evenly apart. Follow the manufacturer's instructions for proper application.
Secure the Netting: Stretch the bird netting across your balcony, ensuring it covers the entire area and overlaps the adhesive hooks or clips. Use cable ties to fasten the netting to the hooks or clips securely.
Trim Excess Netting: Once the netting is in place, use scissors or a cutting tool to trim any excess material along the edges of the balcony. Be careful not to cut the netting too short, leaving enough slack for a secure fit.
Double-Check Security: Walk around the balcony and inspect the netting to ensure it is securely fastened at all attachment points. Make any necessary adjustments to achieve a tight and uniform installation.
Enjoy Your Bird-Free Balcony: With the bird netting securely in place, you can now enjoy your balcony without worrying about feathered intruders. Relax and unwind in your outdoor oasis!
Trust Super Fast Safety Nets Bangalore for Quality Solutions
For top-notch bird netting and expert advice on screw-free installation methods, turn to Super Fast Safety Nets Bangalore. Their wide selection of products and friendly staff make it easy to achieve a bird-free balcony without the need for screws or drilling.
#bird net for balcony#bird netting near me#anti bird net near me#bird netting for buildings#bird control netting#bird net for balcony near me#bird prevention netting#industrial bird netting#bird proofing net#anti bird net for balcony near me#nylon net for pigeons#bird net fixing#pigeon net fixing#pigeon net fixing near me#pigeon net installation near me#bird netting installation companies
0 notes
Text
Crane Rail Clips Manufacturer & Supplier
Looking for reliable and durable crane rail clips for your project? Explore our top-quality crane rail clips designed for secure and efficient rail installation.

0 notes
Text
How to Install the Top Cover Connectors on your Above Ground Pool
So, you’ve got your above ground pool set up and ready to go. The next step is to install the top cover connectors to ensure everything stays securely in place. Depending on your pool model, you may have either 1-piece or 2-piece top cover connectors. Let’s take a look at the different installation methods below.
1-Piece Plastic Clip-On Cover
This installation requires no hardware. Simply hook the back of the cover in place and use your fingers or a screwdriver to slowly bend the front tabs to hold the cover in place. Make sure the cover is centered above the upright when installing it.
2-Piece Plastic Top Cover
Attach the smaller half of the cover into the hole on the top plate using a #12 screw. Then, slide the larger half over the smaller half and secure it with two #10 screws.
2-Piece Plastic Top Cover with Corner Support Bars on the Sides or Front
Slide the larger half of the cover underneath the inner lip of the top railing. Lay the cover flat, centered above the upright.
Place the corner support bar (smaller half) underneath the top half and secure it to the side with 1 or 2 screws (leave it loose for adjustment; the number of screws depends on the model, use 2 if there are two holes).
Next, take a screw and connect the corner support bar to the top cover connector. There will be a small gap – this is designed to accommodate expansion and contraction tolerances in the top railings during manufacturing.
Please note that the font types and sizes may vary depending on the type of pool.
Once you have completed the installation, fill your pool and finish setting up your surroundings. It’s time to dive in!
Proceed to the Next Step: Essential Pool Safety and Maintenance
Alternatively, you can check out our guide on the 17 steps to install your Round Above Ground Pool here.
Additional FAQs
Didn’t find the answer you were looking for? You can always contact us at [email protected] or choose the category below to see our most frequently asked questions related to that topic:
Pool Purchasing
Expert Support Inquiries
Technical Support Inquiries
0 notes
Text
Supplier of SS Fasteners in Bihar

Supplier of SS Fasteners in Bihar:
Meghmani Metal:
We Are a Well-Known Manufacturer and Supplier of All Ferrous And Non-Ferrous Metal Products, Such As Stainless Steel Pipes, Stainless Steel Tubes, Steel Flanges, Steel Butt Welding, Steel Pipe Fittings, Steel Rods, Wires, Colls, Flats, Structural, and so on.
Meghmani Metal is one of the leading manufacturers and Suppliers of SS Fasteners in Bihar. Our Stainless Steel Fasteners division is specialized in the manufacturing of Austenitic grade fasteners.
Applications of SS Fasteners:
Construction: Building facades, bridges, railings, structural components, and electrical installations.
Automotive industry: Engine components, exhaust systems, body panels, and interior trim.
Marine industry: Boats, yachts, offshore platforms, and marine equipment.
Chemical industry: Pipes, tanks, reactors, and processing equipment.
Food processing: Machinery, conveyor systems, and equipment components.
Medical equipment: Surgical instruments, prosthetics, and dental implants.
Electronics: Circuit boards, electrical enclosures, and heat sinks.
Household appliances: Washing machines, refrigerators, and kitchen equipment.
Common Types of SS Fasteners:
Nuts and bolts: The most common type, available in various sizes, threads, and head styles.
Screws: Wood screws, machine screws, self-tapping screws, set screws, and socket head screws.
Washers: Flat washers, lock washers, fender washers, and spring washers.
Rivets: Blind rivets, solid rivets, and pop rivets.
Anchors: Expansion anchors, wedge anchors, and chemical anchors.
Dowel pins: Used for alignment and positioning of components.
Clips and clamps: Used for securing cables, hoses, and other components.
We Provide Supplier of SS Fasteners in Bihar Including Patna, Gaya, Bhagalpur, Muzaffarpur, Purnia, Darbhanga, Ara (Arrah), Begusarai, Katihar, Chapra, Munger (Monghyr), Saharsa, Bettiah, Hajipur, Sasaram, Dehri, Siwan, Motihari Etc.
Read the full article
#Ara(Arrah)#Begusarai#Bettiah#Bhagalpur#Bihar#Chapra#Darbhanga#Dehri#Gaya#Hajipur#India#Katihar#Motihari#Munger(Monghyr)#Muzaffarpur#Patna#Purnia#Saharsa#Sasaram#Siwan#SSFasteners#Stockiest#supplier
0 notes
Link
Check out this listing I just added to my Poshmark closet: GTM Gun Tote'n Mamas Up Town Tote Bag Crossbody Purple Medium Concealed Carry.
0 notes
Text
WPC MOULDING BOARDS: THE PERFECT BLEND OF BEAUTY AND DURABILITY

Elevate Your Interiors With WPC Moulding
When designing eye-catching, modern interiors, the trim, millwork, and moulding play a subtle yet statement-making role. These decorative elements frame walls, flooring, cabinets, and openings while introducing ornate flair. But traditional solid wood moulding requires intensive upkeep that only suits some spaces. It is where innovative WPC moulding offers the best of both worlds.
WPC (wood plastic composite) blends natural wood particles with recycled plastic resins to create a durable, stable solid board. The result looks and feels like natural wood but with enhanced performance benefits. Architects, designers, and homeowners increasingly choose WPC moulding over wood for its unparalleled blend of beauty and durability.
Superior Durability
Solid wood may look splendid when installed but quickly shows wear and tear from moisture, humidity changes, impacts, and everyday use. WPC’s inherent stability and resilience keep moulding like new for years with minimal upkeep. WPC resists rotting, cracking, warping, and insect damage indoors and out.
Ease of Maintenance
Regular refinishing and resealing are musts for natural wood to maintain its integrity and aesthetics over time. WPC needs an occasional wipe down with mild soap and water, without hours of sanding, staining, and sealing—a considerable time and cost savings. The color and texture remain “like new” for decades.
Customizable Finishes
While WPC offers a classic, refined wood look out of the box, it can also be manufactured in various embossed textures and patterns. Custom CNC router finishing creates unique wood grain effects, clips, grooves, chamfers, and inlays. WPC accepts stains, paints, and laminates beautifully for entirely custom looks.
Sustainable Manufacturing
A natural composite material made using wood waste products and recycled plastics, WPC has a lighter eco-footprint compared to milled hardwoods. It diverts plastic from landfills. Many WPC manufacturers like JKD Plastics utilize solar energy and eco-friendly processes.
Fire and Moisture Resistance
Home safety is paramount. WPC contains fire retardant compounds for very low flammability and smoke production when exposed to flame. This inherent fire resistance suits WPC for restaurants, hotels, hospitals, and multi-family residences. And WPC eliminates concerns of moisture damage in kitchens, baths, and basements.
Easy Installation and Handling
WPC moulding cuts, drills, sands, and installs are much like wood but weigh significantly less per linear foot, reducing fatigue and labor time. Fastener retention strength and lack of splitting make attachment points more secure. WPC’s lightweight flexibility simplifies installation around corners or curved openings.
Cost Efficiency
The durability and low maintenance needs of WPC moulding make it highly cost-effective compared to the continual upkeep costs of wood over its lifespan. And recycled content and eco-efficient manufacturing keep WPC moulding prices affordable – less than exotic hardwoods. Long-term value is exceptional.
Design Flexibility
WPC allows limitless flexibility in designing styles from traditional crown moulding, chair rails, and baseboards to contemporary waves and geometric patterns. WPC can be embossed, routed, shaped, and laminated without specialized woodworking equipment. Express your unique creative vision.
Next-Level Interiors
In your upcoming projects, achieve next-level aesthetics, performance, and sustainability by specifying elegant, durable WPC mouldings. Contact JKD Plastics to explore the possibilities and advantages of WPC moulding vs. wood. Their experienced team helps bring your vision to life through innovative materials and manufacturing. Reach out today to learn more!
Source Link: — https://www.bloggerswheel.com/wpc-moulding-boards-the-perfect-blend-of-beauty-and-durability/
0 notes
Text
Elevate Your Home Decor: Creative Ways to Hang Pictures Without Nails
Introduction
Hanging pictures and artwork can transform your living space, adding a personal touch and a burst of color to your walls. However, the traditional method of using nails or screws might not be suitable for every situation. In this blog, we'll explore innovative ways to best way to hang pictures without nails, including ceiling-mounted picture hanging systems. Discover how these alternatives can not only enhance your home decor but also simplify the process of arranging and rearranging your cherished artwork.
Adhesive Picture Hanging Strips
Adhesive picture hanging strips are a game-changer when it comes to damage-free wall decor. These strips are designed to securely hold pictures of various sizes and weights without leaving any marks or holes in your walls. Here's how they work:
Clean the Surface: Ensure your wall is clean and dust-free to maximize adhesion.
Attach Strips: Apply the adhesive strips to the back of your picture frame and press firmly.
Position and Secure: Carefully align your picture and press it against the wall, locking it into place.
Easy Removal: If you want to rearrange or remove the picture, simply pull the tab gently, and the strip will release without damaging the wall.
Display System
It is a versatile and stylish way to hang pictures without nails. They often consist of a rail or track mounted on the wall, from which you can hang multiple pictures using various accessories like hooks or wires. Here are the key benefits of display systems:
Flexible Arrangement: You can easily rearrange your pictures by sliding them along the rail, allowing for quick updates to your decor.
No Wall Damage: Unlike nails or screws, its leave your walls unharmed, making them ideal for renters.
Supports Multiple Art Pieces: It can accommodate a collection of artwork, creating a gallery-like atmosphere in your home.
Picture Hooks
Picture hooks are another smart alternative to nails when it comes to hanging pictures. These hooks are designed to be wall-friendly and easy to install. Here's how to use them:
Select the Right Hook: Choose a picture hook that suits the weight and size of your artwork.
Install the Hook: Follow the manufacturer's instructions to install the hook securely on your wall.
Hang Your Picture: Simply hang your picture on the hook, and it will stay in place without damaging your wall.
Easy Removal: When it's time to take down your picture, carefully remove it from the hook without leaving a mark.
Ceiling-Mounted Picture Hanging Systems
ceiling mount picture hanging system are a unique and elegant way to display artwork. These systems use wires or cables suspended from the ceiling to support your pictures. Here's how they work:
Install the Ceiling Hardware: Mount the necessary hardware on your ceiling, ensuring it's securely attached.
Attach Wires or Cables: Connect wires or cables to the ceiling hardware, making sure they are taut and level.
Hang Your Pictures: Use hooks or clips to attach your pictures to the wires, allowing for easy adjustments and changes.
Limitless Creativity: Ceiling-mounted systems provide the flexibility to arrange your pictures at different heights and angles, creating a visually appealing display.
Conclusion
Hanging pictures without nails is not only possible but also offers numerous advantages. Whether you choose adhesive these alternatives allow you to showcase your artwork without damaging your walls. Plus, they make it easy to change your decor whenever inspiration strikes. So, unleash your creativity and give your home a fresh look with these innovative picture hanging solutions.
#display system#best way to hang pictures without nails#picture hooks#ceiling mount picture hanging system
0 notes
Text
Which industries use fasteners?
Fasteners play an integral role in various industries, providing crucial support and functionality in a wide range of applications. These small but mighty components are used to join or secure two or more objects together, ensuring structural integrity and reliability.
In this blog, we will delve into the numerous industries that heavily rely on fasteners and explore the diverse uses of these essential devices.
1. Automotive Industry:
The automotive industry is one of the largest consumers of fasteners. Fastener uses are employed extensively in manufacturing vehicles, as they are essential for assembling various components such as engine parts, body panels, interiors, and electrical systems. From bolts and screws to nuts and rivets, fasteners ensure that the complex network of parts in an automobile remains securely connected.
2. Aerospace Industry:
The aerospace industry demands exceptional precision and reliability, making fasteners indispensable. Aerospace fastener uses are designed to withstand extreme conditions and vibrations while maintaining the structural integrity of aircraft. These fasteners are used in assembling wings, fuselage, landing gears, and engine components. The aerospace industry relies on fasteners like high-strength bolts, lock nuts, and blind rivets to ensure the safety and performance of aircraft.
3. Construction Industry:
In the construction industry, fastener uses are vital for connecting structural elements and securing building components. Fasteners such as screws, nails, and anchor bolts are extensively used in residential, commercial, and industrial construction projects. They provide the necessary stability, load-bearing capacity, and durability for structures, including framing, roofing, flooring, and finishing applications.
4. Electronics and Electrical Industry:
Fasteners find widespread usage in the electronics and electrical industry. They are utilized in the assembly of printed circuit boards (PCBs), electrical enclosures, control panels, and various electronic devices. Fasteners such as standoffs, screws, and clips are essential for securing components, ensuring proper grounding, and facilitating efficient circuitry.
5. Furniture Manufacturing:
Fasteners play a crucial role in the furniture manufacturing industry. From assembling wooden frames to attaching upholstery, fasteners like screws, bolts, and cam locks are used to create sturdy and functional furniture pieces. Additionally, fasteners enable easy disassembly for transportation and reassembly for end-users, making furniture more versatile and convenient.
6. Energy and Power Generation:
The energy and power generation sector relies on fasteners for assembling machinery, equipment, and infrastructure related to power plants, wind turbines, solar panels, and oil and gas installations. Fasteners in this industry must meet stringent requirements, including resistance to corrosion, high temperature, and pressure. They ensure the safe and efficient operation of power generation facilities.
7. Marine Industry:
The marine industry extensively uses fasteners due to the challenging and corrosive environments encountered at sea. Fasteners made from materials such as stainless steel or corrosion-resistant alloys are employed to withstand saltwater exposure and prevent rusting. They are crucial for constructing ships, offshore platforms, marine engines, and various marine equipment.
8. Medical and Healthcare:
Fasteners play a significant role in the medical and healthcare sector. They are used in medical devices, surgical instruments, orthopedic implants, and prosthetics. Fasteners in this industry require biocompatibility, high strength, and precision to ensure patient safety and optimal performance.
9. Rail and Transportation:
Fasteners are vital for the rail and transportation industry, providing secure connections in railway tracks, bridges, tunnels, and vehicle assemblies. Rail fasteners, including rail bolts, clips, and spikes, are essential for maintaining track stability, reducing vibrations, and ensuring the safety and efficiency of train operations.
10. Packaging and Manufacturing:
Fasteners are used extensively in the packaging industry for securing containers, pallets, and packaging materials. They facilitate safe storage, transportation, and distribution of goods. Moreover, fasteners are employed in manufacturing machinery and equipment, enabling efficient production processes and ensuring equipment integrity.
Certainly! Here are some additional points on industries that use fasteners:
11. Oil and Gas Industry:
Fastener uses are extensively used in the oil and gas industry for various applications, including pipelines, drilling rigs, refineries, and petrochemical plants. These fasteners need to withstand harsh environments, high pressures, and corrosive substances, ensuring the integrity and safety of the infrastructure.
12. Mining Industry:
In the mining industry, fasteners are crucial for assembling heavy machinery, conveyor systems, and structural components. They provide the necessary strength and stability to withstand the rigorous conditions of mining operations, including vibration, impact, and heavy loads.
13. Agriculture and Farming:
Fasteners find utility in the agricultural sector for attaching and securing farm equipment, machinery, and structures such as fences and barns. They enable efficient farming practices and contribute to the overall productivity and reliability of agricultural operations.
14. Telecommunications:
Fasteners play a significant role in the telecommunications industry, where they are used in the installation and maintenance of communication towers, antennas, and equipment. These fasteners ensure the stability and structural integrity of the infrastructure, facilitating seamless communication networks.
15. Renewable Energy:
With the growing emphasis on renewable energy sources, fasteners are crucial in the assembly and installation of solar panels, wind turbines, and other renewable energy systems. They enable the secure attachment of components, ensuring the long-term reliability and performance of renewable energy infrastructure.
16. HVAC and Plumbing:
Fasteners are integral to the HVAC (heating, ventilation, and air conditioning) and plumbing industries. They are used in ductwork, piping systems, and HVAC equipment installation. Fasteners in these industries provide leak-free connections, structural support, and ease of maintenance.
17. Defense and Military:
Fasteners have significant applications in the defense and military sectors, where they are utilized in the construction of vehicles, aircraft, weaponry, and defense equipment. They ensure the structural integrity and reliability of defense systems, contributing to national security.
18. Sports and Recreation:
Even in the realm of sports and recreation, fasteners find their place. They are used in the assembly of sports equipment such as bicycles, skis, snowboards, and camping gear. Fasteners in this industry contribute to the safety, performance, and longevity of sports equipment.
Conclusion:
Fasteners find applications in a diverse range of industries, from automotive and aerospace to construction and healthcare. Their significance in ensuring structural integrity, reliability, and safety cannot be overstated. The Bu-LOK company is a leading manufacturer, trader, and supplier of high-quality fasteners, including pipe fittings, flanges, and round bars. They are committed to providing top-notch products and exceptional customer satisfaction. To explore their range of products and contact them, visit Bu-LOK's website today.
0 notes
Text
One of the key specifications given for a Eurorack module is its power consumption. The cases we use have power supplies that provide a given amount of amperage on each of the lines they have, and each module takes its own chunk of that amount, so it can be important to know that a module you're thinking of adding to your rig will have enough to run.
This is a number in milliamps for each supply the module uses — the +12V, usually the -12V, and occasionally the +5V lines — and for commercial modules, it's given by the manufacturer or designer. I've only got one manufactured module, and only two others that the designers gave numbers for, so I really do need to measure these things myself, and the urgency was helped along by someone planning their own build asking me if I had consumption figures for the Sigma modules I use. There are products and projects designed to take these measurements, but I don't have any of them, so a little web searching on the methods others have used led me to a nice simple hack.

I made an extra-long power cable, a 16-to-10 one, and carefully snipped the first two and last two wires. These are the conductors in the cable that carry the -12V and +12V lines; by soldering alligator clips to each end of each pair and hooking them back together (as pictured), the cable works as normal. If I hook a multimeter in milliamp mode in series between the clips on the side with the stripe, it reads the consumption on the -12V rail, and the other set measures the consumption on the +12V rail. This is how I measured that the Voxmachina Sigma takes 11mA on +12V and 3mA on -12V. Success!
Now, I can't use this cable to measure anything that draws from the +5V line, and splitting out the Appropriate lines on a full 16-to-16 pin cable would be a hassle; you'd have to split the cable up, skipping the outermost 4 lines, and then put clips tying back together 1+2, 9+10, and 11+12. It's doable, but it'd be even messier than this cable. At the same time, no milliammeter I build would be as good as the multimeters I have already lying around, so I plan to build a simple breakout box to make these measurements in the future. Essentially it'll have 16-pin headers on each end and six banana jacks, each pair with a shorting bar; you unplug the shorting bar to plug in the meter into each line. I have the parts but I need to work out mounting issues.
(Yes, amperage is actually measuring current, not power, but the milliamps measurements are what're used. To actually get power, you could multiply these numbers by the voltage to get a figure in milliwatts, but since you need to know the voltage separately anyway, there's no real advantage in doing so.)
0 notes
Last Seen Blogs

vuanongsantaynguyen
Vựa Nông sản Tây Nguyên

orianaliz
Motivos Que Fluyen

onhigh
*// ADDICTED.

wingedstudentcloudprofessor
Unbetitelt

sexypantyhosewifelinda
PantyhoseWifeLinda