#Sewing Guide for Stylish Edges
Explore tagged Tumblr posts
Visit Tumblr Blog
Explore Tumblr blogs with no restrictions, modern design and the best experience.
Last Seen Tumblr Blogs


Fun Fact
After the announcement of the deal with Yahoo!, there were 170K signatures of unhappy Tumblr users petitioning to prevent the sale in 2013.
Text
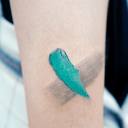
4 Ways How to Sew Lettuce Hem:Beginners Tutorial
In this post, you’ll learn 4 ways on how to sew lettuce hem for beginners. Love what you see ? Support me by snagging some cool items from my shop! Every purchase helps me bring you more awesome content. Thank you! Shop Now A lettuce hem is a stylish and playful way to finish the edges of your garments. This technique creates a ruffled, wavy edge that adds a fun and feminine touch to skirts,…
#Best Fabrics for Lettuce Hem#Decorative Hem Finishes#DIY Fashion Sewing#How to Sew a Lettuce Hem#Lettuce Hem Techniques#Lettuce Hem Tutorial#Ruffled Hem Sewing#Sewing Guide for Stylish Edges#Sewing Machine Settings for Lettuce Hem#Sewing Tips for Beginners
2 notes
·
View notes
Text
Hypothetical Structure of "Stitched with Love"
(Assuming it’s a modern, comprehensive guide for crafters)
1. Introduction to Sewing
Tools & Supplies: Detailed lists for hand-sewing, machine sewing, and quilting.
Fabric Science: How to choose fabrics (woven vs. knit, thread counts, stretch, etc.).
Machine Basics: Setting up a sewing machine, threading, tension adjustments.
2. Foundational Techniques
Hand Stitches: Running stitch, backstitch, slip stitch, blind hem.
Machine Stitches: Straight, zigzag, overcasting, buttonholes.
Seam Finishes: French seams, bias binding, serging.
Zippers & Buttons: Invisible zippers, fly fronts, shank buttons.
3. Quilting Essentials
Patchwork Basics: Cutting, piecing, chain-piecing.
Quilt Construction: Batting choices, basting, quilting (hand vs. machine).
Modern Quilt Designs: Improv piecing, negative space, bold colors.
4. Fiber Arts & Embellishments
Embroidery: Basic stitches (satin, chain, French knots), hoop techniques.
Appliqué: Raw-edge, reverse, and needle-turn methods.
Mixed Media: Incorporating beads, lace, or paint into sewing projects.
5. Project Gallery
(Likely stylish, beginner-friendly makes with step-by-step photos)
Sewing: Tote bags, aprons, elastic-waist skirts, simple tops.
Quilting: Table runners, baby quilts, wall hangings.
Fiber Arts: Embroidered pillows, felt ornaments, fabric scrap projects.
6. Troubleshooting & Pro Tips
Fixing Mistakes: Ripped seams, tension issues, uneven stitches.
Custom Fitting: Adjusting patterns for better fit.
Eco-Friendly Sewing: Upcycling thrifted fabrics, zero-waste patterns.
If This Book Doesn’t Exist… Try These Alternatives!
For Sewing:
"Love at First Stitch" – Tilly Walnes (garment sewing for beginners).
"The Sewing Book" – Alison Smith (encyclopedic resource).
For Quilting:
"Modern Quilt Bible" – Elizabeth Hartman (contemporary designs).
"Walk" by Jacquie Gering (modern quilting techniques).
For Fiber Arts:
"The Embroidery Book" – Christen Brown (stitch encyclopedia).
"Fabric Surface Design" – Cheryl Rezendes (painting/stamping on fabric).
Online Resources for Similar Content
YouTube Channels:
With Wendy (modern garment sewing).
Melanie Ham (beginner quilting tutorials).
Book :
Stitched with Love: A Modern Guide to Sewing, Quilting & Fiber Arts
4 notes
·
View notes
Photo

Starting a yoga clothing line goes far beyond picking colors and slapping on a logo. To create activewear that truly resonates, you need to collaborate with experienced yoga clothing manufacturers who deeply understand the balance between fashion and performance. After all, every decision—from selecting high-performance fabrics to perfecting garment fit and streamlining production—plays a crucial role in building a line that’s as stylish as it is functional. Without the right manufacturing partner, even the best designs can fall short. So, how do you turn your vision into a retail-ready collection? In this guide, we’ll break down the entire process of starting a yoga clothing line—from concept to final delivery. You’ll discover key customization options, sustainable material choices, and realistic timelines to help you launch with confidence. Check out the steps to starting a yoga clothing line… Photo: @themoodguide/Pinterest Starting a successful yoga clothing line isn’t just about design—it’s about execution. From concept to final product, a clear, step-by-step process ensures your collection meets quality, performance, and brand expectations. Here’s how to make it happen: #1. Step One: Define Your Brand and Collection Before sketching a single legging, clarify your niche. Are you crafting minimalist essentials for everyday wear, bold prints for hot yoga enthusiasts, or eco-conscious activewear for sustainable shoppers? Your brand positioning will shape every decision—from fabric choices to marketing. #2. Step Two: Choose a Manufacturer Not all factories are created equal. Partner with a yoga-specialized manufacturer who understands performance fabrics, stretch requirements, and seamless construction. Look for suppliers offering fabric sourcing, sampling, and private labeling—key services that streamline development. #3. Step Three: Submit Your Designs or Tech Packs Whether you’re working with sketches, mood boards, or full tech packs (with detailed specs and sizing), clear communication is critical. Pro tip: Many manufacturers provide in-house design support or customizable templates if you’re not a technical designer. #4. Step Four: Develop and Approve Samples This is where your vision comes to life—and where adjustments matter most. Test samples rigorously for: Fit (does it move with the body?) Fabric performance (moisture-wicking? squat-proof?) Construction (flatlock seams? reinforced waistbands?) Branding (placement of logos, tags, and labels) #5. Step Five: Confirm Production Details Once samples are approved, finalize: Order quantities (MOQs can vary) Colorways & sizing ratios Packaging & branding (hangtags, labels, polybags) Your manufacturer should provide transparent timelines and cost breakdowns before moving forward. #6. Step Six: Begin Bulk Production Production kicks off with fabric cutting, sewing, quality control, branding (e.g., tags, labels), and final packaging. Custom Features for Yoga Tops, Leggings, and Bras Yoga apparel isn’t just fashion—it’s functional armor. Every piece must move, breathe, and recover like a second skin, enduring sweat, deep stretches, and dynamic flows without compromise. That’s where smart customization becomes your competitive edge. #1. Yoga Leggings High-rise waistbands with added compression for core support Gusset inserts for comfort and range of motion Seamless or flatlock seams to prevent chafing Hidden waistband pockets for keys or cards Sculpting panels for shaping and aesthetics #2. Yoga Bras Removable padding for adjustable support Racerback or crisscross straps for flexibility during inversions Moisture-wicking linings to handle sweat during heated sessions Mesh or cutout detailing for breathability and style #3. Yoga Tops Photo: Lululemon Built-in shelf bras for light support Loose-fit tanks for layering Cropped long sleeves for pre- and post-class wear Drop-armhole or open-back designs for airflow Working with an experienced manufacturer allows you to tweak these elements according to your brand’s aesthetic and your customers’ functional needs. Fabrics Commonly Used in Yoga Clothing Manufacturing Photo: Tigbuls Variety Fashion Shop/Pinterest While design catches the eye, fabric determines loyalty. The ideal yoga material must master three demands: unrestricted movement, sweat-wicking performance, and wash-after-wash durability. Top Yoga Fabric Choices Here’s how common materials compare for different needs: Nylon-Spandex blends (75/25 or 80/20): The gold standard for leggings and bras—smooth, compressive, and resistant to pilling. Polyester blends: Lightweight and colorfast (ideal for printed tops), though less breathable than nylon. Supplex®: A nylon variant that feels like cotton but outperforms synthetics—perfect for breathable, abrasion-resistant styles. Bamboo viscose: Naturally temperature-regulating and ultra-soft (a customer favorite for sensitive skin). Modal: Silky and drapes beautifully—best for relaxed, restorative yoga wear. Organic cotton: A sustainable pick for basics, though it lacks the stretch of synthetics. Pro Tip: Always request fabric swatches from your manufacturer. For instance, test how a nylon-spandex blend recovers after stretching or if bamboo fabric pills during abrasion tests. Sustainability and Eco-Friendly Options in Yoga Production As more consumers prioritize sustainability, offering eco-conscious activewear is a powerful differentiator. Many yoga clothing manufacturers now provide access to sustainable materials and responsible production processes. Sustainable Options to Explore: Recycled polyester (rPET): Made from recycled plastic bottles Organic cotton: Grown without pesticides or GMOs Bamboo and modal: Biodegradable plant-based fibers Water-based inks: Safer for people and the planet during printing Low-impact dyeing processes: Reduce water and chemical usage Manufacturers may also offer carbon-offset programs, plastic-free packaging, or certifications such as GOTS, OEKO-TEX®, or WRAP to align with your brand’s sustainability goals. Timeline From Concept to Final Delivery Photo: AnnaStills/iStock The full process of launching a yoga apparel line typically spans several months, depending on the complexity of your designs, order volume, and the responsiveness of your manufacturer. Typical Timeline: Initial consultation and tech pack review: 1 week Sampling (1–3 rounds): 3–5 weeks (total) Production prep and material sourcing: 1–2 weeks Bulk manufacturing: 4–6 weeks Quality checks and packaging: 1 week Shipping (by air or sea): 1–5 weeks Total estimated time: 10 to 16 weeks To avoid delays, it’s best to start the process early, especially before seasonal launches or holiday drops. Factor in buffer time for design revisions, production queues, or material availability. Conclusion Launching a yoga apparel collection is a rewarding journey, but it starts with the right partner. Collaborating with experienced yoga clothing manufacturers ensures that your products meet the performance, aesthetic, and comfort needs of modern yoga enthusiasts. By following a structured development process, selecting the right fabrics, customizing garment features, and aligning with sustainable values, your brand can deliver clothing that supports movement and mindfulness—on and off the mat. Featured Image: Women’s Best/Pinterest For the latest in fashion, lifestyle, and culture, follow us on Instagram @StyleRave_ —Read also !function(f,b,e,v,n,t,s) if(f.fbq)return;n=f.fbq=function()n.callMethod? n.callMethod.apply(n,arguments):n.queue.push(arguments); if(!f._fbq)f._fbq=n;n.push=n;n.loaded=!0;n.version='2.0'; n.queue=[];t=b.createElement(e);t.async=!0; t.src=v;s=b.getElementsByTagName(e)[0]; s.parentNode.insertBefore(t,s)(window, document,'script', ' fbq('init', '496558104568102'); fbq('track', 'PageView'); !function(f,b,e,v,n,t,s)if(f.fbq)return;n=f.fbq=function()n.callMethod? n.callMethod.apply(n,arguments):n.queue.push(arguments);if(!f._fbq)f._fbq=n; n.push=n;n.loaded=!0;n.version='2.0';n.queue=[];t=b.createElement(e);t.async=!0; t.src=v;s=b.getElementsByTagName(e)[0];s.parentNode.insertBefore(t,s)(window, document,'script',' fbq('init', '1453079628754066'); fbq('track', "PageView"); Source link
0 notes
Text
Turn Heads in 613: Why This Iconic Blonde is Taking Over Hair Trends

Bold, bright, and unapologetically glam, 613 blonde hair is more than just a color—it’s a statement. From 613 deep wave wigs to 613 body wave styles and real hair ponytail extensions, this luminous shade is dominating beauty trends and giving Black women across the globe a way to showcase confidence and individuality. Whether you're experimenting with texture or diving into the world of lace wigs, here’s your full guide to rocking 613 in style. And don’t forget—Indique Hair's Semi-Annual Sale and $3K Giveaway Contest is on now!
613 Deep Wave Wig: Volume Meets Vibe

The 613 deep wave wig is a go-to for women who want dimension and movement in a blonde hue. The deep wave pattern adds body and bounce, while the platinum 613 deep wave wig tone keeps the look vibrant and bold. Perfect for date nights or photo shoots, this style delivers drama without compromising softness.
613 Blonde Hair: Unmatched Brightness

613 blonde hair stands out for its brilliant, light-catching finish. It’s ideal for women looking to turn heads or redefine their signature look. Whether you go full wig or mix with bundles, 613 blonde brings out your inner glow. Plus, the color is perfect for toning or adding pastel hues.
613 Closure Wig: Seamless Finish, Maximum Style
A 613 closure wig offers an ultra-natural hairline and protects your edges. This is a perfect option for those new to wigs or anyone wanting a low-maintenance yet high-impact look. The closure blends effortlessly with the rest of the 613 closure wig hair, creating a sleek and professional finish.
613 Hair Bundles: Build Your Look Your Way
Prefer a custom install or sew-in? 613 hair bundles allow you to craft your dream style. You can mix bundles for volume, layer textures, or even dye them for a personalized twist. Indique Hair’s bundles are known for being tangle-free and incredibly soft, making them ideal for extended wear.
613 Lace Wig: Undetectable & Ultra-Versatile
A 613 lace wig is the ultimate in flexibility and finesse. With a transparent lace base, this wig melts into your scalp for a natural look. It also provides parting freedom and lets you style your hair up or down without worrying about exposure. It’s a favorite for glam squads and influencers alike.
613 Body Wave Wig: The Classic Curve
If you’re into elegant waves with a soft finish, the 613 body wave wig is your perfect match. It has a gentle S-pattern that adds bounce without being too dramatic, making it ideal for everyday wear or events. The 613 shade gives it a sunlit shimmer that’s absolutely gorgeous in natural light.
Real Hair Ponytail Extension: Easy Glam on the Go
For days when you need a quick, stylish upgrade, real hair ponytail extensions are your best friend. They blend beautifully with natural hair and can be styled into high ponies, buns, or wrapped looks. Choose a 613 tone for a bold statement or mix with darker shades for a unique ombré effect.
Why Shop at Indique Hair?
Right now, Indique Hair is offering their Semi-Annual Sale, featuring top-quality 613 wigs and bundles at incredible prices. Plus, you can enter their $3K Giveaway Contest for a chance to win luxury hair for free! Known for their premium virgin hair and unmatched customer service, Indique remains a trusted brand in the hair game.
Conclusion

From the playful curls of a 613 deep wave wig to the refined sheen of 613 body wave styles and real hair ponytail extensions, this platinum blonde palette is a must-have for any bold beauty enthusiast. With Indique Hair’s ongoing sales and giveaways, now is the perfect time to invest in looks that light up every room.
FAQs
1. Is 613 hair hard to maintain?
613 hair requires hydration and minimal heat exposure to maintain its quality. Use sulfate-free products and deep condition regularly.
2. Can I dye 613 blonde hair?
Absolutely! 613 hair is ideal for adding pastel or vibrant shades due to its light base.
3. How long do 613 wigs last?
With proper care, 613 wigs can last 6 months to a year or more, especially if sourced from premium brands like Indique Hair.
4. Are real hair ponytail extensions reusable?
Yes, real hair ponytail extensions can be reused multiple times with good care. Wash, condition, and store them properly to maintain longevity.
5. How can I join Indique’s $3K Giveaway Contest?
Visit Indique Hair’s website or follow their social media for instructions on entering the contest and details about their Semi-Annual Sale.
0 notes
Text
How to Rip Your Own Jeans Like a Pro: A Complete Guide
Distressed denim is a timeless fashion trend, but buying pre-ripped jeans can be costly. Instead of spending extra on designer distressed jeans, why not create your own at home? This guide will walk you through the step-by-step process of ripping your jeans while keeping them stylish and wearable. We’ll also explore the role of Denim Manufacturers, Sustainable Clothing Manufacturers, and Custom Clothing Manufacturers in producing high-quality denim.
Why Rip Your Own Jeans?
Cost-Effective – DIY ripped jeans save you money while letting you achieve a designer look.
Personalized Style – Control the placement and level of distressing to suit your preference.
Sustainable Fashion – Repurposing old jeans reduces waste, aligning with the principles of Sustainable Clothing Manufacturers like Pearl Global, which promotes eco-friendly denim production.
Step-by-Step Guide to Ripping Your Jeans
Step 1: Choose the Right Jeans

Picking the right pair of jeans is essential for the best results. Consider:
Fit: Choose jeans that fit well and complement your style.
Fabric: Thicker denim takes longer to distress, while stretch denim may fray unevenly.
Color: Light to medium-wash jeans look more natural when ripped. Denim manufacturers in USA, such as Pearl Global, offer premium quality jeans that hold distressing well.
Pro Tip: If you don’t want to experiment on an expensive pair, try thrift stores for affordable denim options.
Step 2: Gather Your Supplies
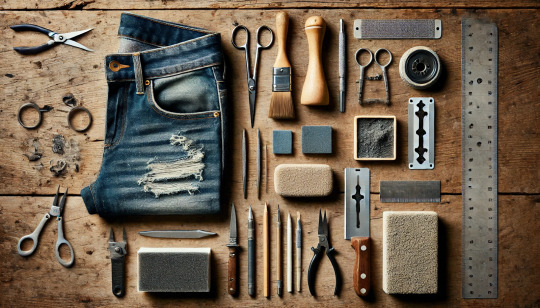
Here’s what you need to get started:
Sharp scissors or a razor blade
Sandpaper or pumice stone for a natural distressed look
Tweezers to pull out threads for a frayed effect
Chalk or pencil to mark the distressing spots
Cutting board or cardboard to place inside the jeans (prevents cutting through both layers)
Step 3: Mark the Areas to Distress
Before cutting, decide where you want to add rips. Common areas include:
Knees: Classic and stylish
Thighs: Edgy but subtle
Pockets & Hems: For a vintage, worn-in feel
Use chalk or a fabric pencil to outline the spots to avoid over-ripping.
Pro Tip: Always aim a little above the knee, as knee rips expand over time with movement.
Step 4: Start the Distressing Process
To create a naturally worn-in look:
Use sandpaper or steel wool to thin out fabric before making cuts.
Rub for 2–3 minutes until the fabric softens and lightens.
For a heavily distressed look, rub a pumice stone over the denim.
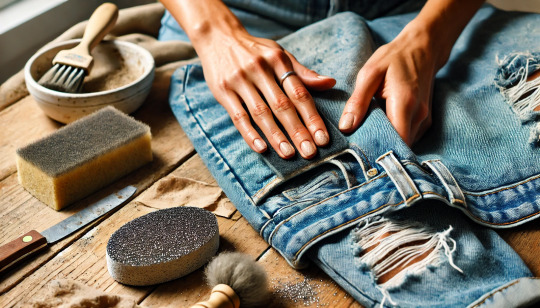
Step 5: Create the Rips
Take scissors or a razor blade and make small horizontal cuts where you marked the distressing spots.
Use your hands or tweezers to pull at the white threads for a naturally frayed effect.
Avoid cutting large holes immediately – you can always make them bigger later.
Step 6: Enhance the Distressed Look
For a professional touch:
Pull apart horizontal threads using tweezers to create a "worn" effect.
Add subtle tears on the edges of rips to make them look more natural.
Wash and dry your jeans after distressing – this helps loosen fibers and adds a vintage finish.
Reinforcing Your Ripped Jeans (Optional)
While the goal is to achieve a distressed look, you may want to prevent excessive ripping over time. Here’s how:
Sew around the rips using a thread that matches your denim.
Iron on fabric patches underneath large holes for added durability.
Use fabric glue to keep frayed edges intact.
Sustainable clothing manufacturers like Pearl Global use reinforced distressing techniques in custom clothing manufacturing to ensure longevity while maintaining style.
Why Choose High-Quality Denim?

If you’re serious about fashion, investing in high-quality denim makes a difference. Here’s why:
Durability: Premium denim lasts longer and holds distressing well.
Sustainability: Ethically produced denim supports sustainable fashion.
Customization: Many custom clothing manufacturers provide unique finishes for a personalized touch.
Pearl Global, a leading denim manufacturer in the USA, focuses on sustainability and ethical sourcing. If you’re looking for sustainable clothing manufacturers that offer high-quality, eco-friendly denim, they’re a trusted name in the industry.
Conclusion: Express Your Style with DIY Ripped Jeans
Ripping your own jeans is an easy, fun way to personalize your wardrobe while embracing sustainable fashion. Whether you're following a trend or creating a unique style, this method allows you to take full control over the distressing process.
By choosing high-quality jeans from reputable denim manufacturers in the USA, such as Pearl Global, you ensure durability and sustainability while staying on-trend. So, grab an old pair of jeans, follow these steps, and start crafting your custom distressed denim today!
#how to make ripped jeans#Denim Manufacturers#denim manufacturers in USA#Sustainable clothing manufacturers#custom clothing manufacturers
0 notes
Text
Ultimate Guide to Cropping Your Hoodie: Easy Steps for Beginners
Are you ready to transform your hoodie into a stylish cropped masterpiece? Whether you're looking to elevate your fashion game or simply want a more comfortable fit, cropping your hoodie is a fun and straightforward DIY project! Let’s dive into this step-by-step guide perfect for beginners. ✂️✨
How to Crop a Hoodie: Step-by-Step Guide for Beginners
What Does It Mean to Crop a Hoodie?
Cropping a hoodie means cutting the hem to shorten its length, creating a trendy, relaxed look that you can pair with high-waisted jeans, skirts, or shorts.
Why Crop Your Hoodie?
Cropping your hoodie can help you mix up your wardrobe, make your outfit feel fresh, and even repurpose an old favorite. 🙌
Benefits of Cropping a Hoodie
Custom Fit: Tailor your hoodie to your style.
Trendy Look: Stay in vogue while showcasing your personal style.
Versatility: Pair it with various outfits for different occasions.
Tools and Materials Needed
Essential Tools
Scissors: Essential for any cutting method.
Fabric Marker: Perfect for marking your crop line.
Measuring Tape: Helps determine the perfect length.
No-Sew Methods vs. Cutting Methods
Choose between using scissors for a clean cut or opting for creative no-sew techniques that add unique flair without the risk of uneven edges!
Alternative Techniques
Rubber Bands: Create a gathered look by scrunching the hem.
Shoelace: Tie it at your desired length for a playful style.
Step-by-Step Cropping Process
Step 1: Preparing Your Hoodie
Deciding on the Right Length
Consider how cropped you want it to be. Measure from the bottom of the hoodie to find your ideal length.
Marking the Crop Line Accurately
Use the fabric marker and measuring tape to draw a straight line across the front and back of the hoodie.
Step 2: Executing the Crop
How to Crop a Hoodie Without Cutting It
Utilize rubber bands or a shoelace for a no-cut style. Simply gather the fabric at the desired length!
How to Crop a Hoodie With Scissors
Follow your marked line and cut slowly to ensure an even finish. 📏✂️
How to Crop a Hoodie With Rubber Bands
Pull the fabric at the waist and secure it with rubber bands for a trendy gathered look.
How to Crop a Hoodie With a Shoelace
Tie a shoelace around the gathered fabric for a quirky vibe that’s easy to adjust.
Step 3: Finishing Touches
Adjusting for a Perfect Fit
Try your hoodie on and make additional adjustments if necessary for the ideal fit.
Post-Crop Washing and Care Tips
To maintain your creation, wash it gently and avoid harsh detergents for longevity!
Troubleshooting and Advanced Tips
How to Crop an Oversized Hoodie Without Cutting It
Use the gathering techniques mentioned to style oversized hoodies for a chic appearance. 🎉
Common Mistakes and How to Avoid Them
Avoid cutting too much at once. Always start with a little and adjust as needed.
FAQs: Cropping Hoodies for Beginners
Still have questions? Check our website for answers!
Final Tips for a Professional Look
Follow the steps carefully, and don’t rush the process. A sharp pair of scissors will make a difference!
Ready to give your hoodie a makeover? For more in-depth details, check this step-by-step guide on cropping your hoodie like a pro! 💖👚
0 notes
Text
The Best Fabrics to Buy Online for Beginners in Sewing

Sewing is a fantastic skill that allows you to create custom garments, accessories, and home decor. For beginners, choosing the right fabric can feel overwhelming, especially when shopping online. However, buying fabric online opens up a world of choices, from vibrant patterns to a wide variety of textures and materials. Selecting the right fabrics can make your sewing journey enjoyable and ensure successful projects from the start.
Here, we’ll guide you through the best fabrics for beginners, helping you make informed choices that match your skill level and project needs.
1. Cotton: The Beginner’s Best Friend
Cotton is an excellent choice for novice sewists. It’s easy to handle, doesn’t slip while cutting, and works well with basic sewing machines. Cotton fabrics come in various weights and patterns, making them versatile for projects like tote bags, pillowcases, or simple dresses. Look for quilting cotton or broadcloth as they’re easy to manage and widely available online.
2. Linen Blends: Simple and Stylish
Linen blends combine the breathability of linen with the softness of other fibers like cotton or rayon. They’re less prone to wrinkling compared to pure linen, making them beginner-friendly. These fabrics are great for creating stylish garments or home decor items like curtains and table runners.
3. Knit Fabrics: A Stretchy Option for Casual Wear
While stretchy fabrics can be intimidating, some knit fabrics, like jersey, are manageable for beginners. They’re perfect for sewing comfortable clothing such as t-shirts and leggings. When choosing knit fabric online, look for options labeled as medium weight or with minimal stretch to ensure easier handling.
4. Fleece: Warm and Forgiving
Fleece is a soft, warm fabric that’s perfect for making blankets, scarves, or loungewear. It doesn’t fray, which means you don’t need to worry about finishing raw edges. Fleece is widely available in an array of colors and prints, making it an ideal fabric to buy online for beginner-friendly projects.
5. Muslin: Perfect for Practice
Muslin is an affordable and lightweight fabric often used for mock-ups or practice projects. It’s a great way to test patterns and perfect your skills before using more expensive materials. Buying muslin fabric online ensures you always have a stash ready for experimentation.

Tips for Choosing Fabric Material Online
Shopping for fabric material online can be daunting, but following these tips will make the process smoother:
Examine Descriptions Thoroughly: Focus on the material makeup, thickness, and maintenance guidelines. These details will help you understand how the fabric behaves.
Check Reviews: Reviews from other buyers can provide insights into fabric quality and how true to color or description the product is.
Order Swatches: If available, order swatches to feel the fabric and test its suitability before committing to larger quantities.
Start with Simple Projects: Opt for fabrics that match beginner-friendly projects, such as straight-line sewing or items that don’t require intricate shaping.
Stick to Natural Fibers: Natural fibers like cotton, linen, and wool are more forgiving and easier to sew than slippery synthetics.
Exploring Fabrics from an Online Fabric Store
An online fabric store offers a vast range of materials, catering to all types of sewing projects. For beginners, it’s crucial to choose stores that provide detailed product descriptions, easy navigation, and a variety of fabric types. Look for a store that categorizes fabrics by project or difficulty level, making it simple to find what you need.
Fabenzo is one such trusted online fabric store where you can explore a diverse collection of high-quality fabrics. From beginner-friendly cotton to trendy prints and textures, Fabenzo’s curated selection ensures you find the perfect fabric for your projects. Their detailed product descriptions and customer support make shopping for fabric material online a breeze, even for those just starting in sewing.
Whether you’re stitching a simple tote bag, experimenting with apparel, or decorating your home, Fabenzo’s wide range of options will inspire creativity and confidence. Visit Fabenzo today to explore the best fabrics for beginners and embark on your sewing journey with ease!
0 notes
Text
Burlap Basket
Certainly! Here’s a handmade article on crafting burlap baskets, which are both functional and stylish for home organization.
---
Crafting Burlap Baskets: A Handmade Guide
Introduction
Burlap baskets are a charming and practical addition to any home. With their rustic appeal and versatility, they can be used for a variety of purposes—from organizing household items to adding a touch of natural elegance to your decor. Making your own burlap baskets allows you to customize them to fit your needs and personal style. This guide will walk you through the process of creating your own burlap baskets, offering tips and ideas to inspire your DIY project.
1. Why Choose Burlap for Baskets?
Burlap, also known as jute, is a natural, eco-friendly material with a distinctive texture. Here’s why burlap is an excellent choice for baskets:
- Durability: Burlap is strong and can hold up to regular use, making it ideal for storage.
- Natural Aesthetic: Its earthy tone and texture add a rustic charm to any space.
- Customizable: Burlap can be easily decorated or modified to suit your design preferences.
- Affordability: Burlap is relatively inexpensive and widely available, making it a budget-friendly option for DIY projects.
2. Materials Needed
To make a burlap basket, you’ll need the following materials:
- Burlap fabric (the amount depends on the size of the basket you want to make)
- A sturdy base material (cardboard, plastic, or wooden base)
- Scissors
- Hot glue gun or fabric glue
- Sewing machine or needle and thread (optional)
- Decorative elements (ribbons, stencils, paint, etc.) (optional)
3. DIY Burlap Basket Instructions
A. Simple Burlap Basket
Materials:
- Burlap fabric
- Cardboard or a pre-cut base
- Scissors
- Hot glue gun or fabric glue
Instructions:
1. Cut the Burlap: Measure and cut the burlap to fit the height and circumference of your basket. You will need two pieces: one for the sides and one for the base.
2. Prepare the Base: Cut the cardboard or your chosen base material to the size you want for the bottom of the basket.
3. Attach the Base: Use the hot glue gun or fabric glue to attach the burlap to the base. Apply glue around the edges and press the burlap down to secure it.
4. Create the Sides: Wrap the burlap around the sides of the base and glue it in place, making sure there are no gaps.
5. Finish Edges: Fold the top edge of the burlap inward and glue it down to create a neat finish.
6. Decorate (Optional): Add any decorative elements you like, such as ribbons, stenciled designs, or fabric paint.
B. Sewn Burlap Basket
Materials:
- Burlap fabric
- Sewing machine or needle and thread
- Cardboard or a pre-cut base
- Scissors
- Hot glue gun (optional)
Instructions:
1. Cut and Sew the Sides: Cut two rectangles of burlap for the sides of the basket and two for the base. Sew the rectangles together to form a box shape. Reinforce the corners with additional stitches.
2. Attach the Base: Cut the base material to fit the bottom of the basket. Sew or glue it to the bottom of the burlap box.
3. Finish the Top: Fold the top edge of the burlap inward and sew or glue it down to create a clean edge.
4. Add Handles (Optional): Cut additional strips of burlap to create handles. Attach them to the sides of the basket with glue or stitches.
C. Decorative Burlap Basket
Materials:
- Burlap fabric
- Cardboard or a pre-cut base
- Scissors
- Hot glue gun or fabric glue
- Decorative elements (lace, paint, stencils, etc.)
Instructions:
1. Prepare the Fabric: Cut burlap to cover the sides and base of your basket, similar to the previous methods.
2. Attach Base and Sides: Use glue or sew the burlap onto the base and around the sides, as described before.
3. Decorate: Enhance the basket with decorative touches. Add lace trim around the edges, paint stenciled designs, or glue on embellishments like buttons or fabric flowers.
4. Finish: Ensure all decorations are securely attached and that the basket is sturdy and functional.
4. Tips for a Successful Burlap Basket Project
- Pre-Wash Burlap: Burlap can sometimes shrink or fray. Pre-wash the fabric to prevent this issue.
- Use a Liner: To prevent items from poking through the burlap, consider adding a fabric liner inside the basket.
- Handle Care: If adding handles, make sure they are securely attached and comfortable for carrying.
- Avoid Overloading: Burlap baskets are durable, but they have limits. Avoid overloading them to maintain their shape and longevity.
5. Troubleshooting Common Issues
- Fraying Edges: To prevent fraying, seal the edges of the burlap with fabric glue or by stitching.
- Weak Base: If the base feels weak, reinforce it with additional layers of cardboard or a sturdier material.
- Uneven Shape: If the basket’s shape is uneven, adjust the sides or base and reapply glue or stitches as needed.
Conclusion
Purchasing burlap baskets is a rewarding DIY project that combines functionality with rustic charm. By following these simple steps, you can create custom baskets that enhance your home organization while adding a personal touch. Whether you choose a simple design, a sewn version, or a decorative approach, the key to a successful burlap basket is creativity and attention to detail. Embrace the craft and enjoy the satisfaction of making something beautiful and practical with your own hands.
This article provides a comprehensive guide to making burlap baskets, offering various methods and tips to ensure your DIY project is a success.
0 notes
Text
Revolutionizing Shirt Manufacturing for Wholesale: Alista Shirts
Introduction
In the dynamic world of fashion, Alista Shirts stands out as a beacon of innovation, quality, and reliability. As a premier brand in shirt manufacturing for wholesale, Alista Shirts is committed to delivering top-notch products that cater to diverse customer needs. This article delves into the meticulous process behind Alista Shirts' manufacturing, highlighting the brand's dedication to excellence and customer satisfaction.
Quality Materials: The Foundation of Excellence
At Alista Shirts, the journey of creating a perfect shirt begins with the selection of high-quality materials. The brand sources premium fabrics from renowned suppliers worldwide, ensuring each shirt boasts superior comfort, durability, and style. Whether it's 100% cotton, linen blends, or innovative synthetic fabrics, Alista Shirts prioritizes materials that enhance the wearer's experience.
Cutting-Edge Manufacturing Processes
Alista Shirts leverages state-of-the-art technology and skilled craftsmanship to produce shirts that meet the highest standards. The manufacturing process is a seamless blend of automation and human expertise, ensuring precision and efficiency at every stage.
Design and Pattern Making: Expert designers at Alista Shirts create contemporary and classic designs that resonate with a wide audience. Using advanced CAD software, patterns are meticulously crafted to guarantee a perfect fit.
Fabric Cutting: Precision is paramount in the cutting stage. Automated cutting machines, guided by the digital patterns, slice the fabric with accuracy, minimizing waste and ensuring consistency across batches.
Sewing and Assembly: Skilled artisans operate modern sewing machines, stitching the cut pieces into refined shirts. Attention to detail is evident in every seam, buttonhole, and collar, reflecting Alista Shirts' commitment to quality.
Quality Control: Every shirt undergoes rigorous quality control checks. From fabric integrity to stitching accuracy, each aspect is scrutinized to ensure the final product is flawless.
Customization and Flexibility
Understanding the diverse needs of its wholesale clients, Alista Shirts offers extensive customization options. Clients can choose from various fabrics, colors, patterns, and styles to create unique collections that cater to their target market. This flexibility allows retailers to stand out in a competitive landscape, offering products tailored to their customers' preferences.
Sustainable Practices
Alista Shirts is dedicated to sustainability and ethical manufacturing. The brand implements eco-friendly practices throughout the production process, from using organic fabrics to minimizing waste. By partnering with ethical suppliers and adhering to fair labor practices, Alista Shirts ensures that its products are not only high-quality but also responsibly produced.
Efficient Supply Chain Management
Timely delivery and efficient supply chain management are crucial in the wholesale industry. Alista Shirts excels in this aspect by maintaining robust logistics and inventory systems. Advanced tracking and management software ensures that orders are processed and delivered promptly, allowing retailers to keep their shelves stocked with the latest trends.
Conclusion
Alista Shirts is a leader in shirt manufacturing for wholesale, setting the standard for quality, innovation, and customer satisfaction. By combining superior materials, cutting-edge technology, skilled craftsmanship, and sustainable practices, Alista Shirts creates exceptional products that meet the evolving needs of the fashion industry. Wholesale clients can rely on Alista Shirts for stylish, durable, and customizable shirts that elevate their brand and delight their customers. Visit us : www.alistashirts.com
0 notes
Text
Abaya Stitching Made Easy: Your Style, Your Way
In the realm of modest fashion, the abaya stands as a symbol of grace and elegance. Whether you’re new to sewing or a seasoned pro, crafting your own abaya offers a unique blend of personal style and traditional beauty. In this comprehensive guide, we will delve into the art of abaya stitching, ensuring that every stitch is a step towards a beautifully tailored piece that reflects your individual style.
Choosing the Right Fabric for Your Abaya
The foundation of any stunning abaya is its fabric. Selecting the right material is crucial as it impacts the garment's drape, comfort, and overall appearance.

Fabrics to Consider
Crepe: Known for its lightweight and slightly textured finish, crepe is a popular choice for abayas due to its elegance and ease of handling.
Chiffon: Ideal for a flowing, ethereal look, chiffon abayas are perfect for special occasions.
Nidha: A luxurious fabric often used in premium abayas, Nidha offers a soft, smooth finish that is both comfortable and stylish.
Jersey: For a more casual, everyday abaya, jersey fabric provides stretch and comfort.
Color and Pattern Selection
Choosing the color and pattern of your fabric is just as important as the material itself. Abaya Store In mangalore Traditional abayas are often black, but modern interpretations embrace a variety of hues and patterns. Consider your personal style and the occasion when selecting your fabric.
Essential Tools and Materials
Before diving into the stitching process, ensure you have all the necessary tools and materials:
Fabric: As discussed, the choice of fabric is crucial.
Sewing Machine: A reliable sewing machine will make your stitching process smoother and faster.
Needles and Threads: Choose needles and threads that are compatible with your selected fabric.
Scissors: Sharp fabric scissors are essential for clean cuts.
Measuring Tape: Precision is key in tailoring, making a measuring tape indispensable.
Pins and Pin Cushion: To hold your fabric in place while stitching.
Iron and Ironing Board: For pressing seams and finishing touches.
Taking Accurate Measurements
A well-fitted abaya starts with accurate measurements. islamic dress shop in Mangalore Here’s a step-by-step guide to ensure precision:
Bust: Measure around the fullest part of your bust.
Waist: Measure around the smallest part of your waist.
Hips: Measure around the fullest part of your hips.
Length: Measure from the top of your shoulder to your desired abaya length.
Sleeve Length: Measure from your shoulder to your wrist, ensuring comfort and mobility.
Creating a Pattern
A pattern serves as a blueprint for your abaya. You can purchase a pre-made pattern or create your own based on your measurements.
Steps to Create a Custom Pattern
Draft the Bodice: Using your measurements, draft the bodice of your abaya on pattern paper.
Add Seam Allowances: Ensure to add seam allowances (typically 1/2 inch) around your pattern pieces.
Cut the Fabric: Pin your pattern pieces to the fabric and cut carefully, ensuring precision.
Stitching the Abaya
With your fabric cut and ready, it’s time to start stitching. hijab store in Mangalore Follow these steps for a professional finish:
Sewing the Bodice
Seam the Shoulders: Begin by sewing the shoulder seams. Ensure they are aligned and straight.
Attach the Sleeves: Pin the sleeves to the armholes, ensuring the fabric is evenly distributed. Sew in place.
Sew the Side Seams: With the sleeves attached, sew the side seams from the armpit to the hem.
Creating the Neckline
The neckline is a focal point of the abaya. Here’s how to perfect it:
Bias Tape Finish: Use bias tape to finish the neckline for a clean, professional look.
Facing: Alternatively, you can use a facing technique to ensure a neat finish.
Hemming the Abaya
A well-hemmed abaya exudes professionalism and attention to detail:
Press the Hem: Fold the hem up by 1 inch and press with an iron.
Sew the Hem: Stitch close to the folded edge, ensuring an even and straight hemline.
Adding Embellishments
Personalizing your abaya with embellishments can transform a simple piece into a statement garment.
Popular Embellishments
Embroidery: Add intricate embroidery designs for a traditional touch.
Beading: Incorporate beads along the neckline, cuffs, or hem for added elegance.
Appliqué: Use appliqué to create decorative patterns on your abaya.
Placement and Application
Consider the overall design of your abaya when placing embellishments. Ensure they enhance the garment without overwhelming it.
Finishing Touches
The final touches can make or break your abaya. Abaya Stitching In Mangalore Here’s how to ensure a polished finish:
Pressing Seams: Use an iron to press all seams, ensuring they lie flat and neat.
Inspect for Loose Threads: Trim any loose threads to maintain a clean appearance.
Final Fitting: Try on your abaya to ensure a perfect fit. Make any necessary adjustments.
Caring for Your Abaya
Proper care extends the life of your abaya, maintaining its beauty and durability.
Washing and Drying
Hand Wash: To preserve the fabric and embellishments, hand wash your abaya in cold water.
Air Dry: Avoid using a dryer. Instead, lay your abaya flat to air dry, preserving its shape and fabric integrity.
Storage
Hang Properly: Use padded hangers to prevent creases and maintain the abaya’s shape.
Avoid Sunlight: Store your abaya in a cool, dark place to prevent color fading.
By following these comprehensive steps, you can create a stunning abaya that is both stylish and personal. Happy stitching!
#Abaya Stitching In Mangalore#Burkha Studio In Mangalore#Hijab Stitching In Mangalore#Abaya Stitching store In Hampankatta#Makna Stitching Hampankatta#hijab store in Hampankatta#islamic dress shop in Hampankatta#islamic dress shop in Mangalore#Hijab store in Mangalore#Abaya Store In manglore
0 notes
Text
How to Make Your Own Scrunchies at Home
Making your own scrunchies at home is a fun and creative way to personalize this trendy accessory. Not only is it a cost-effective project, but it also allows you to experiment with different fabrics and styles. Here’s a step-by-step guide to help you create your own scrunchies.
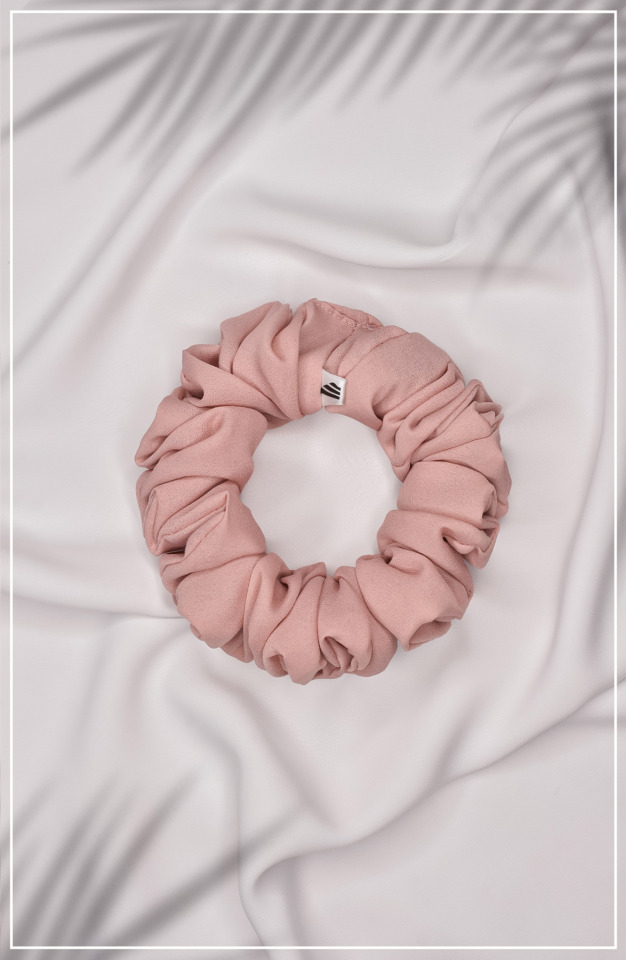
Materials You Will Need
Fabric of your choice (cotton, silk, satin, velvet, etc.)
Elastic (1/4 inch wide)
Scissors
Sewing machine or needle and thread
Safety pin
Measuring tape or ruler
Pins
Step-by-Step Instructions
Step 1: Prepare Your Materials
First, gather all the materials you need. Select a fabric that suits your style and the type of scrunchie you want to make. Lightweight fabrics like silk and satin are great for a delicate look, while cotton and velvet provide a more casual and sturdy option.
Step 2: Cut the Fabric
Cut a strip of fabric that measures approximately 22 inches long and 4 inches wide. You can adjust the length depending on how voluminous you want your scrunchie to be. For a smaller scrunchie, you might cut the fabric to 18 inches long.
Step 3: Fold and Pin the Fabric
Fold the fabric strip lengthwise with the right sides facing each other. Pin along the edge to secure the fabric in place. Make sure the edges are aligned properly.
Step 4: Sew the Fabric
Using a sewing machine or needle and thread, sew along the pinned edge, leaving a 1/4 inch seam allowance. Make sure to backstitch at the beginning and end to secure the stitches. You will now have a fabric tube.
Step 5: Turn the Fabric Right Side Out
Turn the fabric tube right side out. You can use a safety pin to help guide the fabric through the tube, making the process easier.
Step 6: Cut and Insert the Elastic
Cut a piece of elastic that is about 8-10 inches long, depending on how tight you want your scrunchie to be. Attach a safety pin to one end of the elastic and thread it through the fabric tube. Be careful not to let the other end of the elastic slip inside the tube.
Step 7: Secure the Elastic
Once the elastic is threaded through the fabric tube, overlap the ends of the elastic by about 1 inch and sew them together securely. You can use a zigzag stitch on your sewing machine or hand sew the ends.
Step 8: Close the Scrunchie
Fold one end of the fabric tube inside itself by about 1/2 inch to create a clean edge. Insert the raw edge of the other end of the fabric tube into the folded end. Pin them together and sew along the edge to close the scrunchie. Make sure your stitches are neat and secure.
Step 9: Final Adjustments
Gently pull on the scrunchie to distribute the fabric evenly around the elastic. Fluff it up to ensure it looks full and stylish. Your homemade scrunchie is now ready to wear!
Customization Ideas
Add Decorative Elements
You can personalize your scrunchies by adding decorative elements such as bows, beads, or small charms. Simply sew or glue these embellishments onto the scrunchie for a unique touch.
Experiment with Different Fabrics
Try making scrunchies with various fabrics to see how they affect the look and feel. For a luxurious touch, use silk or velvet. For a more casual style, cotton or jersey works well.
Create Themed Scrunchies
Make themed scrunchies for holidays, special events, or to match specific outfits. Use fabrics with seasonal prints, vibrant colors, or unique patterns to create scrunchies that stand out.
Conclusion
Making your own scrunchies at home is a simple and enjoyable project that allows you to customize your hair accessories to suit your personal style. With just a few materials and basic sewing skills, you can create a variety of scrunchies that are both fashionable and functional.
Explore the beautiful range of fabrics and crafting supplies at Malbus, where you can find everything you need to make stunning scrunchies at home. With Malbus, you can unleash your creativity and add a personal touch to your hair accessories. Start crafting today and enjoy the endless possibilities of homemade scrunchies.
0 notes
Text
Your Ultimate Guide to Car Rentals in Fiji: Rent a Car in Fiji
Are you looking to add a touch of enchantment and warmth to your home decor? Look no further than Purple Butterfly Fabric, Blanket Panel Fabric, and Animals Blanket Panel. These versatile and beautiful fabrics are perfect for creating cozy and stylish blankets that will delight both children and adults alike.
The Allure of Purple Butterfly Fabric
Purple Butterfly Fabric is a stunning choice for anyone looking to infuse a bit of magic into their home. The rich, vibrant purple hues combined with delicate butterfly designs create a sense of whimsy and elegance. This fabric is perfect for a variety of projects, including:
Quilts: Add a pop of color and a touch of nature to your quilts with this enchanting fabric.
Throw Blankets: Perfect for draping over a couch or chair, adding a decorative and functional element to your living space.
Decorative Pillows: Create matching or contrasting pillows to complete the look.
Versatility of Blanket Panel Fabric
Blanket Panel Fabric is designed specifically for making blankets, offering a convenient and cohesive look. These fabric panels come in a variety of themes and designs, making it easy to create a blanket that suits your style. Whether you prefer classic patterns or contemporary designs, Blanket Panel Fabric has something for everyone.
Adorable and Fun Animals Blanket Panel
For those who love animals, the Animals Blanket Panel is a fantastic choice. These fabric panels feature a variety of adorable animal designs that are perfect for creating blankets for kids or animal lovers. Some popular options include:
Jungle Animals: Lions, tigers, and elephants, oh my! Bring the adventure of the jungle into your home with these fun designs.
Farm Animals: Cows, pigs, and chickens add a rustic charm to any blanket.
Woodland Creatures: Foxes, deer, and owls create a cozy, forest-inspired blanket perfect for snuggling up on a cold night.
Crafting with Purple Butterfly Fabric, Blanket Panel Fabric, and Animals Blanket Panel
Creating a blanket with these fabrics is simple and rewarding. Here are some tips to get you started:
Choose Your Fabric: Select your favorite Purple Butterfly Fabric, Blanket Panel Fabric, or Animals Blanket Panel.
Measure and Cut: Make sure to measure your fabric according to the size of the blanket you want to create. Cut the fabric panels with care to ensure a clean, professional look.
Sew the Panels: Use a sewing machine to sew the panels together. For added warmth, consider adding a layer of batting between the fabric layers.
Finish the Edges: Finish your blanket by hemming the edges or adding a decorative binding.
Why Choose These Fabrics?
Opting for Purple Butterfly Fabric, Blanket Panel Fabric, and Animals Blanket Panel offers several benefits:
Unique Designs: Stand out with unique and beautiful designs that are not commonly found in mass-produced blankets.
Quality Material: Enjoy the durability and comfort of high-quality fabric that is perfect for everyday use.
Personal Touch: Handmade blankets make wonderful gifts and are a great way to show someone you care
0 notes
Text
Transform Your Space: Budget-Friendly Interior Design Tips You Need to Know
Redecorating your home doesn’t have to be an expensive endeavor. With some creativity and strategic planning, you can transform your space into a stylish and comfortable retreat without breaking the bank. This comprehensive guide covers essential budget-friendly interior design tips to help you achieve a beautiful home on a budget.

Declutter and Clean
Before diving into the more exciting aspects of interior design, start with a clean slate. Decluttering and deep cleaning your space can make a significant difference in how your home feels.
Steps to Declutter and Clean:
Sort Through Belongings: Divide your items into categories: keep, donate, sell, and recycle. Be ruthless in your decisions to minimize clutter.
Organize Storage: Use bins, baskets, and shelving units to store items neatly. Label everything for easy access.
Deep Clean: Clean every nook and cranny of your home. This includes washing windows, dusting light fixtures, and scrubbing floors.
Benefits of Decluttering:
Creates a more open and spacious environment.
Reduces stress and improves mental clarity.
Makes it easier to implement new design ideas.
Paint: The Power of Color
Painting is one of the most cost-effective ways to transform a room. A fresh coat of paint can change the mood, make a space feel larger, and provide a clean backdrop for other design elements.
Choosing the Right Colors:
Neutral Shades: Whites, grays, and beiges create a versatile base that can be easily updated with accessories.
Accent Walls: Add a pop of color with an accent wall to create a focal point without overwhelming the space.
Mood Influencers: Consider the mood you want to set. For example, blues and greens are calming, while yellows and oranges are energizing.
DIY Painting Tips:
Use painter's tape for clean edges.
Invest in quality brushes and rollers.
Apply primer for a more even finish.
Furniture: Rearrange and Repurpose
You don’t need to buy new furniture to transform your space. Sometimes, rearranging what you already have or repurposing items can make a huge difference.
Rearrangement Strategies:
Functionality First: Arrange furniture to enhance the functionality of the space. Ensure there is a clear flow of movement.
Create Zones: Define areas for different activities, such as reading, dining, or relaxing, especially in open-plan spaces.
Focal Points: Arrange furniture around a focal point, such as a fireplace, large window, or a piece of art.
Repurposing Ideas:
Old Dressers: Convert an old dresser into a bathroom vanity or a stylish entryway console.
Bookshelves: Turn bookshelves into room dividers or display units.
Dining Tables: Use an old dining table as a desk or crafting table.
Thrift and DIY Decor
Embrace thrift stores, flea markets, and DIY projects to find unique and affordable decor items that add personality to your home.
Thrifting Tips:
Regular Visits: Inventory changes often, so frequent visits increase your chances of finding great items.
Look Beyond Surface: Consider the potential of items that may need minor repairs or a fresh coat of paint.
Mix and Match: Don’t be afraid to mix different styles and eras for an eclectic look.
DIY Project Ideas:
Wall Art: Create your own art using canvases, paints, and even fabric.
Pillows and Throws: Sew your own pillow covers or throw blankets using affordable fabric.
Planters: Make planters from old jars, tins, or pallets.
Benefits of DIY Decor:
Customization to suit your personal taste.
Significant cost savings.
A sense of accomplishment and uniqueness.
Lighting: Brighten Up
Good lighting is essential in creating a welcoming and functional space. Instead of expensive fixtures, there are many budget-friendly ways to enhance your home’s lighting.
Layered Lighting Approach:
Ambient Lighting: Use ceiling fixtures or large lamps to provide overall illumination.
Task Lighting: Place task lights like desk lamps or under-cabinet lights in areas where focused lighting is needed.
Accent Lighting: Add accent lights such as string lights, candles, or small lamps to create ambiance.
Affordable Lighting Solutions:
LED Bulbs: Invest in energy-efficient LED bulbs to save on electricity bills.
DIY Fixtures: Create your own light fixtures using simple materials like mason jars or wire baskets.
Mirrors: Place mirrors opposite windows to reflect natural light and make the space feel brighter.
Textiles: Add Warmth and Texture
Textiles are an easy and affordable way to add warmth, color, and texture to your home. From rugs to curtains, the right textiles can pull a room together.
Textile Tips:
Layer Rugs: Use multiple rugs in different sizes and patterns to create depth and interest.
Seasonal Changes: Swap out throw pillows and blankets seasonally to keep the space feeling fresh.
Curtains: Hang curtains high and wide to make windows appear larger and the room more spacious.
Textile Projects:
No-Sew Curtains: Use fabric glue or iron-on hem tape to make curtains without sewing.
Custom Pillows: Mix and match fabrics to create unique pillow covers.
DIY Upholstery: Reupholster chairs or ottomans with new fabric for an instant update.
Greenery: Incorporate Plants
Plants bring life, color, and a sense of tranquility to any space. They are also known to improve air quality and create a more inviting atmosphere.
Choosing the Right Plants:
Low Maintenance: Opt for plants like snake plants, pothos, and succulents that require minimal care.
Herbs and Edibles: Grow herbs in your kitchen for a functional and aesthetic addition.
Large Statement Plants: Use larger plants like fiddle leaf figs or monstera to make a bold statement.
Plant Display Ideas:
Hanging Planters: Save floor space and add visual interest with hanging planters.
Window Sills: Utilize window sills for small pots and herb gardens.
Grouping: Group plants of varying heights and types together for a lush, layered look.
Art and Accessories: Personalize Your Space
Art and accessories are the finishing touches that make a house feel like a home. They reflect your personality and can easily be updated or changed.
Art and Accessory Tips:
Gallery Walls: Create a gallery wall with a mix of photos, prints, and other artwork.
Personal Items: Display items that have sentimental value, such as travel souvenirs or family heirlooms.
Budget Finds: Look for affordable art prints online or at local markets.
DIY Art Projects:
Photo Collages: Arrange your favorite photos in a creative collage.
Fabric Art: Frame pieces of fabric or wallpaper samples for unique wall art.
Nature Inspired: Use natural elements like pressed flowers, leaves, or driftwood in your decor.
Functional and Stylish Storage
Effective storage solutions are essential for maintaining a clutter-free and organized home. Stylish storage options can also enhance your decor.
Storage Solutions:
Multi-Functional Furniture: Choose furniture with built-in storage, such as ottomans, benches, or coffee tables with shelves.
Baskets and Bins: Use decorative baskets and bins to store items while adding texture and interest.
Wall-Mounted Shelves: Utilize wall space with shelves for books, decor, and everyday items.
DIY Storage Ideas:
Customized Shelves: Build your own shelves using reclaimed wood or pallets.
Mason Jar Organizers: Attach mason jars to a wooden board for a rustic storage solution.
Pegboards: Use pegboards in kitchens, offices, or craft rooms for versatile and customizable storage.
Final Touches: Details Matter
The details in your decor can make a big difference. Small changes and thoughtful touches can elevate your home’s style and make it feel complete.
Detail Ideas:
Hardware: Update cabinet knobs, drawer pulls, and doorknobs for a quick refresh.
Trim and Molding: Add or update trim and molding to give your home a polished look.
Switch Plates: Replace old switch plates with new, stylish ones.
Personal Touches:
Scents: Use candles, essential oils, or diffusers to add pleasant scents to your home.
Throws and Pillows: Add cozy throws and pillows in varying textures and colors.
Artwork Rotation: Regularly rotate artwork and decor items to keep your space feeling fresh.
Transforming your space on a budget is not only achievable but also a rewarding endeavor. By implementing these budget-friendly interior design tips, you can create a stylish, comfortable, and personalized home that you’ll love spending time in. Remember, the key to successful interior design lies in creativity, resourcefulness, and attention to detail. Happy decorating!
1 note
·
View note
Text
DIY Rug Makeovers: Easy Ways to Revamp Your Floors
Rugs are more than just floor coverings; they are an essential element of home decor, adding warmth, texture, and personality to a space. If your rugs are starting to look a bit tired or you simply crave a change, a DIY rug makeover can breathe new life into your floors without breaking the bank. In this article, we'll explore creative and easy ways to revamp your rugs and transform your living spaces.
Painted Rug Designs One of the simplest yet impactful ways to give your rug a makeover is by adding a touch of paint. Create geometric patterns, stripes, or intricate designs using fabric paint or even regular latex paint for a more textured look. Use painter's tape to create clean lines and let your creativity flow. This DIY project allows you to customize your rug to match your decor style and color scheme.
Dyeing for a Change If you have a plain or faded rug, consider dyeing it for a dramatic transformation. RIT dye, a popular fabric dye, is an excellent choice for this project. Choose a color that complements your existing decor or go bold with a vibrant hue. Follow the dyeing instructions carefully, and soon you'll have a rug that looks brand new and adds a burst of color to your room.
Add a Border Enhance the visual appeal of your rug by adding a border. Use fabric, ribbon, or even paint to create a border that frames the edges. This simple addition can elevate the overall look of your rug and tie it in seamlessly with the rest of your decor. Experiment with different colors and patterns to find the perfect border for your space.
Tassel Trim Give your rug furnish a bohemian or eclectic flair by adding tassel trim. You can purchase pre-made tassels or make your own using yarn or embroidery thread. Attach the tassels along the edges of the rug to create a playful and stylish border. This DIY rug makeover adds texture and movement to your floor covering, making it a unique focal point in any room.
Stencil Magic Stencils provide a quick and easy way to transform the look of your rug. Choose a stencil pattern that complements your decor style and use acrylic paint to apply the design. Stenciling works well on both plain and patterned rugs, allowing you to experiment with various looks. Whether you opt for a Moroccan tile pattern or a floral motif, stenciling offers endless possibilities for customization.
Patchwork Perfection If your rug has seen better days and has a few worn-out spots, consider turning it into a patchwork masterpiece. Cut the rug into squares or rectangles and rearrange the pieces to create a new pattern. Sew or glue the patches together, and you'll have a one-of-a-kind patchwork rug that breathes new life into the old.
Bleach Art For a chic and modern rug makeover, try bleach art. Use a stencil or freehand a design on a solid-colored rug using bleach. The bleach will lighten the rug fibers, creating a stunning contrast between the pattern and the base color. This technique works particularly well on darker rugs and adds a trendy, custom touch to your floor decor.
Rug Layering If you have multiple rugs or carpets that you love, experiment with layering. Place smaller rugs on top of larger ones to create visual interest and depth. Mix patterns, textures, and colors to achieve a boho-chic or eclectic look. Rug layering is not only a great way to revamp your floors but also provides extra warmth and comfort underfoot.
Conclusion DIY rug makeovers offer a budget-friendly and creative way to revitalize your living spaces. Buy Handmade Rugs & Carpets Online in India Whether you choose to paint, dye, add trims, or experiment with different techniques, the key is to let your imagination guide you. Transforming your rugs can breathe new life into your home, making it a reflection of your personal style and creativity. With these easy and inventive rug makeover ideas, you can turn a simple floor covering into a statement piece that enhances the overall aesthetic of your living space. Get ready to roll up your sleeves, unleash your artistic side, and embark on a rug makeover journey that will leave your floors looking refreshed and rejuvenated.
0 notes
Text
Mastering Custom Lapel Pins: Your Comprehensive Guide
Are you ready to add a touch of flair and personality to your outfits? Look no further! Lapel pins are the ultimate fashion statement, effortlessly elevating any ensemble. Whether you’re a seasoned lapel pin enthusiast or just starting out in the world of accessories, this comprehensive guide has got you covered. From their rich history to different types and how to style them flawlessly – we’ve gathered everything you need to know about lapel pins right here. So get ready to unlock endless possibilities for self-expression and let’s dive into this stylish journey together!

Benefits of Wearing a Lapel Pin
A lapel pin is a small, decorative badge that can be worn on your clothing. Lapel pins can be made from a variety of materials, including metal, enamel, and plastic. They are often used to show support for a cause or organization, or to show membership in a group or club. Lapel pins can also be worn as fashion accessories.
There are many benefits to wearing a lapel pin. Lapel pins can help you make a statement without saying a word. They can show your support for a cause or tell the world what you’re passionate about. Wearing a lapel pin can also make you feel more confident and put-together. And because they’re so small, lapel pins are easy to change out depending on your mood or the occasion.
Customizing Your Lapel Pins
Lapel pins are a great way to show your unique style and personality. You can choose from a variety of different materials, colors, and designs to create a custom lapel pin that is perfect for you.
There are a few things to keep in mind when customizing your lapel pin. First, decide what material you would like your pin to be made from. There are many options available, including metal, enamel, plastic, and even wood.
Next, choose the color or colors that you would like your pin to be. You can either select one color or mix and match multiple colors to create a truly unique look.
Select the design of your pin. This can be anything from a simple logo to an intricate piece of art. Once you have finalized your design, send it off to a lapel pin manufacturer to have it created for you.
How to Attach Lapel Pins
Lapel pins are often used to show support for a cause or as a fashion statement. They can be attached to clothing using a variety of methods, depending on the type of pin and the fabric it will be worn on.
Some lapel pins have a sharp metal clasp that can be inserted through fabric and secured on the back side. These are best used on thicker fabrics such as coats or jackets. For thinner fabrics, look for pins with a flat base and grip Mechanism. The pin will slide through the fabric and the grip will keep it in place from behind.
Another option is to use a magnet to attach your lapel pin. This is particularly helpful if you want to avoid puncturing your clothing. Simply attach the magnet to the back of the pin and it will adhere securely to your shirt or lapel.
If you’re looking for a more permanent solution, consider sewing your lapel pin onto your garment. This works well for small pins and can be done by hand or with a sewing machine. Simply thread a needle with matching thread and stitch around the edges of the pin, being careful not to catch the front of the design in your stitching.
Types of materials used in lapel pins
There are a variety of materials that can be used to create lapel pins, and the type of material you choose will ultimately depend on your budget and desired look. Here are some of the most common materials used in lapel pin production:
-Enamel: Enamel is a popular choice for lapel pins because it comes in a wide range of colors and can be molded into any shape or design. Additionally, enamel pins have a high-quality look and feel that is perfect for promotional or corporate use.
-Metal: Metal is another popular choice for lapel pins, and it can be stamped, die-cast, or etched into any desired shape. Metal lapel pins have a classic look and feel that is perfect for more formal occasions.
-Plastic: Plastic is a great choice for Lapel Pins if you’re looking for a budget-friendly option. Plastic pins can be molded into any shape or design, and they come in a wide range of colors.
Conclusion
Lapel pins are a fun and versatile way to express yourself. Whether you’re looking to make a fashion statement, show your support for your favorite cause, or commemorate an important event or person, lapel pins can help you do all of that and more. With so many shapes, designs, colors and materials available it’s easy to find the perfect lapel pin for whatever occasion you might have in mind. So go ahead – pick out some pins and add a little extra flair to your wardrobe today!
Blog source: https://sunsetpinscoins.wordpress.com/2023/08/28/the-ultimate-guide-to-lapel-pins-everything-you-need-to-know/
0 notes