#Step by step retroarch windows 10
Explore tagged Tumblr posts
Visit Tumblr Blog
Explore Tumblr blogs with no restrictions, modern design and the best experience.
Last Seen Tumblr Blogs


Fun Fact
Tumblr has been providing a Korean-language service since 2013.
Text
Step by step retroarch windows 10

#STEP BY STEP RETROARCH WINDOWS 10 INSTALL#
#STEP BY STEP RETROARCH WINDOWS 10 FREE#
#STEP BY STEP RETROARCH WINDOWS 10 INSTALL#
Download iOS 11 Beta 3 & Install On iPhone 7, 7 Plus, 6s, 6, SE, 5s, iPad, iPod.Download iOS 11 Public Beta 2 And Install The Right Way, Here’s How.
#STEP BY STEP RETROARCH WINDOWS 10 FREE#
Watch Game of Thrones Season 7 Premiere Free Online Without Cable Subscription, Here’s How.
iOS 11 Beta 4 / Public Beta 3 Download Release Date Expectation.
Snapchat Hacks 2017: Download Snapchat++ IPA On iOS 10 Without Jailbreak.
Is iOS Jailbreaking Dead? The Pioneers Of iPhone Jailbreak Weigh In.
Download VizoRec IPA Screen Recorder App On iOS 10.
The developer profile should now be trusted meaning that you can launch the app without it crashing back to the home screen.Įnjoy running all those classic games on your iPhone or iPad! Step 5: And that’s all that you need to do. Tap on that and then tap Trust again when the alert appears. When you tap on the profile you will notice that there is a Trust button in the middle of the display. Step 4: Locate the profile in that section which is assigned to the emulator installation. Launch the Settings app on the device and navigate to General > Profiles & Device Management. On some iOS devices, this may have a slightly different name. The reason being that we need to stop the app from crashing back to the Home screen whenever it is tapped. Step 3: Now that you have the application installed on your device, it is time to actually tell iOS that it needs to trust the installation in order to be able to run it.
Cydia Impactor: Sideload iOS Apps On Windows, Mac With Cydia Impactor Without Jailbreak, Here’s How.
Xcode (official supported method for sideloading): How To Sideload iOS Apps Without Jailbreak Using Xcode.
You can do this without the use of the App Store and Cydia by simply with either a Mac or Windows machine using any one of the guides below: Step 2: Now that you have the RetroArch multi-system emulator IPA in your possession, you are going to need to actually get it sideloaded onto your iOS 10 device. You can grab the RetroArch emulator IPA from here. Step 1: Before you can begin the installation process, you are going to need to have the necessary IPA file downloaded to your machine.
0 notes
Text
Comprehensive Guide for Emulating KOF 94-99 thru Retroarch
So, in my MANY attempts to drag people into KOF I wanted to make an easy to follow guide on how to emulate and play it on a Windows PC! This video is helpful if you prefer following along in a video format (which can definitely be easier for some people, although it does skip past a few things, thus why I'm writing this) The video I linked sped past this part so if you're following the video exactly, go to step 10 on this guide to see how to load your games into Retroarch!
You'll be emulating this through the Neo Geo CD, which is how the first several King of Fighters games were released outside of arcades! It runs really smoothly. You can theoretically download ROMs from anywhere for this, but I got mine from here (linked from the offical roms subreddit! It's specifically for the Neo Geo CD that you wanna get downloads from!)
1. Download the files! To make it quicker than scrolling, you can just search the word "king" to find all the files nicely in a row. Personally, I didn't go with the files that had (Rev 1) by the name, simply because I wasn't sure what the difference was.

2. The files will take a bit to download based on your internet, but once they've downloaded, just leave them in the .zip format! You'll be unzipping them later! For ease, I put all the .zip files in one folder in my downloads folder so they stayed out of the way for when I was installing Retroarch and moving files around. This isn't necessary but it helped me a TON from getting files mixed up.
3. Install Retroarch (if its not installed already), I selected the Nightly version as it's more kept up to date. You just scroll down to the bottom to where u get two little links, press the Nightly Builds option (if you're going for that one!). It will send you to a file folder system, navigate to the folder that is just called Windows, then the 86x64 folder, scroll down to the file that is called Retroarch.7z and click it. It should start downloading. For easier access, I have a link to just where you have to click the actual download for the Retroarch.7z file.
Then you'll want to unzip it with either 7zip or winrar and place the folder where you want it to permanently be. If you move it after you run it for the first time, it could mess files up (but if that happens, you can just delete the retroarch.cfg file to basically reset it!)
Before you open Retroarch, navigate to the Systems folder and create a new folder. Name it "neocd" (without the quotes!)
4. Next up, you'll want to install the BIOS file for the NeoGeo CD at this link right here! With the two download options (version 4.0 for MVS/AES or version 3.3 for CD), you want to download version 3.3 for CD. And just like with the Retroarch file, you want to unzip this too.
5. Now that both files are unzipped and you have the neocd folder created, you just want to open up the BIOS folder, which should have 2 files inside, and move the "uni-bioscd.rom" file into the newly created "neocd" folder.
6. The hard part is over! Launch retroarch and do any neccesary setup! Click on the Online Updater button, then click on Core Downloader (the video is using a slightly older version but this is how it looks right now (as of ver 1.10.02)
7. Scroll down and select the file called "SNK - Neo Geo CD (NeoCD)" (again without the quotes) and let the core download. This should only take a few seconds.
8. Now, its time to unpack your games! Extract the files (I personally chose to extract to a folder (the option with Winrar says "Extract to (game name)" to keep my folder really organized). It will take several minutes to extract, but when it is extracted, you should have a bunch of files with the extension .bin and one with the extension of .cue.
Following the example of KOF 94, this is how my extracted folder looks.
9. Back to Retroarch now that you have all this done! Go ahead and select the Load Content button. You should have several options, but the easiest (for me) is going to the C:/ option, then navigating through Windows to find my files. My files are in my downloads folder, so I went to Users -> (my username) -> Downloads -> (the specific subfolder I keep my Neo Geo games in). I kept the .zip files as I was worried about messing something up, so my folder looks like this (obviously, you dont need to keep the .zip files once you've extracted!)

10. You'll want to open the folder for the game you wish to run, in this case, I'm going to go with KOF 94. Again, you have a lot of .bin files, so you want to scroll all the way down to the .cue file and select that. This should open up a new window, and you'll be greeted with the Neo Geo CD launch screen!
11. Now, your game might have a different screen, one with the SNK logo and two different menu options. The way to go around this is pushing select on your controller. It will bring up a menu with Region and System Options.
Quick side note: if you don't have a controller plugged in (as I didn't), really quickly open up a new tab in Retroarch (by right clicking on the icon and selecting Retroarch, you should have two tabs running at once. Then you'll want to select the Load Core button, select the "SNK - Neo Geo CD (NeoCD)" core, then check the bottom of your screen. It should show something similar to this in the bottom left corner of Retroarch:

Then navigate to Settings -> Input -> scroll down until you find Port 1, then open that up. These are your controls which you can remap however you need to, but take note of which key is the Select Key and your arrow and A key. Go back to your main window with the SNK screenshot shown above and continue following the main tutorial.
12. Set your region using your directional keys (setting it as whatever region you're in, so I selected US, then going down and pressing CDZ. Push A and you should be greeted with the Neo Geo CD launch animation, then the main menu of your game
13. Push the F1 key on your computer to bring up the Retroarch menu, navigate to the Settings button and set your settings so they match this! The Neo Geo CD was notorious for how long it would take to load things so this makes it run smoothly and fast!
And you're done! You should be completely able to play any game now, and just loading in new games the same method used from steps 9-10. But navigating through all your folders to reach your games is a massive hassle, so you can create a playlist rather simply (this is not necessary, simply easier than how it was before!)
1. Launch Retroarch and select the Show Desktop Menu button. A new window should pop up, push OK on the popup that appears!
2. Right click on this area and select New Playlist

(You'll see that I already have mine set up, ignore the bottom playlist as that's what yours will look like when finished!)
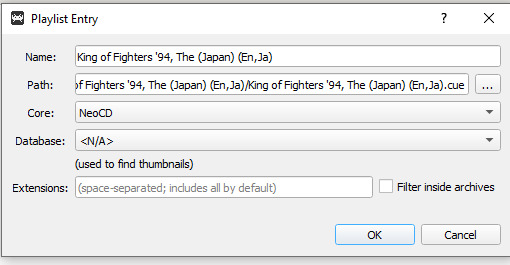
3. You'll get a pop up asking you to name your playlist and name it exactly like this (without the quotes) "SNK - NEO GEO CD" (important note to have a space in between your dashes and to have it in all caps!). Naming it this way gives you the fun icon that matches how the Neo Geo CD console looks on the side bar (you can see this in my screenshot above!)
4. Click on your Neo Geo CD Playlist and right click on the empty space, and select Add File(s)
5. Navigate to where your Neo Geo games are and select the .cue file for your game (if you see my screenshot on step 8 of the main guide, you can see right where the .cue file is!
6. Change your settings to match these (by setting your core to Neo Geo CD and that's it!)
7. Your game should show up in the folder, then add the rest (if you downloaded more than one game!) by doing the same steps of right clicking, adding a file, selecting the .cue file, changing your core to NeoCD, then pressing ok!
And that's all! You're finally done setting this up! When you go back to your normal retroarch menu, you should be able to scroll down on the left side bar and see a folder that is titled NEO GEO CD and contains all of your games with a CD icon beside them! You just click on them, then press the Run button, and your game is launched in a lot less time than navigating around stuff if you're not getting things in a playlist!
#twist rambles#kof posting#i like. wanted to do this bc ben showed interest and um hashtag girl i wanted to make it easier#MASSIVE thanks to the youtuber who made the vid as im more of a visual learner but genuinely. its not too hard to set up! and i wanted to +#make an easier to follow tutorial for the people that learn by reading things!#long post#<- even tho its under a cut! its long if u wanna read it all the way thru
7 notes
·
View notes
Text
Windows 10 make google default search engine in firefox

#Windows 10 make google default search engine in firefox install#
#Windows 10 make google default search engine in firefox manual#
#Windows 10 make google default search engine in firefox password#
#Windows 10 make google default search engine in firefox download#
#Windows 10 make google default search engine in firefox windows#
Some packages also have additional configurations.
#Windows 10 make google default search engine in firefox install#
By selecting a package you can choose to install it, or remove it. The packages are ordered first by type (emulators / libretro cores / ports), then alphabetically. Stable additional packages are under the “Optional” section, with more unstable packages listed under experimental. In each section are lists of packages that can be installed (and it will show what is currently installed). Once there you can navigate to “Manage Packages” where you will see various sections. Software can be installed from the RetroPie-Setup script – which is accessible from the RetroPie menu on EmulationStation. Ports like quake and doom and some other emulators like ScummVM can be installed later. This should cover everything most users would be doing. The pre-made images contain the best working emulators for each system supported by the hardware. On RetroPie 4.0+, not everything is installed by default. Once configured you will see your IP addressįor more WiFi configuration options see this page HERE Installing additional Emulators
#Windows 10 make google default search engine in firefox password#
Type your Wifi Password (may take a moment to connect) If you wish to use wifi to transfer roms over the network rather than a USB stick or Ethernet cable you’ll need to setup your wifi- which can also be done from the Retropie menu in emulationstation: Connect to Wifi Network: Transferring roms are described in the following steps. When you first see EmulationStation you may wonder why you don’t see systems like the SNES or Game Boy- worry not- they are installed on the system, roms just need to be added to their respective rom folders before they will become visible. Note that hotkeys are only specific to the retroarch/libretro based emulators. By default, the hotkey is select so that means you hold down select while pressing another button to execute a command. The following chart shows the default hotkey combinations. Hotkeys enable you to press a combination of buttons to access functions such as saving, loading, and exiting emulators. See the following diagrams for reference: SNES Controller
#Windows 10 make google default search engine in firefox manual#
For more details on manual controller configurations see this page Here. If you wish to configure more than one controller, you can do so from the start menu of emulationstation. When you get to OK press the button you have configured as “A”. Hold down any button on your keyboard or gamepad and the name will appear at the bottom and then open up into a configuration menu:įollow the onscreen instructions to configure your gamepad- if you run out of buttons just hold down a button to skip each unused button. On first boot your filesystem will be expanded automatically, you will then be welcomed with the following screen- this menu will configure your controls for both Emulationstation and RetroArch Emulators: If you’re updating from a previous version of retropie see HERE Configure Controllers You will be able to access the filesystem over the network as described in the transferring roms section below.
#Windows 10 make google default search engine in firefox windows#
Note RetroPie is built on top of Raspbian (a linux based OS for the Raspberry Pi) and as such the partition on the SD card is EXT4 (a linux filesystem) which is not visible on windows systems, so the card will show up as a smaller size than usual and you wont be able to see everything on the card, but it is all there. See the official Raspberry Pi “WRITING AN IMAGE TO THE SD CARD” instructions. For Linux you can use dd command or Etcher.For Windows you can use a program called Win32DiskImager.(You may need a MicroSD card reader to plug it into your computer) To install the RetroPie SD image on your MicroSD card. To extract from the command line, you can type the following into a Terminal window, placing X with version you downloaded: gz file and the extracted file will be a. Once you have downloaded your SD card image you need to extract it using a program such as 7-Zip.
#Windows 10 make google default search engine in firefox download#
If you get the error Illegal Instruction when it boots or if it just boots into the terminal, you picked the wrong SD image or the image was corrupted on download or extraction. If you are unsure which version of Raspberry Pi you have just count the raspberries on boot: Raspberry Pi 0/1 There is one version for Raspberry Pi 0/1 (Model A, A+, B, B+) and there is a version for Raspberry Pi 2/3.ĭownload the SD image for your version of Raspberry Pi from the following page: There are currently two versions of RetroPie. Below is a guide directly from RetroPie’s GitHub page, linked here. This is a companion guide to my RetroPi Cart and will outline the steps for installing RetroPie on your Raspberry Pi Zero-W.
0 notes
Text
How to install retropie dreamcast emulator

How to install retropie dreamcast emulator for free#
How to install retropie dreamcast emulator how to#
How to install retropie dreamcast emulator software#
How to install retropie dreamcast emulator windows#
How to install retropie dreamcast emulator windows#
15 Windows Command Prompt (CMD) Commands You Must Know.
How to install retropie dreamcast emulator how to#
How to Track Downloads in Google Drive, Dropbox, and Box.
10 Reasons Why Brave Browser Is Becoming So Popular.
The Best Dark Web Browser for Your Device.
Deck the Halls With These 8 High-Tech Christmas Decorations.
How to install retropie dreamcast emulator for free#
6 Ways You Can Get a Microsoft Office License for Free.What Is OpenBSD? Everything You Need to Know.How to Add Name Pronunciation to Your LinkedIn Profile.What Are Bézier Curves in Computer Graphics?.
How to install retropie dreamcast emulator software#
The 5 Best Tools to Download Streaming Video From Any Website Here are the best apps and software for when you want to download videos from websites quickly and painlessly.how to emulate Amiga games on Raspberry Pi.RetroPie beta images for Raspberry Pi 3 B+.installing an operating system on the Raspberry Pi.While there remain a few Dreamcast games that won't play on the Raspberry Pi (see below), using a Pi 3 B+ will give you the best chance of being able to enjoy the Dreamcast gaming experience. The newer the Raspberry Pi model, the better, as superior hardware delivers more consistent results. You'll also need to ensure that you're using a Raspberry Pi 2 or 3 for the best results. However, it does run under RetroArch, of which RetroPie is a fork. This is because the emulator for Dreamcast games, Reicast, doesn't run with Recalbox. Raspberry Pi users have the option of two great gaming emulation suites: Recalbox and RetroPie.īut to play your favorite Sega Dreamcast games on a Raspberry Pi computer, you'll need to use the RetroPie image. Why You Need RetroPie to Emulate the Dreamcast Game controller (mine is an Xbox 360 USB controller).Raspberry Pi 2 or 3 ( I'm using a Raspberry Pi 3B+).Thanks for reading and watching, if you have any doubt comment me below i will like to give answers. Hope you enjoyed the tutorial, if missed something in this article give your feedback in the comment section i will fill that point. So you learned how download game roms to the retropie and how to install, one more website i want to include, check it here. Thanks for watching this video if you want to buy the items shown in video check video’s description for links. How to Build Retro GAME CONSOLE with RPi 3 B+ & Retropie I found it have good ratings and contains mega roms collection. Find link in next Paragraph.ĭownload game roms for all the platforms like Playstation, Nintendo entertainment system, SNES, Nintendo64, Mame, NeoGEO, SEGA, Atari etc from this Game Roms website. There is a Website which is trusted by many people and its safe too. Do not download any illegal roms from untrusted sites, otherwise the will may put malware to your device. Ask your friend if they have some or you can search google for roms. How and where to Download Game Roms for Retropie ?įor the copyright reasons and some other reasons retropie website do not serve any game roms on there website, you have to find game roms yourself. Step 7 : Start your Raspberry pi and you will see the emulators and games are now showing in the retropie. Step 6 : Now keep your Raspberry pi turned off, insert the USB drive to Pi. Step 5 : Copy the roms to their respective emulator folders (in the retropie/roms folder) Step 4 : After waiting take out the USB drive and plug it into a computer. Step 3 : Then plug it into the pi and wait for 2 or 3 minutes, retropie will create some folder and setting to your USB drive. Step 2 : Now create a folder on your flash drive and rename it to “retropie” Step 1 : Insert a empty flash drive to your computer or format your Flash drive using sdcard formatter in FAT32 File system. Now let’s see how to get ready your USB drive to be able to transfer the ROMs: You can use any flash drive but it must be in a fat32 partition format. You will need a USB drive to add ROMs and a computer. To add game ROMs to Retropie there are three options, but in this article I will show you the easy one. This is a Linux based operating system and its also called best Gaming os for playing retro games of the ’90s. Retropie also has a service REtro ARCH which allows you to connect and play other computers. You can download 1000+ retro game ROMs below in the article. Installing the Retropie you will need to configure your gamepad first then you have to add game ROMs on it. You can download this operating system for free in Retropie website. Retropie is an Operating System for ARM boards like Raspberry pi, to emulate games from multiple gaming platforms.
0 notes
Text
Best nintendo ds emulator reddit

Best nintendo ds emulator reddit full#
Best nintendo ds emulator reddit software#
Best nintendo ds emulator reddit code#
Best nintendo ds emulator reddit Pc#
Best nintendo ds emulator reddit windows#
There are very few playable commercial titles for PlayStation 4, PlayStation Vita, Xbox one, and Nintendo Switch emulators.
This is /r/ emulation - not /r/flashcarts or /r/consolehomebrew.
Please abide by reddit's site-wide rules on self-promotion. Any further videos should be packaged into a self post, accompanied by a submission statement that facilitates discussion.
Users are permitted to post one emulator demonstration video per day as a link post.
Comments stepping significantly over the line will be removed- use some common sense. Simple tech support or general queries not fulfilling that requirement belong in the Weekly Question Thread and will be redirected there.
Self posts should provide scope for wider, interesting discussion.
Use Google and check The Emulation General Wiki before posting.
Best nintendo ds emulator reddit software#
Don't ask for or link directly to pirated software or copyrighted material without permission of the copyright holder. It can be installed on Windows, Mac, and Linux.To get started check out our wiki page or The Emulation General Wiki.It emulates 3DS local Wi-Fi so that you can play multiplayer with other people running games on the emulator.It also offers an in-house screen recorder.
Best nintendo ds emulator reddit code#
It has joystick support, screen layout options, and cheat code support.
Best nintendo ds emulator reddit full#
It allows you to run several 3DS titles at full graphics and high resolution, even with a mediocre system.
It enables users to set internal resolutions up to 4K.
Best nintendo ds emulator reddit Pc#
The last NDS emulator for PC I recommend is Citra. Its disadvantage is that running games is relatively difficult as compared to the other Nintendo DS emulators here. It can be installed on Windows, macOS, and Linux.It allows you to record your gaming session and even stream your gameplay on Twitch.It has highlights like RetroArch are shaders, netplay, rewinding, next-frame response times, run ahead, machine translation, blind accessibility features, and much more.It can run games from all mainstream retro consoles like NES, SNES, DS, DSi, 3DS, 64, Atari, MAME, and many more.RetroArch is an all-in-one emulator and it can be used to play games of nearly all retro consoles. However, NO$GBA also has disadvantages, for example, it is lacking in screen layout features and it is only available on Windows.
Best nintendo ds emulator reddit windows#
It can be installed on a Windows 10, Windows XP and MS-DOS computer system.
It takes very few system resources and works very fast, even on underperforming PC’s.
Although it only has handful graphic settings, you can get good game graphics comparable to DeSmuME with a few tweaks.
NO$GBA is an ideal emulator for anyone who is rocking an older computer system or wants to enjoy DS games on a low-powered laptop.
Like DeSmuMe, MelonDS is open-source but it is available for both Windows and Linux.
It can save progress whenever a player wants to and displays live FPS while playing games.
2D & 3D rendering by the MelonDS emulator are almost pixel-perfect. (Thanks to OpenGL render, the Nintendo DS emulator allows you to tap in extreme resolutions even with medium performing systems.)
It has excellent features like OpenGL renderer, 3D upscaling, joystick support, local multiplayer, and online connectivity.
MelonDS is also one of the best Nintendo DS emulator. When we talk about best DS emulator for PC, we can't avoid MelonDS. You can use DeSmuMe on both Windows and macOS. You can either opt for high graphics quality coupled with mediocre performance or low graphics quality with flawless performance.
It allows users to customize the graphics and emulation settings based on their system configurations.
It allows users to play exclusive DS titles at maximum graphics.
Thanks to being open-source, this emulator is constantly improving.
DeSmuMeĭeSmuMe is one of the best DS emulators for PC. If you are also seeking for a Nintendo switch emulator PC, here are some recommendations for you. However, some people may like to play these games on PC via a Nintendo DS emulator. On this device, you can play Mario, The Legend of Zelda, Metroid Prime Hunters, etc. It was released in 2004 and was the first handheld system to feature dual screens. The Nintendo DS is the most recent handheld system developed by Nintendo.
0 notes
Text
My disney kitchen pc download for windows 10

MY DISNEY KITCHEN PC DOWNLOAD FOR WINDOWS 10 SOFTWARE
MY DISNEY KITCHEN PC DOWNLOAD FOR WINDOWS 10 PC
When playing in the future and you want to continue from your saved state, you can use File > Load State to load up the game from exactly where you last saved it. You can save your progress in whatever point you like within the game, not only on the official checkpoints offered by the game. Instead, you’ll need to click File > Save State and then choose an empty slot. The integrated save system will not save your progress. Tip: Saving games on an emulator functions a little differently. The game will now run on the emulator and you can play the game freely. Step 2: return to Retroarch and hit File > Open. A ROM is essentially a virtual version of the game that needs to be loaded into the emulator. But now you’ll need to find the correct ROMs online. Your emulator will now be ready to play My Disney Kitchen rom. After, double click the RetroArch-1.7.5-x86-setup.exe file in order to start the emulator. zip file to a location, for example your Desktop. Once you have finished downloading Retroarch, extract the downloaded. Games Being Played Right Now Latest Searches play my disney kitchen freeload, play zork 2, pokemon emerald 356, encarta 98, .ua online game link:'' online car games, romulation, mobile boy pokemon fire red rom, Super Metroid - Digital Cube (v0. We’d suggest Retroarch – it’s open source, fast and one of the most frequently updated. Step 1: you can start by downloading a reliable and bug free emulator. My Disney Kitchen has not been rated by our users yet. My Disney Kitchen runs on the following operating systems: Windows. It was initially added to our database on. The latest version of My Disney Kitchen is currently unknown.
MY DISNEY KITCHEN PC DOWNLOAD FOR WINDOWS 10 SOFTWARE
The second component is the My Disney Kitchen rom itself to play on the emulator. My Disney Kitchen is a Shareware software in the category Miscellaneous developed by My Disney Kitchen.
MY DISNEY KITCHEN PC DOWNLOAD FOR WINDOWS 10 PC
Download the Online Stopwatch Application for your PC or MAC. The first component is the emulation program which can imitate the psx OS and software. 10 Minute Timer (600 Seconds) - Online Timer. There are two components for playing a psx My Disney Kitchen rom on your PC.
0 notes
Text
Windows 10 no sound from earphones 無料ダウンロード.How to Fix No Audio Output Device is Installed Error in windows 10,7,XP
Windows 10 no sound from earphones 無料ダウンロード.Windows 10でRealtek HD Audio Managerをダウンロード [MiniTool]

Check if the RetroArch is muted.How to fix No Sounds on RetroArch for Windows 10 –
Step3: Select“Troubleshoot audio playback” Windows 10 Step 1: Right click the sound icon in the system tray. Step 2: Choose “Troubleshoot sound problems” Step 3: After detecting, the related problem will be displayed, and please follow the instructions prompted to troubleshoot the problem. Solution 4: Switch Audio Output Mode Windows 10 の ISO ファイルをダウンロードするためにメディア作成ツールを使用した場合は、これらの手順に従う前に、ISO ファイルを DVD に書き込む必要があります。 Windows 10 をインストールする PC に、USB フラッシュ ドライブまたは DVD を挿入します。Missing: earphones 無料 dts sound インストール のダウンロード ソフトウェア UpdateStar - DTS サウンド、モバイル ・ エンターテイメントのための包括的なオーディオ ソリューション卓越したエンターテイメントのオーディオとビデオの組み合わせを提供します。DTS 音声で消費者がヘッドフォンで展開されたステレオ
Windows 10 no sound from earphones 無料ダウンロード.Windows Sonic for Headphonesとは? | Windows10標準のバーチャルサラウンド機能! | penpenのPC入門サイト
Download the DTS® Sound Unbound™ app to start your free trial of DTS® Headphone:X® and DTS:X® spatial audio technologies and amplify your gaming and video content. 無料ダウンロード & セキュリティ Windows 10 のこの拡張機能を使用して、指定した種類のメディアを再生してください。 Jun 18, · 続きを読む: Realtek HD Sound用のRealtek Equalizer Windows 最後に. この記事では、Windows 10コンピューターにRealtek HD Audio Managerをダウンロードする方法をご紹介しました。お役に立てれば幸いです。Missing: earphones Windows 10 の ISO ファイルをダウンロードするためにメディア作成ツールを使用した場合は、これらの手順に従う前に、ISO ファイルを DVD に書き込む必要があります。 Windows 10 をインストールする PC に、USB フラッシュ ドライブまたは DVD を挿入します。Missing: earphones
あなたのWindowsコンピュータで Sony Headphones Connect を使用するのは実際にはとても簡単ですが、このプロセスを初めてお使いの場合は、以下の手順に注意する必要があります。 これは、お使いのコンピュータ用のDesktop Appエミュレータをダウンロードしてインストールする必要があるためです。 以下の4つの簡単な手順で、Sony Headphones Connect をコンピュータにダウンロードしてインストールすることができます:. エミュレータの重要性は、あなたのコンピュータにアンドロイド環境をエミュレートまたはイミテーションすることで、アンドロイドを実行する電話を購入することなくPCの快適さからアンドロイドアプリを簡単にインストールして実行できることです。 誰があなたは両方の世界を楽しむことができないと言いますか? まず、スペースの上にある犬の上に作られたエミュレータアプリをダウンロードすることができます。 A.
Nox App または B. Bluestacks App 。 個人的には、Bluestacksは非常に��及しているので、 "B"オプションをお勧めします。あなたがそれを使ってどんなトレブルに走っても、GoogleやBingで良い解決策を見つけることができます lol. exeを正常にダウンロードした場合は、コンピュータの「ダウンロード」フォルダまたはダウンロードしたファイルを通常の場所に保存してください。 見つけたらクリックしてアプリケーションをインストールします。 それはあなたのPCでインストールプロセスを開始する必要があります。 [次へ]をクリックして、EULAライセンス契約に同意します。 アプリケーションをインストールするには画面の指示に従ってください。 上記を正しく行うと、ソフトウェアは正常にインストールされます。. これで、インストールしたエミュレータアプリケーションを開き、検索バーを見つけてください。 今度は Sony Headphones Connect を検索バーに表示し、[検索]を押します。 あなたは簡単にアプリを表示します。 クリック Sony Headphones Connectアプリケーションアイコン。 のウィンドウ。 Sony Headphones Connect が開き、エミュレータソフトウェアにそのアプリケーションが表示されます。 インストールボタンを押すと、アプリケーションのダウンロードが開始されます。 今私達はすべて終わった。 次に、「すべてのアプリ」アイコンが表示されます。 をクリックすると、インストールされているすべてのアプリケーションを含むページが表示されます。 あなたは アイコンをクリックします。 それをクリックし、アプリケーションの使用を開始します。.
Toggle navigation Windows PC アプリ. カテゴリ 書籍 ビジネス カタログ 教育 エンターテイメント 財務 食べ物 飲み物 ゲーム 健康 フィットネス ライフスタイル 医療 音楽. ナビゲーション ニュース ニューススタンド 写真 ビデオ 生産性 参照 買い物 ソーシャルネットワーク スポーツ 旅行中 ユーティリティ 天気.
すべてのゲーム ア��ション 冒険 アーケード ボード カード カジノ 家族 子供. 音楽 パズル Racing ロールプレイ中 シミュレーション スポーツ 戦略 Triva ワード. トップフリー 最高収入 人気がある すべての新しいアプリ 新着&無料 新規&有料。 Streaming アプリ Tv アプリ. VPN アプリ IPTV アプリ Movies アプリ Job アプリ Editing アプリ Crypto アプリ Kodi Tv アプリ Video Editors. カテゴリ: Utilities 最終更新日: 現在のバージョン: 8. ダウンロード アプリをダウンロード. ダウンロードとインストール Sony Headphones Connect あなたのWindows PCで.
あなたのWindowsコンピュータで Sony Headphones Connect を使用するのは実際にはとても簡単ですが、このプロセスを初めてお使いの場合は、以下の手順に注意する必要があります。 これは、お使いのコンピュータ用のDesktop Appエミュレータをダウンロードしてインストールする必要があるためです。 以下の4つの簡単な手順で、Sony Headphones Connect をコンピュータにダウンロードしてインストールすることができます: 1: Windows用Androidソフトウェアエミュレータをダウンロード エミュレータの重要性は、あなたのコンピュータにアンドロイド環境をエミュレートまたはイミテーションすることで、アンドロイドを実行する電話を購入することなくPCの快適さからアンドロイドアプリを簡単にインストールして実行できることです。 誰があなたは両方の世界を楽しむことができないと言いますか? まず、スペースの上にある犬の上に作られたエミュレータアプリをダウンロードすることができます。 A.
約 Sony Headphones Connect. アプリ レビュー. バイ sony rolly 1. 調子悪い レビューすら書けない。. バイ じゃがりこ食べたい! 4. 機能面では文句なし 接続がしずらいときがある. バイ Nuts0v0 4. 風切り音について 風切り音を減らせるようになり、風が吹いている日でも外でノイズキャンセリングモ��ドが使いやすくなったのはとても良いと思います。しかし、安全面も考えると外でノイズキャンセリングモードを使うのはとても危ないのでアンビエントサウンドモード時にも風切り音を削減出来れば良いと思います。. バイ 究極のゴミゲーム 1. 繋がらない 30,円の高級イヤホンが繋がらない. Sony REC Remote. Sony Headphones Connect. IP Remote.
HDD Audio Remote. NS Setup. Sony Music Center. ES Remote.
0 notes
Text
Download Playstation Emulator For Mac
Xbox Emulator For Mac
Download Playstation Emulator For Mac Download
Playstation Rom For Mac
Download PS3 emulator for Mac can be a bit complicated if we do not know which one to download. One of the great and few drawbacks of having a Mac computer is the compatibility of many programs and games with this operating system, and PS3 emulators for Mac are no exception.
Download PS1 emulator, PCSX-Reloaded is a free and open-source PlayStation 1 emulator for written in C for Windows, Android, macOS & Linux.
Sony playstation emulator for mac free download. RetroArch RetroArch is a way to run classic games on a wide assortment of Operating Systems and Consoles.
The emulator has its own website, and you can also download various PS4 titles from there. Virtual Gaming Station (VGS) VGS was designed by Connectix for the Mac OS, but later, updated to. Playstation One Emulator For Mac Windows 10; Mac Ps3 Emulator; Playstation One Emulator For Pc; Playstation One Emulator For Mac.
The best PS3 Emulator for Mac OS
Xbox Emulator For Mac

Just as for its namesake in operating systems there are a multitude of options, for Mac we have few emulators for PlayStation 3 that work really well, but there is one in particular that stands out above the rest: RetroArch.
Download PS3 emulator for Mac OS
The latest release of the PCSX2 Mac port. The source code of each PCSX2 release can be found here. PCSX2 is under the GPL v2/v3 license. Here you will find some useful tools (including the BIOS dumper) for usage with PCSX2. Old stable and beta releases for Windows, Linux and Mac including plugins. FREE LINK emulator, ps4, emulator, playstation 4, ps4 emulator for pc, pcsx4, playstation 4 emulator, play ps4 games on pc, mac, pc.
You can download the PS3 Emulator for MacOS in the following link. This is the most updated version, once installed do not hesitate to check if there are new updates available, in which you can have new compatible games, new features in the program…
Install PS3 emulator for Mac OS
Download Playstation Emulator For Mac Download
To install the PS3 emulator for Mac OS we will have to follow the instructions provided in the following link. This is a simple, easy, fast and free process. So even if you have no computer knowledge, you can do it without any problem. Also, below we leave all the steps explained in case you have any questions.
Other PS3 emulators for Mac OS
Playstation Rom For Mac
MAME
0 notes
Text
Clc Workbench Download

This page contains directions on how to connect your CLCbio Genomics Workbench to the CLCbio Genomics Server installation on HTC cluster, allowing you to offload analyses to the cluster
Clc Main Workbench
Clc Genomics Workbench Software Download
Clc Workbench 20 Download
Clc Genomics Workbench 12 Download
Compatibility
We currently maintain two clcbio servers: clcbio.crc.pitt.edu and clcbio-stage.crc.pitt.edu.
Download CLC Main Workbench (64-bit) for Windows to make a large number of advanced protein sequence analysis. Download CLC Main Workbench (64-bit) for Windows to make a large number of.
CLC Main Workbench is a comprehensive workbench for advanced DNA, RNA, and protein analyses. Main Features: - Editor for graphically and algorithmically advanced primer design. Assembly of DNA sequence data. Molecular cloning. Advanced RNA structure prediction and editing. Integrated and advanced gene expression analysis.
CLC Genomics Workbench is a comprehensive analysis package for the analysis and visualization of data from all major next-generation sequencing (NGS) platforms. The workbench supports and seamlessly integrates into a typical NGS workflow. CLC Genomics Workbench is available for Windows, Mac OS X, and Linux platforms. These instructions are written for the 64 bit Linux installer script for CLC Genomics Workbench (which is a file with a name that ends in.sh) The instructions are the same for installation using the the 32 bit version, or for other Workbench versions. The only differences is the specific installation script name.
clcbio.crc.pitt.edu runs CLC Genomics Server 20.0.3.
clcbio-stage.crc.pitt.edu runs perpetual CLC Genomics Server 11.0.3.
CLC Genome Finishing Server Extension and CLC Microbial Genomics Server Extension are enabled on clcbio.crc.pitt.edu.
CLC Assembly Cell 5.0.3 is available on HTC cluster.
Compatibility
Windows 10 countdown widget. The follow are the corresponding client applications for CLC Genomics Server 20.0 clcbio.crc.pitt.edu
CLC Genomics Workbench 20.0.3
CLC Main Workbench 20.0.3
CLC Command Line Tools 20.0.3 Mythware classroom management software, free download windows 7.
The following are the corresponding clients for the CLC Genomics Server 11.0.3 clcbio-stage.crc.pitt.edu
CLC Genomics Workbench 12.0.3
CLC Main Workbench 8.1.3
CLC Command Line Tools 6.0.3
We recommend running the corresponding versions of clients for CLC Genomics Server. However, CLC Genomics Workbench 12.0, 12.0.1, and 12.0.2, CLC Main Workbench 8.1, 8.1.1, and 8.1.2, and CLC Command Line Tools 6.0, 6.0.1, and 6.0.2 can also connect to CLC Genomics Server 11.0.3. Tools that have changed between versions cannot be launched when using compatible, but not corresponding, client-server combinations.
Server plugins (clcbio.crc.pitt.edu and clcbio-stage.crc.pitt.edu)
Additional Alignments Server Plugin 20.0.0
Download Setup FileThe Sims 1 Download Free PC Game The Sims 1 download pc game is a video game of strategiclife simulationdeveloped by Maxis and published by Electronic Arts in 2000. It is a simulation of the daily activities of one or more virtual people (the “Sims”) in a. READ BELOW- If you would please like to donate to my paypal for new recording software, follow this link: https://www.paypal.com/cgi-bin/webscr?cmd=. Download Setup File. Gratis download The Sims 1 full version untuk pc atau laptop windows complete collection 100% work. The Sims 1 adalah sebuah permainan simulasi keluarga pertama seri The Sims dari Maxis / Electronic Arts. Permainan ini akan memberi Anda pengalaman emosional yang takkan pernah bisa Anda dapatkan dari sebuah video game manapun. Sims 1 pc game free download. The Sims 1 + Expansion pack (8 in 1) Simulation Games developed by Maxis and later by The Sims Studio, and published by Electronic Arts. It is one of the most successful video games series of all time. As of May 2011, the franchise has sold more than 150 million copies worldwide, and is also the best-selling PC franchise in PC history. 1) Download the 'Rip' version of the game for Windows. 2) copy 'sims' folder to a free directory on your drive. I put it into the Downloads folder to test-run it. Tomorrow I'll create a permanent folder for it. 3) Double-click the Sims executable. Should run like a charm. Windows 10 Too fast graphics card 32GB mem 8-processor CPU Ryzen.
Advanced Structural Variant Detection Server Plugin (Beta) 20.0.0 Annotate with GFF file server plugin 20.0.0 Biomedical Genomics Analysis Server Plugin 20.0.0 Cloud Server Plugin 20.0.0 Ingenuity Pathway Analysis Server Plugin 20.0.0 Ingenuity Variant Analysis Server Plugin 20.0.0
Long Read Support Server Plugin (Beta) 20.0.0
MetaGeneMarkServer 2.1.0 Transcript Discovery Server Plugin 20.0.0 Whole Genome Alignment Server Plugin (Beta) 20.0.0
View, comment, download and edit ps3 skin Minecraft skins. Browse and download Minecraft Ps3 Skins by the Planet Minecraft community. View, comment, download and edit ps3 Minecraft skins. 262 ps3 16 ps360 14 ps3yes 9 ps3ud0b3st 7 ps3002 5 ps3gameswin 4 ps3100 4 ps33 4 ps33000 4 ps3zocker 3 ps3djhero 3 ps3knight 3 ps3xd 42 ps3 skin 13 ps3 minecraft 10 ps3 ninja 9 ps3 steve 5 ps3 by 5 ps3 nickval 4 ps3 de 4 ps3 totobacap11 4 ps3 guy 4 ps3 edition 4 ps3 for 4 ps3 angi. Minecraft skin pack 3 ps3. Shop Hardware and Discs; Digital Games and Services; Official Merchandise.
Old gameboy emulator. Gameboy emulator supporting link function. PlayGuy: Windows: Freeware: Rating: 7.9 (49 Votes) Gameboy Color emulator. RetroArch Multi-platform: Open-Source: Rating: 7.6 (397 Votes) Frontend for the Libretro API, effectively a multi-system emulator DreamGBC: Windows: Freeware: Rating: 7.3 (18 Votes) Gameboy Color emulator. Free - GBC Emulator is a complete Game Boy and Game Boy Color emulator that allows you to play almost all of the games developed for these handheld Nintendo consoles, directly. Is a full-featured and super-fast emulator to run Game Boy and Game Boy Color games on the broadest range of Android devices, from very low-end phones to modern tablets. Play GBA Games Online in the highest quality available. Play Emulator has the biggest collection of Gameboy Advance emulator games to play. These GBA games work in all modern browsers and can be played with no download required. Browse more Gameboy Advance games by using the game.
Commercially available Server Extensions (clcbio.crc.pitt.edu)
CLC Genome Finishing Server Extension 20.0.0
CLC Microbial Genomics Server Extension 20.0.0
CLC workbench download link
CLC Genomics Workbench 20.0.3 for clcbio.crc.pitt.edu
Version: 20.0.3
Download macOS Installer - 292.9 MB (.dmg) http://download.clcbio.com/CLCGenomicsWorkbench/20.0.3/CLCGenomicsWorkbe..
Download Linux 64 bit installer - 320.2 MB (.sh) http://download.clcbio.com/CLCGenomicsWorkbench/20.0.3/CLCGenomicsWorkbe..
Clc Main Workbench
Download Windows 64 bit installer - 279.4 MB (.exe) http://download.clcbio.com/CLCGenomicsWorkbench/20.0.3/CLCGenomicsWorkbe..
CLC Genomics Workbench 12.0.3 for clcbio-stage.crc.pitt.edu
Version: 12.0.3 - Release date: 15. Aug 2019
Clc Genomics Workbench Software Download
Download macOS Installer - 269.6 MB (.dmg) http://download.clcbio.com/CLCGenomicsWorkbench/12.0.3/CLCGenomicsWorkbe..
Download Linux 64 bit installer - 298.4 MB (.sh) http://download.clcbio.com/CLCGenomicsWorkbench/12.0.3/CLCGenomicsWorkbe..
Clc Workbench 20 Download
Download Windows 64 bit installer - 251.3 MB (.exe) http://download.clcbio.com/CLCGenomicsWorkbench/12.0.3/CLCGenomicsWorkbe..
Clc Genomics Workbench 12 Download
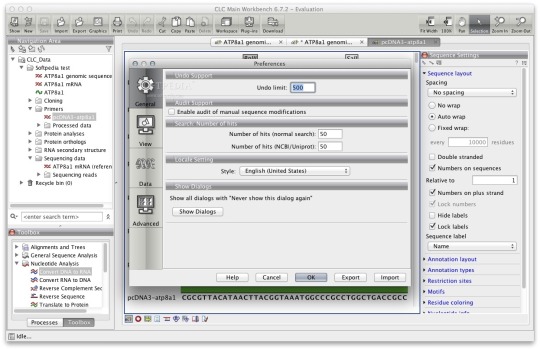
Ensure you have the most up-to-date version of the CLCbio Genomics Workbench (the software should tell you if there's a more recent version when you start it, or you can check this page on the CLCbio website). Register CLC Genomics workbench here and follow the steps to connect to CLCBio workbench license server.
If you have not already done so, request a user account/allocation on the Center for Research Computing (CRC) cluster by filling out the required information on this page. Principal Investigator must be Pitt faculty, and faculty email is the faculty's pitt email. The faculty member is notified via email.
If your computer is not connected to the Pitt network (e.g. you are working from home or on a trip), or you are working from a laptop that is connected to the UPMC network, make sure you setup Pitt SSLVPN, so that you can communicate with the Center for Research Computing (CRC) cluster (clcbio servers are using HTC cluster). Make sure that 'Server URL' (4) is sremote.pitt.edu, and 'Please select a Role' (14) is Firewall-SAM-USERS-Pulse. Note that there are many different VPN roles. Only Firewall-SAM-USERS-Pulse role can connect to CRC clusters. If your VPN is installed by system administrators and you are not sure what role is used, open Pulse Secure, and click + sign and follow the instructions in these figures (https://crc.pitt.edu/htc#Off-campus-access ).
Start up the CLC Genomics Workbench
If you would like to use extra plugins, click the Plug-ins button () in the toolbar at the top of the CLC Genomics Workbench window. This will bring up the Manage Plugins dialog box. Find the Plugin, click the Download and Install button, and then close the Manage Plugins dialog box and restart the CLC Genomics Workbench (choose Yes when the dialog box comes up that asks if you want to restart the workbench now). If you are using Windows machine, you may need to start CLC Genomics workbench as administrator to install Plugins.
From the File menu, choose the 'CLC Server Connection' option. The Server name is clcbio.crc.pitt.edu, and the Port is 7777. Fill in your Pitt username and password, then check off the boxes to have this information saved, and to have the software automatically log in to the server (assuming the software you are using is on your own computer, and not a publicly accessible machine). Please note that username is case sensitive and all letters are in lowercase. Refer to the image below for an example of how the settings in this box should look:
Your workbench software will now attempt to connect to the CLCbio Genomics Server installation on CRC cluster. One of the only noticeable changes will be the appearance of new folders in your Navigation Area. You can find one folder named CLC_Server_Data with a blue S on the folder icon:
This is the data folder on CRC cluster, and inside it you will find folders corresponding to your group, which you should have access to (the name convention is first letter of first name + last name of the faculty):
This folder is your group's working directory. Copying files in the workbench from your local folders to the folders on the server will copy your data over to CRC (again, file permissions have been set to restrict access to your data to only those members of your group - if you need any special permissions, or if you do not find a folder matching your group, please open a support ticket on the CRC mainpage). Note that this folder is on Pitt CRC's BeeGFS parallel file system. CRC's formal policy for data storage is no charge for data storage up to 5 TB per PI. This folder is separate from each PI’s normal HPC storage on BeeGFS parallel file system.
Computational genomics tasks require various reference genome. CLC_References with a blue S on the folder icons are the folders for reference genomes. CLC_Referenes are associated with Biomedical Genomics Server, and its contents include human, mouse and rat genomes. Reference genomes for the other species are installed inside Genomes folder under CLC_References. If you need any special reference genome, please open a support ticket on the CRC mainpage).
Running an analysis on HTC cluster operates in much the same fashion as running an analysis on your own computer, however in the dialog box that opens (when you first select a tool to run), you will now see additional options:
To run on HTC cluster, always select the 'Grid' option (do not attempt to run analyses using the 'CLC Server' option as, counterintuitively, these will fail). The drop-down menu under the 'Grid' option allows you to select an appropriate grid present, to control how many cores are assigned to your job and how long the job will need to run:
'HTC Data' Grid options are designed for data import/export. Only 16 GB RAM, 1 core is assigned to the jobs. In our experience, most RNA-Seq Analysis jobs do not require more than 24 hours to complete (really most of them finish in less than 4 hours) using 'HTC Job (64GB, 4 cores, 24 hours)'. Aligning large exome data sets to a reference genome typically can be done using 8 cores in about 4 hours (even data sets with up to 100x coverage). Aligning whole genome data sets (especially those with high coverage) is best done with 16 cores, and will typically require something less than 24 hours (recent alignments of 100x whole genome data - nearly 1 billion reads - have been completed in 12 hours using 16 cores, and even larger data sets - 1.5 billion reads - completed in 24 hours using 16 cores). Note however that variant calling requires much more time than alignment (sometimes requiring almost twice as much time), but does not use as many cores. In our experience, variant calling for whole exome data sets typically takes on the order of 6 hours (using 4 cores), while variant calling for whole genome data sets takes more like 30 hours (using 4 cores). Minimizing the number of cores your jobs use, and the amount of time blocked off for your jobs is essential, as there are limited resources currently available to the CLC server.
If you think your job requires a grid preset that is not currently available, please send Dr. Fangping Mu an email: [email protected] Currently, CLC usage is managed differently from the normal account setup process for the HPC. Users may only utilize the CLC server through CLC Genomics Workbench, and do not need to set up a separate HPC account. Depending on use levels in the future, this procedure may change.
When your data is on the server or a place that the server has access to, you can choose a Grid preset.
Import tools can be used to simultaneously convert data from FASTQ format (for example) to the CLCbio format and transfer the CLCbio format file to the server. We can assign each group (faculty) an import/export directory on bgfs /bgfs/. Member of the group shared this import/export directory with read/write permissions. Please open a support ticket on the CRC mainpage if you do not find a folder matching your group.
Once you start a job running on HTC cluster, you will see the usual progress bars in the Process section of the Toolbox. When the job status is listed as 'Running', you can close your Workbench software, and the job will continue running on the remote server. When you relaunch your workbench, it will again connect to the server (as long as you checked 'Automatic login' above - otherwise you can manually log in again), and the status of your job will be updated.
Working directory and Import/export directory are assigned on /bgfs. Note that this /bgfs is not backed up, so you will need to be diligent and back up to your own personal drives.
At the moment, the CLCbio software does not provide fine control of data access at the individual user level. The access permissions are enforced at the group level. What this means is that if User_A and User_B are both within Group_Z, then both will have read/write access to data stored within the Group_Z directory.
Each group from the schools of health sciences is assigned a group quota of 5TB on bgfs. If your group requires more disk space on bgfs, please contact us.
If you have any problems with this procedure, or your jobs will not execute, please either send an email to Dr. Fangping Mu ([email protected]) or submit a CRC support ticket online (login required)
0 notes
Text
Ios Simulator For Mac Yosemite

Apple Ios Simulator
Iphone Simulator Mac
Ios simulator free download - Router Simulator, Wondershare Dr.Fone for iOS, Euro Truck Simulator 2, and many more programs. I’ve included Appetize.io and listed it in the first place due to the ease of use offered.

Download: PS3 Emulator for Mac. IOS Emulator iPadian for Mac. As its name suggests, this is an emulator that helps you run iOS applications on your Mac. By downloading this simulator, users can use iPad applications on a Mac as well. The best iOS emulator currently available is the iPadian. However, if you do, OS X Yosemite supports simulating iOS 7.1 (versions older than 7.1 will need to be installed on a machine running Mavericks or earlier). To make the change From the simulator, select Hardware Devices Manage Devices.
Check compatibility
You can upgrade to OS Yosemite on any of the following Mac models. Your Mac also needs at least 2GB of memory and 8GB of available storage space.
MacBook introduced in 2009 or later, plus MacBook (13-inch, Aluminum, Late 2008) MacBook Air introduced in late 2008 or later MacBook Pro introduced in mid 2007 or later Mac mini introduced in early 2009 or later iMac introduced in mid 2007 or later Mac Pro introduced in early 2008 or later Xserve models introduced in early 2009
To find your Mac model, memory, storage space, and macOS version, choose About This Mac from the Apple menu . If your Mac isn't compatible with OS X Yosemite, the installer will let you know.
Make a backup
Before installing any upgrade, it’s a good idea to back up your Mac. Time Machine makes it simple, and other backup methods are also available. Learn how to back up your Mac.

Get connected
It takes time to download and install OS X, so make sure that you have a reliable Internet connection. If you're using a Mac notebook computer, plug it into AC power.
Download OS X Yosemite
For the strongest security and latest features, find out whether you can upgrade to macOS Catalina, the latest version of macOS.
If you still need OS X Yosemite, use this link: Download OS X Yosemite. A file named InstallMacOSX.dmg will download to your Mac.
Install the macOS installer
Double-click the downloaded file to open a window showing its contents. Then double-click the file within, named InstallMacOSX.pkg.
Follow the onscreen instructions, which will guide you through the steps necessary to install.
Begin installation
After installation of the installer is complete, open the Applications folder on your Mac, then double-click the file named Install OS X Yosemite.
Click Continue and follow the onscreen instructions. You might find it easiest to begin installation in the evening so that it can complete overnight, if needed.
Allow installation to complete
Please allow installation to complete without putting your Mac to sleep or closing its lid. Your Mac might restart, show a progress bar, or show a blank screen several times as it installs both OS X and related updates to your Mac firmware.
Learn more
OS X Yosemite won't install on top of a later version of macOS, but you can erase your disk first or install on another disk.
You can use macOS Recovery to reinstall macOS.
Emulator is the software that helps us to run multiple OS on a single hardware. It typically helps one OS to behave as another for as much amount of time as we want and then switch back to our original OS. This in turn helps people to run different apllications exclusively for various OS on a single platform. Like if you have an Windows PC emulator, or the iOS one, you can run Windows or iOS appliactions on your Mac computer, especially good for app developers.
Mac PC is now common around the world, and it’s not surprising that some people would want to play game with it. But there are some games that only built for Windows, Nintendo or other devices, and hence you may need the game emulator for these games to run on Mac OS. So, here in this article, we will show you some of the best Game Console Emulators for macOS.

Tips: If you ever lost important notes or messages on iPhone, you can also use Gihosoft iPhone Data Recovery for Mac to get them back easily even without backup.
Also read: 6 Best iOS Emulator For Windows To Build & Run iOS Apps
Top 15 Gaming Emulators for Mac Computers
1. Virtual PC for Mac
This emulator by Microsoft aims to emulate Windows OS on your Mac giveing you the freedom to run those programs specifical for Windows OS that you can not use on your Mac OS. This game emulator will successfully take out your worry about the fact that you cannot run your Windows games on Mac. This Windows emulator will work as Windows 7 version, which may be a bit outdated but still it can do your job perfectly.
Download: Virtual PC for Mac
2. XBOX 360 Emulator for Mac

As the name suggests this is an XBOX oriented emulator completely made for Mac OS. For playing XBOX games, XeMu360 emulator is the most widely used emulator. This is comparatively a new software and it does support almost all XBOX games. This is a very powerful emulator so that Mac OS users can enjoy playing XBOX games on it flawlessly.
Download: XBOX 360 Emulator for Mac
3. Playstation Emulators for Mac
PCSX-Reloaded is one of the the best emulator that can be installed on your Mac OS ideal for playing Playstation games. As an open source software, this emulator gives you the freedom to install it on all versions of Mac OS. Things become much simpler and easier after its installation process has been modified recently. It would be better to keep all your playstation games inside one folder on Mac. Then after installing PCSX-Reloaded all you have to do is to drop the game you want to play in it. The emulator also has a built-in BIOS and the ability to edit memory cards as well.
Download: Playstation Emulators for Mac
4. Nintendo 64 Emulator for Mac
Mupen64 is one of the well-known emulator for Nintendo 64 to use on Mac OS. This emulator is very stable and compatible with all types of Mac OS.
However, you will require to install the GTK+ for this Nitendo 64 emulator to work smoothly. GTK+ is a graphical toolkit that needs to be installed on the Mac to process graphics. GTK+ will remains in the background and rightly handles the graphics of the N64 ROMS on Mac.
Download: Nintendo 64 Emulator for Mac
5. GameCube and Wii Games Emulator for Mac
Dolphin is one of the best game emulator for macOS to run GameCube, Wii and Triforce games. This emulator is very much compatible with multiple platforms including the macOS. It is also free to use as an open source project. The emulator works well with macOS 10.6 to 10.8 and is very user friendly as well.
The only thing the user needs to do is to specifiy the BIOS file which comes always with the ROM. When you start playing the game, Dolphin emulator automatically senses the game file and starts playing it on Mac.
Download: GameCube and Wii Games Emulator for Mac
6. OpenEmu
OpenEmu emulator is one of the most reliable emulators in the market, compatible with Mac OS 10.7 and higher. Being very user friendly, it also has an iTunes type menu. This is the ultimate gaming emulator that detects the game Roms according to their requirement.
OpenEmu – How To Run Emulators on a Mac N64 PSP SNES NES And More!
OpenEmu supports a great number of consoles like:
Game Boy
NeoGeo Pocket
Game Gear
Sega Genesis and lot more
Download: OpenEmu
7. RetroArch
RetroArch seems to be an all-in-one emulator for macOS that helps the users to play any kind of retro games. The emulator even can be used to play PlayStation 1 games and older ones as well. In the handheld game console RetroArch even supports Game Boy Advance games. It is totally based on the number of cores with each of the core emulating a console.
Download: RetroArch
8. PPSSPP
The name PPSSPP stands for Playstation Portable Simulator Suitable for Playing Portably, which is an emulator for playing PSP games. The emulator was originally created by Dolphin developers and is widely used across the globe. PPSSPP is very easy to install and to use on Mac, and also it supports a wide number of PSP games.
Download: PPSSPP
9. ScummVM
This emulator is speifically designed for those people who like to play point-and-click games. SucmmVM is supported by macOS and uses the Scumm scripting language shown as its name. The emulator also supports many of the adventure games like the Monkey Island 1-3, Sam & Max and much more.
Download: ScummVM
10. DeSmuME
DeSmuMe is another emulator for macOS that helps users to play with the dual screens of Nintendo, i.e. by simulating dual screens on the monitor itself. The emulator also supports games that we want play on the devices sideways.
The best part of this emulator is that its constantly being modified by developers and new features are getting added to it on a regular basis. And now over the years this has become one of the best game emulators for Mac in the market.
Download: DeSmuME
11. DosBox
As the name suggests this emulator is purposefuly made for DOS based programs. Many DOS based games are still played by users; so to make those games available even on macOS this emulator has been created.
Download: DosBox
12. Xamarian Android Player for Mac
This is an Android emulator that can be run on macOS so that you can play the millions of Android games onto your Mac. Xamarain Android player also supports OpenGL and actually virtualizes the device instead of simply emulating it.
This also helps to enhance the performance of your Mac. The emulator has a great integration with both the Visual Studio and the Xamarin Studio, and this one has a native user interface.
Download: Xamarian Android Player for Mac
13. PS3 Emulator for Mac
PS3 emulator typically supports macOS and allows users to play PlayStation 3 games on Mac. It is completely free and only need you to have any PS3 supported game. This gives complete freedom for users to choose whatever PS3 game they want to play on their Mac.
Download: PS3 Emulator for Mac
14. iOS Emulator iPadian for Mac
As its name suggests, this is an emulator that helps you run iOS applications on your Mac. By downloading this simulator, users can use iPad applications on a Mac as well. The best iOS emulator currently available is the iPadian.
This emulator is based on Adobe AIR and readily creates an interface similar to iPad on your Mac. iPadian is a very good emulator if you are just looking to run iOS appliactios and games on your Mac flawlessly.
Apple Ios Simulator
Download: iOS Emulator iPadian for Mac
15. Visual Boy Advance
Iphone Simulator Mac
The Visual Boy Advance, also known to be the Mac Boy advance, can play almost all games of the Nintendo consoles on Mac. This GBA is written and developed specifically for the OS X and is compatibile with almost all kinds of macOS.
Download: Visual Boy Advance
So, here are our top 15 picks of game consloe emulators that you can readily download onto your Mac and seamlessly enjoy Android, DOS, Windows, iOS and much more experiences. By this way, you do not have to buy other kinds of OS, but just an emulator that will help you to run other applications on the single macOS.
Each of these emulators for Mac has its own advantage, and gaming on them is another treat to be honest. With such wide variety of support for games, you can download each of them and find out your favorite one and play all along. If you have any other good suggestion or question, welcome to comment down.
Related Articles
Please enable JavaScript to view the comments powered by Disqus.
0 notes
Text
7 Best iOS Emulators For PC (Windows And Mac) To Run iOS Apps
Employing a Android or i-OS emulator to conduct amobile program in your own desktop computer system has quite a few benefits, such as replicating the cell apparatus's behaviour without the extra hardware price. By way of instance, you may conduct games such as PUBG and Pokemon Proceed in your own pc using an emulator. Additionally, it helps program developers find abrupt behaviour throughout the screening period of their programs.
When there really are lots of deserving Android emulators out-there, this sort of answers for conducting i-OS programs on Windows and Mac are not ordinary. That will aid you, I have curated alist of this finest i-OS emulators for both PC and Mac. The majority of the listings within this short article are all liberated, yet many others allow you to make the most of the emulator app for some trial time interval. Thus, let us begin:
Notice: The i-OS emulation applications said from the record have been largely geared at program developers who would like to check their programs before forcing it into ultimate launch. Some programs may be described as considered a little specialized to prepare, and also routine users ready to make work with of an easy i-OS program in their own computer may not discover them even very beneficial. As previously mentioned, there is a genuine deficiency of easy-to-use i-OS simulation program.
Leading Rated I-OS Emulators for PC and Mac | 20-19 Edition
Appetize.io
Ripple
I-OS Simulator at Xcode
TestFlight
Electric Cellular Studio
Distant I-OS Simulator for Windows
iPadian
1. Appetize.io
I have comprised Appetize.io and recorded it at the very first place as a result of simplicity of use provided via this freemium services. Considering that the shortage of i-OS emulators for both personal computer and Mac at the very first location, it really is amazing to chance upon a method that requests one to add your own program on its site, and also you're all set.
The programmers may utilize Appetize.ion for streaming i-OS simulators from the internet web browser with the goal of embedding programs in testing, websites, along with alternative stages of evolution. Speaking concerning the prices, the completely absolutely totally free trial phase with this i-phone simulator provides you one hundred moments of flowing period to get programs. It's possible for you to track your utilization in the dash and also install alarms whenever you accomplish your limitation.
System: World Wide Net (browser-based)
Prices programs: No Cost of Charge, Top Quality
2. Ripple

Even though Appetize.io can be really actually just a browser-based i-phone emulator for PCs, Ripple does its occupation at the kind of the Chrome extension. It truly is very famous for analyzing crossplatform portable and html 5 software without moving right through an intricate installation procedure.
Targeted Toward programs such as PhoneGap and WebWorks, Ripple Intends to Assist programmers by providing attributes such as HTML DOM Inspection, Automatic Screening, JS Debugging, and much more. In realtime, an individual will conduct the programs on various monitor resolutions and apparatus. This i-OS emulator to the own computer will not have to get re started in the event that you select a fresh apparatus, making the knowledge pretty practical.
System: World Wide Net expansion (browser-based)
Prices programs: Totally Absolutely Free
3. I-OS Simulator at Xcode
Apple's home-grown Xcode program development environment for Mac has its app simulator for i-OS, tvOS, watchOS, along with iMessage. Therefore, if a person really is utilizing Xcode whilst the most important program development package, afterward it truly is adequate to categorize various kinds of interactions such as faucets, apparatus spinning, scrolling, and also other activities completed from the consumer.
Mac consumers may certainly kick off their programs from your Xcode job. What offers Safari a border around other complimentary i-phone emulators may be your skill to try web programs by obtaining Safari inside of Xcode.
System: Mac
Prices programs: Totally Absolutely Free
4. TestFlight
TestFlight, that is currently possessed by Apple, is frequently utilised by programmers to test their own i-OS programs coded with Xamarin. You may even think of it since Apple's formally advocated system for analyzing those programs.
TestFlight's intensive documentation can be an advantage tip with this particular i-OS emulator for computer system. This completely absolutely totally free program supports programs such as i-OS, watchOS, tvOS, along with iMessage. Additionally, it has an alternative for outside beta screening of all those programs previous to the last inspection. The drawback with the emulation assistance is an relatively technical installation, and also you additionally must produce a App Store source account.
System: Mac
Prices programs: Totally Absolutely Free
5. Electric Mobile Studio

Electric Cellular Studio Electric cellular Studio can be still a paid solution to make sure execute i-OS programs on Windows computer systems, however, it also provides the complete product identification for a week, helping to make it a qualified option with this particular specific list. Its emphasize features incorporate full size emulation of both I phones, I-pads, and reactive programs, and also the power to make utilize of exactly precisely the exact identical merchandise or service on just two computers to get shared job installations at your office along with dwelling.
Programmers additionally desire this i-phone emulator for Windows-10 due into this incorporated WebKit along with Chrome shredding software which produce their tasks simpler. An individual may add hot key navigation keys for mapping their favourite short cuts. Windows users may even readily incorporate the particular application to get i-OS program with Visual Studio.
System: Windows
Prices programs: Demo, Compensated out
6. Remoted iOS Simulator for Windows

Remoted I-OS Simulator for Windows Still another favorite choice to try i-OS software for your own Windows personal computer will be Remoted i-OS Simulator for Windows. This is really a developer-focused instrument which arrives pre-loaded like an integral part of Xamarin from Visual Studio. Microsoft has step by step documentation which can be found on its internet site that end consumers may trace along with examine their own programs together using the i-OS simulator.
The program's window indicates a pretty helpful tool bar on very best that's of use options such as House, Settings, Lock, and screen-shot. From Preferences, you also can empower contact ID-like performance, mimic moving and static requirements and shake gestures, spinning, etc.. The application also delivers iPhone-like signature gestures along with stylus inputsignal.
System: Windows
Prices programs: No Cost, Compensated out
7. iPadian
You can find lots of applications such as iPadian which can be pretty famous for supplying an I pad or even i-phone for example adventure on computer and Mac. But, these remedies do not allow you to upload your own app/code and examine drive that insteadthey do the job as a customized made coating towards the peak of one's OS, also something could put in particular iOS-like programs out of their program shop. In the event you only want touse an i-OS simulator which reproduces the appearance and design of i-OS hardware, then you also could really go for iPadian.
System: Windows, Mac
Replies programs: Compensated out
I expect that only enjoy our listing of Android emulators for PCs, you will likewise locate this iOS-focused record very valuable. In addition, we wish to make a new listing of retro match emulators so-on like RetroArch and PCSX2 also, so keep tuned in. Read Fossbytes!
0 notes
Text
People May Really Be Able To Emulate The PS4 And Xbox One
Backward compatibility has not been among the talked about issues on the subject of the PS4. You can stream gameplay to a LAPTOP or tablet, but it have to be running Windows 10. The PS4 Remote Play app works on Home windows 8.1, Home windows 10, OS X 10.10, and OS X 10.11. With a bit of luck, this move from Sony will spur Redmond to broaden its assist going ahead. However that is not even the worse of it I handle to get into the PS4 and I found another obvious failure; the app no longer locates the PS4. The newest Nintendo 3DS Emulator update have come with fixed bugs and supplies better functionality examine to start. It will be nice to have PS3 backwards also...however my PS3 will keep attached until 3D playback is an choice on PS4. Our PS4 Emulator is actively developed and nearly day-after-day new features are added and bugs mounted as properly. Emulator work like downloader which helps you to entry iOS apps and play iOS video games on your home windows PC 7/8/8.1/10. It's appropriate with Windows LAPTOP and MAC working systems, so everybody's coated here with this one. The unofficial PS4 Distant Play PC application is Free and you can obtain it right here (A premium version of this unofficial Distant Play PC exists, that prices roughly $10, with additional features). In other phrases, the PS4 does the processing job, and the rendering goes via webkit, which means the graphics lib was not used. Sorry, I do know this is way off subject but I've already got my fire-proof suit on so be happy to flame me. It is not quite that straightforward. ps4 emulator for android enter on the rear of the field accepts a video signal from any HDMI supply and PlayStation VR acts exactly like as it will when dealing with non-VR content from a typical PS4. Nintendo 3DS Emulator is the best gaming console created by Nintendo which announced it in 2010 and released in the identical 12 months and the emulator gained the nice response from iOS customers. When you're not immediately prompted to replace your PS4 upon boot-up, head over to Settings > System Software program Replace, and download the most recent firmware. First-person adventure Firewatch ( also on Mac ) is a reasonably preferrred one, given the leisurely strategy, together with gorgeous puzzler The Witness. Simply keep in mind that Dolphin is a console emulator: it does what the video games instruct it to do. Every recreation has its own needs and necessities. And as we have said earlier than, iOS and Android help could be the next logical step. What is on the video is most probably a wrapper with a PS4 seize built-in into it. For the love of fuck someone permit me to play my PSX video games or PSX classics from USB or one thing. As soon as RetroArch is downloaded, go forward and open it up, then plug in a USB controller to your pc (RetroArch works with a large number of USB recreation controllers, from an XBox controller to a PS4 controller, but I haven't been able to find an precise list of appropriate controllers anywhere). Minecraft: Story Mode - Season 2 is in growth and players can obtain the premiere, Episode 1: Hero In Residence, in July. These Star Wars games aren't that graphically intensive, though; as Eurogamer notes, it will likely be really exciting if the emulator can run Steel Gear Stable 3 or God of Battle at larger body rates.
0 notes