#User-Defined Data Types in SQL Server
Explore tagged Tumblr posts
Visit Tumblr Blog
Explore Tumblr blogs with no restrictions, modern design and the best experience.
Last Seen Tumblr Blogs


Fun Fact
Tumblr’s website traffic is steadily declining.
Text
Harnessing Power and Precision with User-Defined Data Types in SQL Server
CodingSight
In the world of SQL Server, data is king, and precision is paramount. As your database grows and evolves, you may find that standard data types don't always fit your specific needs. This is where User-Defined Data Types (UDDTs) step in as the unsung heroes of SQL Server. In this article, we'll explore User-Defined Data Types in SQL Server, their advantages, how to create them, and practical use cases.
What Are User-Defined Data Types (UDDTs) in SQL Server?
User-Defined Data Types, often abbreviated as UDDTs, allow you to define custom data types tailored to your application's unique requirements. Think of them as your own personalized data containers. SQL Server, a robust relational database management system, offers this feature to empower developers with flexibility and precision in data handling.
Advantages of Using User-Defined Data Types
Enhanced Clarity and Documentation: By creating UDDTs with meaningful names, you enhance the clarity of your database schema. This makes it easier for your team to understand the data structure, leading to better documentation and maintenance.
Data Integrity: UDDTs enable you to enforce constraints and rules specific to your data. For instance, you can define a UDDT for representing valid email addresses, ensuring data integrity by preventing incorrect data from entering the database.
Simplified Maintenance: When you need to make changes to your data structure, modifying a UDDT in one place automatically updates all columns using that type. This simplifies maintenance and reduces the risk of errors.
Creating User-Defined Data Types
Creating a User-Defined Data Type in SQL Server is a straightforward process. Here's a basic syntax example:
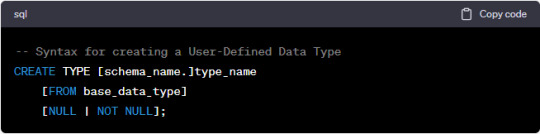
[schema_name.]: Specifies the schema in which the UDDT will be created.
type_name: Assign a unique name for your UDDT.
[FROM base_data_type]: You can base your UDDT on an existing SQL Server data type.
[NULL | NOT NULL]: Define whether the UDDT allows NULL values or not.
Practical Use Cases for User-Defined Data Types
Standardized Date Formats: If your application requires consistent date formats, create a UDDT to enforce this standard. This ensures that all dates in your database conform to your chosen format.
Geographic Coordinates: When working with geographic data, defining a UDDT for latitude and longitude pairs can enhance precision and simplify location-based queries.
Product Codes: In e-commerce databases, you can create a UDDT for product codes with specific formatting and validation rules, preventing invalid codes from entering the system.
Currency Values: To ensure accuracy in financial applications, use UDDTs to represent currency values with fixed decimal places, reducing the risk of rounding errors.
Conclusion
User-Defined Data Types in SQL Server provide the means to tailor your database to your application's exact needs. They offer advantages such as improved clarity, data integrity, and simplified maintenance. By creating custom data types, you empower your database to handle data with precision and accuracy, enhancing both your application's performance and your development team's efficiency.
In a world where data is king, User-Defined Data Types reign as the crown jewels of SQL Server, allowing you to unlock the full potential of your database and take control of your data like never before. Whether you're developing a new application or enhancing an existing one, harness the power and precision of UDDTs to create a data structure that perfectly aligns with your vision.
0 notes
Text
Complete PHP Tutorial: Learn PHP from Scratch in 7 Days
Are you looking to learn backend web development and build dynamic websites with real functionality? You’re in the right place. Welcome to the Complete PHP Tutorial: Learn PHP from Scratch in 7 Days — a practical, beginner-friendly guide designed to help you master the fundamentals of PHP in just one week.
PHP, or Hypertext Preprocessor, is one of the most widely used server-side scripting languages on the web. It powers everything from small blogs to large-scale websites like Facebook and WordPress. Learning PHP opens up the door to back-end development, content management systems, and full-stack programming. Whether you're a complete beginner or have some experience with HTML/CSS, this tutorial is structured to help you learn PHP step by step with real-world examples.
Why Learn PHP?
Before diving into the tutorial, let’s understand why PHP is still relevant and worth learning in 2025:
Beginner-friendly: Easy syntax and wide support.
Open-source: Free to use with strong community support.
Cross-platform: Runs on Windows, macOS, Linux, and integrates with most servers.
Database integration: Works seamlessly with MySQL and other databases.
In-demand: Still heavily used in CMS platforms like WordPress, Joomla, and Drupal.
If you want to build contact forms, login systems, e-commerce platforms, or data-driven applications, PHP is a great place to start.
Day-by-Day Breakdown: Learn PHP from Scratch in 7 Days
Day 1: Introduction to PHP & Setup
Start by setting up your environment:
Install XAMPP or MAMP to create a local server.
Create your first .php file.
Learn how to embed PHP inside HTML.
Example:
<?php echo "Hello, PHP!"; ?>
What you’ll learn:
How PHP works on the server
Running PHP in your browser
Basic syntax and echo statement
Day 2: Variables, Data Types & Constants
Dive into PHP variables and data types:
$name = "John"; $age = 25; $is_student = true;
Key concepts:
Variable declaration and naming
Data types: String, Integer, Float, Boolean, Array
Constants and predefined variables ($_SERVER, $_GET, $_POST)
Day 3: Operators, Conditions & Control Flow
Learn how to make decisions in PHP:
if ($age > 18) { echo "You are an adult."; } else { echo "You are underage."; }
Topics covered:
Arithmetic, comparison, and logical operators
If-else, switch-case
Nesting conditions and best practices
Day 4: Loops and Arrays
Understand loops to perform repetitive tasks:
$fruits = ["Apple", "Banana", "Cherry"]; foreach ($fruits as $fruit) { echo $fruit. "<br>"; }
Learn about:
for, while, do...while, and foreach loops
Arrays: indexed, associative, and multidimensional
Array functions (count(), array_push(), etc.)
Day 5: Functions & Form Handling
Start writing reusable code and learn how to process user input from forms:
function greet($name) { return "Hello, $name!"; }
Skills you gain:
Defining and calling functions
Passing parameters and returning values
Handling HTML form data with $_POST and $_GET
Form validation and basic security tips
Day 6: Working with Files & Sessions
Build applications that remember users and work with files:
session_start(); $_SESSION["username"] = "admin";
Topics included:
File handling (fopen, fwrite, fread, etc.)
Reading and writing text files
Sessions and cookies
Login system basics using session variables
Day 7: PHP & MySQL – Database Connectivity
On the final day, you’ll connect PHP to a database and build a mini CRUD app:
$conn = new mysqli("localhost", "root", "", "mydatabase");
Learn how to:
Connect PHP to a MySQL database
Create and execute SQL queries
Insert, read, update, and delete (CRUD operations)
Display database data in HTML tables
Bonus Tips for Mastering PHP
Practice by building mini-projects (login form, guest book, blog)
Read official documentation at php.net
Use tools like phpMyAdmin to manage databases visually
Try MVC frameworks like Laravel or CodeIgniter once you're confident with core PHP
What You’ll Be Able to Build After This PHP Tutorial
After following this 7-day PHP tutorial, you’ll be able to:
Create dynamic web pages
Handle form submissions
Work with databases
Manage sessions and users
Understand the logic behind content management systems (CMS)
This gives you the foundation to become a full-stack developer, or even specialize in backend development using PHP and MySQL.
Final Thoughts
Learning PHP doesn’t have to be difficult or time-consuming. With the Complete PHP Tutorial: Learn PHP from Scratch in 7 Days, you’re taking a focused, structured path toward web development success. You’ll learn all the core concepts through clear explanations and hands-on examples that prepare you for real-world projects.
Whether you’re a student, freelancer, or aspiring developer, PHP remains a powerful and valuable skill to add to your web development toolkit.
So open up your code editor, start typing your first <?php ... ?> block, and begin your journey to building dynamic, powerful web applications — one day at a time.

0 notes
Text
PHP with MySQL: Best Practices for Database Integration
PHP and MySQL have long formed the backbone of dynamic web development. Even with modern frameworks and languages emerging, this combination remains widely used for building secure, scalable, and performance-driven websites and web applications. As of 2025, PHP with MySQL continues to power millions of websites globally, making it essential for developers and businesses to follow best practices to ensure optimized performance and security.
This article explores best practices for integrating PHP with MySQL and explains how working with expert php development companies in usa can help elevate your web projects to the next level.
Understanding PHP and MySQL Integration
PHP is a server-side scripting language used to develop dynamic content and web applications, while MySQL is an open-source relational database management system that stores and manages data efficiently. Together, they allow developers to create interactive web applications that handle tasks like user authentication, data storage, and content management.
The seamless integration of PHP with MySQL enables developers to write scripts that query, retrieve, insert, and update data. However, without proper practices in place, this integration can become vulnerable to performance issues and security threats.
1. Use Modern Extensions for Database Connections
One of the foundational best practices when working with PHP and MySQL is using modern database extensions. Outdated methods have been deprecated and removed from the latest versions of PHP. Developers are encouraged to use modern extensions that support advanced features, better error handling, and more secure connections.
Modern tools provide better performance, are easier to maintain, and allow for compatibility with evolving PHP standards.
2. Prevent SQL Injection Through Prepared Statements
Security should always be a top priority when integrating PHP with MySQL. SQL injection remains one of the most common vulnerabilities. To combat this, developers must use prepared statements, which ensure that user input is not interpreted as SQL commands.
This approach significantly reduces the risk of malicious input compromising your database. Implementing this best practice creates a more secure environment and protects sensitive user data.
3. Validate and Sanitize User Inputs
Beyond protecting your database from injection attacks, all user inputs should be validated and sanitized. Validation ensures the data meets expected formats, while sanitization cleans the data to prevent malicious content.
This practice not only improves security but also enhances the accuracy of the stored data, reducing errors and improving the overall reliability of your application.
4. Design a Thoughtful Database Schema
A well-structured database is critical for long-term scalability and maintainability. When designing your MySQL database, consider the relationships between tables, the types of data being stored, and how frequently data is accessed or updated.
Use appropriate data types, define primary and foreign keys clearly, and ensure normalization where necessary to reduce data redundancy. A good schema minimizes complexity and boosts performance.
5. Optimize Queries for Speed and Efficiency
As your application grows, the volume of data can quickly increase. Optimizing SQL queries is essential for maintaining performance. Poorly written queries can lead to slow loading times and unnecessary server load.
Developers should avoid requesting more data than necessary and ensure queries are specific and well-indexed. Indexing key columns, especially those involved in searches or joins, helps the database retrieve data more quickly.
6. Handle Errors Gracefully
Handling database errors in a user-friendly and secure way is important. Error messages should never reveal database structures or sensitive server information to end-users. Instead, errors should be logged internally, and users should receive generic messages that don’t compromise security.
Implementing error handling protocols ensures smoother user experiences and provides developers with insights to debug issues effectively without exposing vulnerabilities.
7. Implement Transactions for Multi-Step Processes
When your application needs to execute multiple related database operations, using transactions ensures that all steps complete successfully or none are applied. This is particularly important for tasks like order processing or financial transfers where data integrity is essential.
Transactions help maintain consistency in your database and protect against incomplete data operations due to system crashes or unexpected failures.
8. Secure Your Database Credentials
Sensitive information such as database usernames and passwords should never be exposed within the application’s core files. Use environment variables or external configuration files stored securely outside the public directory.
This keeps credentials safe from attackers and reduces the risk of accidental leaks through version control or server misconfigurations.
9. Backup and Monitor Your Database
No matter how robust your integration is, regular backups are critical. A backup strategy ensures you can recover quickly in the event of data loss, corruption, or server failure. Automate backups and store them securely, ideally in multiple locations.
Monitoring tools can also help track database performance, detect anomalies, and alert administrators about unusual activity or degradation in performance.
10. Consider Using an ORM for Cleaner Code
Object-relational mapping (ORM) tools can simplify how developers interact with databases. Rather than writing raw SQL queries, developers can use ORM libraries to manage data through intuitive, object-oriented syntax.
This practice improves productivity, promotes code readability, and makes maintaining the application easier in the long run. While it’s not always necessary, using an ORM can be especially helpful for teams working on large or complex applications.
Why Choose Professional Help?
While these best practices can be implemented by experienced developers, working with specialized php development companies in usa ensures your web application follows industry standards from the start. These companies bring:
Deep expertise in integrating PHP and MySQL
Experience with optimizing database performance
Knowledge of the latest security practices
Proven workflows for development and deployment
Professional PHP development agencies also provide ongoing maintenance and support, helping businesses stay ahead of bugs, vulnerabilities, and performance issues.
Conclusion
PHP and MySQL remain a powerful and reliable pairing for web development in 2025. When integrated using modern techniques and best practices, they offer unmatched flexibility, speed, and scalability.
Whether you’re building a small website or a large-scale enterprise application, following these best practices ensures your PHP and MySQL stack is robust, secure, and future-ready. And if you're seeking expert assistance, consider partnering with one of the top php development companies in usa to streamline your development journey and maximize the value of your project.
0 notes
Text
Navigating the Full Stack Development Lifecycle: From Concept to Deployment
In today’s fast-paced digital landscape, building a web application is more than just writing code — it's about turning an idea into a real, working solution that people can interact with. This journey, known as the full stack development lifecycle, is one that many developers walk daily. Whether you’re a beginner stepping into the world of web technologies or someone aiming to become a professional, understanding this lifecycle is key to building robust, scalable, and user-friendly applications.
At the heart of this journey is the full stack web developer, a professional who bridges the gap between front-end user experience and back-end data handling. With the right skills and structured training such as full stack web development by TechnoBridge, aspiring developers can confidently handle every layer of web application development, from concept to deployment.
Let’s break down the full stack lifecycle and understand how an idea becomes a fully functioning application.
1. Ideation and Planning
Everything begins with a concept. Maybe it's a new e-commerce site, a productivity tool, or a social networking app. The ideation phase involves brainstorming and outlining what problem the app will solve, who the users are, and what features it should include.
Define the core purpose of the application
Conduct market research and competitor analysis
Create user personas to understand user needs
Prioritize features for the minimum viable product (MVP)
Here, the full stack web developer works with stakeholders or clients to align technical possibilities with business goals.
2. Designing the Architecture
Once the idea is clear, it’s time to design the system. Architecture planning includes deciding how the front end and back end will communicate, which frameworks to use, and what databases will store the data.
Choose tech stacks (e.g., MERN, MEAN, LAMP)
Plan the database schema (SQL vs NoSQL)
Create API routes and data flow maps
Define security protocols and user authentication strategies
Courses like full stack web development by TechnoBridge help learners master this stage by teaching both theory and practical architecture planning using real-world case studies.
3. Front-End Development
This is the visual part — what users see and interact with. From layouts to buttons, everything you click, type, and swipe on a website is crafted by the front-end developer.
A full stack web developer must know:
HTML5, CSS3, and modern JavaScript (ES6+)
Responsive design with Flexbox or Grid
Front-end libraries/frameworks like React, Angular, or Vue.js
UX/UI principles for optimal user experience
Thanks to programs like full stack web development by TechnoBridge, developers get hands-on exposure to these tools, learning how to build interfaces that are both attractive and functional.
4. Back-End Development
This is the engine behind the scenes. The back end manages data, handles requests, and ensures everything works smoothly on the server side.
Programming languages like Node.js, Python, PHP, or Java
Frameworks such as Express.js, Django, or Spring Boot
RESTful APIs and server-side routing
Database interactions using MySQL, MongoDB, or PostgreSQL
A full stack web developer ensures that the server, application, and database communicate seamlessly. Learning full stack web development by TechnoBridge empowers developers with server-side scripting skills, real-time database management, and deployment knowledge.
5. Testing and Debugging
No web application is perfect on the first try. Testing is essential to catch bugs, ensure performance, and provide a seamless experience to users.
Unit testing and integration testing
Automated testing with tools like Jest or Mocha
Debugging browser and server-side errors
User acceptance testing (UAT)
Professionals trained in full stack web development by TechnoBridge are equipped to use modern testing tools and methodologies to minimize errors and improve performance.
6. Deployment
Once everything is tested and ready, it’s time to make the application live. Deployment involves pushing your code to a server so users can access it online.
Using platforms like AWS, Heroku, or Netlify
Continuous Integration/Continuous Deployment (CI/CD) pipelines
Domain setup and DNS configuration
Monitoring uptime and performance
A full stack web developer doesn't just build apps — they launch them and keep them running. That’s why real-world deployment training, as offered in full stack web development by TechnoBridge, is so vital for career readiness.
7. Maintenance and Updates
The launch is not the end — it’s the beginning of another phase. Regular updates, bug fixes, feature enhancements, and user feedback become a continuous cycle.
Monitor server logs and analytics
Patch security vulnerabilities
Add new features based on user feedback
Optimize for performance and SEO
By understanding the entire lifecycle, a full stack web developer becomes a valuable asset to any team or project.
Final Thoughts
The path from concept to deployment is full of learning, iteration, and innovation. A career in full stack development requires not just coding skills but a deep understanding of how each layer of technology interacts with the others. That’s why structured training programs like full stack web development by TechnoBridge are crucial — they don’t just teach you how to code, but how to think like a developer across the full stack.
So, whether you’re building your first app or your fiftieth, remember: the best developers are those who never stop learning — and who can navigate the full stack lifecycle with confidence and clarity.
0 notes
Text
AX 2012 Interview Questions and Answers for Beginners and Experts

Microsoft Dynamics AX 2012 is a powerful ERP answer that facilitates organizations streamline their operations. Whether you're a newbie or an professional, making ready for an interview associated with AX 2012 requires a radical knowledge of its core standards, functionalities, and technical factors. Below is a list of commonly requested AX 2012 interview questions together with their solutions.
Basic AX 2012 Interview Questions
What is Microsoft Dynamics AX 2012?Microsoft Dynamics AX 2012 is an company aid planning (ERP) solution advanced with the aid of Microsoft. It is designed for large and mid-sized groups to manage finance, supply chain, manufacturing, and client relationship control.
What are the important thing features of AX 2012?
Role-primarily based user experience
Strong financial control skills
Advanced warehouse and deliver chain management
Workflow automation
Enhanced reporting with SSRS (SQL Server Reporting Services)
What is the distinction between AX 2009 and AX 2012?
AX 2012 introduced a new data version with the introduction of surrogate keys.
The MorphX IDE changed into replaced with the Visual Studio development environment.
Improved workflow and role-based totally get right of entry to manipulate.
What is the AOT (Application Object Tree) in AX 2012?The AOT is a hierarchical shape used to keep and manipulate objects like tables, bureaucracy, reports, lessons, and queries in AX 2012.
Explain the usage of the Data Dictionary in AX 2012.The Data Dictionary contains definitions of tables, information types, family members, and indexes utilized in AX 2012. It guarantees facts integrity and consistency across the device.
Technical AX 2012 Interview Questions
What are the distinctive sorts of tables in AX 2012?
Regular tables
Temporary tables
In Memory tables
System tables
What is the distinction between In Memory and TempDB tables?
In Memory tables shop information within the purchaser memory and aren't continual.
Temp DB tables save brief statistics in SQL Server and are session-unique.
What is X++ and the way is it utilized in AX 2012?X++ is an item-oriented programming language used in AX 2012 for growing business good judgment, creating custom modules, and automating processes.
What is the cause of the CIL (Common Intermediate Language) in AX 2012?CIL is used to convert X++ code into .NET IL, enhancing overall performance by using enabling execution at the .NET runtime degree.
How do you debug X++ code in AX 2012?Debugging may be accomplished the use of the X++ Debugger or with the aid of enabling the Just-In-Time Debugging function in Visual Studio.
Advanced AX 2012 Interview Questions
What is a Query Object in AX 2012?A Query Object is used to retrieve statistics from tables using joins, tiers, and sorting.
What are Services in AX 2012, and what sorts are to be had?
Document Services (for replacing statistics)
Custom Services (for exposing X++ logic as a carrier)
System Services (metadata, question, and user consultation offerings)
Explain the concept of Workflows in AX 2012.Workflows allow the automation of commercial enterprise techniques, together with approvals, via defining steps and assigning responsibilities to users.
What is the purpose of the SysOperation Framework in AX 2012?It is a substitute for RunBaseBatch framework, used for walking techniques asynchronously with higher scalability.
How do you optimize overall performance in AX 2012?
Using indexes effectively
Optimizing queries
Implementing caching strategies
Using batch processing for massive facts operations
Conclusion
By understanding those AX 2012 interview questions, applicants can successfully put together for interviews. Whether you're a novice or an experienced expert, gaining knowledge of those topics will boost your self assurance and help you secure a role in Microsoft Dynamics AX 2012 tasks.
0 notes
Text
Using Parameterization in Azure Data Factory for Reusability

1. Introduction
Azure Data Factory (ADF) allows users to create powerful data integration workflows, but hardcoded values can make pipelines rigid and difficult to maintain. Parameterization in ADF enhances reusability by enabling dynamic configurations, reducing redundancy, and improving scalability.
In this blog, we will cover:
What is parameterization in ADF?
Types of parameters: pipeline, dataset, linked service, and trigger parameters
Implementing dynamic pipelines using parameters
Best practices for managing parameters effectively
2. Understanding Parameterization in ADF
Parameterization enables dynamic configurations in ADF by passing values at runtime instead of hardcoding them. This allows a single pipeline to handle multiple use cases without duplication.
Where Can Parameters Be Used?
Pipeline Parameters — Used to pass values dynamically at runtime
Dataset Parameters — Enables dynamic dataset configurations
Linked Service Parameters — Allows dynamic connection settings
Trigger Parameters — Passes values when a pipeline is triggered
3. Implementing Parameterization in ADF
3.1 Creating Pipeline Parameters
Pipeline parameters allow dynamic values to be passed at runtime.
Step 1: Define a Pipeline Parameter
Open your ADF pipeline.
Navigate to the Parameters tab.
Click New and define a parameter (e.g., FilePath).
Assign a default value (optional).
Step 2: Use the Parameter in Activities
You can use the parameter inside an activity. For example, in a Copy Activity, set the Source dataset to use the parameter dynamically:
Expression Syntax: @pipeline().parameters.FilePath
3.2 Dataset Parameterization for Dynamic Data Sources
Dataset parameters allow a dataset to be reused for multiple sources.
Step 1: Define a Parameter in the Dataset
Open your dataset.
Navigate to the Parameters tab.
Create a parameter (e.g., FileName).
Step 2: Pass the Parameter from the Pipeline
Open your Copy Data Activity.
Select the dataset and pass the value dynamically:
@pipeline().parameters.FileName
This approach enables a single dataset to handle multiple files dynamically.
3.3 Parameterizing Linked Services
Linked services define connections to external sources. Parameterizing them enables dynamic connection strings.
Step 1: Define Parameters in Linked Service
Open the Linked Service (e.g., Azure SQL Database).
Click on Parameters and define a parameter for ServerName and DatabaseName.
Step 2: Use the Parameters in Connection String
Modify the connection string to use parameters:json{ "server": "@linkedService().parameters.ServerName", "database": "@linkedService().parameters.DatabaseName" }
Step 3: Pass Values from the Pipeline
When using the linked service in a pipeline, pass values dynamically:json{ "ServerName": "myserver.database.windows.net", "DatabaseName": "SalesDB" }
3.4 Using Trigger Parameters
ADF Trigger Parameters allow passing values dynamically when scheduling pipelines.
Step 1: Create a Trigger Parameter
Open Triggers and create a new trigger.
Define a Trigger Parameter (e.g., ExecutionDate).
Step 2: Use the Parameter in the Pipeline
Pass the trigger parameter dynamically:
Expression: @triggerBody().ExecutionDate
This method is useful for time-based data loading.
4. Best Practices for Parameterization
✅ Use Default Values Where Possible — Helps in debugging and testing ✅ Keep Parameter Naming Consistent — Use meaningful names like SourcePath, DestinationTable ✅ Avoid Excessive Parameterization – Only parameterize necessary values ✅ Secure Sensitive Parameters – Store secrets in Azure Key Vault instead of passing them directly
5. Conclusion
Parameterization in ADF enhances pipeline reusability, reduces duplication, and makes data workflows more efficient. By applying pipeline parameters, dataset parameters, linked service parameters, and trigger parameters, you can build scalable and maintainable data pipelines.
WEBSITE: https://www.ficusoft.in/azure-data-factory-training-in-chennai/
0 notes
Text
Automated Testing in the Cloud: Ensuring Quality at Speed
In the fast-paced world of software development, ensuring application quality without compromising release speed is critical. Automated testing in the cloud plays a vital role in achieving this by streamlining testing processes, improving accuracy, and accelerating feedback loops.
By integrating automated testing into cloud environments, organizations can deliver high-performing applications faster while reducing manual effort and human error. This blog explores the key benefits, strategies, and tools for implementing cloud-based automated testing to achieve quality at speed.
Why Automated Testing is Essential in the Cloud
Traditional testing methods often struggle to keep up with modern cloud environments due to:
❌ Frequent Code Changes: Continuous updates increase testing demands. ❌ Scalability Challenges: Testing across multiple environments is complex. ❌ Resource Constraints: Manual testing slows down release cycles.
By leveraging cloud-based automated testing, teams can test faster, identify issues earlier, and ensure applications run reliably in dynamic cloud environments.
Key Benefits of Automated Testing in the Cloud
✅ Faster Release Cycles: Automated tests quickly validate code changes. ✅ Improved Accuracy: Automated scripts reduce the risk of human error. ✅ Scalable Testing Environments: Easily scale tests across multiple devices, browsers, and platforms. ✅ Cost Efficiency: Pay only for resources used during testing. ✅ Enhanced Collaboration: Cloud-based platforms enable global teams to collaborate seamlessly.
Types of Automated Tests for Cloud Applications
🔹 1. Unit Testing
Validates individual components or functions to ensure they perform as expected. ✅ Ideal for testing logic, algorithms, and isolated code units. ✅ Provides fast feedback to developers.
🔧 Tools: JUnit, NUnit, PyTest
🔹 2. Integration Testing
Ensures multiple components or services work together correctly. ✅ Ideal for testing APIs, database interactions, and microservices. ✅ Detects issues in service-to-service communication.
🔧 Tools: Postman, REST Assured, Karate
🔹 3. Functional Testing
Validates application features against defined business requirements. ✅ Ensures UI elements, workflows, and key features behave as expected. ✅ Ideal for cloud-based SaaS platforms and web applications.
🔧 Tools: Selenium, Cypress, Playwright
🔹 4. Performance Testing
Simulates user traffic to measure application speed, scalability, and stability. ✅ Identifies performance bottlenecks and capacity limits. ✅ Ensures applications remain responsive under load.
🔧 Tools: JMeter, k6, Gatling
🔹 5. Security Testing
Ensures cloud applications are resilient to security threats. ✅ Identifies vulnerabilities like SQL injection, XSS, and data breaches. ✅ Ensures compliance with security standards.
🔧 Tools: OWASP ZAP, Burp Suite, Astra
🔹 6. Regression Testing
Verifies that new code changes don’t break existing functionality. ✅ Critical for continuous integration pipelines. ✅ Ensures stability in frequent cloud deployments.
🔧 Tools: TestNG, Selenium, Robot Framework
Best Practices for Implementing Automated Cloud Testing
🔹 1. Integrate Testing into CI/CD Pipelines
Embedding automated tests directly into your CI/CD pipeline ensures continuous validation of new code.
✅ Trigger automated tests on every code commit or merge. ✅ Use parallel testing to run multiple tests simultaneously for faster results. ✅ Implement fail-fast strategies to identify issues early.
🔧 Tools: Jenkins, GitLab CI/CD, Azure DevOps
🔹 2. Use Scalable Test Environments
Leverage cloud platforms to create dynamic and scalable test environments.
✅ Automatically spin up cloud-based test servers as needed. ✅ Simulate real-world user environments across browsers, devices, and networks. ✅ Scale test environments based on project size or workload.
🔧 Tools: AWS Device Farm, BrowserStack, Sauce Labs
🔹 3. Implement Test Data Management
Effective data management ensures test accuracy and consistency.
✅ Use data masking and anonymization for sensitive data. ✅ Generate synthetic data to test various scenarios. ✅ Manage dynamic test data across environments.
🔧 Tools: TDM, Datprof, GenRocket
🔹 4. Automate Infrastructure Setup with IaC
Infrastructure as Code (IaC) ensures test environments are consistent and reproducible.
✅ Use IaC tools to define testing infrastructure as code. ✅ Automate environment setup to eliminate manual provisioning errors. ✅ Easily create, update, or destroy test environments as needed.
🔧 Tools: Terraform, AWS CloudFormation, Azure Resource Manager
🔹 5. Leverage Service Virtualization for Reliable Testing
Service virtualization enables testing of application components even when dependent services are unavailable.
✅ Simulate APIs, databases, and third-party integrations. ✅ Test applications in isolated environments without dependencies.
🔧 Tools: WireMock, Mountebank, Hoverfly
🔹 6. Monitor Test Performance and Results
Monitoring provides insights into test coverage, success rates, and performance bottlenecks.
✅ Use dashboards to track key metrics. ✅ Set alerts for test failures or performance anomalies. ✅ Continuously analyze test trends for process improvement.
🔧 Tools: Grafana, Datadog, TestRail
Salzen Cloud’s Approach to Automated Cloud Testing
At Salzen Cloud, we help businesses adopt scalable and effective automated testing frameworks. Our solutions include:
✔️ Implementing comprehensive CI/CD pipelines with integrated testing. ✔️ Designing scalable test environments to support complex cloud infrastructures. ✔️ Leveraging advanced tools to ensure application performance, security, and reliability.
Conclusion
Automated testing in the cloud accelerates development cycles while ensuring software quality. By combining scalable test environments, CI/CD integration, and comprehensive test coverage, businesses can achieve faster releases and improved reliability.
With Salzen Cloud, you can implement cutting-edge testing strategies to deliver high-performing cloud applications with confidence.
Need guidance on building a robust cloud testing strategy? Let's connect! 🚀
0 notes
Text
Crack the Code: How to Bulletproof Your Web Application In today’s hyper-connected world, web applications are the backbone of businesses, enabling seamless user experiences and efficient operations. However, with great convenience comes the looming threat of cyberattacks. From data breaches to phishing schemes, the stakes have never been higher. This is where security testing steps in—a vital process to ensure your web application can withstand malicious attacks. In this comprehensive guide, we’ll walk you through how to perform security testing for web applications effectively. Whether you’re a developer, QA engineer, or project manager, understanding these techniques is crucial to safeguarding your application and user data. 1. Understand the Basics of Security Testing Before diving into the technicalities, it’s essential to grasp what security testing is all about. In a nutshell, security testing evaluates a web application to identify vulnerabilities, weaknesses, and potential entry points for attackers. Why Security Testing Matters: Protects sensitive user data from unauthorized access. Ensures compliance with industry regulations (e.g., GDPR, HIPAA). Maintains the reputation and trustworthiness of your business. Types of Security Testing: Vulnerability Scanning: Identifies known vulnerabilities using automated tools. Penetration Testing: Simulates real-world attacks to find exploitable weaknesses. Security Auditing: Reviews code, configurations, and infrastructure for security flaws. Ethical Hacking: Involves ethical hackers to test your application’s resilience. 2. Prepare for Security Testing Preparation is key to effective security testing. Follow these steps to set the stage: Define Objectives: Determine the scope of your testing. Are you focusing on authentication mechanisms, data encryption, or overall application security? Understand Your Application: Map out the application’s architecture, including its features, data flow, and integration points. This helps in pinpointing areas to test. Gather Tools and Resources: Security testing requires a mix of automated tools and manual techniques. Some popular tools include: OWASP ZAP: Open-source tool for finding vulnerabilities. Burp Suite: Comprehensive platform for security testing. Nmap: Network scanner for identifying open ports and services. Metasploit: Framework for penetration testing. Establish a Test Environment: Create a separate environment for security testing to avoid affecting live users. Use realistic data and configurations to simulate real-world scenarios. 3. Key Areas to Focus On Security testing involves a thorough examination of various aspects of a web application. Below are the critical areas to focus on: Authentication and Authorization: Ensure that users can only access data and features they’re authorized to use. Test login mechanisms for brute-force vulnerabilities. Check session management to prevent session hijacking. Verify role-based access control (RBAC). Input Validation: Validate all user inputs to prevent injection attacks such as SQL injection, cross-site scripting (XSS), and command injection. Use whitelisting instead of blacklisting. Implement input sanitization on both client and server sides. Data Protection: Secure sensitive data both in transit and at rest. Use HTTPS for all communication. Encrypt sensitive information using strong algorithms (e.g., AES-256). Avoid storing unnecessary user data. Error Handling: Ensure error messages do not expose sensitive information. Avoid displaying stack traces or database errors. Log errors for debugging but ensure logs are securely stored. Third-Party Dependencies: Regularly update and audit third-party libraries and APIs to minimize vulnerabilities. Use tools like Dependabot or Snyk to monitor dependencies. 4. Conducting Security Tests
Now that you’re prepared, it’s time to execute the tests. Below are some common techniques: 1. Vulnerability Scanning: Run automated scans to detect common vulnerabilities such as insecure configurations and outdated components. Use OWASP ZAP for a quick and efficient scan. 2. Penetration Testing: Simulate real-world attacks to uncover hidden vulnerabilities. For instance: Attempt SQL injection attacks by inserting malicious SQL queries. Test for cross-site scripting (XSS) by injecting JavaScript code into input fields. 3. Fuzz Testing: Feed your application unexpected or random data to observe how it handles invalid inputs. This can reveal edge cases where your app may crash or behave unpredictably. 4. Secure Code Review: Manually review your application’s source code to find potential security flaws. Pay special attention to authentication logic, input validation, and error handling. 5. Remediation and Reporting Security testing is not just about finding vulnerabilities—it’s about fixing them. Prioritize Vulnerabilities: Use a risk-based approach to address vulnerabilities based on their severity and impact. Focus on critical issues first, such as SQL injection or weak password policies. Implement Fixes: Collaborate with your development team to resolve vulnerabilities. Test the fixes to ensure they work as intended without introducing new issues. Document Findings: Prepare a detailed report summarizing: Vulnerabilities discovered. Steps taken to remediate them. Recommendations for ongoing security practices. 6. Best Practices for Ongoing Security Security is not a one-time activity but a continuous process. Here are some best practices to maintain a secure web application: Adopt the Principle of Least Privilege: Grant users and systems only the access they need to perform their functions. Keep Software Up to Date: Regularly update your web application, server, and dependencies to patch known vulnerabilities. Conduct Regular Security Audits: Schedule periodic reviews to stay ahead of potential threats. Educate Your Team: Train your development and operations teams on secure coding and deployment practices. Monitor and Respond: Use intrusion detection systems (IDS) and log monitoring to identify and respond to suspicious activity in real time. Conclusion Security testing is a vital component of web application development and maintenance. By proactively identifying and addressing vulnerabilities, you not only protect your users but also ensure the long-term success of your application. Whether you’re running a small e-commerce site or a large-scale enterprise platform, investing in robust security practices pays dividends in trust and reliability. So, roll up your sleeves, follow the steps outlined in this guide, and make your web application a fortress against cyber threats.
0 notes
Text
Career Path and Growth Opportunities for Integration Specialists
The Growing Demand for Integration Specialists.
Introduction
In today’s interconnected digital landscape, businesses rely on seamless data exchange and system connectivity to optimize operations and improve efficiency. Integration specialists play a crucial role in designing, implementing, and maintaining integrations between various software applications, ensuring smooth communication and workflow automation. With the rise of cloud computing, APIs, and enterprise applications, integration specialists are essential for driving digital transformation.
What is an Integration Specialist?
An Integration Specialist is a professional responsible for developing and managing software integrations between different systems, applications, and platforms. They design workflows, troubleshoot issues, and ensure data flows securely and efficiently across various environments. Integration specialists work with APIs, middleware, and cloud-based tools to connect disparate systems and improve business processes.
Types of Integration Solutions
Integration specialists work with different types of solutions to meet business needs:
API Integrations
Connects different applications via Application Programming Interfaces (APIs).
Enables real-time data sharing and automation.
Examples: RESTful APIs, SOAP APIs, GraphQL.
Cloud-Based Integrations
Connects cloud applications like SaaS platforms.
Uses integration platforms as a service (iPaaS).
Examples: Zapier, Workato, MuleSoft, Dell Boomi.
Enterprise System Integrations
Integrates large-scale enterprise applications.
Connects ERP (Enterprise Resource Planning), CRM (Customer Relationship Management), and HR systems.
Examples: Salesforce, SAP, Oracle, Microsoft Dynamics.
Database Integrations
Ensures seamless data flow between databases.
Uses ETL (Extract, Transform, Load) processes for data synchronization.
Examples: SQL Server Integration Services (SSIS), Talend, Informatica.
Key Stages of System Integration
Requirement Analysis & Planning
Identify business needs and integration goals.
Analyze existing systems and data flow requirements.
Choose the right integration approach and tools.
Design & Architecture
Develop a blueprint for the integration solution.
Select API frameworks, middleware, or cloud services.
Ensure scalability, security, and compliance.
Development & Implementation
Build APIs, data connectors, and automation workflows.
Implement security measures (encryption, authentication).
Conduct performance optimization and data validation.
Testing & Quality Assurance
Perform functional, security, and performance testing.
Identify and resolve integration errors and data inconsistencies.
Conduct user acceptance testing (UAT).
Deployment & Monitoring
Deploy integration solutions in production environments.
Monitor system performance and error handling.
Ensure smooth data synchronization and process automation.
Maintenance & Continuous Improvement
Provide ongoing support and troubleshooting.
Optimize integration workflows based on feedback.
Stay updated with new technologies and best practices.
Best Practices for Integration Success
✔ Define clear integration objectives and business needs. ✔ Use secure and scalable API frameworks. ✔ Optimize data transformation processes for efficiency. ✔ Implement robust authentication and encryption. ✔ Conduct thorough testing before deployment. ✔ Monitor and update integrations regularly. ✔ Stay updated with emerging iPaaS and API technologies.
Conclusion
Integration specialists are at the forefront of modern digital ecosystems, ensuring seamless connectivity between applications and data sources. Whether working with cloud platforms, APIs, or enterprise systems, a well-executed integration strategy enhances efficiency, security, and scalability. Businesses that invest in robust integration solutions gain a competitive edge, improved automation, and streamlined operations.
Would you like me to add recommendations for integration tools or comparisons of middleware solutions? 🚀
Integration Specialist:
#SystemIntegration
#APIIntegration
#CloudIntegration
#DataAutomation
#EnterpriseSolutions
0 notes
Text
How to Build an App with Power Apps

Power Apps, In today’s digital landscape, businesses are increasingly turning to low-code solutions to streamline their operations. Power Apps is a powerful tool that allows users to create custom applications without extensive coding knowledge. It provides a user-friendly interface and integrates seamlessly with Microsoft services and third-party applications. In this guide, we’ll walk through the steps to build an app with Power Apps, covering key concepts, best practices, and essential features. PowerApps Training in Hyderabad
Step 1: Understanding Power Apps
Before diving into app development, it's important to understand what Power Apps is and how it works. It is a suite of apps, services, and connectors that enable users to build custom applications tailored to business needs. There are three main types of apps you can create with Power Apps Online Training
Canvas Apps – Offer full control over app design by dragging and dropping elements onto a blank canvas.
Model-Driven Apps – Follow a data-first approach, automatically generating UI components based on underlying data models.
Portal Apps – Allow external users to interact with data through a web-based interface.
Each app type serves different use cases, but for this guide, we will focus on creating a Canvas App, as it offers the most flexibility in design and functionality.
Step 2: Setting Up Power Apps
To start building your app, follow these steps:
Sign in to Power Apps – Go to Power Apps and log in with your Microsoft account.
Choose Your Data Source – Select from various data sources such as SharePoint, Excel, Dataverse, SQL Server, or third-party connectors.
Select the App Type – Click on "Create" and choose "Canvas App" to start from a blank canvas or use a prebuilt template.
Once you have set up your workspace, you can start designing the user interface (UI) and defining your app's logic. PowerApps Training in Hyderabad
Step 3: Designing the User Interface
A well-designed UI enhances user experience and improves app usability. Power Apps provides a drag-and-drop interface that simplifies the design process. Here’s how to design your app’s UI: Power Apps Online Training
Add Screens – Apps in Power Apps consist of multiple screens such as a home screen, form screen, and summary screen. Use the "Insert" tab to add new screens.
Customize Controls – Add buttons, text fields, galleries, and dropdowns to enhance interactivity.
Apply Themes and Branding – Maintain consistency by using predefined themes or customizing colours and fonts to match your brand.
Power Apps offers flexibility in UI design, allowing you to create user-friendly and visually appealing applications.
Step 4: Configuring App Logic
App logic determines how users interact with your application. In Power Apps, logic is implemented using formulas similar to Excel functions. Here are some key aspects to configure:
Data Connections – Use connectors to link your app with external data sources such as SharePoint, Excel, or Microsoft Dataverse.
Formulas and Expressions – Use Power Fx formulas to define behaviours like filtering data, validating inputs, and triggering actions.
Navigation Between Screens – Implement navigation buttons using Navigate (ScreenName, ScreenTransitionType) to switch between different app screens.
Conditional Visibility – Show or hide elements based on conditions using formulas like If (condition, true_action, false_action).
By defining clear app logic, you ensure that your Power Apps solution operates efficiently and meets business needs.
Step 5: Testing and Debugging
Before deploying your app, thorough testing is essential to identify and fix potential issues. Follow these best practices:
Preview the App – Use the “Preview” mode to interact with your app in real-time.
Test Different Scenarios – Check how your app handles various inputs, including invalid data.
Use Monitor Tool – The Monitor tool in Power Apps helps track app performance and identify bottlenecks.
Collaborate with Users – Gather feedback from test users to refine usability and functionality.
Testing ensures that your Power Apps application runs smoothly and delivers the intended experience.
Step 6: Deploying and Sharing the App
Once your app is ready, the next step is deployment. Power Apps provides multiple options for publishing and sharing applications:
Save and Publish – Click "File" > "Save" and then "Publish" to make the app available to users.
Share with Users – Assign user permissions and roles through the "Share" option.
Embed in Microsoft Teams or SharePoint – Enhance collaboration by embedding the app in Microsoft Teams or a SharePoint site.
Export and Import Apps – Move applications between different environments using the export and import feature.
Deploying your Power Apps solution effectively ensures smooth adoption within your organization.
Step 7: Maintaining and Improving the App
Building an app is just the beginning. Ongoing maintenance and improvements ensure that your Power Apps solution continues to meet evolving business needs. Here are some tips:
Monitor Performance – Regularly check app performance and optimize slow-loading components.
Update Data Sources – Ensure your app’s data sources remain accurate and up to date.
Implement User Feedback – Gather insights from users and refine app functionality.
Enhance Security – Set role-based access permissions and comply with data security policies.
By maintaining and improving your Power Apps, you maximize its value and ensure long-term success.
Conclusion
Building an app with Power Apps is an efficient way to create customized business solutions without the need for extensive coding. By following the steps outlined in this guide—understanding the platform, designing a user-friendly interface, implementing logic, testing, deploying, and maintaining the app—you can develop a high-quality application tailored to your organization’s needs.
Whether you are automating workflows, enhancing data collection, or integrating with Microsoft services, Power Apps provides the tools necessary to transform ideas into functional applications. Start building today and unlock the full potential of Power Apps!
Visualpath is the Leading and Best Institute for learning in Hyderabad. We provide POWERAPPS and POWER AUTOMATE TRAINING. You will get the best course at an affordable cost.
Call on – +91-7032290546
Visit: https://www.visualpath.in/online-powerapps-training.html
#PowerApps Training#Power Automate Training#PowerApps Training in Hyderabad#PowerApps Online Training#Power Apps Power Automate Training#PowerApps and Power Automate Training#Microsoft PowerApps Training Courses#PowerApps Online Training Course#PowerApps Training in Chennai#PowerApps Training in Bangalore#PowerApps Training in India#PowerApps Course In Ameerpet
1 note
·
View note
Text
DBMS Tutorial Explained: Concepts, Types, and Applications

In today’s digital world, data is everywhere — from social media posts and financial records to healthcare systems and e-commerce websites. But have you ever wondered how all that data is stored, organized, and managed? That’s where DBMS — or Database Management System — comes into play.
Whether you’re a student, software developer, aspiring data analyst, or just someone curious about how information is handled behind the scenes, this DBMS tutorial is your one-stop guide. We’ll explore the fundamental concepts, various types of DBMS, and real-world applications to help you understand how modern databases function.
What is a DBMS?
A Database Management System (DBMS) is software that enables users to store, retrieve, manipulate, and manage data efficiently. Think of it as an interface between the user and the database. Rather than interacting directly with raw data, users and applications communicate with the database through the DBMS.
For example, when you check your bank account balance through an app, it’s the DBMS that processes your request, fetches the relevant data, and sends it back to your screen — all in milliseconds.
Why Learn DBMS?
Understanding DBMS is crucial because:
It’s foundational to software development: Every application that deals with data — from mobile apps to enterprise systems — relies on some form of database.
It improves data accuracy and security: DBMS helps in organizing data logically while controlling access and maintaining integrity.
It’s highly relevant for careers in tech: Knowledge of DBMS is essential for roles in backend development, data analysis, database administration, and more.
Core Concepts of DBMS
Let’s break down some of the fundamental concepts that every beginner should understand when starting with DBMS.
1. Database
A database is an organized collection of related data. Instead of storing information in random files, a database stores data in structured formats like tables, making retrieval efficient and logical.
2. Data Models
Data models define how data is logically structured. The most common models include:
Hierarchical Model
Network Model
Relational Model
Object-Oriented Model
Among these, the Relational Model (used in systems like MySQL, PostgreSQL, and Oracle) is the most popular today.
3. Schemas and Tables
A schema defines the structure of a database — like a blueprint. It includes definitions of tables, columns, data types, and relationships between tables.
4. SQL (Structured Query Language)
SQL is the standard language used to communicate with relational DBMS. It allows users to perform operations like:
SELECT: Retrieve data
INSERT: Add new data
UPDATE: Modify existing data
DELETE: Remove data
5. Normalization
Normalization is the process of organizing data to reduce redundancy and improve integrity. It involves dividing a database into two or more related tables and defining relationships between them.
6. Transactions
A transaction is a sequence of operations performed as a single logical unit. Transactions in DBMS follow ACID properties — Atomicity, Consistency, Isolation, and Durability — ensuring reliable data processing even during failures.
Types of DBMS
DBMS can be categorized into several types based on how data is stored and accessed:
1. Hierarchical DBMS
Organizes data in a tree-like structure.
Each parent can have multiple children, but each child has only one parent.
Example: IBM’s IMS.
2. Network DBMS
Data is represented as records connected through links.
More flexible than hierarchical model; a child can have multiple parents.
Example: Integrated Data Store (IDS).
3. Relational DBMS (RDBMS)
Data is stored in tables (relations) with rows and columns.
Uses SQL for data manipulation.
Most widely used type today.
Examples: MySQL, PostgreSQL, Oracle, SQL Server.
4. Object-Oriented DBMS (OODBMS)
Data is stored in the form of objects, similar to object-oriented programming.
Supports complex data types and relationships.
Example: db4o, ObjectDB.
5. NoSQL DBMS
Designed for handling unstructured or semi-structured data.
Ideal for big data applications.
Types include document, key-value, column-family, and graph databases.
Examples: MongoDB, Cassandra, Redis, Neo4j.
Applications of DBMS
DBMS is used across nearly every industry. Here are some common applications:
1. Banking and Finance
Customer information, transaction records, and loan histories are stored and accessed through DBMS.
Ensures accuracy and fast processing.
2. Healthcare
Manages patient records, billing, prescriptions, and lab reports.
Enhances data privacy and improves coordination among departments.
3. E-commerce
Handles product catalogs, user accounts, order histories, and payment information.
Ensures real-time data updates and personalization.
4. Education
Maintains student information, attendance, grades, and scheduling.
Helps in online learning platforms and academic administration.
5. Telecommunications
Manages user profiles, billing systems, and call records.
Supports large-scale data processing and service reliability.
Final Thoughts
In this DBMS tutorial, we’ve broken down what a Database Management System is, why it’s important, and how it works. Understanding DBMS concepts like relational models, SQL, and normalization gives you the foundation to build and manage efficient, scalable databases.
As data continues to grow in volume and importance, the demand for professionals who understand database systems is also rising. Whether you're learning DBMS for academic purposes, career development, or project needs, mastering these fundamentals is the first step toward becoming data-savvy in today’s digital world.
Stay tuned for more tutorials, including hands-on SQL queries, advanced DBMS topics, and database design best practices!
0 notes
Text
Network Load Balancers vs. Application Load Balancers: Key Differences
Network Load Balancers (NLBs) and Application Load Balancers (ALBs) differ in functionality, operational layers, and use cases. NLBs operate at the transport layer (OSI Layer 4) and manage TCP/UDP traffic. They excel in low-latency, high-throughput environments like real-time applications or financial systems. ALBs work at the application layer (OSI Layer 7), handling HTTP/HTTPS traffic. They offer advanced features such as content-based routing, SSL termination, and user authentication, making them ideal for web applications and API services.
While NLBs focus on speed and efficiency, ALBs provide fine-grained control over traffic based on application-level data. Choosing between them depends on factors like performance needs, protocol support, and application complexity, with many setups benefit ing from a combination of both.
Introduction to Load Balancing
Load balancing is a crucial component in the infrastructure of web services and applications. It efficiently distributes incoming traffic across multiple servers, ensuring high availability and reliability. There are two common types of load balancers used in modern networks: Network Load Balancers (NLBs) and Application Load Balancers (ALBs). Understanding the key differences between these two can help businesses choose the most appropriate solution for their specific needs.
What is a Network Load Balancer (NLB)?
A Network Load Balancer operates at the transport layer (Layer 4) of the OSI model. It handles the distribution of traffic based on IP addresses, TCP/UDP ports, and protocols. NLBs are designed to manage high-volume traffic and can efficiently route network requests to backend servers without modifying the data. Their primary advantage lies in their ability to handle large amounts of traffic with low latency and high throughput.
What is an Application Load Balancer (ALB)?
In contrast, an Application Load Balancer operates at the application layer (Layer 7) of the OSI model. It is responsible for routing traffic based on the content of the request, such as the URL path, HTTP headers, cookies, and even query strings. This level of traffic inspection allows ALBs to direct requests to the appropriate backend server based on specific application logic. ALBs are ideal for handling complex, content-driven applications and microservices architectures.
Performance and Scalability: NLB vs. ALB
When comparing performance, NLBs are optimized for handling high-throughput, low-latency traffic. They are often deployed in situations where fast, simple traffic routing is required, such as for gaming servers, real-time communications, and other low-latency applications. On the other hand, ALBs are more suited for applications that require advanced routing capabilities, such as web applications that rely on different URLs for distinct functionalities. While both load balancers are scalable, NLBs can handle a higher volume of traffic with minimal overhead, making them a better choice for raw performance.
Security Features: NLB vs. ALB
Both NLBs and ALBs offer security features, but they differ in their implementation and capabilities. NLBs typically provide basic security by supporting SSL/TLS encryption for data in transit. However, the primary focus is on traffic distribution rather than deep inspection. ALBs, however, come with more advanced security capabilities, such as the ability to inspect HTTP headers, cookies, and other web application parameters. ALBs integrate seamlessly with Web Application Firewalls (WAF), offering enhanced protection against web vulnerabilities like SQL injection and cross-site scripting (XSS). Additionally, ALBs support fine-grained access control, enabling administrators to define detailed security policies based on application content.
Cost Considerations: NLB vs. ALB
The cost structure of NLBs and ALBs differsbased on their functionality and complexity. Network Load Balancers are generally more cost-effective for simpler use cases, particularly when high performance and low latency are prioritized over deep application inspection. Since NLBs handle traffic at Layer 4, they require fewer resources and are less complex to operate, thus lowering operational costs. ALBs, however, tend to be more expensive due to the advanced features they provide. The extra capabilities, such as application-layer routing and deep packet inspection, require more computing resources and can drive up the cost, making ALBs a better option for businesses that need more control over application-level traffic.
Use Cases: When to Choose NLB or ALB
The choice between a Network Load Balancer and an Application Load Balancer depends largely on the application’s needs and the type of traffic being managed. If the primary goal is to handle high-volume, low-latency traffic with minimal processing, a Network Load Balancer is the ideal choice. This is especially true for services such as streaming platforms, VoIP services, and other real-time applications. On the other hand, if your application requires content-based routing, user authentication, or deep inspection of traffic at the HTTP level, an Application Load Balancer is the better option. ALBs are perfect for dynamic web applications, microservices, and APIs, where different requests need to be routed to different servers based on application-level criteria.
Conclusion
In conclusion, both Network Load Balancers (NLBs) and Application Load Balancers (ALBs) are essential components in optimizing network traffic and ensuring high availability. NLBs are perfect for applications requiring high throughput and low latency, particularly in real-time services, while ALBs excel in scenarios where more complex routing decisions are needed at the application layer. Choosing the right load balancer depends on your specific use case, performance requirements, and budget.
0 notes
Text
MySQL Naming Conventions
What is MySQL?
MySQL is a freely available open source Relational Database Management System (RDBMS) that uses Structured Query Language (SQL). SQL is the most popular language for adding, accessing and managing content in a database. It is most noted for its quick processing, proven reliability, ease and flexibility of use.
What is a naming convention?
In computer programming, a naming convention is a set of rules for choosing the character sequence to be used for identifiers that denote variables, types, functions, and other entities in source code and documentation.
General rules — Naming conventions
Using lowercase will help speed typing, avoid mistakes as MYSQL is case sensitive.
Space replaced with Underscore — Using space between words is not advised.
Numbers are not for names — While naming, it is essential that it contains only Alpha English alphabets.
Valid Names — Names should be descriptive of the elements. i.e. — Self-explanatory and not more than 64 characters.
No prefixes allowed.
Database name convention
Name can be singular or plural but as the database represents a single database it should be singular.
Avoid prefix if possible.
MySQL table name
Lowercase table name
MySQL is usually hosted in a Linux server which is case-sensitive hence to stay on the safe side use lowercase. Many PHP or similar programming frameworks, auto-detect or auto-generate class-based table names and most of them expect lowercase names.
Table name in singular
The table is made up of fields and rows filled with various forms of data, similarly the table name could be plural but the table itself is a single entity hence it is odd and confusing. Hence use names like User, Comment.
Prefixed table name
The table usually has the database or project name. sometimes some tables may exist under the same name in the database to avoid replacing this, you can use prefixes. Essentially, names should be meaningful and self-explanatory. If you can’t avoid prefix you can fix it using php class.
Field names
Use all above cases which include lowercase, no space, no numbers, and avoid prefix.
Choose short names no-longer than two words.
Field names should be easy and understandable
Primary key can be id or table name_id or it can be a self-explanatory name.
Avoid using reserve words as field name. i.e. — Pre-defined words or Keywords. You can add prefix to these names to make it understandable like user_name, signup_date.
Avoid using column with same name as table name. This can cause confusion while writing query.
Avoid abbreviated, concatenated, or acronym-based names.
Do define a foreign key on database schema.
Foreign key column must have a table name with their primary key.
e.g. blog_id represents foreign key id from table blog.
Avoid semantically — meaningful primary key names. A classic design mistake is creating a table with primary key that has actual meaning like ‘name’ as primary key. In this case if someone changes their name then the relationship with the other tables will be affected and the name can be repetitive losing its uniqueness.
Conclusion
Make your table and database names simple yet understandable by both database designers and programmers. It should things that might cause confusion, issues with linking tables to one another. And finally, it should be readable for programming language or the framework that is implemented.
#MySQL#DatabaseManagement#SQL#NamingConventions#RelationalDatabase#DatabaseDesign#CodingStandards#TableNaming#FieldNaming#DatabaseSchema#ProgrammingTips#DataManagement#CaseSensitivity#PrimaryKey#ForeignKey#DatabaseBestPractices#OpenSource#DatabaseOptimization#MySQLTips#DataStructure
0 notes
Text
What Is IT System Infrastructure? Key Components Explained
In the modern business landscape, IT system infrastructure is the foundation that supports all digital operations. It encompasses the physical and virtual components needed to ensure seamless communication, data processing, and business functionality. But what exactly does IT system infrastructure include, and why is it critical?
This guide delves into the definition and key components of IT system infrastructure to provide a clear understanding of its role in today’s organizations.
Understanding IT System Infrastructure
At its core, IT system infrastructure refers to the combination of hardware, software, networks, and services that collectively enable an organization’s IT environment. It provides the backbone for running applications, managing data, and ensuring connectivity across systems.
Without a well-designed IT infrastructure, businesses face challenges like downtime, data loss, and inefficiency. Therefore, having a robust and scalable infrastructure is crucial for operational success and long-term growth.
Key Components of IT System Infrastructure
1. Hardware
Hardware forms the physical layer of IT infrastructure, enabling data processing, storage, and communication. Key hardware components include:
Servers: Centralized systems that handle data storage and application management.
Computers and Workstations: Devices used by employees for daily tasks.
Storage Devices: Hard drives, solid-state drives (SSDs), and network-attached storage (NAS) systems.
Networking Equipment: Routers, switches, and modems that enable connectivity.
2. Software
Software integrates with hardware to provide functionality and control. Critical types of software in IT infrastructure include:
Operating Systems: Platforms like Windows, Linux, and macOS that manage hardware resources.
Enterprise Applications: CRM, ERP, and other software for business operations.
Database Management Systems (DBMS): Tools like SQL Server and Oracle for managing structured data.
System Management Tools: Applications for monitoring, maintaining, and optimizing IT resources.
3. Networking
Networking connects all components of an IT infrastructure, facilitating communication and data transfer. This includes:
Local Area Networks (LANs): Internal networks for office connectivity.
Wide Area Networks (WANs): Broader networks connecting multiple locations.
Virtual Private Networks (VPNs): Secure connections for remote access.
Internet Access: Essential for global communication and cloud services.
4. Data Storage and Management
Data is at the heart of every business. IT infrastructure ensures secure and efficient storage and access through:
On-Premises Storage: Physical storage devices located within the organization.
Cloud Storage: Scalable solutions hosted by third-party providers.
Backup Solutions: Redundant systems to prevent data loss.
Data Centers: Facilities dedicated to housing IT equipment and data.
5. Security Measures
Protecting IT infrastructure from cyber threats is paramount. Essential security components include:
Firewalls: Systems that block unauthorized access.
Antivirus Software: Tools to detect and neutralize malware.
Encryption: Techniques to secure sensitive data.
Identity and Access Management (IAM): Policies to control user access.
6. Cloud Services
Cloud computing has become an integral part of IT infrastructure, offering flexibility and scalability. Key cloud services include:
Infrastructure as a Service (IaaS): Virtualized computing resources.
Platform as a Service (PaaS): Environments for developing and deploying applications.
Software as a Service (SaaS): Cloud-hosted applications like email and CRM tools.
7. People and Processes
IT infrastructure also relies on skilled personnel and well-defined processes to function effectively. These include:
IT Administrators: Professionals who manage and maintain infrastructure.
Standard Operating Procedures (SOPs): Guidelines for handling IT tasks.
Support Teams: Resources for troubleshooting and user assistance.
Why Is IT System Infrastructure Important?
1. Supports Business Operations
A reliable IT infrastructure ensures uninterrupted workflows, enabling employees to perform their tasks efficiently.
2. Enhances Collaboration
With robust networks and cloud services, teams can collaborate seamlessly, regardless of location.
3. Drives Innovation
Modern infrastructure provides the foundation for adopting new technologies like AI, IoT, and big data analytics.
4. Ensures Security and Compliance
Comprehensive security measures protect sensitive data and help meet regulatory requirements.
5. Facilitates Scalability
Scalable infrastructure supports business growth without requiring major overhauls.
Conclusion
A well-designed IT system infrastructure is indispensable for businesses navigating today’s digital landscape. By understanding its components and their roles, organizations can build systems that enhance productivity, security, and innovation. Whether you’re a small business or a large enterprise, investing in robust IT infrastructure is key to staying competitive and achieving long-term success.
0 notes
Text
A Guide to Creating APIs for Web Applications

APIs (Application Programming Interfaces) are the backbone of modern web applications, enabling communication between frontend and backend systems, third-party services, and databases. In this guide, we’ll explore how to create APIs, best practices, and tools to use.
1. Understanding APIs in Web Applications
An API allows different software applications to communicate using defined rules. Web APIs specifically enable interaction between a client (frontend) and a server (backend) using protocols like REST, GraphQL, or gRPC.
Types of APIs
RESTful APIs — Uses HTTP methods (GET, POST, PUT, DELETE) to perform operations on resources.
GraphQL APIs — Allows clients to request only the data they need, reducing over-fetching.
gRPC APIs — Uses protocol buffers for high-performance communication, suitable for microservices.
2. Setting Up a REST API: Step-by-Step
Step 1: Choose a Framework
Node.js (Express.js) — Lightweight and popular for JavaScript applications.
Python (Flask/Django) — Flask is simple, while Django provides built-in features.
Java (Spring Boot) — Enterprise-level framework for Java-based APIs.
Step 2: Create a Basic API
Here’s an example of a simple REST API using Express.js (Node.js):javascriptconst express = require('express'); const app = express(); app.use(express.json());let users = [{ id: 1, name: "John Doe" }];app.get('/users', (req, res) => { res.json(users); });app.post('/users', (req, res) => { const user = { id: users.length + 1, name: req.body.name }; users.push(user); res.status(201).json(user); });app.listen(3000, () => console.log('API running on port 3000'));
Step 3: Connect to a Database
APIs often need a database to store and retrieve data. Popular databases include:
SQL Databases (PostgreSQL, MySQL) — Structured data storage.
NoSQL Databases (MongoDB, Firebase) — Unstructured or flexible data storage.
Example of integrating MongoDB using Mongoose in Node.js:javascriptconst mongoose = require('mongoose'); mongoose.connect('mongodb://localhost:27017/mydb', { useNewUrlParser: true, useUnifiedTopology: true });const UserSchema = new mongoose.Schema({ name: String }); const User = mongoose.model('User', UserSchema);app.post('/users', async (req, res) => { const user = new User({ name: req.body.name }); await user.save(); res.status(201).json(user); });
3. Best Practices for API Development
🔹 Use Proper HTTP Methods:
GET – Retrieve data
POST – Create new data
PUT/PATCH – Update existing data
DELETE – Remove data
🔹 Implement Authentication & Authorization
Use JWT (JSON Web Token) or OAuth for securing APIs.
Example of JWT authentication in Express.js:
javascript
const jwt = require('jsonwebtoken'); const token = jwt.sign({ userId: 1 }, 'secretKey', { expiresIn: '1h' });
🔹 Handle Errors Gracefully
Return appropriate status codes (400 for bad requests, 404 for not found, 500 for server errors).
Example:
javascript
app.use((err, req, res, next) => { res.status(500).json({ error: err.message }); });
🔹 Use API Documentation Tools
Swagger or Postman to document and test APIs.
4. Deploying Your API
Once your API is built, deploy it using:
Cloud Platforms: AWS (Lambda, EC2), Google Cloud, Azure.
Serverless Functions: AWS Lambda, Vercel, Firebase Functions.
Containerization: Deploy APIs using Docker and Kubernetes.
Example: Deploying with DockerdockerfileFROM node:14 WORKDIR /app COPY package.json ./ RUN npm install COPY . . CMD ["node", "server.js"] EXPOSE 3000
5. API Testing and Monitoring
Use Postman or Insomnia for testing API requests.
Monitor API Performance with tools like Prometheus, New Relic, or Datadog.
Final Thoughts
Creating APIs for web applications involves careful planning, development, and deployment. Following best practices ensures security, scalability, and efficiency.
WEBSITE: https://www.ficusoft.in/python-training-in-chennai/
0 notes
Text
Database Management: Key Concepts Every Student Should Know
Database management is a critical skill in today’s digital world. It’s the backbone of any system that handles data, from small businesses to global corporations.
But what exactly is database management?
This article aims to simplify these concepts with AssignmentDude. It’s designed for students and beginners in the field of database management. It’s also a useful resource for professionals looking to brush up on the basics and get Database Homework Help for your piled up assignments.
We’ll start by defining what a database and a Database Management System (DBMS) are. We’ll then delve into the evolution of DBMS and the different types of databases.
Key components of a database, such as tables, records, fields, and keys, will be discussed. We’ll also cover the principles of database design, including consistency, integrity, and security.
By the end of this article, you’ll have a solid understanding of the key concepts of database management. This knowledge will serve as a foundation for further study or practical application.
So, let’s dive in and explore the world of database management.
Understanding Database Management
Database management involves a thorough understanding of how data is structured, stored, and retrieved. It’s essential for anyone working with large sets of information.
The main goal is to ensure data is easily accessible and secure. This means implementing effective ways to manage and organize data.
Database management encompasses several concepts, including data modeling and database design. These are crucial for creating efficient database systems.
Effective database management requires understanding different types of databases and their uses. This knowledge ensures appropriate selection and implementation.
Here’s a brief overview of the essential elements involved in database management:
Data storage: Efficiently storing data in tables.
Data retrieval: Accessing data quickly when needed.
Data security: Ensuring only authorized users have access.
Data integrity: Maintaining accuracy and reliability.
Understanding these components helps build a strong foundation in database management.
What is a Database?
A database is a structured collection of data. It organizes information to make it easy to access, manage, and update.
Think of a database as a digital filing system. It stores data in an organized manner to facilitate quick retrieval.
Databases are used across industries, from banking to healthcare, to keep track of information. They support decision-making by providing insights based on data analysis.
Each piece of data in a database is called a record. These records are stored in tables, which consist of rows and columns. Tables allow for efficient data management and retrieval.
The format and organization of a database enable users to find specific information quickly. This makes databases indispensable in data-driven environments.
What is a Database Management System (DBMS)?
A Database Management System (DBMS) is software that manages databases. It serves as an interface between users and the data in the databases.
The primary role of a DBMS is to manage the data stored in a database effectively. It allows users to perform operations like querying, updating, and administration.
DBMSs provide a systematic way to create, retrieve, update, and manage data. They ensure data integrity, security, and consistency.
Additionally, a DBMS allows multiple users to interact with the database simultaneously. It handles data concurrency and ensures that operations do not interfere with one another.
Prominent examples of DBMS software include Oracle, MySQL, and Microsoft SQL Server. These tools support a wide range of database management tasks and are widely used across industries.
The Evolution of Database Management Systems
The evolution of database management systems (DBMS) reflects the growing complexity of data needs. Originally, databases were simple, flat files used to store data sequentially. This approach had limitations in terms of scalability and efficiency.
As technology advanced, hierarchical and network models emerged. These models enhanced data retrieval and storage capabilities. However, they were still complex and rigid, making updates cumbersome.
The relational database model, introduced by E.F. Codd in 1970, marked a significant breakthrough. It used tables to store data, making it more flexible and easier to query.
The adoption of SQL (Structured Query Language) further streamlined interactions with databases. It became the standard language for relational databases.
In recent years, NoSQL databases have gained popularity. These databases accommodate unstructured and semi-structured data. They offer scalability and are ideal for handling big data and real-time web applications.
Today, cloud-based database management systems are transforming data storage and accessibility. They offer advantages like cost efficiency, scalability, and remote access.
This evolution continues as database management systems adapt to modern technological demands and data complexities.
Types of Databases
Databases are vital for managing information. They come in various types, each suited for different needs. Understanding these types helps in selecting the right system for specific applications.
The three main types of databases are relational databases, non-relational databases, and distributed databases. Each type has unique characteristics and use cases. Here are some details about these database types:
Relational Databases: Use structured tables to store data.
Non-Relational (NoSQL) Databases: Handle unstructured data flexibly.
Distributed Databases: Spread data across multiple locations for scalability.
Choosing the right database type involves understanding the specific needs of an application. Capacity, speed, and data structure play a significant role in this decision.
Let’s delve into each type to discover its benefits and applications. This insight helps maximize the potential of database management systems.
Relational Databases
Relational databases are the traditional backbone of data management. They store data in structured tables with defined relationships. Each table has rows and columns, simplifying data retrieval with SQL.
The strength of relational databases lies in their organization and integrity. They support ACID properties — Atomicity, Consistency, Isolation, Durability. These properties ensure reliable transactions and accurate results.
Relational databases are ideal for applications requiring complex queries and transaction processes. They have widespread use in banking, retail, and other sectors needing robust data handling.
Non-Relational (NoSQL) Databases
Non-relational databases, or NoSQL, cater to unstructured and semi-structured data. They offer flexibility, supporting dynamic schemas and horizontal scaling. This adaptability is crucial for big data and real-time applications.
NoSQL databases come in various forms, such as document, key-value, column-family, and graph databases. Each form serves different data storage needs, from simple lookups to complex networking relationships.
These databases suit applications with high data volume and variety. Social media platforms, IoT, and web applications benefit from their scalability and speed. They thrive where traditional relational databases might struggle with agility.
Distributed Databases
Distributed databases enhance scalability and availability by spreading data across multiple servers or locations. They ensure data redundancy, enhancing fault tolerance and reducing downtime.
This approach allows databases to handle large amounts of data efficiently. Distributed databases offer load balancing, ensuring optimal performance even during peak usage.
Applications that require high availability and extensive reach, such as global online services, benefit from distributed databases. They provide robust support for geographically dispersed data and users, improving access speed and reliability.
Key Components and Design Principles of a Database
Understanding the key components of a database is crucial for effective management. These components form the foundation on which data is structured and queried. Knowing them helps in designing efficient databases.
Essential components include tables, records, fields, and keys. Each part plays a specific role in storing and organizing data effectively. Let’s explore these components:
Tables: The core structure, holding data.
Records: Individual entries within a table.
Fields: Columns that define data types.
Keys: Unique identifiers that link data across tables.
Database design principles ensure the system remains reliable and secure. Consistency, integrity, and security are paramount. These principles guide the formation of robust databases.
Designing a database involves careful planning. A well-designed database enhances data retrieval and reduces redundancy. Let’s delve deeper into the main components that make this possible.
Tables, Records, Fields, Keys
Tables form the backbone of a database. They organize data into rows and columns. Each row is a record, representing a single data item. Columns, known as fields, specify the type of data stored.
Fields define data characteristics and constraints. They ensure every piece of data fits within the database structure. Clear field definitions prevent errors and maintain data quality.
Keys are the unique identifiers that relate tables. Primary keys uniquely identify each record in a table. Foreign keys create links between tables, establishing relationships and ensuring data consistency across the system.
Database Design Principles: Consistency, Integrity, Security
Consistency ensures that a database operates uniformly across transactions. It maintains uniformity, even when multiple users access the database. Consistent systems perform predictable operations.
Integrity involves validating data, ensuring accuracy, and correctness. It involves constraints and rules that govern data entry. Data integrity prevents errors, preserving the quality and credibility of information stored.
Security is crucial to protect sensitive data from unauthorized access. It involves authentication, encryption, and access controls. Secure databases protect user data and comply with regulatory requirements.
These principles are essential in maintaining a reliable and trustworthy database system. They form the backbone of effective database management practices.
Database Operations and Management
Database operations involve numerous activities required to maintain data integrity and efficiency. Effective management ensures databases perform well under various demands. Key operations include backup, recovery, and performance tuning.
Administrators need to consistently monitor database health. Regular audits and updates prevent vulnerabilities. Proper management minimizes downtime and enhances system reliability.
Here’s a list of crucial database management operations:
Backup and Recovery: Safeguarding data from loss.
Performance Tuning: Optimizing system speed and efficiency.
Monitoring and Diagnostics: Tracking database health and detecting issues.
Security Management: Ensuring data protection and compliance.
Understanding database operations aids in making informed decisions. It is vital for maintaining a robust and effective database environment.
The Role of a Database Administrator (DBA)
A Database Administrator (DBA) is pivotal to a database’s success. DBAs manage and organize the flow of data. They ensure the database remains safe, secure, and efficient.
DBAs perform critical tasks such as backup, recovery, and security audits. They optimize system performance and troubleshoot issues. A good DBA helps maintain data quality while supporting user needs.
Structured Query Language (SQL)
Structured Query Language (SQL) is essential for database management. It is the standard language for querying relational databases. SQL enables users to retrieve and manipulate data effectively.
SQL’s versatility allows complex queries to be executed with ease. Understanding SQL is crucial for anyone working with databases. Mastery of SQL is a gateway to database manipulation and analysis.
Data Modeling and Entity-Relationship (ER) Models
Data modeling lays the foundation for database design. It involves creating a conceptual framework for data relationships. Proper modeling enhances data retrieval and storage efficiency.
Entity-Relationship (ER) models visually represent data structures. They illustrate how data components relate within the system. ER models help in designing databases that are logical and intuitive. Understanding these models is vital for effective database design and management.
Advanced Database Management Concepts
Exploring advanced concepts in database management equips students with a deeper understanding. These concepts address challenges related to data integrity, security, and efficiency. Mastery of these topics enhances the ability to manage complex databases.
The following are significant areas within advanced database management:
Normalization: Minimizes redundancy and enhances data integrity.
Transaction Management: Manages data consistency during operations.
Database Security: Protects data through authentication and encryption.
Concurrency Control: Ensures efficient multi-user access.
Developing skills in these areas is vital for aspiring database professionals. It prepares them for real-world challenges in database management.
Normalization and Data Redundancy
Normalization is a systematic approach to organizing data. It reduces data redundancy by dividing data into related tables. Proper normalization ensures consistency and avoids duplication.
This process is crucial for maintaining data accuracy. It streamlines the database structure, making it efficient and easy to manage. Understanding normalization is essential for effective database design.
Transaction Management and Concurrency Control
Transaction management is pivotal for maintaining data integrity. It ensures that database operations are completed successfully. Transactions group operations, treating them as a single unit.
Concurrency control enables multiple users to access the database simultaneously. It avoids conflicts by managing simultaneous transactions. These practices ensure consistent data retrieval and modification.
Database Security and User Authentication
Database security is a top priority in management. It involves implementing measures to protect sensitive data. Ensuring that users have proper access permissions is crucial.
User authentication verifies user identity before granting database access. It reduces the risk of unauthorized access and potential breaches. Emphasizing security in database management safeguards data from threats.
The Future of Database Management
The future of database management is shaped by innovation and technological advancements. As data generation skyrockets, efficient management solutions become essential. Emerging technologies like AI and machine learning will redefine data handling.
Organizations are turning to these innovations for competitive advantages. They need ways to store, process, and extract insights from extensive data volumes. As a result, database systems are rapidly evolving to meet these demands.
The shift towards digital transformation also influences database technology. Businesses require scalable, flexible, and reliable systems. This trend is propelling the adoption of cloud-based database solutions.
As the landscape changes, understanding future trends becomes crucial. Staying informed about these developments ensures that students and professionals remain at the forefront of the industry.
Big Data and Cloud Services
Big data reshapes how organizations view databases. The massive amount of information generated daily requires advanced strategies. Processing this data efficiently allows organizations to gain valuable insights.
Cloud services offer scalable and flexible solutions to manage big data. They allow organizations to store, process, and analyze data without significant infrastructure investment. This shift towards cloud computing simplifies data management.
Trends and Predictions in Database Management
Trends suggest a growing reliance on automation in database management. This includes automated performance tuning and predictive analytics. These technologies will streamline database operations.
Another prediction is increased focus on enhanced security measures. As cyber threats grow, ensuring data protection becomes vital. Future database systems will prioritize robust security protocols to combat risks effectively.
Conclusion and Further��Learning
Understanding the core concepts of database management is essential for students and professionals. As technology evolves, adapting to new practices is crucial.
This foundational knowledge serves as a springboard for advanced studies. Submit Your Assignment Now with AssignmentDude.
For those eager to deepen their expertise, continuous learning is key. Engaging with current literature, such as the “concepts of database management 9th edition” or “10th edition,” can be invaluable. Further exploration can include certifications or specialized courses to stay updated and skilled in an ever-changing field.
#do my programming homework#programming assignment help#urgent assignment help#assignment help service#final year project help#php assignment help#python programming
0 notes