#Visual Composer wordpress
Explore tagged Tumblr posts
Visit Tumblr Blog
Explore Tumblr blogs with no restrictions, modern design and the best experience.
Last Seen Tumblr Blogs


Fun Fact
After the announcement of the deal with Yahoo!, there were 170K signatures of unhappy Tumblr users petitioning to prevent the sale in 2013.
Text
How can you put images on posts?
Adding images to your posts can make them more visually appealing and engaging for your readers, and they can also help to illustrate your points and make your content more digestible. There are a few different ways to add images to your posts, depending on the platform you're using.
Here are the general steps on how to put images on posts:
Prepare your image: Make sure that your image is the right size and format for your platform. For example, if you're adding an image to a blog post, you'll want to make sure that the image is not too large, as this can slow down your page load times. You can also use an image editing tool to resize or crop your image to the desired size.
Upload your image: Once you have prepared your image, you can upload it to your platform. This may be done by clicking on an "Upload" button or by dragging and dropping the image into the post editor.
Position your image: Once your image is uploaded, you can position it in your post. You can choose whether to have the image appear on the left, right, or center of the post, and you can also choose whether to have the image float alongside the text or be displayed in a full-width block.
Add a caption: Once your image is positioned, you can add a caption. This is a short description of the image that will help your readers to understand what it is. A good caption should be no more than a few sentences long and should be informative and engaging.
Add alt text: Alt text is a text description of the image that is used by search engines and screen readers. It is important to add alt text to your images so that people who are unable to see the image can still understand what it is.
Here are some specific instructions on how to add images to popular platforms:
WordPress:
To add an image to a WordPress post, click on the "Add Media" button in the post editor.
Select the image you want to upload from your computer.
Click the "Insert into post" button.
Position the image in your post.
Add a caption and alt text.
Facebook:
To add an image to a Facebook post, click on the "Photo/Video" button in the status update box.
Select the image you want to upload from your computer.
Add a caption.
Click the "Share" button.
Twitter:
To add an image to a Tweet, click on the "Image" button in the tweet composer.
Select the image you want to upload from your computer.
Add a caption.
Click the "Tweet" button.
Instagram:
To add an image to an Instagram post, open the Instagram app and tap on the "+" button.
Select the image you want to upload from your phone's photo library.
Edit the image as desired.
Add a caption and hashtags.
Tap the "Share" button.
If you found this answer helpful, please like and leave a comment. You can also follow me for more helpful tips and tricks.
#image post#image description in alt#image optimization#image described#blogger community#bloggers on tumblr#information overload
6 notes
·
View notes
Text
Add the music from BLUE GIANT to your collection with its official soundtrack
(Featured Image Source: ©Blue Giant Partners / ©GKIDS, INC. / © 2023 Classical Centerstage Store. All Rights Reserved.) The anime film adaptation of BLUE GIANT was amazingly fun and captivating, with brilliant visuals alongside music composed by pianist Hiromi (Hiromi Uehara). Fans can take home the film’s stunning arrangement of jazz music with new soundtrack releases. ©Blue Giant Partners /…

View On WordPress
4 notes
·
View notes
Text
Monday's Photography Inspiration- Ed van der Elsken
Ed van der Elsken also known as the ‘enfant terrible’ of Dutch photography was not just a photographer. He was a visual poet who composed vivid stories with his camera. His lens wasn’t just a tool; it was an extension of his heart, capturing life’s myriad emotions, and his work resonates with a timeless intimacy that invites viewers to delve into the core of human existence. Born on March 10,…

View On WordPress
#ArtisticVision#CapturingLife#EdVanDerElsken#EmotivePhotography#HumanEmotions#LifeInPictures#LoveOnTheLeftBank#PersonalStories#PhotographicLegacy#PhotographyAppreciation#PhotographyBlog#PhotographyInspiration#PhotographyJourney#PhotographyLegend#PhotographyMaster#StorytellingThroughImages#StreetPhotography#TimelessPhotography#VisualPoet
4 notes
·
View notes
Text
How to Install
Looking for easy, step-by-step guides on how to install everything from software to home devices? Our "How to Install" blog provides clear, beginner-friendly instructions to help you get things up and running without the hassle. Whether you're setting up a new app, assembling tech gadgets, or configuring tools, we simplify the process for you. Each post is written with accuracy and user convenience in mind.
How to Install How to Install Printers Without CD How to Install Webcam Drivers How to Install SSH How to Install Pixelmon How to Install OptiFine How to Install Fabric How to Install Zend Framework with XAMPP on Windows How to Install Roblox on Chromebook How to Install Roblox Studio How to Install Firefox on Mac How to Install Firefox on Linux How to Install Firefox on Windows How to Install Java Step-by-Step Guide for Beginners How to Install Java on Mac Follow Full Process Ultimate Guide How to Install Java for Minecraft Easy Step Guide for How to Install VPN for Privacy How to Install VPN Server Virtual Private Network How to Install VPN on Router A Step-by-Step Guide : Complete Guide for How to Install Anaconda How to Install Anaconda on Linux Complete Guide How to Install Anaconda on Mac: A Step-by-Step Guide How to Install Anaconda on Ubuntu: A Step-by-Step Guide How to Install Anaconda on Windows How to Install npm A Step-by-Step Guide for Beginners How to Install npm on Ubuntu Step-by-Step How to Install NVM on Ubuntu Tips, and Explanations How to Install npm on Windows Solve Common Issues How to Install NVM on Windows Troubleshooting Tips How to Install npm on Visual Studio Code How to Install Node.js on Your Machine How to Install Node.js on Linux Step-by-Step Guide How to Install Node.js on Mac Step-by-Step Guide How to Install Node Modules on Angular How to Install Node.js on Ubuntu The Latest Version How to Install Node.js on Windows Get started Full Method How to Install APK File on Your Android Device Complete Guide on How to Install APK on Android TV How to Install APK on Chromebook Step by Step Process How to Install APK on iOS A Comprehensive Guide How to Install IPA on iPhone A Complete Guide How to Install APK on Windows 10 Complete Guide How to Install Git A Step-by-Step Guide for Beginners How to Install Git Bash A Complete Step-by-Step Guide How to Install Git on Visual Studio Code How to Install GitHub Simple Step-by-Step Process How to Install Git on Mac Step-by-Step Guide How to Install Git on Linux A Step-by-Step Guide How to Install Git on Ubuntu Step-by-Step Guide How to Install Git on Windows A Simple Guide How to Install Docker How to Install Docker on Linux How to Install Docker on Mac How to Install Docker Daemon Mac How to Install Docker on Ubuntu How to Install Docker Compose on Ubuntu 20.04 How to Install Docker Compose on Windows How to Install Docker on Windows How to Install WordPress How to Install WordPress on Ubuntu How to Install WordPress Plugins How to Install WordPress on Windows 10 How to Install Kodi on Firestick How to Install Exodus on Kodi How to Install The Crew on Kodi How to Install XAMPP on Mac
0 notes
Text

3 Saniye Hedefiyle WordPress Hızlandırma
Web siten hızlı mı, yoksa kullanıcılar daha senin başlığı görmeden sekmeyi kapatıyor mu? İnternet çağında hız artık bir lüks değil, hayati bir ihtiyaç. Özellikle WordPress altyapısıyla çalışan sitelerde hız, SEO’dan kullanıcı deneyimine, satışlardan marka algısına kadar her şeyi etkiliyor. Google diyor ki: “Sayfan 3 saniyeden geç açılıyorsa, ziyaretçilerin yarısını kaybediyorsun.”
Bu yazıda, bir WordPress sitesini 3 saniye ve altı yükleme süresine nasıl ulaştırabileceğini, hangi hatalardan kaçınman gerektiğini, hangi araç ve eklentilerin işini kolaylaştıracağını tüm detaylarıyla paylaşıyoruz. Teknik detaylara boğmadan, bol örnekle ve sade bir dille.
Hazırsan başlayalım. Bu yazı, yavaşlığı tarihe gömmek isteyen herkes için.
Neden Hız Bu Kadar Önemli?
Kullanıcı Deneyimi ve Sabır Eşiği
Hadi dürüst olalım: bir site 3 saniyeden fazla yükleniyorsa, çıkıyoruz değil mi? İşte senin ziyaretçin de aynı şeyi yapıyor. İnsanlar sabırsız, özellikle mobil kullanıcılar. Sayfa geç açılırsa ürününü bile görmeden siteyi terk ediyorlar.
SEO Sıralamaları ve Sayfa Yükleme Süresi
Google, hız takıntılı. Sayfa yükleme süresi, doğrudan sıralamaları etkileyen faktörlerden biri. Core Web Vitals güncellemeleriyle birlikte hızlı yüklenen siteler, yavaş rakiplerine fark atıyor. 3 saniyenin altında bir site, SEO’da da bir adım önde.
Mobil Trafikte Hızın Kritik Rolü
Mobil kullanıcılar için hız = sadakat. Siten yavaşsa, dönüşüm oranı düşer. Google’ın araştırmasına göre, yüklenmesi 5 saniye süren bir mobil sayfa, hemen çıkma oranında %90 artışa neden olabiliyor.
Web Siteniz Yavaş mı? Kontrol Etmenin 5 Yolu
1. Google PageSpeed Insights
Ücretsiz ve doğrudan Google’dan. Sayfanın masaüstü ve mobil skorlarını, eksiklerini, iyileştirme önerilerini verir. Sayısal puanlama 0–100 arasıdır. 90+ hedefin olsun.
2. GTmetrix ve Lighthouse
GTmetrix hem performansı ölçer hem görsel ağırlık gibi detaylı analiz verir. Lighthouse, özellikle geliştiriciler için teknik detay sunar. Hepsi ücretsiz.
3. Mobil & Masaüstü Ayrımı
Mobil performans masaüstünden farklı olabilir. Mobilde 4G değil, bazen EDGE bile olabilir. O yüzden her iki platformda ayrı test yap.
4. İlk Bayt Süresi (TTFB)
Sunucu ne kadar hızlı yanıt veriyor? TTFB süresi 200ms altında olmalı. Yüksekse hosting değiştirmen gerekebilir.
5. Gerçek Kullanıcı Testleri (RUM)
Gerçek kullanıcı verileri, laboratuvar testlerinden daha değerli. Google Search Console’daki “Core Web Vitals” raporlarını incele.
3 Saniyenin Altına İnmenin Temel Dinamikleri
Hosting Seçiminin Rolü
Ucuz hosting, pahalı sonuçlar doğurur. Paylaşımlı sunucular seni yavaşlatır. LiteSpeed destekli, SSD tabanlı ve CDN uyumlu hosting tercih et.
Tema & Eklenti Performansı
Kod yapısı ağır temalar yavaşlatır. Hafif ve sade temalar tercih et: Astra, GeneratePress, Hello Theme gibi. Eklenti sayısı 20’yi geçiyorsa, optimize etme zamanı gelmiş demektir.
CDN Kullanımı
Cloudflare, BunnyCDN, KeyCDN gibi servisler, içeriğini farklı lokasyonlardan hızlıca ulaştırır. Hem hızı artırır hem saldırı riskini azaltır.
Görsel ve Dosya Optimizasyonu
JPEG yerine WebP formatı kullan. 200 KB üstü görseller siteyi gömer. TinyPNG, ShortPixel gibi araçlarla sıkıştır.
Önbellekleme (Caching) Stratejileri
Ziyaretçiye sunulan sayfa her seferinde yeniden oluşturulmamalı. WP Rocket, LiteSpeed Cache gibi eklentilerle “önbellekten sunum” yap.
WordPress’te En Yavaşlatan 7 Etken
Ağır Slider’lar ve Sayfa Oluşturucular Visual Composer, Elementor gibi builder’lar çok kaynak tüketebilir.
Yüksek Çözünürlüklü Optimizasyonsuz Görseller HD görsel güzeldir ama 3MB’lik bir banner hiç çekici değil.
Kötü Kodlanmış Eklentiler Puanı düşük, nadir güncellenen eklentilerden uzak dur.
Render Blocking CSS/JS Sayfa yüklenmeden çalışmak isteyen dosyalar, yüklemeyi geciktirir.
Fazla Sayıda HTTP Request Her element (görsel, font, ikon) bir istek gönderir. Sayfayı şişirme.
Pingback & Trackback Ayarları Kapat gitsin. Hem güvenlik açığı hem performans düşmanı.
Güncellenmemiş Yazılım Eski WordPress sürümleri, yavaşlık + güvenlik açığı = kabus.
3 Saniyelik Performansa Ulaşmak İçin Adım Adım Rehber
Hız testleriyle başlayın. Sorun nerede?
Hosting kalitenizi değerlendirin, gerekirse değiştirin.
Hafif bir tema seçin ve sadece ihtiyaç duyduğunuz eklentileri tutun.
Cache eklentisini kurun ve yapılandırın.
Cloudflare gibi CDN entegre edin.
Görselleri WebP’ye dönüştürün, lazy-load etkinleştirin.
Veritabanını WP-Optimize gibi eklentilerle temizleyin.
HTML, CSS ve JS dosyalarını küçültün.
Gzip sıkıştırmasını aktif edin.
Her değişiklik sonrası test yapın ve iyileştirin.

Core Web Vitals ile Uyumlu Olmak
LCP, CLS, FID Nedir?
LCP: Sayfanın yüklenebilir ana içeriği ne kadar sürede görünüyor?
CLS: Sayfa elemanları oynuyor mu?
FID: İlk tıklamaya ne kadar sürede tepki veriyor?
Yükselten Teknikler
Lazy-load, preload kullan.
Kritik CSS inline ekle.
Yazı fontlarını sistem fontlarına çevir.
Kapsayıcı container yapısını netleştir.
E-Ticaret Sitelerinde Hızın Satışa Etkisi
Yavaş açılan ürün sayfası = terk edilmiş sepet. WooCommerce gibi sistemlerde optimizasyon şart:
Checkout sayfasını sadeleştir.
Otomatik upsell eklentilerini sınırlı tut.
Görselleri sadece ihtiyaç kadar göster.
E-Ticaret Sitelerinde Hızın Satışa Etkisi
Yavaş açılan ürün sayfası = terk edilmiş sepet. WooCommerce gibi sistemlerde optimizasyon şart:
Checkout sayfasını sadeleştir.
Otomatik upsell eklentilerini sınırlı tut.
Görselleri sadece ihtiyaç kadar göster.

Sık Yapılan Hatalar ve Uzak Durulması Gerekenler
“Ne kadar eklenti o kadar fonksiyon” yanılgısı.
AMP zannedildiği kadar çözüm değil.
Her sayfaya slider koymak zorunda değilsin.
Animasyonlar hızın düşmanıdır.
Hızlandırma Sonrası Ne Yapmalı?
A/B test yaparak kullanıcı davranışlarını ölç.
15 günde bir GTmetrix testlerini tekrarla.
Eklenti güncellemelerini takip et.
Kullanıcı geri bildirimlerini topla.
Hızlandırmanın ardından dönüşüm oranlarını izle.
3 Saniyelik Hedef Hayal Değil, Plan Meselesi
Eğer bu yazıyı buraya kadar okuduysan, sitenin hızını önemseyenlerdensin. İyi haber şu: 3 saniyeye inmek mümkün. Kötü haber? Sabır ve düzenli takip istiyor.
Ama unutma: hızlı açılan bir site, sadece SEO’da değil satışta, güvenilirlikte, marka algısında da 3 adım öne geçer. Ve işin özü şu: Hız, bir lüks değil; bir gereklilik.
Sıkça Sorulan Sorular (SSS)
1. WordPress sitem neden yavaş çalışıyor olabilir? → Ağır tema, kötü hosting, optimize edilmemiş görseller, çok fazla eklenti gibi sebeplerle.
2. Site hızı SEO’yu ne kadar etkiler? → Direkt etkiler. Google sıralama kriterlerinden biridir.
3. Hangi eklentiyle hızımı artırabilirim? → WP Rocket, LiteSpeed Cache, Autoptimize ilk önerilenlerdendir.
4. Hangi hosting hizmetini önerirsiniz? → LiteSpeed destekli SSD hosting kullanan güvenilir firmalar önerilir.
5. CDN şart mı? → Evet. Özellikle global ziyaretçiniz varsa şart.
6. WebP görsel nedir? → Google’ın önerdiği yüksek sıkıştırmalı ve kaliteli görsel formatı.
7. Elementor sitemi yavaşlatır mı? → Gereğinden fazla kullanıldığında evet. Hafif temalarla dengelenebilir.
8. 3 saniyeye ulaşmak ne kadar sürer? → Sitenin mevcut durumuna göre 2 gün ile 2 hafta arasında değişebilir.
9. Core Web Vitals ne işe yarar? → Kullanıcı deneyimini ve SEO performansını ölçer. Skorları iyileştirmek önemlidir.
10. Hızlı site = daha fazla satış mı? → Evet. Yüksek hız, daha az terk edilme, daha fazla dönüşüm demektir.
0 notes
Text
WPBakery Pro Eklentisi - WordPress Sayfa Oluşturucu İndir
WPBakery Sayfa Oluşturucu Pro – WordPress İçin En Popüler Sürükle-Bırak Sayfa Oluşturucu WPBakery Page Builder (eski adıyla Visual Composer), WordPress siteniz üzerinde profesyonel ve çarpıcı sayfalar oluşturmanızı sağlayan en yaygın kullanılan premium sayfa oluşturucu eklentilerinden biridir. Kod bilgisine ihtiyaç duymadan, tamamen sürükle-bırak yöntemiyle içeriklerinizi yönetmenize olanak…
0 notes
Text
🛒 Build a Stunning Online Store with Makali – Only $3.99!
Looking for a flexible, beautiful, and easy-to-use WordPress theme for your online shop? ✨ Meet the Makali Multipurpose WooCommerce Theme — a modern eCommerce design built for creators, makers, and business owners who want total control without the complexity.
Perfect for: 💄 Beauty & Cosmetics Stores 💍 Jewelry Shops 🪑 Furniture Brands 🌱 Organic & Plant Boutiques 🚗 Auto Parts Stores ...and anything else you dream up.
🎨 What’s Inside Makali? ✔️ Visual Composer – Drag & drop your perfect store layout ✔️ Customizable Design – Fonts, colors, headers & footers made easy ✔️ Daily Deals with Countdown – Boost urgency & sales ✔️ Blog + Testimonials – Share your story & build trust ✔️ Mailchimp-Ready Footer – Grow your audience in style ✔️ Fully Responsive – Mobile-friendly, retina-ready ✔️ Unlimited Use – GPL license, install it wherever you like
💰 Just $3.99 📥 Download here → https://wpsuperbox.com/makali-multipurpose-woocommerce-theme

#MakaliTheme#woocommerce#wordpress#ecommercedesign#ShopTheme#tumblrbusiness#OnlineStoreInspo#webdesigntools#wordpressthemes#WPSuperBox#TumblrShopSupport
0 notes
Text
The Future of Mobile Applications: How Technology is Transforming the Way We Interact
Every e-commerce person needs to know how to build pages with WP bakery page builder. This theme provides support for the Visual Composer plugin as well as a custom-made plugin named “Visual Composer Extension” for our customers. The Visual Composer plugin and extension adds a range of drag-and-drop plugins to your dashboard, allowing you to create your site quickly and easily. This theme provides support for the Visual Composer plugin as well as a custom-built plugin named “Visual Composer Extension” for our customers.
The Visual Composer plugin and extension adds a plethora of drag-and-drop plugins to your dashboard, allowing you to create your site quickly and easily. Creating pages for your WordPress platform is also as simple as a few clicks and drag-and-drop operations with WPBakery Page Builder‘s elaborate but intuitive front-end and back-end editors. I’ll teach you how to add WPBakery Page Builder to your WordPress installation and walk you through all of the key features in this Visual Composer guide.
Requirements for WP Bakery Page Builder
You’ll need the following items to follow along with this WPBakery Page Builder tutorial:
WordPress 5.0 or higher is essential.
a subscription to Envato
In addition, I recommend reading the following article to better understand how to use Visual Composer and why you should use WPBakery Page Builder instead of any of the other page-builder plugins available today:
WPBakery Page Builder Installation
WPBakery Page Builder is a WordPress premium plugin. It’s available on Code Canyon, so sign up with your Envato account and buy a license. It’s still commonly is in reference as Visual Composer. Once you’ve paid for it, you’ll be able to download a ZIP file containing various plugin data.
Look for a file called js composer.zip after extracting the ZIP file. This is a WordPress plugin archive file that you must add to your server. So, go to Plugins > Add New in your WordPress admin line. Then pick js composer.zip from the Upload Plugin drop-down menu. To begin the update, click the Install Now button. When the installation is over, click the Enable Plugin button. You’ll be guided to the WPBakery Page Builder welcoming screen as soon as you do so.
Make Sure WPBakery Page Builder Plugin Is Installed & Active
Make sure the WPBakery Page Builder plugin is turned on. Since this plugin is not included with the theme (for good reason), it must be installed and allowed as described in the “Installing Recommended Plugins” guide. You should have been asked to install the recommended plugins after downloading the theme. Now is the time to install the Visual Composer if you haven’t already.
Configuring the WP Bakery Page Builder Plugin
It’s easy to learn how to use WPBakery Page Builder. The plugin is highly customizable, with hundreds of configuration choices to tailor it to your specific needs. To see them, press the Settings button on the welcome pad.
WP Bakery Page Builder with general settings
The plugin comes with a well-thought-out default setup that will suffice for the majority of use cases. For example, you can see that it supports responsive design right out of the box in the General Settings tab. The plugin also attempts to add different optimizations so that the pages you generate with it load quickly. For example, it defaults to using only the Latin script subset of Google fonts. All you have to do is change the Google fonts subsets option to accept other scripts.
You’ll note that this plugin is only available for your WordPress site’s pages in the Role Manager tab. Select Custom in the Post styles list and allow the post feature if you want it to be eligible for your posts as well.
Configuring post types:
Scroll down and press the Save Changes button once you’ve made the changes.
Finally, go to the Template Options tab and search the Use custom design area if you want to configure the look and feel of WPBakery Page Builder’s content elements. You’ll be able to adjust the plugin’s pre-set colors, margins, and widths after you’ve done so.
Define Main Settings for WP Bakery Page Builder
To configure the plugin, go to Settings > WPBakery Page Builder. The most crucial step is to turn on the composer for the post forms you choose to use it for. This is achieved through the “Role Manager” tab and the “Post Types” options. You can make the page builder accessible based on the user function, but you’ll really just want to change the “Administrator” settings.
Using the WP Bakery Page Builder Plugin
The Visual Composer is really simple and doesn’t need much explanation; for a short guide, see the screenshots below (you can also check out this more detailed Visual Composer guide). To begin, choose if you want to use the Backend or Frontend editor and press the appropriate button.
The Visual Composer Backend Editor
In this Visual Composer tutorial, this is a crucial step. There are two powerful editors included with WPBakery Page Builder: a back-end editor and a front-end editor. They can only be accessed from inside a website or a tweet. As a result, I recommend that you make a new page by heading to Pages > Add New for the time being. You can select which editor you want to use in the page construction GUI. To open the backend editor, first press the Backend Editor button.
You can conveniently connect a number of widely used elements to the website using this editor. Simple elements including text blocks, pictures, and separators are available in WPBakery Page Builder. Advanced features include Facebook “Like” icons, Google Maps, charts, and animated carousels. The components are grouped into four groups for easy access: text, social, structure, and WordPress widgets.
The elements that are available are listed below:
Content elements, as the name implies, are elements that are often used to construct the contents of a blog or an article. Social features, on the other hand, are ones that make it simple for people to share your profile on social media sites. Structure components, on the other hand, are intended for more experienced users who are familiar with writing code. They allow you to add raw HTML and JavaScript to your website directly.
To add an element, simply click the Add Element button and choose the desired element. Alternatively, you should use the Add Text Block button to add text to the website directly.
Text editor
If you don’t like the way an aspect looks by default, you can always change its styles by going to the Design Options page. Once you’ve added a few items, you’ll find that each one has a toolbar with a few buttons associated with it. These buttons show intuitive icons and enable you to perform essential operations like dragging and dropping an entity to alter its position, duplicating, removing, or editing its contents.
Keep in mind to save your page once you’ve finished adding components.
The Visual Composer Frontend Editor
The frontend Visual Composer has the same page building choices as the backend Visual Composer. The main distinction is that instead of position holders, you will see the individual page elements when you insert theme.
Using the WYSIWYG Front-End Editor
The back-end editor is perfect for pages with a number of elements that are lengthy and complicated. You get to deal on the final presentation of your website right from the start if you use the WYSIWYG front-end editor instead. You can swap between editors at any time, so scroll up and click the Frontend Editor button to launch the latest one.
Frontend Editor
Only when you mouse over a feature in this editor can you see the toolbars associated with it. Toolbars and the features they provide are somewhat close to those provided by the back-end editor in frontend editors demo options. You will now see how the website appears on different screen sizes using the front-end editor. You can also continue editing the page in whatever screen size you choose.
Using Templates
Using models is another critical part of learning how to use WPBakery Page Builder. Any page or post you make with WPBakery Page Builder can be turned into a prototype. You will reduce the amount of tedious work you do when making pages for your WordPress site by using this feature.
Open the Templates dialogue, assign the template a tag, and click the Save Template button to save the new layout of your page as a template.
Save the template in the Save Template dialogue box
Working with your own models isn’t the only choice. This plugin has a huge template library that is maintained on a daily basis. Switch to the Template Library tab and hit the Access Library button to access the library. In the template library, you’ll find that the library has a large number of high-quality layout models. You will do any of them for free. However, before you can use them, you must first unlock your WPBakery Page Builder certificate.
0 notes
Text
Construction WordPress theme https://visualmodo.com/theme/construction-wordpress-theme/ a business theme designed specifically for construction, building companies and those that offer building services. The theme comes pre-packed with a drag and drop page builder (Visual Composer) to ensure you can easily design your website just how you like it. 👷♂️🚧🏗️👷
building #developer #webdesign #HTML5 #CSS3 #templates #plugins #theme #WordPress #construction #ecommerce #responsive #retina #SEO #website #siteBuilder #services
0 notes
Text
Templatera NULLED Plugin 2.3.0

The Templatera NULLED Plugin is your go-to solution for seamless template management in WordPress using Visual Composer. This powerful tool lets you create, save, and reuse templates across your entire site with ease—without paying a single cent. With the nulled version, you get access to all premium features completely free, offering a cost-effective way to enhance your workflow and design capabilities. Whether you're managing client projects or building your own site, the Templatera NULLED Plugin empowers you to work faster and smarter. It’s fully functional, easy to install, and safe to use—just like the original. Perfect for freelancers, agencies, and DIY site owners alike, this plugin brings professional-grade template control to your fingertips with zero limitations.
0 notes
Text
Why don't newspapers use more graphs with their articles?
This post is a response to a question initially posed on Quora, and can also be accessed via “https://www.quora.com/Why-dont-newspapers-use-more-graphs-with-their-articles/answer/Antonio-Amaral-1“ A straightforward answer is that visuals are a LOT more time-consuming to create and fill a space than words. What can be conveyed within a couple of paragraphs, taking only a few minutes to compose,…

View On WordPress
0 notes
Text
Artist Oli El Captches the essence of minimum in the Architectural Photography
Artist Oli El, German -based graphic designer with a camera, has skillfully captured the essence of minimum in architectural photography. His work is defined by deep eyes for clean lines, striking compositions and vibrant colors. Windows, doors and geometric structures converted daily buildings into abstract visual narratives. Each frame is carefully composed, using bold contrasts and cautious…

View On WordPress
0 notes
Text
Heart And Soul
https://www.youtube.com/watch/nULSZY9gI3Y Heart And Soul Provided to YouTube by Universal Music Group Heart And Soul · T’Pau Bridge Of Spies ℗ 1987 Virgin Records Limited Released on: 1987-09-14 Producer: Roy Thomas Baker For RTB Audio Visual Productions USA Composer, Vocalist: Carol Decker Composer: Ronnie Rogers Auto-generated by YouTube. via YouTube https://www.youtube.com/watch?v=nULSZY9gI3Y…

View On WordPress
0 notes
Text
Progress Bars
YAYINDA! https://mguzel.com.tr/progress-bars/
Progress Bars
Progress Bars Shortcodes
Check out all the progress bars options and can be set in different styles with Visual Composer Progress Bar, Pie Chart shortcodes.
Default
60%
0%
Contextual classes
Striped
Animated
Border Radius
Sizes
Animated & Tooltips
HTML/CSS
100%
Design
85%
WordPress
75%
Photoshop
85%
Colors
Primary
50%
Secondary
70%
Tertiary
75%
Quaternary
40%
Circular
HTML/CSS0%
HTML/CSS
Sizes
0%
HTML/CSS0%
HTML/CSS0%
Options
HTML/CSS0%
HTML/CSS0%
HTML/CSS0%
0 notes
Text
Illustration Beautifully Visualizes Connections Between Math & Music | My Modern Met
By Eva Baron on December 27, 2024 John Coltrane’s reinterpretation of the circle of fifths. The diagram is now known as “The Coltrane Circle” or “Coltrane’s Circle of Tones.” Pythagoras once claimed that “there is geometry in the humming of the strings, and there is music in the spacing of the spheres.” The accomplished jazz saxophonist, bandleader, and composer John Coltrane thought…

View On WordPress
0 notes
Text
Proper Steps To Create A WordPress Website For A Dental Clinic
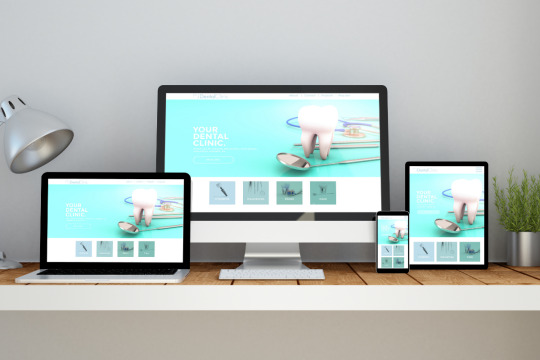
Visitors are more likely to return to your dental business if your website is visually appealing. Even if your clinic is small and you rely on word of mouth, patients are likely to search for your business online. Creating a stunning website for dentists doesn’t have to break the bank, and we’ll show you how in this guide.
Choosing A Dental Clinic Website Template
Choosing a WordPress dental clinic website theme is the first step in constructing your WordPress site. To begin, you can choose between general healthcare or a dentist’s theme. To make a significant effect on the internet, we suggest that you select a specialist theme from our list of the finest dentist themes. A cross-browser-compatible, responsive WordPress theme is the best way to make sure that your website visitors see a beautiful site regardless of their device type and size.
It’s even better to use a theme that includes a page builder like visual composer or Elementor page builder. It allows you to create new pages with greater freedom and control over the look and feel of your website. If you’re looking for a dental clinic WordPress theme, establish a list of all the features you need, and then look for a theme that supports a plugin that can help you get them all.
For instance, an appointment booking form if you wish to have online appointments, a full-width layout, a giant menu for your site, or any number of other options. When you have a clear picture of what you want your website to look like, picking a theme becomes easy.
Subscribing For Hosting And Domain Name
A domain name and web hosting can now be obtained in conjunction with the dental clinic website theme you’ve previously purchased.
In the same way that other website builders don’t charge a fixed monthly fee, WordPress does not. It’s free, but you’ll need to find a place to put your site on the internet.
Hosting
Because of the fierce rivalry amongst web hosting firms, it is now easy to locate a host for your website that is both affordable and reliable. Your site can be hosted by finding the best options in your area. To host your website, we recommend Bluehost, which has the finest uptimes, top-notch customer service, and security.
Domain name
You can think of your domain name as essentially representing your online persona and location. Because of this, you should always take your time while picking a domain name.
Choosing A Domain Name Might Be Tricky, So Here Are Some Pointers:
Short and easy to remember
Make spelling mistakes a thing of the past
Do not use symbols or numbers
Use caution while selecting a domain name extension
Include the keywords if you can
Symbolize your company’s identity in a unique way
Bluehost is a great option for hosting your domain name, as we’ve said before. Search for the availability of two or three distinct domain names. For your dental clinic’s website, purchase the domain name.

Installing WordPress for a Dental Clinic Website Theme Is A Simple Process.
Following purchase and download, you’ll be given access to all of the components that come with the template, including a parent theme and a subtheme. Our WordPress dashboard is now ready for theme installation, so let’s get to it! We need to go to the ‘Appearance’ area and click on ‘Themes’ in order to do so.
What we really want is for you to be taken to a page that lists all of the installed themes, but we’re not interested in that! Select the “Add New” option. By now you should have selected the “Dentario” zip package by selecting “Upload Theme” and then “Upload”. After you’ve installed the theme, WordPress will inform you which plugins are required.
This is critical since it will ensure that all of the template’s features perform as expected. Just select all of the plugins you need and click the “Install” button to begin the process of installing them. You’ll have to go through the same process again to activate them when they’ve been installed.
Content Of Your Website
Your website’s content is unquestionably king!
What keeps your site’s users interested and motivated to take action is the variety of content you offer them on your site. Your website’s success is entirely contingent on how successfully you prepare and implement the content.
Material writers can be hired to develop a wide range of different types of content for you.
Mobile-Friendly Dental Clinic Website
Optimizing your website for the mobile platform will increase the number of visitors to your site. It is important to take notice of spacing, image sizes, and features that may not look good or perform properly on mobile devices. You don’t want to be in a situation where your dentist’s website development appears bad on a mobile device and causes customers to go to other, better-looking dentist websites.
Tips for Building a Dentist Website
Add Statistics
Even if the numbers are bad, people enjoy reading them. Add a few numbers on the homepage to show how many people have visited. Customer satisfaction, procedures, or anything else you think is significant can be included in these numbers.
Use Popups
Using popups for messages that you want the user to focus on is a good practice. Anything from a discount to an invitation for you to get in touch is possible.
Use Forms
Users can easily reach out to you by filling out forms on your website. Become their favorite dentist by making their life easy.
Having a website for your dental practice is a good idea. We’re not just referring to a pretty website that doesn’t actually do anything. It should be able to help with things like scheduling an appointment, finding a dentist, and looking at their work. All of these elements were incorporated into ‘Dentario’ by its designers. Just a few blocks are all you need to do to get there. A few tweaks are all that is needed before you’re ready to launch your website. If you’re seeking help with dental website development, you should consider contacting a WordPress development company in Cincinnati.
Contact Us
At Reversed Out Creative, we understand the challenges and opportunities presented by AI disruption. Our team of experts specializes in web design, SEO, graphic design, and digital marketing services. Reach out to us through our contact form to learn more about navigating the evolving job market and embracing the potential of AI. Together, let’s shape a future that combines human ingenuity with the power of AI.
Content source: https://reversedout.com/benefits-of-wordpress-for-dental-clinic-website/
#Website Development Company In Cincinnati#WordPress Website Create#WordPress Website Building#Web Development Company Cincinnati#Design Agencies In Cincinnati
0 notes