#WebAssembly backend for TensorFlow.js
Explore tagged Tumblr posts
Visit Tumblr Blog
Explore Tumblr blogs with no restrictions, modern design and the best experience.
Last Seen Tumblr Blogs


Fun Fact
Tumblr.com is the 103rd most visited website in the world.
Text
What is WebAssembly (wasm) ?
WebAssembly is a new type of code that can be run in modern web browsers — it is a low-level assembly-like language with a compact binary format that runs with near-native performance and provides languages such as C/C++, C# and Rust with a compilation target so that they can run on the web.
WebAssembly is designed to complement and run alongside JavaScript — using the WebAssembly JavaScript APIs, you can load WebAssembly modules into a JavaScript app and share functionality between the two. This allows you to take advantage of WebAssembly’s performance and power and JavaScript’s expressiveness and flexibility in the same apps, even if you don’t know how to write WebAssembly code.
Now, if you have programs in C/C++ or Rust etc. now you can run those programs on the web with help of WebAssembly alongside JavaScript. You can also develop WebAssembly using AssemblyScript (A language made for WebAssembly).
Now these has opened doors for running complex programs written in “low-level assembly-like language” on web.
We are already seeing some interesting use cases of WebAssembly, Like TensorFlow has announced — WebAssembly backend for TensorFlow.js (more details here)

One more interesting example of WebAssembly could be — A WebAssembly Powered Augmented Reality Sudoku Solver.
In our example using WebAssembly NES emulator and run Super Mario Brothers and Tetris game in our web browser.
TL;DR Use docker image:
$ docker pull bhargavshah86/rust-wasm-demo:1.0.0 $ docker run --name rust-wasm-demo -d -p 8080:80 bhargavshah86/rust-wasm-demo:1.0.0$ # http://localhost:8080/wasm_rust_demo.html
Manual steps:
Download WebAssembly NES emulator (nes_rust_wasm.js and nes_rust_wasm_bg.wasm)
Download ROM files,
Super_mario_brothers.nes
Tetris.nes
3. HTML and JS code to glue in all parts together
<html> <head> <meta content="text/html;charset=utf-8" http-equiv="Content-Type"/> <style> canvas { background: #000; margin: 10px; } .actual { width: 256; height: 240; } .double { width: 512; height: 480; } .quadruple { width: 1024; height: 960; } td { padding: 5px; } </style> </head> <body> <script type="module"> import init, { WasmNes, Button } from './nes_rust_wasm.js'; const setupAudio = (wasm, nes) => { const audioContext = AudioContext || webkitAudioContext; if (audioContext === undefined) { throw new Error('This browser seems not to support AudioContext.'); } const bufferLength = 4096; const context = new audioContext({sampleRate: 44100}); const scriptProcessor = context.createScriptProcessor(bufferLength, 0, 1); scriptProcessor.onaudioprocess = e => { const data = e.outputBuffer.getChannelData(0); nes.update_sample_buffer(data); // Adjust volume for (let i = 0; i < data.length; i++) { data[i] *= 0.25; } }; scriptProcessor.connect(context.destination); }; const start = romArrayBuffer => { // @TODO: Call init beforehand init() .then(wasm => run(wasm, new Uint8Array(romArrayBuffer))) .catch(error => console.error(error)); }; const run = (wasm, romContentArray) => { const width = 256; const height = 240; const canvas = document.getElementById('nesCanvas'); const ctx = canvas.getContext('2d'); const imageData = ctx.createImageData(width, height); const pixels = new Uint8Array(imageData.data.buffer); const nes = WasmNes.new(); nes.set_rom(romContentArray); setupAudio(wasm, nes); nes.bootup(); // FPS counter let totalElapsedTime = 0.0; let previousTime = performance.now(); let frameCount = 0; const fpsSpan = document.getElementById('fpsSpan'); const countFps = () => { frameCount++; const currentTime = performance.now(); const elapsedTime = currentTime - previousTime; totalElapsedTime += elapsedTime; previousTime = currentTime; if ((frameCount % 60) === 0) { fpsSpan.textContent = (1000.0 / (totalElapsedTime / 60)).toFixed(2); totalElapsedTime = 0.0; frameCount = 0; } } // animation frame loop const stepFrame = () => { requestAnimationFrame(stepFrame); countFps(); nes.step_frame(); nes.update_pixels(pixels); ctx.putImageData(imageData, 0, 0); }; // joypad event listener setup // @TODO: Mapping should be configurable const getButton = keyCode => { switch (keyCode) { case 32: // space return Button.Start; case 37: // Left return Button.Joypad1Left; case 38: // Up return Button.Joypad1Up; case 39: // Right return Button.Joypad1Right; case 40: // Down return Button.Joypad1Down; case 50: // 2 return Button.Joypad2Down; case 52: // 4 return Button.Joypad2Left; case 54: // 6 return Button.Joypad2Right; case 56: // 8 return Button.Joypad2Up; case 65: // A return Button.Joypad1A; case 66: // B return Button.Joypad1B; case 82: // R return Button.Reset; case 83: // S return Button.Select; case 88: // X return Button.Joypad2A; case 90: // Z return Button.Joypad2B; default: return null; } }; window.addEventListener('keydown', event => { const button = getButton(event.keyCode); if (button === null) { return; } nes.press_button(button); event.preventDefault(); }, false); window.addEventListener('keyup', event => { const button = getButton(event.keyCode); if (button === null) { return; } nes.release_button(button); event.preventDefault(); }, false); stepFrame(); }; // rom load let romSelected = false; document.getElementById('romSelect').addEventListener('change', event => { if (romSelected) return; romSelected = true; const select = event.target; const option = select.selectedOptions[0]; const filename = option.value; if (!filename) { return; } select.disabled = true; // @TODO: Reset Nes instead fetch('./' + filename) .then(result => result.arrayBuffer()) .then(start) .catch(error => console.error(error)); }); window.addEventListener('dragover', event => { event.preventDefault(); }, false); window.addEventListener('drop', event => { event.preventDefault(); if (romSelected) return; romSelected = true; document.getElementById('romSelect').disabled = true; // @TODO: Reset Nes instead const reader = new FileReader(); reader.onload = e => { start(e.target.result); }; reader.onerror = e => { console.error(e); }; reader.readAsArrayBuffer(event.dataTransfer.files[0]); }, false); // screen size document.getElementById('screenSizeSelect').addEventListener('change', event => { const select = event.target; const option = select.selectedOptions[0]; const className = option.value; if (!className) { return; } const canvas = document.getElementById('nesCanvas'); for (const name of ['actual', 'double', 'quadruple']) { if (name === className) { canvas.classList.add(name); } else { canvas.classList.remove(name); } } }); </script> <div> <select id="romSelect"> <option value="" selected>-- select rom --</option> <option value="Super_mario_brothers.nes">Super Mario</option> <option value="Tetris.nes">Tetris</option> </select> or Drag and Drop your own rom file </div> <div> <canvas id="nesCanvas" width="256" height="240"></canvas> </div> <div> <select id="screenSizeSelect"> <option value="actual" selected>256x240</optioin> <option value="double">512x480</optioin> <option value="quadruple">1024x960</optioin> </select> <span id="fpsSpan">--.--</span> fps </div> <div> <table> <tr> <td>Down →</td> <td>Down</td> </tr> <tr> <td>Left →</td> <td>Left</td> </tr> <tr> <td>Right →</td> <td>Right</td> <!-- <td>6</td> --> </tr> <tr> <td>Up →</td> <td>Up</td> <!-- <td>8</td> --> </tr> <tr> <td>A →</td> <td>A</td> <!-- <td>X</td> --> </tr> <tr> <td>B →</td> <td>B</td> <!-- <td>Z</td> --> </tr> <tr> <td>Start →</td> <td>Space</td> <!-- <td>-</td> --> </tr> <tr> <td>Select →</td> <td>S</td> <!-- <td>-</td> --> </tr> <tr> <td>Reset →</td> <td>R</td> <!-- <td>-</td> --> </tr> </table> </div> <div> <p>NES Roms Copyright <a href="https://github.com/takahirox/nes-rust">NES emulator in Rust</a></p> </div> </body> </html>
4. Open our “rust_wasm_demo.html” in browser.

Conclusion:
WebAssembly brings the performance of native applications to the web in a way that’s completely secure, yet enabling a full functionality expected from games, major applications and the entire spectrum of software you can run on a computer. WebAssembly is just built as a binary format and very compact to download, and also very efficient to compile and execute. There’s a whole bunch of optimizations coming that will drive that even further, allowing huge mobile applications to load up quickly, even on mobile devices.
Source:
#WebAssembly#WebAssembly backend for TensorFlow.js#What of WebAssembly#WebAssembly JavaScript APIs#Native App Development#Mobile App Development#Hire App Developer#Hire JS Developer#WeCode Inc#Japan
0 notes
Text
Digital Tutorials: TensorFlow.js now has a WebAssembly backend https://t.co/kGDlMl7PfZ
Digital Tutorials: TensorFlow.js now has a WebAssembly backend https://t.co/kGDlMl7PfZ
— Damian Fallon (@DamianFallon2) March 18, 2020
from Twitter https://twitter.com/DamianFallon2
0 notes
Text
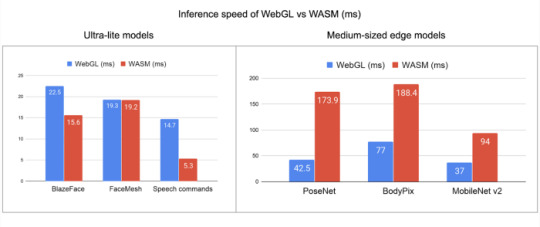
We’re excited to release the Alpha of our WebAssembly backend for TensorFlow.js! 🎉 WASM has wider device support and better numerical stability while getting competitive with WebGL for smaller models. Share your feedback here → https://t.co/PqwNOGDRKZ pic.twitter.com/f5NthyUcHe
— TensorFlow (@TensorFlow) December 20, 2019
0 notes
Text
Digital Tutorials: TensorFlow.js now has a WebAssembly backend https://t.co/kGDlMl7PfZ
Digital Tutorials: TensorFlow.js now has a WebAssembly backend https://t.co/kGDlMl7PfZ
— Damian Fallon (@DamianFallon2) March 17, 2020
from Twitter https://twitter.com/DamianFallon2
0 notes
Text
Digital Tutorials: TensorFlow.js now has a WebAssembly backend https://t.co/kGDlMl7PfZ
Digital Tutorials: TensorFlow.js now has a WebAssembly backend https://t.co/kGDlMl7PfZ
— Damian Fallon (@DamianFallon2) March 16, 2020
from Twitter https://twitter.com/DamianFallon2
0 notes
Text
Digital Tutorials: TensorFlow.js now has a WebAssembly backend https://t.co/kGDlMl7PfZ
Digital Tutorials: TensorFlow.js now has a WebAssembly backend https://t.co/kGDlMl7PfZ
— Damian Fallon (@DamianFallon2) March 13, 2020
from Twitter https://twitter.com/DamianFallon2
0 notes