#Windows Android iOS Chrome OS
Explore tagged Tumblr posts
Visit Tumblr Blog
Explore Tumblr blogs with no restrictions, modern design and the best experience.
Last Seen Tumblr Blogs


Fun Fact
China blocked Tumblr because of pornography and censorship problems in 2013.
Text
Deliver Seamless User Experience with GQAT Tech’s Compatibility Testing
Why Compatibility Testing is a Must for Today’s Digital Products
In today's information technology world, people use hundreds of different devices, browsers, operating systems, and screen sizes to access websites and applications. Users could be customers interacting with your app on a mobile phone or a professional accessing your software from a desktop. Overall, the user experience must be seamless and consistent across multiple endpoints.
In order to ensure a seamless and consistent user experience, your product must go through Compatibility Testing, which is part of the Quality Assurance process that will confirm your software operates correctly in multiple environments.
Compatibility Testing at GQAT Tech is conducted by seasoned QA Engineers who will test your product in a compatibility matrix across real devices and environments to ensure all users experience a seamless and consistent user experience.
What is Compatibility Testing?
Compatibility Testing is a sort of non-functional testing that tests whether or not an application or website properly behaves over various combinations of:
Browsers (Chrome, Firefox, Safari, Edge, etc.)
Operating systems (Windows, macOS, Android, iOS, Linux)
Devices (smartphones, tablets, desktops, laptops)
Network environments (Wi-Fi, 4G, 5G)
Screen resolution, hardware configuration
The intent is to uncover any discrepancies, bugs, layout problems, or functionality under different platforms.
Why is Compatibility Testing Important?
Let's say you have an excellent website that works correctly in desktop view with Google Chrome! But, your consumers on an iPhone using Safari experience layout issues or broken buttons. This will result in:
Poor user experience
Lower customer trust
Lost traffic and conversions
Potential revenue loss
In summary, not doing a compatibility test can cost your business users and money.
GQAT Tech’s Compatibility Testing Services
GQAT Tech provides Compatibility Testing services because they meet the expectations of the modern-day user. Their skilled team uses manual testing, automation, and real devices to simulate a wide range of use cases and environments.
Their Offerings Include:
Cross-Browser Tests
Cross-Device Tests
OS Compatibility
Verify UI/UX Consistency
Responsive Design Tests
Bug Logging & Reporting in Real-time
Every test case is targeted to make sure your software is able to function the same way, no matter what, where, or when it is used.
Why Choose GQAT Tech?
Competent Quality Assessment Group – Our group holds a wealth of knowledge and experience to perform testing in real environments on web and mobile platforms.
Real Device Testing – All tests are performed on real devices, so you are getting authentic results.
Detailed Reporting – An issues report that includes screenshots, device/browser specifications, and clearly-identified steps to reproduce.
Quick Turnaround – Ensures you are able to get your product to market on time, as you can do more cycles of testing.
Custom Testing Plans – Approach to testing that considers your audience, type of product, and release goals.
With GQAT Tech, compatibility testing can scale to your development cycle without missing a beat.
Conclusion:
Today’s digital ecosystem means users expect your app or site to just work – anywhere, anytime, on any device. If you want to meet their expectations and outplay the competition, you will need Compatibility Testing.
The GQAT Tech QA team will work with you on providing an enjoyable and bug-free experience across the board.
💬 Want to make your software world-ready?
👉 Explore Compatibility Testing Services at GQAT Tech
#Compatibility Testing#Cross-Browser Testing#Cross-Platform Testing#Software Quality Assurance#Mobile App Testing#Web App Testing#Device Compatibility#OS Compatibility#Functional Testing#QA Testing Services#User Experience Testing#Responsive Design Testing#Testing on Real Devices#Software Testing#GQAT Tech QA Services
0 notes
Text
Price: [price_with_discount] (as of [price_update_date] - Details) [ad_1] From the manufacturer Compact and Elegant Design - The self-storing design not only protects the connector, but also but also improves portability. Aluminum alloy case and braided cable make UH3020C more durable. Bring you a better user experience.Easy to Use with Plug & Play - Simply plug in and start using in seconds, thanks to driver-free install with Mac OS, Windows 11/10/8.1/8/7, Linux OS, iPadOS, iOS, Android, Chrome OS, and Nintendo OS. 3 in 1 USB-C Hub —— UH3020C turns a single USB-C port into 3 ports with a 4K@60Hz HDMI, 100W Power Delivery, 1× USB-A Data Ports. Ultra High-Definition Media Display —— Connect to an external monitor via the 4K@60Hz HDMI port for a stunning ultra high-definition experience. Powerful 100W Fast Charging —— Plug the charging cable into UH3020C and continuously deliver up to 100W of power to your PC while transferring files or streaming media. 5 Gbps SuperSpeed Data Transfer —— UH3020C adds a USB 3.0 port to enable fast data transfer. Easy to Use with Plug & Play —— Simply plug in and start using in seconds, thanks to driver-free install with Mac OS, Windows 11/10/8.1/8/7, Linux OS, iPadOS, iOS, Android, and Chrome OS. [ad_2]
0 notes
Text
ACCA DipIFR Remote Exam: Requirement, Set-up & Tips

In our previous blog, we discussed ACCA DipIFR exam utility interface & answer writing tips which will help students to get comfortable with CBE interface and to be familiar with the examination pattern and face it with confidence.
This blog is especially for the students who chose Remote examination session i.e., who would appear from home or office instead of centre-based examination. This blog will guide you about technical requirements of the allowed devices and necessary care to be taken before and during the remote examination session.
System Requirements:
Operating System
• Windows 11 and 10 (64-bit) – (excluding ‘S Mode’) • macOS 13 and above – (excluding beta versions)
Note: • Mac OS, starting with Mojave, now requires permission from the user to allow any hardware access to an application, which includes OnVUE (proctorapp). Candidates should be prompted to allow this application • Windows Operating Systems must pass Genuine Windows Validation.
Unsupported operating systems
• Windows 8/8.1, Windows 7, Windows XP, and Windows Vista • Linux/Unix and Chrome based Operating Systems
Firewall
• Corporate firewalls should be avoided as they often cause this delivery method to fail. • VPNs and proxies should not be used. • We recommend testing on a personal computer. Work computers generally have more restrictions that may prevent successful delivery.
RAM Required
Recommended Minimum RAM of 4 GB or more
Display
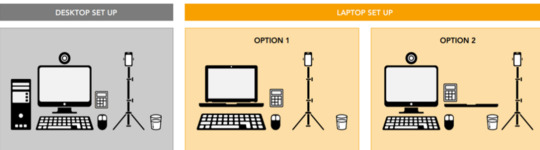
Minimum Resolution: 1024 x 768 in 16-bit col Recommended Resolution: 1920 x 1080 or higher in 32-bit color • If using an external monitor, you must close your laptop and use an external keyboard, mouse, and webcam. • Multiple monitors are forbidden. • Touch screens are strictly forbidden.
Webcam
• The webcam may be internal or external. It must be forward-facing and at eye level to ensure your head and shoulders are visible within the webcam. • The webcam must remain in front of you and cannot be placed at an angle. • Webcam filters are not allowed (for example, Apple’s ‘Reactions’). • Webcam must have a minimum resolution of 640x480 @ 10 fps.
Note: • Mobile phones are strictly prohibited as a webcam for exam delivery. • Mac OS users may need to allow OnVUE within their System Preferences: Security & Privacy: Privacy settings for camera & microphone.
Speakers and microphone
Speakers: • Speakers must be built-in or wired. • Bluetooth speakers or the use of headphones* as speakers are not allowed. Headphones: • Headphones and headsets are not allowed unless explicitly approved by your test sponsor. • If allowed, headphones must be wired – Bluetooth are not allowed.
Browser settings
Internet Cookies must be enabled.
Device
All tablets are strictly prohibited, unless they have a physical keyboard and meet the operating system requirements mentioned earlier.
Power
Make sure you are connected to a power source before starting your exam to avoid draining your battery during the exam.
Internet Browser
The newest versions of Microsoft Edge, Safari, Chrome, and Firefox, for web registrations or downloading the secure browser.
Internet Connection
• For better performance, a reliable and stable connection speed of 12 Mbps download and 3 Mbps upload required. • We recommend testing on a wired network as opposed to a wireless network. • If testing from home, ask others within the household to avoid internet use during your exam session.
We strongly recommend using equipment that meets or exceeds the Recommended Specifications. The minimum requirements will change periodically based on the needs of exam sponsors.
Mobile phone: You may have the option to use your mobile phone to complete the check-in process. The mobile must meet the following requirements:
• Android (11+, Chrome) or IOS (15+, Safari) operating systems • A functioning camera with a stable internet connection
A mobile phone is used only for completing admission steps and must not be used during the exam. After completing the check-in steps, please place the mobile phone where it is not accessible to you during the exam. As a reminder, phones are a prohibited item and should not be within your reach or visible to you while sitting in front of your computer.
Pre-exam requirements
Passing the Mandatory system test
• You MUST pass mandatory system test prior to your check-in for exam. • When taking the test, use same device and the same location you we’ll use on exam day. • Make sure your last test run is a pass, so that you are eligible for all post-exam options. • Go to Exam Planner & hit the Run System Test button.
Practice using the scratch pad
Remember, you cannot use scratch paper for remote exam session. So, it’s important to get used to using the scratch pad on the Practice Platform before your live exam.
Exam set-up
Your room setup
You will be under exam conditions and monitored by an invigilator throughout. Make sure below conditions are being followed: • A private and quite room with solid walls and doors. • No other person can be visible or heard for full duration of exam. • Use curtains or blinds to cover windows if anyone can be seen through them. • Switch all other unnecessary electrical equipment off. • Refer below images to have an idea about ideal exam environment.
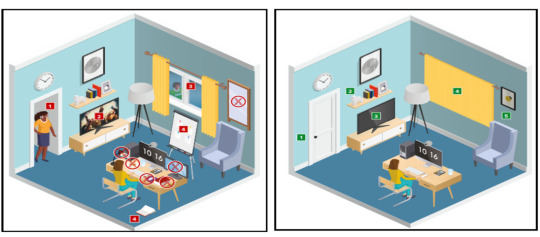
Prohibited Permitted
Your desk setup
Your desk must be setup in a way that meets the rules and regulations of the exam: • No scrap paper• Only one monitor • A glass/bottle of water with label removed permitted • No headphones / earbuds / earphones • No watches
The check-in process
• Check in to your exam by going the exam planner and click launch exam button. • You can launch your exam 30 minutes prior your scheduled time. • If you are more than 15 minutes late you will miss your exam attempt and be marked as Absent.
Using your mobile phone:
• You may use your mobile phone during the check-in process – On-screen instruction will guide you.• You’ll be asked to take and upload photos of your exam environment, yourself and your ID. • Once completed this process place your mobile phone on silent and out of arm’s reach. • Do not use your mobile phone for any other purpose during exam (exception if invigilator calls you) • Taking photos of your screen or making calls during the exam is strictly prohibited.
Under exam conditions:
In addition to the desk/room requirements you should be aware that the following is also prohibited:
• Talking aloud during your exam. • People being audible outside your room. • Leaving the exam early – DO NOT end your exam early, you must stay supervised for the full-time duration.
Contacting the invigilator
• To start a chat with your invigilator, select the chat button. • Your invigilator will be with you as soon as they are available. • Unlikely they can assist you, but you should inform your invigilator if you are experiencing any technical difficulties. • You must inform your invigilator if you wish to use your permitted bathroom break.
Bathroom breaks
You can take one bathroom break during your exam of up to 5 minutes: • Notify your invigilator when you are leaving and returning from bathroom break. • You do not have to wait for the invigilator to give you their permission before taking your bathroom break. • The exam timing will continue to run – if you exceed 5 minutes your exam may be terminated.
Post-exam options: In the event of technical issue disrupting your exam, you may wish to use post-exam options which can be accessed on exam planner or under Contact Us on ACCA’s website.
Minimise the risk of the technical issue by: • Performing your equipment and connectivity test. • Accessing troubleshooting resources.
Using post exam options
To use rebook or withdrawal option you must have: • attempted to check-in your exam • experienced a technical issue impacting your ability to complete exam.
Additional withdrawal eligibility criteria
• The mandatory system test must be taken ahead of each exam session. • Student must have passed the mandatory system test in their last attempt prior to checking in for your exam.
Make sure that your device / other equipment’s are compatible as per the provided requirements and you are availed with the environment requisite for the exam purpose. Everyone should make sure to follow fair practices during exam to avoid any disqualification or disciplinary action.
We hope, this blog about ACCA DipIFR Remote Exam Requirement, Set-up & Tips shall assist in making the necessary arrangements.
Further, please watch video related to the remote examination on the below link: https://youtube.com/playlist?list=PLRYOefFr48S0apGK6f0kw0sX7fC6uSzsx&feature=shared
Best wishes from Team FinPro!
#finproconsulting#diploma in ifrs#accounting#dipifrs#ifrs#ifrs online classes#finpro consulting#dipifr course#diplomainifrs#acca
0 notes
Text
Dev Log May 30 - It's baaaaack (the WebKit issues, that is)
Last week we released the Sweet Bee update for Crescent Roll, which had some substantial changes both in terms of content and some of the inner organization. It was supposed to be a little bit bigger than it ended up being, but we decided to split up the changes into a couple of chunks to give it more polish and not have to re-do things for the public API release. (Which the PM in me wants to apologize to somebody for the delay, but I was the only one who set the time table anyway, so we'll have to work on breaking that "everything has to be done Yesterday" mentality.) As a quick recap - Crescent Roll is written in Javascript, which means it runs in a web browser. For Windows, Android, iOS, and practically every other platform, you can write your program to hook in to the OS native one and not have to install anything. For Linux (which Steam OS is a fork of), there is no native browser. Valve technically _did_ include Chromium as their front-end for their store, but they embedded it directly into their application and as such nobody else can reach it. Which is bad news, as if you want to embed it yourself, that's an extra 1GB of space. Which is bad for our 30MB game. So, in order to keep install size lower, we ended up opting for using WebKit instead. WebKit is what Safari is based on, just like how Chrome and Edge are based on Chromium. Fortunately, it's a lot smaller at around 200MB, which is technically still more than 5x bigger than the application, but it's better than the 30x. This, however, is proving to be a rather bad move. The Steam Deck uses a container system that runs self-contained little mini operating system runtimes that can just be stuck on pretty much any flavor of Linux with minimal compatibility issues. The unfortunate part for us is that it is Debian 11-based. Which is only 4 years old at the time of writing, but gcc and clang (C compilers) already dropped support for it, and thus WebKit also dropped support for _right_ before they did a major overhaul to a lot of important internal systems that fixed a lot of performance problems. When testing the newest update, apparently some of the libraries that were being provided by the OS received updates that have severely interfered with the game's performance. The startup now takes about 5-10 seconds on a black screen before anything shows up. Shutdown will keep playing the music and also requires you to press B to close for some unknown reason. The Main Menu had also dropped to 45FPS out of nowhere, and something with the audio playback got completely screwed over where it suddenly decides to stop playing music, and then every single sound that was attempted in rapid succession at faster speeds a few seconds later (In what world is that ever the expected behavior?! Just don't play it if it can't. This one is just stupid.) Fortunately, none of the issues actually affect gameplay all that much. Most levels still ran at 60FPS, and even when they dipped, we built the system specifically to support variable framerates, so the game speed is still exactly the same with no lag. The update was still published, as the issue was apparently caused by the OS changes and not our changes, so even old versions are still affected. As a result though, much of this week's work went in to optimizing the graphics system even more and attempting to play around whatever the heck is going on with that audio playback. We were able to hit 60FPS again, but at the time of writing, are still having the audio thing happen occasionally. So, what now? I think I've officially given up on WebKit. We're squeezing blood of out a stone at this point in terms of optimizations I can make to the game itself. It seems kind of silly that Windows is able to pull off 4k at 120Hz on 15-year old hardware, but the trimmed-down Linux port can't even handle sub-1080p at 60Hz. I've had an idea to try and use the Windows version of CEF specifically for the Steam Deck, which will keep it around 300MB and maybe solve some of our issues. It's going to take a bit, so fingers crossed.
0 notes
Text
How Mobile App Testing Differs from Web App Testing

In today’s digitally-driven world, businesses operate across multiple platforms to ensure broad user engagement and seamless experiences. Among these platforms, web and mobile applications dominate the landscape, each offering distinct functionalities and user experiences. To ensure the success of any digital application, rigorous testing is imperative. However, testing a mobile app significantly differs from testing a web app due to the inherent variances in technology, user interaction, device compatibility, performance considerations, and deployment processes.
This article explores the critical differences between mobile app testing and web app testing and highlights how intelligent testing platforms like genqe.ai streamline and enhance both processes.
1. Platform Diversity and Device Fragmentation
One of the most apparent differences between mobile and web app testing is the level of platform and device fragmentation.
Mobile App Testing
Mobile apps must be tested across various devices, each with different screen sizes, resolutions, hardware capabilities, and operating systems. For example, Android phones alone come in thousands of models with variations in manufacturer customization, OS versions, and performance specs. iOS devices, though more limited in variety, still present fragmentation challenges due to different generations of iPhones and iPads.
This fragmentation necessitates testing on a wide spectrum of devices to ensure a consistent and reliable user experience.
Web App Testing
Web apps, on the other hand, are generally accessed through browsers, making testing relatively less complex in terms of device diversity. The main focus is on browser compatibility — Chrome, Firefox, Safari, Edge, etc. — across different operating systems like Windows, macOS, and Linux. Though browser rendering engines may behave differently, the testing scope is typically narrower compared to mobile.
Key Difference: Mobile testing must account for a broader variety of devices and configurations, while web testing emphasizes browser compatibility.
2. User Interaction and Interface Testing
Mobile App Testing
Mobile apps utilize touchscreen gestures, including swipes, pinches, taps, long-presses, and accelerometer-based controls. Testing must therefore verify all these interactions work smoothly across devices. Moreover, apps must handle scenarios such as incoming calls, push notifications, or changes in connectivity (e.g., switching from Wi-Fi to mobile data).
Web App Testing
Web apps rely mostly on mouse clicks, keyboard input, and basic navigation. Though responsive design adds some complexity, particularly when web apps are accessed on tablets or smartphones, the interactions are more predictable and limited compared to mobile apps.
Key Difference: Mobile app testing requires thorough validation of touch-based gestures and device behaviors, while web app testing is centered around traditional input methods.
3. Installation and Distribution
Mobile App Testing
Mobile applications need to be installed on a device, either via the App Store (iOS), Google Play (Android), or sideloaded for testing purposes. Installation testing ensures that the app installs correctly, updates without issues, and uninstalls cleanly.
Additionally, developers must consider app store guidelines and approval processes, which can affect deployment timelines.
Web App Testing
Web apps are accessed via URLs and do not require installation. Updates can be pushed instantly without needing end-user interaction. This simplifies the deployment and testing cycle, as testers can access the latest version directly in their browsers.
Key Difference: Mobile apps require installation testing and adherence to app store protocols, while web apps offer easier, real-time deployment and access.
4. Performance and Resource Constraints
Mobile App Testing
Mobile devices operate under strict resource constraints — limited memory, CPU power, battery life, and network stability. Performance testing must evaluate how the app behaves under low memory conditions, battery drainage, CPU load, or weak signal strength. Testing must also account for latency and performance across different types of network connections (2G, 3G, LTE, 5G, Wi-Fi).
Web App Testing
While web apps also require performance testing, they typically run on more stable environments with ample resources, such as desktop computers or laptops. Internet connection consistency is also higher for web app users.
Key Difference: Mobile apps need rigorous performance testing under varied resource and connectivity constraints, whereas web apps often operate in more controlled and stable environments.
5. Security Considerations
Mobile App Testing
Security testing for mobile apps includes data storage, secure API usage, permission handling, and prevention of data leaks. Mobile apps may store sensitive information on the device, requiring encryption and secure sandbox environments. Permissions for camera, location, contacts, etc., must be explicitly tested to avoid privacy violations.
Web App Testing
Web app security involves validating session management, preventing cross-site scripting (XSS), SQL injection, and ensuring secure data transmission. While both platforms demand strict security measures, mobile apps face unique challenges due to local storage and frequent offline access.
Key Difference: Mobile apps face additional security concerns related to device-level data handling and permissions, while web apps focus more on server-side and browser-based threats.
6. Offline Functionality and Sync Testing
Mobile App Testing
Many mobile applications support offline access, storing data locally and syncing with the server once connectivity resumes. Testing must ensure data consistency, conflict resolution, and correct behavior during intermittent connectivity scenarios.
Web App Testing
Web apps generally require an internet connection to function. Though Progressive Web Apps (PWAs) introduce some offline capabilities, this remains less common than in mobile environments.
Key Difference: Offline functionality and data synchronization are critical in mobile app testing, whereas web apps typically rely on continuous connectivity.
7. Update and Regression Testing
Mobile App Testing
Mobile app updates often involve new APK/IPA versions that must be downloaded and installed. Testers need to verify that new updates do not break existing functionality, especially across different OS versions and device types. Regression testing is time-consuming due to the need to validate against multiple configurations.
Web App Testing
Since web applications are updated on the server, testers can immediately validate changes. Automated regression testing is more straightforward, and issues can be fixed and redeployed quickly.
Key Difference: Mobile updates are more complex and fragmented, requiring broader regression coverage. Web apps allow for quicker, centralized updates.
8. Testing Methodologies and Automation
While both web and mobile applications benefit from manual and automated testing, mobile testing introduces unique challenges due to hardware and platform diversity. Writing stable and reusable automated tests for mobile apps is harder due to UI inconsistencies across devices.
Platforms like genqe.ai provide an intelligent and scalable approach to both mobile and web app testing. By leveraging AI-driven test generation, real-time test execution, and smart analytics, genqe.ai empowers teams to reduce manual effort while maintaining high test coverage.
Its unified testing framework supports both mobile and web applications, enabling testers to create and manage test cases, execute across different environments, and receive actionable insights — all from one intelligent interface. This is especially valuable for teams maintaining cross-platform applications who seek consistency and efficiency in their testing strategies.
Conclusion
Mobile app testing and web app testing are fundamentally different disciplines, each with its own set of challenges and best practices. From platform fragmentation to performance constraints, mobile testing is significantly more complex and multifaceted than web testing. Conversely, web apps benefit from streamlined deployment and a more predictable environment, but still require rigorous testing for compatibility and security.
Understanding these differences is essential for QA professionals, developers, and product managers. With intelligent testing platforms like genqe.ai, teams can overcome the traditional limitations of cross-platform testing and ensure robust, user-centric applications in both mobile and web ecosystems.
Whether you’re launching a dynamic web portal or a responsive mobile app, your testing strategy should align with the unique demands of the platform — and genqe.ai provides the tools to do just that with precision, speed, and intelligence.
0 notes
Text
Xender vs. Nearby: De ultieme vergelijking voor snelle bestandsdeling

Bestanden delen tussen verschillende apparaten zou gemakkelijk moeten zijn, maar niet alle apps maken het even eenvoudig. Google ’s Nearby Share is handig voor mij als Android-gebruiker, maar wanneer ik bestanden wil versturen naar een iPhone, Windows-pc of Mac dan geeft dit moeilijkheden. Dan loop ik altijd snel tegen beperkingen aan. De app Xender biedt wél een complete oplossing – ik heb er al vaker over geschreven. Het is en blijft de betere keuze voor het snel versturen van bestanden. Ik leg het hieronder nogmaals uit.
Cross-Platform Ondersteuning: Xender’s universele bereik vs. Nearby Shares beperkingen
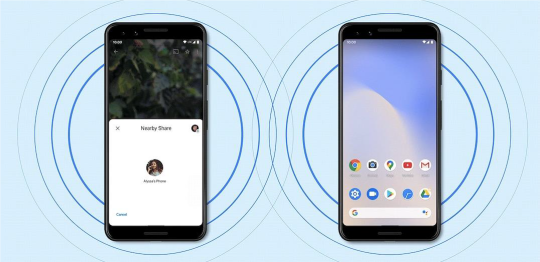
Werkt Xender op Alle Apparaten? • Jazeker Xender ondersteunt; Android, iOS, Windows en Mac. Of je nu een video van een Samsung naar een iPhone deelt of een document naar een laptop, het werkt moeiteloos. • Nearby Share werkt daarentegen alleen tussen Android en Chrome OS. Het biedt geen ondersteuning voor iPhones of niet-Google-apparaten, waardoor het ongeschikt is voor veel gebruikers.
Om het verduidelijken gebruik ik een voorbeeld; probeer maar eens een bestand te sturen van een Google Pixel naar een iPad met Nearby Share – Dit werkt niet en is gewoon onmogelijk! Met Xender lukt het in seconden.

Verbinden: QR-Code vs. Bluetooth & Wi-Fi • Xender gebruikt een QR-code of hotspot voor directe verbinding. Geen instellingen aanpassen, gewoon scannen en delen. • Nearby Share heeft Bluetooth, Wi-Fi én een Google-account nodig. Heb je geen internet, jammer dan, dan is er geen bestandsdeling. Ook moet de ontvanger eerst toestemming geven via zijn Google-profiel.
Privacy: Geen Google-Tracking vs. Verplichte Accountkoppeling • Xender biedt end-to-end-encryptie zonder inlogvereisten. Jouw bestanden blijven privé. • Nearby Share koppelt alles aan je Google-account, wat betekent dat je activiteit mogelijk wordt opgeslagen.
Bestandsbeheer: Geavanceerd vs. Basis • Xender heeft een ingebouwde bestandsmanager om mediabestanden, APK’s en mappen te organiseren. • Nearby Share is puur gericht op verzenden en ontvangen, zonder extra functies.
Snelheid & Betrouwbaarheid: Xender wint • Xender gebruikt dynamische chunking voor grote bestanden, waardoor overdrachten stabiel blijven. • Nearby Share heeft soms last van vertragingen of mislukte transfers, vooral bij bestanden boven 1GB. Mijn conclusie: Xender is enige, goede oplossing! Als je cross-platform bestanden wilt delen, is Nearby Share te beperkt. Xender biedt: ✔ Ondersteuning voor alle apparaten (Android, iOS, PC, Mac) ✔ Snelle QR-code-koppeling** (geen Google-account nodig) ✔ Betere privacy** (geen data-tracking) ✔ Geavanceerd bestandsbeheer**
Probeer Xender nu zelf! Download voor Android; https://play.google.com/store/apps/details?id=cn.xender&hl=en_US Download voor iPhone https://apps.apple.com/us/app/xender-file-share-share-music/id898129576 Download voor PC/Mac https://www.xender.com
1 note
·
View note
Text
Cómo Xender Resuelve el Problema de La Plataforma de Quick Share

¡Hola a todos! Últimamente he estado obsesionada con las aplicaciones para compartir archivos (si, lo sé… necesito una vida…). Y quiero compartir por que creo que Xender es mucho mejor al compararlo con Quick Share de Google.
Ahora, no me malinterpreten, Quick Share parece genial a primera vista. ¿Compartir archivos de Android a Android? Fácil, ¿no? Pero, ¿qué pasa cuando necesitas enviar esa impresionante presentación desde tu Android al iPhone de tu jefe? ¿O compartir esas fotos de vacaciones con su familia que usa diferentes dispositivos? Aquí es donde las limitaciones de Quick Share se vuelven evidentes.
Sólo funciona en Android y iOS. Eso es. Y en la vida donde usamos diferentes dispositivos, ahí no es fácil trabajar con eso.
¡Ahí es donde viene Xender para salvar el día!
Xender vs. Quick Share: Una Comparación Completamente
Multiplataforma Apoya de Xender
Esta es la mejor función. Xender no es exigente como Quick Share. Funciona con Android, iOS, Windows y Mac. ¿Necesitas enviar un archivo de tu Android a un iPhone? Hecho. ¿De tu PC a una tablet Android? Fácil. Es una verdadera app de transferencia de archivos entre plataformas. Quick Share, en cambio, sólo funciona con Android y Chrome OS. Es como intentar hablar inglés en una conferencia donde solo se permite el francés.
Rapido y Facil Proceso de Compartir
Xender utiliza un método rápido y sencillo mediante código QR o punto de acceso para vincular dispositivos. Solo escanea, conecta y listo. En mi experiencia, Xender conecta Android con iPhone en unos 10 segundos. Quick Share ni siquiera funciona entre esos. Usa Bluetooth y Wi-Fi, que pueden ser lentos o fallar, especialmente en zonas muy concurridas. ¿Quién tiene tiempo para eso?
Privacidad Garantizar
Esto realmente me importa. Xender utiliza cifrado de extremo a extremo, así que tus archivos se mantienen seguros durante la transferencia. Quick Share necesita tu cuenta de Google para funcionar, lo cual genera dudas sobre cómo se usa tu información. Prefiero mantener mis datos para mí, gracias.
Gestión de archivos: Sincronización perfecta
Xender te da un espacio organizado para gestionar tus archivos, lo que hace que sea fácil encontrar y compartir cualquier cosa. Quick Share es bastante básico. Funciona (si tus dispositivos son compatibles), pero no tiene las herramientas ni funciones extra que Xender sí ofrece.
Por Que Esta Importa
Si lo piensas bien, constantemente estamos compartiendo algo entre distintos dispositivos. Ya sean documentos de trabajo, fotos, videos o música, necesitamos una solución que sea rápida, confiable y que funcione en todas partes.
Quick Share es una opción bien si solo usas dispositivos Android. Pero si necesitas una verdadera compatibilidad entre plataformas, Xender es el claro ganador. Ofrece una experiencia de transferencia de archivos fluida, segura y versátil que simplemente no tiene competencia.
¡Pruébalo tú mismo!
De verdad creo que Xender puede hacerte la vida más fácil. Descarga la última versión hoy mismo y compruébalo por ti mismo. Estoy segura de que te impresionará tanto como a mí.
Descarga Xender: http://www.xender.com Google Play: Xender en Google Play Store App Store: Xender en App Store
Cuéntame en los comentarios qué te ha parecido. ¡Siempre me encanta conocer sus experiencias y opiniones!
0 notes
Text
What platforms or devices are Frandzzo’s solutions compatible with?
In today's fast-moving digital world, businesses need software that works everywhere — on every device, every platform, and every location. At Frandzzo Technologies Private Limited, we understand the need for flexibility, accessibility, and high performance. That’s why all our solutions are designed to be platform-agnostic, cloud-ready, and device-compatible — ensuring a seamless user experience for businesses and teams of all sizes.
In this blog, we’ll explore what platforms and devices Frandzzo’s software works with and how this helps your business grow smarter and faster.
1. Cross-Platform Compatibility by Design
Frandzzo’s AI-powered SaaS solutions are built to work across major operating systems, including:
Windows
macOS
Linux
Chrome OS
Whether your business runs on traditional desktop environments or newer cloud-based systems, Frandzzo ensures smooth performance and secure access. This compatibility helps your teams stay productive, no matter what OS they use.

2. Mobile-First and Responsive
In the age of mobile workforces, we make sure our platforms are fully optimized for mobile devices. Frandzzo’s solutions are compatible with:
iOS (iPhones and iPads)
Android smartphones and tablets
Our web-based dashboards and applications are responsive, meaning they adapt perfectly to any screen size. Whether you're checking insights on your phone or managing users from a tablet, the experience is smooth, fast, and intuitive.
3. Cloud-Ready and Browser-Based Access
Frandzzo’s solutions are hosted on secure cloud infrastructure, making them easily accessible from:
Any modern web browser (Chrome, Safari, Firefox, Edge)
Any internet-connected device
You don’t need to install heavy software or worry about version mismatches. Your team can access powerful tools and insights from anywhere in the world — securely and instantly.
4. Third-Party Platform Integration
Frandzzo’s products are also designed to integrate seamlessly with other tools your business may already use. This includes:
CRMs like Salesforce, Zoho, and HubSpot
Cloud storage platforms like Google Drive, OneDrive, Dropbox
Collaboration tools like Microsoft Teams and Slack
ERP platforms and APIs
By enabling smart integrations, we help businesses streamline workflows and boost productivity without switching systems.
5. IoT and Edge Device Support
Frandzzo is forward-thinking and future-ready. For businesses dealing with IoT, smart devices, or edge computing, we offer custom integrations and device support that bring AI insights directly to your hardware — be it in manufacturing, logistics, retail, or healthcare.
This gives you the power to connect physical systems with digital intelligence, helping you make real-time, data-driven decisions.
Why Compatibility Matters for Your Business
Device and platform compatibility isn’t just a technical feature — it’s a business advantage. With Frandzzo, you benefit from:
Faster onboarding across teams
Lower IT overhead and hardware limitations
Improved flexibility for remote and hybrid work
Secure access anywhere, anytime
0 notes
Photo

Canon Maxify MB2740 4 in 1 Colour Printer All-In-One colour inkjet for home offices. The Canon MAXIFY MB2740 provides mobile printing and cloud integration, while its 500-sheet paper capacity and fast 24ipm mono print speed maximise productivity. General Specifications Functions: Print, Copy, Scan, Fax, Wi-Fi, Ethernet + Cloud Link Printer Specifications: Print Margins (min.) Top: 3mm, Bottom: 5mm, Left & Right: 3.4mm Print Technology: Inkjet, FINE print head Mono Print Speed: 24.0 ipm mono A4¹ Colour Print Speed: 15.5 ipm colour A4¹ First-Print-Out Time Mono: 6 sec (ready) / 10 sec (sleep) Colour: 7 sec (ready) / 12 sec (sleep) Two Sided Printing Automatic (A4, LTR plain paper) Automatic Document Feeder (ADF) Up to 50-sheets Cartridges and Yields Standard Ink Cartridges: Dual Resistant High Density ink 4 ink tanks (Black, Cyan, Magenta, Yellow) Optional XL Ink Cartridges: PGI-1400XL BK (1200 pages)¹ PGI-1400XL C (1020 pages)¹ PGI-1400XL M (780 pages)¹ PGI-1400XL Y (935 pages)¹ Colour ink tanks (CMY) average yield: 900 pages¹ Paper Support Paper Types: Plain Paper Envelopes (DL, COM10, C5, Monarch) Canon High Resolution Paper (HR-101N) Canon Matte (MP-101) Canon Pro Luster (LU-101) Canon Plus Semi-gloss (SG-201) Canon Plus Glossy II (PP-201) Canon Glossy Everyday Use (GP-501) Maximum Paper Input: Upper cassette: 250 sheets of plain paper Lower cassette: 250 sheets of plain paper Paper Sizes: Plain paper: A4, A5, B5, LTR, LGL Photo paper: A4, LTR, 20x25cm, 13x18cm, 10x15cm Custom sizes: Width 89-215.9 mm, Length 127-355.6 mm Paper Weight: Plain paper: 64 - 105 g/m² Canon photo paper up to 275 g/m² Scanner Specifications: Scanner Type: Flatbed, ADF CIS colour scanner Scan Speed: Simplex. 15.5 ipm Col¹ Simplex. 18.5 ipm B/W¹ Scanner Resolution (Optical): Up to 1200 x 1200 dpi¹ Scanning Depth (Input / Output): Colour: 48 bit / 24 bit Greyscale: 16 bit / 8 bit Maximum Document Size: Flatbed: A4, LTR (216x297mm) ADF: A4, LTR, LGL Copier Specifications Copy Speed: ADF colour: 11.5 ipm¹ ADF mono: 22.0 ipm¹ Copy Quality: Standard, High Multiple Copy: Up to 99 pages Copy Functions: Frame Erase, Collate, 2-on-1, 4-on-1 Copy Zoom: 25-400%, Fit to Page Fax Specifications Fax Type: Super G3 / Colour Fax Resolution: Mono: up to 300 x 300dpi Colour: 200 x 200 dpi Fax Speed: Mono: approx. 3 sec. (33.6kbps)¹ Colour: approx. 1 min. (33.6kbps)¹ Fax Memory: Up to 250 pages Coded Speed Dialing: Max. 100 locations Group Dial: Max. 99 locations Interface Display Type & Size: 7.5cm colour touch screen Connectivity Wired LAN: Hi-Speed USB 2.0 Ethernet 10/100Mbps (auto switchable) USB flash memory port (A type) Wireless LAN: Wi-Fi IEEE802.11 b/g/n¹ Wireless LAN Frequency Band: 2.4GHz Access Point Mode Please refer to the user manual for instructions on how to activate/deactivate the wireless LAN. Software Supported Operating Systems: Chrome OS Windows 10 / 8.1 / 8 / 7 / 7 SP1 / Vista SP2 Windows Server 2008 / 2008 R2 / 2012 / 2012 R2 Mac OS X v10.8.5 or later Supported Mobile Systems: iOS, Android, Windows RT, Windows 10 Mobile Minimum System Requirements: Windows: Internet Explorer 8, internet connection or CD-ROM Mac: Safari 5 and internet connection Display: 1024x768 or higher Software Included: Printer driver and fax driver Quick Utility Toolbox IJ Network Device Setup Utility Easy-WebPrint EX Physical Features Weight: 12.1kg Dimensions (W x D x H): 463 x 389 x 320 mm 463 x 459 x 320 mm (paper installed) Acoustic Noise Levels: Approx. 56 dB(A)¹ Recommended Operating Environment: Temperature: 15-30°C Humidity: 10-80%RH (no dew condensation) Power Source: AC 100-240V, 50/60Hz Duty Cycle: up to 20,000 pages¹ Power Consumption: Standby (scanning lamp is off) USB connection to PC : approx. 0.9 W Standby (all ports connected, scanning lamp is off) : approx. 1.7 W Time to enter Standby mode : approx. 7 mins OFF : approx. 0.2 W Copying (USB connection to PC): approx. 26 W¹ Typical Electricity Consumption: 0.15 kWh¹ Recommended Print Volume: 200-1000 pages / month
0 notes
Text

Con queste offerte arrivate proprio oggi, Amazon conferma la volontà di sorprendere anche ad aprile dopo le offerte primaverili. Come si può vedere infatti i prezzi sono arrivati al minimo storico in più situazioni, sia per quanto riguarda alcuni articoli monitorati da tempo dagli utenti, che per quanto riguarda diverse altre soluzioni molto attese. È chiaro allo stesso tempo che ci sono tanti utenti che hanno paura di non riuscire a bloccare in tempo le offerte per portarle a casa al minimo storico ed è per questo che possiamo consigliare una soluzione unica nel suo genere: il nostro canale Telegram ufficiale. Per entrare al suo interno e godersi le offerte Amazon più importanti del giorno tutti i giorni, vi consigliamo di iscrivervi cliccando qui. Amazon produce offerte anche oggi, ecco cosa si può acquistare risparmiando tantissimo TP-Link UA520C Adattatore HDMI USB C fino a 4K@60Hz, Compatibile con desktop, smartphone, laptop, tablet, MacOS, Windows, iPadOS, iOS, Android, Linux OS e Chrome OS, con Cavo Intrecciato lungo 100mm, PREZZO: 12,99€, LINK Belkin SoundForm Bolt Auricolari true wireless, earbud wireless con 28 ore di batteria, modalità Mono, resistenza a sudore e’acqua (IPX4), cuffie Bluetooth con microfono per iPhone, Galaxy e altri, PREZZO: 19,99€, LINK TP-Link Archer GE800 Router Wi-Fi 7 Tri-Band BE19000, 2 Porte 10G+4 Porte 2.5G, Canali 320MHz, 4K-QAM, Beamforming, 8 Antenne Interne, Home Shield, Compatible con EasyMesh, Alexa, non supporta xDSL, PREZZO: 439,99€, LINK Trust Carve Mouse USB con Filo (3 Pulsanti e Rotella per lo Scrolling, 1200 DPI, Adatto a Utenti Sia Destri che Mancini, PC Portatile/Computer) Nero, PREZZO: 7,00€, LINK HUAWEI WATCH FIT 3, Display AMOLED da 1.82", Design ultra-sottile, Monitoraggio completo del fitness, Monitoraggio salute 24h, Compatibilità con iOS e Android, Chiamate Bluetooth, Grigio, PREZZO: 119,00€, LINK CORSAIR M65 RGB ULTRA WIRELESS Mouse da Gioco FPS Sintonizzabile - 26.000 DPI - Wireless Sub-1ms - Sistema di peso - Batteria fino a 120 Ore - Compatibile con iCUE - PC, Mac, PS5, PS4, Xbox - Bianco, PREZZO: 89,99€, LINK Meross Presa Intelligente WiFi, Smart Plug Spina(Type F) 16A, 3840W, Funzione Timer, Compatibile con Amazon Alexa, Google Home, Controllo Remoto via Andriod iOS App, 2,4GHz, Nessun Hub Richiesto, PREZZO: 7,79€, LINK TP-Link TL-WA3001 Access Point Gigabit Wi-Fi 6 AX3000 Dual Band, Punto di Accesso, Modalità AP/Range Extender/Multi-SSID/Client, Passive PoE, Captive Portal, WPA3, Tecnologia MU-MIMO e Beamforming, PREZZO: 69,99€, LINK ORICO 1 TB SSD esterno fino a 1050MB/s, unità a stato solido portatile con design a fori pendenti, cavo USB C e A 2 in 1, archiviazione affidabile per smartphone, tablet e laptop Type-C - C10, PREZZO: 69,99€, LINK VIMAR K42955 Kit videocitofono WIFI monofamiliare, alimentatore barra DIN, touch screen vivavoce Wi-Fi a colori LCD 7", targa audiovideo RFID, PREZZO: 230,72€, LINK Bose QuietComfort Earbuds II, cuffie wireless intrauricolari Bluetooth con cancellazione del rumore e suono personalizzato, Nero, PREZZO: 188,68€, LINK Logitech G G435 LIGHTSPEED Cuffie Gaming Wireless Bluetooth - Cuffie Over Ear Leggere, Microfoni Integrati, Batteria da 18 Ore, Compatibile con Dolby Atmos, PC, PS4, PS5, Smartphone - Nero, PREZZO: 45,06€, LINK ECOVACS DEEBOT T30C Pro OMNI Robot Aspirapolvere Lavapavimenti con Stazione Pulizia, Aspirazione 12800Pa, Spazzola ZeroTangle 2.0, TruEdge, Svuotamento Automatico, Asciugatura a 45°C, Assistente YIKO, PREZZO: 569,00€, LINK TP-Link RE500XD Ripetitore WiFi 6 AX1500Mbps, Access Point, WiFi Extender, Amplificatore WiFi, Ripetitore WiFi Potente per Casa, Porta Gigabit, Desktop o Wall Mount, Compatibile con Tutti i Modem, PREZZO: 49,99€, LINK MSI Modern 14 C13M-613IT, Notebook 14" FHD 60Hz, Intel i7-1355U, Intel Iris Xe, RAM 16GB DDR4 3200MHz, 512GB SSD PCIe3, WiFi 6, Win 11 Home, Layout e Garanzia ITA, Nero, PREZZO: 649,00€, LINK Read the full article
0 notes
Text
Price: [price_with_discount] (as of [price_update_date] - Details) [ad_1] From the manufacturer Compact and Elegant Design - The self-storing design not only protects the connector, but also but also improves portability. Aluminum alloy case and braided cable make UH3020C more durable. Bring you a better user experience.Easy to Use with Plug & Play - Simply plug in and start using in seconds, thanks to driver-free install with Mac OS, Windows 11/10/8.1/8/7, Linux OS, iPadOS, iOS, Android, Chrome OS, and Nintendo OS. 3 in 1 USB-C Hub —— UH3020C turns a single USB-C port into 3 ports with a 4K@60Hz HDMI, 100W Power Delivery, 1× USB-A Data Ports. Ultra High-Definition Media Display —— Connect to an external monitor via the 4K@60Hz HDMI port for a stunning ultra high-definition experience. Powerful 100W Fast Charging —— Plug the charging cable into UH3020C and continuously deliver up to 100W of power to your PC while transferring files or streaming media. 5 Gbps SuperSpeed Data Transfer —— UH3020C adds a USB 3.0 port to enable fast data transfer. Easy to Use with Plug & Play —— Simply plug in and start using in seconds, thanks to driver-free install with Mac OS, Windows 11/10/8.1/8/7, Linux OS, iPadOS, iOS, Android, and Chrome OS. [ad_2]
0 notes
Text
Chromeリモートデスクトップ活用術:在宅勤務を効率化する設定と使い方
クロスプラットフォーム対応の基本設定 テレワーク環境の整備において、ChromeリモートデスクトップはOSを問わない柔軟性が最大の特徴です。 Windows、macOS、Linuxに加え、AndroidやiOS端末からもアクセス可能な設計となっており、あらゆるデバイス間でシームレスな遠隔操作を実現します。 Windows環境での初期設定手順 デスクトップPCの右下にある通知領域からChromeリモートデスクトップのアイコンを右クリックし、「リモートアクセスを有効化」を選択します。 6桁以上の数字で構成されるPINコードを設定する際、生年月日や連続数字など推測されやすい組み合わせは避けることが重要です。 Windows…
0 notes
Text
How To Install Team Viewer Into Ubuntu 16.04 Gnome Desktop
Teamviewer is remote system as your pc control. You can use various purposes like windows, linux, Mac, Chrome OS, Raspberry Pi, Android and iOS etc. So now I want to share how to install team viewer on your Ubuntu 16.04 gnome desktop. ★ How To Install Zabbix 5.0 On Centos 7 ★ How To Fix Jitsi Meet Video Conference Using Mobile Browser Step #01: Must be your server update and…
1 note
·
View note
Text
16 Android Tips

Android is a remarkably powerful, innovative mobile operating system that frequently leapfrogs Apple’s iOS in new technology support. Android Tips to make your phone best productive.
1. Uninstall Not Needed Apps
Most Android phones come with a sound making a difference of preinstalled apps. Numerous will be invited by about everyone—maps, e-mail, browser, and so on—but there are without a doubt a few you don’t need or require. On the off chance that you’re fair not a podcast individual, you don’t require a podcast app. And phone sellers tend to incorporate a bunch of their claim apps merely may never have to be utilize. Essentially long-press an app’s icon and after that select the i section to induce to its detail page where you'll be able uninstall it. Unfortunately, there are a few stock apps you cannot uninstall. Ex. Chrome
2. Set Up the Phone App in Windows OS
I suspect that most individuals who utilize Mac desktops or portable workstations are too most likely utilizing an iPhone, which offers marvelous integration with macOS. But with the Your Phone desktop app for Windows 10, Android clients can get fair as much progression with their desktop computer.
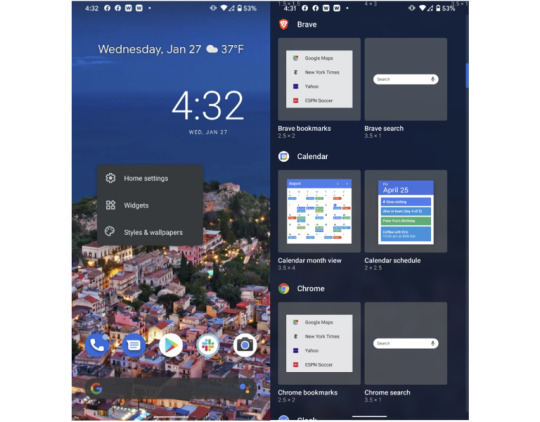
3. Edit Quick Settings
One thing I’m not insane almost in Android is that the Fast Settings require two swipes to appear more than one row—and indeed after you are doing that, you just still have two pages of them. You'll make beyond any doubt that the settings you wish most frequently are there within the to begin with swipe-down push. Fair hit the pencil symbol, and you'll include valuable devices like Center mode or Dull mode switches.
4. Install Apps From the Web
This is one of the coolest advantages of Android over iOS: You don’t have to have your phone in your hand to install an app on it. Just go to the Google Play(Opens in a new window) store in your web browser and you'll remotely introduce any app or amusement, as long as you’re marked in to the same Google account the phone employments. In the event that you've got different Android gadgets beneath your account, you’ll see them listed once you go to introduce. It’s a great convenience for once you find an app at your computer and don’t need to bobble together with your phone to urge the app on it.
5. Install a Launcher App
Usually one customization type iPhone users don’t get: You'll be able alter the fundamental begin screen on your phone by introducing a third-party launcher app from the Play Store. A few essential launchers are Activity Launcher, Summit, the cleverly named Garden Chair, Lightning, the Microsoft Launcher, Nova, Niagara, and Savvy Launcher.
6. Customize Message Notifications
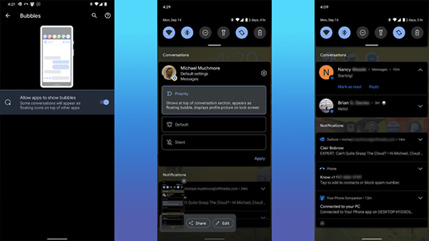
Android 11 lets you select message notices so that a few contacts are more conspicuous, and discussions remain together. You'll be able presently set messages to seem on beat of any other running apps as bubbles. You essentially turn them on in Settings and set the contact to Need. Inside a notice there's another setting for Bubbles with three alternatives: All Discussions Can Bubble, Chosen Discussions Can Bubble, and Nothing Can Bubble.
7. Add Widgets & Customize Home Screen
iOS fair got the capacity to include widgets to the domestic screen with form 14. Android clients have been able to do this for ages, but not everybody knows how. All you've got to do is essentially long-press on the home screen, select Widgets, and after that choose from the determination made accessible by any apps introduced on their phones.
8. Additional Storage
A major advantage of Android over iPhones is that a few phone models permit you to extend capacity with a microSD card. Not as it were does this let you store more media and apps on your phone, but it too offers a way to exchange expansive sums of record information between your phone and other devices. Another advantage is simply can plug a few Android phones into an external USB capacity drive and browse its records. In the event that your phone encompasses a USB-C harbour, you'll essentially plug in a USB streak memory drive with a Type-C association.
9. Install Antivirus
Since Android is distant more open than iOS—that is, more like Windows than macOS—it’s moreover more open to malware assaults. Google has built in a parcel of solid securities, but we prescribe you run an antivirus app on Android.
10. Open the Camera by Double-Taping Power Button
Not at all like the iPhone—which does, in any case, incorporates a camera symbol on the bolt screen—most Android phones let you twofold tap the control button to turn on the camera. Fast camera get to is fundamental for capturing those escaping minutes. You'll too utilize volume keys to center and take the shot. Long-press on either to begin a video recording.
11. Use Screen Pinning
This could be a awesome tip from our companions at ExtremeTech.com(Opens in a modern window): In the event that you wish to hand your phone to somebody else and don’t need them snooping around in other apps, fair stick the screen. In case this isn’t empowered by default, you'll turn it on within the Security menu. Tap the app symbol on any app within the multitasking interface and select “Pin” to avoid them from exchanging apps.

12. Guest Access Setting
In the event that you need to allow somebody else a small more get to than screen-pinning permits, you'll be able. To let somebody borrow your phone, but not get to your apps, information, or settings, or send content messages, head to Settings > Framework > Progressed > Multiple Clients and empower it. You'll alternatively empower the slider for Include Clients from Bolt Screen. You'll presently swipe down twice from the best of your phone to urge to Speedy Settings. Tap on your client symbol within the lower right and select Include Visitor. The phone takes a small whereas to switch to the mode.
13. Record Screen
With Android 11, Google included built-in screen-recording capability right into the OS. Already, Samsung, LG, and OnePlus proprietors had the capability, but presently any phone running Android 11 gets it. It’s basic to utilize: You fair drag down the best shade and select Screen Record > Begin Recording. You get choices for appearing touch focuses and recording sound or not. To halt recording, drag down the shade once more and tap the huge ruddy bar. It worked like a charm in our testing, creating a standard MP4 record within the photo display.

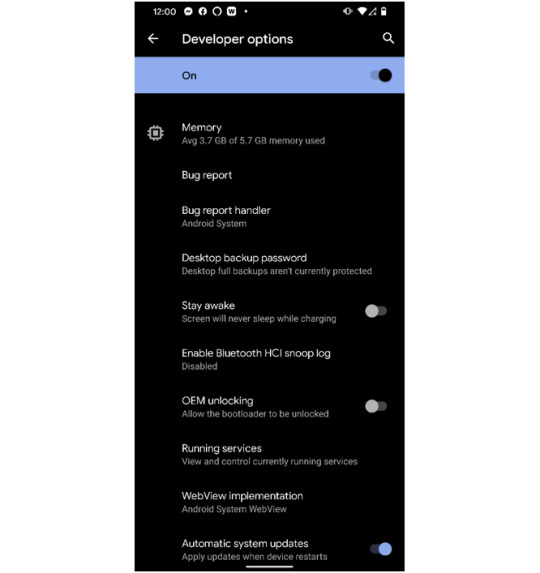
14. Use Developer Options
This one comes through PCMag’s Ben Moore. To turn this on, head to the Settings app’s Approximately Phone area, go down to the Construct number and tap on it seven times. At that point head to Settings > Framework > Progressed > Engineer Choices. From here, you'll be able appear screen taps, alter Bluetooth gadget options, and set USB association inclinations, together with numerous other settings as it were of intrigued to designers. This one is unquestionably as it were for the extraordinary tinkerer, and not for the technophobe.
15. Turn on Find My Device

In the event that you lose your phone or it gets stolen, both portable OSes have highlights that assist you find it on a outline. Not as it were that, but these too Discover My administrations let you cripple the phone, wipe it, and play a sound on it.
16. Battery Saver Mode
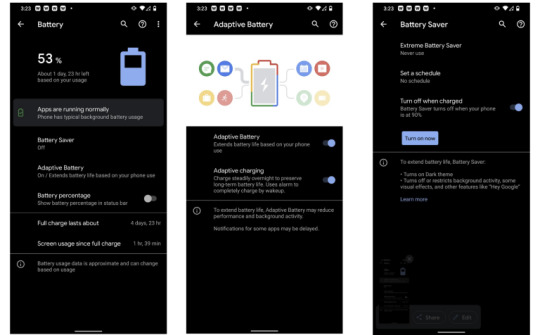
Android offers a part more control over battery sparing alternatives than the iPhone does. Not as it were can you empower Battery Saver mode and have it naturally turn off when the phone is charged, Above are few Android tips and tricks which a user rarely use. Read the full article
0 notes
Text
Xender vs. Nearby: De ultieme vergelijking voor snelle bestandsdeling

Bestanden delen tussen verschillende apparaten zou gemakkelijk moeten zijn, maar niet alle apps maken het even eenvoudig. Google ’s Nearby Share is handig voor mij als Android-gebruiker, maar wanneer ik bestanden wil versturen naar een iPhone, Windows-pc of Mac dan geeft dit moeilijkheden. Dan loop ik altijd snel tegen beperkingen aan. De app Xender biedt wél een complete oplossing – ik heb er al vaker over geschreven. Het is en blijft de betere keuze voor het snel versturen van bestanden. Ik leg het hieronder nogmaals uit.
Cross-Platform Ondersteuning: Xender’s universele bereik vs. Nearby Shares beperkingen
Werkt Xender op Alle Apparaten? • Jazeker Xender ondersteunt; Android, iOS, Windows en Mac. Of je nu een video van een Samsung naar een iPhone deelt of een document naar een laptop, het werkt moeiteloos. • Nearby Share werkt daarentegen alleen tussen Android en Chrome OS. Het biedt geen ondersteuning voor iPhones of niet-Google-apparaten, waardoor het ongeschikt is voor veel gebruikers. Om het verduidelijken gebruik ik een voorbeeld; probeer maar eens een bestand te sturen van een Google Pixel naar een iPad met Nearby Share – Dit werkt niet en is gewoon onmogelijk! Met Xender lukt het in seconden.
Verbinden: QR-Code vs. Bluetooth & Wi-Fi • Xender gebruikt een QR-code of hotspot voor directe verbinding. Geen instellingen aanpassen, gewoon scannen en delen. • Nearby Share heeft Bluetooth, Wi-Fi én een Google-account nodig. Heb je geen internet, jammer dan, dan is er geen bestandsdeling. Ook moet de ontvanger eerst toestemming geven via zijn Google-profiel.
Privacy: Geen Google-Tracking vs. Verplichte Accountkoppeling • Xender biedt end-to-end-encryptie zonder inlogvereisten. Jouw bestanden blijven privé. • Nearby Share koppelt alles aan je Google-account, wat betekent dat je activiteit mogelijk wordt opgeslagen.
Bestandsbeheer: Geavanceerd vs. Basis • Xender heeft een ingebouwde bestandsmanager om mediabestanden, APK’s en mappen te organiseren. • Nearby Share is puur gericht op verzenden en ontvangen, zonder extra functies.
Snelheid & Betrouwbaarheid: Xender wint • Xender gebruikt dynamische chunking voor grote bestanden, waardoor overdrachten stabiel blijven. • Nearby Share heeft soms last van vertragingen of mislukte transfers, vooral bij bestanden boven 1GB. Mijn conclusie: Xender is enige, goede oplossing! Als je cross-platform bestanden wilt delen, is Nearby Share te beperkt. Xender biedt: ✔ Ondersteuning voor alle apparaten (Android, iOS, PC, Mac) ✔ Snelle QR-code-koppeling** (geen Google-account nodig) ✔ Betere privacy** (geen data-tracking) ✔ Geavanceerd bestandsbeheer**
Probeer Xender nu zelf! Download voor Android; https://play.google.com/store/apps/details?id=cn.xender&hl=en_US Download voor iPhone https://apps.apple.com/us/app/xender-file-share-share-music/id898129576 Download voor PC/Mac https://www.xender.com

0 notes
Text
Did you know that the third most popular web browser in the world, second only to Google Chrome and Apple Safari, is not Firefox or Opera, but the Chinese UC Browser? Today we will talk specifically about UC Browser for Windows and take a look at how this program is capable of fighting with the most common PC browsers.Specify, the third place is almost entirely the merit of the insanely popular mobile edition of the browser, which is available for Android, iOS, and other mobile OS. But the version of the UC Browser for the Windows operating system has not yet received such fame. Moreover, the developer took it seriously only a couple of years ago.UC Browser – The Extensive and Valid ReviewUC Browser is now available for all Windows PCs, including not only current Windows 7 and Windows 10, but even XP. We also note that the UC Browser for computers is based on Chromium, so some special revelations in terms of performance should not be expected here, and in our review, we will focus on the interface.Images, and the ability to save the page in one fileSeveral special features in UC Browser are associated with images. Firstly, the program has a built-in tool for creating screenshots, the likes of which are just about to appear in Opera and Firefox 2017. And if in these browsers there is only the functionality of directly capturing and saving the selected area, then UC Browser already offers a simple editor.That is, to add notes, frames, and arrows to the screenshot, you will not have to open an additional program. Secondly, UC Browser can save images with Alt + left-click. By the way, the animation of downloading images, as well as other types of files, is made in the browser in the form of a nutlet (associated with the logo), which jumps to the download manager, located in the status bar below.Adblocker and Download ManagerLike Opera and Brave, the developers of UC Browser have embedded an ad blocker in their program. It works very well. The number of blocked ad units on the current page is displayed in the address bar.The option "do not block this site" instantly adds the current site to the list of exceptions. It is worth paying attention to the UC Browser downloads interface. It is made not like Chrome, but in the style of Firefox / Opera and is a compact pop-up menu.In turn, a full-fledged download manager interface in the browser can distribute downloads by file type. It is very convenient to find something specific in the case of a large number of downloads.The Express PanelWe proceed to get acquainted with the program. The browser welcomes us, first of all, with our express panel:In terms of customizability, it most closely resembles Opera but is made somewhat different in style, where instead of square cells arranged in a strict order, round ones are used, arranged arbitrarily. If you don’t like this original version, then the browser provides the ability to use the more familiar express panel style. This option is available from the drop-down menu.Like modern versions of Opera, instead of miniature screenshots of sites, UC Browser for Windows prefers to use their logos. It is often clearer, and the logo, in contrast to the preview, looks more attractive. Adding sites to the express panel in the UC Browser is also slightly more convenient than in other web browsers.The player in a Separate Window, the Ability to Download Audio/VideoFrom various visual solutions, let's move on, finally, to specific functions and begin with multimedia. Above any video, when you hover the cursor, you will have a special socket with a few buttons. The first of them is responsible for taking video into a separate window, which is not linked to the current web page. This is still not in Chrome, but already has a number of its competitors.It would seem that Chinese developers only quickly added to their program a feature that is gaining popularity. In fact, everything is a little different: it was in the UC Browser long before Opera and Safari.Also, UC Browser for Windows PC can download almost any video from sites like YouTube.
To do this, you need to click on the middle button and select the desired format/resolution.Finally, the third function allows you to immediately pull out and download the audio track from the video. You must admit that it is also a nice feature.The DesignA lot of attention was paid to the developer's appearance in the program. This is evident from the original animation effects for some browser functions to the advanced settings for changing the appearance. You can set the color of the "browser header — a choice of ten options, including both very neat and catchy colorful colors.There are also full-fledged themes that coolly change the interface of the web browser. In addition to the main classic theme, five additional themes are integrated into the program, and another special stub informing that there will be more themes in the future.ConclusionAlthough this browser has many advantages, there is still room for improvement. In the nearest future, it has the potential to become a serious competitor for top browsers, such as Chrome, Firefox, and Safari.
0 notes