#also digital paper cut art is very fun to do but so tedious
Text

tiny paper cut out gin from a secret santa event I forgot to post oops
#my son#gin ibushi#yttd#your turn to die#I want to see him grow up happy and healthy. he deserves the world#kimi ga shine#also digital paper cut art is very fun to do but so tedious#ur telling me I gotta add shadows under all these layers
158 notes
·
View notes
Text
I think one of the most wild things for me to learn is that digital art is about efficiency*.
I've recently learned that I've been going about digital art in the Wrong Way by treating it like traditional art.
Traditional art, for me, is all about the process- the time it takes to make something, for better or for worse. I really hate painting for how long it takes and how much you have to keep up with, but there's also something special in directing your energy into such a tedious task to make something beautiful.
And this goes for many other art forms - charcoal, sketching, watercolor, pastels, etc etc.
Anyways, I treated digital art in the same way by doing everything by hand. All the shading, lighting, blending - I did it layer by layer in the same way you would on paper. But learning that there are literally tools and 'cheats' to make the process much faster is interesting and, honestly, so helpful.
This ramble doesn't have a purpose I'm just thinking aloud.
*By efficiency, I mean the fact that, when you're a digital artist, you're most likely making graphics, animations, or something of the sort that is just as time consuming as traditional art. Learning how to cut some corners is great for saving time, especially since digital art can be in demand in a very corporate way.
I think it goes into the very fun ( and personal ) philosophical question of when efficiency is worth it over the personal enjoyment of art, which is what I'm trying to balance now.
#these tools dont make the art any less valuable btw#as long as you have soul for your art then do whatever#it still takes skill and knowledge to know how and when to use those tools#luz rambles about art#luzs tinted glasses
0 notes
Text
So I made a reply a while ago about some cool dude who made a small hidden camera to take secret pictures during like 1890... and some people reblogged it where they were impressed with my small mention on how technically easy it is to just make your own camera. More specifically, with the fact that my camera class back then simply decided to make a whole room into one. Now I didn’t want to detract too much from the actual guy, so I left it at the mention, but thought it might be interesting for some people.
My class actually got the idea cause when we were making our small cameras as part of class, the prof mentioned that there was some artist dude that made a big trashcan into one and hid inside it. So he could get secret pics without anyone realizing. And that is naturally a pretty big camera. But we wanted...bigger.
So we at first went with small stuff, figuring things out, getting the hang of the calculation time, etc.

These are just MY cameras, I was among the less creative ones except for the bread box lol (one girl had a multi-cam inside a jewelry box and one dude turned his car into one). Pictures made with these turned out mostly fine, the ones that went bad we could all retrace to an error in calculating exposure time.

But obviously, we had our eye on the BIG prize.
It worked in our favor that the university was actually constructing a whole new building and thus a lot of rooms and labs were being emptied out to move into the new one. So we kept nagging, begging and annoying...until we were given one month in which we could have a double office (as in, two rooms connected with a door). From there, camera creation began:
Step 1: Make it a black box
Any light that is inside a camera can mess up your picture so you want it to be as black as possible, that way only the light and thus image from your hole will be on the photo. So we went, “borrowed” all the black cloth we could get from the theater club and went nuts.

Also, obviously we got ourselves a thing that was supposed to hold our photo paper

Did I mention how MASSIVE the paper was? We actually had to cut it into 3 smaller pieces so we could better transport and develop it.
Step 2: Take the picture
So we actually at first had a math error and thought it will take 2 hours and 30 minutes, but that ended up being almost black and after rechecking everything, we noticed that 1 hour 40 minutes was enough.
Which for us meant sit in this pitch black room, doing nothing, cause if we’d leave, light would come in and shit. Thank the heavens that it was not 1890 and we thus had music players lol. Have an exciting image of what our life was for those 2 hours inside our camera ♥

Step 3: Develop the image
So now came the actually most complicated part. NORMALLY you just have the image fully submerged in development fluid, then wash it off by fully submerging it in water. We...couldn’t exactly do that without renting a pool, sooo

Yes, it was as tedious as it looks. The room was a mess after and we all smelt like an exploded bleach factory.
Step 4: Admire your photo
At the end of the day tho, we got our picture (obv this is digitally inverted, but I like it like this more).

Two 2x2m photos of the view from out the university window, made by making an entire room into a camera. It was a lot of fun, it was very cool and if you happen to have an empty room for a month, a photo development lab and big light-sensitive paper, then I can only recommend it lmao
BONUS: Do bullshit with the camera
We were art students, what did you expect: for us to just disassemble it after and call it a day? Nah.
We put 3D glasses on our hole and then enjoyed looking at the view in 3D

We also obviously brought in massive rolls of normal paper and decided to sketch the outlines of what was projected for lulz

So yeah, build your own camera. Have fun, figure stuff out yourself. Instagram filters are all neat and cool, but there is something really exciting about doing it like the old masters ;)
#photography#room camera#2x2 meter photo#art project#art students#yes we were insane#but clearly it worked out so we were at least not WRONG lmao
15 notes
·
View notes
Text
5 Creative Ways to Market a Luxury Home
Having difficulty selling a luxury home? High-end real estate can be both financially rewarding and challenging to sell. Factors outside of your control, like the economy and market in which you’re selling, can affect your ability to get a home sold. That’s when creativity can be a major asset. Choosing an unconventional method to market your luxury home can help a property spend fewer days on market. Even in a tough market, selling a luxury home at a fair price point is possible when you think outside the box. After all, unusual homes should be marketed in unusual ways.
Ready to sell that stubborn property that has been on the market for too long? Here are just some creative ideas that are shared amongst the members of the Institute for Luxury Home Marketing.
Send Out Stunning Property Brochures
Instead of an online listing, use an old-school approach and send stunning property brochures to people in the neighborhood. Brochures offer the benefit of a lot of page space, which allows you to include images of the house liberally. Remember, everyone knows what the outside of the house looks like, but include inside shots and you’ll be sure to pique their interest. Plus, if you send out brochures to people who already live in the neighborhood, they might have family or friends who are looking to buy near them. Many people who live in luxury homes or gated communities would prefer someone they know to move in down the street than a complete stranger.
Distributing brochures will alert the neighbors that your property is for sale and increase the likelihood of referrals. Make sure your brochure mirrors your luxury home by using glossy paper, high-resolution images and a cohesive page layout. Choose a professional designer to prepare the brochure to maximize the features of the home—the difference is astounding. Our preferred partner, Real Marketing, provides just such a service.
The Institute provides members with detailed information about local demographics and real estate trends, which you can include on your brochure to emphasize your expertise.
Create a Dedicated Website for the Home
Your luxury listing is important, so why not dedicate a whole website to it? Choose a website creation service, such as our preferred partner Real Marketing, that can help you make a beautiful landing page for the property. The home’s website is the perfect location to add as much information about the home as you can from pictures to square footage, unique features, local neighborhood amenities and whom to contact for further inquiries.
Making the page online is just the first step of a successful property website. Once you finish the website, you’ll have to get it in front of the right audience. Here are some ways you can make sure your stunning landing page gets seen:
Promote the website through your social media channels.
Implement a text marketing campaign and link to the website.
Hand out flyers with one striking image of the home, and include the URL for the website at the bottom of the flyer.
Include the website in an email blast so that your existing contacts see and tell their friends.
The Institute also helps their members network with other luxury real estate agents who, in turn, can circulate your home’s website within their professional network in case a colleague is representing the perfect buyer.
Sell It at Auction
Some people make the mistake of associating all home auctions with foreclosures, but in this changing world that is no longer the case. Selling a luxury home using auctioneers such as our preferred vendor Supreme Auctions, as opposed to selling in a traditional way, can have a lot of benefits.
Firstly, they tend to have a very extensive network of potential affluent buyers as well as marketing strategies that can connect locally, nationally and even globally. They inspire a sense of urgency with a drop date for possible purchase being the day of the auction. A little bit of friendly competition encourages bidders to commit to properties they love, which increases the chances of the home selling at market value or above.
Buyers must put down a non-refundable deposit, which can help eliminate uncertainty in the selling process. While pre-auction preparation of the home to showcase it to its maximum potential is still incredibly important, properties sell “as-is,” which means there are no long drawn out negotiations about the additional renovations, repairs or extras that need to be done before a sale can be finalized.
Selling through an auction cuts out a number of the tedious tasks and keeps the sale process on the seller’s terms.
Promote It Internationally
If you can’t seem to find the right buyer for your home domestically, it could be because the perfect buyer lives in a different country. International promotion is key if you’re looking to tap into new markets. You will be rewarded for the time and effort spent connecting with new clients, as every addition to your network brings access to their own connections. It can be hard to know where to start when promoting a property internationally, but, once again, we have teamed up with an awesome partner, Proxio International, to assist our members. Designed for brokers, agents and builders alike, Proxio International helps real estate professionals connect with new markets by offering training videos, webinars and conference calls between agents. By using Proxio International’s services, you can promote your luxury property online with advanced digital marketing strategies to expand your home’s reach.
Stage It Professionally
Staging a home is standard when it comes to selling a home, but luxury homes give sellers the chance to take it to a whole new level. Affluent buyers want to be able to picture themselves in the home before buying, so consider who you’re selling to and then exaggerate the staging. Does your audience appreciate more modern decor? Update the property with unique furniture pieces and decorative art that will wow them. Do they appreciate luxury cars? Rent a Ferrari for a day to make the garage pop. Furniture, cars and attention-grabbing touches can usually be rented, so you don’t have to break the bank by going above and beyond. The opportunities to stage your luxury home are endless, and prospective buyers will remember the work you put into the details.
Now that you have some ideas of how to get started marketing a luxury home creatively, have fun with it. The high-end real estate market attracts those with an eye for the finer things in life. Use these ideas to make their experience both delightful and impactful as possible. Going the extra mile might not only get the home sold, but result in future referrals.
Learn more ways to think outside-the-box with your marketing at one of the Institute’s online or in-person training sessions.
Diane Hartley is the president of the Institute for Luxury Home Marketing, a premier independent authority in training and designation for real estate agents working in the upper-tier residential market. Hartley brings her passion for luxury marketing and more than 20 years of experience growing and leading businesses to her role as president of the Institute.
The post 5 Creative Ways to Market a Luxury Home appeared first on RISMedia.
5 Creative Ways to Market a Luxury Home published first on https://thegardenresidences.tumblr.com/
0 notes
Text
Final Instructional Design Course - Reflection
After over a year’s worth of full time study in this Masters degree program, I can proudly say that I’ve reached the end! This program has taught me a lot, not only by way of the actual course content, but because of the accelerated pace, and the overall format of online schooling. I was able to learn a lot about myself and what makes me thrive in an educational environment, I had to learn time management skills as I worked and studied full time, and quickly recognized the power of proper communication and deadline management, which is imperative when doing online schooling.
As far as the actual course content, this Masters degree taught me practical skills that I’ve already put to use in my current role as a Training Coordinator. Below is an assessment of each course.
Mastery - Personal Development and Leadership
This was the first course in the program and it set the tone for all following classes. They eased us in, as there was not an actual project, but rather, a paper that we wrote, which helped us discover what we wanted to “Master,” as graduate students in this program.
Greatest Triumph: I got a 100 in this course, which was a very pleasant shock. I hadn’t been in school for just about four years and was unsure how I would do. This helped me gain a lot of confidence in myself and started me on the right foot.
Strategies for Learner Engagement
This class was very entertaining for me. It was foundational in nature. The first assignment was to write a paper on various Instructional Design theories, including ADDIE, SAM, Gradual Release, Rapid Prototyping, and Schema Theory, among others. I found myself going back to this paper and the research materials quite often over the next few months, and even used some of them as resources in future assignments.
Greatest Triumph: I earned a Course Director’s Award for this class. He really liked my designs for my Models of ID posters, and again, that was a great confidence booster. I can write well, but design has never been anything I dabbled with. This course really helped me see that I have an eye for aesthetic design and taught me cursory knowledge of design software, using the free service Piktochart.
Visual and Verbal Communication in Instructional Design
This class took some of the elements of design in the previous course one step deeper. Here, we learned about typography and visual literacy, and used Adobe Illustrator. This software was brand new to me, and I made heavy use of Lynda.com, Google, and Youtube for how to customize my design. We also created an interactive infographic, which used Adobe Illustrator. I’ve been intrigued with the way many creatives can utilize simple vector shapes to create works of art, and I would love to be at that level some day. By practicing the infographic, I’ve gotten more familiar with using the graph tools, and it was slightly simpler than I imagined it to be. This will be helpful during training or curriculum-building, where I may want to depict information or statistics in an easily-digestible fashion.
Greatest Triumph: My travel posters were quite a hit! It also helped me get even more hands on experience with very relevant software that I’ve since used.
Corporate Training and Motivational Development
This class taught us about the Conscious Competency Theory, which include Unconscious Incompetence, Conscious Incompetence, Conscious Competence, and Unconscious Competence. This was useful even in my role as a trainer. Knowing that each stage of that theory can come with widely varying levels of self-confidence (for instance, Conscious Incompetence is when you’re very aware that you don't know something, and that is not a fun experience to have at a new job,) meant that I could more easily guide my new hires through this phase and into Conscious Competence, which is a major morale booster.
Greatest Triumph: I was actually traveling to Montreal, Canada during this class and still managed to get a high A. I was considering taking an interruption of training, as this trip had been planned for several months, but decided against it. I was able to have a great time in Montreal and submit my assignments on time as well!
Instructional Design and Evaluation
This course was about learning how to create a Training Needs Analysis with a given project. We were given a previous student’s analysis which was about 4 pages, and our final version, after adding all required elements such as surveys and SME’s, ended up being about 15-20 pages long. I didn’t pass this course the first time around, due to some personal issues. However, when I retook the course, I came to the class mentally prepared for the amount of work that was required, and with a clearer understanding of the timeline and various goals of the analysis. This course taught me that there is so much research, planning, and iteration and reiteration that is required when developing a curriculum, more so than I expected!
Greatest Triumph: I did very well the 2nd time around, so much so that my instructor used my final analysis as an “exemplary example of a final document.” I was honored and again encouraged to continue to push harder through the rest of the program.
Digital Media and Learning Applications
This course taught us about the power of video as a medium for teaching. I was warned about this course by other peers who had taken it before, as it was the first course to implement coding, which I had no experience with whatsoever! First, we learned about the virtues of video as a learning tool. Then, we picked a topic and created an interactive quiz on a NASA video of our choosing. We used Illustrator to edit pictures, and Brackets for the coding. This assignment was very meticulous, as coding is extremely particular about any stray character you may add accidentally. However, this was one of my favorite projects as it was so hands-on and the final result was amazing, to think that I was able to do that! The quiz was fully customizable, which is always fun, and I learned a lot about my topic of choice, the 2017 Solar Eclipse, which was a huge event just a few months prior to the assignment. Finally, we created a video walkthrough of the quiz, and I added narration (not required but was fun to do) to explain my design choices.
Greatest Triumph: I didn't start this class too great. My paper was lacking, in my instructor’s opinion, and I didn't score nearly as high as I usually do on papers. I don’t know if I got over-confident, or didn't understand the assignment, but it took some work to bring my grade up. However, at the end of the course, my instructor really liked my final project. I scored a 100 on it. He said it was fun to go through my quiz, and that I went “above and beyond what was required.” I learned, through this program, that I have a good speaking and narration voice and really enjoy doing it.
Music and Audio for Instructional Design
This course was one of my absolute favorites! Here, we delved into GarageBand as a tool to record and edit narration, foley, and audio for videos. We started with a narration project, where we summarized and recorded us reading a Gimm’s Fairy Tale. We also had to add sound effects and background noises on GarageBand, which I had never used before. The final project had us record narration over a provided silent video of the Pioneer Village in Osceola County, Florida. This was a unique experience as I live in the area and took a field trip there as a chid in middle school. We recorded a dramatic narration and again added foley such as music, animal sounds, and the like, and used tools in GarageBand like ducking and audio editing. As mentioned above, I really enjoy narrating, so though this class was quite tedious, it was very fun to do.
Greatest Triumph: I think my greatest triumph had to be simply learning how to use GarageBand properly. It came into play several more times throughout the program and this foundational class was super helpful for that. I’ve had GrarageBand for years on my Macs and never put it to use, and now I have good cursory knowledge for future personal projects, such as my podcast which is in development.
Filmmaking Principles for Instructional Design
This course built upon the previous audio course and added a video element. Here, we learned a lot about storyboarding, which is a very effective way of planning an instructional video. Though I've heard of them before, I never really saw the value of a storyboard until I had to submit one. I realized, after submitting it, that most of the work was done, Now, I just had to do the actual recording. I underestimated how much time it takes to plan something, and by the time it was time to record, I already could see the final product in my mind’s eye and was able to cut my recording time in half as a plan was already laid out.
Greatest Triumph: I learned a lot about the concept of good lighting, and have used it in other assignments since. Understanding how to light your subject against the background made my final video very crisp and clean, and this was perhaps the first class where I could see most element of what I learned in the past, come into play. From typography, to the power of video as a learning tool, to audio essentials, it was a great amalgamation of my knowledge up to that point, and one of the more fun projects I did.
Game Strategies and Motivation
In this class, we learned about the power of gamification in learning. A lot of the concepts were difficult for me to grasp. I couldn’t initially differentiate between gamification and game based learning, as the terms initially seemed interchangeable to me. I did deeper research and was able to finally understand the difference between the two. We were also required to develop a plan for a game asset for a class of our choice, using Google maps. I designed a fun geography based game called Tripler, where my middle school students would team up and take a “trip” around the world, filling out a “Passport” for six separate continents and information on each, such as a famous landmark on each, and information about countries on each continent (Antarctica excluded.)
Greatest Triumph: I presented this game to my sister and when I was done explaining it to her and showing her the pitch I created, she actually wanted to play it! I don’t have the actual components created, but it was so much fun to plan and imagine an actual classroom of students playing this game, that I would love to develop it, even if it’s just for my friends and family to play one day. I never imagined myself to be a game master or anything, so developing this game really had me walk through all possible scenarios and work through loopholes or confusing bits in the rules, which was difficult but very fun.
Learning Management Systems and Organization
In this class, we learned about various LMS’s that we can make use of when developing a course. This class’s content wasn’t particularly challenging, as we had to use a previously developed project as the basis of the course we were creating. However, I was going through a very rough time in my life, and I had to repeat this course several times. My instructor was very understanding but this was a huge disappointment to me. I knew I had it in me, and I had picked the silent video narration from the Audio class so I couldn’t pinpoint why it was such a hard class to get motivated for, other than the external factors of my dad’s illness getting in the way at the time. When I finally took the class (for a third time) I did very well. My instructor first recommended that I completely overhaul the project and change the topic, and that was a huge help for me. I couldn't imagine having to redo it a third time so taking on another topic really made it feel new to me.
Greatest Triumph: My greatest triumph in this class, and perhaps in this whole program, was finally passing this class. I passed with a high A after having failed it twice, and it helped remind me that I was so close to the finish line, and that I had it in me to finish on a strong note.
Media Asset Creation
This course was another one of those that took a little from many previous courses and made use of what we’ve learned thus far. Here, we took the previous course’s project and created the media assets that we had proposed for the topic. In my case, I created an instructional video that introduced the students to the course, which was intended for new hires in a financial aid office. When I had switched the topic of the previous course’s project, my instructor said that it’d be helpful to create something I can actually use later, which this project very much was. It’s exactly related to what I do in my role currently as a financial aid advisor and trainer for the department. I was able to take specific time to create a very detailed course that I’m implementing in my training, rather than an arbitrary topic that would “sit on a shelf” and not really serve my career goals.
Greatest Triumph: I love being able to use something that I did in class, in my current role. It affirms that I am in the career and degree that best suits me, and it didn't feel like wasted work. Being able to present this to my manager was a great experience, and I had much more passion behind this project, as it’s something that will take root and actually be fleshed out very soon.
For this final project, I was able to consider various instructional design theories. I really connected with the idea of Gradual Release, which is my favorite theory, because it slowly releases the responsibility of knowledge to the learner. I planned my curriculum around this idea, of teaching a concept, having the learners practice it together, and assessing them on their own. I was also able to use software like Illustrator, GarageBand, and iMovie, which really brought my entire education in this program full circle, and helped me see how all pieces interlock to creating an effective training curriculum.
Since I am already in this field, I have been able to use many of the concepts learned in this program already, and am excited to be able to implement more of them as I progress in my career. From developing more entertaining presentations using iMovie and Powerpoint, to adding and editing narration, audio, foley, and most importantly, creating a detailed, research-based, cohesive training needs analysis, this program has taught me more intricacies of corporate training than I could have hoped for.
0 notes
Photo
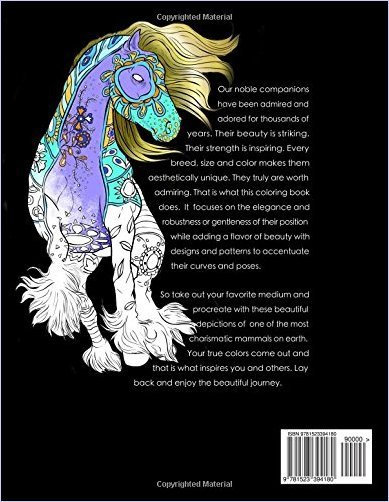
5.0 out of 5 stars
Beautiful coloring book filled with fantastic horse designs – printed on one side of page
5.0 out of 5 stars
Excellent horse coloring book!
I am always on the lookout for horse coloring books. This one is exceptional. It is filled with over 40 lovely pages. The horses are done in different styles. Most have designs within, but there are a few more realistic drawings as well. There are sweet babies, a couple of winged horses and one very cute baby zebra. The bird and horse muzzle page just made me smile. The lines are easy to see and the edges of the drawings aren't cut off without regard as they were in the last horse book I ordered. The paper is on the lighter side, but the pages are single sided and not perforated. There are no two-page spreads. This is my first review, but I had to share and recommend this fine book to any horse lover! Go to Amazon
5.0 out of 5 stars
If you like horses and you like to color, you will love this book!
I wanted THIS coloring book the moment I saw it, upon receiving it and thumbing through, I was delighted even more! There are 42 one sided, individually created images of horses (there are a few other horse type animals and some fantasy horse type animals) in this book. Some are line art only, many have shading included, similar to the gray scale (grey scale) images that are so popular, but don't be misled, these are not mere photographs that have been digitally bleached out, they are each works of art. The picture of the horse on the cover is very descriptive of what you will see here, detailed, realistic line art with fanciful doodles drawn on top. There are also a few non shaded and a few realistic horses with no doodles over them.Some colorist like gray scale images to color, some do not, I love it, but if you aren't sure, go to her website, do search for "selah works" and you can get some free pages to download and color, some of them are line art and some are shaded. You can also find her on YouTube, do the same search as written above, you see a flip through of this book and her other books as well as some tips and tricks on coloring her beautiful images.Bottom line, if you like horses and you like to color, you will love this book. Go to Amazon
5.0 out of 5 stars
Gorgeous drawings!
A wonderful book. Will make Xerox copies of the horses to color. This book is so much fun to look at and enjoy the horses. Go to Amazon
5.0 out of 5 stars
this book is wonderful. The pictures are just amazing
From someone who owns a lot of coloring books for adults, this book is wonderful. The pictures are just amazing, they are not cheesy like some other books with animals, I love it! The pages are not think paper so if you use markers you may want to put something behind you page, so they do not bleed onto the 2nd page. Now each page is one sided, so behind the page you are coloring on is blank, which is a to me that is a major plus to me. Go to Amazon
5.0 out of 5 stars
A BEST BUY
Most beautiful horse coloring book I have! The cover got my attention and the contents did not disappoint. Just enough pattern design to infuse the horses with creative choices yet not require tedious little spaces to color. A few whimsical creations, such as turtles flying with Pegasus. Previous reviews very helpful especially the post with video showing all the pages in the book and the artists website "SelahWorks" where you can download coloring pages or view her other books. Couldn't wait to start my first page which reminds me very much of a mare I used to own, the eyes are very realistic. Will post images as I finish pages. UPDATE: I now have 6 of Cindy's books and this one, along with the Midnight version, are my favorites. Get her Dog or Cat books too! Go to Amazon
5.0 out of 5 stars
A gift for your favorite horse lover!
I bought this coloring book for my wife, who loves the creative arts. She also is a horse lover, so this gift was perfect for her. The pictures are well drawn and feature interesting patterns to color. She uses color pencils for her book.Pros:- Makes a great gift for a horse lover- Great pictures to color- Book layout and paper quality is good for the average personCons:- Sometimes the patterns on the horses are too small to get the color on.- Some of the patterns on the horses are a little too 'flower power' but if you like that sort of thing, this is for you. Go to Amazon
0 notes
Last Seen Blogs

krxmera
K R I X X Y

gun-important
Untitled

vensa10
Vensa Austin

macca-lennon
Beautiful World of Lennon & McCartney

2290tax
Form 2290 e-file