#also summer arrived which means more time but also too much unstructured time for my adhd brain
Note
Lol once May 12 comes, Champ won't know what hit him
DKSNDKSNKDSNDK YEAH
I’m so excited! I digitally preordered the game and now I see the icon for it whenever I go to play Hyrule Warriors and I get hyped for it all over again!
Tbh I’ve been avoiding any stuff for it after I realized there was an official release date and haven’t seen anything past the second trailer. I’m goin’ in blind!
Botw was my first proper Zelda game and really what got me into the Zelda series as a whole. Granted, my family are all gamers so we owned a few Zelda games before this (OoT 3D, Phantom Hourglass, Spirit Tracks, Twilight Princess) but I never actually played any of them past the beginning. At least not until recently, where I’ve played (and finished) like 6 Zelda games, which is impressive because I leave games unfinished 90% of the time lmao
Anyway, I started rambling a bit but yeah, I’m def gonna make some adventure swap stuff for it!
#the whumptober thing has sapped a lot of my creative energy tbh#also summer arrived which means more time but also too much unstructured time for my adhd brain#I’ve accomplished nothing but playing Hyrule Warriors for the past week and a half#also having asks really motivates me to make stuff#I just wanna thank you because without your questions I wouldn’t have made half the stuff I have#you’ve been a great motivator and I really appreciate it
3 notes
·
View notes
Text
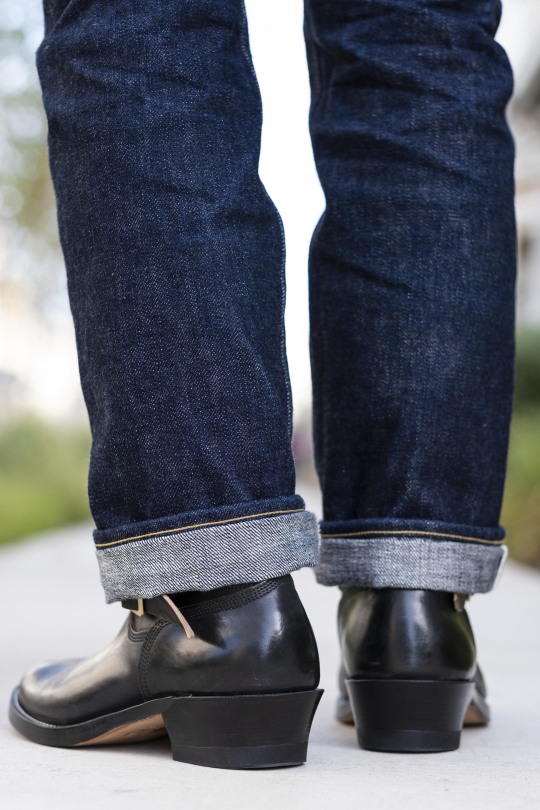
Role Club Engineers: Worth the Wait?
Introduction (Part I): History of Engineer Boots
Engineer boots are definitely a polarizing style of footwear within the heritage/amekaji boot community. For one, they utilize an ankle strap for fastening in lieu of laces, and second, their tall stovepipe shafts don’t integrate quite well with the slim tapered esthetic of modern denim/trousers. While often associated with motorcycles and bikers, engineer boots were actually designed as protective gear for firemen working on railway engines back in the 1930s. (Hence the name “engineers.”) Their minimal design and use of buckles over laces made them ideal for this line of work. The tall shafts provided protection for the lower leg, while the slip-on design allowed for quick removal should anything dangerous (such as hot coals or embers) slip down the shaft into the boot. This style of footwear lost some popularity following the introduction of lace-up combat boots during World War II, but would later be picked up by motorcyclists who found use of their insulating and protective features. (And there is your history lesson for the day, courtesy of Wikipedia. Lol)
Introduction (Part II): How I Got into Engineer Boots
I first got into more well-made boots back in early 2019. Like most boot n3wbs, I was completely infatuated by that lace-up service boot esthetic, and insisted on wearing them with the slimmest, most tapered denim I could find. My first boot purchase was (of course) a pair of Red Wing Iron Rangers, followed by three pairs of Truman service boots in pretty quick succession. That first summer was when I discovered @brianthebootmaker on Instagram and YouTube, and instantly fell in love with his Underdog design, which I later purchased in August 2019 and received in May 2020.
At that point in time, Brian’s popular Underdog boots fit perfectly within my slim service boot style. However, Brian’s most iconic boot pattern was (and is) definitely his engineer boots. I admit I wasn’t sold on them at first, but I was intrigued. Did they fit my wardrobe at all? Nope. Would they even fit under the 6.75” leg openings of my PBJ denim? LOL nah. Nevertheless, I found myself constantly going back to Brian’s Instagram page and browsing all the photos of his engineer boots. Eventually, I grew to really love the look of engineer boots, ultimately placing a second deposit with Brian for a pair of engineers in October 2019. I had no idea how I was going to fit them into my wardrobe, but I figured I’d make it work somehow. (Luckily, since then my denim preferences have actually shifted toward more relaxed cuts, just in time for the arrival of these engineers.)
The Ordering Process
For most customers purchasing online, Brian requires you to take a set of measurements on your own feet, which he uses to build your boots remotely. However, those lucky enough to live nearby can actually visit Brian’s shop in LA to be personally measured by the boot maker himself, as well as discuss any details or questions you have regarding your specific makeup. I was one of these lucky people who could actually visit him in person, and used those measurements to order two pairs of boots from him: first a pair of Underdogs, and now some engineers. Both pairs were built on different lasts (which I will discuss more later), and both fit perfectly. (For a more detailed summary of being measured in person, check out my previous review of my Role Club Underdogs.)

My Specifications
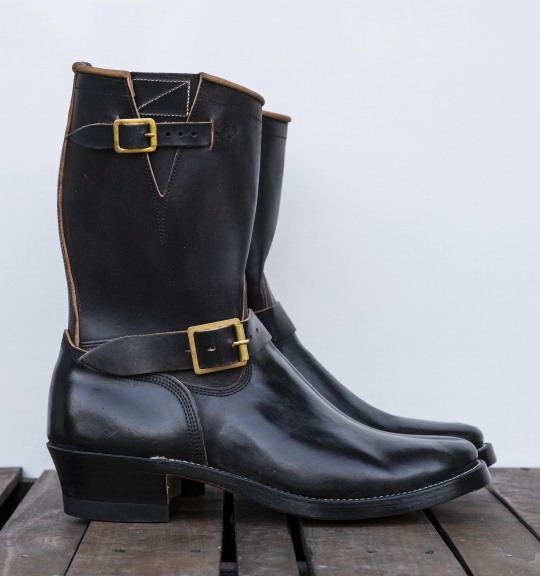
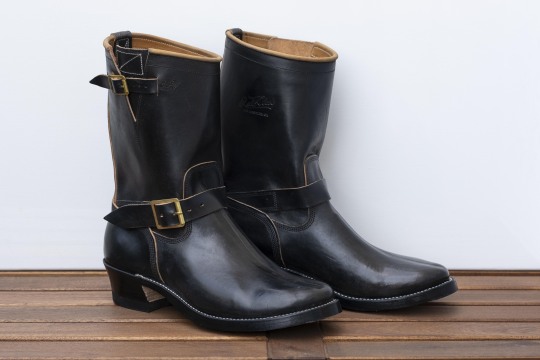
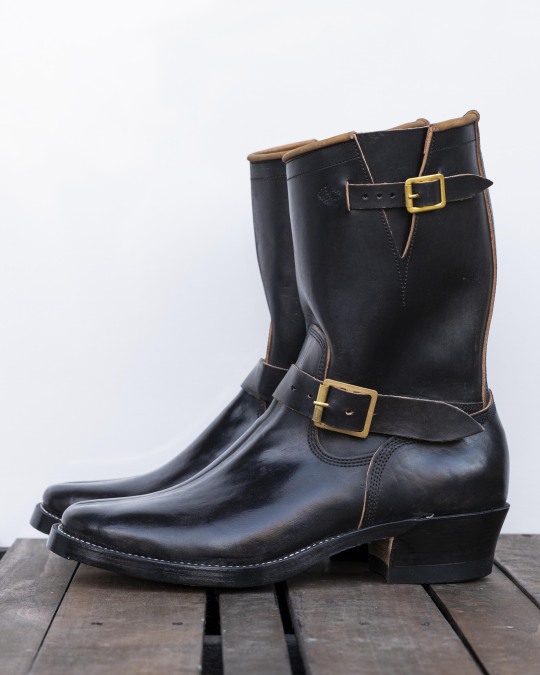
While you can’t really go wrong with any of Brian’s engineer makeups, I personally loved the design Brian designed for himself: brown CXL horsehide hand-finished black, a full leather outsole, and full woodsman heels. They definitely have a more western, cowboy, workwear vibe compared to most other engineer boots out on the market, but in my opinion these are one of the best patterns, with some of the cleanest construction to boot.

A few screenshots I took of Brian's engineer boots, taken off his Instagram.
I did make a few tweaks/upgrades from Brian’s boots when designing my own, which I’ve listed below:
Model: engineer boots
Shaft height: 10”
Upper leather: brown Italian vegtan horsebutt, hand-finished black
Toe track: yes
Upper stitching: black
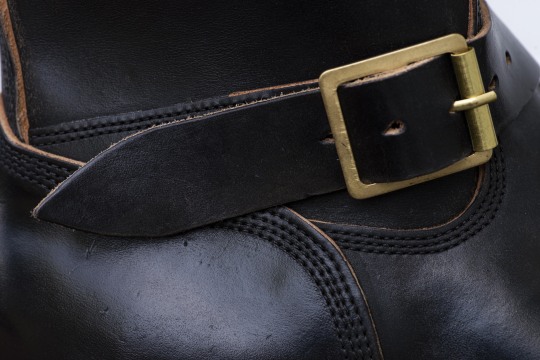
Hardware: brass roller buckles
Last: 2307 last
Unstructured toe
Edge finish: black
Welt stitching: white
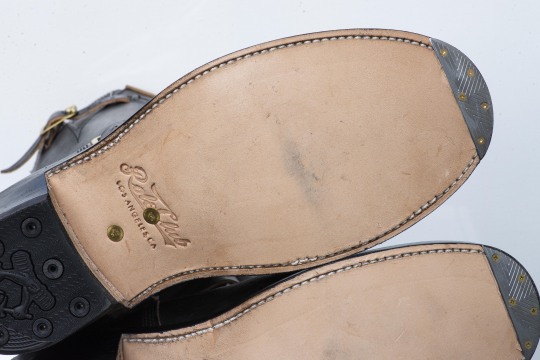
Sole: full leather sole, black heel cap
Heel style: full woodsman heel
Metal toe plates
Custom built-in orthotics (same as my Underdogs)
One of the biggest reasons I keep going back to Brian is that he’s able to use the orthotics I typically slip into all my footwear and actually build them into the insoles of my boots. Not sure how difficult this actually is for a boot maker, but Brian has absolutely nailed the fit on my ugly feet both times, and it’s super convenient to not have to worry about a removable orthotics.
Price, Lead Time, & Shipping
The initial deposit to reserve a pair of Role Club boots is $200 regardless of which model you are ordering, with the remaining balance due upon completion. I visited Brian’s shop in Los Angeles on 8/21/2019 and placed my deposit on 10/15/2019, with an estimated completion date of November 2020. However, due to delays in construction (including waiting for my custom metal toe plates to come in), my boots weren’t actually completed until 3/25/2021 (nearly five months late). Inconvenient, but it’s not like I was wearing boots and going out much anyway due to COVID.
When I placed my first deposit for my Underdogs in August 2019, the estimated wait time was just 8 months (April 2020). However, when I placed my second deposit for these engineers just two months later, the wait time had jumped to 13 months (November 2020). To be honest, I’m not even sure how long Brian’s queue is now. Last I heard it was sometime in 2023 or 2024. (Freaking insane. So thankful I placed my second deposit when I did, before his waitlist exploded.)
At the time I placed my deposit, the base price for Brian’s engineer boots was $1350. After a few upgrade fees (hand-finished leather, toe plates, etc.), the final price of my specific makeup was $1500. Minus my initial $200 deposit, my final payment for these engineers was $1300 + $20 shipping. I made this payment via Venmo on 3/26/2021, my boots were shipped the following Monday 3/29/2021, and I received them via USPS on 4/2/2021.
At $1500, these are not a cheap pair of boots by any means. However, for engineer boots this price is actually not unreasonable, as there are some other brands selling engineer boots at a higher price point in stock sizes with limited to no customization (i.e., Clinch). #perspective #itsallrelative (To be completely honest, I roll my eyes when people scoff at a pair of boots in this price range, claiming they’re “too expensive” or that they can’t afford it, and turn around and buy 2-3 pairs of average Vibergs instead. Just stop. Clearly it’s not the cost, it’s your personal values and priorities. #endrant lol (Also, not knocking Clinch or Viberg or anything. Just a few examples to prove a point.))
ANYWAYS. For those hesitant to commit to such an ungodly wait time, I will point out that the cost to reserve a pair of Role Club boots is just $200, regardless of which model you are ordering. In fact, you don’t even need to finalize your order at the time of deposit. You can continue to brainstorm, change your mind, and discuss with Brian about your specifications long after the deposit is placed. (I mean, you have like 2-3 years before he even starts working on your boots anyway, so you have ample time to decide. Haha) Also, should you decide you can’t wait that long (or you suddenly become more financially responsible, lol), I hear you can also use that $200 deposit for something else more affordable, such as a resole of another pair of boots. Either way, hopefully this knowledge makes the $200 deposit a little less daunting and scary of a commitment.
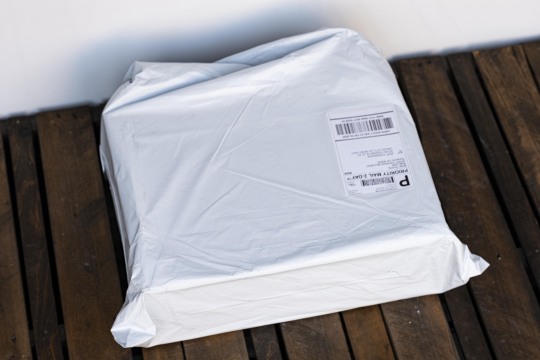
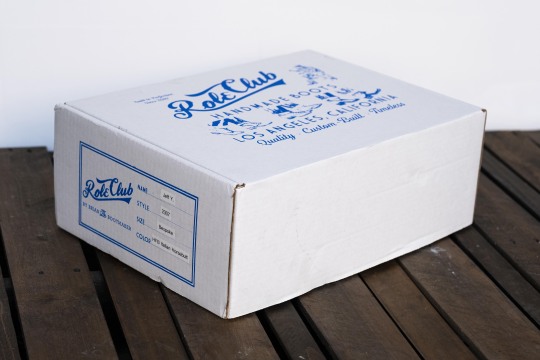
Unboxing
The boots arrived in a single standard shoe box enclosed in a standard plastic shipping bag. There was zero padding included, so the box did arrive with some dents and dings. Inside the box, each boot was slipped inside an individual clear plastic sleeve. Unlike most other brands, no extra padding, tags, or shoe bags were included. Just the boots. (Though, they are some freaking amazing boots. Lol)

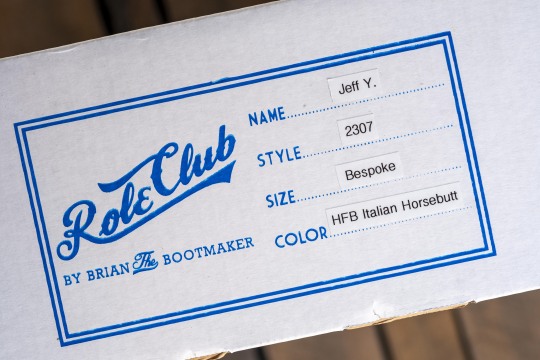
“HFB” for Hand Finished Black.

360 Degree View


The 2307 Last
When trying to pick a last for these engineers, I was debating between his 1940s last and the 2307 last. Ultimately I picked the 2307, mostly because it had a lower toe bump. I do think that his 1940s last is his most popular for engineers, and the toe bump really doesn’t make too big of a difference once the unstructured toe collapses. (For a more in-depth summary of all the lasts/toe shapes Role Club toe has available, I will link you to Brian’s YouTube video.)

Profile views of both the 1940 and 2307 lasts. Notice the more pronounced toe bump on the 1940 last in comparison to the 2307.

I had my Underdogs built on Brian’s 100 last, which typically has a significantly slimmer, almond toe shape in comparison to the 2307 last. However, due to my awkwardly wide feet and bunions, the MTM 100 last ended up not being too dissimilar from my MTM 2307 last. I definitely like the 2307 more, as the outer sweep of the toe box has a more angular, elegant curve in comparison to my 100 last, which kinda just looks like a thumb.

As you can see, my Underdogs were supposedly built on the 100 last, but ended up being way more rounded than expected (which I’m happy about).
The Leather

Brian most often sources his leather from the Horween Tannery, specifically CXL horsehide and shell cordovan. Brian used brown CXL horsehide hand-finished black for his own pair of engineer boots, which has aged incredibly. Personally, I tend to opt for vegtan leathers whenever possible, as it’s more environmentally friendly and in my opinion tends to build a nicer patina than chrome tanned or combination tanned leathers. Luckily, Brian happened to have some brown Italian horsebutt lying around his shop that he was willing to offer me. At the time, Brian didn’t remember the tannery from which he sourced the horsebutt (which, according to him, no longer exists), but he was able to send me a few photos. I immediately said yes.

A few photos of another pair of engineers Brian made in the same Italian brown horsebutt. Loved the depth of color...which I had painted over. lol

I was hesitant at first to have Brian hand-paint black dye over this beautiful brown leather. However, I was pretty set on getting some classic black engineers, and I trusted that the black dye would slowly fade away in high abrasion areas, resulting in a beautiful black-brown pseudo-tea core finish. For horsebutt leather, there actually isn’t too much visible grain/marbling within the leather). It has a fairly smooth, consistent finish, which I don’t mind at all. Also, I can already see some browns peeking through, which gives me hope as to how the black dye will chip away as these boots break in.

Some of the brown undertones can already be seen beneath the black dye, which is most apparent on the vamps.
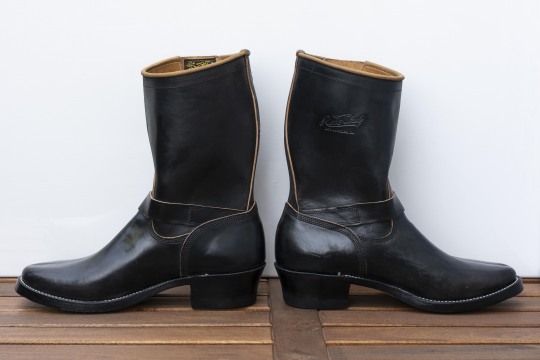
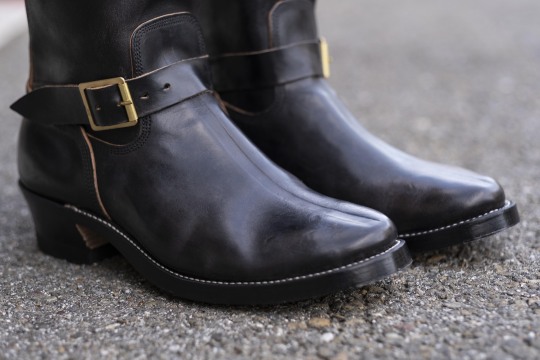
The Pattern & Stitching
I absolutely love Brian’s take on engineer boots. His pattern works perfectly with his lasts, creating a very well balanced, properly proportioned boot that looks just as good sitting on a shelf as it does on foot.
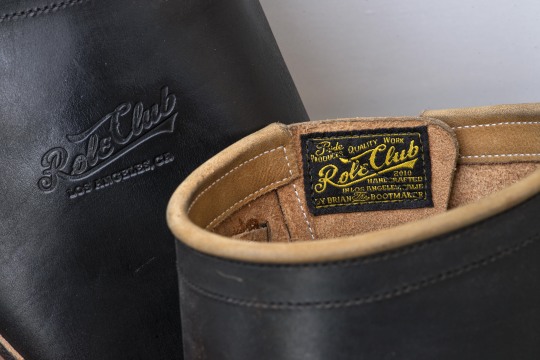
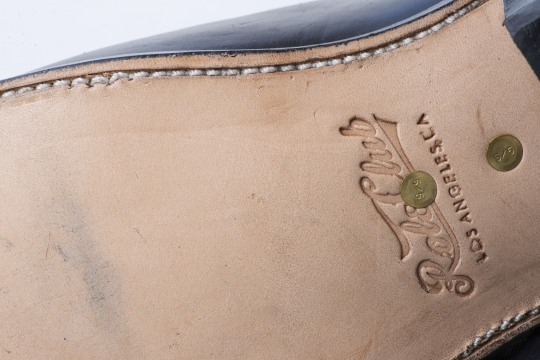
To my understanding, all of the boots in the Role Club Collection are branded with the same two markings: an embossed logo on the left boot and a sewn-on tag on the right.

The back stay is simple and clean. No extravagant stitch patterns or anything, just very clean, vertical lines. Nice, conservative, elegant. I like it.
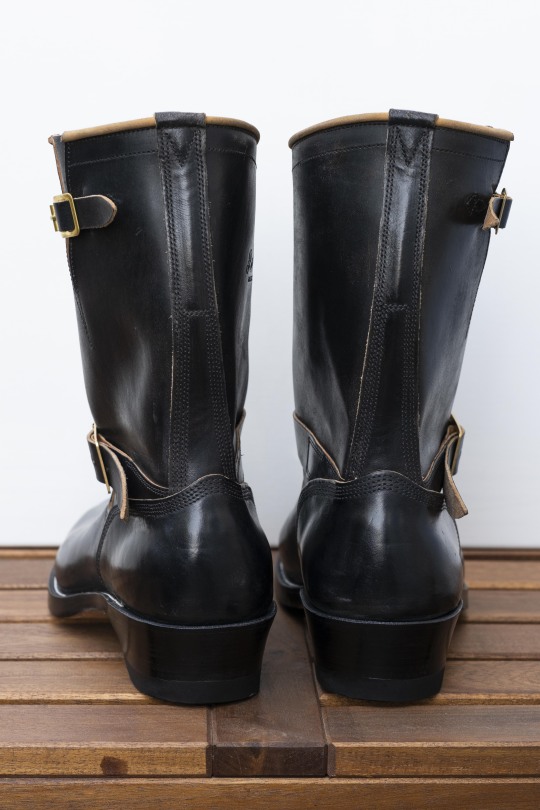

I think of all the engineer boots I’ve seen on Instagram, the buckles Brian uses are some of my favorite. Flat, rectangular, roller buckles. Again, nothing gaudy. Some other brands choose to use more elaborate, bulbous buckles on their engineer boots, which kinda just look out of place. Maybe they’re too eye-catching, making it seem like they’re trying too hard. In contrast, Brian’s simple flat buckles are clean and minimal, allowing the pattern and construction quality of the boots speak for themselves. Less is more.


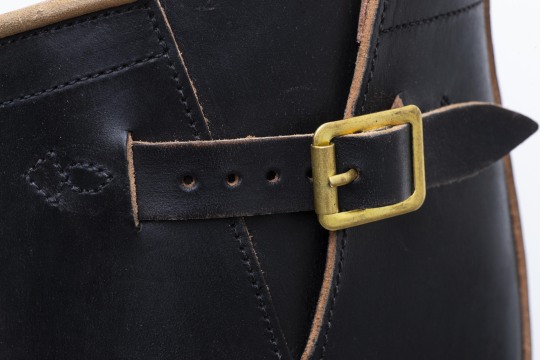
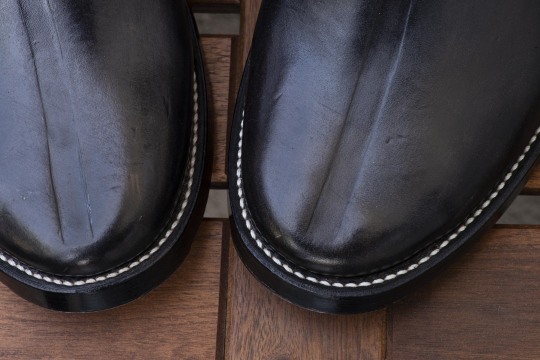
In general, I tend to like the look of 3-4 rows of stitching as opposed to just two. It just looks more substantial and sturdy. (Does it actually increase the quality or longevity of the boot? Probably not. I just like how it looks.) Also, can we take a moment to appreciate just how absolutely pristine this upper stitching is?

Perhaps my preference for 3-4 rows of stitching stems from my appreciation for higher levels of craftsmanship when it comes to boot pattern and construction. Having additional rows of stitching all perfectly spaced and parallel requires a little more attention to detail, and it looks amazing when properly executed.


2, 3, and 4 rows of stitching, all equally dense, evenly spaced, and perfectly parallel. Perfect execution. I haven’t found a single stitch out of place on the uppers of either boot.
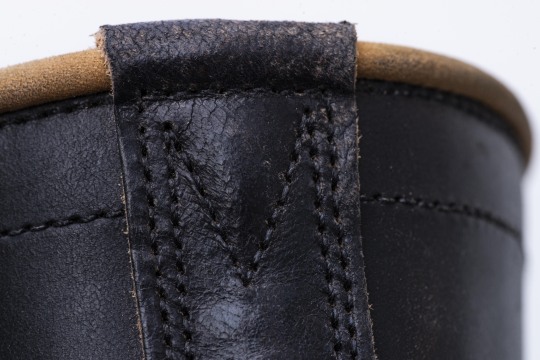
Another little feature I opted to include on my boots were hand-crimped toe tracks running up the vamps of each boot. To be honest, I didn’t know too much about why it’s done or it’s benefits. However, here is an explanation I found on superfuture from Brian himself, posted by @beautiful_FrEaK:
The indentation you see on the boots is called a toe track. The reason a boot has a toe track is because the vamp went through the crimping process. It is used to get all the stretch out of the vamp because when a bootmaker needs to turn something that's 2D into 3D it is more work if the vamp is not crimped. Another benefit when a vamp is crimped is it keeps the vamp smooth without any wrinkles. The crimped vamp sits well on the shoe last.
There are different way to crimp a vamp. For example Buco puts their vamps into a crimp machine. It is a hot blade that folds the vamp in half and indents the leather. I wouldn't mind having a crimp machine (really expensive!) but I use crimp boards at the moment. It is the same process but more hands on. I last the vamp on a piece of board to get all the stretch out and it naturally gets the toe track.
Personally, I mostly chose to have the toe track for esthetic purposes, but understanding the reasoning behind it is pretty cool too.

The Heel
Unlike my Underdog boots, which have a low woodsman heel, I decided to go all out with the full woodsman heel on these engineers. I will admit, walking with such elevated heels will take some getting used to. It also definitely adds to the whole western cowboy boot vibe, but I dig it. Plus, the added lift makes me over 6 feet tall now. Added bonus.

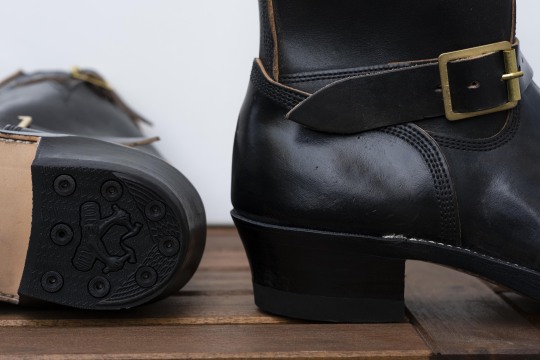
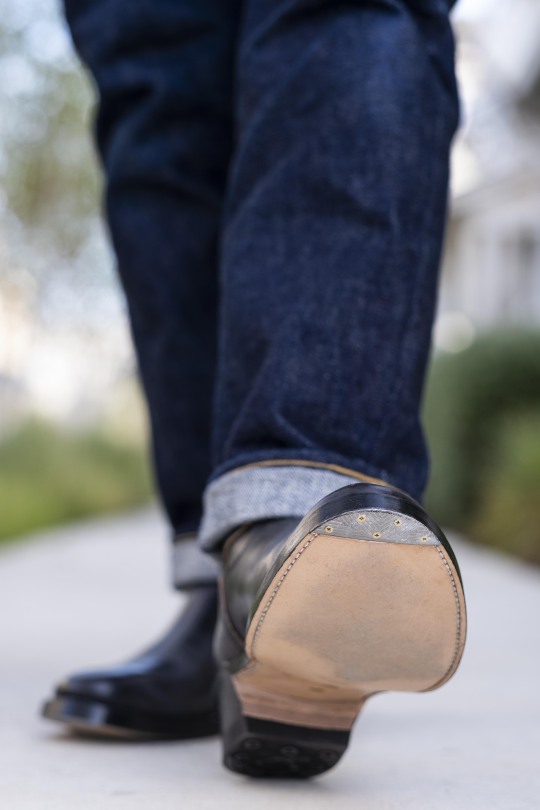
The Sole
This is my first pair of boots with a full leather sole. Felt a bit risky putting it on such an expensive pair of boots, but whatever. They look great on Brian’s pair, so I wasn’t too worried. Plus, I live a pretty sedentary lifestyle in the California Bay Area. I don’t go on many nature hikes, nor does it ever snow here (or rain really, for that matter). Thus, I don’t really have a need for much grip or traction with my footwear.
The sole channel stitching is all pretty clean, minus one little wonky spot on the inside portion of the right boot (pictured above in the top left corner). Not a big deal though, as no one is ever gonna see it.
My biggest concern with full leather soles was the reduced durability/longevity from walking on concrete, specifically at the toe. To combat this, I asked Brian to add metal toe plates to my boots to prevent premature wear at the toe. Crisis averted.

Here’s a close up of one of the toe plates, cut into the leather sole as to be nice and flush. Apparently these had to be custom ordered to accommodate for the width of my foot, adding 4-5 months to my wait time. Meh. Worth the wait in my opinion, if it meant getting it done right.
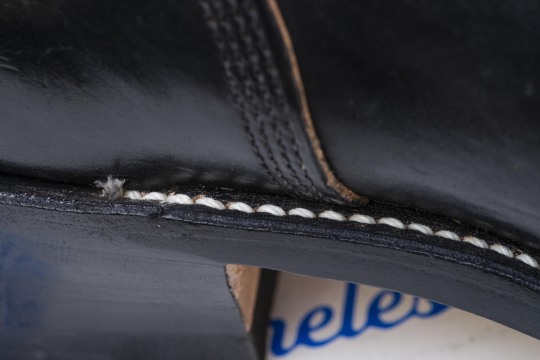
The Welt Stitching
Similar to my Underdogs, the welt stitching on these engineers is all very clean and consistent. If I were to point out anything, it’d be that a little bit of black edge dye got on the white stitching in some areas, and there’s a small tuft of loose thread ends popping out on the inside of the left boot. However, if these are the biggest errors I could find on the whole boot, I think that’s pretty amazing.


If you look closely, you can see the spots where some of the black edge coat got onto the white welt stitching. Not the cleanest, but doesn’t bother me too much.
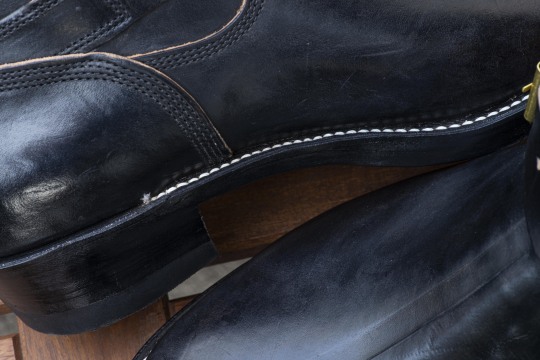
Here’s the small tuft of loose threads at the end of one of the 270 degree welt stitches. Again, very minor, and won’t keep me up at night.
Try On & Initial Thoughts

Being completely honest, I’m actually still blown away at how amazing these boots feel on foot. I can really tell that these boots were made to measure. I shouldn’t be surprised though, as the Underdogs Brian made for me last year fit amazingly. Although, being lace-up boots that can by cinched down with laces, they naturally are less prone to fit errors such as heel slip. Engineers, by comparison, are much more difficult to fit properly, but Brian did so masterfully.
First of all, right out of the box I actually had very little trouble getting the boots on and off. I feel like this is often the biggest struggle in breaking in a new pair of engineer boots, but not this time. Sliding my foot down the shaft felt appropriately snug, until my heel snapped past the “pass line” and sucked down into the heel cup. (I actually didn’t even need to unbuckle the strap to get them on, which was double surprising.)

Once fully seated, I could feel the built-in leather-lined orthotics beneath my feet, and the adjusted width of the 2307 last comfortably fit my bunions. What I’m most shocked by is how little heel slip I have in either boot. Until now, I had just assumed that heel slip was to be expected with all engineer boots, and only with break in and wear would that slip maybe go away. Apparently I was wrong, as these engineers already exhibit less heel slip than some of my other boots and derbies.
In designing these engineers, I chose to try out a couple things for the first time: first full leather soles, and first full woodsman heels. I know it’s still early, but I’m already loving the full leather soles. They seem to breathe much more than half and full rubber soles, and they flex and move much more naturally with the movements of my feet. I feel as though I can “feel the ground” better, if that makes sense. I will admit that I can definitely tell these leather soles have significantly less traction than rubber/cork half/full soles. However, I knew that from the get go, so me and my sedentary lifestyle are completely fine with it. I haven’t slipped yet, so it’s all good. Second, the full woodsman heels on these engineers are by far the tallest heels of any boot I own, yet once on foot, I can barely even tell the difference. Even with the steep drop off from the full woodsman heel to the leather sole, walking felt completely natural.

The last thing I’d like to note is how nicely the Italian horsebutt is breaking in. I know it’s still early, but so far all the leather on the vamps and shafts seem to be nice and tight with very little grain break or creasing. Loose grain and unsightly creasing are definitely some of my biggest pet peeves when it comes to boots, so props to Brian on absolutely killing it on the clicking. (At least so far.) I can’t wait to see how this leather continues to break in, and for the black hand-paint to chip away to reveal that beautiful brown horsebutt underneath.
If I had to pick out one spot that may require a little extra break-in, it would be the top rim around the shafts of the boot. They bounce around while I walk, knocking and banging into my shins. I expect this is probably true for most engineer boots, but hopefully this break-in period doesn’t take too long, cuz it doesn’t feel great. Until then, maybe I’ll just have to rock some longer tube socks as shin padding.
(Note: I do my best to remain impartial and objective in all of my reviews. That being said, it was difficult not to sound like some fanboy trying to sell you on a pair of Role Clubs, but this really my honest opinion. I really just love these boots. Lol)
Conclusion
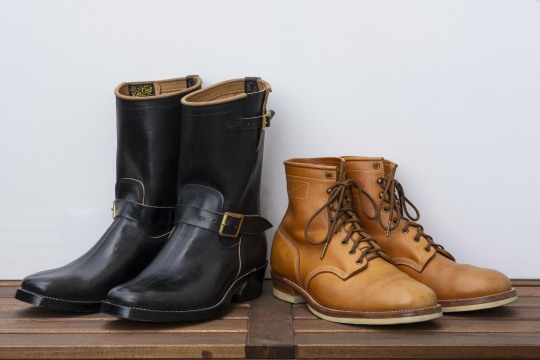
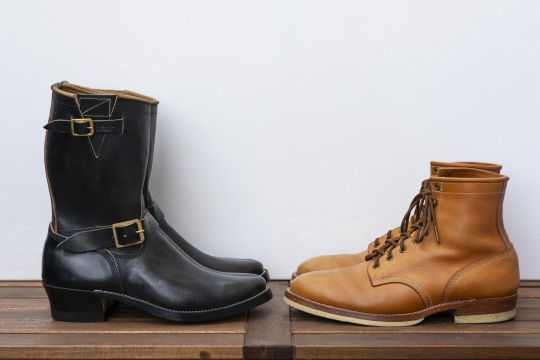
If you couldn’t tell already, I’m absolutely through the roof with regards to these new engineers. The construction quality and level of finishing are pristine, and the comfort and fit out of the box is surprisingly on point. In my opinion, I think Brian and Clinch design two of the most beautiful engineer boots (on Instagram, at least), yet at the same time they exhibit two totally different vibes. Brian’s engineers draw from more rugged, western, cowboy influences, while Clinch engineers are a bit more refined, fitting very nicely within the whole Japanese workwear esthetic. Both styles are very cool, with some of the highest quality construction available.
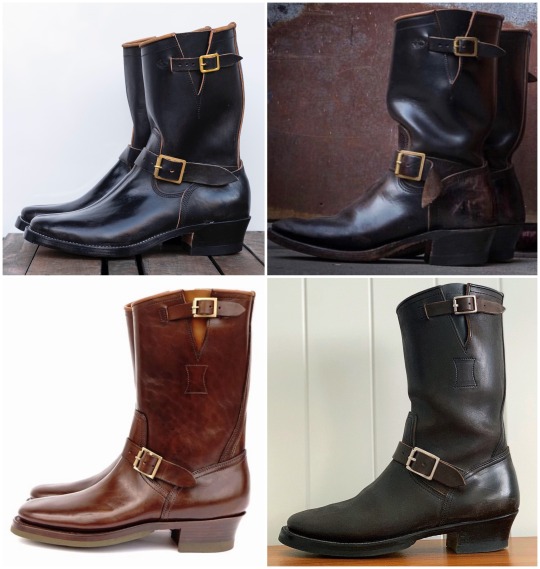
A comparison of Role Club (top) and Clinch (bottom) engineers, both new and worn. (Photo credit: top left: me, top right: @brianthebootmaker, bottom left: @bsw_keisuke, bottom right: @partial2vintage.)
While I’ve barely owned these for a week, and already I can confidently say that these are one of my favorite pairs in my collection. With such a beautiful pattern and solid construction, I could pick them up and stare at them all day. Also, not gonna lie, the fact that Role Clubs are so difficult to come by these days does make me feel even cooler for owning a pair. Haha
Anyway, I’ll try to write a follow up review once these are more broken in. Until then, you can follow along my journey breaking in these engineers through my instagram (@thedenimdentist). Ttfn!
5 notes
·
View notes
Text
I read a quote somewhere – don’t say you’re jealous of someone else. Because if you really were, and if you really wanted to do that thing, you’d be doing it. When the exchange talks started up, I almost convinced myself not to go. I told myself I didn’t have the money. But in a moment of clarity, a million different cliches and sayings flashed through my head:
“If not now, then when. If not you, then who?”
“When you pursue your treasure, the whole universe conspires to help you achieve your dream.”
“You can’t take any of it [money] with you when you die.”
And even
“We fought for these ideals we shouldn’t settle for less.”

Do not dream your life, but live your dreams
Now while the way I chose to interpret these quotes may not line up with the original meanings, they still came together with one conclusion: I had to go. There was no point in hoarding my savings for some far-distant future. Paolo Coelho claims in The Alchemist that if you are in pursuit of your dreams, the universe will make them happen. Yet the logical, rational part of my brain screamed: STUDENT LOANS!!! STUDENT LIFE!! What’s more, I knew how deeply I loved my friends and my community at McMaster. I had seen other people struggle to find a job and pay off their loans after graduation. But I also knew that if I chose to stay, then every year after it would be harder and harder to go. I watched for signs from the universe. They came. I would read a book and a character would end up in Paris. Camino de Santiago came up many times in a few weeks. Ed Sheeran, for God’s sake, released a song called Barcelona. A friend offered an opportunity to work in Israel. The universe was conspiring, and I would have been a fool to ignore it. So I set off. Camino had been on my bucket list for a long time, as well as seeing Paris, and the Sagrada Familia, and Parc Guell. Israel, the Holy Land, had special importance to me as a Catholic, and when the opportunity arose to go, I took it. For this first leg of my trip, I allowed myself to be a little – not unwise, but unstructured. I basically hopped from place to place across the continent, before flying to New Zealand.
Pictured Above: 3 months in 6 pictures – France, Spain and Israel
I chose New Zealand for many reasons. I knew I wanted to really immerse myself in outdoorsy adventures and activities, and become more savvy about camping and outdoor sports, and that there were few better places to do it. I knew I had family in Auckland which would hopefully make the transition easier. The language and culture are similar enough to Canada that I hoped culture shock wouldn’t be too great. The language being the same meant greater range of options for picking courses. As someone passionate about indigenous rights, I was keen to take Māori Studies courses and learn about a culture and body of knowledge that I would never normally get to study. I also had a couple friends in NZ (Hi Courtney! Hi Jordan!) and since meeting them at a conference two years earlier I had talked about going on exchange to NZ and seeing them again. So really, everything just made sense to come here. The universe was conspiring. It just felt like the right step. So I took it, and I’ll always be grateful that I did.
This slideshow requires JavaScript.
Currently, I’m spending a month and a half of Southern Hemisphere summer in Australia. The original plan was a three week trip, but the longer you’re here the more you realize you could spend a year travelling all over the place and still never be done! I decided to come since I was closer to Oz than I’d ever been, and its been one of the best trips of my life. I planned my destinations and travel by stalking travel blogs and googling variations of “What to do East Coast Australia” about a billion times. I’m generally too cheap to buy travel books when I can use Google and talk to locals, but I’m thinking of investing in some for Asia just because of the limited time I have there. Since arriving, I got a job with Georgie’s Getaway after traveling with Georgie herself. This incredibly hard-working, compassionate lady brought me up the East Coast and along the way welcomed me onto her team. Working in travel has always been my dream, and I am so happy that she has given me this chance to achieve it.
This slideshow requires JavaScript.
Moving forward, I’m trying to travel more intelligently in regards to country, by traveling to places that I will be passing through anyways due to layovers. This summer (June – Aug) I’m flying to Malaysia and out of Vietnam. That’s basically all I have planned for two months. There’s a dive course and a hotel that I’d like to do, but beyond place markers like that, the two months are a blank slate to go with the flow. It’s easy to do this kind of thing when you’re travelling alone and decisions are your own; when you are constantly meeting other travellers and making friends as you go; and with the knowledge that through technology you are never really alone. Working with Georgie means I always have a travel advisor a Facebook message away. And what’s more, every country/area has backpacker, Rideshare, road trip, and travel groups on Facebook that are easy to join and use to meet up with new people. This is something I highly recommend doing – trust strangers (see Chapter 2)! Remember, every friend you have was once a stranger.
After Asia, I fly to Vancouver, which again is on my way home. I ended up messing up and booking a flight based on price in USD, but it’s the kind of mistake you need to make once to ensure you never make it again. For this Great Canadian road trip, I’m renting a car with a few friends if possible, and if not, I’ll hitch my way back. And from there, I will be using YYZ Travel, and Scott’s Cheap Flights to find cheap flights all over the world, along with research of the tours GG offers to make sure it’s affordable. I’m not too picky about where to go, because really I want to go everywhere. I definitely have vague plans of where I want to go after graduation, but with that time still a year and a half away those plans are definitely subject to change. One of my loose rules is however to see as many new places as possible before returning to old haunts. The world is so vast, and there is still so much to see; I just want to keep moving forward and falling in love with new and interesting places over and over again. It makes me feel connected and rooted to the Earth as a whole when I feel a sense of belonging in strange and varied places. Above all, it makes me feel alive and untethered, free and connected, all at once. So always, I say, Onwards and Upwards! Excelsior!

Golden Hour in Paradise
Chapter 3: Excelsior I read a quote somewhere – don’t say you're jealous of someone else. Because if you really were, and if you really wanted to do that thing, you’d be doing it.
0 notes
Last Seen Blogs

fit-to-be-tied-xo
Yeap

discothemechanic
Dom's wife :3

littlebyrd13
Little Byrd

wardog-of-the-endless
~Guardian of The Dreaming~

the-final-disciple
Burnish