#android-x86-8.1-r3.iso
Explore tagged Tumblr posts
Visit Tumblr Blog
Explore Tumblr blogs with no restrictions, modern design and the best experience.
Last Seen Tumblr Blogs


Fun Fact
Tumblr has a low social media market share in South America.
Text
Instalar Android en Ubuntu y derivados
Instalar Android en Ubuntu y derivados. Es indiscutible que Android, es el sistema operativo más utilizado en smartphones y otros dispositivos inteligentes. Incluso más extendido que el iOS de los iPhone. La evolución de Android es constante, e incluso muchos desarrolladores tratan de incrustarlo en sistemas de tipo PC (personal computer). La versión open source de Android, se puede instalar en máquinas con linux (como sistema operativo base), y aunque es posible que suceda algún error imprevisto vamos por buen camino. En este artículo, vemos cómo instalar el sistema operativo Android-x86 en Ubuntu, Linux Mint o cualquier derivado. Antes de comenzar necesitamos un par de cosas que detallamos a continuación. Android-x86 - Por su estabilidad y ligereza nosotros elegimos Android 8.1 en su versión de 32bits. La descargamos: android-x86-8.1-r3.iso. Para otras versiones o arquitecturas visita su zona de descargas oficial. Grub Customizer - Esta aplicación nos permite configurar el sistema operativo predeterminado, agregar o eliminar entradas de inicio, de forma sencilla. Si no recuerdas como se instala, revisa este articulo.
Instalar Android en Ubuntu y derivados
Ahora debemos crear una carpeta en la raiz del sistema para alojar Android, en nuestro ejemplo la llamaremos "android81". Abrimos Thunar con permisos. sudo thunar Crea el nuevo directorio.
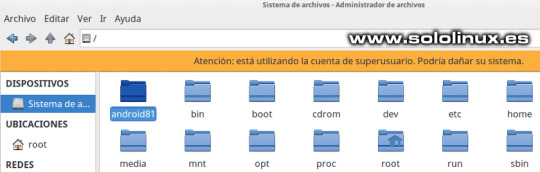
Crear la carpeta android81 Abrimos la carpeta android81, pegamos la iso de Android que descargamos anteriormente (/android81/). Sobre la iso, pulsa el botón derecho del ratón y descomprime la imagen, al concluir puedes borrar la iso. En el mismo directorio (android81), creamos otra carpeta llamada "data". Cierra Thunar. Ya casi tenemos preparado nuestro sistema Android, solo nos falta crear una nueva entrada en el Grub. Abrimos la herramienta Grub Customizer, y pulsamos en crear nuevo archivo de entrada.

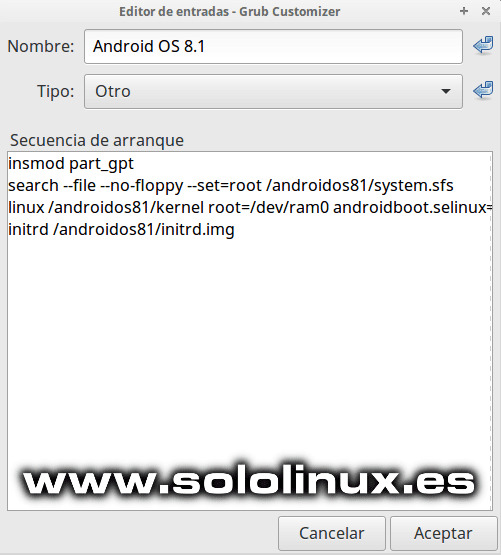
Crear entrada en Grub Customizer Rellenamos los datos (si has descargado otra versión, debes modificar los valores o rutas que correspondan): Nombre - En nuestro ejemplo Android OS 8.1 Tipo - Nos aparecen varias alternativas, debes seleccionar Otro Secuencia de arranque - Insertamos el siguiente script... insmod part_gpt search --file --no-floppy --set=root /androidos81/system.sfs linux /androidos81/kernel root=/dev/ram0 androidboot.selinux=permissive buildvariant=userdebug SRC=/androidos81 initrd /androidos81/initrd.img
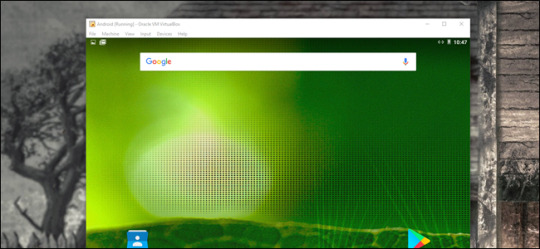
Datos de nueva entrada en Grub Customizer Para terminar pulsa en aceptar y guardar menú. Reinicias tu sistema y podrás ver la opción de iniciar desde Android OS 8.1. Nota final: Como ya dije anteriormente, aún no es un sistema considerado como estable, pero vamos por buen camino. Para desinstalar Android, solo tienes que borrar la entrada de Grup Customizer y el directorio completo android81. Estas instrucciones también son validas en otras distribuciones linux. Suerte. Canales de Telegram: Canal SoloLinux – Canal SoloWordpress Espero que este articulo te sea de utilidad, puedes ayudarnos a mantener el servidor con una donación (paypal), o también colaborar con el simple gesto de compartir nuestros artículos en tu sitio web, blog, foro o redes sociales. Read the full article
#Android8.1#AndroidenUbuntu#Android-x86#android-x86-8.1-r3.iso#android81#GrubCustomizer#InstalarAndroid#ios#nuevaentradaenelGrub#sistemaAndroid
0 notes
Text
Android Virtual Machine For Mac

After providing ‘android-x86-4.2-20130228.iso‘ file to the virtual machine, the installation of Android-x86 will begin. When this window appears, using the arrow keys, go all the way down to ‘ Installation ‘ and press the Enter key on your keyboard. Jan 13, 2021 Here are the best virtual machine apps for Mac. VirtualBox is a free and open source virtual machine software from Oracle. It’s designed with developers and IT professionals in mind, so VirtualBox provides you with a great deal of control over your virtual environments. VirtualBox supports a great number of guest operating.
To install and experience the Android x86 on PC you nee two things VirtualBox or Vmware software and Android x86 ISO image or Android x86 VM image.
Android, the most popular operating system, now not only just limited to your smartphones. If you have the curiosity to use it on your personal computer (PC) then you can do it. Now, the users those have a spare machine to test the Android operating system on PC can use the Android ISO image. You just need to make a bootable USB drive using the downloaded ISO images of Android 7.0, 8.0, 9.0 or whatever the version you want. However, if you don’t have the extra system to test the Android then another option which available is Virtualization. The most popular Virtualization software are VirtualBox and Vmware. The VirtualBox is an open source tool and available for Linux, Windows, and Mac. While the other one Vmware is also available for the OS mentioned but it is proprietary software.
To connect to the Android Emulator running on a Mac from a Windows virtual machine, use the following steps: Note We recommend using an Android Emulator that does not include the Google Play Store. Therefore, if you want to install a third-party app or APK file in your existing virtual machine, here is what you need to do. As Android Studio is available for Windows, Mac, and Linux, you can execute this trick on all those platforms. How To Install APK On Emulator In Android Studio.
You can either use the Android ISO image to install the Android OS on VirtualBox / VMware or simply download the pre-configured Android x86 Virtual machine image (VM). The benefit of using Virtual Image is, you don’t need to configure storage, Ram, other hardware configuration for the OS on Virtualization software. Just download the Android VM image and it simply boots as a preinstalled machine. It saves a lot of time.
Using Android on the Mac is simple. Clicking into the Android window will let you control the Virtual Machine using the keyboard and mouse and the back, menu, and home buttons are available for use from the bottom of the screen. To exit the VM and use your keyboard and mouse to control the Mac, tap the left Command key on the Mac's keyboard.
An easy yet detailed tutorial showing you how to effectively install Android as a virtual machine on your Mac with the help of VirtualBox. This is an updated.
Prerequisites to install Android x86
To install and experience the Android on PC you nee two things VirtualBox or Vmware software and Android x86 ISO image or Android x86 VM image. Here in this tutorial, we are going to use the VirtualBox and to save time and make it easy to install the Android on PC, the Android x86 VM image.
Here are the Links to download the above-mentioned prerequisites software.
VirtualBox: Link
Android X86 VM image: Link( VM image available while writing the article are: Android-x86 8.1-RC2 Oreo, Nougat, Marshmallow (R3), 5.1 (RC1), Android x86 4.4 r1 and more)
Android x86 ISO image: Link(For those don’t want to use the Andriod VM image)

Install Android OS on VirtualBox and VMware
Note: It doesn’t matter which operating system you are using it could be Linux, Windows or Mac because the process of working with Virtual or Vmware is the same for all of them. While writing article Android OReo was the latest build.
Step 1: Download VirtualBox or VMware player
First of all, download and install the VirtualBox on your PC machine ( Linux, Windows or Mac). Battlevoid: sector siege ost download for mac.
Step 2: Get Android Oreo OS VM image
After the installation of the Virtualbox, you need to download the VM image from the link given above given in this article. On the website, you will find two images one is for VirtualBox and other is meant for Vmware. According to your software select that. As we are using the VirtualBox, so we downloaded the VirtualBox image. While writing this the article the latest Android VM image available on the website was Android-x86 8.1-RC1 Oreo.
Step 3: Extract Android X86 VM image file
The downloaded the Android X86 VM image file will be in a 7z archive format. After downloading you need to extract the Android VM image from using the normal Winrar or 7zip or any other archive/ compression software.
Step 4: Run the VirtualBox.
Click on the NEW button from the VirtualBox menu.
Give some name to your Android virtual machine, like we have given Android test H2s.
From Type’s drop-down select the Other and Version = other/unknown.
Select the size of memory you want to provide your operating system. We have assigned 2GB for fluid functions.
From the Hard disk section, select the option- Use an existing virtual hard disk file.
Click on the Folder icon.
Step 5: Select the extracted Android X86 VDI image which you downloaded above.
Step 6: Click on the Create button.
Step 7: Select the created Android x86 Virtual machine from the left panel of VirtualBox.
Step 8: Now Click on the START button given on the VirtualBox menu.
Step 9: The Android Virtual Machine will start.
Step 10: Select the normal mode- Android X86 8.1-rc1
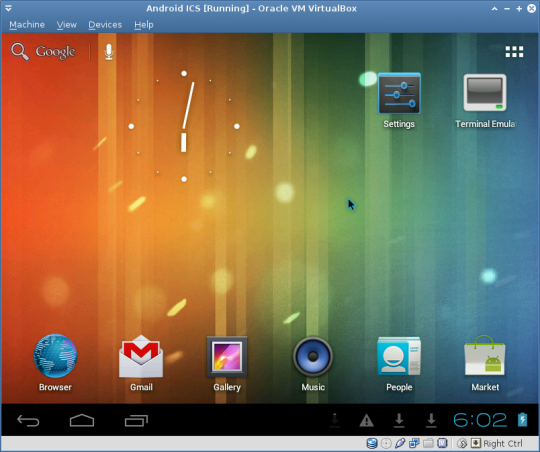
Step 11: Android x86 is installed
The OS has been installed and it will boot to provide you with a familiar screen like your smartphone.
We tried to install the PUBG on the Android x86 Virtual Machine on Linux PC and it worked…
Android Virtual Machine For Mac Download
Virtual Machine Download Free
Android Virtual Machine For Mac To Run Windows
Other Useful Resources:
Best Virtual Machine For Mac
0 notes
Text
Virtualbox Android For Mac

Disable Mouse Integration for VirtualBox: Run virtual machine go to menu Machine Disable Mouse Integration or simply press Right CTRL + i to enable/disable mouse integration. Fix Blankscreen issue: Go to Settings Display Sleep Select “ Never time out ”. ARChon is a little different than most of our emulators for Mac in that this one is actually a. It is a free and powerful x86 and AMD64/Intel64 virtualization product available for most of the operating systems such as Linux, Microsoft Windows, Mac OS X, Solaris and ported version for FreeBSD. Read wiki about VirtualBox. You can follow our blog for new images we release for VirtualBox. VirtualBox is a powerful x86 and AMD64/Intel64 virtualization product for enterprise as. VirtualBox for Mac is a virtualization tool that allows you to create virtual machines for Mac OS X, Linux, or Windows running on Mac OS X. VirtualBox for Mac is not available from the App Store.
Free Virtualbox For Mac
Android Virtualbox Mac Os X
Virtualbox Android For Mac
пятница 25 января admin 54
The graphics performance issue is shared, at least so far, by all virtualization apps. The problem is caused by the virtualized operating system not having direct access to the Mac's underlying graphics system. To get around this issue, virtualization apps, including Parallels, create a virtualized graphics system that Windows and other virtualized OSes can make use of. Mac os sierra iso download for virtualbox. The virtualized graphics system translates the graphics calls into calls to Apple's core graphics services.
When you install Andy on a Mac, it installs VirtualBox for you. It also offers to install Advanced Mac Cleaner and make Yahoo! Your default search engine. Andy runs an x86 version of Android, and it seems to run apps correctly. It’s not particularly fast on my 2.0 GHz Core 2 Duo MacBook, but an adequate performer on the 3.06 i3-based iMac.
This extra software layer adds a hefty penalty in graphics performance, especially when compared to native performance.

To install and experience the Android x86 on PC you nee two things VirtualBox or Vmware software and Android x86 ISO image or Android x86 VM image.
Android, the most popular operating system, now not only just limited to your smartphones. If you have the curiosity to use it on your personal computer (PC) then you can do it. Now, the users those have a spare machine to test the Android operating system on PC can use the Android ISO image. You just need to make a bootable USB drive using the downloaded ISO images of Android 7.0, 8.0, 9.0 or whatever the version you want. However, if you don’t have the extra system to test the Android then another option which available is Virtualization. The most popular Virtualization software are VirtualBox and Vmware. The VirtualBox is an open source tool and available for Linux, Windows, and Mac. While the other one Vmware is also available for the OS mentioned but it is proprietary software.
You can either use the Android ISO image to install the Android OS on VirtualBox / VMware or simply download the pre-configured Android x86 Virtual machine image (VM). The benefit of using Virtual Image is, you don’t need to configure storage, Ram, other hardware configuration for the OS on Virtualization software. Just download the Android VM image and it simply boots as a preinstalled machine. It saves a lot of time.
Prerequisites to install Android x86
Free Virtualbox For Mac
To install and experience the Android on PC you nee two things VirtualBox or Vmware software and Android x86 ISO image or Android x86 VM image. Here in this tutorial, we are going to use the VirtualBox and to save time and make it easy to install the Android on PC, the Android x86 VM image.
Here are the Links to download the above-mentioned prerequisites software.
VirtualBox: Link
Android X86 VM image: Link( VM image available while writing the article are: Android-x86 8.1-RC2 Oreo, Nougat, Marshmallow (R3), 5.1 (RC1), Android x86 4.4 r1 and more)
Android x86 ISO image: Link(For those don’t want to use the Andriod VM image)
Install Android OS on VirtualBox and VMware
Install Android OS on VirtualBox and VMware
Note: It doesn’t matter which operating system you are using it could be Linux, Windows or Mac because the process of working with Virtual or Vmware is the same for all of them. While writing article Android OReo was the latest build.
Step 1: Download VirtualBox or VMware player
First of all, download and install the VirtualBox on your PC machine ( Linux, Windows or Mac).
Step 2: Get Android Oreo OS VM image
After the installation of the Virtualbox, you need to download the VM image from the link given above given in this article. On the website, you will find two images one is for VirtualBox and other is meant for Vmware. According to your software select that. As we are using the VirtualBox, so we downloaded the VirtualBox image. While writing this the article the latest Android VM image available on the website was Android-x86 8.1-RC1 Oreo.
Step 3: Extract Android X86 VM image file
The downloaded the Android X86 VM image file will be in a 7z archive format. After downloading you need to extract the Android VM image from using the normal Winrar or 7zip or any other archive/ compression software.
Step 4: Run the VirtualBox.
Click on the NEW button from the VirtualBox menu.
Give some name to your Android virtual machine, like we have given Android test H2s.
From Type’s drop-down select the Other and Version = other/unknown.
Select the size of memory you want to provide your operating system. We have assigned 2GB for fluid functions.
From the Hard disk section, select the option- Use an existing virtual hard disk file.
Click on the Folder icon.
Step 5: Select the extracted Android X86 VDI image which you downloaded above.
Step 6: Click on the Create button.
Step 7: Select the created Android x86 Virtual machine from the left panel of VirtualBox.
Step 8: Now Click on the START button given on the VirtualBox menu.

Android Virtualbox Mac Os X
Step 9: The Android Virtual Machine will start.
Step 10: Select the normal mode- Android X86 8.1-rc1
Step 11: Android x86 is installed
The OS has been installed and it will boot to provide you with a familiar screen like your smartphone.

We tried to install the PUBG on the Android x86 Virtual Machine on Linux PC and it worked…
Other Useful Resources:
0 notes