#anemoneisle
Photo


❂❁ picked up the game again after seeing the pumpkin news. dream address here i come!!!!
#mine#anemoneisland#anemoneisle#tt#acnh spoilers#acnh#animal crossing#animal crossing new horizons#new horizons#ac photo#acnh fall#ac gif
1K notes
·
View notes
Photo


day one! still futzing around with how i want my villager to look, but i’m loving the camera functionality and the filters.... it’s so cute!!!!!!!! also, i LOVE how the regular trees look in this game-- it’s never felt so much like an actual forrest! natural towns are going to be so gorgeous in this game :’)
1 note
·
View note
Photo


❂❀✲ workin’ on paths! i’m really liking how lining them with two rows of flowers and then putting a fence behind everything makes them feel super wide and luxurious :)
#anemoneisle#mine#acnh#animal crossing#new horizons#animal crossing new horizons#ac new horizons#ac#ac inspo
2K notes
·
View notes
Photo


❂❀✲ a day’s progress in anemone... testing out how i want paths to look! only have wind/hyacinth/tulips/some pansies, so options are limited, but i like what i came up with B-)
#mine#anemoneisland#anemoneisle#tt#acnh spoilers#acnh#animal crossing#animal crossing new horizons#new horizons#ac photo#if u want to let me come to your island and buy seeds. i would be so grateful
2K notes
·
View notes
Photo


❂❀✲ ripped up like... 1/2 of my island and redid the entrance-- luckily i remembered to take a few progress shots! thought it might be a good opportunity to put together a little infographic explaining how i think about my paths! something i didn’t mention in the picture is that i start with the flower ‘motif’ and work from there-- i very rarely have a plan going into any given path. hope this helps!!
also, though this goes w/o saying: the path in this post is functionally 10 tiles wide, which is a big commitment-- start with a big empty space for minimum frustration!!!
#acnh#mine#anemoneisle#acnh tutorial#also i replaced all the blue flowers with purple ones#i don't like the blue very much even though i want tooooo
603 notes
·
View notes
Photo

❂❀✲ actively obsessed with putting weeds on sand. they remind me SO MUCH of every santa cruz beach. anyway here’s marshal’s house!!! ✲❀❂
#anemoneisle#mine#acnh#literally improvised his yard w stuff i already had in my inventory#and now he's a surfer which tbh yeah!!!
200 notes
·
View notes
Photo


❂❀✲ took my mailbox on a walk !!
#mine#anemoneisle#acnh#acnh exterior#acnh landscaping#since ik people read tags sometimes and i dont want to make a whole post abt it:#does someone have a white cypress i could catalog ?!?!? lmk!
103 notes
·
View notes
Photo


made some sweaters :’) MA: 0906-9731-9264
#mine#anemoneisland#anemoneisle#tt#acnh spoilers#acnh#animal crossing#animal crossing new horizons#new horizons#ac photo#ac design
21 notes
·
View notes
Photo

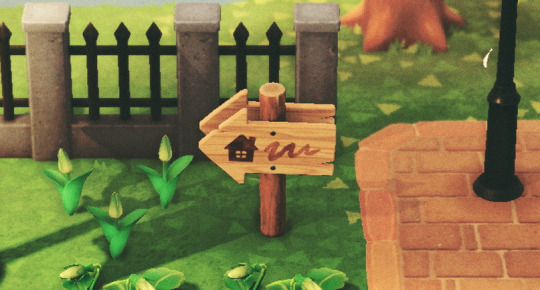

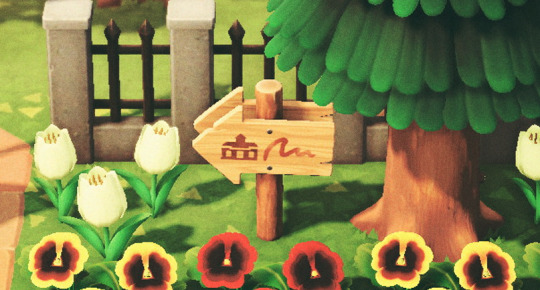
❂❀✲ found the signpost recipe today and immediately crafted 10... if anyone has an extra slanted signpost recipe.... i’ll do anything
103 notes
·
View notes
Photo


❂❀✲ simply taking a leisurely walk through the streets and by-ways
#mine#anemoneisle#acnh#i have no idea how tumblr decides if a gif will upload but whatever they're up now!!!#animal crossing#new horizons#watch out for a few more too :p
66 notes
·
View notes
Photo


❂❀✲ workin on yet another square with yet another fountain ..
52 notes
·
View notes
Photo

❂❀✲ made some street signs and i thought they turned out cute, so here are the codes in case you too want to have your own poppy avenue!! <3
ALSO PLEASE witness the tiger tshirt dress that a balloon gave me
#mine#anemoneisland#anemoneisle#tt#acnh spoilers#acnh#animal crossing#animal crossing new horizons#new horizons#ac photo#how long did it take me to get these to where i liked them? let's.. not talk about it
54 notes
·
View notes
Photo


❂❀✲ flowers have started to spread across anemone~
#mine#acnh#animal crossing#animal crossing new horizons#new horizons#ac photo#anemoneisle#anemoneisland#did a witttttleeee bit of time traveling bc i was excited#ac gif#gif#my gifs#my edits
52 notes
·
View notes
Photo

got a few requests on this post to make a tutorial for how i made my little mosaics, so here it is! it’s pretty simple (and if you have any questions feel free to send me an ask). everything is below the read more to keep dashes neat!
if you don’t want to bother with making your own and want to use mine, all my patterns on this page.
step 1: find your image
this is probably the most annoying part since even very famous mosaics don’t have a good top-down picture easily available on the internet. if you have one specific mosaic you want to convert, i would recommend looking for it’s museum entry or doing a deep google images search. if not, i would recommend just browsing thorough museum materials. i found both my mosaics on the princeton museum website-- the met also has a some good pictures. you want the picture to be as top-down as possible.
for the purposes of this tutorial, let’s say that i’ve chosen the medusa mosaic from my original post.

step 2: make it square
this can be as simple or as complicated as you want. any picture editor will let you crop into a 1:1 ratio, which is the bare minimum for this method. what i did is a little more complicated and will probably get you a neater result-- it does require photoshop, though. (if you want this done to your picture but don’t have photoshop, send me an ask! it’s pretty quick and i’d be happy to do it for you.) if you don’t want to mess with photoshop, skip to step 3-- you could also make your picture square using the tool in step 3, but i recommend using an more precise picture editor than the crop function that’s built in. one step i do in photoshop that you can do with any photo editing app is to increase contrast-- that’s optional, though!
bring the picture into photoshop however you want (i tend to just copy the image into a new file set to clipboard dimensions).

next, using whatever tool you want (i use the rectangular selection tool with shift held down), mark out the perfect square you want the final product to be. make this as close to the original picture as possible. i do this step because mosaics are never perfectly square, but animal crossing patterns are.
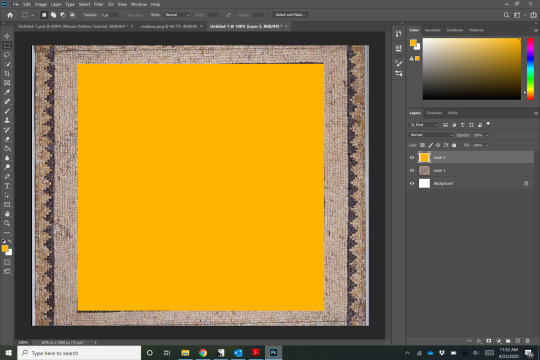
set this square to ~50% opacity so that you can see the original picture underneath.

mess around with the original picture using transform tools to get the border as perfectly lined up with the square you’ve made as possible. to do this, i’ll crop the entire image closer to the square and transform > warp until i’m happy.
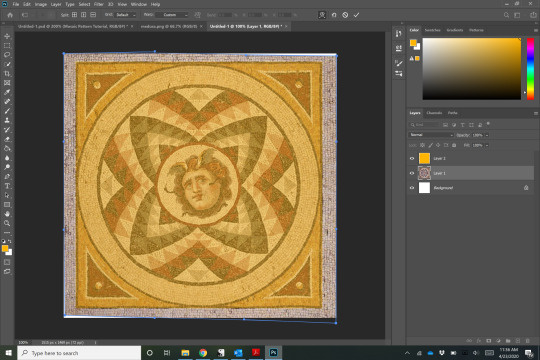
make a selection from the layer with your square (by ctrl clicking the layer thumbnail) and crop the entire image to the square. you can get rid of the square at this point. (if you want to get really crazy, you can clone stamp the borders to make them even sharper.) you should be left with something like this:

you could 100% take this to step 3, but i like to add a few adjustment layers to make it look the best in the game. the main one is bumping the contrast waaay up. you could also bring it into black and white, but the tool we’ll use later can do that automatically too. i prefer black and white because the color range on animal crossing patterns is reeeeaaallyyyy small and the final product will look weird close-up, but that’s just a personal preference.
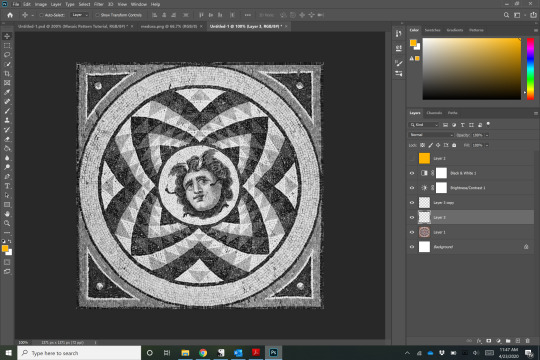
save this as a jpg/png and all the photo editing is done!
step 3: put it through the converter
acpatterns.com has a fantastic converter functionality that can break a picture up into several patterns. the crucial thing here is to set the height/width of the image to however many patterns you want. i’m doing 3x3 because it’s a nice middle between small/undetailed and large/too many patterns.

if you’ve chosen to have color, you can mess around with the color conversion options on the far left to see what you like best. everything else is pretty self-explanatory!

this should be the result:

from here, i download the qrs are a .zip file (the third option) and scan them into the game from there.
that’s it!! the number of pictures might make it seem like this takes a while, but even with all my messing around in photoshop it doesn’t take more than 20 mins. i hope this helped and feel free to leave me an ask with requests/questions!
28 notes
·
View notes
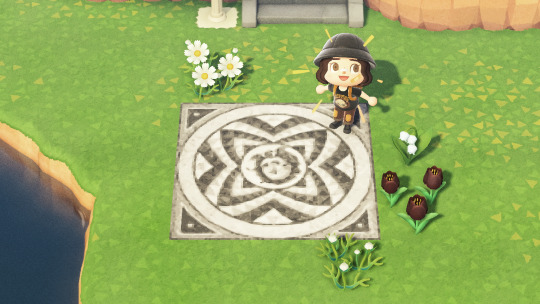
Photo


after much deliberation, i think these will be the mosaics i put in the sculpture garden. (they’re replicas, of course. 2nd century mosaics in the RAIN?!?!?!?!) the first is of komodia, the muse of comedy, glycera (which just means sweet one, idk which glycera this one is), and menander, since i work on greek comedy (link to museum page for it here) and the second is of medusa who i have no particular kinship with, i just think the geometry is incredible (link to museum page for it here)!
i’d be happy to put together a tutorial for people if anyone’d be interested in doing this for mosaics/works of art-- it’s much easier than it looks!
19 notes
·
View notes
Photo

❂❀✲ couldn’t find any flower stall designs that had what i was looking for so i made my own! the main flower design is a modification of this guide from new leaf!
#mine#anemoneisle#the dimensions of this are weird but i don't want to change them#acnh#acnh stall#acnh stalls#acnh stall design#acnh design#also i still haven't had the courage to respond to messages sorry :(
18 notes
·
View notes
Last Seen Blogs

iconshuta
huta icons

fovarudosu
Без названия

modafinilrxonline
Buy Modafinil, Modalert, Waklert Online | Modvigil

drmatchalatte
Aerolla에라

popomerrygamz
Not so secret spriting blog