#angular 4 set default route
Explore tagged Tumblr posts
Visit Tumblr Blog
Explore Tumblr blogs with no restrictions, modern design and the best experience.
Last Seen Tumblr Blogs


Fun Fact
Tumblr posted its first advertisements in May 2012 and subsequently earned $13M in revenue.
Text
How to Learn Angular: A Step-by-Step Guide for Beginners
Angular, a robust and powerful front-end framework developed by Google, is widely used to build dynamic, single-page web applications (SPAs). Whether you're a beginner or an experienced developer, learning Angular can significantly enhance your skill set and boost your career in web development. If you're in Pune and want to excel in this popular technology, enrolling in an Angular course in Pune is a smart move. This guide will walk you through the key steps to effectively learn Angular and become proficient in building high-quality, interactive applications.
Why Learn Angular?
Before diving into the learning process, it's important to understand why Angular is such a popular choice for developers:
Modular Architecture: Angular’s modularity allows developers to break down applications into smaller, manageable parts, making it easier to maintain and scale.
Two-Way Data Binding: With Angular’s two-way data binding, changes made in the model immediately reflect in the view and vice versa, creating seamless real-time updates.
Large Ecosystem: Angular boasts a large ecosystem with a plethora of libraries, extensions, and third-party tools to aid in development.
Cross-Platform: You can use Angular to build web, mobile, and desktop applications, ensuring versatility.
Step-by-Step Guide to Learning Angular
Here’s a structured approach to learning Angular from scratch:
1. Master the Basics of Web Development
Before you start learning Angular, it's important to have a solid understanding of web development fundamentals. Ensure you are comfortable with:
HTML and CSS: The building blocks of web design.
JavaScript: Angular is built on top of JavaScript, so a strong command of JS is essential.
TypeScript: Angular is developed using TypeScript, which is a superset of JavaScript. Understanding TypeScript basics like types, classes, and interfaces will ease your Angular learning journey.
2. Understand Angular’s Core Concepts
Angular has several core concepts that form the foundation of the framework. Begin by familiarizing yourself with the following:
Modules: Angular apps are divided into modules, each responsible for a different part of the application.
Components: Components are the building blocks of Angular applications. They define the view (HTML) and the logic (TypeScript).
Templates: Angular uses templates to define the layout and structure of the application.
Services: Services in Angular provide functionality that can be reused across multiple components.
Dependency Injection: This powerful feature allows for the efficient handling of services and other dependencies.
3. Set Up Your Development Environment
To start coding in Angular, you'll need the right development tools. Here's what you need:
Node.js and npm: Angular requires Node.js to install dependencies and manage packages. Download and install Node.js, which comes with npm (Node Package Manager).
Angular CLI (Command Line Interface): Install the Angular CLI by running the command npm install -g @angular/cli. The CLI simplifies the development process by providing useful commands for creating components, services, and modules.
Text Editor/IDE: Use a text editor like Visual Studio Code or WebStorm for writing and managing your code efficiently.
4. Start with Basic Angular Projects
Once your environment is set up, it's time to create your first Angular project. Use the Angular CLI to generate a new project:
bash
Copy code
ng new my-first-app cd my-first-app ng serve
This command will create a new Angular application and start a development server. Visit http://localhost:4200 to see your project in action. Experiment with the default setup and try making simple modifications to the code to get a feel for how Angular works.
5. Learn Angular Routing
Routing is essential for building single-page applications. Angular’s router enables developers to navigate between different pages without refreshing the entire page. Learn how to:
Define routes in your application.
Set up links between different views.
Use route parameters to pass data between components.
6. Build Interactive User Interfaces
Angular provides several tools to build dynamic and responsive UIs. Focus on these key areas:
Forms: Learn how to create both template-driven and reactive forms to handle user inputs.
Directives: Directives like *ngIf, *ngFor, and ngClass allow you to manipulate the DOM dynamically.
Two-Way Data Binding: This core Angular feature synchronizes data between the view and the model in real-time.
7. Explore Angular Services and Dependency Injection
To build scalable applications, you'll need to understand services and how Angular implements Dependency Injection (DI). Services allow you to share logic across components, while DI provides a clean way to manage those services without manual instantiation.
8. Work with APIs and HTTP Requests
Most modern web applications require communication with back-end servers. Angular’s HTTP client allows developers to make API calls to retrieve or send data. Learn how to:
Use HttpClientModule to handle API requests.
Implement GET, POST, PUT, and DELETE methods.
Handle responses and errors using RxJS observables.
9. Testing in Angular
Angular provides built-in tools for testing components and services. Learn how to write unit tests with Karma and Jasmine to ensure your code is robust and bug-free.
10. Create a Real-World Application
Once you’ve grasped the basics, build a full-fledged real-world application. This could be anything from a simple to-do list app to a more complex e-commerce site. This hands-on project will reinforce your learning and help you apply theoretical concepts in a practical scenario.
Recommended Resources for Learning Angular
Official Angular Documentation: The Angular Docs provide a detailed explanation of every aspect of the framework.
YouTube Tutorials: Channels like Academind, Traversy Media, and Programming with Mosh offer comprehensive video tutorials.
Courses on Platforms Like Udemy, Coursera, and Pluralsight: Many of these platforms offer structured Angular courses with hands-on projects.
Angular GitHub Repositories: Check out open-source Angular projects on GitHub to learn best practices and see how experienced developers structure their applications.
Conclusion
Learning Angular can seem intimidating at first, but with a structured approach, you can master it in no time. Start by understanding the basics of web development, then dive into Angular’s core concepts like components, services, and routing. Practice by building small projects, and gradually move on to more complex applications.
By following the steps in this guide and staying committed, you'll become proficient in Angular and be well on your way to building dynamic, scalable web applications. Whether you’re aiming for a career in front-end development or want to expand your full-stack skills, Angular is a valuable tool to have in your developer toolkit.
Ready to take your Angular skills to the next level? If you're based in Pune, consider joining ITView’s Angular course in Pune to get hands-on training from industry experts. Our comprehensive curriculum covers everything from Angular fundamentals to advanced concepts, ensuring you're ready for real-world projects. Enroll today and fast-track your career in web development!
0 notes
Text
Kickstart Your Journey with Angular 18 and ASP.NET 8.0 Free Coupon
The ever-evolving world of web development demands continuous learning and adaptation. If you're looking to build modern, dynamic web applications, mastering a powerful front-end framework like Angular 18 in tandem with a robust back-end solution like ASP.NET 8.0 is a strategic move. This combination equips you with the tools to create seamless user experiences and high-performing applications.
Web Development Careers: Unveiling the Path to Success
This article serves as your comprehensive guide to kickstarting your journey with Angular 18 and ASP.NET 8.0. We'll delve into these technologies, explore their valuable features, and guide you through the learning process with a special bonus - a free coupon for a comprehensive Udemy course!
Why Angular 18 and ASP.NET 8.0?
Angular 18:
Modern Framework: Built with TypeScript for strong typing and improved developer experience.
Angular 18 New Features: A complete guide for developers - Kellton
Improved Performance: Ivy compiler optimizations for faster build times and smoother app performance.
Enhanced Forms Module: Streamlined form handling and validation for better user interaction.
Strict Mode by Default: Catches potential errors at compile time, promoting cleaner code.
Rich Ecosystem: Extensive library support and a vibrant developer community.
ASP.NET 8.0:
Cross-Platform Development: Build applications for Windows, Linux, and macOS with minimal code changes.
Improved Web API: Enhanced developer experience for creating RESTful APIs.
Enhanced Security: Robust built-in security features to protect your applications.
Cloud-Native Development: Seamless integration with cloud platforms like Azure.
Modern Development Tools: Visual Studio support provides a powerful IDE for development.
Together, Angular 18 and ASP.NET 8.0 offer a compelling combination for building full-fledged web applications.
Learning Path
1. Building a Strong Foundation:
HTML, CSS, and JavaScript: Mastering these fundamentals is crucial for understanding the building blocks of web applications.
TypeScript: Learn this superset of JavaScript for improved code type safety and maintainability.
2. Delving into Angular 18:
Understanding Components: Grasp the core building blocks of Angular applications.
Data Binding and Services: Utilize these techniques to manage data flow efficiently.
Routing and Navigation: Create seamless navigation experiences within your application.
Forms and Validation: Build user-friendly forms with robust validation.
Dependency Injection: Understand this design pattern for cleaner and more maintainable code.
3. Exploring ASP.NET 8.0:
Setting Up the Development Environment: Install the .NET SDK and learn to navigate Visual Studio.
Building Web APIs: Create RESTful APIs using ASP.NET Core MVC for communication between front-end and back-end.
Database Integration: Learn to connect your web APIs to databases for data persistence.
Security Best Practices: Implement authentication and authorization measures to secure your applications.
4. Building an Angular 18 and ASP.NET 8.0 Application:
Project Setup: Create separate projects for the Angular front-end and the ASP.NET back-end.
API Integration: Establish communication between the Angular app and the ASP.NET Web API.
Data Fetching and Display: Fetch data from the API endpoints and display it in the Angular application.
User Management: (Optional) Implement user login and registration functionalities through the API.
Resources and Learning Tools:
Udemy Courses (Free Coupon Included!): Explore a comprehensive Udemy course with video lectures, quizzes, and practical exercises. This article includes a special free coupon to unlock this valuable resource! (Details below)
Official Documentation: Both Angular and ASP.NET provide detailed documentation to guide your learning journey.
Online Tutorials and Blogs: Leverage the vast amount of online resources available for Angular and ASP.NET.
Community Forums: Engage with other developers on forums and communities to ask questions and share knowledge.
Free Udemy Course Coupon!
Get a head start on your Angular 18 and ASP.NET 8.0 journey with a free coupon for a Udemy course! This comprehensive course will equip you with the essential skills to build dynamic web applications.
0 notes
Photo

Angular is open-source JavaScript framework that easy to build applications using HTML, CSS and JavaScript languages. Angular is built and maintained by Google Team.
For learn more at - https://www.javagf.com/
#advanced java tutorial#java tutorial for beginners#learn java#java for beginners#javascript tutorial#java tutorial#java training classes#learn java programming#angular 2 tutorial#angular 4 tutorial#angular 4 set default route
0 notes
Text
Full Stack Developer course

Many of us get into the programming and web development world by knowing only one or two expertise like Java, C++, or JavaScript, but that won't reduce the ice anymore. There had been teams of tens of people doing specialized jobs like entrance-finish improvement is completed by a separate set of developers and back-finish is written by different units of programmers, commonly known as server-aspect builders. They can shortly ship an utility to millions of customers and get immediate suggestions. Developers right now are conscious of the frontend, backend, database, and debugging of internet purposes and are capable of developing both client and server-aspect software.
But now when powered with emerging technologies it is bound to influence Full-stack development. A full-stack developer can oversee the entire application growth lifecycle. They can offer their expertise in front-finish development, back-finish growth, as well as handle diverse knowledge sorts and manage an software efficiently utilizing a database. This full stack developer course is all you have to step into this area and take your career to new heights. Many courses can be found out there for Java full-stack developers, offered both in offline and online mode. However, 360digitmgJava Full Stack Developer course is a comprehensive 6-month course covering all the aspects of Java full stack.
If you have an interest in learning jQuery, then The Complete jQuery Course is a great place to begin with. It's a full-stack framework and contains all the mandatory options by default as a substitute of offering them as separate libraries. With Django, you're going to get authentication, URL routing, template engine, object-relational mapper , and database schema migrations multi function pack.
Angular JavaScript, Bootstrap, SASS, React, Vue, jQuery, and Swift are some frontend frameworks and libraries. Most widespread Front End languages for website development such as HTML, JavaScript or CSS. Tourism is the chief thriving business in Kuala Lumpur, and there are numerous points of interest for vacationers to select from, ranging from conventional to trendy depending on their pursuits. There are temples and mosques which add to the diversity of the town, local markets and street food, and every little thing else you can think about. According to a report revealed by the Market Research Future , the worldwide enterprise software market is anticipated to develop at eight percent CAGR with a worth of US $634 billion by 2023.
Today, a web developer has to wear many hats and play totally different roles of a designer, developer, or a database specialist. Full-stack engineer holds the fifth position on the list of top emerging jobs for 2020 according to a report by LinkedIn. There are a lot of great job boards on the market particularly for full stack development roles, however you can also search general job boards for common full stack developer job titles.
Finding coaching institutes in Kuala Lumpur is step one towards getting an online development certification in Kuala Lumpur. A net improvement course in Kuala Lumpur is on the market by way of particular platforms and institutes. The first step towards the platform's growth is to join it. To ensure that no one is denied entry into this internet improvement certification in Kuala Lumpur for monetary reasons, we offer numerous financing options to assist learners with the charge payment. The financing details could be accessed in the "Admissions Fee and Financing" section of the website. Gain a complete understanding of automation testing and integration with Selenium WebDriver.
Additionally, you get the chance to achieve real-world expertise by way of 4 industry-based mostly capstone tasks. To become a full stack Developer in Kuala Lumpur, you have to have full stack java developer certification in Kuala Lumpur. You ought to be proficient in front-end and back-end languages, like Javascript. A basic understanding of Github, internet architecture, and workflow is required. With the current global market size pegged at USD 1,713.0 million, the software program development trade is predicted to grow at a CAGR of thirteen.3% from 2018 to 2016 and produce 25% extra jobs by 2018.
Explore more on - full stack developer course with placement
https://360digitmg.com/course/certification-program-on-full-stack-web-developer
INNODATATICS SDN BHD (1265527-M)
360DigiTMG - Data Science, IR 4.0, AI, Machine Learning Training in Malaysia
Level 16, 1 Sentral, Jalan Stesen Sentral 5, KL Sentral, 50740, Kuala Lumpur, Malaysia.
+ 601 9383 1378 / + 603 2092 9488
#full stack web development course#full stack development course#full stack developer course with placement#full stack web development course malaysia
0 notes
Text
TOP 10 OF ANGULAR 10
Angular model 10, has been launched at the twenty fourth of June, 2020 but with the beta version this time. This can imply that we are nearing the final launch of the newest version of the google-developed, typescript primarily based framework. The Version 10.0.0 is a major release that spans the framework, Angular Material, and the CLI. It has only been four months since they launched model 9.0 of Angular. Let’s explore the new features of Angular 10…
Here’s a list of top ten features of the newly updated Angular 10
1. Language Service and Localization
The language-service-precise compiler permits more than one typecheck files by using the venture interface which creates ScriptInfos as necessary. Autocompletion is additionally appeared to have been removed from HTML entities, consisting of &, <, etc., on the way to safeguard the inhouse center functionality of Angular LS, which holds questionable value and a performance cost. One of the fine capabilities of Angular 10 is that the today's angular model supports for merging of more than one translation files which could best load one report in the previous variations. Now clients can specify a couple of documents in step with locale, and the translations from each of these documents may be merged together by a message ID. In practice, this means you want to position the files so as of most vital first, with fallback translations later.
2. Router
The CanLoad shield now can go again Urltree in angular model 10. A CanLoad protect returning Urltree cancels the modern-day navigation and allows to redirect. This suits current conduct to the available CanActivate guards which might be also reputedly added. This however doesn’t have an effect on the preloading. Also, any routes with a CanLoad guard won’t be preloaded, and the guards will now not be completed as part of preloading. 3.Service Workers and Bug Fixes In the previous versions of angular Vary headers might had been considered even as retrieving sources from the cache, however simply stopping the retrieval of cached belongings and fundamental to unpredictable conduct because of inconsistent/buggy implementations in various browsers. However, in angular model 10 Vary headers are omitted even as retrieving sources from the ServiceWorker caches, which can bring about sources being retrieved even when their headers are not similar. If your utility needs to distinguish its responses based totally on request headers, it is important to ensure that the Angular ServiceWorker is configured to keep away from caching the affected sources. With this Angular 10 model, there had been a number of malicious program fixes, this consists of the compiler keeping off undefined expressions in a holey array and the middle averting a migration error at the same time as a nonexistent image is imported. Another worm restore ensures right identification of modules affected by overrides in TestBed. 4. Warnings about CommonJS imports
Starting with version 10, we now warn you while your build pulls in this kind of bundles. If you’ve started seeing these warnings on your dependencies, allow your dependency realize that you’d decide on an ECMAScript module (ESM) package. Converting pre-Ivy code All the pre-Ivy dependencies from npm ought to be converted to Ivy dependencies, which is supposed to take place as a precursor to jogging ngtsc at the application. Further all the destiny compilation and linking operations must be made inside the course of transforming variations of the dependencies.
5.Optional Stricter Settings
Angular version 10 offers a more strict project setup in order to create a new workspace with ng new.ng new --strictOnce this flag is enabled, it initializes the new task with a pair of recent settings that improve maintainability, help in catching bugs well in advance in time, and allow the CLI to perform superior optimizations on your app. Enabling this flag configures the app as side-effect free to make certain extra superior tree-shaking
What the flag does?
Enables strict mode in TypeScript
Turns template type checking to Strict
Default bundle budgets have been reduced by ~75%
Configures linting rules to prevent declarations of type any
Configures your app as side-effect free to enable more advanced tree-shaking
6. New browser configuration
The browser configuration is up to date for new initiatives to exclude older and less used browsers. This has the side effect of disabling ES5 builds by means of default for brand new projects. To permit ES5 builds and differential loading for browsers that require it (which include IE or UC Browser), actually upload the browsers you want to guide within the .browserslistrc file. 7. Typescript 3.9, TSLib 2.9 & TSLint v6
Angular 10 features typescript 3.9. As opposed to the previous version which supported typescript 3.6, 3.7 and even 3.8. Typescript is a language that builds on JavaScript by adding syntax for type declarations and annotations which is used by the TypeScript compiler to type-check our code. This in turn clean readable JavaScript that runs on lots of different runtimes. Typescript helps save the files with its rich editing functionality across editors. With Typescript 3.9 the team has worked on performance, polish, and stability. Apart from error-checking, this version powers things like completions, quick fixes and speeding up the compiler and editing experience.
8.Deprecations
The Angular Package Format no longer includes ESM5 or FESM5 bundles, saving you 119MB of download and install time for Angular packages and libraries. These formats are are not needed as any downleveling to help ES5 is finished at the end of the construct process. Deprecating support for older browsers including IE 9, 10, and Internet Explorer Mobile.
9. Flags and logic
Logic is updated relating formatting day periods that cross midnight, which will fit the time within an afternoon period that extends past midnight. Applications which are the use of either formatDate() or DatePipe or the b and B format codes are likely to be affected by this change. Another point underneath this segment is that any resolver that returns EMPTY will occur to cancel navigation. In order to enable any navigation, builders will should replace the resolvers to update some vale, together with default!Empty. Angular NPM inside the version 10 does no longer contain wonderful jsdoc comments to assist the Closure Compiler’s superior optimizations. Support for Closure Compiler in applications has been experimental and damaged for some times. For folks who will employ Closure Compiler is possibly better off soaking up Angular programs constructed from resources directly in preference to ingesting variations published on NPM. As a brief workaround, customers can't overlook using their present-day construct pipeline with Closure flag --compilation_level=SIMPLE. This flag will make sure that the build pipeline produces buildable, runnable artifacts, at a price of elevated payload size because of advanced optimizations being disabled.
10.New Date Range Picker
Material now consists of a brand new date range picker. To use the new date range picker, you can use the mat-date-range-input and mat-date-range-picker components.
We will be happy to answer your questions on designing, developing, and deploying comprehensive enterprise web, mobile apps and customized software solutions that best fit your organization needs. As a reputed Software Solutions Developer we have expertise in providing dedicated remote and outsourced technical resources for software services at very nominal cost. Besides experts in full stacks We also build web solutions, mobile apps and work on system integration, performance enhancement, cloud migrations and big data analytics. Don’t hesitate to
get in touch with us!
0 notes
Text
Best React Native Developer Tools for designing Exceptional Apps in 2020!

Companies across the globe have hundreds of libraries and frameworks to choose from while doing mobile application development. Despite the innumerable choices, React Native by far has become one of the most preferred choices of corporate enterprises and mobile app development companies. The reason behind its popularity is the extensive benefits offered by React Native development for myriad applications! Right from simple learning curve, code re-usability, cross-platform development, high-speed development, support from a vibrant community, to the creation of native-like applications, this framework has a lot to give. And when we talk about its technical goodies, React Native developer tools just can’t be ignored. These tools are some of the most vital factors of this framework.
So this blog is all about the top-notch React Native tools available in the market. These are widely used by almost every React Native app development company out there. So let’s have a glimpse at a few of them.
8 Popular React Native Developer Tools to Know and Use in 2020

1. Visual Studio Code
Released in 2015 by the software giant Microsoft, Visual Studio Code is lightweight yet a robust source-code editor. It is open-source and free to use. It is written in JavaScript, CSS, and TypeScript. It works well with platforms like Windows, Mac, Linux, etc.
Visual Studio Code comes with in-built support for technologies like Node.js, TypeScript, and JavaScript. Besides, it has a huge ecosystem of extensions to support languages like C#, C++, Python, PHP, Java, Go, etc. It also supports runtimes like Unity and .NET.
2. Android Studio
As the name suggests, this tool enables React Native development for Android. Android Studio 4.1 was the major release. The recent version of Android Studio comes with features like Kotlin DSL support in Android Gradle plugin, newer database inspector, allows running of android emulator inside Android Studio, visual layout editor, faster emulator, APK analyzer, flexible build system, smart code editor, real-time profilers, and much more.
3. Xcode
Xcode is Apple’s integrated development environment (IDE) that contains several software development tools for building apps in iOS, MacOs, etc. This is a perfect pick for creating powerful React Native apps for iOS. It is also a great tool for debugging and installation of iOS packages. Recently, Xcode 12 was released by Apple which comes with all the more fascinating features like customizable font sizes for the navigator, new document tabs, redesigned organizer, improved code completion, enhanced auto-indentation, etc.
4. Redux
Written in JavaScript, Redux was developed by Andrew Clark and Dan Abramov and released in the year 2015. It is an open-source tool commonly used with libraries like React, Angular, etc for developing user interfaces. It is a very small tool whose file size accounts for hardly 2kB including dependencies. It helps in the creation of apps that run in different environments like native platforms, front-end, back-end, etc. and are quite easy to test. Also, it offers features like a time-traveling debugger and live code editing. As a result, it is highly recommended that React Native development services should use this tool for their projects.
5. React Native Debugger
This tool is like a standalone desktop app that goes well with Windows, macOS, Linux, etc. It is probably the best debugger tool for the React Native developers when they are already using Redux. It comes with default React’s Developer Tools and Redux DevTools embedded in it. Also, it is possible to edit the UI and inspect React Native elements using this tool.
6. React Navigation
React Navigation is written in JavaScript and is quite popular amongst the developer community as it enables them to establish the navigation and routes in the native apps with the help of navigators like Drawer, Tab, Stack, etc. It is an easy to use tool which is highly customizable and also provides Extensible Platforms. It is used for developing alluring components for both platforms- Android and iOS.
7. React Native CLI
Being the official CLI for the React Native framework, React Native CLI is an MIT licensed tool. This tool provides an original method for bootstrapping for creating a react native app using the command line. This method is required if the react native developer needs to access the native layer of the app. It is extensively used for the automation of tasks such as starting the packager, linking, creating the apps, etc. It is used as a debugging tool as well sometimes. It supports custom configurations. For instance, it can be used for the installation of React Native project pre-configured with a particular package such as TypeScript or even complete boilerplates.
8. React Native Tools
It is also a free tool developed by Microsoft but kind of an extension of the Visual Studio Code. This tool provides a supportive environment for developing as well as debugging the React Native projects. It allows debugging styles in React Native and also enables debugging for React components, making it one of the best debugging tools. Besides, it runs the react-native command with the use of “command palette”.
8 Additional React Native Tools explained in Brief:
1. Nuclide: Nuclide is a free and open-source tool that is highly customizable and helps the React Native developers to make improvements in code. Its top features include-context view, working sets, remote development, a task runner, quick open, health statistics, a debugger, code diagnostics, etc.
2. Bit: This tool is quite useful for the creation of advanced React Native component libraries. It resolves issues related to collaborating and sharing on UI components across different repositories.
3. Expo: This is an open-source tool-chain that has its own CLI and offers easy-to-use components and APIs. It also provides several services like accelerometer, real-time updates, fine documentation, powerful community support, etc.
4. React devtools: Though this tool is more concerned with React and Reactjs, it is also useful for debugging the React Native code. Also, its latest version provides support for inspecting React native styles, live editing, etc.
5. Vim Editor: This tool comes with a highly configurable text editor and provides a complete set of features for designing React Native apps. It is easy to work with and helps in effectively changing any kind of text.
6. Sublime Text: This is another amazing text editor that has numerous plugins and functionalities for app development. It also has features like “Goto Anything” for faster navigation to files, lines, symbols, etc. Other goodies that Sublime Text offers is “Command Palette” and support to multiple programming languages and markup languages.
7. Jest: Developed by Facebook, it is actually a testing framework for JavaScript but also works well with React Native, especially for functions like unit testing. Its features like Built-in code coverage, zero-configuration, and snapshot testing make it a rich tool.
8. Reduxsauce: This tool is helpful to the developers when they work on Redux codebases and need to create Reducers and Actions in Redux.
Final Words:
The React Native developer tools that we have mentioned in this blog play a significant role in not only building captivating apps but also in accelerating the development process to a great extent. These are one of the finest tools and it is essential for the React Native Developers to have the fundamental knowledge of at least the ones noted here.
Along with these tools, the knowledge of React Native component libraries is an add-on. For detailed insights on these, please have a look here.
Has this blog been helpful to you?
Please let us know your thoughts in the comment section.
Also, share with us the tools that you have used for React Native app development in your projects.
0 notes
Link
#angular 4 set default route#angular 4 tutorial#angular 2 tutorial#learn java programming#java training classes#java tutorial#javascript tutorial#java for beginners#learn java#java tutorial for beginners#advanced java tutorial
0 notes
Photo

What it takes to maintain a large open source project
#475 — February 14, 2020
Unsubscribe : Read on the Web
An oddly quiet week in terms of big, timely news, but yet again there's so much generally going on that I think we've got a good issue here :-) Till next week!
JavaScript Weekly
FullCalendar: A Full Sized JavaScript Calendar Control — An interesting option if you want a Google Calendar style control for your own apps. Has connectors for React, Vue and Angular. The base version is MIT licensed, but there’s a ‘premium’ version too.
Adam Shaw
How to Make a WebGL-Powered US Counties Map with D3 and Three.js — Creating a simple SVG-based map is one thing, but if you want the best performance, leaning on WebGL and your GPU is a good option. This tutorial covers how to approach moving from SVG to WebGL by way of Three.js.
Mika Iriarte
New: Our 'Most Loved' JavaScript Course 🧡 Gets Updated — Take your JavaScript to the next level. Gain an understanding of callbacks, higher order functions, closure, asynchronous and object-oriented JavaScript.
Frontend Masters sponsor
On the Maintenance of Large Open-Source Projects — A written-up group chat with former Node core team member Bert Belder (of libuv fame) and Leaflet creator Vladimir Agafonkin about what it takes to maintain large open source projects.
Anne-Laure Civeyrac
Tiny Helpers: Single Purpose Online Tools for Web Developers — A growing collection of single-purpose online tools aimed at developers of all types. Covers things like base64 conversion, color management, favicon generators, exploring JavaScript ASTs, key codes..
Stefan Judis
7 (Possibly) Good Reasons Not to Use TypeScript — Hang on.. did you read that headline right? Why not to use TypeScript? Yes, despite all the buzz around TypeScript, you don’t have to use it and there might be good reasons not to (although the reasons presented are highly opinionated and you’re free to disagree too).
Michael Krasnov
Quick bytes:
There's a sneaky bug in Chrome 80 that affects Array#reduce and it has broken people's Angular apps. Here's a potential quick fix.
If you want to go to VueConf in Austin in a few weeks, I'm told this is the last week you can get tickets.
💻 Jobs
Find a Dev Job Through Vettery — Vettery is completely free for job seekers. Make a profile, name your salary, and connect with hiring managers from top employers.
Vettery
Announcing a 100% Remote Opportunity as a Sr. Fullstack Dev (Node/React) — We’re passionate about giving developers the chance to do meaningful work by building transformational technology solutions.
Clevertech
📘 Articles & Tutorials
Why JavaScript is Eating HTML — The idea of JavaScript and HTML remaining separate and never the twain shall meet is now decidedly old-school and HTML-in-JS (a la JSX) is definitely A Thing™. Here’s a tour of all the parts involved.
Mike Turley
Building a Continuous Integration and Deployment Pipeline Using Docker — A really sweet, well paced tutorial that almost anyone would be able to follow to set up a basic CI/CD process for a Node app.
Tania Rascia
A Pool Table-Style 'Bouncing Balls' Simulation in Plain JS — It’s mostly code but included in tutorials as it’s designed to be a learning experience. Here’s a demo of the end result.
Meto Trajkovski
Optimize the Performance of Single Page Applications Using RUM
Site24x7 sponsor
How to Publish an Updated Version of an npm Package — If you release your own npm packages, or if you’ve inherited packages from your team, this is a nice guide that covers many of the challenges with getting a new version out.
Scott Vandehey
70 JavaScript Interview Questions — You’re never going to get a list like this that’s perfect but it’s a pretty solid list of the sorts of questions (and answers) you could get thrown at an interview, so if you’re in that position..
Mark Abeto
4 Methods to Search Through Arrays — includes, find, indexOf, and filter.
Stephen Hartfield
▶ Fast by Default: Algorithmic Performance Optimization in Practice — A talk from dotJS 2019.
Vladimir Agafonkin
ForwardJS Ottawa (May 26-29) Speakers Announced — Topics include React/Redux, TypeScript, containers, design systems, static sites, scaling teams and monorepos. Join us.
ForwardJS sponsor
Building Bridges with Other Departments in Developer Relations — If you've been in the JavaScript world a while, you might be familiar with Estelle Weyl and her insights will interest you if a career in developer relations has ever intrigued you.
Dave Nugent and Estelle Weyl
How To Create Maps with React and Leaflet
Shajia Abidi
Building a 'Grouper' Component for Svelte — Mat Ryer shows how you can build a Grouper component in Svelte to neatly group up lists into meaningful sections.
Mat Ryer
🔧 Code & Tools

Debug Visualizer: Visualize Data While Debugging in VS Code — An interesting looking VS Code extension that lets you visualize the result of an repeatedly evaluated expression. An intriguing idea, though I think you’d need to fiddle a bit to get the results you want.
Henning Dieterichs
plink-plonk.js: Listen to Web Pages As Their DOM Changes — This is really cool. Run this code at a console on a ‘busy’ Web page with lots of DOM changes and updates and you’ll be able to ‘hear’ them taking place.
Tom Hicks
Stream Chat API & JavaScript SDK for Custom Chat Apps — Build real-time chat in less time. Rapidly ship in-app messaging with our highly reliable chat infrastructure.
Stream sponsor
Type Route: A Flexible, Type-Safe Routing Library — A flexible routing library with TypeScript support, designed with React integration in mind (indeed, it’s used in React Router), but can be used with any framework (Vue, Angular, etc).
type-route
Ionic 5 Released: A Popular Webapp + Native Framework — Ionic’s goal is to get you an app you can put on an app store and the Web with a single shared code base, yet with adaptive styling to look native in each case. It was originally focused on Angular but now has an official React integration.
Brandy Carney
esbuild: An Extremely Fast JavaScript Bundler and Minifier, But... — An experiment in proving that tools for bundling JavaScript can actually be very fast.. though in this case by implementing one in Go ;-)
Evan Wallace

LegraJS: Render Lego Brick Graphics to a Canvas — A small library for drawing LEGO style brick shapes on to a canvas.
Preet Shihn
by via JavaScript Weekly https://ift.tt/2OUlWNn
0 notes
Text
What’s new in Angular 8.0?

Angular 8 is the first major release from Google in the year 2019. It has focused on the toolchain and also making Angular easier for users for different applications development with performance improvements. But this, major version release also contains some new features and upgradation with respect to the previous versions. New Angular version is much lighter, faster and easier. Angular 8 supports the TypeScript version 3.4. So, using the new TypeScript version, it is easy to code with faster subsequent build with the incremental flag, type checking for globalThis, and generic type arguments. With the new release now available, it’s important to understand what has changed so you’ll know how to approach Angular 8.

New features of Angular 8-
1. Angular Ivy-
If you’re not familiar with Ivy, is it something you should think about? If the case is that, user experience of your apps is significant for you, then Ivy is definitely something you should think about. In spite of the fact that the system has made huge upgrades in file size and runtime speed since the times of Angular 2, Angular applications frequently will in general be on the substantial side with regards to file size and memory use.
Compared with the current Angular View Engine, Ivy provides the following benefits:
The code generated by the Angular compiler is now much simple to read and understand.
Rebuild times are significantly faster
Decreased payload size, so it will take browsers less time to download and parse your applications.
Better template type checking, so you can catch more errors at build time and prevent your users from encountering them at runtime
Over this, Angular Ivy aims to be broadly compatible with existing Angular applications, so preferably, you’ll have the option to get the majority of Ivy’s advantages without changing your applications at all. There will be some bugs and hiccups, however. So it’ll be helpful to develop your current Angular apps using Angular 8 and Ivy. There are some areas where Ivy is lacking—in particular, internationalization and Angular Universal support aren’t yet fully compatible. So if your Angular app supports multiple languages and additionally uses server-side rendering, don’t expect it to be ready to work with Ivy just yet.
2. Web Worker support-
As we all know that JavaScript executes in a single-threaded manner. So, to perform any huge data call or any consecutive Rest API call in an asynchronous manner is essential. But, in real application based scenario, this concept will not help us. This is because today all the web browser support the web worker process. Basically, the web worker process is the scripts executed by the browser in a separate thread. Communication with that thread in the browser tab will be carried out by sending messages. So, in general, web worker is not related to Angular from any point-of-view. But, the main point is that these scripts should be considered in the build process of the application. So, that after deployment of application the same process can be performed continuously. Hence, the main objective is to provide one single bundle for every web worker. Now, in Angular 8 this task can be performed by the Angular CLI.
Also, we can configure our Angular CLI project if we add the web worker for the first time. In this process, CLI will exclude the worker.ts files from the tsconfig.json files and also, add a new TypeScript configuration file named tsconfig.worker.json which handles the worker.ts file. Also, this information also added to the angular.json file as
“webWorkerTsConfig”: “tsconfig.worker.json”
3. Support for typescript-
Finally, Angular 8 is updates to the latest and greatest versions of Angular’s dependencies, which include tools like RxJS and TypeScript. In spite of the fact that this might seem like a small improvement, it’s also an appreciated one. Keeping up with TypeScript, in particular, is great because the TypeScript team consistently appears to pack useful new features into every release. In spite of the fact that there’s nothing preventing you from manually upgrade to the latest version of TypeScript in your projects, it’s great to see that the Angular team is keeping up with everything that TypeScript has to offer and that new apps generated via the Angular CLI will also use the newest version of TypeScript by default.
4. Bazel support-
In new version of Angular, Google introduced another build tool called Bazel. In reality, it is not a new tool. Google used this tool internally since a long time but now, they released this tool as open source. But Bazel is not totally ready in Angular 8. It is introduced as pick in choice with Angular 8 and is expected to be included in the Angular CLI in version 9.
Benefits of using Bazel-
It will provide a faster build time. Generally, It takes time for the first build but taking less time from the concurrent builds.
Using this tool, we can develop the application as an incremental build and deploy only what has been changed rather than the entire app.
We can eject the Bazel file which is normally hidden.
We can add Bazel Support using the below Angular CLI Command,
ng add @angular/bazel
Also, we can create a new app with Bazel with the help of below command,
npm install -g @angular/bazel
ng new my-app –collection=@angular/bazel
5. Differential Loading for performance optimization-
It is one of the best new features in the Angular CLI 8. Because with the assistance of these features, we will determine which browser we will target and the CLI will build the application with related necessary JS bundles with the necessary polyfills. The default target browser in the tsconfig.json file is now es2015. This means that when CLI build the application, it will build for the modern browser that supports ES6 features. But, we have to run the application in an older browser like IE9, then we have to specify it in the browser list file. This file exists in the root folder of the CLI project. Previously, it is used for the CSS part only. Now, it can be used for JS generation.
6. Changes in Lazy Loading in Route-
In Angular from the starting, the router mechanism always supports the concept of lazy loading. Till Angular 7, it was done by the string value of the loading module as below,
{
path: ‘lazy’,
loadChildren: () => ‘./admin/admin.module#AdminModule’
}
The value up to the #(hash) sign represents the path of the module file. In this the target component exists and the value after the hash sign represent the class name of that module. This style will continuously work in Angular 8. Only the way of writing lazy module has been changed. The string value of the loadchildren has been deprecated because of the support of ECMAScript and Ivy will only support this. So, now the loadchildren declaration will be like this,
{
path: ‘lazy’,
loadChildren: () => import(‘./admin/admin.module’).then(m => m.AdminModule)
}
7. Use Analytics Data-
In Angular 8, Angular CLI use analytics data so that Angular team can prioritize the features and improvements. So, when we update the CLI projects, it will opt-in with ng analytics on options. If we allow this globally, then it will collect some data like command used, the flag used, Operating System, Node Version, CPU Count, RAM Size, execution time and error with crash data if any to the Angular team for the improvement purpose in the future releases.
8. Support SVG Template-
Now, Angular 8 supports the template features with a file extension SVG. This means that, we can use the SVG extension file as a template in place of HTML file without any extra configuration settings. But why we will use a .svg file as a template instead of using the image in an HTML file? The reason is when we use SVG as a template, then we can use that as a directive and as a result, we can bind it just like HTML templates. With this approach, we can dynamically generate interactive graphics in our Angular Applications.
@Component({
selector: “app-icon”,
templateUrl: “./icon.component.svg”,
styleUrls: [“./icon.component.css”]
})
export class DashboardComponent {…}
9. PNPM Support-
In Angular 8, Angular CLI also support PNPM including NPM and Yarn. Also, in the command ng add now provide a new flag called – registry for adding packages from any private NPM registry. This command is already available in the Angular CLI version for ng update command.
Conclusion-
These are the new features in Angular 8, that you can use for effective development. If your apps are going to need changes, it’s better to find out immediately than to wait. You can know the comparison between Angular, React and Vue at out blog- Angular vs. React vs. Vue: A 2019 Comparison (Updated).
Are you looking to develop software with Angular? We suggest you the development with Angular 8. Solace is the perfect place to start with. Developers at Solace are well trained in Angular 8 development to give you the best solution. Get a free quote for software development that helps your business to stand out in the wide market competition.
0 notes
Text
An Introduction To React With Ionic
About The Author
I love building software for the web, writing about web technologies, and playing video games. More about Jerry …
Mobile app development using hybrid frameworks has come a long way since initial release in 2008. With the improvements being made to the JavaScript engine and improved processing power available to mobile phones, the major concern people had when they considered developing their apps using the hybrid approach — namely, performance — has all but been eliminated, and cross-platform frameworks have seen a surge in popularity.
We’re going to build a mobile application that pulls data from the Marvel Comics API; the data will show Marvel comics and you’ll be able to choose your favorites. At the end, we’ll create a native build of the project on Android.
The Ionic Framework is an open-source UI toolkit for building fast, high-quality applications using web technologies with integrations for popular frameworks like Angular and React. Ionic enables cross-platform development using either Cordova or Capacitor, with the latter featuring support for desktop application development using Electron.
In this article, we will explore Ionic with the React integration by building an app that displays comics using the Marvel Comics API and allows users to create a collection of their favorites. We’ll also learn how to integrate native capabilities into our app with Capacitor and generate builds for a native platform.
If you have not worked with Ionic in the past, or you’re curious to find out how Ionic works with React, this tutorial is for you.
Prerequisites
Before you can start building apps with the Ionic Framework, you will need the following:
Node.js (at least v10) installed on your computer
working knowledge of React
familiarity with the Hooks API
some experience with TypeScript
a native IDE, Android Studio for Android, or XCode for iOS
a Marvel developer account with an API key. You can get one here
Here’s a picture of what we’ll be building:
Marvel comics client app (Large preview)
Installing Ionic CLI
Ionic apps are created and developed primarily through the Ionic command line interface (CLI). The CLI offers a wide range of dev tools and help options as you develop your hybrid app. To proceed with this guide, you will need to make sure the CLI is installed and accessible from your terminal.
Open a new terminal window and run the following command:
npm install -g @ionic/cli
This will install the latest version of the Ionic CLI and make it accessible from anywhere on your computer. If you want to confirm that the install was successful, you can run the following command:
ionic --version
This command will output the installed Ionic version on your computer and it should be similar to this:
6.4.1
You can now bootstrap Ionic apps for the officially supported framework integrations — Angular and React — using any of the prebuilt templates available.
Starting An Ionic React Application
Creating an Ionic React application is easy using the CLI. It provides a command named start that generates files for a new project based on the JavaScript framework you select. You can also choose to start off with a prebuilt UI template instead of the default blank “Hello world” app.
To get started, run the following command:
ionic start marvel-client tabs --type=react --capacitor
This command will create a new Ionic React app using the tabs template. It also adds a Capacitor integration to your app. Capacitor is a cross-platform app runtime that makes running web apps natively on iOS, Android, and desktop easy.
Navigate your terminal to the newly created directory and run start the server.
cd marvel-client ionic serve
Now point your browser to http://localhost:8100 to see your app running.
Note: If you have used create-react-app (CRA) before, your current project’s directory structure should feel very familiar. That’s because, in order to keep the development experience familiar, Ionic React projects are created using a setup similar to that found in a CRA app. React Router is also used to power app navigation under the hood.
Creating A React Component
You are going to create a reusable React component in this step. This component will receive data and display information about a comic. This step also aims to help demonstrate that Ionic React is still just React.
Delete the files for the ExploreContainer component from src/components and remove its imports from the .tsx files in the src/pages directory.
import React from 'react'; import { IonContent, IonHeader, IonPage, IonTitle, IonToolbar } from '@ionic/react'; import ExploreContainer from '../components/ExploreContainer'; import './Tab1.css'; const Tab1: React.FC = () => { return ( <IonPage> ... <IonContent> <IonHeader collapse="condense"> <IonToolbar> <IonTitle size="large">Tab 1</IonTitle> </IonToolbar> </IonHeader> <ExploreContainer name="Tab 1 page" /> </IonContent> </IonPage> ); }; export default Tab1;
In your Tab1.tsx file, also remove the content within the <IonContent></IonContent> tag.
Next, create a file named ComicCard.tsx in your src/components directory. Then, open the file in your editor and add the following contents:
import React, { FC } from 'react'; import { Comic } from '../interfaces/comic'; import { IonImg, IonCard, IonCardTitle, IonCardSubtitle, IonCardHeader } from '@ionic/react'; type Props = { comic: Comic; } const ComicCard: FC = (props): JSX.Element => { const { comic } = props; return ( <IonCard> <div style= > <IonImg src={`${comic.thumbnail.path}.${comic.thumbnail.extension}`} /> </div> <IonCardHeader> <IonCardSubtitle> {comic.title} </IonCardSubtitle> <IonCardTitle> <h3> {comic.series.name} </h3> </IonCardTitle> </IonCardHeader> </IonCard> ); } export default ComicCard;
Your ComicCard component receives props containing details of a comic and renders the information using an IonCard component. Cards in Ionic are usually composed using other subcomponents. In this file, you are using the IonCardTitle and IonCardSubtitle components to render the comic title and series information within a IonCardHeader component.
Consuming The Marvel API
To use your newly created component you would have to fetch some data from the Marvel API. For the purpose of this guide, you are going to use the axios package to make your HTTP Requests. You can install it by running the following command:
yarn add axios
Next, add the following folder to your src directory:
# ~/Desktop/marvel-client/src mkdir -p services
Then, cd into the services directory and create a file named api.ts:
# ~/Desktop/marvel-client/src/services touch api.ts
Finally, open the file and add the following contents:
import axios from 'axios'; import { DataContainer } from '../interfaces/data-container'; import { Comic } from '../interfaces/comic'; const API_KEY = '813xxxxxxxxxxxxxxxxxx'; const api = axios.create({ baseURL: 'https://gateway.marvel.com:443/v1/public', headers: { 'Content-Type': 'application/json', }, }); api.interceptors.response.use((response) => { if (response.status === 200) { return response.data.data; } }); export function getComics(): Promise<DataContainer<Comic>> { return api.get('/comics', { params: { apikey: API_KEY, limit: 10, hasDigitalIssue: true, }, }); }
Be sure to replace the value of API_KEY with your own API key. If you don’t have one, you can request one by signing up at the Marvel developer website. You also need to set up your account to allow requests from your local development server by adding localhost* to your Marvel authorized referrers list (see the image below):
Marvel Account. (Large preview)
You now have an axios instance configured to use the Marvel API. The api.ts file has only one export, which hits the GET /comics endpoint and returns a collection of comics. You are limiting the results to only those that are available digitally. You will now proceed to use the API Service in your application.
Open the Tab1.tsx file and replace the contents with the following:
import React, { FC, useState, useEffect } from 'react'; import { IonContent, IonHeader, IonPage, IonTitle, IonToolbar, IonSpinner, IonGrid, IonRow, IonCol } from '@ionic/react'; import './Tab1.css'; import ComicCard from '../components/ComicCard'; import { Comic } from '../interfaces/comic'; import { getComics } from '../services/api'; const Tab1: FC = () => { const [comics, setComics] = useState(null as Comic[] | null); const [loading, setLoading] = useState(false); const fetchComics = () => { setLoading(true); getComics().then((response) => { if (response && response.results) { setComics(response.results); } }).finally(() => { setLoading(false); }); }; useEffect(() => { fetchComics(); }, []) return ( <IonPage> <IonHeader> <IonToolbar> <IonTitle>Home</IonTitle> </IonToolbar> </IonHeader> <IonContent> {(loading) && ( <div className="ion-text-center ion-padding"> <IonSpinner name="crescent" /> </div> )} {(comics) && ( <IonGrid> <IonRow> {comics.map((comic) => ( <IonCol key={comic.id} sizeXs="12" sizeSm="6" sizeMd="4" sizeLg="3" sizeXl="2"> <ComicCard comic={comic} /> </IonCol> ))} </IonRow> </IonGrid> )} </IonContent> </IonPage> ); }; export default Tab1;
The file above is an example of a page in Ionic. Pages are components that can be accessed with a route/URL. To ensure transitions between pages work properly, it is necessary to have the IonPage component be the root component in your page.
IonHeader is a component meant to exist at the top of a page. It’s not required for all pages, but it can contain useful components like the page title, the IonBackButton component for navigating between pages, or the IonSearchBar. IonContent is the main content area for your pages. It’s responsible for providing the scrollable content that users will interact with, plus any scroll events that could be used in your app.
Inside your component, you have a function called fetchComics() — called once inside the useEffect() hook — which makes a request to get comics from the Marvel API by calling the getComics() function you wrote earlier. It saves the results to your component’s state via the useState() hook. The IonSpinner component renders a spinning icon while your app is making a request to the API. When the request is completed, you pass the results to the ComicCard component you created earlier.
At this point your app should look like this:
App home page. (Large preview)
In the next step, you will learn how to use Capacitor plugins in your app by enabling offline storage.
Creating a Personal Collection of Marvel Comics
Your app looks good so far, but it isn’t very useful as a mobile app. In this step you will extend your app’s functionality by allowing users to ‘star’ comics, or save them as favorites. You will also make information about the saved favorites available to view offline by using the Capacitor Storage plugin.
I’m a big fan of The Collector. (Large preview)
First, create a file named util.ts in your src directory:
# ~/Desktop/marvel-client/src touch util.ts
Now, open the file and paste the following contents:
import { Plugins } from '@capacitor/core'; import { Comic } from './interfaces/comic'; const { Storage, Toast } = Plugins; export const updateFavourites = async (comic: Comic): Promise => { const saved = await Storage.get({ key: 'savedFavourites' }); const favourites: Comic[] | null = (saved && saved.value) ? JSON.parse(saved.value) : null; if (!favourites) { const comics = [comic]; await Storage.set({ key: 'savedFavourites', value: JSON.stringify(comics), }); return Toast.show({ text: 'Added to favourites', }); } const copyOfFavourites = favourites.slice(); const { id } = comic; const isSavedIndex = copyOfFavourites.findIndex((c) => c.id === id); if (isSavedIndex !== -1) { copyOfFavourites.splice(isSavedIndex, 1); await Storage.set({ key: 'savedFavourites', value: JSON.stringify(copyOfFavourites), }); return Toast.show({ text: 'Removed from favourites', }); } else { copyOfFavourites.unshift(comic); await Storage.set({ key: 'savedFavourites', value: JSON.stringify(copyOfFavourites), }); return Toast.show({ text: 'Added to favourites', }); } }; export const getFavourites = async (): Promise<Comic[] | null> => { const saved = await Storage.get({ key: 'savedFavourites', }); return (saved && saved.value) ? JSON.parse(saved.value) : null; }; export const checkFavourite = async (id: number): Promise<boolean> => { const saved = await Storage.get({ key: 'savedFavourites', }); const favourites: Comic[] | null = (saved && saved.value) ? JSON.parse(saved.value) : null; if (favourites) { const isSavedIndex = favourites.findIndex((c) => c.id === id); if (isSavedIndex !== -1) { return true; } } return false; };
The Storage plugin provides a key-value store for simple data, while the Toast plugin provides a notification pop-up for displaying important information to a user.
The updateFavourites() function in this file takes a single argument, a Comic object, and adds it to the device storage if it doesn’t exist, or removes it from the device storage if it was already saved. getFavourites() returns the user’s saved comics, while checkFavourites() accepts a single argument, a Comic resource ID, and looks it up in the saved comics, returning true if it exists, or false otherwise.
Next, open the ComicCard.tsx file and make the following changes to allow your app’s users to save their favorite comics:
import { star, starOutline } from 'ionicons/icons'; import * as utils from '../util'; type Props = { comic: Comic; } const ComicCard: FC<Props> = (props): JSX.Element => { const { comic } = props; const [isFavourite, setIsFavourite] = useState(false); const checkFavourite = (): void => { utils.checkFavourite(comic.id).then((value: boolean) => { setIsFavourite(value); }); } useEffect(() => { checkFavourite(); }); return ( <IonCard> ... <IonCardHeader> ... </IonCardHeader> <IonCardContent> <IonButton onClick={(): void => { utils.updateFavourites(comic).finally(() => { checkFavourite(); }); }} > <IonIcon icon={(isFavourite) ? star : starOutline} color="light" /> {(isFavourite) ? 'Remove' : 'Add' } </IonButton> </IonCardContent> </IonCard> ); }
Your ComicCard component now has a IonButton component that, when clicked, calls the updateFavourites() function you wrote earlier. Remember that the function acts like a toggle, removing the comic if it was already saved, or else saving it. Don’t forget to add the imports for the new Ionic components, IonButton, IonCardContent and IonIcon, just added to this component.
Now for the final part of this step, where you will be rendering saved comics in their own page. Replace the contents of the Tab2.tsx file with the following:
import React, { useState } from 'react'; import { IonContent, IonHeader, IonPage, IonTitle, IonToolbar, IonGrid, IonRow, IonCol, useIonViewWillEnter } from '@ionic/react'; import './Tab2.css'; import { Comic } from '../interfaces/comic'; import { getFavourites } from '../util'; import ComicCard from '../components/ComicCard'; const Tab2: React.FC = () => { const [comics, setComics] = useState(null as Comic[] | null); const loadComics = (): void => { getFavourites().then((result) => { if (result) { setComics(result); } }) }; useIonViewWillEnter(() => { loadComics(); }); return ( <IonPage> <IonHeader> <IonToolbar> <IonTitle>Favourites</IonTitle> </IonToolbar> </IonHeader> <IonContent> {(comics) && ( <IonGrid> <IonRow> {comics.map((comic) => ( <IonCol key={comic.id} sizeXs="12" sizeSm="6" sizeMd="4" sizeLg="3" sizeXl="2"> <ComicCard comic={comic} /> </IonCol> ))} </IonRow> </IonGrid> )} </IonContent> </IonPage> ); }; export default Tab2;
This page is quite similar to the Tab1 page but, instead of making an API request to get comics, you are accessing locally saved data. You are also using the Ionic life cycle hook, useIonViewWillEnter(), instead of a useEffect() hook, to make a call to the function that reads saved comics and updates the component’s state. The useIonViewWillEnter() hook gets called just as the page being navigated to enters into view.
Your application now makes use of a few native plugins to improve its functionality. In the next step, you will learn how to generate a native project for Android and create a native app using Android Studio.
Note: You can delete the files related to *Tab3* and remove the import and related *IonTab* component in the *App.tsx* file.
Generating A Native Project
Ionic comes with support for cross-platform app runtimes such as Capacitor and Cordova. These frameworks help you to build and run apps developed using Ionic on a native device or emulator. For the purpose of this guide, you will be using Capacitor to generate native project files.
Before proceeding to adding a platform, you will need to generate a production build of your application. Run the following command in your project’s root directory to do so:
ionic build
Now let’s add Capacitor to your project and generate the assets required to build a native application. Capacitor provides a CLI which can be accessed in your project by using npx or from the ionic CLI as shown below:
Using npx
npx cap add android
This command adds the android platform to your project. Other possible platform values are ios and electron.
Using ionic
Since you initialized your project using the --capacitor flag earlier, Capacitor has already been initialized with your project’s information. You can proceed to adding a platform by running the following command:
ionic capacitor add android
This command will install the required dependencies for the android platform. It will also generate files required for a native Android project and copy over the assets you built earlier when running ionic build.
If you have installed Android Studio, you can now open your project in Android Studio by running:
ionic capacitor open android
Finally, build your project:
Generate an APK. (Large preview)
Conclusion
In this guide, you have learned how to develop hybrid mobile applications using Ionic Framework’s React integration. You also learned how to use Capacitor for building native apps, specifically for the Android platform. Check out the API docs as there are a lot more UI components available to be used in Ionic apps that we didn’t explore. You can find the code on GitHub.
References
(ks, ra, yk, il, og)
Website Design & SEO Delray Beach by DBL07.co
Delray Beach SEO
source http://www.scpie.org/an-introduction-to-react-with-ionic/ source https://scpie.tumblr.com/post/617303473044799488
0 notes
Text
An Introduction To React With Ionic
About The Author
I love building software for the web, writing about web technologies, and playing video games. More about Jerry …
Mobile app development using hybrid frameworks has come a long way since initial release in 2008. With the improvements being made to the JavaScript engine and improved processing power available to mobile phones, the major concern people had when they considered developing their apps using the hybrid approach — namely, performance — has all but been eliminated, and cross-platform frameworks have seen a surge in popularity.
We’re going to build a mobile application that pulls data from the Marvel Comics API; the data will show Marvel comics and you’ll be able to choose your favorites. At the end, we’ll create a native build of the project on Android.
The Ionic Framework is an open-source UI toolkit for building fast, high-quality applications using web technologies with integrations for popular frameworks like Angular and React. Ionic enables cross-platform development using either Cordova or Capacitor, with the latter featuring support for desktop application development using Electron.
In this article, we will explore Ionic with the React integration by building an app that displays comics using the Marvel Comics API and allows users to create a collection of their favorites. We’ll also learn how to integrate native capabilities into our app with Capacitor and generate builds for a native platform.
If you have not worked with Ionic in the past, or you’re curious to find out how Ionic works with React, this tutorial is for you.
Prerequisites
Before you can start building apps with the Ionic Framework, you will need the following:
Node.js (at least v10) installed on your computer
working knowledge of React
familiarity with the Hooks API
some experience with TypeScript
a native IDE, Android Studio for Android, or XCode for iOS
a Marvel developer account with an API key. You can get one here
Here’s a picture of what we’ll be building:
Marvel comics client app (Large preview)
Installing Ionic CLI
Ionic apps are created and developed primarily through the Ionic command line interface (CLI). The CLI offers a wide range of dev tools and help options as you develop your hybrid app. To proceed with this guide, you will need to make sure the CLI is installed and accessible from your terminal.
Open a new terminal window and run the following command:
npm install -g @ionic/cli
This will install the latest version of the Ionic CLI and make it accessible from anywhere on your computer. If you want to confirm that the install was successful, you can run the following command:
ionic --version
This command will output the installed Ionic version on your computer and it should be similar to this:
6.4.1
You can now bootstrap Ionic apps for the officially supported framework integrations — Angular and React — using any of the prebuilt templates available.
Starting An Ionic React Application
Creating an Ionic React application is easy using the CLI. It provides a command named start that generates files for a new project based on the JavaScript framework you select. You can also choose to start off with a prebuilt UI template instead of the default blank “Hello world” app.
To get started, run the following command:
ionic start marvel-client tabs --type=react --capacitor
This command will create a new Ionic React app using the tabs template. It also adds a Capacitor integration to your app. Capacitor is a cross-platform app runtime that makes running web apps natively on iOS, Android, and desktop easy.
Navigate your terminal to the newly created directory and run start the server.
cd marvel-client ionic serve
Now point your browser to http://localhost:8100 to see your app running.
Note: If you have used create-react-app (CRA) before, your current project’s directory structure should feel very familiar. That’s because, in order to keep the development experience familiar, Ionic React projects are created using a setup similar to that found in a CRA app. React Router is also used to power app navigation under the hood.
Creating A React Component
You are going to create a reusable React component in this step. This component will receive data and display information about a comic. This step also aims to help demonstrate that Ionic React is still just React.
Delete the files for the ExploreContainer component from src/components and remove its imports from the .tsx files in the src/pages directory.
import React from 'react'; import { IonContent, IonHeader, IonPage, IonTitle, IonToolbar } from '@ionic/react'; import ExploreContainer from '../components/ExploreContainer'; import './Tab1.css'; const Tab1: React.FC = () => { return ( <IonPage> ... <IonContent> <IonHeader collapse="condense"> <IonToolbar> <IonTitle size="large">Tab 1</IonTitle> </IonToolbar> </IonHeader> <ExploreContainer name="Tab 1 page" /> </IonContent> </IonPage> ); }; export default Tab1;
In your Tab1.tsx file, also remove the content within the <IonContent></IonContent> tag.
Next, create a file named ComicCard.tsx in your src/components directory. Then, open the file in your editor and add the following contents:
import React, { FC } from 'react'; import { Comic } from '../interfaces/comic'; import { IonImg, IonCard, IonCardTitle, IonCardSubtitle, IonCardHeader } from '@ionic/react'; type Props = { comic: Comic; } const ComicCard: FC = (props): JSX.Element => { const { comic } = props; return ( <IonCard> <div style= > <IonImg src={`${comic.thumbnail.path}.${comic.thumbnail.extension}`} /> </div> <IonCardHeader> <IonCardSubtitle> {comic.title} </IonCardSubtitle> <IonCardTitle> <h3> {comic.series.name} </h3> </IonCardTitle> </IonCardHeader> </IonCard> ); } export default ComicCard;
Your ComicCard component receives props containing details of a comic and renders the information using an IonCard component. Cards in Ionic are usually composed using other subcomponents. In this file, you are using the IonCardTitle and IonCardSubtitle components to render the comic title and series information within a IonCardHeader component.
Consuming The Marvel API
To use your newly created component you would have to fetch some data from the Marvel API. For the purpose of this guide, you are going to use the axios package to make your HTTP Requests. You can install it by running the following command:
yarn add axios
Next, add the following folder to your src directory:
# ~/Desktop/marvel-client/src mkdir -p services
Then, cd into the services directory and create a file named api.ts:
# ~/Desktop/marvel-client/src/services touch api.ts
Finally, open the file and add the following contents:
import axios from 'axios'; import { DataContainer } from '../interfaces/data-container'; import { Comic } from '../interfaces/comic'; const API_KEY = '813xxxxxxxxxxxxxxxxxx'; const api = axios.create({ baseURL: 'https://gateway.marvel.com:443/v1/public', headers: { 'Content-Type': 'application/json', }, }); api.interceptors.response.use((response) => { if (response.status === 200) { return response.data.data; } }); export function getComics(): Promise<DataContainer<Comic>> { return api.get('/comics', { params: { apikey: API_KEY, limit: 10, hasDigitalIssue: true, }, }); }
Be sure to replace the value of API_KEY with your own API key. If you don’t have one, you can request one by signing up at the Marvel developer website. You also need to set up your account to allow requests from your local development server by adding localhost* to your Marvel authorized referrers list (see the image below):
Marvel Account. (Large preview)
You now have an axios instance configured to use the Marvel API. The api.ts file has only one export, which hits the GET /comics endpoint and returns a collection of comics. You are limiting the results to only those that are available digitally. You will now proceed to use the API Service in your application.
Open the Tab1.tsx file and replace the contents with the following:
import React, { FC, useState, useEffect } from 'react'; import { IonContent, IonHeader, IonPage, IonTitle, IonToolbar, IonSpinner, IonGrid, IonRow, IonCol } from '@ionic/react'; import './Tab1.css'; import ComicCard from '../components/ComicCard'; import { Comic } from '../interfaces/comic'; import { getComics } from '../services/api'; const Tab1: FC = () => { const [comics, setComics] = useState(null as Comic[] | null); const [loading, setLoading] = useState(false); const fetchComics = () => { setLoading(true); getComics().then((response) => { if (response && response.results) { setComics(response.results); } }).finally(() => { setLoading(false); }); }; useEffect(() => { fetchComics(); }, []) return ( <IonPage> <IonHeader> <IonToolbar> <IonTitle>Home</IonTitle> </IonToolbar> </IonHeader> <IonContent> {(loading) && ( <div className="ion-text-center ion-padding"> <IonSpinner name="crescent" /> </div> )} {(comics) && ( <IonGrid> <IonRow> {comics.map((comic) => ( <IonCol key={comic.id} sizeXs="12" sizeSm="6" sizeMd="4" sizeLg="3" sizeXl="2"> <ComicCard comic={comic} /> </IonCol> ))} </IonRow> </IonGrid> )} </IonContent> </IonPage> ); }; export default Tab1;
The file above is an example of a page in Ionic. Pages are components that can be accessed with a route/URL. To ensure transitions between pages work properly, it is necessary to have the IonPage component be the root component in your page.
IonHeader is a component meant to exist at the top of a page. It’s not required for all pages, but it can contain useful components like the page title, the IonBackButton component for navigating between pages, or the IonSearchBar. IonContent is the main content area for your pages. It’s responsible for providing the scrollable content that users will interact with, plus any scroll events that could be used in your app.
Inside your component, you have a function called fetchComics() — called once inside the useEffect() hook — which makes a request to get comics from the Marvel API by calling the getComics() function you wrote earlier. It saves the results to your component’s state via the useState() hook. The IonSpinner component renders a spinning icon while your app is making a request to the API. When the request is completed, you pass the results to the ComicCard component you created earlier.
At this point your app should look like this:
App home page. (Large preview)
In the next step, you will learn how to use Capacitor plugins in your app by enabling offline storage.
Creating a Personal Collection of Marvel Comics
Your app looks good so far, but it isn’t very useful as a mobile app. In this step you will extend your app’s functionality by allowing users to ‘star’ comics, or save them as favorites. You will also make information about the saved favorites available to view offline by using the Capacitor Storage plugin.
I’m a big fan of The Collector. (Large preview)
First, create a file named util.ts in your src directory:
# ~/Desktop/marvel-client/src touch util.ts
Now, open the file and paste the following contents:
import { Plugins } from '@capacitor/core'; import { Comic } from './interfaces/comic'; const { Storage, Toast } = Plugins; export const updateFavourites = async (comic: Comic): Promise => { const saved = await Storage.get({ key: 'savedFavourites' }); const favourites: Comic[] | null = (saved && saved.value) ? JSON.parse(saved.value) : null; if (!favourites) { const comics = [comic]; await Storage.set({ key: 'savedFavourites', value: JSON.stringify(comics), }); return Toast.show({ text: 'Added to favourites', }); } const copyOfFavourites = favourites.slice(); const { id } = comic; const isSavedIndex = copyOfFavourites.findIndex((c) => c.id === id); if (isSavedIndex !== -1) { copyOfFavourites.splice(isSavedIndex, 1); await Storage.set({ key: 'savedFavourites', value: JSON.stringify(copyOfFavourites), }); return Toast.show({ text: 'Removed from favourites', }); } else { copyOfFavourites.unshift(comic); await Storage.set({ key: 'savedFavourites', value: JSON.stringify(copyOfFavourites), }); return Toast.show({ text: 'Added to favourites', }); } }; export const getFavourites = async (): Promise<Comic[] | null> => { const saved = await Storage.get({ key: 'savedFavourites', }); return (saved && saved.value) ? JSON.parse(saved.value) : null; }; export const checkFavourite = async (id: number): Promise<boolean> => { const saved = await Storage.get({ key: 'savedFavourites', }); const favourites: Comic[] | null = (saved && saved.value) ? JSON.parse(saved.value) : null; if (favourites) { const isSavedIndex = favourites.findIndex((c) => c.id === id); if (isSavedIndex !== -1) { return true; } } return false; };
The Storage plugin provides a key-value store for simple data, while the Toast plugin provides a notification pop-up for displaying important information to a user.
The updateFavourites() function in this file takes a single argument, a Comic object, and adds it to the device storage if it doesn’t exist, or removes it from the device storage if it was already saved. getFavourites() returns the user’s saved comics, while checkFavourites() accepts a single argument, a Comic resource ID, and looks it up in the saved comics, returning true if it exists, or false otherwise.
Next, open the ComicCard.tsx file and make the following changes to allow your app’s users to save their favorite comics:
import { star, starOutline } from 'ionicons/icons'; import * as utils from '../util'; type Props = { comic: Comic; } const ComicCard: FC<Props> = (props): JSX.Element => { const { comic } = props; const [isFavourite, setIsFavourite] = useState(false); const checkFavourite = (): void => { utils.checkFavourite(comic.id).then((value: boolean) => { setIsFavourite(value); }); } useEffect(() => { checkFavourite(); }); return ( <IonCard> ... <IonCardHeader> ... </IonCardHeader> <IonCardContent> <IonButton onClick={(): void => { utils.updateFavourites(comic).finally(() => { checkFavourite(); }); }} > <IonIcon icon={(isFavourite) ? star : starOutline} color="light" /> {(isFavourite) ? 'Remove' : 'Add' } </IonButton> </IonCardContent> </IonCard> ); }
Your ComicCard component now has a IonButton component that, when clicked, calls the updateFavourites() function you wrote earlier. Remember that the function acts like a toggle, removing the comic if it was already saved, or else saving it. Don’t forget to add the imports for the new Ionic components, IonButton, IonCardContent and IonIcon, just added to this component.
Now for the final part of this step, where you will be rendering saved comics in their own page. Replace the contents of the Tab2.tsx file with the following:
import React, { useState } from 'react'; import { IonContent, IonHeader, IonPage, IonTitle, IonToolbar, IonGrid, IonRow, IonCol, useIonViewWillEnter } from '@ionic/react'; import './Tab2.css'; import { Comic } from '../interfaces/comic'; import { getFavourites } from '../util'; import ComicCard from '../components/ComicCard'; const Tab2: React.FC = () => { const [comics, setComics] = useState(null as Comic[] | null); const loadComics = (): void => { getFavourites().then((result) => { if (result) { setComics(result); } }) }; useIonViewWillEnter(() => { loadComics(); }); return ( <IonPage> <IonHeader> <IonToolbar> <IonTitle>Favourites</IonTitle> </IonToolbar> </IonHeader> <IonContent> {(comics) && ( <IonGrid> <IonRow> {comics.map((comic) => ( <IonCol key={comic.id} sizeXs="12" sizeSm="6" sizeMd="4" sizeLg="3" sizeXl="2"> <ComicCard comic={comic} /> </IonCol> ))} </IonRow> </IonGrid> )} </IonContent> </IonPage> ); }; export default Tab2;
This page is quite similar to the Tab1 page but, instead of making an API request to get comics, you are accessing locally saved data. You are also using the Ionic life cycle hook, useIonViewWillEnter(), instead of a useEffect() hook, to make a call to the function that reads saved comics and updates the component’s state. The useIonViewWillEnter() hook gets called just as the page being navigated to enters into view.
Your application now makes use of a few native plugins to improve its functionality. In the next step, you will learn how to generate a native project for Android and create a native app using Android Studio.
Note: You can delete the files related to *Tab3* and remove the import and related *IonTab* component in the *App.tsx* file.
Generating A Native Project
Ionic comes with support for cross-platform app runtimes such as Capacitor and Cordova. These frameworks help you to build and run apps developed using Ionic on a native device or emulator. For the purpose of this guide, you will be using Capacitor to generate native project files.
Before proceeding to adding a platform, you will need to generate a production build of your application. Run the following command in your project’s root directory to do so:
ionic build
Now let’s add Capacitor to your project and generate the assets required to build a native application. Capacitor provides a CLI which can be accessed in your project by using npx or from the ionic CLI as shown below:
Using npx
npx cap add android
This command adds the android platform to your project. Other possible platform values are ios and electron.
Using ionic
Since you initialized your project using the --capacitor flag earlier, Capacitor has already been initialized with your project’s information. You can proceed to adding a platform by running the following command:
ionic capacitor add android
This command will install the required dependencies for the android platform. It will also generate files required for a native Android project and copy over the assets you built earlier when running ionic build.
If you have installed Android Studio, you can now open your project in Android Studio by running:
ionic capacitor open android
Finally, build your project:
Generate an APK. (Large preview)
Conclusion
In this guide, you have learned how to develop hybrid mobile applications using Ionic Framework’s React integration. You also learned how to use Capacitor for building native apps, specifically for the Android platform. Check out the API docs as there are a lot more UI components available to be used in Ionic apps that we didn’t explore. You can find the code on GitHub.
References
(ks, ra, yk, il, og)
Website Design & SEO Delray Beach by DBL07.co
Delray Beach SEO
source http://www.scpie.org/an-introduction-to-react-with-ionic/
0 notes
Text
An Introduction To React With Ionic
About The Author
I love building software for the web, writing about web technologies, and playing video games. More about Jerry …
Mobile app development using hybrid frameworks has come a long way since initial release in 2008. With the improvements being made to the JavaScript engine and improved processing power available to mobile phones, the major concern people had when they considered developing their apps using the hybrid approach — namely, performance — has all but been eliminated, and cross-platform frameworks have seen a surge in popularity.
We’re going to build a mobile application that pulls data from the Marvel Comics API; the data will show Marvel comics and you’ll be able to choose your favorites. At the end, we’ll create a native build of the project on Android.
The Ionic Framework is an open-source UI toolkit for building fast, high-quality applications using web technologies with integrations for popular frameworks like Angular and React. Ionic enables cross-platform development using either Cordova or Capacitor, with the latter featuring support for desktop application development using Electron.
In this article, we will explore Ionic with the React integration by building an app that displays comics using the Marvel Comics API and allows users to create a collection of their favorites. We’ll also learn how to integrate native capabilities into our app with Capacitor and generate builds for a native platform.
If you have not worked with Ionic in the past, or you’re curious to find out how Ionic works with React, this tutorial is for you.
Prerequisites
Before you can start building apps with the Ionic Framework, you will need the following:
Node.js (at least v10) installed on your computer
working knowledge of React
familiarity with the Hooks API
some experience with TypeScript
a native IDE, Android Studio for Android, or XCode for iOS
a Marvel developer account with an API key. You can get one here
Here’s a picture of what we’ll be building:
Marvel comics client app (Large preview)
Installing Ionic CLI
Ionic apps are created and developed primarily through the Ionic command line interface (CLI). The CLI offers a wide range of dev tools and help options as you develop your hybrid app. To proceed with this guide, you will need to make sure the CLI is installed and accessible from your terminal.
Open a new terminal window and run the following command:
npm install -g @ionic/cli
This will install the latest version of the Ionic CLI and make it accessible from anywhere on your computer. If you want to confirm that the install was successful, you can run the following command:
ionic --version
This command will output the installed Ionic version on your computer and it should be similar to this:
6.4.1
You can now bootstrap Ionic apps for the officially supported framework integrations — Angular and React — using any of the prebuilt templates available.
Starting An Ionic React Application
Creating an Ionic React application is easy using the CLI. It provides a command named start that generates files for a new project based on the JavaScript framework you select. You can also choose to start off with a prebuilt UI template instead of the default blank “Hello world” app.
To get started, run the following command:
ionic start marvel-client tabs --type=react --capacitor
This command will create a new Ionic React app using the tabs template. It also adds a Capacitor integration to your app. Capacitor is a cross-platform app runtime that makes running web apps natively on iOS, Android, and desktop easy.
Navigate your terminal to the newly created directory and run start the server.
cd marvel-client ionic serve
Now point your browser to http://localhost:8100 to see your app running.
Note: If you have used create-react-app (CRA) before, your current project’s directory structure should feel very familiar. That’s because, in order to keep the development experience familiar, Ionic React projects are created using a setup similar to that found in a CRA app. React Router is also used to power app navigation under the hood.
Creating A React Component
You are going to create a reusable React component in this step. This component will receive data and display information about a comic. This step also aims to help demonstrate that Ionic React is still just React.
Delete the files for the ExploreContainer component from src/components and remove its imports from the .tsx files in the src/pages directory.
import React from 'react'; import { IonContent, IonHeader, IonPage, IonTitle, IonToolbar } from '@ionic/react'; import ExploreContainer from '../components/ExploreContainer'; import './Tab1.css'; const Tab1: React.FC = () => { return ( <IonPage> ... <IonContent> <IonHeader collapse="condense"> <IonToolbar> <IonTitle size="large">Tab 1</IonTitle> </IonToolbar> </IonHeader> <ExploreContainer name="Tab 1 page" /> </IonContent> </IonPage> ); }; export default Tab1;
In your Tab1.tsx file, also remove the content within the <IonContent></IonContent> tag.
Next, create a file named ComicCard.tsx in your src/components directory. Then, open the file in your editor and add the following contents:
import React, { FC } from 'react'; import { Comic } from '../interfaces/comic'; import { IonImg, IonCard, IonCardTitle, IonCardSubtitle, IonCardHeader } from '@ionic/react'; type Props = { comic: Comic; } const ComicCard: FC = (props): JSX.Element => { const { comic } = props; return ( <IonCard> <div style= > <IonImg src={`${comic.thumbnail.path}.${comic.thumbnail.extension}`} /> </div> <IonCardHeader> <IonCardSubtitle> {comic.title} </IonCardSubtitle> <IonCardTitle> <h3> {comic.series.name} </h3> </IonCardTitle> </IonCardHeader> </IonCard> ); } export default ComicCard;
Your ComicCard component receives props containing details of a comic and renders the information using an IonCard component. Cards in Ionic are usually composed using other subcomponents. In this file, you are using the IonCardTitle and IonCardSubtitle components to render the comic title and series information within a IonCardHeader component.
Consuming The Marvel API
To use your newly created component you would have to fetch some data from the Marvel API. For the purpose of this guide, you are going to use the axios package to make your HTTP Requests. You can install it by running the following command:
yarn add axios
Next, add the following folder to your src directory:
# ~/Desktop/marvel-client/src mkdir -p services
Then, cd into the services directory and create a file named api.ts:
# ~/Desktop/marvel-client/src/services touch api.ts
Finally, open the file and add the following contents:
import axios from 'axios'; import { DataContainer } from '../interfaces/data-container'; import { Comic } from '../interfaces/comic'; const API_KEY = '813xxxxxxxxxxxxxxxxxx'; const api = axios.create({ baseURL: 'https://gateway.marvel.com:443/v1/public', headers: { 'Content-Type': 'application/json', }, }); api.interceptors.response.use((response) => { if (response.status === 200) { return response.data.data; } }); export function getComics(): Promise<DataContainer<Comic>> { return api.get('/comics', { params: { apikey: API_KEY, limit: 10, hasDigitalIssue: true, }, }); }
Be sure to replace the value of API_KEY with your own API key. If you don’t have one, you can request one by signing up at the Marvel developer website. You also need to set up your account to allow requests from your local development server by adding localhost* to your Marvel authorized referrers list (see the image below):
Marvel Account. (Large preview)
You now have an axios instance configured to use the Marvel API. The api.ts file has only one export, which hits the GET /comics endpoint and returns a collection of comics. You are limiting the results to only those that are available digitally. You will now proceed to use the API Service in your application.
Open the Tab1.tsx file and replace the contents with the following:
import React, { FC, useState, useEffect } from 'react'; import { IonContent, IonHeader, IonPage, IonTitle, IonToolbar, IonSpinner, IonGrid, IonRow, IonCol } from '@ionic/react'; import './Tab1.css'; import ComicCard from '../components/ComicCard'; import { Comic } from '../interfaces/comic'; import { getComics } from '../services/api'; const Tab1: FC = () => { const [comics, setComics] = useState(null as Comic[] | null); const [loading, setLoading] = useState(false); const fetchComics = () => { setLoading(true); getComics().then((response) => { if (response && response.results) { setComics(response.results); } }).finally(() => { setLoading(false); }); }; useEffect(() => { fetchComics(); }, []) return ( <IonPage> <IonHeader> <IonToolbar> <IonTitle>Home</IonTitle> </IonToolbar> </IonHeader> <IonContent> {(loading) && ( <div className="ion-text-center ion-padding"> <IonSpinner name="crescent" /> </div> )} {(comics) && ( <IonGrid> <IonRow> {comics.map((comic) => ( <IonCol key={comic.id} sizeXs="12" sizeSm="6" sizeMd="4" sizeLg="3" sizeXl="2"> <ComicCard comic={comic} /> </IonCol> ))} </IonRow> </IonGrid> )} </IonContent> </IonPage> ); }; export default Tab1;
The file above is an example of a page in Ionic. Pages are components that can be accessed with a route/URL. To ensure transitions between pages work properly, it is necessary to have the IonPage component be the root component in your page.
IonHeader is a component meant to exist at the top of a page. It’s not required for all pages, but it can contain useful components like the page title, the IonBackButton component for navigating between pages, or the IonSearchBar. IonContent is the main content area for your pages. It’s responsible for providing the scrollable content that users will interact with, plus any scroll events that could be used in your app.
Inside your component, you have a function called fetchComics() — called once inside the useEffect() hook — which makes a request to get comics from the Marvel API by calling the getComics() function you wrote earlier. It saves the results to your component’s state via the useState() hook. The IonSpinner component renders a spinning icon while your app is making a request to the API. When the request is completed, you pass the results to the ComicCard component you created earlier.
At this point your app should look like this:
App home page. (Large preview)
In the next step, you will learn how to use Capacitor plugins in your app by enabling offline storage.
Creating a Personal Collection of Marvel Comics
Your app looks good so far, but it isn’t very useful as a mobile app. In this step you will extend your app’s functionality by allowing users to ‘star’ comics, or save them as favorites. You will also make information about the saved favorites available to view offline by using the Capacitor Storage plugin.
I’m a big fan of The Collector. (Large preview)
First, create a file named util.ts in your src directory:
# ~/Desktop/marvel-client/src touch util.ts
Now, open the file and paste the following contents:
import { Plugins } from '@capacitor/core'; import { Comic } from './interfaces/comic'; const { Storage, Toast } = Plugins; export const updateFavourites = async (comic: Comic): Promise => { const saved = await Storage.get({ key: 'savedFavourites' }); const favourites: Comic[] | null = (saved && saved.value) ? JSON.parse(saved.value) : null; if (!favourites) { const comics = [comic]; await Storage.set({ key: 'savedFavourites', value: JSON.stringify(comics), }); return Toast.show({ text: 'Added to favourites', }); } const copyOfFavourites = favourites.slice(); const { id } = comic; const isSavedIndex = copyOfFavourites.findIndex((c) => c.id === id); if (isSavedIndex !== -1) { copyOfFavourites.splice(isSavedIndex, 1); await Storage.set({ key: 'savedFavourites', value: JSON.stringify(copyOfFavourites), }); return Toast.show({ text: 'Removed from favourites', }); } else { copyOfFavourites.unshift(comic); await Storage.set({ key: 'savedFavourites', value: JSON.stringify(copyOfFavourites), }); return Toast.show({ text: 'Added to favourites', }); } }; export const getFavourites = async (): Promise<Comic[] | null> => { const saved = await Storage.get({ key: 'savedFavourites', }); return (saved && saved.value) ? JSON.parse(saved.value) : null; }; export const checkFavourite = async (id: number): Promise<boolean> => { const saved = await Storage.get({ key: 'savedFavourites', }); const favourites: Comic[] | null = (saved && saved.value) ? JSON.parse(saved.value) : null; if (favourites) { const isSavedIndex = favourites.findIndex((c) => c.id === id); if (isSavedIndex !== -1) { return true; } } return false; };
The Storage plugin provides a key-value store for simple data, while the Toast plugin provides a notification pop-up for displaying important information to a user.
The updateFavourites() function in this file takes a single argument, a Comic object, and adds it to the device storage if it doesn’t exist, or removes it from the device storage if it was already saved. getFavourites() returns the user’s saved comics, while checkFavourites() accepts a single argument, a Comic resource ID, and looks it up in the saved comics, returning true if it exists, or false otherwise.
Next, open the ComicCard.tsx file and make the following changes to allow your app’s users to save their favorite comics:
import { star, starOutline } from 'ionicons/icons'; import * as utils from '../util'; type Props = { comic: Comic; } const ComicCard: FC<Props> = (props): JSX.Element => { const { comic } = props; const [isFavourite, setIsFavourite] = useState(false); const checkFavourite = (): void => { utils.checkFavourite(comic.id).then((value: boolean) => { setIsFavourite(value); }); } useEffect(() => { checkFavourite(); }); return ( <IonCard> ... <IonCardHeader> ... </IonCardHeader> <IonCardContent> <IonButton onClick={(): void => { utils.updateFavourites(comic).finally(() => { checkFavourite(); }); }} > <IonIcon icon={(isFavourite) ? star : starOutline} color="light" /> {(isFavourite) ? 'Remove' : 'Add' } </IonButton> </IonCardContent> </IonCard> ); }
Your ComicCard component now has a IonButton component that, when clicked, calls the updateFavourites() function you wrote earlier. Remember that the function acts like a toggle, removing the comic if it was already saved, or else saving it. Don’t forget to add the imports for the new Ionic components, IonButton, IonCardContent and IonIcon, just added to this component.
Now for the final part of this step, where you will be rendering saved comics in their own page. Replace the contents of the Tab2.tsx file with the following:
import React, { useState } from 'react'; import { IonContent, IonHeader, IonPage, IonTitle, IonToolbar, IonGrid, IonRow, IonCol, useIonViewWillEnter } from '@ionic/react'; import './Tab2.css'; import { Comic } from '../interfaces/comic'; import { getFavourites } from '../util'; import ComicCard from '../components/ComicCard'; const Tab2: React.FC = () => { const [comics, setComics] = useState(null as Comic[] | null); const loadComics = (): void => { getFavourites().then((result) => { if (result) { setComics(result); } }) }; useIonViewWillEnter(() => { loadComics(); }); return ( <IonPage> <IonHeader> <IonToolbar> <IonTitle>Favourites</IonTitle> </IonToolbar> </IonHeader> <IonContent> {(comics) && ( <IonGrid> <IonRow> {comics.map((comic) => ( <IonCol key={comic.id} sizeXs="12" sizeSm="6" sizeMd="4" sizeLg="3" sizeXl="2"> <ComicCard comic={comic} /> </IonCol> ))} </IonRow> </IonGrid> )} </IonContent> </IonPage> ); }; export default Tab2;
This page is quite similar to the Tab1 page but, instead of making an API request to get comics, you are accessing locally saved data. You are also using the Ionic life cycle hook, useIonViewWillEnter(), instead of a useEffect() hook, to make a call to the function that reads saved comics and updates the component’s state. The useIonViewWillEnter() hook gets called just as the page being navigated to enters into view.
Your application now makes use of a few native plugins to improve its functionality. In the next step, you will learn how to generate a native project for Android and create a native app using Android Studio.
Note: You can delete the files related to *Tab3* and remove the import and related *IonTab* component in the *App.tsx* file.
Generating A Native Project
Ionic comes with support for cross-platform app runtimes such as Capacitor and Cordova. These frameworks help you to build and run apps developed using Ionic on a native device or emulator. For the purpose of this guide, you will be using Capacitor to generate native project files.
Before proceeding to adding a platform, you will need to generate a production build of your application. Run the following command in your project’s root directory to do so:
ionic build
Now let’s add Capacitor to your project and generate the assets required to build a native application. Capacitor provides a CLI which can be accessed in your project by using npx or from the ionic CLI as shown below:
Using npx
npx cap add android
This command adds the android platform to your project. Other possible platform values are ios and electron.
Using ionic
Since you initialized your project using the --capacitor flag earlier, Capacitor has already been initialized with your project’s information. You can proceed to adding a platform by running the following command:
ionic capacitor add android
This command will install the required dependencies for the android platform. It will also generate files required for a native Android project and copy over the assets you built earlier when running ionic build.
If you have installed Android Studio, you can now open your project in Android Studio by running:
ionic capacitor open android
Finally, build your project:
Generate an APK. (Large preview)
Conclusion
In this guide, you have learned how to develop hybrid mobile applications using Ionic Framework’s React integration. You also learned how to use Capacitor for building native apps, specifically for the Android platform. Check out the API docs as there are a lot more UI components available to be used in Ionic apps that we didn’t explore. You can find the code on GitHub.
References
(ks, ra, yk, il, og)
Website Design & SEO Delray Beach by DBL07.co
Delray Beach SEO
source http://www.scpie.org/an-introduction-to-react-with-ionic/ source https://scpie1.blogspot.com/2020/05/an-introduction-to-react-with-ionic.html
0 notes
Text
How to configure a CDN in AWS
Amazon CloudFront is a web service that speeds up the distribution of static and dynamic web content, such as html, css, javascript, and image files.
This document will cover the steps to host an angular website using AWS CloudFront.
Permissions Needed 1. S3 Permission 2. CDN Permission 3. AWS Certificate Manager Permission
Steps to configure CDN
1. Create an S3 bucket named webhost
a. Create Index.html with the following content i. <div style="text-align:center"> You have successfully completed your website hosting! </div> b. Upload index.html to the S3 bucket
2. Configure the bucket for Web Hosting
a. Select the bucket
b. Select “Properties”
c. Select “Static web hosting”
i. For Index document enter index.html (Angular prod build generates index.html as the starting point for the website)
ii. For Error document enter error.html (create a file called error.html to show a custom error message when users access a wrong URL)
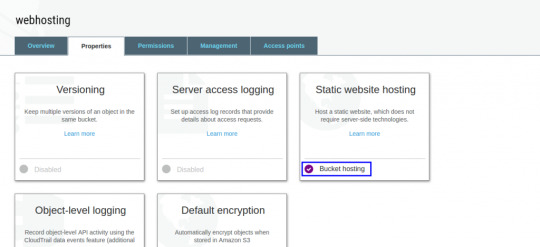
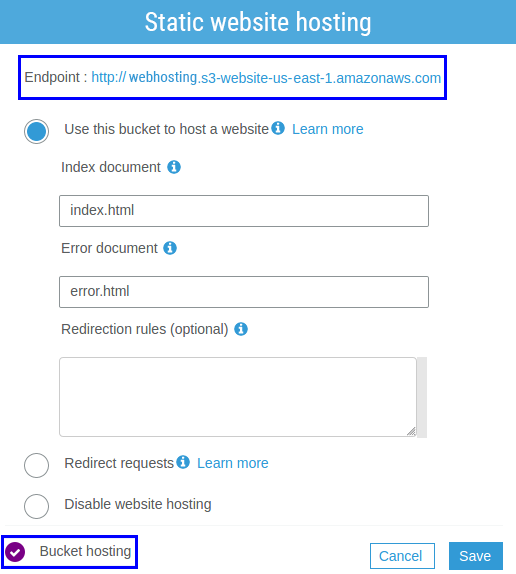
3. Set Bucket policy There are two possible options a. Make the bucket public b. If a custom policy is set, then make the content of the bucket publicly accessible. Refer to this document to set bucket policy

4. Create Cloudfront Distribution a. Select services from the top menu b. Select CloudFront c. Select Create Distribution. d. Select Get started under “Web”
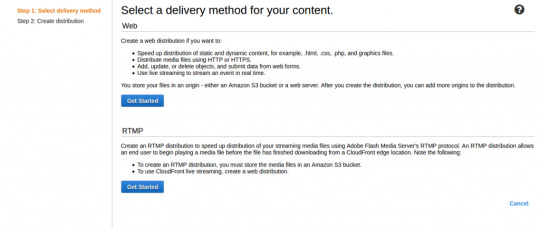
Set “Origin Domain name” as the Endpoint of Static website hosting (Step No 2)
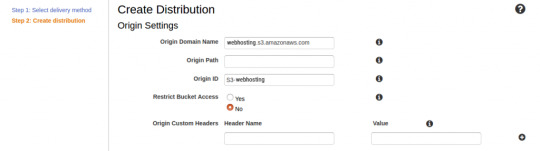
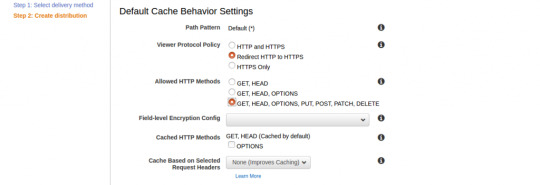
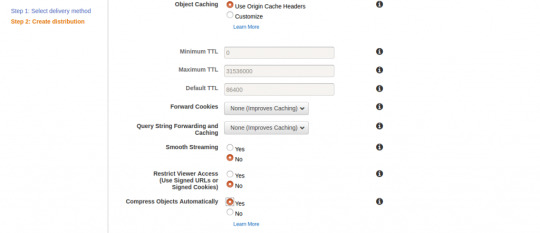
Compress Objects Automatically – Select “Yes” for a better performance

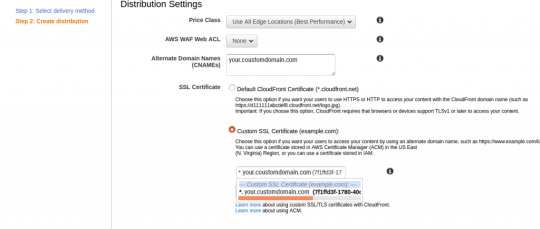
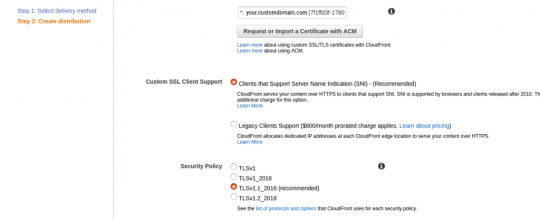
CNAME – website name. (Optional, use this for user-friendly website name) If alternate domain is used, an ACM (AWS Certificate Manager) certificate has to be created
Refer to this document to create ACM.

In the above image, set the “Default Root Object” to index.html

5. Click “Create Distribution”. 6. Map CNAMEs and Domain in Route 53 or any other DNS provider.
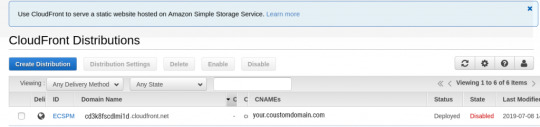
7. Type your domain in the address bar of the browser. You should see the following result.

0 notes
Link
#advanced java tutorial#java tutorial for beginners#learn java#java for beginners#javascript tutorial#java tutorial#java training classes#learn java programming#angular 2 tutorial#angular 4 tutorial#angular 4 set default route
0 notes
Text
15 Best Node.js Framework to Know in 2020 for Developing Real-time Application

For web development, most of the developers are looking forward to using JavaScript. This leads to prefer JavaScript Framework other than another framework.
One great tool that uses JavaScript for developing real-time applications is Node.js.
Node.js was introduced in 2009 for building scalable server-side web applications.
It offers numerous benefits like not limited to the usage of event-driven non-blocking input/output model, single-threaded asynchronous programming amongst others.
In this blog you can learn about 15 Best Node.js frameworks that are best suited for real-time application development.
What is Node.js?
If you want to cross-platform runtime environment for executing JavaScript code outside of the browser then Node.js framework will be the right choice.
It runs on various platforms which is a free and open-source framework.Node.js is stimulated by the Linux Foundation’s Collaborative Projects program. It supports multiple platforms like Linux, macOS, Microsoft Windows and more.
Node.js is a wrapper around virtual machines like V8of Google executes with built-in modules and easy to use asynchronous API.
Node.js allows developers to use JavaScript on both the front-end and the back-end of an application.
And moreover, Node.js is easy to learn and get started.
Some advantage of using Node.js Framework
Node.Js frameworks are known for their speed, knowledge, and productivity.
Node.Js allows you to write the same code for both the front-end and back-end languages with saving you from learning other codes and time.
It allows you to maintain the same coding pattern throughout the front-end and back-end.
It has tools and recommended practices that help in saving your lot of time.
Let Now see what are top 15 Node.js framework in 2020.
1.Express.js
Express.Js is the most popular framework and first choice of the developers.
Express.js know for its fast, unopinionated, and minimalist framework.
It helps in setting up and configure routes. This intern used as a tool for sending and receiving requests between the front-end and the database of an app.
You can develop both web and mobile applications.
It supports different template engines, so developers aren't forced into any specific ORM.
Features:
With the help of Express.Js, anyone can easily plot both single and multi-page, along with different web applications.
It works as seamless architectural patterns for creating eccentric applications.
You can render large HTML pages dynamically, Express.Js also allows you to respond to HTTP requests by setting up middlewares.
Express.Js is actually a routing table, i.e., a set of routing libraries. These sets of libraries perform a variety of web actions based on HTTP methods.
This framework also comes with a multiple view support system. Users are impressed with the speedy I/O and it is robust API making routines easier and faster.
2.Meteor.js
Fundamentals NodeJs Frameworks is Meteor.Js.
It is a full-stack framework of Node.js that can be used to build real-time applications.
It sends data over the wire, instead of HTML
Meteor.Js is used to create both mobile and web-based JavaScript applications.
Features:
You are allowed to share the same APIs on the server-side and client-side components.
Meteor.Js is lightweight architecture with a few lines of codes.
In Meteor.Js, developers can reuse the codes on several devices. The implementation of regular updates is easier with Meteor.Js due to this feature.
Meteor.Js gives you the liberty to use any other platform at an occurrence.
Many pre-written modules come with Meteor.Js. The Meteor.Js community is always there with useful tutorials, packages, documentation in the need
3.Koa.js:
Koa is used many for developing a cross-platform server-side runtime environment application.
It comes with an array of objects related to middleware functions.
It executes those middleware objects in a stacked manner upon request making it easier for web developers. This makes to build and build fast and scalable network applications.
It makes the middleware writing process easy by providing improved interoperability and robustness.
This framework accelerates the development of custom web applications and API of the application.
Features :
If you are going to develop a more customized application then Koa is the right choice. In this, you are allowed to build applications from scratch and developers can add features that they need only.
It makes error handling system better by limits the use of callbacks.
Since its Middleware is not a bundle any pattern which makes server writing with Koa faster.
Features Freshness of cache, content negotiation and proxy-support help you to develop useful strategy.
You can manage the code neatly with a syn/await keyword.
4.Sails.js
The framework that adopts convention over configuration principle is Sails.js framework.
It is also a model–view–controller(MVC) framework. With the help of MVC it allows building single-page apps, REST APIs, and real-time apps.
It allows building applications with less writing of code with code generators. This framework is built on top of Socket.io.
With the help of this, it allows us to build an application with real-time, bidirectional, event-based communication.
Features:
With Sails.Js you can use almost any database. With help of ORM (Object Rational Mapping) solution it allows connecting users with any database.
Sails.Js framework is highly compatible with most of the front-end platforms. Developers can develop any applications using this framework.
What's more is Sails.Js supports Socket.io by default making it one of the best selections for different social media applications, chat tools, and many others.
Sails.Js offers flawless transitions as it has the same MVC structure as many other quality frameworks.
Sails.Js handles HTTP requests by using Express.Js. Hence, it ensures the same quality and better performance.
5.Hapi.js
It is released by Eran Hammer at Walmart. For developing JSON API, this is the best choice since the powerful and robust open-source framework.
Most of Application programming interface (API) servers, websites, and HTTP proxy applications are built with hapi.js.
It facilities developers with features like input validation, implement caching,configuration-based functionality and error handling. Hapi is used for building large-scale websites that are the most useful applications and providing technology solutions.
Features:
Hapi offers Code reusability so function developed in this application can be reused in other application.
No external dependencies so it takes less time in executing.
Security for application, it is used in developing a highly secured application.
Hapi uses Integrated Architecture: which makes the authorization and authentication available in a node framework.
Hapi.Js is fast and smart in Fixing bugs and adding new features through a powerful plugin network.
Hapi.Js is allowed to the users to use it with MySQL, MongoDB, and Postgres to create potential and static websites.
To build HTTP proxy applications, Hapi.Js can help users by forwarding requests from its main API to other sources.
Hapi.Js comes with a plugin – nes that help in real-time chat applications and other social apps development.
Rendering dynamic contents have been easier with Hapi.Js with help of JavaScript Templating Engine
6.Derby.js
Derby.Js is an open-source framework. and use MVC structure, it is also a full-stack NodeJs Web Framework. Derby.Js is considered ideal for developing real-time collective applications.
For build quality web and mobile applications you can use Derby.Js. Real-time concurrency, developing multi-websites and data sync is possible with this framework.
Features:
With the help of data synchronization, this framework allows synchronization of data-time between browsers, servers, and application databases seamlessly.
Quick self-regulating timing and real-time concurrency offered by Derby.Js allow users to enjoy the benefits of multi-users in the same applications with a variety of editing options.
Derby.Js ensures bi-directional script development. It lets users work with both client-side and server-side script components.
Using Derby.Js, developers can easily add customized codes and build real-time and effective custom-made websites.
Derby.Js automatically resolves the conflict that is directed by ShareDB. ShareDB implements the use of OT technology (Operational Transformation) and naturally resolves conflicts in online/offline.
7.Total.js
Total.Js is a yet another open-source Node.Js framework which is a fast, robust, and stable service for developing applications.
It offers ultimate flexibility which is one of the main benefits that developers enjoy while using Total.Js framework.
For IoT applications along with other web and desktop-based applications, this framework suits well.
Features:
Total.Js is highly compatible with multiple database systems – MySQL, MongoDB, PostgreSQL along several front-end systems- Angular, Ember, React.
Total.Js offers a modular architecture which helps in image processing tool, simple mail transfer protocol (SMTP) system, and others.
With Total.js framework you can Creating real-time responsive applications which is never been easier before.
For build cost-effective, fully responsive applications you can use this framework.
Total.Js does not need any help from grunting module to compress, which makes this framework simple and easy to put on work.
It is suitable and efficient on development projects along with the NoSQL database is embedded on it.
8.Adonis.js
Adonis is a popular NodeJs MVC framework which is suitable for writing scalable server-side web applications.
It is declared that AdonisJs runs on all major OS.
For writing different web applications s with a few lines of codes this framework is best. If secure development of the platform is your option, then this framework will suit most.
Features:
AdonisJs framework offers a consistent ecosystem where developers can focus more on professional needs and avoid wasting time on choosing between different packages.
ORM Technique is included that allows developers to explore and handle data easily from databases such as SQLite and Postgres.
In Adonis, developers can quickly work on the existing applications to holds a set of standardized conventions.
For beginners, AdonisJs is easy to learn. Having a standard understanding of NodeJs Framework, JavaScript, and Async programming is enough, to begin with, Adonis.
The MVC structure of Adonis is quite similar to Laravel.
9.Nest.js
NestJs is a Node.Js framework that mainly focuses on developing progressive server-side applications by using cumulative JavaScript. TypeScript is used by Nest.js it’s an only programming language.
Features:
NestJs offers better typing reliability with components of FP, OOP, and FRP using typescript.
NestJs offers a modular structure, and it arranges codes systematically in different modules making the use of external libraries easier and common with this framework.
For building your backend with NestJs and AngularJs as your front end framework will be more comfortable.
NestJs utilizes the features of Express.Js. Developers are offered with the seamless benefits of building highly scalable, loosely linked, testable, and easily manageable applications.
It makes the integration process easier for a lot of unique features that are not always in the box using Nest CLI.
10.LoopBack.js
One of the highly-extensible API framework and used widely will be LoopBack. Modern applications often come with complex integration.
You can easily create dynamic REST APIs with a minimum or even no knowledge of coding.
Features:
Allows you to create such APIs that can work with any kind of web client and can be easily bridged to backend data sources.
LoopBack allows you to connect with several databases such as Oracle, SQL, and MongoDB.
Permits developers to create SDKs and API Documentations with help of widget – API Explorer that comes in default with LoopBack.
Because LoopBack provides a full-stack configuration, developers can easily inquire about their database from the client-side using direct filters.
Provides a clean and modular structure of codes and easy to use.
It has model-relation-support, third party login and storage service, API swagger, better user management policy, moreover they are built-in options in it.
11.Socket.io
Socket.io is a full-stack framework. It is a JavaScript library that focuses on creating real-time applications. Socket.io also provides users with a simple and straightforward API that works in harmony with almost every service. Developers are impressed by the speed and reliability offered by this framework.
Features:
Socket.io works on ultra-speed by providing similar APIs to both the web-client side section and server-side section.
EventEmitters in Socket.io allows developers to establish bi-directional communication between the web client and the server.
Socket.io has been playing a significant role as a Node.Js, transferring the WebSockets into being more reliable and easy-to-access.
Developers can feed readable streams to different browsers from the server using binary streaming options.
When you are looking to use an option like auto-correction, anomaly detection, rendering JSON serializable objects, multiplexing, etc. in your application then use Socket.io framework.
12.Mean.io
Mean.io is a JavaScript Framework that is a full-stack MVC framework. It makes this framework to deliver a fast, powerful, and easily manageable applications. The word Mean actually consists of Mongo, Angular 6, Express, and Node. Mean is a collection of open source technologies. It is ideal for developing real-time dynamic applications.
Features:
Additionally having a full Mean Stack, Mean.io also supports many other development tools – Babel, GraphQL, etc.
Mean.io is a full development stack. Developers will not have to worry about additional components. Every component of this framework is programmed to be utilized together.
Developers enjoy working with Mean as it requires only JavaScript. In fact, developers will not need any standalone server if they are proficient enough in JavaScript.
Mean.io offers developers rapid and real time changes to applications even if they are in development stages allowing developers to present demo versions of their applications to the clients easily.
13.ActionHero.Js
An application that needs framework with lightweight and rich-featured then ActionHero might be the right one for them.
One of the light and fast Node.Js frameworks will be ActionHero framework.
Even that is best used for building reusable and progressive API services. It has many special features and is highly flexible for different types of clients to work with.
Features:
ActionHero can be use for developing web clients, socket clients, and web socket clients such as HTTP, HTTPS, TLS, TCP.
It offers developers to build background tasks, place them on several queues, and work with them later.
Along with the help of the Redis-backed library, it powers the service system.
One of the finest options on this framework will be a top-class cache system, decentralization of communication, and distribution of workers.
For Games and applications which use both HTTP and Socket, ActionHero can be used.
ActionHerocan be used in creating IoT applications also.
14.Restify.Js
Restify is a well-known REST API framework of Node.Js. Developers are satisfied with their potential solutions for REST APIs for years.
The performance of the Restful framework is adjusted frequently for generating semantically accuracy in RESTful APIs.
Features:
Restify is one of the earlier frameworks of Node.Js. It is exclusively developed for building scalable APIs.
Developers can monitor and examine entire API frameworks with help of direct harmony with HTTP actions
If you are working on a platform that is DTrace supportive, Restify will be of real use to you. Restify offers automatic support for DTrace.
Restify maintains real-time data via Socket.io. It offers bi-directional communication to both web and client-side components. It also helps you to broadcast and store data.
Restify lets you handle errors immediately and systematically. It hooks the errors that take place during development with the help of multiple error trapping functions.
15.Keystone.Js
Keystone.Js is a full-stack and open-source framework. Developed in Express.Js and MongoDB, this powerful framework is used for developing database-driven applications, websites, and APIs.
Because of its flexible, lightweight and extensible characteristics, most developers use it.
Features:
This NodeJs Web framework offers a great Admin UI which users can easily manage. Moreover, any types of customization are welcome here.
With the help of dynamic routes, you can easily create blocks for creating a database, and form processing.
For developers, it will be easier for developing dynamic websites/applications/APIs with this framework.
This framework offers integration with several online platforms such as Cloudinary, Mandrill, Embedly, and Google Places for easy handling of data.
Regardless of the operating systems (Windows, Mac, Linux, BSD Solaris), Keystone provides stable management to the overall progress in the development process.
Keystone also provides support for other additional frameworks and apps such as JSP/ ASP.NET/ Silverlight applications, WPF, CXF, WCF, and others.
Conclusion
Every day the need for applications becomes more advanced in the digital world.
All the framework on this list has different features which are suitable for kinds of applications.
Node.js is leading the development of the advanced real-time application.
If you want you can learn any framework to develop your application or you can hire an Node.js developer from infinijith to develop your application. Our Node.js team is an expert in handling any situation.
If you thing to any other framework needs to be added to the list? Then comment about it below to discuss further.
Click here to read more: https://www.infinijith.com/blog/nodejs/best-nodejs-framework
0 notes