#ba1b:introto3d
Explore tagged Tumblr posts
Visit Tumblr Blog
Explore Tumblr blogs with no restrictions, modern design and the best experience.
Last Seen Tumblr Blogs


Fun Fact
Total funding amounts to $125.3M.
Photo


Overview
An intensive and productive week on the course, I wanted to put a focus on the narrative research essay task and balance this academic written nature of the project with the medium of stop motion animation. Additionally, I took the time to develop my skills within Maya: re-attempting the Flying Saucers task at home and playing around with the animation workspace. Whilst I was unable to make any significant progress on my digital metamorphosis project and the animated sketchbook assignment, I instead took the time to undertake extensive research into my chosen film of Into the Spider-Verse, alongside producing a range of stop motion iterations and preparations for the ‘box lift’ task.
As a result, I’ve been able to make a series of stop motion animations that go beyond the limitations of the brief, adding a sense of narrative and interaction between off-screen characters and am confident that I��ll be able to begin work on the first draft of my essay next week. With juggling several projects at a time, as I am now, it’s important to be able to focus on particular assignments. Splitting my time between these briefs has been difficult, but I feel like I’m working to strike a balance between my ambitions for each assignment and the limited time I have left.
Narrative Research This week, I was able to decide on an analytical direction for my essay and gather a range of research sources in preparation for the drafting process. My initial idea was to analyse the plot of Into the Spider-Verse, exploring how the creators not only presented an updated take on the Hero’s Journey storyline, but also told a refreshing new version of the classic Peter Parker Spider-Man origin story we all know.
Despite this, I realised that the film’s use of this hero narrative is nothing ground-breaking or particularly new. Rather, what makes Into the Spider-Verse rather of academic study is the animation and visual language: an experimental, alternative approach to animated filmmaking, which is already making waves in the industry. Instead of taking a theoretical approach into my chosen film, I began researching into the comic-inspired aesthetic and crisp, stuttery style of CG animation.
The film represents a ‘break-through’ in animated storytelling, pilling compositional and aesthetic inspiration from it’s comic book source material, adapting dynamic storytelling poses and graphic printing techniques to the animation. In my research for this essay, I wanted to take a look behind the scenes and how this new visual language came to be. Looking through the Art of Into the Spider-Verse book, and trawling through countless interviews, online articles and really anything I could find on the process and film itself led me to the work of visionary Alberto Mielgo, the 2012 Disney experiment Paper Man and how the filmmakers created the signature ‘crunchy’ animation style.
Having completed this extensive research into my chosen film, I’ve reached a place where I’m ready to begin the drafting process. With my own question and a range of research sources ranging from the academic literature of Paul Wells to videos breaking down the animation process of Into the Spider-Verse, next week I will begin writing my essay. My aim is to have a completed draft ready for my individual tutorial, in which I will likely be reducing the word count.
Digital Principles This week, I put a major focus on other projects - taking the time to produce iterations and further develop on the other tasks. As a result, I didn’t really have time to make any significant progress or development in this project.
Stop Motion This week, we were given our second stop motion exercise: to animate a character lifting up a box. With this task, I’m considering all of the basic principles of animation: specifically timing, anticipation and follow through - additionally to staging the sequence properly.
To begin the week, I took the time to prepare for this week’s stop motion task in a depth I’ve never really done before. Producing my own reference footage and sketching from this has allowed my poses to have an authenticity to them, and I was able to act out a range of characters and situations in the process. Having this additional research and preparation in the filmed reference has given me a solid understanding of the action I will animate.
For my first attempt at this task, I experimented with working from this live-action reference. Whilst this allowed me to see the filmed reference poses directly in Dragon Frame, this method of working also posed several problems - and ultimately resulted in a lacking first iteration. The armature’s movement jolted from one pose to another, the staging of the sequence was ineffective and the timing of the motion was simply wrong.
My main take away from the initial attempt was to consider the posing of my armature more - take the time to make sure the pose is correct, and easily understood by the audience. A second idea was to exercise some restraint on the movement and timing: to take multiple frames with little movement, as stillness can be just as effective as motion. On the flip side of this, I also wanted to explore how to create a fast motion, considering making larger moves between frames to believably communicate a quick movement.
With this in mind, I hired out the Stop Motion Studio in my own time and developed on the task, producing two more attempts. In comparison, these were much more successful and interesting than my first test. Taking the time to develop upon the tasks set in the workshop has allowed me to produce stop motion outcomes of a far higher quality and ambition as it lifts the pressure of time off my shoulders. With my own schedule, I was able to really get lost in the work, and allow me to present a more ambitious attempt at character performance and begin to hint at a narrative beyond simply the action itself.
Next week, we will be exploring a more complex stop motion sequence: having a character walk on screen, and visibly change their expression and emotion. In preparation for this, I will begin recording my own live action reference to get a better understanding of the movements and posing and produce a few storyboard iterations of the sequence.
Animated Sketchbook This week, I put a major focus on other projects - taking the time to produce iterations and further develop on the other tasks. As a result, I didn’t really have time to make any significant progress or development on this project.
Digital 3D This week, I took it upon myself to develop upon the previous Flying Saucer task, downloading Maya to use at home and rebuilding the sequence from scratch, using a more planned-out approach. With a humorous direction (the sheep is too heavy for the UFO, which then crashes), I sketched out quick, loose ideas for the sequence. Alongside these preliminary sketches, I also explored Pixar’s approach to the task, Lifted, which also presents a light-hearted take on an alien abduction. With this, I knew I wanted to follow a comical direction that works to effectively subvert the audience’s expectations.
Overall, this represents a far more exciting and successful response to the task. Through iterative development and my own perseverance with Maya, I have been able to challenge myself to create an ‘engaging, successful’ CG animation that puts a new, comic spin on the farm animal abduction’ plot in this short sequence. Something I am going to put a focus on is iterative development on my practical exploration: this was the main point in the feedback of my previous unit, and it’s something I’m constantly considering moving forward. Here, iterations have allowed me to explore and further flesh out this simple CG sequence, and complete an animation (that, whilst simple in composition) demonstrates my new understanding of Maya as an animation and modelling program.
Additionally, we were also set a new task within Maya: taking the focus away from animation, were challenged to explore the modelling potential of the 3D software. Firstly, we were introduced to the Modelling workspace - as we explored the various tools to edit and change an existing shape. This provided us with a range of tools, allowing us to extrude, edit and bevel surfaces of shapes in order to create new, more exciting ones.
Initially, I struggled with this process: but after spending time trying to get to grips with the extrusion tool and asking for feedback, I was able to get a basic understanding of the modelling process and produced a pencil in response. It’s not exactly visually impressive or appealing, but I see the value in this task as a way to introduce the basic foundations of more complex 3D modelling.
The final task was a little more demanding: in the limited time remaining, we were to produce a 3D radio. After experiencing several technical difficulties with the program, I managed to create a basic box-radio following the steps described by our tutor. What I’m finding is the luxury of time with learning these processes: the sessions, whilst helpful, are ultimately too short and fast-paced for me to properly grasp an understanding of the Maya processes. I am somewhat struggling with the modelling side of things, however, I want to develop this understanding and take the opportunity to explore the digital learning world of Linkedin Learning, something our tutor suggested in the session.
In my own time, I managed to complete the radio and add some colour - adding life to the object that I couldn’t really see beforehand. I’m also interested in the potential of rendering this object and seeing how it could move too. Perhaps it squashes and stretches whilst listening to music? It’s a small motion, but I feel like it would be a good independent development of this session and a way for me to add an understanding of the basic principles to my Digital 3D work.
#ba1b:weeklysummary#ba1b:introtostopmotion#ba1b:introto3d#ba1b:narrativetheory#ba1b:animatedsketchbook#ba1b:digitalprinciples
1 note
·
View note
Photo


Overview As I did previously, I wanted to put a focus on specific projects this week. My main aim was to complete the first draft of my essay in preparation for our individual tutorial and focus on my stop motion developments. Fortunately, I was able to do just this: completing the first draft of my essay over the weekend and hiring out the stop motion studio in my own time to produce a few stop motion tests. Like last week, though, this did mean that I was not able to make any real progress on the digital metamorphosis and animated sketchbook assignment. This was to be expected, as it has allowed me to be ahead of the curve regarding the essay, and given me the opportunity to develop my own stop motion animation sequences beyond the expectations of the brief.
Having completed all of the Digital 3D and stop motion tasks, my priority next week will be on catching up with my other assignments. My plan is to have completed editing my essay, finished my digital metamorphosis task up to a point that I am happy with it and filled a single sketchbook by the end of next week. Given the fact that we will be briefed on our next project, explore acting through a performance workshop and a storyboarding masterclass - this may be a difficult balance. However, we also are given another week before hand in, which will be another opportunity to catch up with these two projects.
Something I am looking forward to, however, is our mid-unit review. An individual tutorial spanning around fifteen minutes, this is an opportunity to me to receive individual feedback on my work and an overall reflection of my progress so far. Personally, I feel like I am putting in more effort and work into both my practical responses and blog maintenance in comparison to the first unit - and it will be interesting to see if my tutors agree. This will allow me points to develop and improve upon, and receive a general critique of my current working practice.
Narrative Research Having completed extensive research into my chosen film last week, this week I have been able to begin work on the drafting process. Over the span of two intensive days, I was able to complete a first draft of my essay in preparation for our individual tutorial. My initial draft, however, was ultimately too encompassing and broad: a five thousand word study into Spider-Man: Into the Spider-Verse, exploring both the theoretical and practical approaches the filmmakers took to complete the final film. This was collating all of the research I’d found in the process, and from here my focus was on cutting down the word count to the required limit of 1500 words.
In the process, I ended up cutting the plot analysis of the film and my investigation into the idea of Spider-Man as a character. As a choice, the film offers a range of analytical discussion opportunities, but it’s important to remember to decide on a singular line of inquiry for this essay. With all my research mainly exploring the film’s experimental approach to CG animation, I shifted the focus of my investigation to purely looking at how the film presents its plot: how the creators adapted an alternative approach to animated filmmaking through graphic printing techniques and adding a hand-rendered touch to every frame.
My independent tutorial suggested that my writing was successful and engaging, however, it is seriously over the word count and, like last time, I need to focus on a more academic way of writing. The strength of my essay comes from the depth of detail in the film’s animation and visual language process, and use of academic ideas such as the ‘carnivalesque’ and the various writings of Paul Wells. With terms such as ‘takes the concept and runs with it’, however, my writing nature is much more suited to that of journalism or sensationalist writing styles. This was an area that I needed to improve upon, and whilst it is less prevalent in my newest essay - it’s still a problem. With this in mind, I’ve continued to edit my essay and taken away any superfluous words, exaggerated phrases, and an invasive journalistic tone. A major element of this was my initial question, describing the film’s visual language as ‘entirely new’. On my tutor’s advice, this has now changed to ‘alternative and experimental’ taking the academic language from the original questions outlined in the brief and applying it to my own investigation.
Having completed a draft of the essay, next week I will begin work on the citation and reference process. My essay benefits from a range of sources, and I will need to reference each of these properly to fulfill the requirements of the brief. I’m expecting this to be a time-consuming task and will continue to cut the word count down in the process. As a whole, I’m at a good point in the project with my essay and hope to complete the assignment with plenty of time before the submission date.
Animated Sketchbook This week, I put a major focus on other projects - taking the time to produce iterations and further develop on the other tasks. As a result, I didn’t really have time to make any significant progress or development in this project. However, in the following two weeks, I will be putting a focus on developing and completing this project.
Digital Principles This week, I put a major focus on other projects - taking the time to produce iterations and further develop on the other tasks. As a result, I didn’t really have time to make any significant progress or development in this project. However, in the following two weeks, I will be putting a focus on developing and completing this assignment.
Stop Motion In the last week of our stop motion exercises, we were asked to have a character walk on-screen, visibly change expression, and continue walking with this new emotion. Like last week, this began through an extensive preparation process, in which I produced a few storyboard iterations based on my own live-action reference of the task.
My first attempt at this stop motion exercise proved to be rather interesting, showing a successful and exaggerated change in emotion and expression through body language and timing. Where the character is walking with a fast, optimistic bounce to start with, the armature visibly holds a pose allowing the audience to understand that he’s seen something: a nasty surprise.
With this initial test being much more successful than my previous attempts, I was inspired to continue this task in my own time: developing a few more iterations of this final stop motion exercise. These iterative tests demonstrated clarity of movement through a clear line of action, and gave me the opportunity to experiment and explore character performance in more depth, evoking emotion purely through the use of strong, dynamic posing and body language. I also took this chance to be experimental with the shot composition, having my characters run and lunge towards the camera in these sequences.
In comparison to last week’s stop motion endeavours, however, I can visibly see improvement and better understanding of not only posing but timing within the stop motion process. This is something that I’ve continued to struggle with, however the purpose of these iterations was to intentionally challenge and work on this area. Although each example presents a unique approach to the task, they all include differences in locomotive speed and intention. This was a large focus of the task as a whole, to present a visible and consistent contrast between the two emotional states, and how this affects the character’s movements.
With this, I’ve completed the stop motion animation tasks described in the project brief. I’m happy to say that I’ve completed each task up to a standard that I’m happy with, working in my own time to produce a series of iterations that work to move beyond the requirements of the brief. Stop motion is an animation technique that I really do have a passion for, and would like to continue exploring as I progress in the course. Next week, we are given our next project brief, and I’m hoping to explore the medium of stop motion animation in response to this new assignment, additionally to working within Maya.
Digital 3D In our final session introducing us to the basics of animation and modelling software Maya, we explored the ideas of 3D texturing: serving as an introduction to the UV editor and adding predefined 2D textures to 3D objects. To induct us into this process, our first task was to create a cereal box within the software. Using a simple cube, and editing it into the shape and size of a cereal box, the next step was to map the UV island to a flat map of a pre-made cereal box. After finding each face using the UV editor tools, I was able to create a 3D cereal box: with the correct design on each face.
This then allowed us to export the map as a flat PNG, to develop and edit in Photoshop. The process of texturing a 3D mapped object was more intuitive and straight-forward than I’d initially expected. I’ve somewhat struggled to keep up in the previous sessions, however this week proved to be much more enjoyable and simple in comparison. With this knowledge, I can now add my own textures to predefined 3D objects (such as cubes, spheres and cylinders).
Finally, our last task was to create and edit UV’s for a pre-made bird object, allowing us to project a 2D image to the 3D model’s surface for texture mapping. Whilst the actual process of creating and splitting the model into a series of separate UVs for each body part was time-consuming and difficult at first, I worked with a peer and we completed the task together. With the limited time remaining, I explored the use of painting within Maya. Whilst this is ultimately a limited function within the software, using the flood paint tool did allow me to block colour my model quickly. With this, I created a seagull design working within a limited monochrome palette.
With this, I’ve reached the end of our introductory Digital 3D sessions. Having covered some of the basics of Maya, it is now up to us to continue developing and working on our knowledge of the software independently. From these workshopped sessions, I’ve identified a range of animation potential to develop upon. For example, I’m interested in making the radio bounce to music, and explore the potential of animating this seagull model that I’ve painted in this session. It’s been somewhat of a struggle, but computer-generated animation is a technique that I want to continue to work on as an independent response to this brief.
#ba1b:weeklysummary#ba1b:introtostopmotion#ba1b:introto3d#ba1b:narrativetheory#ba1b:digitalprinciples
0 notes
Photo


Digital 3D: Introduction to 3D Texturing
In our final session introducing us to the basics of Digital 3D animation, we explored the use of 3D texturing in Maya: serving as an introduction to the UV editor and adding predefined 2D textures to digital 3D objects. To put it simply, UV mapping is the 3D modelling process of projecting a 2D image to a 3D model's surface for texture. Interestingly, the letters "U" and "V" denote the axes of the 2D texture because "X", "Y" and "Z" are already used to denote the axes of the 3D object in model space.
To induct us into this process, our first task was to create a cereal box within the software. Using a simple cube, and editing it into the shape and size of a cereal box, we were to map the UV island to a flat map of a premade cereal box. After finding each face using the UV editor tools, I was able to create a 3D cereal box: with the correct design on each face.
For some reason, this was one task within Maya that I seemed to understand and grasp relatively quickly, actually helping other students to complete the process. This allowed me to not only help others but develop and consolidate my own understanding of the task. This then allowed us to export the map as a flat PNG, to develop and edit in Photoshop. Whilst my peers went for a more light-hearted and comical approach, I wanted to work on some minimalist design principles and create my own design for the box. The process of texturing a 3D mapped object was more intuitive and straight-forward than I’d initially expected. I’ve somewhat struggled to keep up in the previous sessions, however this week proved to be much more enjoyable and simple in comparison. With this knowledge, I can now add my own textures to predefined 3D objects (such as cubes, spheres, and cylinders).
Finally, our last task was to create and edit UV’s for a pre-made bird object, allowing us to project a 2D image to the 3D model’s surface for texture mapping. Whilst the actual process of creating and splitting the model into a series of separate UVs for each body part was time-consuming and difficult at first, I worked with a peer and we completed the task together. With the limited time remaining, I was able to explore the use of painting within Maya. Whilst this is ultimately a limited function within the software, using the flood paint tool did allow me to block colour my model quickly. With this, I created a seagull design working within a limited monochrome palette.
With this, I’ve reached the end of our introductory Digital 3D sessions. Having covered some of the basics of Maya, it is now up to us to continue developing and working on our knowledge of the software independently. From these workshopped sessions, I’ve identified a range of animation potentials to develop upon. For example, I’m interested in making the radio bounce to music and explore the potential of animating this seagull model that I’ve painted in this session.
It’s been somewhat of a struggle, but computer-generated animation is a technique that I want to continue to work on as an independent response to this brief. Digital 3D is something that I want to potentially explore as a career opportunity, and so I will take it upon myself to explore it further in my own time.
0 notes
Photo


Digital 3D: Modelling in Maya Review
This week’s Maya session took the focus away from animation, as we were challenged to explore the modeling potential of the 3D software. Firstly, we were introduced to the Modelling workspace - as we explored the various tools to edit and change an existing shape. This provided us with a range of tools, allowing us to extrude, edit and bevel surfaces of shapes in order to create new, more exciting ones.
The first idea we explored was 3D extrusion: which works by selecting a face on a shape and effectively ‘pulling it forward’, extruding the shape out of its original size. The primary use of this was to create a 3D pencil, something achieved by extruding cylinders, and adding more vertices to get that classic angled pencil look.
Initially, I struggled with this process: but after spending time trying to get to grips with the extrusion tool and asking for feedback, I was able to get a basic understanding of the modeling process and produced a pencil in response. It’s not exactly visually impressive or appealing, but I see the value in this task as a way to introduce the basic foundations of more complex 3D modelling.
This is an area of animation that I’ve always struggled with: I find the actual animation process exciting and inspiring, however modelling (be it stop motion or CG) has always been difficult for me. Going into the session, I knew that I’d likely struggle in comparison to my peers - however, I feel like the models I’ve been able to create here represent a step up in my understanding of Maya.
For this reason, I do see success in this workshop. As a way to develop upon this task, I created a 3D mechanical pencil allowing me to test this understanding further. This second attempt was much more visually appealing - and allowed me to produce a more successful outcome, I feel. The shapes are more interesting, and the audience can see what my model is supposed to be. At a purely graphic level, it works as a 3D iconic representation of a pencil.
The final task was a little more demanding: in the limited time remaining, we were to produce a 3D radio. After experiencing several technical difficulties with the program, I managed to create a basic box-radio following the steps described by our tutor. What I’m finding is the luxury of time with learning these processes: the sessions, whilst helpful, are ultimately too short and fast-paced for me to properly grasp an understanding of the Maya processes. I am somewhat struggling with the modelling side of things, however, I want to develop this understanding and take the opportunity to explore the digital learning world of Linkedin Learning, something our tutor suggested in the session.
In my own time, I managed to complete the radio and add some colour - adding life to the object that I couldn’t really see beforehand. I’m also interested in the potential of rendering this object and seeing how it could move too. Perhaps it squashes and stretches whilst listening to music? It’s a small motion, but I feel like it would be a good independent development of this session and a way for me to add an understanding of the basic principles to my Digital 3D work.
Something I’m learning is the need to take the time to learn these new processes independently: the sessions are a good introduction, but ultimately move too quickly for me to follow. I feel like I underestimated the steep learning curve of Maya and similar 3D software, but I’m determined to get a grasp of the programs. 3D Digital animation is a medium I’ve never worked with before, and over these coming weeks, I want to challenge myself to get to grips with the medium.
It’s a whole new approach to working, and it will be difficult - however, I will endure this in an attempt to get a basic understanding of the program. Earlier this week, I was playing around with the animation process in Maya which I found to be exciting and intuitive. In comparison, the modelling process seems somewhat daunting. Whilst I’m happy with the models I was able to build today, ultimately I simply want to have more confidence and ease when building my 3D assets, and so my next plan is to develop upon this process further: modelling a specific object, and then perhaps even animating it, considering squash and stretch principles in the Maya workspace.
0 notes
Photo


Digital 3D: Flying Saucers Review
This week, we were able to get an initial introduction to Maya, a powerful animation, modelling, simulation, and rendering software. An application used widely in the visual entertainment industry, Maya is primarily used to build 3D computer generated assets for film, television, game development and architecture. As animators, we will primarily be using the software for modelling and animation purposes: designing and building our own characters, props, and sets in a 3D workspace and learning how to animate these.
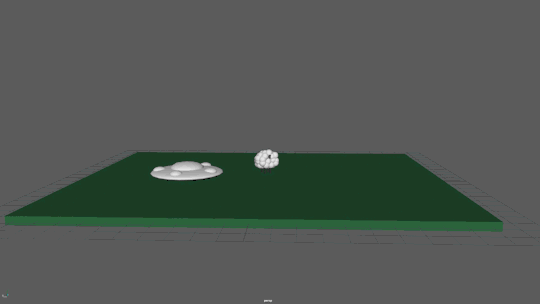
The purpose of this first workshop was to be inducted to the absolute basics of the software, learning how to create predefined shapes (like a cube, cylinder or sphere) and move, duplicate and edit these basic shapes for animation. Using these basic tools and features of Maya, our task was to create and animate a scene featuring an alien abduction between a UFO and a farm animal. We were briefed on modelling a cow, but I wanted to take the time to challenge myself and work on something a little more visually pleasing: in this case, I chose a sheep.
For this task, however, I wanted to limit myself purely to making use of the predefined 3D shapes - sticking to the teachings of the workshop. Using a mixture of duplicated and edited cubes and spheres, I was able to build a 3D sheep that I think can be described as ‘visually pleasing’. My peers found the design to be appealing, and ‘cuddly’ through a cartoon-like use of spheres to replicate wool and highly exaggerated proportions. After building the UFO, which was essentially a series of cylinders and spheres, modelling the sheep was, comparatively, much easier.
My main challenge came from modelling the UFO, as creating equidistant orbs on the spaceship proved to be a technically difficult task. An entirely new software for me, Maya represents a new approach to the medium of animation that I haven’t really encountered before. Modelling is something I’d expected to find difficulty with, simply a result of the technical process that I haven’t quite grasped yet. With the guide of my tutor, however, I was able to create my UFO, and with this, I could then move onto the animation process.
The first animated test I was able to create has potential, but I ultimately ran out of time during the session. From what I can see, though, there is a visually appealing arc to the UFO’s lift off the ground, and the use of turquoise blue compliments the colour scheme well. Despite this, there is clear room for improvement - just with this initial test.
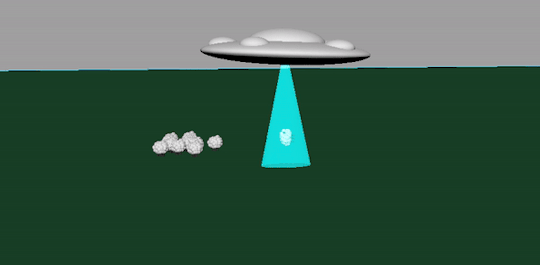
The main idea I want to convey with this sequence is that the sheep is too heavy for the UFO, which cannot fly in a regular pattern. In order to do this, I need to consider slowing the action down: have the sheep float around whilst in the tractor beam, which is slowly dragging the UFO down. Also, there is a jolting movement to the UFO’s rotation - something which can be smoothed out simply by extending the rotation sequence.
For the first introduction to Maya, admittedly I found it somewhat difficult to work as fast as the demonstration, but after asking the tutor for more help after the workshop, I was able to grasp a basic understanding of the program. I feel like I need to take the time to learn these new processes independently: this workshop provided a good introduction, but ultimately move too quickly for me to follow. 3D Digital animation is a medium I’ve never worked with before, and over these coming weeks, I want to challenge myself to get to grips with the medium. As a review of the software, however, I really enjoyed playing around with Maya. Digital 3D animation is one technique of the medium that I’ve never had the opportunity to explore before, and I found it to be an interesting and engaging challenge here. It’s a whole new approach to animation, and it will be difficult - however, I will be enduring this in order to develop my understanding of the program.
As a way to evidence this, I took it upon myself to create another attempt at the task: downloading the program to use at home and rebuilding the sequence from scratch, with a much more planned-out approach. Having settled on the idea of ‘the sheep is too heavy for the UFO, which then crashes’, I began sketching out quick, loose ideas for this in my sketchbook. This allows me to work from a very rough storyboard, and ultimately adds a sense of direction to my work.
Additionally to this, I explored Pixar’s approach to the task as a form of independent research: the CG short film Lifted presents a successful polished take on the alien abduction premise, adding a humorous touch which isn’t really felt with this type of narrative in traditional examples, which follow more of a sci-fi, horror approach to an alien abduction. Watching this example has clearly influenced my own approach to this task: following a comical direction that works to effectively subvert the audience’s expectations.
Having created the models already, my task was to create an engaging, humorous animation that conveys the weight of the sheep, show that the UFO is having trouble lifting it’s abductee away.
In this new iteration, I decided to create a flock of sheep, and have the sheep waddle up to the UFO and hit the ship: knocking it into action. Created a simple and minimal approach to an animated walk through keyframing the sheep’s position bobbing up and down, and playing with the rotation to create the illusion of a waddle. The purpose of this, however, was to embrace the limitations of a rig-less digital puppet and challenge myself to animate a walk using the simple animation tools we were taught in the original workshop. Unlike building the models, I found the actual animation process quite intuitive - in discussion peer, I likened it to a virtual stop motion process, only this method allows for both straight-ahead and calculated pose-to-pose animation. Using the keyframe technique to alter the sheep’s size, rotation, and shape, I feel like I have been able to create an interesting CG sequence here.
The sheep’s side-to-side waddle is appealing, I think. The use of anticipation and follow through add a sense of life to the movements, and having the sheep simply wiggle around on it’s back is able to engage the audience thanks to its ‘cuddly’ design and restricted nature of movement due to its exaggerated proportions. In comparison to my first attempt, this sequence is much more successful. Instead of a jolting liftoff, the UFO hovers above the ground with a sense of struggle through continuously moving up and down in no single direction smoothly: the purpose of this was to suggest that the alien driver doesn’t quite know how to fly this thing - adding a sense of humour to the piece. An added note is the continuously rotating UFO, a piece of secondary movement that further communicates that this vehicle isn’t from our planet.
A final addition to the sequence was the inclusion of a second, white tractor beam. This represents the alien driver’s last hope to abduct this weirdly-heavy sheep. When this also fails, the beams fly back up, and the UFO crash lands onto the sheep instead. The idea was to communicate a sense of struggle in the UFO, and that’s something that, through iterative development, I feel that I’ve been able to do here. As a way to consolidate these claims, I asked a peer for some critical feedback.
Firstly, the animation was a ‘successful sequence’, with strong use of anticipation before the UFO crash lands. They also noted the ‘appeal of the waddle’, and how this adds to the ‘cutesy’ design approach I’m trying to evoke. My comical approach is an ‘interesting take’ on the idea, and clearly holds some potential for further development.
However, it’s by no means a perfect sequence: in particular, it was suggested that I should explore how the light beams would also rotate and follow the same path as the UFO itself. This problem arises through a technical detail of not being able to parent the beams to the UFO and is something I would like to tackle again if I had the chance. Personally, I also feel that the light beam shoots down (and back up) far too quickly - something which could be improved rather simply by adding more keyframes in the movement.
A final suggestion from my peer feedback was something I hadn’t thought of: if I really want to develop upon this task, and present an outcome with polish, I should look at the possibility of rendering my sequence and explore the possibility of different camera angles for effect. The way the camera is positioned in the shot communicates a great amount of information about the subject of the frame: power dynamics, emotional themes amongst others - and so I should be taking advantage of the three-dimensional aspect of the project. This is something that I want to explore further: rendering a few seconds of animation from my sequence in various different positions to best tell this comedic story.
Overall, this represents a far more exciting and successful response to the task. Through iterative development and my own perseverance with Maya, I have been able to challenge myself to create an ‘engaging, successful’ CG animation that puts a new, comic spin on the farm animal abduction’ plot in this short sequence. Something I am going to put a focus on is iterative development on my practical exploration: this was the main point in the feedback of my previous unit, and it’s something I’m constantly considering moving forward. Here, iterations have allowed me to explore and further flesh out this simple CG sequence, and complete an animation (that, whilst simple in composition) demonstrates my leap in understanding of Maya as an animation and modelling program.
Next week, we will be exploring the modelling tools and interface of Maya: producing our own shapes and models instead of simply editing and altering existing ones.
0 notes
Photo


Introduction to Digital 3D
In this post, I’m breaking down and responding to our new project brief, introducing us to the basics of 3D Digital animation. This assignment will be building on my understanding of the processes involved within the medium whilst also equipping us with basic skills using industry standard software.
Through a series of workshops, I will be getting to grips with Autodesk Maya and creating a series of modelling and animation exercises in response to set tasks. This will teach me the core skills and mechanics of the software, whilst also working to inspire my own creative experiments done in my own time. We are expected to refine these pieces through independent study, which builds on our understanding of the Basic Principles of Animation, applied to Digital 3D workspace.
Whilst the concepts of key framing and ‘tweening’ are fundamental to the Digital 3D process, these are also applicable to a number of digital animation techniques and software - and so we will be learning transferable skills that we can apply to a range of digital animation programmes. This project represents a step away from the traditional approaches to the craft explored in the previous unit, as I delve into the world of contemporary animation in the form of Digital 3D animation and modelling.
The project will introduce us to the workflow of working in Digital 3D, from model-making, animating and finally rendering the finished piece. We will be exploring how to create the illusion of life in these digital processes through animated performances, additionally to learning how to work within specific file and folder structures.
My personal response to this is one of curiosity and interest: I’ve never had the opportunity to explore Digital 3D animation before, but it’s a technique of the craft that’s always engaged me as a viewer and artist. To me, Digital 3D represents a world of animation that I’ve never explored before. With this obviously brings new challenges - mainly to get to grips with a brand new software and workflow, but also great new potentials. The purpose of this first year is to introduce us to a whole range of animation techniques, allowing us to find and specialise in whichever form we choose in our own time. There is an audience and a demand for 3D animators both in the creative industries with film and television, but also commercial ventures such as animated advertisements.
As a technique, it’s a viable form of animation to develop further. This is one area of animation that I’ve never explored before, and so out of all my projects, I feel like it’s this specialism that I will initially struggle with. In spite of this, though, it’s an area that I will attempt to develop independently - taking the time to explore the Autodesk suite and the potential of the software on my own, looking at online articles and videos explaining the program.
One challenge I can already foresee is the modelling aspect of Maya and similar digital 3D programs. This is one area of the animation world that I already struggle with, the technical prowess to build something - and so I want to challenge myself in this field. The actual process of animation was always what I considered to be the most successful part of my work, not the model-making. Whilst it’s not a strong suit or the role I will specialise for within the industry, it’s important to break new ground and experiment as an artist - to get out of our comfort zones, and learn.
As always, we are asked to keep a research portfolio in the form of this blog: collating experimentation of technical and creative engagement throughout the project. We are asked to continue our research and analysis of core animation principles in the context of Digital 3D sources, as a way to further our knowledge of the animation fundamentals. We are expected to continue developing our research skills through our own inquiry into the world of digital 3D animation, and the craft as a whole through ideas such as key framing, ‘tweening’ and performance.
The Tasks Interestingly, the brief doesn’t mention any specific tasks. The purpose of this project is to simply introduce ourselves to digital 3D software, through a series of modelling and animation excursuses. We will be introduced to the basic tools and workflow of Maya, an industry standard in digital 3D animation when considering both the creation of characters and objects through digital modelling and how they move through the keyframe-based animation process.
Additionally to these basic exercises, we are expected to continue and refine these responses independently, in our own time. This is crucial to our development as animators and allows us to develop key professional practices such as working independently and taking initiative.
Although this project is only three-weeks long with time-tabled workshops, I want to continue to experiment and develop my digital 3D experiments beyond the expected deadline. It’s worth noting that the taught workshops simply act as a way to introduce us to the fundamentals of the software through simple tutorials, and it’s up to us as individual professional As a technique of animation, this is one that has always intrigued me but I’ve never taken the time to explore digital 3D properly: I will be using this new brief as an opportunity to explore the world of digital 3D animation and develop a concrete understanding of timing and posing in the process.
On the whole, I’m very much excited about this new project and look forward to exploring the world of digital 3D animation and the various opportunities and challenges it will bring. Digital 3D represents a whole new approach to animation for me, and I’m eager to explore the technique and produce some exciting experiments within Maya.
References
Maya Bodybuilder CHARACTER MODELING Tutorial https://www.youtube.com/watch?v=spi4lGxnMZg
3D Animation Student Showcase 2015 - Animation Mentor https://www.youtube.com/watch?v=rjbOReWvepk
Pixar Intro HD 1080p https://www.youtube.com/watch?v=VqZXdS7oYCo
Spider-Man: Into the Spider-Verse. (2018). Sony Pictures Animation.
0 notes


Photo


Overview
This week, I wanted to take a break from my work in Digital Principles and focus on exploring the medium of stop motion in more depth. As a result, I haven’t been able to make that much progress in this Digital Principles project. However, I haven’t left the assignment altogether this week - I’ve been able to further explore After Effects and I’m closer to finishing the project for deadline.
Something I wasn’t expecting, however, was the added pressure of this week’s projects. Something that I feel that I have to mention is the amount of projects handed to us this week, and I feel like it will be a bit of a struggle to juggle them all. As someone who attempts to put real effort into their work, I’m beginning to feel the pressure of having five projects going on at the same time. I understand that this is largely my fault for continuing to work on the others after timetabled hours have stopped, but for this metamorphosis task I want to produce a piece of motion graphics work that I’m proud of; something that is of an Industry standard. I understand that this is a big task, but as an animator I need to be challenging myself to produce more exciting practical work and putting a focus on these projects.
I see the benefit of a project such as Animated Sketchbook, but with the amount of effort and energy I’m putting into the other projects I’m finding that I haven’t got time to indulge myself with simply filling a sketchbook with life drawings, creature studies or character designs. I’m working on a project brief Guess the Film, that truly engages and challenges my abilities as an animator, and thus of course I’ll be putting a focus on this project. What I’m learning throughout this course, though, is the importance of balance. Moving forward, I want to be working on striking a balance between multiple projects, and perhaps even lessening my ambitions for each assignment as a way to stay on top of everything I’m given.
Animated Sketchbook This week, I’ve been largely focusing on other projects: specifically stop motion and digital principles. I’ve not been able to complete many pages, as this week I’ve put all my energy and effort into producing stop motion tests, writing about this these tests and further progressing with my Guess the Film animation assignment. I see the benefit of a project such as Animated Sketchbook, but with the amount of effort and energy I’m putting into the other projects, I’m finding that I haven’t got time to indulge myself with simply filling a sketchbook with life drawings, creature studies or character designs.
With my upcoming brief of stop motion, an assignment that explores the idea of physical objects and armatures moving, I feel like this approach to sketchbook will change: I’ll be sketching ideas, concepts and potential designs for these stop motion sequences - and I feel like that’s my personal challenge with this brief. Whilst it’s been fun to find characters out of ink blots, develop my understanding of animal structures and the like, it’s not FOR any specific brief - and that’s why I’m somewhat lacking here, I think.
Despite this, I am going to fill a sketchbook up for this project - and will re-continue working on the assignment next week. Next week, I want to pick up where I left off and begin sketching real-life animals and natural features as a way to insure my own fantastical and imagined creature designs, and developing my understanding of animal anatomy in the process.
Digital Principles This week, I wanted to take a little break away from Digital Principles project and focus on an introduction to stop motion animation: taking the time to produce some stop motion tests independently, and refining my stop motion ball bounce. Despite this, I was still able to make some progress on my Guess the Film animation, developing my understanding of the software in the process of completing the final sequence.
The week began in my sketchbook, as I quickly explored potential ideas for a transitionary animation between my two Heptapod language illustrations, before transforming into the second prop, the Shell. Once I had an idea of the movement, I then jumped into After Effects and created a few tests of the sequence using the trim paths tools, before settling on a final sequence.
For this short motion, I wanted to add as many of the basic principles as I could: the direction is obviously in an arc shape, but I added easing to the motion via keyframe assistant tools in After Effects and played around with the offset with trim paths as a way to add a bit of anticipation to the final swing. The idea was to create a quick, fluid and graphic-orientated transition to the final Heptapod language illustration - something that I think I’ve been able to achieve here. The line swings round counter-clockwise to begin with, before finishing the illustration. The timing of the shot isn’t too fast to the point where the audience can’t see what’s going on: it’s a quick movement which stays clear due to anticipation.
Finally, I also was able to work on the transition animation between the Shell’s edge outline and the fully realised prop. After attempting to produce the sequence with the same ‘trim paths’ technique, I realised I wanted to take another, more visually exciting approach. I’ve discussed on this blog how the language is smoke like, and having designed flat 2D smoke already, I want to explore how I could have the language dissolve into black smoke, and then form into the Shell from this - whilst keeping with the simple, flat design aesthetic. It wouldn’t be ridiculously difficult - I’ve got most of the designs already created and thus would simply need to play around in After Effects and explore the potential of this idea there, creating in-betweens either via shape layers or jumping into Illustrator first. As an initial response to this idea, I feel like this will be the best approach to this task and importing the frames into After Effects.
This will be primary focus next week, animating the actual metamorphosis between the Heptapod language and the Shell, and the ship’s 2D turnaround within After Effects.
Narrative Research In this week’s narrative research session, we explored the fundamentals of visual storytelling and the unique language of animation. Visual storytelling is one of the most important ideas central to my research into my chosen film of Spider-Man: Into the Spider-Verse, and as such, has arguably been one of the most interesting and helpful lectures of the project.
Visual storytelling is the act of communicating a narrative through purely visual means; through elements of the mis en scene, compositing, cinematography and performance. It’s what artists put in the frame to communicate an idea entirely through visuals. To exercise my understanding of this idea, I analysed a scene from Into the Spider-Verse and the hand-drawn animated film The Old Lady and the Pigeons. I also discussed the unique language of animation, and how a film’s medium can work hand-in-hand with the message.
With this final lecture, I’ve been able to establish all of the ideas and subjects needed for the essay task. Having covered all of the research material, I can now begin to construct my own essay question based on the idea of narrative analysis and begin analysing my research on the blog. I’ve been gathering research sources along the way, and I want to use a breadth of references from digital to print to evidence a considered response to this task.
At the moment, I’m considering exploring how Spider-Man: Into the Spider-Verse uses a Hero’s Journey narrative to perfectly encapsulate what Spider-Man represents: to both everyone in the audience, and the public on-screen. Additionally to this, I want to explore the cultural impact the film has had on the public: ‘anyone can wear the mask’. This is the ultimate takeaway and lesson from the film, and I feel like I should analyse how the narrative crafts this poignant message, in a way that doesn’t feel cheesy, tacked-on or hollow.
Next week, having completed all of the research lectures, I will begin writing up my research into the film and finally decide on an essay question. I feel like I’m reaching a point where my research is shaping my essay, and I will soon begin work on a first draft.
Stop Motion This week, we were set our first animation exercise from our new project, in which we are exploring the medium of stop motion animation. The task was to create a ball bounce animation, in which the ball stays in place and simply bounces on the spot. The ball bounce is one of the oldest animation exercises in the book, as established by legendary Disney animators Ollie Johnston and Frank Thomas.
As we were using pre-defined plasticine models for this task, the process brought a few new challenges that I didn’t encounter when animating with an armature. Firstly, I feel like the success of this task largely depends on our sculpting ability. This, unfortunately, is not one of my strong suits, and I found it quite difficult to sculpt the plasticine into my desired shapes. As a result, only a few of the animations have a visual polish when it comes to the actual squash and stretch of the ball - and it is also why I find the prospect of building a stop motion puppet from scratch to be quite daunting. Despite this, as I progressed through the session I feel like my outcomes became more successful - meaning I was learning and improving with each iteration.
The final ball bounce has a sense of life, but in retrospect I would have wanted to have the ball squash to more of an extreme position, before bouncing back up. After producing the refined squash and stretch ball bounce, I wanted to continue playing around with the task beyond what’s expected of the brief: and so looked at the idea of a ‘splash’ like effect using additional plasticine.
As a whole, though, I’m pleased with the amount of work I managed to produce for this task. Whilst it was a challenging process, I managed to develop my sculpting skills in between frames and have begun to develop an understanding of timing and spacing in the medium of stop motion animation.
Next week, I will be attempting to animate the Box Lift: in which a character attempts to lift a box, using a ball-and-socket armature. In preparation for this, I will be planning the sequence using a storyboard and creating live-action reference of myself to use as a guide for dynamic posing.
Digital 3D This week, we were able to get an initial introduction to Maya, a powerful animation, modelling, simulation and rendering software. Maya is an application used to build 3D computer generated assets for film, television, game development and architecture, and is widely used in the visual entertainment industry. As animators, we will primarily be using the software for modelling and animation; building our own characters, props and sets in 3D space and learning how to animate these.
The purpose of this first week was to grasp the fundamentals of the software, learning how to use the basic tools and features to create and animate a scene featuring an alien abduction. For this, I created a UFO, sheep and grassland. We were tasked with animating a cow, but I wanted to challenge myself and work on something more visually pleasing: in this case, I chose a sheep. For this task, though, I wanted to limit myself purely to making use of the 3D predefined shape tools. Using a mixture of cubes and spheres, I was able to build a 3D sheep that my peers found to be visually quite appealing and ‘cuddly’ through a cartoon-like use of spheres to replicate wool and exaggerated proportions.
The animated test I was able to create has potential, but I ultimately ran out of time during the session. For a singular introduction, I found it a little difficult to work as fast as we were being shown, but after asking the tutor for more help after the demonstration, I was able to grasp an understanding of the program. As a review of the software, however, I really enjoyed playing around with Maya. Digital 3D animation is one technique of the medium that I’ve never had the opportunity to explore before, and I found it to be an interesting and engaging challenge here. Next week, I will be developing upon this task in my own time: downloading the program to use at home, and challenging myself to create an engaging 3D animation that puts a new spin on the ‘farm animal abduction’ plot in a short sequence.
#ba1b:weeklysummary#ba1b:narrativetheory#ba1b:introto3d#ba1b:introtostopmotion#ba1b:animatedsketchbook#ba1b:digitalprinciples
0 notes