#ba1b:lipsync
Explore tagged Tumblr posts
Visit Tumblr Blog
Explore Tumblr blogs with no restrictions, modern design and the best experience.
Last Seen Tumblr Blogs


Fun Fact
28.6 is the average number of monthly visits per US mobile user.
Photo


History of Lip Sync & Industry Examples In the process of lip synchronization, the animator must have an understanding of how phonetics work, and how our mouths are positioned in order to produce certain sounds which are represented by letters and letter combinations. In this post, I want to briefly delve into the history of the technique and the basics of lip syncing for animation.
What is lip sync? Lip sync, which is short for lip synchronization, is a technical term for matching a speaking or singing person’s lip movements with prerecorded sung or spoken vocals that listeners hear through an audio output system. The term can refer to any number of different techniques and processes from film production, concerts, and dubbing, but for the purposes of this assignment, we are exploring the use of lip sync in animation.
This is the art of making an animated character appear to speak, to a pre-recorded track of dialogue or sound. This technique of making an animated character appear to talk involves a range of key ideas, but mainly figuring out the timings of the speech and the actual animation of the lips and mouth to match the dialogue track.
A Brief History Historically, the earliest examples of lip synchronization in animation were attempted by Max Fleischer in the 1926 short My Old Kentucky Home, but for obvious reasons (racial discrimination and insensitivity) I will not show it here. The technique, however, has since been refined and honed since this early example and is a staple of the animation industry to this day. The technique is used by all types of animated works, from feature films such as Cloudy with a Chance of Meatballs to American animated sitcoms like The Simpsons and Family Guy.
Lip synchronization typically begins by analyzing sound frame by frame, a method which dates back to the late 1920s with the origin of sound cartoons. Traditionally, this would involve transferring the dialogue tracks for animated films ‘onto sprocketed optical sound film’. The holes on this film material would exactly match ‘with those of the motion picture film’, which enabled sound and image to be mechanically locked together on editing and sound mixing machines.
This process is called 'track reading'. The dialogue track is analyzed and the information is charted up onto camera exposure sheets, sometimes called 'dope sheets' or 'camera charts', as a guide for the animator. With contemporary animation, we have the ability to analyze a sound using digital sound tools such as Audacity or the sound workspace within TVPaint itself. These allow us to scrub back and forth over ‘a graphical depiction’ of a sound wave, and see where the sound begins and finishes.
Industry Practices Approaches to the lip synchronization process can be just as varied as the character designs themselves: simple, elaborate, restrained or exaggerated. Every individual animator’s approach to the process is different, so in larger studios where more than one animator is in charge of the same character, extensive notes, drawings and sketches will be created to instruct the rest of the team how to animate the mouth consistently throughout a series. This can be seen in Adventure Time, where creator Pendleton Ward and lead designers for the show instruct animators working overseas how to keep protagonist Finn’s mouth shapes on-model at all times. For a large production like Adventure Time where the animation is done externally, this is a key industry practice.
Often, the way a mouth works is determined by the character’s head design: animators use tricks and techniques to cut down the workload by subtly separating the head or just the mouth, in the form of beards, necklaces or neckties that allow animators to work solely on the mouth and faces during the lip sync process. Sometimes, the mouth is hidden behind a wiggling mustache or replaced altogether with a mask in the example of The Spectacular Spider-Man animated series.
The Importance of Gesture Something that contemporary animation, in particular, has been found guilty of doing is the use of talking heads: this is commonly seen in shows such as Family Guy and similar digital 2D animated sitcoms where the characters don’t move and simply talk to each other. This can quickly get boring and is something I am going to try and consciously avoid during this project. A solution to this problem would be the use of gestures and body movement. Despite the fact we are encouraged to solely focus on the lip sync itself, gestures and body movements can communicate something about the personality of a character and the way it is feeling to an audience. This also makes for something much more interesting and engaging to watch, rather than simply watching the mouth. Small movements and gestures such as shrugging the shoulders or pointing can communicate ideas of emotion and what the character is thinking, helping sell the performance to the viewer.
Economical Animation When a character’s head remains static during a passage of dialogue, animators will take this opportunity to simply cycle the mouths onto a different layer, and place these onto of a character without a mouth. This is a key industry practice and saves lots of time and energy on the animator’s part. It’s important to maintain the same sort of perspective view in the mouth, otherwise, it will look separated from the face.
A more effective and engaging technique is treating the whole head as the lip-sync component. This allows movement of the bottom jaw that can actually open and drops lower, and also allows animators to work stretch and squash into the entire face. It is ‘rare for one mouth position to be onscreen for less than two frames’, as animating on ones tends to look far too quick. This is a lesson that I had to learn myself in my initial response to the assignment, animating the sequence frame by frame in TVPaint.
The Hold One important principle of modern lip sync animation is ‘the hold’. This is a technique which describes the animation of the body, which is held for numerous frames whilst the lip sync takes place. As a rule, animators work on gestures and body language first, and then go back and add the mouth in afterward. This will inform my own process in TVPaint, as I will begin the animation by developing the body movements first before moving onto the actual mouth shapes.
Whilst classic Disney animated films featured characters that rarely actually stopped moving, it is far more commonplace to have still illustrations be held for multiple frames whilst the lip sync animation takes place. This saves time and effort but also places the focus on a handful of expressive gestural poses that work to convey the emotion of the scene. This approach can be seen in almost any animated television production, we can see this in the example from Regular Show, in which only select parts of the two main characters move. The face and arms are animated, but the body stays still as to not detract from the lip sync.
As a rule, lip synchronization is ‘best underplayed’, with the exception of important accents and vowel sounds. Emphasis on the size and mechanics on the mouth can detract from a good lip-sync animation - this is an idea that I will be considering with my own animation.
It’s in the Eyes A final interesting idea that I found is the focus on the eyes of the characters: ‘the audience often watch the eyes, so emphasis and accents can be initiated here’ before the rest of the face and mouth is considered. It’s often said that the eyes are the window to the soul: it’s a powerful way of getting a character to communicate their inner feelings without actually saying anything, and even the act of thinking of words can speak can be expressed in the eyes. This is something that I found to be true in my own video reference for this assignment, as I observed how my eyes would move around as I was delivering the dialogue, in character.
Summary Through my own independent research into the history of lip synchronization in animation and other online sources presented below, I have been able to really develop my understanding of this crucial animation process. Having looked at a few industry examples here, next I want to continue this line of inquiry further and explore some actual tutorials by animators on some more basic principles of lip synchronization for animation.
References:
The Little Whirlwind | A Classic Mickey Short. (2017). Mickey Mouse. https://www.youtube.com/watch?v=REHJ1lz_HLQ
Damo and Darren 3 - Centrelink. (2015). Michael Cusack. https://www.youtube.com/watch?v=s96drQkfpPI
Regular Show. (2014). JG Quintel. https://www.youtube.com/watch?v=KOSdKV2z7_Q&t=45s
The Simpsons. (1987). Matt Groening. https://www.youtube.com/watch?v=nekvVuoiTyA&t=1s
The Spectacular Spider-Man. (2012). Disney Animation. https://www.youtube.com/watch?v=8v4PL2-EC1Q&t=5s
Lip Sync. (2015). AIM Animation. http://minyos.its.rmit.edu.au/aim/a_notes/anim_lipsync.html
2 notes
·
View notes
Photo


Lip Sync: Final Touches Review This week, my main aim was to complete my lip sync animated sequence ready for submission and begin experimentation and developments within After Effects. With this, I took the line work completed last week and began the colouring process. This was relatively simple, having done the actual animation work, the focus this week was on refining each illustration with full colour. As opposed to using the block fill tool, I wanted to hand colour each piece, working in layers to cut the work load in half.
This was a much more efficient way of working, allowing me to briefly explore the potential of blur frames throughout. However, my lack of understanding within this area ultimately made this an unsuccessful venture, and I quickly abandoned the concept for the purposes of this assignment. Blur frames are something that I want to explore further in my own time as a way to show fluid, quick motion, but it didn’t really make sense to simply throw them into this dialogue sequence.
After colouring, I managed to complete a final iteration for submission, complete with a white background. This was to ensure a focus on facial acting and the actual lip sync, allowing us to explore the use of backgrounds and further developments in our own time.
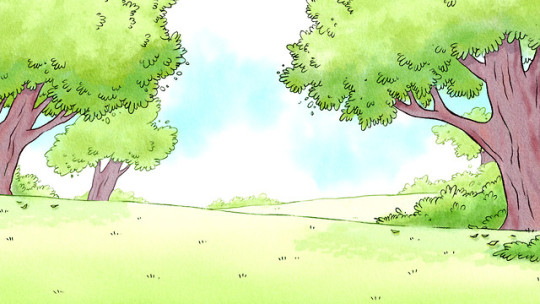
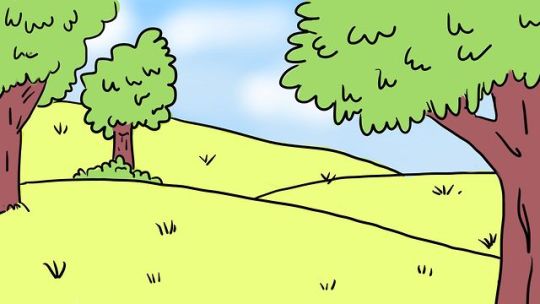
Having completed this simple iteration for submission, I could then turn my attention to developing the piece further: this began through creating a background illustration. For this, I was looking at background art from hit animated series Regular Show for inspiration regarding colours and composition. A series featuring two park groundskeepers, the show features an extensive amount of forest and park backgrounds, and I felt this was a perfect reference source for my sequence.
The final illustration matches the character’s line quality: something that I put a focus on whilst creating it with the pen brush in TVPaint. Its simple design matches the animation style too, with simple block colours.
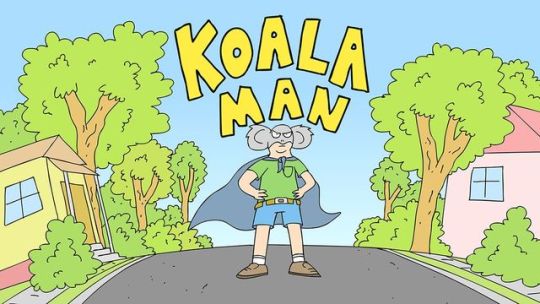
Looking back, I feel this was largely inspired by the online animated series Koala Man, created by Michael Cusack. I feel that this was actually a large influence on my work, something I haven’t mentioned until now. The use of bold, warm colours and a rough, naive art style is something characteristic of Cusack’s work, an artist that I always seem to find myself returning to. Like the lip sync sequences from Regular Show, it’s that idea of limited animation and telling stories with little actual movement. This idea of an economical approach to animation - with a focus on story over fluid movement - is quite a revolutionary concept for me, and I wanted to explore the idea with this assignment.
With this, I wanted to develop my lip sync sequence further and explore my news broadcast idea in After Effects. Inspired by my own initial ideas for this project, I wanted to explore the use of virtual cameras within After Effects to simulate the hand-held aesthetic of a news report. Having explored the technique earlier for my Guess the Film sequence, this wasn’t too difficult and I was able to create a little shaking movement that I feel works nicely. It’s a gamble, but I feel it does add a nice sense of cartoony realism to the sequence.
News Banner My final experiment was to add an animated news banner to the sequence. At this point, my only focus was experimentation and I wasn’t worried about covering parts of the animation with a news banner: it was simply a fun development that I could explore in my own time. Having dedicated a day to complete this assignment, I was able to create an animated news banner and ticker complete with moving text.
Whilst this is ultimately a novelty, I quite liked the aesthetic and the concept itself is appealing: taking small audio bites and creating surreal news broadcast sequences based off these is an idea that I would like to explore further, and could represent an untapped mine for animation ideas. Alongside this, I wanted to try and respond to this dialogue clip in an interesting and original way. The only problem with having many students animate to the same audio clip is the risk of losing a creative identity, and ideas can easily become shared and stale.
With my sequence, I wanted to take the shot in a different way and explore the potential of an animated news interview. Having seen several of my peers’ work, it seems like this was an original idea - something which elevates the sequence, I feel.
Potential Developments Despite this, I would like to explore the use of a hand-written typeface for the news banner. As opposed to the hand-drawn nature of the animation, I can’t help but feel the news banner feels somewhat artificial and I plan to continue to explore this sequence further in my own time. Alongside this, the actual animation itself could be improved, I feel. Whilst the lip sync itself works, I would have liked to explore the potential of a fully animated face, rather than working with layers. With this, I could have the jaw and chin open up and close, as opposed to drawn on mouths moving. This would be an interesting development, and allow me to add more fluidity to the mouth movements.
Following from this, I would also want to return to my initial idea of smear frames and take the time to properly explore this idea in more depth. For this, I would need to research into the technique more and apply it to the ‘it’s a swan’ sequence as the character moves towards the camera and grabs the microphone. The actual microphone grab could also be developed upon, adding anticipation and follow through to the movement would be a good development for this piece.
A final development that I would like to explore for this lip sync sequence is the idea of the hair flopping down. This was an idea taken from my reference footage, and it’s something that I would like to return to. It instantly adds another level of quality and character, and if timed right, would add a light-hearted humour to the sequence. My only problem with this was the timing, however if it was at the end of the shot, I feel it would work nicely.
As a whole, however, I’m happy with this final lip sync sequence. I feel that the actual lip synchronisation is successful, and after having shown it to a few peers, I was happy to see that they found the sequence engaging. The added touch of the handheld camera added to that cartoony realism of a news broadcast, and the added news banner seemed to add to the entertainment value too.
Summary Through this assignment, I’ve been able to explore the idea of lip synchronisation to animation. This is a principle that I’ve never really attempted before, but it is a key industry practice. At the start of this project, I mentioned how I wanted to get a grasp of the process early on. Looking at my sequence, I feel as if I have been able to achieve this goal. From this project, I have been able to develop my understanding of lip synchronisation processes with hand-drawn animation. This was achieved primarily through actually beginning the animation process in TVPaint, but also my extensive research into the area on this blog.
With my own research, I was able to identify a series of key principles that really impacted the success of my final piece. The evidence can be found when we compare my initial response to the task and my final sequence, in which the voice actually synchronises with the animation. Taking the time to research key industry practices has actually really helped my practical work and I was able to learn concepts that I hadn’t considered before, such as the mouth not opening a certain way, and closing the mouth a couple frames after the sound has stopped to aid synchronisation.
Having completed a lip sync sequence for submission, I will continue to explore the lip sync process in 2D animation in my own time. In particular, I am interested in exploring the potential of creating a 2D character face rig in After Effects and looking at how I could create a quick lip sync animation in that software - with a focus on simple shapes and overlapping action such as hair movement, using plugins such as ‘joysticks and sliders’ and ‘rubberhose’ - industry standard practices for motion design and animation.
0 notes
Photo


Lip Sync: Mouth Chart & Line Animation Review
This week, I was able to start work on my lip sync animated sequence. The first step in this process was working out the main body movements, which will drive the entire performance. Whilst we are asked to simply animate the head and shoulders, it is crucial to have the character’s body move around whilst they talk in order to give an engaging performance. At this stage, my focus was exploring different ideas on how to add small character details such as the hair falling down, as a way to add a sense of character and life to the animation beyond just a talking head.
Rough Animation As opposed to my initial response to this task, for this rough animation I was working with a series of different layers as a way to not only ease the workload but also allow my animation to have held keyframes at important parts in the dialogue. Inspired by my own research into animated shows such as Adventure Time and Regular Show, I wanted to exercise some creative restraint for this sequence and not have the character move for every frame. Often times, I found that only the eyes and mouth would move quickly, whilst the body would only move every ten frames or so, when the dialogue called for it.
For the actual body movements and facial animation, I was working from my own video reference and observing when I would glance over to the side of the screen, shrug my shoulders or squint my eyes when delivering the lines. This hopefully adds an authenticity to the performance, though I feel as if adding movement of the arms and specifically the hands would have been so much more effective with this sequence. Something from my own personal research into lip sync animation and the industry as a whole is the audience’s visual focus on key areas when watching a lip sync sequence: the face and the hands. These are the key areas that we as an audience gravitate to in order to read the feelings of a performance.
In comparison to my initial attempt, I had taken the chance to change the character design somewhat and explore a more simple approach. This was informed not only by my research but as a way to allow for smoother head turns as I was basing my character’s head on a simple cylinder shape. This made drawing the character in multiple angles much more easy to grasp, and my peers felt this new design was more appealing.
Working with Layers Working in different layers meant that I could purely work on one body part at a time, and not worry about having to redraw each and every frame. This saved an extensive amount of time, and allowed me to work quickly and efficiently. This isn’t really a process I’ve had the opportunity to work with before in detail, but I’ve found that digital 2D animation is something that really interests me as an animation specialism to explore further. Something that has helped extensively throughout this process is simply drawing face construction guidelines, which helped to keep my drawings on-model throughout the sequence.
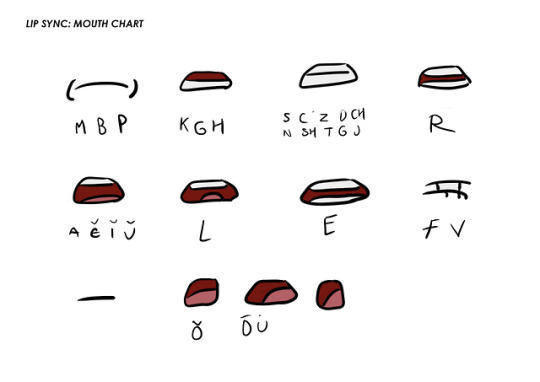
Mouth Chart Review Having worked on the rough animation, my next step was to begin developing a mouth chart. Looking at both my own video reference and a handful of industry examples, I was able to develop a quick set of mouths showing the full range of mouths used in the sequence. For this, I wanted to pursue a fairly simple approach to the mouths following my own stylised design choices so far, with a bold line quality. Whilst fairly quick in its execution, this mouth chart represented an incredibly useful tool in the lip sync process. As opposed to the drag and drop process of building a custom brush with saved mouth shapes, my own plan for this sequence was to draw each mouth by hand, as the character doesn’t stay standing still for extended periods of time. Whilst this is a little more time consuming, I felt it was much more natural and intuitive rather than dropping pre-drawn mouths onto the character.
However, whilst this initial mouth chart was useful, it ultimately feels a little rushed. With this, I went back and produced a more refined mouth chart with the same shapes, but more of a consistent and equal line quality, something more in line with my own research into Adventure Time and Regular Show. These all have an equal line stroke which helps give the illustrations a clean sense of appeal, whilst still having that hand-drawn quality. Line quality is something that I will continue to explore further, and is an area that I really want to work on moving forward with my studies on this course as a whole.
The Lip Sync Process Having produced a final mouth chart, I then began work on the actual lip sync process: analysing the dialogue, identifying which mouth shapes to use based on the phonetic sounds being heard (as opposed to the words being said) and began drawing the mouths on a separate layer. With my independent research into the process, I actually found this to be quite a simple process and bringing the mouth shapes in a frame or so before the dialogue began allowed the actual lip synchronisation to be much more successful in comparison to my initial attempt.
Isolating just this layer allowed me to work purely on the mouth shapes and getting them to be consistent throughout the sequence, something that I’m actually quite happy with. The jaw does not open in a way that is anatomically impossible, and the synchronisation with the audio is actually somewhat successful. In comparison to my initial straight-ahead attempt, this represents the leap in my understanding of the lip sync process.
Finally, I was able to work back into my animated sequence and create a single layer with more refined, smooth line work using the pen brush and smoothing tool within TVPaint. The smoothing tool was incredibly helpful to this process, allowing me to create a line of equal weight no matter how much pressure I applied to the tablet. Whilst the line quality is still not perfect, this is a great improvement upon my initial attempts and with this, next week I will begin the colouring process.
Something that I will continue to work on, however, is the application of the basic principles to this animated sequence. In particular, I want to make the head swing at the end much more fluid. At the moment, the movement as the character steps forward to grab the microphone feels somewhat stilted. In order to develop upon this, I will be adding several in-between frames to add an arcing motion to the movement. Alongside this, I would also like to explore the potential of adding followthrough motion with hair, however this remains a potential independent development if I get the time.
Summary As a whole, however, I’m happy with the animated performance I was able to create here. Given the restrictive nature of the brief, the focus of the shot has to be on the facial performance and body movements. Looking back at my animation, I feel as if it is a successful lip sync sequence. The mouth movements synchronise with the dialogue nicely, and the character performance moves past a simple talking head. After the interviewer asks ‘anything else’, there is a visible change of expression that I feel really works with the timing of the sequence. This change of emotion is simply conveyed through the use of eye movement and a subtle head turn, as the character takes in the ridiculous nature of the question.
Additionally to my application of the principles, I hope to be able to develop this sequence further in After Effects after being fully coloured. My plan is to explore the use of a virtual camera in this sequence to immerse the viewer further into the idea that is an interview, with the camera moving around subtly whilst the character talks. This would be an independent development, additionally to the sequence for submission.
Next week, my main aim will be to add in any necessary in-betweens to make the body movements much more fluid, and complete the colouring process ready for experimentation in After Effects.
1 note
·
View note

Photo


Lip Sync: Principles of Lip Sync Animation
After exploring the historical context of lip sync animations, I took the time to explore a few more principles of good lip sync animation through various online tutorials from animators across the globe. This represents my own independent research into the lip sync process, but also a way to develop my own understanding of the technique in preparation for my practical developments later during the week. These techniques and tips that I’m describing here can ultimately apply to any animation medium.
Having filmed some video reference already, I have a basic idea of the animated performance and wanted to get a few tips from animators online. Firstly, we are encouraged to use a mirror. This is animator Howard Whimhurst’s first tip, and it’s something that we actually made use of during my initial rough animation for the assignment last week. Using a mirror, it is easier to map the jaw to the mouth onto our character’s face, and see what the shape of the mouth looks like, from any angle.
This would be working on the same idea as recording reference footage, allowing us to actually observe what the shape of the mouth looks like, and what it is doing. It’s important to draw what we see, not what we think we see.
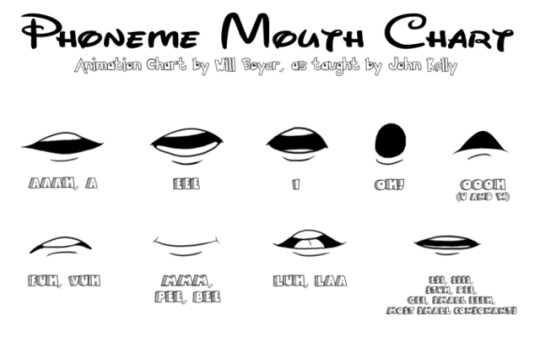
In lip syncing, we have to have an understanding of how phonetics work, and how our mouths are positioned in order to produce certain sounds represented by letters and letter combinations. Its easier to read someones words if they are really articulating their words than to just mumble them. Its also important to pay attention to the dialogue and remember what kind of tone you’re trying to portray with your words. If a character is cheerful, we need to arc the mouth upwards to indicate that they are happy.
Typically, animators focus on the body before animating on the face. This is to make sure the face has a solid foundation: if the body is moving in any way, the face is instantly the secondary component to it. You have to know where the face is, before animating it. This is something I hadn’t really considered, as my initial rough animation was created by drawing every frame. When I next begin work on the lip sync animation, I will seperate key elements of the shot into layers such as the background, character body and facial features.
A key idea that would have benefited my initial attempt is the idea that not every letter needs to be drawn. A sort of unspoken rule of lip sync animation is that we shouldn’t use a different mouth for every letter of a word. As human beings, we have developed the ability to say a large amount of words, and have become very efficient using our mouth. This means that we tend to skip over certain things, and emphasise specific syllables in a word. Again, this would come down to observation through video reference and a mirror.
Analysing Dialogue A key principle of lip sync animation is analysing the dialogue properly: we need to understand that English is not a phonetic language. We need to be able to interpret the sounds we are hearing being said, as opposed to animating each letter of a word. This can result in extremely busy mouths, which looks bizarre and unsuccessful, to say the least. The end of one word sound flows directly into the next, rather than working as individual words.
Simple lip sync involves correctly timing the mouth open and ‘mouth-closed’ positions, an example of which being the Muppets. Their sock-puppet lips cannot form all of the complex mouth shapes required for actual human dialogue, but the simple contrast of ‘open’ and ‘shut’ makes for an effective lip-sync when successfully timed. Typically, convincing lip synchronisation requires around eight to ten various mouth shapes.
An idea that is crucial to lip syncing animation practice is the interaction of two different body parts: the voice box, and the mouth. It’s important to understand that we ‘start making the mouth movements before the sound is made’. Our lips get ready and into the right position before the sound is heard, rather than as it is said. As a general rule, we need to form our mouth shapes a few frames before we hear the sound.
Alongside this, I’ve found that extending an open mouth frame past when the dialogue ends means the animation feels more synchronised in most cases. This allows us to mimic the ‘tendency of humans to keep the mouth slightly parted’, even after the vocal chords stop vibrating. We can even see this in my reference video, where after the word ‘swan’ my mouth remains open for a little while longer.
Another online tutorial explains how lots of animations feature mouths that move up and down like a sock puppet. This is bizarre, as the upper teeth and jaw doesn’t move, they are not retractable and should stay in the same place through the entire sequence.
One final concept to consider is the speed of a typical lip sync. This often happens very quickly, and it can be extremely important to add exaggeration in the mouth poses so the animation can be read properly by the audience. One suggestion was to listen closely to the audio, and mark ‘all the moments where the character is speaking louder’. We would then use these marks as moments to ‘push the mouth shapes further’, exaggerating the mouth for shapes such as ‘w’ and ‘o’ allowing the audience to read it more clearly.
This idea of clear audience reading is key to a successful lip sync animation, and here I wanted to briefly explore a few basic principles of successful lip sync animation as a way to develop my now understanding of the process and continue my research for this project. Through these several online videos, I have been able to learn a great amount about good lip synchronization practice with character animation and looking back at my initial rough, I can see the flaws easily.
Having filmed my own reference and drew sketches from these, I will be applying this understanding of basic lip sync principles to my own work. I feel like one of the key ideas that I need to consider is the use of layers within the software, and starting the lip sync a few frames before the sound begins. Although this may look like it is offset on the timeline, watching it back will reveal that this allows for a smoother, more natural animation.
Moving forward, I will begin by animating the body movements in TV Paint and developing a series of specific mouths from there.
References
https://www.pluralsight.com/blog/film-games/proven-tips-animating-believable-lip-sync
https://www.animatorisland.com/a-lip-sync-must-know-for-limited-style-animation/
http://www.keithlango.com/tutorials/old/lipSync.htm
https://www.youtube.com/watch?v=pTTQ6hXz8J8
0 notes
Video
vimeo
Lip Sync: Acting Reference
In preparation for my practical developments within TV Paint, this week I took the time to produce some reference footage for the Lip Sync project, exploring how to add personality and character through the movement of the face, shoulders and line delivery. In response to my research into industry practices regarding lip sync animation, I found that a key element was recording video reference. This was especially true for feature-film animators, who will often film themselves delivering the dialogue and animate based on this.
To begin, I was taking ideas from my own sketches and initial rough animation created last week and began workshopping ideas spontaneously, with the help of my peer. The purpose of this independent research session was to act out a few different approaches to the lip sync idea and develop an understanding of facial and body performance before finalizing these ideas into a refined ‘master reference cut’ that I can return to for my animation.
With this, I was able to record a range of ideas and approaches, exploring different emotional reactions in response to my peer saying the other lines - something that helped my performance and react in character. Something I was interested in is seeing how different characters would hold themselves, and move their weight around whilst doing something as simple as standing up, talking. Initially, I was exploring the idea of a character being sarcastic and becoming annoyed at the idea of an interview since he is being asked to describe what a swan looks like - we all know what this animal looks like, and I wanted to emphasize that idea here.
At first, I was exploring a more angry-type fellow who just didn’t want to be there. He would act irritable and constantly have a frown on his face, but I soon realized that watching someone like this wouldn’t be a particularly engaging sequence. After a few iterations of playing around with ideas, and bouncing concepts off my peer, I moved towards a more emotionally indifferent character - someone who didn’t want to be there but didn’t really care either.
My plan for this sequence is to have the character move around slightly whilst talking, to evidence a real performance. We rarely simply stay still whilst talking, and adding small body movements and head turns will allow me to demonstrate my own understanding of solid drawing and secondary action to convey personality.
The idea is that this character has been picked off by a news interviewer for TV broadcast and is being asked all these questions, whilst the swan is literally just off-camera. I had originally imagined these characters at a park, and perhaps this swan has done something rather surreal, like rob a bank.
After recording a series of reference clips, my final task was to produce a ‘master cut’ by collecting and cutting the most interesting pieces of character performance into a single reference video that I can then use to animate from. This process of ‘cutting and pasting’ multiple live-action reference files is a key industry practice, demonstrating a professional reconsideration and development of ideas. For this, I made use of several of my iterations and edited them into a single sequence, which actually flows nicely. For this, I was looking through each iteration to find the subtle nuances of my own facial performance, this is the central theme of the brief and is something I will put a focus on where possible.
The final master cut includes a range of head movement that works to emphasize the lines and exaggerate the emotional performance of the sequence. Having the head move up and down, tilt and similar subtle movements work to accentuate the words, which subsequently will make the action easier to read from an audience’s perspective.
Unlike my initial rough animation, I found that when I look across when describing the swan’s appearance, only my head turns around, and my body stays facing the same direction: it’s only a head turn. This type of observation is key to successful animated character performance.
As the interview continues, the character looks more and more irritated before finally grabbing the microphone and delivering the line ‘it’s a swan’. With this part, in particular, I wanted to focus on a slightly exaggerated performance - my main reference will be American animated shows such as Adventure Time and Regular Show, which follow a similar approach to performance and lip sync.
With this final cut, I have been able to produce a good final video reference to return to throughout the animation process. It’s a strong performance, and I particularly like the more nuanced elements such as the eye shutting slightly when looking off-screen at the swan, and how the character always has this blank, a surprised expression on his face that reads ‘are you serious?’, something which adds to the comical nature of the situation.
Another key concept that I identified was the importance of the eyes: instead of having the eyes dead on the viewer and not move, I observed that my eyes moved around freely during the interview. It’s a little detail, but something that works to convey my emotions in a powerful way: the eyes are the gateway to the soul, of course. Having the eyes move around in a certain direction communicates to the audience that the character is accessing memories or emotions - something key to the study of body language and facial expressions for psychological analysis.
Based on this research, I will be designing a character with eyeballs and pupils, allowing the eye to move around whilst talking. This is only an initial idea, but it is one that I want to explore further within TVPaint.
Summary Here, I’ve been able to reflect on my own reference footage for the lip sync project, and how I can add personality and character through the movement of the face, shoulders, and eyes. This will be a key reference source to return to throughout the animation process. Having produced my video reference here, my next move will be to begin refining a character and look at some examples of lip sync animation from the animated shows mentioned earlier, such as Adventure Time and Regular Show, which will form my main secondary research and reference sources for this project.
0 notes
Video
vimeo
Lip Sync: Initial Roughs
As an initial response to the assignment, this is the rough animation I created exploring ideas of composition, performance, and timing.
0 notes
Photo


Lip Sync: Initial Response Review
Having been briefed the project assignment, I took the opportunity to develop a series of initial responses to the task: analyzing the source material, creating a series of loose drawings in my sketchbook exploring composition ideas and design concepts, and developing an initial, rough animated response using TV Paint. These represent my initial explorations in response to this brief, and I want to discuss my process and outcomes here.
Firstly, we were shown lip sync examples by freelance animator Katherine Dallimore in which she outlined the basic ideas of a lip-synching animation. In this early stage, we should just be focusing on an initial, loose response to the audio dialogue. The purpose of this session was to begin our exploration into lip syncing and get a grasp of the basic fundamentals of the process using TV Paint. Hand drawn, digital 2D animation is something that I really enjoy doing, and I���m happy that we’re following this route for the lip syncing project as opposed to After Effects. Whilst I enjoyed working with After Effects, it feels refreshing to dive back into hand-drawn animation after working in CG and stop motion quite heavily in recent projects.
My first action was to explore the original source material, a clip from Hot Fuzz, an excellent comedy film from director Edgar Wright. In the scene, the main character (a police officer) is asking a public citizen about an escaped swan. In our animation, we are asked to simply animate one speaker, and so I only focused on the citizen’s acting here. I feel as if briefly analyzing this performance has developed my understanding of the dialogue too, giving my own ideas a foundation, and point of reference.
In the clip, the character has his hands in his pockets, so, fortunately, there’s no real arm movement. The body is slowly swaying, and the character arcs his head slightly with the final ‘it’s a swan’ to convey his own confusion and mild irritation at having to describe a swan. There’s a squinting quality to the character’s glance and an overall atmosphere that says ‘I don’t want to be here’. For my own response, I wanted to take this idea further, but I will not be basing my character’s design off the actor presented here in the original source material. Ultimately, I want my animated sequence to be an entirely new piece, and I will be designing my own character as part of that process.
Initially, I knew I wanted to take my response in an unexpected direction, to push the limitations of the brief to add some creative flair to my outcome. Whilst the source material presented more of a police questioning, I felt the structure of the dialogue would fit a news broadcast interview format nicely, and I began exploring this idea further in my own initial sketches. These rough drawings represent my first explorations into the concept, as I started to look at ideas of composition and the potential to add an off-screen character holding a microphone to drive the ‘interview’ idea home to the audience.
Instantly, this idea presented me with some real animation potential and I began sketching out alternative compositions and design potential: adding news broadcast banners and the idea of a hand-held camera. This wouldn’t be difficult to do and would be possible in either After Effects or TV Paint using virtual cameras. Of course, these features would be my own personal development and I would still simply hand a clear, white background version of my animation in for submission.
Rough Animation With these sketches, my next move was to open up TVPaint and begin developing an initial rough animation in response to the dialogue, inspired by my own interview idea. Although this is still in the early stages, the idea was to have a character be interviewed after seeing a swan operate a robbery. The initial concept explored a sensationalist television broadcast interviewing an unsuspecting member of the public who witnessed this, and try to describe the thief in question; as such, the sequence would have a somewhat surrealist tone.
The actual process of synching the animation to the audio was rather simple: using TV Paint, I could import the audio track into the timeline and using the notes layer, scrub through the timeline and write down the key phonetics. For my rough animation, I worked straight ahead and drew each frame. Whilst this was a time-consuming process, the final result managed to successfully present an overall first idea on what my final animation will look like.
At this early stage, the focus was simply exploring my own ideas in terms of performance, without worrying about staying on-model. There are some successes to this rough animation: firstly, I feel the interview idea really works and although I’m challenging the expectations of the brief with the addition of the microphone, it’s such a small feature that I think it will be perfectly acceptable for submission. As animation students, we are encouraged to be experimental and respond to the briefs in our own way - and this small feature creates an instant idea of the context for my scene. It also allows there to be some movement whilst the off-screen speaker is talking, keeping the viewer engaged.
With my character positioned on the left-hand side of the screen, I’m working on the rule of thirds creating a pleasing composition. This is an effective way to frame the sequence, and it’s a simple composition that I will be taking further. Having the hair flop down is a nice character touch, a small observational movement inspired by my own experiences! This is a small piece of secondary action that adds to the character, and gives him something to do whilst the interviewer speaks, whilst also working to convey the idea that this character doesn’t want to be there.
From the get-go, I knew that I wanted my character to have a sense of volume, and to look to the side during the sequence. I feel like it would be very easy to make an animation where the character just looks at the camera and talks, but I want to practice my understanding of solid drawing here, in particular. I’m imagining the swan in question to be a few meters away from the characters, and I’d like to have a pan across to a shot of the swan. Ultimately, this would need to be an independent development, outside of submission requirements and deadlines.
Finally, I feel the ending has potential: having the character grab the microphone to exaggerate his final point works to convey his sarcastic, disappointed emotion and further emphasize the facial performance. I’m interested in looking at the potential of altering the volume of this final piece of dialogue to further work with the animation, but this is simply an initial idea.
Despite this, there are a few obvious problems here. Firstly, the character is not on-model and loses shape and volume throughout the sequence. Whereas most of the class’ animations feature characters looking at the camera, I will be creating an animation with a turnaround, and as such, I need to look at developing mouth shapes from the side and not purely from a front-on perspective. This will be an additional challenge, but it instantly adds weight and depth to the character. I need to consider the use of layers to separate the various elements of my scene, rather than simply drawing it frame by frame. This makes the sequence much more visually consistent but also eases my workload.
Also, the actual lip movements are slightly out of synchronization with the audio at some moments. Looking through my work, I feel as if this is because I was animating the lip sync as the words are being said. Having researched into the process independently, I have since found that I need to begin my mouth shapes before the sound is made: we see it before hearing it.
Summary As an initial response to the project however, I was able to block out the main performance and key beats, but the actual lip synchronization isn’t that successful. As this represents my first attempt at the process, my next move is to begin developing my own independent research into the process before my next iteration. Ultimately, though, this test presents an interesting take on the assignment, and my next move is to record some primary reference inspired by this news broadcast interview format. Using a microphone, I will be exploring the potential of an exaggerated performance and film myself saying the same lines in a few recorded iterations, to gather a range of ideas and approaches to the performance. Personally, I find the interview idea is quite engaging and I will be continuing with this concept through this project.
0 notes
Photo


Lip Sync Project Briefing
Our latest project assignment explores the idea of lip syncing within character animation, introducing us to the fundamental processes of synchronisation of moving image with sound. This is a key aspect of many animation productions, and this project gives us the opportunity to begin our own exploration into lip-synching using 2D program TV Paint. Using digital cut out techniques, we will create an animated character sequence, focusing on the synchronisation of facial acting and movement with a predefined dialogue audio clip.
We will be given the choice of two provided audio sound bites, and asked to animate a simple character in synchronisation with the predefined dialogue. It’s important that our character will only consist of shoulders and head, with no major use of arms or hands to communicate emotion. This allows us to focus purely on analysis and performance of the face, and as such, the character design must be simple. There needs to be an emphasis on core shapes of the head and eyes, mouth and eyebrows, allowing us to work from primary research.
The character will be set against a pure white background for the submission video, however, we are encouraged to create an alternative, more visually exciting version for our own personal work. This is something that I plan to do: take my simple animation from TVPaint and develop it further, using a textured visual style inspired by motion graphics examples. For my own personal showreel, I’m interested in the potential of adding background and other elements to really bring this sequence to life. Of course, I will be completing this in my own time.
The focus of this project will be to create a convincing character performance, something achieved through primary observation being translated into the animation. This will be gathered through sketch booking and filming video reference of myself to develop the performance. Although I will be working from my own video reference, I need to remember to exaggerate the performance and not be afraid to add my own ideas in the animation stage.
Additionally to the final animated sequence, we will be creating a ‘dope sheet’ collecting all of our mouth shapes which we can then use for reference when building our own custom brushes in TVPaint. These drawn mouths will be specific to the chosen audio, and we are encouraged to develop our own research into lip synchronisation processes on our blogs. With this, I plan to explore a brief history of the technique and analyse a few contemporary examples of lip sync animations as a way to further develop my understanding of key industry processes.
As we are synchronising our animations to audio, we will be working to a predefined time limit of ten seconds, animating on twos and at 25 frames per second.
For this assignment, we will be following an iterative process and creating several passes to develop a successful character performance. Firstly, I will be developing a rough animation, with loose expressive drawing and working out the main story points of the shot. Here, I will be simply experimenting and exploring my own ideas in response to the audio clip, and gathering primary research for reference.
From this, I will begin ‘tying down’ the animation: drawing the character on-model, with a bolder outline. This begins the refinement process, as I develop the final line work before moving to lighting and colouring - cleaning up the animation and focusing on confident, crisp lines to then develop on further. We are reminded that each stage in this process is an actual industry role, and that these are all individual positions within the pipe line.
Deliverables:
Mouth Chart a PDF or JPEG created digitally, showing the full range of mouth shapes used.
Lip Sync Sequence the completed sequence. 1920 x 1080. 25fps.MP4
Research Portfolio showcasing your research and development within the project,
including revising research and application of the principles of posing and animation.
Reflective Journal a PDF extracted from your research portfolio containing all weekly
summaries of the project, plus a final critical evaluation with a suggested word count of 250 words
Initial Response Having never really attempted a lip sync animation before, I’m eager to begin work on this assignment. The idea of lip synchronisation to animation is a key industry practice, and it’s something that I want to grasp early on in this first year. I feel like this project will present a learning curve, but it’s one that is crucial to my progression as an animator. Additionally to the actual performance, I plan to really push the limits of this assignment in my own time, developing the animation with illustrated background, secondary animation and textures. This is something that I began exploring in a previous project, and I want to continue this 2D exploration further with this assignment.
Moving forward, I will select and analyse my chosen audio clip and begin developing an initial, rough animation in response to the dialogue. In this early stage, my focus will simply be on exploring my own ideas for this assignment, not worrying about staying on-model and instead, looking at my initial performance ideas. Additionally to this, I will be beginning my own independent research into the lip synchronisation process; exploring a few historical and contemporary examples and looking at how important the technique is to the animation industry as a whole.
0 notes