#basilonetutorial
Explore tagged Tumblr posts
Visit Tumblr Blog
Explore Tumblr blogs with no restrictions, modern design and the best experience.
Last Seen Tumblr Blogs


Fun Fact
Post activity is at the highest at 4:00 pm EDT; notes peak at 10:00 pm EDT.
Note
hi! i love your gifs so much!! i love the coloring to them and how crispy they are! i was curious, is there any specific sites you use to create gifs and the basic steps of gif making?
Hi! This is so nice to hear, thank you! 😊 I don't use websites to create mine. I know they're out there, but I've never used them. I use video files, an old version of KMPlayer, and Photoshop CS6 to essentially build the gif from loose screencaps to the finished product you see on my blog. A lot of these need coloring/brightening adjustments that Photoshop can do really well, and after so many years of giffing I think I've found a way that works best for me.
I followed a lot of tutorials (and sometimes still do!) to get a hang of making gifs. I wound up writing my own, which still tells you a lot of the basics even when some of the ways in which I brighten/color now have changed a little since then. You can find the two-part tutorial under the tag #basilonetutorial on my blog.
If you have any specific questions, please let me know! Hope this will help. 😊
3 notes
·
View notes
Note
hello! i was interested, what sites or programs do you use to get screencaps, gifs, and/or video clips from the pacific or band of brothers? i really wish to be able to gif/screencap/video clip certain films and was wondering if you’re able to give tips. thank you!!
Hiya! 😊
I got the shows through a download quite a long time ago. I cannot quite help you with where to get them, but I can tell you that I think the best quality for screencap/gif purposes is 1080p. As long as you stick to that when getting the videos, you'll be golden.
I use an old version of KMPlayer (4.2.2.38) in order to pull screencaps from the video files. I use Photoshop CS6 to then put those screencaps in a moving image, cut them to a size Tumblr can handle, sharpen the images, and brighten & recolor them. I have two gif tutorials in the tag #basilonetutorial that will tell you a little more about that process!
I hope this helps a little bit. If you have any specific questions about the process, please don't hesitate to ask. ^^
3 notes
·
View notes
Text
basilone’s gif tutorial (part II)
Following yesterday’s first part of this gif tutorial, we’re now gonna move on to where the real magic happens! Today, we are going to go from the basic gif we created in part I to the type of gif that I typically publish.
In other words.. we start with this:

And we end with this:
Sounds good? Let’s rock it!
What you need for the second part:
Photoshop (again, I use CS6 but any version is fine)
Some patience
Step 1
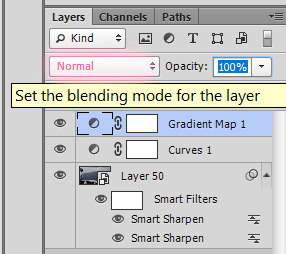
If you’ve followed all the steps from part I of this tutorial, you’ll have a Smart Object on your hands that’s essentially all the layers/frames of your gif condensed into a single package.
The first step to making it look pretty is to use a sharpening action! (There is plenty of info on Google about how to add an action into PS – for the sake of length, I haven’t included it here. Feel free to drop me an ask about this or anything else in this tutorial if it’s too confusing, though!)
I use this sharpening action religiously, as it works with any gif. You could also do this manually through the use of Filter → Sharpen → Smart Sharpen but you’re gonna have to experiment with the settings of that one yourself because I’m notoriously lazy and never do it by hand, haha.
For the next step, we’re gonna brighten the gif. There are two ways to brighten a gif to the point where you can actually see things properly, lol. I sometimes use both methods at once, like in this gif we’re doing now, so I will explain them both.
Step 2
Go to Layer → New Adjustment Layer → Curves. (Alternately, just click on the Curves option in the Adjustments box.)
There are three things that matter in the box that appears on screen now. I’ve color-coded them in the screenshot below. You can play the gif and pause it at a particular frame if this will help you in this next part – sometimes, the parts you need are not in the frame the Smart Object landed on. ;)

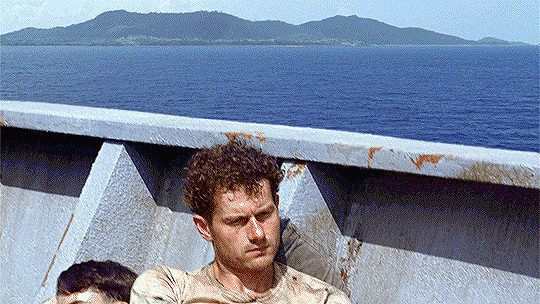
Click on the eyedropper I marked with red. Now, use it to click on the brightest/whitest part in the image. You might need to experiment a bit here to see which part looks best! (In other words, use CTRL+Z to undo it so you can try again. I typically wind up clicking a few sections or zooming in on the image to see which part is white or close to white.) I went for a part of the clouds, but had to click a few times to get the result that brought out most of the cyan tones in the gif.
Click on the eyedropper I marked with green. This is a bit of a finicky one to be honest with you. Sometimes this one works like a charm and sometimes it hates me. Use it to click on the most neutral-toned/grey-ish part of the gif. In this case, I really want to bring out the blue parts of the gif and so I chose a part of the pillow-ish thing Leckie is leaning against.
Click on the eyedropper I marked with blue. Now, click on the darkest/blackest part of the gif. I went with the underside of the boat’s railing, but again had to retry a few times to wind up with something that didn’t add too many red tones.
Step 3
If you don’t want to use Curves, if Curves make it all look odd no matter how you click things, if you want to add some additional lightness, whatever else have you.. then try Gradient Maps. Find them in the Adjustments box or through Layer → New Adjustment Layer → Gradient Map.
For brightening purposes, I almost always use a gradient map with pink on the left and yellow on the right. (#ffcbe6 for the pink – #fffec3 for the yellow.) As you can probably tell from this screenshot, this is gonna do something wacky to your gif! We’re gonna fix that up real nice though.
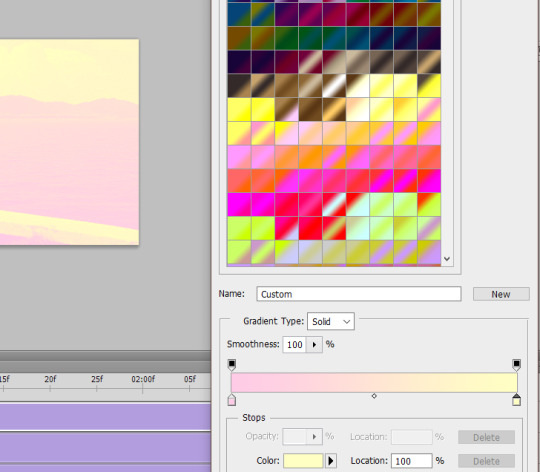
Go to your old friend the Layers box and click on the part I marked in pink. Now, choose soft light and tadaa – the pink/yellow is gone, but your gif looks different!!
Now, I’m pretty pleased with the brightness but I hate that the Gradient Map took away some of the blues in the image. So, I chose to set the Opacity of the gradient map’s layer to 30% instead of 100%. That looks good, right?
Step 4
Now!! This next bit is where we’re gonna go from good-looking gif to color-porn gif, haha.
It’s time to meet the bestest friend you’re ever gonna get when you’re giffing: Selective Color. You can find this baby, again, in the Adjustments box or through the Layers → New Adjustment Layer → Selective Color bit.
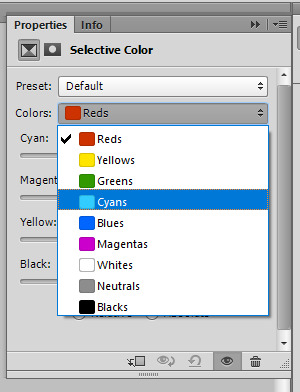
Now, we’re not gonna touch all of the colors. You can select specific ones in the drop-down menu you see in the screenshot above. For this gif, we’re going to touch the following: green, cyan, blue, white, neutral, and black.
Here’s the theory behind Selective Color:
All images are built up out of different colors. Some of them you can see straight off, while others are more of a background building block. When I select Green in the drop-down menu, I am going to work with every green part in the image – both visible and invisible. When I select Neutral, I am going to work with every neutral part of the image. (And so on for the other colors as well..)
Selective Color works with sliders. You can be subtle with those, or you can be like me. =P When you have selected a color in the drop-down menu, you’ll see 4 sliders.
This is what you need to remember about those:
The first one is Red-Cyan. Sliding to the left means the image will turn redder, while sliding it to the right means that there’ll be more cyan.
The second is Green-Magenta. Sliding to the left makes it greener; sliding to the right turns it pink.
The third is Blue-Yellow. Sliding to the left makes it all blue and sliding to the right.. yup.. turns it yellower.
The last is White-Black. Left makes white, right makes black. Use this one sparingly!!
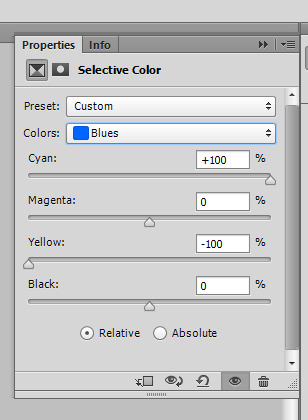
For this gif, we’re gonna do the following.
Select the Green color. Slide the second slider all the way to the left. (You’ll see a number that says -100%.)
Select the Cyan color. Slide the first slider all the way to the right. (+100%.) Slide the third slider all the way to the left. (-100%.)
Select the Blue color. Slide the first slider all the way to the right (+100%) and the third all the way to the left (-100%), just like you did with the cyan!
Select the White color. Set the fourth slider a little to the left. (In numbers, this is represented as something like -9%.)
Select the Neutral color. Set the first slider a little to the left (-9%) and the third a little to the right (+7%). Be very careful with this one! I typically never slide it further than -12% or +12% on these because it messes with skin tone like whoa. (It’s great for when the Curves/Gradient made skin tone look paler though, as this setting breathes life back into the skin tone really well. There’s nothing selective color can’t fix!!)
Select the Black color. Set the final slider a little to the right (between 3 and 7% should do it!).
For other gifs with different colors, you’re gonna need to try different things with the sliders. Just play around with it and see how the colors of the gif change depending on what you do with the sliders. Sometimes, a scene will be entirely too yellow and then it really helps to go to the Yellow and Neutral sections and slide the third slider more toward blue. Similarly, a scene that is very neutral-toned can benefit from adding small bursts of color alongside black to make the little color there is ‘pop’. Seriously, this tool is so multi-functional that it’s almost impossible to show you the whole nine yards of what you can accomplish with it! So please, experiment and have fun. =)
Step 5
Aaaaand.. we’re done! Save your gif using the exact same settings we used in part I of this tutorial!
#gif tutorial#ps tutorial#basilonetutorial#these are like.. 3/4 of my giffing secrets right here#I'm not fond of hoarding info and keeping it to myself#I prefer to share and teach and whatever else -- to inspire folks to create!!#I hope this is a clear instruction though lol
24 notes
·
View notes
Text
basilone’s gif tutorial (part I)
I have been getting so many lovely comments on my gifs (thank you!) that I feel like I can give something back to all of you who want to create that sort of thing but have no idea on where to even begin. A lot of people have mentioned the colouring of my gifs in particular as something they really like, so I wanted to do a little tutorial on how to achieve it!
Part I of this tutorial will focus on how to go from absolutely nothing to the most basic of gifs. Most basic, in this case, means entirely unaltered: all this part of the tutorial will talk about is how I create a gif. (Other people may have other methods but this is the one I’m most familiar with.)
Part II will include how to go from the basic gif we created in the first part to the kind of gif you see me publish in my gifsets, with all the colours and sharpening settings and all that jazz.
If you have any questions or need clarification on anything, please drop me an ask and let me know!!
What you need for this first part:
A video file of whatever you want to gif
KMPlayer
Photoshop (I use CS6, other versions are cool too)
A little bit of patience
My end result once I have followed all the steps of part I looks like this:

Step 1
Open your video in KMPlayer. I used episode 4 of The Pacific for this tutorial! Search in the video until you find the exact scene you want to make a gif of. (For the sake of part II of this tutorial, I’ve chosen a scene with lots of daylight and colours.)
Step 2
Pause the video, if you haven’t already, and then click CTRL+G. You will now see this box appear:
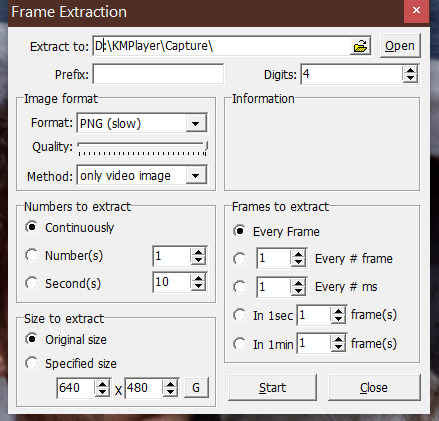
Use my exact settings (shown above) for this one. In Extract to, choose the folder you want the screencaps to land in. Make sure the option Every frame is selected. Now click ‘start’.
Step 3
Play the video until the scene you want to gif is done. Pause it again. Click CTRL+G once more and press ‘stop’.
Step 4
Go to the folder on your PC that you saved the screencaps to. You’ll likely have hundreds (if not thousands) of them, but please don’t panic! Delete all the screencaps that don’t belong to the part of the scene you want to gif.
Important rule of thumb! How many screencaps you need depends on the size you want to make your gif. For gifs that are 540x304px, use no more than 50-60 screencaps tops. For gifs that are 268x151px, use no more than 80. For 151x85px (please love yourself what are you doing), just go crazy – you can easily use more than 100 for that. (You don’t wanna be in the situation where you’ve created and coloured your gif, only to find out when saving it that it exceeds Tumblr’s petty 8mb size and you have to go back to delete some frames.. believe me. :’))
Step 5
Start up your Photoshop (yay!) and go to File → Scripts → Load Multiple DICOM Files. Select the folder your screencaps are in, then click ‘ok’.
Make sure you’ve got all the tools open that you’re gonna need for both parts of this tutorial. You do this by going to Window in the Photoshop menu bar and selecting the following:
Actions
Adjustments
Layers
Navigator
Timeline
Step 6
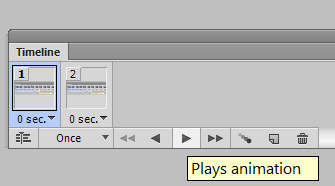
Timeline is gonna be your new best friend! Click on Create Frame Animation. Then click on the little downward arrow that has three small stripes next to it, which is gonna make this next menu appear:
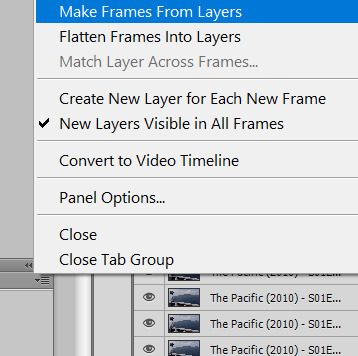
Select Make frames from layers and watch how all the individual frames are loaded into the timeline. Good, right? (You can see the individual frames in the Layers box as well, which we’ll get to in a hot moment.)
Step 7
Select all the frames on the timeline and click the little arrow next to where it says 0 sec below the frames. We don’t want to set our gif to 0 sec. We want to set it to 0,08. So, we select Other and type in 0,08 and then click ‘ok’ like we know what we’re doing.
That’s the movement part of the gif done, believe it or not, so we must be doing something right!
Step 8
So, yeah, we got it to move. Now what, you might ask? ;) Now it’s time to actually make sure that Tumblr doesn’t freak out about us uploading it. Here’s how we’re gonna do that.
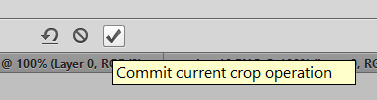
Make sure all the frames are still selected on the timeline. Now select the Crop tool, set it to 540 px by 304 px or whatever size you want your gif to have, and start fiddling around with the corners of the image. You can select the part of the frame you actually want in your gif that way. Double-click on your selection once you’re satisfied with it or click the check mark that appears on screen. Tadaa! Gif is resized!

Step 9
Now, I assume that you’re like me in this case but if you’re not please feel free to skip past this step. I always have more frames than I technically need. I start off with about 70 screencaps/frames for big gifs, which I then need to select down to ideally 40-50 screencaps/frames total!
What I personally do is that I will make the gif the way I just described with all 70 frames in place, and then I will play it a couple of times in the timeframe mode to see which sections can feasibly be cut away. You can do the same thing, try it! (And you get to see how nifty the gif is gonna look, too!)
Select the frames on the timeline that you want to get rid of and click the little garbage can on the timeline. That gets rid of half of the trouble, but now you gotta do something else. Remember me saying something about the Layers box? That’s gonna be your other best friend in this first part. Go to that box and select the layers you just deleted from the timeframe.

How do you know which layers you’ve deleted? Select all the frames you’ve still got on the timeline. Those layers will get a little eyeball in front of them in the Layers box. Any layer that does not have the eyeball is one you’ve deleted. Select those layers and delete them by simply pressing delete on your keyboard or clicking on the garbage can in the Layers box.
(Alternately, as shown in the screencap above, select the first frame on the timeline. It will get an eyeball in front of it. Delete everything below that layer in the Layers box. Select the last frame on the timeline. Delete everything above that layer in the Layers box. NEVER delete frames in the middle, it’s gonna disrupt the flow of your gif like whoa!!)
Step 10
Almost there!
Click the button on the bottom left of the Timeline box, which will say ‘convert to video timeline’ when you hover over it.

Now select all your layers in the Layers box and right-click on them with your mouse. You’ll see the following pop-up. Select Convert to smart object.

Step 11
Save your gif as follows. Go to File → Save for Web. Use these settings:

Click ‘save’, give your gif a name, and you’re all set!!
#gif tutorial#ps tutorial#basilonetutorial#eesh I hope Tumblr uploads this properly and that y'all understand my step-by-step instructions#and I hope it'll be inspiring for folks? like half of PS is just experimentation tbh#just try to do things and click on stuff and watch/read tutorials from people cos honestly you don't have to reinvent the whole wheel#wait until we get to part II omg y'all are gonna die over the change between this basic gif and the finished product lol
19 notes
·
View notes
Note
Could you please link me to that post you made ages ago about how to make gifs? ☺️💕
Of course!! I hope you’ll enjoy experimenting with them haha. ❤️ I have tagged them as #basilonetutorial as well, for quick perusal, but here they are:
Part I (the giffing process itself)
Part II (how to make a gif look pretty)
4 notes
·
View notes