#cinearm
Photo
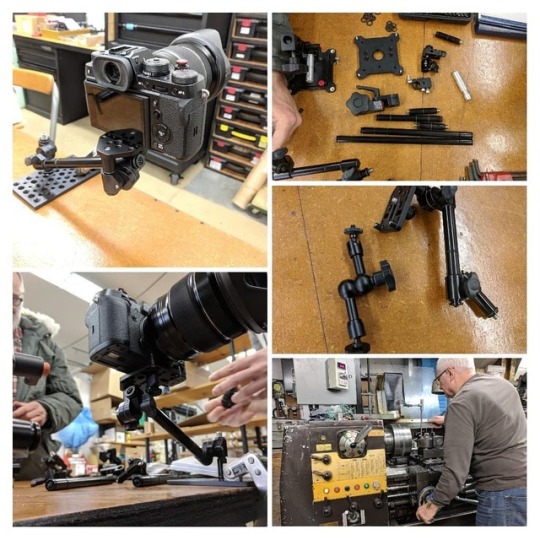
Thank you for the great day yesterday @upgrade_innovations! Fantastic customer service! Where else can the business owner jump on a lathe and quickly turn a custom part for you?! I love my new #rudyarm and will be trusting it to new heights on the #technocrane #alexa #panavision #cinearm #cinegear #magicarm #yvrfilm #vancouverfilmindustry #stabilizedhead #setlife #lifeonset #theshot #filmindustry #filmequipment #filmproduction #griplife #griprigs #gripequipment
#theshot#griprigs#panavision#filmequipment#cinegear#magicarm#yvrfilm#stabilizedhead#filmproduction#gripequipment#rudyarm#setlife#alexa#cinearm#vancouverfilmindustry#griplife#technocrane#lifeonset#filmindustry
0 notes
Text
Hands on with the Sony RX0
Last month at Sony Pictures Studios on Stage 23, I was given a few hours to play around with the recently released Sony RX0, priced at $700. There were two pre-lit scenes available to film and photograph, along with a person-sized circular podium to highlight the slow-mo capabilities of the RX0 by spinning it around the podium as quickly as possible on a sort of selfie stick. The footage was reminiscent of the comedian intros from Ari Shaffir’s This is Not Happening.
The first thing I did was pull out my Sony X3000 Action Cam and compare sizes. The RX0 is more GoPro-like in size and shape than its Action Cam brother, but constructed out of aircraft-grade aluminium instead of plastic. The front of the camera is optical glass instead of something like Gorilla Glass, meaning that while the camera body can take a 10ft fall just fine, the glass will absolutely shatter. While Sony has made it easy to replace via removal of the 4 front screws, replacement glass will run you an eye-popping $100 each. I can see people finding similar-thickness plastic sheets and cutting them down to size rather than replacing the front.
I was personally relieved to find the bottom of the camera has a standard ¼” screw hole, just like the X3000, which allows for mounting on standard camera mounts, mono or tripods, cinearms, etc. I hate the GoPro’s proprietary mount, but that’s just me. The camera is also waterproof down to 33ft/10m.
The immediate comparisons with Sony’s Action Cam line kind of ends there. As Sony themselves have stated, this is not an advancement of that line. Instead, it’s more or less a miniaturization of the CyberShot series, specifically the RX100V. This camera shares its 1” sensor, menu design, and many of the same features with that product.
In that vein, this is not a “set it and forget it” style camera as the body size would suggest. You’re going to need to adjust your settings as you would with any camera for the best results in any given shooting situation. While rather tiny, the menu is extensive enough to offer full control of your image without taking up 18 pages. The button layout is intuitive with a standard complement of up/down, left/right, select, and menu buttons. The only thing that wasn’t obvious was the fact that you have to hit “left” when outside the menu to change shooting modes. Here I was hitting “right” over and over, thinking either direction would offer that functionality. After talking to some of the other people at the event, I discovered that was a common hiccup.
Like many cameras, the RX0 comes with auto modes for photo and video, but just like those cameras, the results can be hit or miss. Due to the 24mm equivalent f/4 lens, in a dark situation you’re either boosting ISO or lowering shutter speed. From my experience neither offered an ideal result. However, when shooting the pre-lit scenes, the photos looked great with the video just looking above-average. By comparison, the X3000 & RX100V have f/2.8 & f/1.8-2.8 aperture lenses respectively.
Interestingly, the video modes use the full 1” sensor whereas the photo modes use a smaller section. I shot the photos shown below in JPEG+RAW but was unable to edit the RAW images in Photoshop when I got home, for whatever reason. After updating to the most recent version, neither Bridge nor Photoshop could read the RX0’s .ARW files, so I’m assuming there’s an update on the horizon. I’m potentially doing something wrong, but I don’t know what that could be. I wasn’t able to convert the ARW file to something more universal like DNG either, using Adobe’s conversion tool.
[unedited jpegs straight out of the RX0]
It was at this point that I found myself having trouble pinning down what this camera was for. The X3000 is a great action cam due to its ease of use, wide FOV, BOSS Optical Image Stabilization, and can be trusted to get the shot even in surprisingly dark scenes (even better than the GoPro, which isn’t saying much). The RX100V is a great pocket camera utilizing a tried-and-true sensor pedigree, great functionality, and reasonable size. Imagine buying an RX100 but the screen is 2” and you have to make all your adjustments in menus. A little annoying, right? While you can set custom functions to the buttons easing some of that discomfort, judging focus is near impossible, and so much of the screen is taken up by information readouts that you’re really only able to use it for framing. In essence, the RX0 is either a difficult to use RX100V or an over-complicated X3000 with a nicer sensor.
So where does the RX0 succeed? Well, the half-press to focus (a feature on every camera save action cams) was a welcome surprise. While it can only record 1080p internally, it can do so up to an impressive 960fps which is pretty uncommon and oft-asked for feature. If you want 4K (UHD) you can attach it to a recorder via HDMI, but then its form factor becomes sort of a moot point and it can’t do high frame rates at that size anyway. To be fair, I never shoot in 4K so that wouldn’t bother me too much. It also shoots to common MicroSD cards instead of something proprietary, which is a big plus, and does so in standard formats like AVCHD, MP4 and Sony’s own XAVC-S codec. Additionally, it has Slog2, which for professional video is basically a requirement.
Amusingly, among photo profiles like “Vivid” and “Neutral” there’s “Autumn Leaves” which I’ve never seen before and is such a specific thing to program in that I’m not entirely sure who thought we needed that, but there it is.
Just like the X3000, the PlayMemories Mobile app is easy to use and works with little to no fuss. Even with (let’s say) 30 to 50 different RX0s all in play at once in the studio, mine never lost connection. At worst it was a little choppy, which may just be the result of my beta Android firmware. Unlike the X3000, I was unable to transfer video to my phone via the app (photo worked just fine), but I was told that functionality would be available soon. Putting the RX0’s SD card in my X3000, I was able to kick the videos over to my phone without issue. While the UI is a little bland, the PlayMemories app absolutely destroys whatever GoPro is calling its current iteration and all previous versions. It’s actually nice to use, and one of the best things I can say about it is that it just works. That means a lot.
This isn’t a bad camera, just a confusing one. I’ve come to the conclusion that Sony has made this for multi-cam situations and crash cams, as evidenced by the ability to control up to 5 cameras with the app alone and by some of their literature. A multi-camear “bullet time” demonstration was quietly going on at one of the scenes. I’d guess they’re also aiming at the 360 Video market (NOT to be confused with VR because they are not the same thing) as people are using A7s’ and RX100s for this as we speak.
All things considered, if you’re in that sort of crash cam situation or the small form-factor and the ability to adjust settings for specific shooting scenarios is required, this might be a good camera to look at. If you’re in a cinema scenario and have the time to dial in settings, then it would be a decent choice. However, in most situations, it’s really not a replacement for your GoPro. Aside from not being very wide-angle, you can’t strap the RX0 to your Snowboard helmet and just start riding due to all the aforementioned menu-fuddling in the same way you can’t just turn on a FS700 and just start shooting. If you’re thinking this will replace your GoPro, you’re going to have a bad time.
The post Hands on with the Sony RX0 appeared first on ProVideo Coalition.
First Found At: Hands on with the Sony RX0
0 notes
Text
Product Review: The Dutti Dolly from Matthews Studio Equipment
The Dutti Dolly is a new, lightweight and travelable dolly from Matthews Studio Equipment intended to speed up your on-set workflow and allow you to shoot lower to the ground and in tighter scenarios than most other options. Like many DPs, I often like to shoot low to the ground so I jumped at the chance to give this thing a test run.
I’m not a gimbal fan, really. If I had my way I’d always be on a dolly/sticks or a Steadicam. The way a gimbal chooses your frame for you when a second operator is absent, or you can’t control the pan/tilt yourself, doesn’t sit well with me; I don’t like a machine making framing choices for me. As such, coupled with the run and gun nature of my shoots, I’m usually handheld. Speed of execution and portability of are paramount importance to me, so when I took the Dutti Dolly I knew those would be the two things that would make or break it. Does it “get in my way” and is it fast to set up?
My friend and frequent collaborator Chase Lock was tasked with painting a piece of luggage by the Ronald McDonald House Charity to be auctioned off at an event later in the month, so I figured a little film about that process would be a good test of the aforementioned qualities of the dolly. I wouldn’t know what he would do, where he’d walk, or what his creative process would be that day. This would be a pure run-and-gun scenario, as usual. No pre-production, pre-vis, or shot lists.
First off, as a solo shooter, I had to load everything into my car. The rental kit I was given came with the dolly, three braces (instead of two, for some reason), a 75mm & 100mm ball mount adapter with risers, and two stands which had to be hauled separately from the case that carried everything else. The case is about twice the height of the dolly and just barely wider so it’s pretty easy to manage. It even comes with wheels and a luggage-like extendable handle to pull it with. While the fully-loaded case is reasonably heavy, it’s not unwieldy. In total, I had my C100mkII and its accessories in a Pelican Case, the dolly in its case, the stands in one backpack and tools & sound equipment in another backpack, requiring two trips to the car. Not bad, all things considered. If you’ve got a buddy, you’re fine.
The dolly itself is incredibly simple: a 25lb aluminium “plate” with a Mitchell mount in the middle (adaptable to ball mounts), 4 sets of inline wheels, and two handle cutouts. There are also 14 ⅜” tapped holes for accessories, the 4 center ones being used for the ball head adapter. The sled its 20”x24”x3.5” and has a generous 800lb capacity. Setting it up was a breeze, only needing one hex key as the ball mount riser is attached with 8 screws. If you have a Mitchell tripod head, there’s a simple flat screw-in “puck” that comes with the kit allowing you to make clearance under the dolly just fine. Once your tripod head is attached, you’re basically done. Start shooting.
The wheels are a nice softness (or hardness depending on how you want to look at it) and the bearings are smooth as butter allowing for lovely gliding moves on any flat surface and even more so on tracks. The Dutti Dolly is comfortable on almost any kind of track you can put under it, square or round, favoring 1.25” square tube or angle iron with some wiggle room from .75” to 2.25” diameter track solutions. I used the square tube. The brackets are adaptable to any stand and took seconds to set up and tighten down.
The biggest problem you’ll likely run into ends up not being Matthews’ fault, and that’s the quality of your tripod head. My Manfrotto 503HDV is about a decade old and is a bit herky-jerky, so during certain moves I had to jam the handle portion under my armpit with my left hand on the RedrockMicro handle attached to the Ultracage, my right in the C100’s handle, and a Noga Cinearm connected to the top of the cage resting against my head. I could then use multiple points of contact and sort of “lean” into the camera to smooth out any moves. It took me a while to figure out I needed to do that, but that’s what camera tests are for (which, of course, I didn’t do). If you’re going to invest in this dolly, definitely add a nice tripod head to your budget to avoid any unnecessary headaches. Warp stabilizer in Premiere smoothed out any bumps or jerks just fine though.
There’s almost nothing to “review” here as the Dutti Dolly is dead simple, pleasingly portable, incredibly durable and (in true Matthews fashion) works exactly as advertised. Even moving between setups was pain-free and could be moved by Chase and I without taking anything down or removing parts. We just grabbed it by the brackets, held the rails with our thumbs, and carried it across the room with the camera and slider still on it. I’m sure that’s not the recommended method of transport, but the point is it’s not burdensome or awkward.
Overall, the dolly complimented my shooting style beautifully and kept up with the fast pace shoot just fine. Whatever shot I wanted (including one where I had to ride on it like a skateboard), the Dutti Dolly delivered.
If Matthews comes looking for me, tell them I went to Austria or something. I’m keeping it.
The post Product Review: The Dutti Dolly from Matthews Studio Equipment appeared first on ProVideo Coalition.
First Found At: Product Review: The Dutti Dolly from Matthews Studio Equipment
0 notes
Last Seen Blogs

asian-beauty-blog01
Asian_Beauty

les-h-en-vadrouille
Sans titre

olivass
SEREIA DA TERRA

pristine-construction-group
Pristine Construction Group

binancehcare
Binance Customer H care 1)615-( 55-870-83 Hyped Up to Be