#constrainedbox
Explore tagged Tumblr posts
Visit Tumblr Blog
Explore Tumblr blogs with no restrictions, modern design and the best experience.
Last Seen Tumblr Blogs


Fun Fact
China blocked Tumblr because of pornography and censorship problems in 2013.
Text
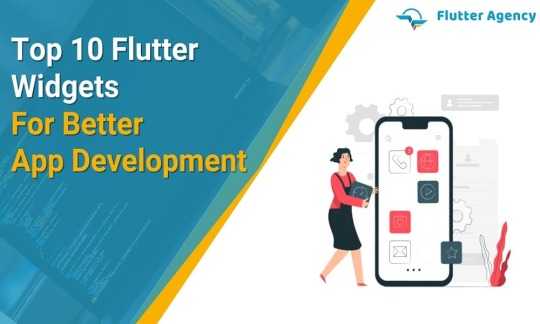
Top 10 Flutter Widgets For Better App Development
It is challenging to imagine, But it is possible to have the Flutter applications without coding! Are you thinking about how? Then the answer is Widget. Flutter has a rich set of widgets, which makes them more sustainable. You can use Flutter widgets to create high-quality web, mobile, and desktop applications.
Flutter widgets are well-known because of their highly customizable and provide extensive flexibility and fluidity, which is perfect for any mobile app type. Flutter UI widgets are optimized for their high performance. These widget elements are organized in the form of a widget tree. It will describe the process of the frontend native apps screen, and the central part of Flutter widgets is its configuration and the widget state.
With a pool of great Flutter widgets lists, it is very tough to find the ten leading Flutter widgets you should take advantage of while creating the Flutter applications. But, we have eased out the selection process by taking out the great Flutter widgets for you.
What are Flutter Widgets?
Flutter is the mobile application development platform and the ecosystem for cross-platform app development. The main component of Flutter is a library of widgets, the set of building blocks that enable the creation of engaging and appealing app user interfaces.
Instead of coding for UI, you can use Flutter widgets to help you construct your app’s layout. In the Flutter widget, everything is nested inside each other. Also, Flutter widgets are the same as web UI elements of HTML divs or CSS classes. A ready-made widget is used to create your app’s UI, like buttons, tables, and text fields.
In Flutter, there are two major types of widgets:
Stateless Widget
Stateful Widget
Depending on these two types of widgets, we have categorized 14 different widgets in Flutter, which are:
Accessibility
Assets, icons and images
Async
Motion and Animation
Basics
Cupertino Widget
Input
Interaction models
Layout
Material Components
Painting and Effects
Scrolling
Styling
Text
However, you may have seen that each of these widgets has functional integration in mobile app development. Also, the Stateless vs stateful Widget is the debate topic. Let us see the great Flutter widgets.
1. Constrained Box
ConstrainedBox is the in-built Widget that is present in Flutter SDK. The primary use of this Widget is to add limitations in the size of the child widgets. The developers can add flexibility concerning the height and width of the child widget.
However, a widget has restrictions when the child’s more prominent in size than the container. It will cut down a child’s view and make the front end look out of line. Therefore, this issue is solved by not defining the maxHeight property and adjusting it to by default value of double. infinity.
2. SafeArea
SafeArea is an excellent widget for creating a dynamic and adaptive UI. This Widget supports adjusting the screen with multiple devices that vary in height and width. It helps to overcome the area constraints induced by a status bar, navigation bar, etc. Safe area widget integration did not allow the design to overlay any areas with a frontend UI visibility constraint, making them error-free.
Hence, a safe area Widget is referred to as a padding widget because it adds padding to an android or iOS app whenever there is a constraint.
3. Motion Tab Bar
It is the animated Widget utilized for animating a tabbar and moving it as per the theme.
4. FittedBox
FittedBox is the responsive Flutter widget. It will help you in inducing responsiveness to the single child assigned to it.
You must include the Row widget as a child in a specific FittedBox widget. The Row widget itself has two containers as the children. In that case, a second child will overflow to the one side, But this problem has been solved with the Fitted Box widget.
5. Opacity
An opacity widget is used to make the child inside a container transparent. It will temporarily change a child into the intermediate buffer and make them transparent.
Hence, the remaining space is rearranged, or you can keep it empty.
6. Wrap
In the Flutter, a wrap widget is used to wrap children horizontally or vertically. For instance, if you have several widgets and want them to use them in a row or a column, then you can take the help of a wrap widget to prevent the data from getting clipped.
You can give the name in any direction, i.e., horizontal or vertical, depending on the front end that you require in your application. It will also aid in defining a space between the two widgets.
The FittedBox widget is utilized to scale and position the child widget inside the parent widget. A UI built using a FittedBox widget is clean, dynamic, and crisp. You can use the FittedBox class and enter the child Widget using the FittedBox widget.
7. Flutter Arc Text
An Arc Text widget will help you simplify the task of writing a text’s code and the content available over the arc shape.
You can set the various angles and define the content you require around the circle, which is impossible to do without Flutter code.
8. FloatingActionButton
Every Flutter programmer has experience using FloatingActionButton in app development. However, the hover action button draws attention to a particular element of application content. FloatingActionButton is the main Widget of a Scaffold widget.
9. Numeric Keyboard
This Widget has been great for the developers as it has ended the hassle of developing the custom number pad in the application. You can use a Numeric keyboard widget with no iOS or Android package.
10. StreamBuilder
To synchronize streams of received data, consider using the StreamBuilder widget. This Widget got support from the dart language and extended its support to asynchronous data streams. StreamBuilder widget usually has two arguments:
A stream
A Builder
This Widget will play the role of a pipe that will get the entered data from one end and release it from the other end.
Conclusion
This blog has helped you in many ways as you get the essential list of Flutter widgets. For any development of the Widget or Flutter app development, you can directly connect with us. Our Flutter experts will get back to you in a short time.
Frequently Asked Questions (FAQs)
1. Why is everything in the Flutter widget?
Widgets are just small chunks of UI which you can merge to make an entire app. Creating an app with Flutter is like developing a lego set piece by piece. Widgets are nested internally with each other to develop your app.
2. Define stateless Widget
A stateless widget will describe a part of the user interface by creating a constellation of other widgets which will define a user interface more concretely.
3. Why is the Flutter widget immutable?
Immutability in Flutter is utilized for performance. If the Widget requires changes, you must create a new instance. It is easy to check cases if they are identified as the same state. Due to this, a const is used most often.
Originally Published At: https://flutteragency.com/top-10-flutter-widgets/
0 notes
Photo

Day 25 of 100DaysOfCode Flutter Edition
TIP: Use the ConstrainedBox widget to impose size constraints on a child object, which gives you control over its minimum or maximum size.
0 notes
Link
Learn about ConstrainedBox, a widget in Flutter which helps in building Responsive UI in 1 minute!
Please let me know if the explanation was clear and if i could bring a smile to your face!
Link: https://youtu.be/jLqUr4EXQqY
0 notes
Text
【 Flutter 】Flutter を 基礎 から 学習 ( ウィジェット編 ) part33 Single-child layout widgets
【 Flutter 】Flutter を 基礎 から 学習 ( ウィジェット編 ) part33 Single-child layout widgets
「基礎 から 学ぶ Flutter 」という書籍で 学習 したことを ブログでアウトプットしていこうと思います。今回は ウィジェット編 ( part33 )です。 前回 【 Flutter 】Flutter を 基礎 から 学習 ( ウィジェット編 ) part32 Single-child layout widgets 引き続き、Single-child layout widgetsについて学びます。 Single-child layout widgets ConstrainedBoxウィジェット,…

View On WordPress
0 notes
Link
tThe Flutter Widgets are popular these days and they are highly customizable and will offer with the right fluidity and flexibility that can be perfect for any mobile application choice. You have the flutter UI widgets and these are optimized for the high level performance and for the reason of particular development. The widget components are organized in the way in the specific formation of the widget tree. The method by which the widgets are placed will help define the front-end in case of the native application screen. In case of Flutter Widgets you have to deal with the two specific options like widget state and configuration. Here you have the list of the Flutter Widgets necessary for the reason of application.
Table of Contents
List of the Top 10 Flutter Widgets for App Development
SafeArea
ConstrainedBox
FittedBox
Motion Tab Bar
Wrap Widget
Opacity
FloatingActionButton
Flutter Arc Text
StreamBuilder
Numeric Keyboard
List of the Top 10 Flutter Widgets for App Development
SafeArea
This is the most dynamic and the adaptive widget that will help in making adjustments with the screen along with the proper and varied devices based on the height and the width of the widget. The SafeArea widget will also help in eliminating the area constraints that are being induced and introduced by the status bar in real.
ConstrainedBox
It is an innate built-in widget that makes a part of the flutter SDK. I is the best one to be used in adding limitations in matters of sizing the child widgets. It will surely allow the developers in adding flexibility in accordance to width and height of the smaller widget. The widget comes with the perfect limitations when the size of the child is bigger when compared to the container.
FittedBox
It is the highly responsive Flutter Widget and it help in providing the kind of responsiveness into the assigned single child option with the best of requisites and perfect exclusiveness. In process, you need to add the row widget with the two containers along with the children. In the scenario the second child is sure to overflow the one that is there on the side, and the problem is rightly soled with the FittedBox widget.
Motion Tab Bar
It is the most awesome and the animated widget and it is rightly ued for the animation of the tab bar. You can easily move the widget based on its particular theme and subject matter.
Wrap Widget
You have the wrap widget in Flutter and it is used for wrapping the children in the horizontal and the vertical motions. Suppose you have a variety of widgets and you would like to use them in a specific row or in the specific column. This is when you can make the right use of the wrap widget from protecting the content to get clipped.
Opacity
It is nice to know about the Opacity Widget. It is the right widget one can use to make the child transparent within the container. It works right by transforming the child into the kind on intermediate buffer and can temporarily make it transparent for the reason of better functionality. Automatically, the remaining space will rearrange things or you can even keep it empty or you can do things in both the ways.
FloatingActionButton
All the Flutter Programmer or newbie have the best of experience in using the AloatingActionButton widget with the right precision. It has the specific hovering action button and it helps in drawing attention to the specific elemental point in case of the app content. It is one of the principle widgets and it is a part of the main scaffold widget.
Flutter Arc Text
It is the highly programmable widget as part of the big list. It helps perform the simple tasks in writing the code for the text and the available content over the arc shape. Here you are able to set the angles well and this will help te desirable content that you would like to have round the circle. This is something very difficult when you are doing it with the Flutter code.
StreamBuilder
It is the perfect widget to help in synchronizing The various received data in time. The Widget is highly supported by the Dart language that will help in extending the support for asynchronizing the stream of data. The widget acts like the perfect pipe that helps in receiving the entered data from the specific end and then releases it from the other end.
Numeric Keyboard
It is the right widget to end the hassle in developing the custom number pad present within the application. One can easily make use of the Numeric Keyboard Widget in the straight forward way and it is available with open package in both cases of the iOS and the Android.
Here you get to know in details regarding the implementation of the Flutter Widget in matters of proper app development. You have the language experts in the field of Flutter programming and they will always help you in aspect of the Flutter related technicalities.
0 notes
Text
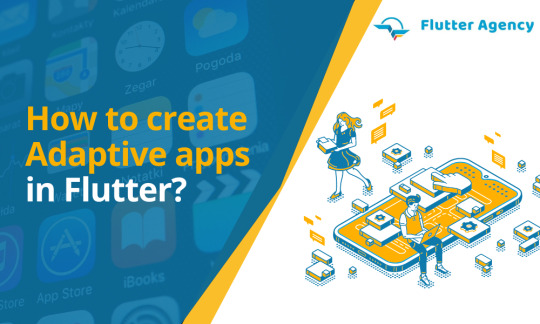
Steps to Make An Adaptive Apps in Flutter.
Do you want to explore the steps to make adaptive apps in Flutter? If yes, then this guide lets you understand the process very effectively. In general, Flutter offers new opportunities for building innovative apps that can run better on desktop, web, and mobile from a single codebase. Having a personalized developer can make your development process smooth & fast. In this case, hire Flutter developer is a decent option to develop your mobile or web, or desktop app.
Through these new opportunities, there come specific new challenges. You must make your app familiar to users, ensure a seamless and comfortable experience and adapt to all platforms by increasing usability. Besides that, one more functionality in Flutter is the interactivity of your application. Hence it is a must for you to build apps that are fully platform adaptive along with multiplatform.
Three essential categories must be considered to develop platform-adaptive apps: layout, input and idioms and norms.
Building adaptive layouts
First, consider certain things to bring your app to multiple platforms. The main thing to consider is how to adapt it to various shapes and sizes of the screens so it can run effectively.
Layout widgets
When building websites or apps, you are probably familiar with building responsive interfaces effectively. A wide range of widgets can make everything simple for Flutter expertise.
Here you can check out certain of Flutter’s most useful layout widgets:
Single child
AspectRatio
Align
CustomSingleChildLayout
ConstrainedBox
FractionallySizedBox
Expanded and Flexible
SingleChildScrollView
LayoutBuilder
CustomMultiChildLayout
Column, Row, and Flex
ListView, GridView, and CustomScrollView
Flow
Table
Stack
Wrap
The adaptive app is a sort of sentence structure used for the Flutter system programs that successfully install the server code for the page applications. Usually, the server-based codes are beneficial to make the dynamic web programs in the site building, while the site page is composed of the program coding.
The server-side Flutter app development is like the Flutter on the customer side that is designed for client-centred applications for characterising the sites more powerfully. Here, when the website page is known as the server effectively executing the server-based code in the pages, even before the page executes in the web program to show the outcomes.
With the utilisation of the adaptive apps, it is difficult to run the server using the codes, and they are given the stage to get to the database components for the execution of online applications.
The adaptive app syntax used as a part of the Flutter site applications is entirely standard for the Flutter web applications in a more powerful way. A percentage of the essential ideas utilised as a part of the Flutter web apps are displayed here more successfully. They are readily available here.
To utilise the site page improvement for the sites, you should use the development from the Flutter applications.
For the successful improvement of the sites, the utilisation of the adaptive apps is getting used by Flutter apps both the regular use of the application development in a more compelling way.
The ideas used as a part of the application make use of the same comparable ideas of the application development, utilising the standard elementary sites from the Flutter application improvement.
The dynamic sites in the dot application development utilise the different packages, so introduce every one of the packages for the successful element site improvement.
The helpers are getting used to those stages for the essential programming assignments in the Flutter app development.
The adaptive app syntax is getting used for adding to the dynamic web applications utilising the Flutter application. The Flutter is a viable package for dynamic web applications, so they are highly crucial in the sites in the flutter structure. For making those sentence structures, utilise the accompanying steps.
For the dynamic sites, make the Flutter; when it is now getting opened, click with sites and pick the Flutter for reviving the entrance records in the most viable way.
After that, select the utilisation of the files for use in the workspace for the applications.
In the check box, select their new alternatives and utilise the Flutter.
After opening with the Flutter pages, it used to involve certain factors.
Develop the coding for the compelling site improvements.
The adaptive apps are adequately running in the programming stages like the adaptive app variables in the online system. The adaptive app structures utilise the different aid for using the Flutter web applications. An adaptive UI in the app will also grant the authority to create visually appealing user interfaces on the various platforms.
The helpers are given by the Flutter platforms that can be effortlessly gotten to with the single lines of the adaptive apps. A portion of the valuable helpers available with the adaptive apps is a wide range of platforms that can help everyone effectively and the validation process in the adaptive apps.
Indeed, the application development in the Flutter app will work needs more broad information on the coding improvement. So the adaptive apps are used to make the ease of the coding in the web applications for the sites more successful.
The helpers used as a part of the flutter structure are perfect, and they are accessible as extra packages for the site development. There are various simple tools, and the application interfaces are accessible from the sites from the utilisation of the partners, where they are used as a part of the successful development.
At the time of establishing the partners in the flutter structure, adaptive apps use influential factors for the worldwide access of the improvement in a more successful way.
Conclusion
From the scenario mentioned above, now you have explored the steps to make adaptive apps in Flutter. A reputed Flutter app development company will also give you tips for the startup of your business.You can hire Flutter programmers without hesitation and use them to complete this task for you. They have more experience and give 100% better results.
Frequently Asked Questions (FAQs)
As there is no clear explanation of the adaptive design in Flutter, adaptive platform applications will add model overlays on desktops and the sheets on mobile. It reflects user expectations and permits the navigation’s layout and flow from the maximum utility of the Flutter, which is easily adaptive, and the responsive UI across all platforms like desktop devices and mobile.
This application will run on numerous devices, such as desktop and mobile, which must deal with the mouse and keyboard input and touch input. It means that there are different expectations about the visual density of the app, how the selection of components works, utilizing the platform-specific features, and more.
A FocusableActionDetector is a widget that will combine the functionality of Actions, Shortcuts, and MouseRegion. The Focus widget will design the detector that states the actions and critical binding and also offers the callbacks for handling focus and will hover over the highlights.
Content Source: https://flutteragency.com/make-adaptive-apps-in-flutter/
0 notes
Text
How to use/implement Listener Class in Flutter?

Introduction:
A widget called the Listener triggers callbacks in response to frequent pointer events.
It pays attention to things like when the cursor is pressed, moved, released, or canceled that can create motions.
It doesn’t pay attention to mouse-specific events as when the mouse arrives, leaves, or hovers over an area without clicking any buttons. Use MouseRegion Class for these events.
When comparing the list of objects that a mouse pointer is hovering on between this frame and the previous frame, MouseRegion is used. This includes moving mouse cursors, starting events, and ending events.
Use Listener or, preferably, GestureDetector Class to listen to common pointer occurrences.
In this article, we will see how to use the listener class in the Flutter app development.
Below is the constructor of the Lister Class.
Listener(
{Key? key,
PointerDownEventListener? onPointerDown,
PointerMoveEventListener? onPointerMove,
PointerUpEventListener? onPointerUp,
PointerHoverEventListener? onPointerHover,
PointerCancelEventListener? onPointerCancel,
PointerSignalEventListener? onPointerSignal,
HitTestBehavior behavior = HitTestBehavior.deferToChild,
Widget? child}
)
Properties of the Listener class:
PointerDownEventListener? onPointerDown: Callers can be informed of these events in a widget tree thanks to the listener.onPointerDown function.
PointerMoveEventListener? onPointerMove: While the pointer is in contact with the object, it has moved in relation to that object.
PointerUpEventListener? onPointerUp: The pointer is no longer in close proximity to the object.
PointerHoverEventListener? onPointerHover: While the pointer is not in contact with the device, it has moved in relation to it.
PointerCancelEventListener? onPointerCancel: The input from the pointer is no longer directed towards this receiver.
PointerSignalEventListener? onPointerSignal: Pointer signals are discrete events that come from the pointer but don’t affect the state of the pointer itself. They don’t have to be understood in the context of a chain of events to be understood.
HitTestBehavior behavior: Only if one of their children is struck by the hit test do targets that defer to their children get events within their boundaries.
Widget? child: The Flutter framework’s primary class hierarchy is constructed of widgets. An immutable description of a component of a user interface is referred to as a widget. Elements that govern the underlying render tree can be created by inflating widgets.
Example of Listener Class:
import ‘package:flutter/material.dart’;
void main() => runApp(const MyApp());
class MyApp extends StatelessWidget {
const MyApp({Key? key}) : super(key: key);
@override
Widget build(BuildContext context) {
return MaterialApp(
home: Scaffold(
appBar: AppBar(title: const Text(“Flutter Listener Class Sample”)),
body: const Center(
child: MyStatefulWidget(),
),
),
);
}
}
class MyStatefulWidget extends StatefulWidget {
const MyStatefulWidget({Key? key}) : super(key: key);
@override
State createState() => _MyStatefulWidgetState();
}
class _MyStatefulWidgetState extends State {
int _down = 0;
int _up = 0;
double x = 0.0;
double y = 0.0;
void _incrementDown(PointerEvent details) {
_updateLocation(details);
setState(() {
_down++;
});
}
void _incrementUp(PointerEvent details) {
_updateLocation(details);
setState(() {
_up++;
});
}
void _updateLocation(PointerEvent details) {
setState(() {
x = details.position.dx;
y = details.position.dy;
});
}
@override
Widget build(BuildContext context) {
return ConstrainedBox(
constraints: BoxConstraints.tight(const Size(400.0, 300.0)),
child: Listener(
onPointerDown: _incrementDown,
onPointerMove: _updateLocation,
onPointerUp: _incrementUp,
child: Container(
color: Colors.green,
child: Column(
mainAxisAlignment: MainAxisAlignment.center,
children: [
const Text(
‘You have pressed or released in this area this many times:’),
Text(
‘$_down presses\n$_up releases’,
style: Theme.of(context).textTheme.headline4,
),
Text(
‘The cursor is here: (${x.toStringAsFixed(2)}, ${y.toStringAsFixed(2)})’,
),
],
),
),
),
);
}
}
Output:
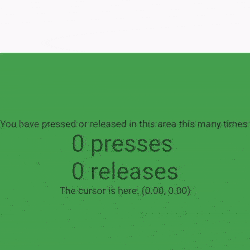
Conclusion:
We described the fundamental implementation of the Listener in a Flutter in the article; you are free to change the code as you see fit. This was a brief explanation of Listener On User Interaction from our perspective, and it functions with Flutter. Get experienced consultation support from our Flutter developer for custom business mobile application development solutions. Hope you enjoy this article.
0 notes
Text
How to Add Scroll In Flutter Application?

Consider a case where users get lots of data on the screen, and the size of data received is not fixed, so it may occur that after getting some amount of data user may get an overflow error. So if we can scroll the page, then whenever users reach the bottom of the page, new data gets loaded. So in this article, we are going to learn How to Scroll Page In Flutter?
How to Add Scroll Page In Flutter?
User cam wraps your widget tree inside a SingleChildScrollView like below:
body: SingleChildScrollView( child: Stack( children: <Widget>[ new Container( decoration: BoxDecoration( image: DecorationImage(...), new Column(children: [ new Container(...), new Container(...... ), new Padding( child: SizedBox( child: RaisedButton(..), ), .... ... );
We will use a LayoutBuilder widget and receive the output we want to. Then, fold the SingleChildScrollView widget with LayoutBuilder Widget and call the Builder function. We will use the LayoutBuilder Widget to earn the box contains or the quantity of available space.
new LayoutBuilder( builder: (BuildContext context, BoxConstraints viewportConstraints) { return SingleChildScrollView( child: ConstrainedBox( constraints: BoxConstraints(minHeight: viewportConstraints.maxHeight), child: Column(children: [ // remaining stuffs ]), ), ); }, )
Using ListView: Listview Widget also offers you scrolling Facilities. So, you don’t need to be stressed about adding an extra widget.
ListView( children: [ Container(..), SizedBox(..), Container(...), Text(..) ], ),
You will also receive the same result using the CustomScrollView widget. Put your CustomScrollView widget inside the Column Widget.
return Scaffold( appBar: AppBar( title: const Text('AppBar'), ), body: Container( constraints: const BoxConstraints.expand(), child: Column( children: <Widget>[ Expanded( child: CustomScrollView( scrollDirection: Axis.vertical, shrinkWrap: false, slivers: <Widget>[ SliverPadding( padding: const EdgeInsets.symmetric(vertical: 0.0), sliver: SliverList( delegate: SliverChildListDelegate([ for (var i = 1; i <= 100; i++) ListTile( title: Text(i.toString()), ) ]), ), ), ], ), ), ], )), );
Output:

Conclusion:
In this article, We have been through How to Scroll Page In Flutter?
Thank you for reading. Hope you enjoyed reading and got some value from our article. Feel free to ask your queries. We are always trying to proved you a best content.
Looking for reliable Flutter app development services? Hire the Flutter app developers from Flutter Agency your next project. Get a free consultation today!
Keep Fluttering!!! Keep Learning!!!
0 notes
Text
Flutter Tutorial: How to Apply “Frosted Glass” Effect?

Flutter provides an inbuilt set of widgets to apply different effects to mobile applications so in this article We will go through How to Apply “Frosted Glass” Effect In Flutter?
How to Apply the “Frosted Glass” Effect In Flutter?
In order to apply the “Frosted Glass” Effect In flutter we need to follow the code snippet like below:
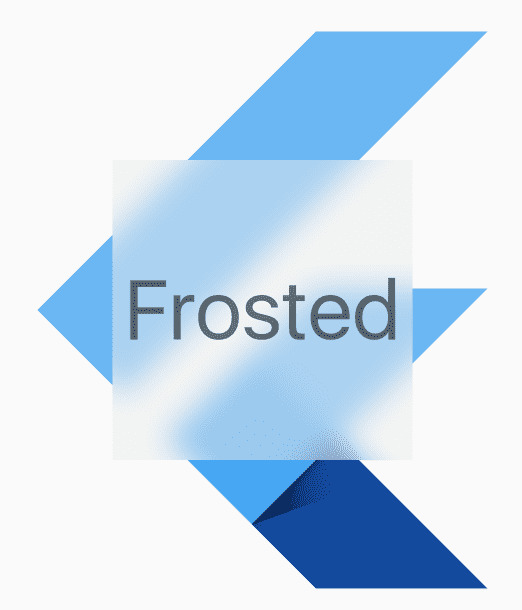
import 'dart:ui'; import 'package:flutter/material.dart'; void main() { runApp(new MaterialApp(home: new FrostedDemo())); } class FrostedDemo extends StatelessWidget { @override Widget build(BuildContext context) { return new Scaffold( body: new Stack( children: <Widget>[ new ConstrainedBox( constraints: const BoxConstraints.expand(), child: new FlutterLogo() ), new Center( child: new ClipRect( child: new BackdropFilter( filter: new ImageFilter.blur(sigmaX: 10.0, sigmaY: 10.0), child: new Container( width: 200.0, height: 200.0, decoration: new BoxDecoration( color: Colors.grey.shade200.withOpacity(0.5) ), child: new Center( child: new Text( 'Frosted', style: Theme.of(context).textTheme.display3 ), ), ), ), ), ), ], ), ); } }
This will give us output like the below:
You can use the BackdropFilter Widget to achieve this effect. You can also consider a code snippet like the below:
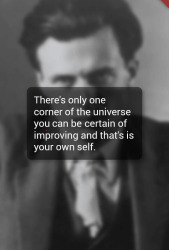
import 'package:flutter/material.dart'; import 'dart:ui' as ui; void main() => runApp( MaterialApp( title: "Frosted glass", home: new HomePage() ) ); class HomePage extends StatelessWidget { @override Widget build(BuildContext context) { return new Scaffold( body: new Stack( fit: StackFit.expand, children: <Widget>[ generateBluredImage(), new Column( mainAxisAlignment: MainAxisAlignment.center, children: <Widget>[ rectShapeContainer(), ], ), ], ), ); } Widget generateBluredImage() { return new Container( decoration: new BoxDecoration( image: new DecorationImage( image: new AssetImage('assets/images/huxley-lsd.png'), fit: BoxFit.cover, ), ), //I blured the parent container to blur background image, you can get rid of this part child: new BackdropFilter( filter: new ui.ImageFilter.blur(sigmaX: 3.0, sigmaY: 3.0), child: new Container( //you can change opacity with color here(I used black) for background. decoration: new BoxDecoration(color: Colors.black.withOpacity(0.2)), ), ), ); } Widget rectShapeContainer() { return Container( margin: const EdgeInsets.symmetric(horizontal: 40.0, vertical: 10.0), padding: const EdgeInsets.all(15.0), decoration: new BoxDecoration( //you can get rid of below line also borderRadius: new BorderRadius.circular(10.0), //below line is for rectangular shape shape: BoxShape.rectangle, //you can change opacity with color here(I used black) for rect color: Colors.black.withOpacity(0.5), //I added some shadow, but you can remove boxShadow also. boxShadow: <BoxShadow>[ new BoxShadow( color: Colors.black26, blurRadius: 5.0, offset: new Offset(5.0, 5.0), ), ], ), child: new Column( children: <Widget>[ new Text( 'There\'s only one corner of the universe you can be certain of improving and that\'s your own self.', style: new TextStyle( color: Colors.white, fontSize: 20.0, ), ), ], ), ); } }
You can also our other articles based on AbsorbPointer Widget in Flutter.
We will get output like the below:
If you are willing to use BackdropFilter Widget then code Snippet will look like the below:
BackdropFilter( filter: ImageFilter.blur(sigmaX: _sigmaX, sigmaY: _sigmaY), child: Container( color: Colors.black.withOpacity(_opacity), ), ),
Conclusion:
Thanks for walking with us on a Flutter Journey !!!
In this article, we have been through How to Apply “Frosted Glass” Effect In Flutter?
Keep Learning !!! Keep Fluttering !!!
FlutterAgency.com is our portal Platform dedicated to Flutter Technology and Flutter Developers. The portal is full of cool resources from Flutter like Flutter Widget Guide, Flutter Projects, Code libs and etc.
0 notes