#databasevalidation
Explore tagged Tumblr posts
Visit Tumblr Blog
Explore Tumblr blogs with no restrictions, modern design and the best experience.
Last Seen Tumblr Blogs


Fun Fact
Tumblr is used by 21% of adults online aged 18-29 years.
Link
Along with deep database research and services, B2B Sales Arrow help to develop custom database and maintain data across the world by extraction and validation
#databasedevelopment#b2bsalesarrow#dataservices#dataappending#databasevalidation#datadrivenmarketing#databasepositioning
1 note
·
View note
Text
0 notes
Link
Today every business from SMBs to large organizations is dealing with databases – cluttered with outdated, invalid or incomplete data. While executives have been regularly drifting between companies, jobs and titles these days, dirty data has become more than a nuisance. Without professional database validation, your situation won’t improve.
Markable Solutions helps you validate your existing database by replacing incorrect or missing contact details, conducting phone verification, and ensuring uniform data format to make sure your database is up-to-date. Markable Solutions can help you in overcoming the following database validation challenges:
Incomplete and redundant records in database
Incompetence to manage/update prospect/customer database regularly
Unproductive purchased email lists
CRM and Marketing Automation Solutions clogged with dirty data
Marketing campaigns not giving the desired results
Markable Solutions offers database validation services and ensures a constant flow of sales-ready leads for your sales team using an integrated marketing approach. Request a quote or call +1 (408) 799 4081 to know more about B2B database validation services.
#customer#database#validation#databasevalidation#b2b#prospect#database cleaning#customer database#marketing#prospect list
2 notes
·
View notes
Link
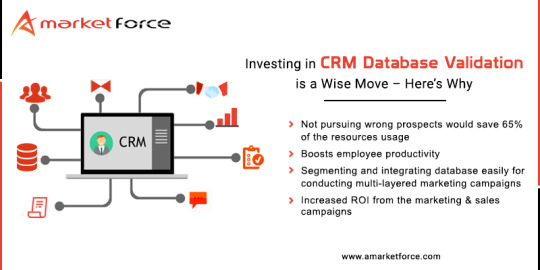
If companies continue to use a poor quality database with inaccurate information stored in it, they are inviting inefficiency in their end sales result. So to get greater ROI companies should invest in CRM Database Cleansing process.
0 notes
Text
FactoryTrace helps you to cleanup unused factories (by @EvgeniyDemin)
If you write tests for your project and use FactoryBot to generate test data then gem FactoryTrace can help you to maintain your factories and traits in the actual state.
What it does?
When you execute your tests gem traces usage of factories and in the end outputs a report.
$ FB_TRACE=1 rspec total number of unique used factories & traits: 3 total number of unique unused factories & traits: 2 unused global trait with_email unused factory admin
Integration
For RSpec, it's enough to just install the gem and it can be used. For any other testing framework, simple do these manipulations:
# add it to the beginning of your tests execution FactoryTrace.start # add it to the end of your tests execution FactoryTrace.stop
Parallel/Partial execution
Sometimes, if tests take long time to execute, we run them in parallel process by partials, and to make data of unused factories correct we need to process usage from all runners.
You can do it in the following way:
# first partial FB_TRACE=trace_only FB_TRACE_FILE=fb_trace_result1.txt bundle exec rspec spec/first_spec.rb # second partial (it can be more) FB_TRACE=trace_only FB_TRACE_FILE=fb_trace_result2.txt bundle exec rspec spec/second_spec.rb # grouping and processing bundle exec factory_trace fb_trace_result1.txt fb_trace_result2.txt
How it works?
Thanks to the implementation of FactoryBot with using ActiveSupport::Notifications we can easily add a callback, when a factory was used:
ActiveSupport::Notifications.subscribe('factory_bot.run_factory') do |_name, _start, _finish, _id, payload| name = payload[:name] traits = payload[:traits] storage[name] ||= Set.new storage[name] |= traits end
And after gathering all the information, we can find all unused factories and traits.
Try it yourself and share your opinion. Any contribution is welcome! Thank you for your time!
More tools
DatabaseConsistency - help you to maintain consistency between your database schema and models definitions.
DatabaseValidations - provides two one-line replacement helpers: db_belongs_to and validates_db_uniqueness_of with better performance and consistency.
P.S. Original post was made by me on reddit.
0 notes
Text
Plan A: Renovate old Apps Server Hardware
If our goal is to perform a Test run of our disaster recovery procedures, or to permanently move a database to a new host, then we can use the Restore & Recovery Procedure. If we use Restore & Recovery procedure, then the DBID for the restored database will be the same as the DBID for the original database, so after the restore & recovery procedure is completed, if we connect to the Test database and the recovery catalog DB, the recovery catalog will be updated with information about the Test DB that can interfere with RMAN's ability to restore and recover the source database (due to same DBID)If our goal is to create a new copy of our target database for ongoing use on a new host, then use the RMAN DUPLICATE command instead of Restore & Recovery procedure. The DUPLICATE command assigns a new DBID to the database it creates and enabling it to be registered in the same recovery catalog as the original database.Caution:If we are performing recovery only for TEST purpose, then make sure RMAN is NOT connected to the recovery catalog, otherwise RMAN records information about resorted database in recovery catalog. Thus you are not able to Restore and recover the original database in future with this RMAN.Scenario:This scenario assumes that we have two networked Windows 2003 hosts, DBSERVER and DBSERVER1. A target database named SADHAN is on DBSERVER and is registered in Recovery catalog RMAN. You want to TEST the Restore & Recovery of SADHAN on DBSERVER1, while keeping database SADHAN up and running on DBSERVER. Same version of Oracle Product needs to be installed with which the RMAN Backup was taken.Steps:Install Oracle software only with all its patched on destination folder.Taking RMAN FULL hotbackup including Datafile, Controlfile, Archivelog and Spfile backup.Copy the backup on other host on the same location as per the DBserver.Create PFILE from current server and Copy the Destination server location.Testing and Validating Listener and RMAN Repository Connection.Create Oracle Service for windows on destination server.Create password file for new server database.Start the database on new host with the pfile and Restore the spfile first.Restore ControlfileRestore and Recover the whole databaseValidate the Restore & Recovery procedure Correctness Consider you have copied entire required backup and file on to the destination server and also you have configured the tnsname and listener configuration of new db and rman successfully.5. Create oracle service for windowsC:>oradim -new -sid SADHAN -intpwd sadhancmd> oradim -new -sid SADHAN -intpwd sys -startmode manual6. Create relevant folder on destination host.D:oracleadminSADHANbdump, cdump, udump, pfileD:oracleoradataSADHANE:oracleArchive7. Create password for new server database.CMD>ORAPWD FILE=D:oracleora92databasePWDsadhan.ora PASSWORD=oracle entries=5Now Configure the ORACLE_SID ON destination Host and try to connect RMAN without catalog.C:>SET ORACLE_SID = SADHANC:SQLPLUS /NOLOGSQL> CONNECT / AS SYSDBAConnected to an idle instance.8. Set the DBID and start the database instance using PFILE and restore the spfile.SQL>STARTUP FORCE NOMOUNT PFILE='D:oracleora92dbssadhan.sql';RMAN> CONNECT TARGET / NOCATALOGRMAN:>SET DBID 63198018;RMAN> RESTORE SPFILE FROM AUTOBACKUP;-or- optional methodRMAN> RESTORE spfile from "H:orabackC-1103102985-20100216-02";RMAN> restore controlfile from "H:ORABACKC-1103102985-20100216-02";You must bounce back the database to make sure spfile is restored.RMAN> SHUTDOWN IMMEDIATE; RMAN> STARTUP NOMOUNT;9. Restore the Controlfile from autobackup and then Mount the database.RMAN> RESTORE CONTROLFILE FROM AUTOBACKUP;RMAN> ALTER DATABASE MOUNT; 10. Restore and Recover the database with the full backup. You must store the backup on the same location as on DBSERVER otherwise you have to catalog the new backup location with CATALOG START WITH 'H:oraback' command.RMAN> RESTORE DATABASE; If archive log is not available (in case of Cold Backup) change the command as: RMAN> RECOVER DATABASE NOREDO;Restore the database in case of hotbackup to perform media recovery.RMAN> RECOVER DATABASE;Note: Do not panic if recovery fail askig for current redolog files, as you have full backup, no problem just exit RMAN relogin and open the database with resetlogs option.RMAN> ALTER DATABASE OPEN;-OR- ALTER DATABASE OPEN RESETLOGS;RMAN> sql 'alter database open resetlogs'; Verify the Database:SQL> archive log list;Database log mode Archive ModeAutomatic archival EnabledArchive destination E:oracleOldest online log sequence 0Next log sequence to archive 1Current log sequence 1 SQL> select name,dbid from v$database;NAME DBID--------- ----------SADHAN 63198018 Connect Identifier of Database:Ping this connect identifier before performing actual restore and recovery process. You can validate it manually and can use Net Manager for the same. Later we can add the other database information in the tnsname.ora. This is just for security purpose not to connect any other database by mistake.tnsname.ora:RMAN.AL-SADHAN.COM = (DESCRIPTION = (ADDRESS_LIST = (ADDRESS = (PROTOCOL = TCP)(HOST = rmanbackup)(PORT = 1521)) ) (CONNECT_DATA = (SERVER = DEDICATED) (SERVICE_NAME = RMAN) ) )SADHAN.WORLD = (DESCRIPTION = (ADDRESS_LIST = (ADDRESS = (PROTOCOL = TCP) (HOST = 192.168.14.222) (PORT = 1521) ) ) (CONNECT_DATA = (SID = sadhan) ) )Listener.ora:# TNSNAMES.ORA Network Configuration File: D:oracleora92networkadmintnsnames.ora# Generated by Oracle configuration tools.SADHAN.AL-SADHAN.COM = (DESCRIPTION = (ADDRESS_LIST = (ADDRESS = (PROTOCOL = TCP)(HOST = 192.168.14.222)(PORT = 1521)) ) (CONNECT_DATA = (SERVER = DEDICATED) (SERVICE_NAME = SADHAN.WORLD) ) )Sqlnet.ora:# SQLNET.ORA Network Configuration File: D:oracleora92networkadminsqlnet.ora# Generated by Oracle configuration tools. NAMES.DEFAULT_DOMAIN = al-sadhan.comSQLNET.AUTHENTICATION_SERVICES= (NTS)NAMES.DIRECTORY_PATH= (TNSNAMES, ONAMES, HOSTNAME)
0 notes