#does ps cs6 have a timeline for animating? cs5 is just frames and... just frames is a bit lacking
Explore tagged Tumblr posts
Visit Tumblr Blog
Explore Tumblr blogs with no restrictions, modern design and the best experience.
Last Seen Tumblr Blogs


Fun Fact
Tumblr was the first site to host the blog for President Barack Obama in 2011.
Text
gif tutorial !! (feat. anamo)
for everyone asking how i get my gifs so crispy
note: this tutorial is made using photoshop cs5! and while it should still work for newer versions, not everything may be the same. sorry :(
programs
photoshop cs5 (this is the only version i’ve really ever used so sorry cs6 and cc users)
topaz clean & denoise (optional)
kmplayer
media downloaders
4k video downloader
twitch leecher (for clips longer than what twitch allows)
how to download twitch clips (I use the “slow” method) twitch update made this useless ! so now i just use this site to download clips :)
1. extracting your frames when you can’t do video frames to layers
I think you need QuickTime (i don’t, which is why i can’t use this method) for this, but if your version of photoshop allows you to do File > Import > Video Frames to Layers, here’s another tutorial to help with that!
Remember that the best, clearest gifs come from the highest quality sources! However, I don’t normally recommend downloading actual 4k videos because while your gifs may be super HD, the frame rate is almost always really weird and slow.
After downloading your video/clip using one those nifty programs listed above, we need to extract your frames! Personally, I’ve only ever used KMPlayer to do this, but I’m sure that other equivalents will work pretty much the same.
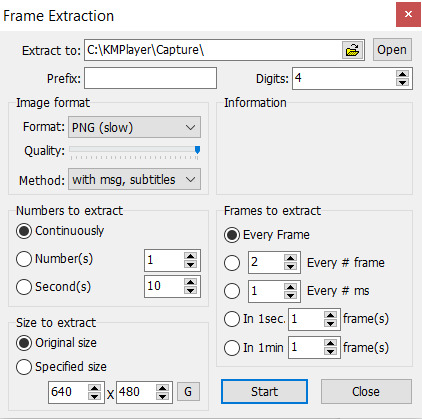
Anyways, after opening your video in KMPlayer, pause right before the scene you want to gif and right click. There should be a tall menu that pops up, and from there you click Capture > Frame: Extract. This brings up yet another menu, and here are the best settings (at least I think so) for extracting your frames!
Now, you need to click start and let your video play. Once you’ve captured all the frames that you want, they should all be in your Capture folder that KMPlayer made for you (mine is located under This PC > Windows (C:) > KMPlayer > Capture). Just organize the frames as you want - I usually separate the frames for each gif into separate folders, but do whatever you want.
To actually get these frames into PS, start up the program and go to File > Scripts > Load Multiple DICOM Files and locate your Capture folder. Look, we have frames now. Cool.
2. actually making gifs
Make sure that your Animation window is open (it’s under Windows on PS if it’s not) so you can see what is likely only one frame, which is probably way less than the amount of frames that you captured (this will be different if you used Video Frames to Layers). To fix this, click on the symbol (a little upside-down triangle next to four lines) on the far right of the animation window and choose Make Frames From Layers.

Since we now have a lot more frames in our timeline, you can click the play button and watch them scroll through. Decide how you want to crop your gif and then resize the cropped frames to fit Tumblr (sizes here). Once you’ve done this, click on the upside-down triangle again and select Convert to Timeline, then select all the frames in the Layers tab that’s probably on the right of your screen and right click > Convert to Smart Filters. This will make sharpening easier because you can sharpen every layer all at once like this.
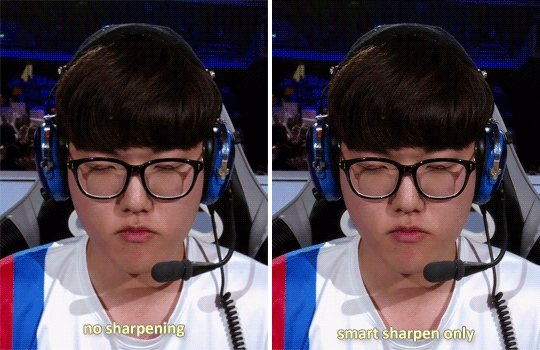
3, sharpening
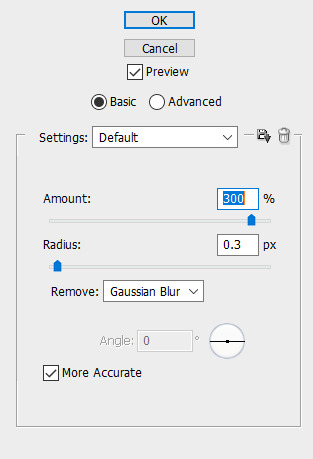
At the top of your PS window, there should be a Filter tab. From there, click Sharpen > Smart Sharpen. Using my fairly limited experience with PS versions other than CS5, I do know that not every version of PS sharpens the same, so if you��re using something other than CS5, settings may vary somewhat. But anyways, here’s what my Smart Sharpen settings look like:
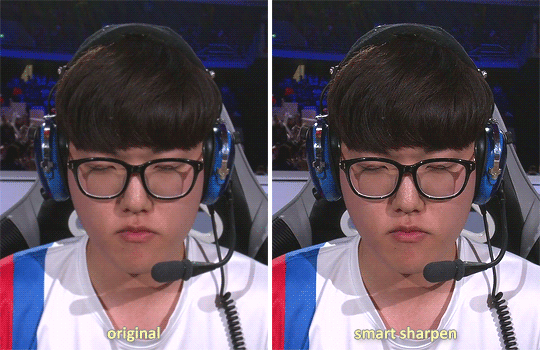
I then have my own personal sharpening action that I apply to the gif to somewhat smooth out the sharpness, but this tutorial has something towards the end that’ll give you a similar effect. And don’t forget to play your gif again to make sure that it works before you start coloring!
4. coloring
As a lot of players are POC, please be conscious of how you color the gif! Obviously, Obivously, it’s one thing to lighten up a dark scene because it’s hard to see what’s going on. However, when you purposefully and consciously make the decision to lighten (or darken) solely a player’s skin color, that’s gross! Stop!
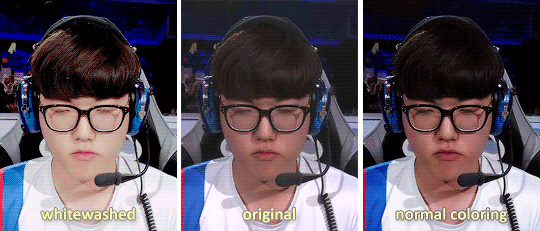
This being said, there are 5.6 million gif coloring tutorials out there and 5.6 million ways to color a gif. Personally, I tend towards more “””natural””” and true-to-life colorings for my OWL gifs, but I’ve made vibrant and pastel and colorful gifs as well. Here’s what the base PSD for all my OWWC gifs looks like, and this is pretty representative of all my other OWL PSDs as well.
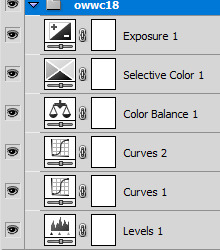
But as I said, there are so many different ways to color gifs - some of my gifs only have a total of three adjustment layers - and everyone has their own preferences for how they like their gifs to look. However, I will say that my first step in coloring is a gif is always use Levels and click the Auto option for a little color correction.
When you’re all done coloring your gif, select everything in your Layers tab (PSD + actual gif), then right click > Convert to Smart Filters again so that you only have one (1) layer in the tab.
5. using topaz to be extra (this is optional)
Is using Topaz necessary to make gifs? No, absolutely not. It also makes the giffing process take longer. It’s literally just to be extra yet I still use it on every single one of my gifs. Why? Because it makes them s m o o t h and I hate seeing pixels. Even if most OWL stages are pretty noiseless and nice overall.
To use Topaz, click on your single Smart Object gif layer and go to Filter > Topaz Labs.
While I do have both Topaz Clean and DeNoise, I typically prefer DeNoise over Clean, and that’s mostly because it’s a bit more difficult to mess it up. Topaz DeNoise does exactly what it sounds like it does - it removes noise from images. However, it also smoothes skin and hair and everything else, which is why you still need to be careful using it unless you’re going for an unrealistic, completely airbrushed look. Topaz Clean does the same, but with more emphasis on the smoothing (I guess), so it’s easier to accidentally go overboard with it.
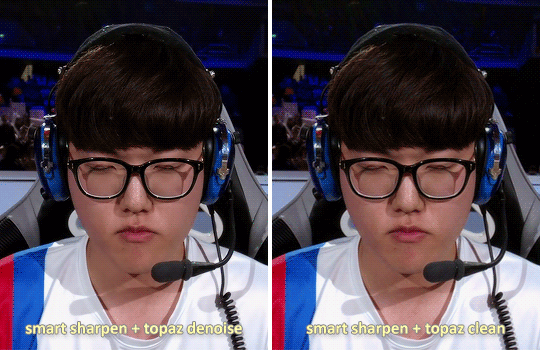
I almost never use the two in conjunction, but a good thing about Topaz is that it also reduces your gif file size by reducing noise! Which is nice! Also here are some nice Topaz settings. I use these (for the most part)!
update as of jan. 6, 2019: I am a Big Liar and I use both Clean and Denoise together all the time now and have been doing so since pretty much immediately after writing this tutorial. Just be careful when using both otherwise your gif might start looking too smooth - as with anything else, Topaz should be used in moderation :)
6. saving your gif
This part is actually super important if you used Topaz on your gifs. After you’ve made everything into a Smart Object, click on the upside-down triangle on your Animation window and select Flatten Frames Into Layers. If you used Topaz and don’t do this before trying to save your gif for posting, you will crash PS.
This process might take a while for Topaz users, but at the end, once your Smart Object has been made into many layers, go back to the upside-down triangle, click Convert to Frame Animation, and then select Make Frames from Layers from that same menu.
Now all your frames are visible on the timeline! Delete the very first one (otherwise the same frame will be repeated twice), select all of the frames on your timeline, then click on the little “0 sec” thing beneath the frames to set the gif timing. For this, I generally recommend using 0.03 or 0.04 seconds, but this depends on personal preference as well as the frame rate of the original video.
It’s time to finally save our gif. You just go to File > Save for Web & Devices and a big window will pop up. Honestly, the only save setting that really matters is that you have your gif set to loop for forever. Some people prefer using Diffusion over Pattern when saving, but this is what mine looks like right now:
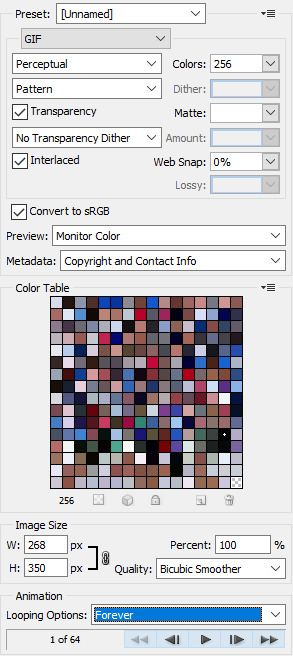
If you go to save your gif and find that it’s above Tumblr’s 3MB gif limit, you are probably just going to want to delete frames if you don’t want to lose the overall gif quality. Otherwise, you can click on that Colors: 256 box and try to cut down the number of different colors in your gif - though I will warn you that this generally makes gifs look more pixelated. And once your good and settled, click save and your gif is ready to post!
12 notes
·
View notes