#email_hosting
Explore tagged Tumblr posts
Visit Tumblr Blog
Explore Tumblr blogs with no restrictions, modern design and the best experience.
Last Seen Tumblr Blogs


Fun Fact
In 2020, 44% of users from Denmark used Tumblr daily.
Video
tumblr
A2zwebinfotech Provide Best Services. #A2zwebinfotech #IVR_Service_Provider #content_service #email_marketing #tollfreeservice #missed_call_service_provider #missedcallservice #email_campaigns
Visit: https://www.a2zwebinfotech.com/
#toll_free_service_provider#email_hosting#Search_engine_optimization#Google_promotion_service#content_writer
0 notes
Photo

Cheap VPS hosting with the highest virtual server reliability & performance! True virtual servers built for speed. Get Started. help_outline. #VPS_Hosting, #Cloud_Hosting, #Reseller_Hosting, #Shared_Hosting, #SSL, #Email_Hosting, #Bulk_SMS, #Backup_Services (at N.J.S) https://www.instagram.com/p/B9YlbenB9xK/?igshid=e438x5x2v2fp
#vps_hosting#cloud_hosting#reseller_hosting#shared_hosting#ssl#email_hosting#bulk_sms#backup_services
0 notes
Text
Implementing Email Sending Functionality in a Django App

Hi there folks! Recently I was doing a task for fossasia which required me to make a Django web app which allowed users to submit their email addresses and receive a welcome email in return. I was able to complete the project in a couple of hours. Most of the time was spent in making the UI look good. I am going to show you how you can easily make a similar app. For the sake of this tutorial we will be using Gmail. 1.Setup the project First of all we need to start a django project. We can start one on our Desktop by typing the following command in the terminal: $ django-admin startproject gci_email Now let’s cd into the newly created project and move on: $ cd gci_email 2.Creating a new app Now we need to make a new app. You can do that by running the following command: $ python manage.py startapp send_email The above command creates a send_email directory inside our project with a couple of files in it. 3.Modify the project settings Now let’s just quickly go ahead and modify the project settings a little bit. In this step we will add our app and all our email sending related info to the settings.py file. Open the settings.py file which is available in the gci_email folder and add the following content to it: EMAIL_USE_TLS = True EMAIL_HOST = 'smtp.gmail.com' EMAIL_PORT Read the full article
0 notes
Text
無料&自分でホストして全機能を利用できるオープンソースの高機能パスワードマネージャー「Psono」レビュー
from https://gigazine.net/news/20200921-psono/
無料&自分でホストして全機能を利用できるオープンソースの高機能パスワードマネージャー「Psono」レビュー

チームでパスワードを管理できるサービスとしては1Passwordがありますが、「お金を払うのはちょっと……」「自分でサービスをホストしたい」という人もいるはず。オープンソースのパスワードマネージャー「Psono」を使うと、無料で高機能なパスワードマネージャーを自分のサーバー上に構築することができます。 Password Manager for Teams | Psono https://psono.com/ 今回はGCPのg1-smallインスタンス上にPsonoを構築。イメージはUbuntu 20.04 LTS Minimalを使用しています。まずは以下のコマンドを実行してDockerをインストール。
curl -fsSL get.docker.com -o get-docker.sh sudo sh get-docker.sh
Dockerコマンドを一般ユーザーでも実行できるよう、ユーザーをdockerグループに追加しておきます。
sudo usermod -aG docker ユーザー名
続いて下記コマンドでdocker-composeも導入しておきます。
sudo curl -L "https://github.com/docker/compose/releases/download/1.27.3/docker-compose-$(uname -s)-$(uname -m)" -o /usr/local/bin/docker-compose sudo chmod +x /usr/local/bin/docker-compose
PostgreSQLのデータを永続化するためのディレクトリを作成。
sudo mkdir -p /var/local/docker/postgres
続いてPsonoサーバーの設定ファイルを記述していきます。
sudo mkdir -p /var/local/docker/psono sudo mkdir -p /var/log/psono sudo vi /var/local.docker/psono/setting.yaml
Psonoサーバーで利用する乱数を生成するため、下記コマンドを実行。
docker run --rm -ti psono/psono-server:latest python3 ./psono/manage.py generateserverkeys
実行結果の画面はこんな感じ。赤枠部分が実行結果で、そのまま設定ファイルに記述します。

デバッグモードを無効にするよう設定ファイルに記述。
DEBUG: False
Psonoで利用するドメイン名やURLを設定。
ALLOWED_HOSTS: ['*'] ALLOWED_DOMAINS: ['examlpe.com'] HOST_URL: 'https://www.example.com/server'
アカウント認証にメールを利用するので、メールを送信するための設定も必要です。今回はMTAにMailHogを利用するので、「EMAIL_HOST」にはコンテナ名を、ポート番号は1025を指定しています。
EMAIL_FROM: '[email protected]' EMAIL_HOST: 'mailhog' EMAIL_HOST_USER: 'psono' EMAIL_HOST_PASSWORD : 'password' EMAIL_PORT: 1025 EMAIL_SUBJECT_PREFIX: '' EMAIL_USE_TLS: False EMAIL_USE_SSL: False EMAIL_SSL_CERTFILE: EMAIL_SSL_KEYFILE: EMAIL_TIMEOUT:
参照するデータベースを指定。
DATABASES: default: 'ENGINE': 'django.db.backends.postgresql_psycopg2' 'NAME': 'psono' 'USER': 'psono' 'PASSWORD': 'password' 'HOST': 'postgres' 'PORT': '5432'
Psonoのテンプレートを指定。
TEMPLATES: [ { 'BACKEND': 'django.template.backends.django.DjangoTemplates', 'DIRS': ['/root/psono/templates'], 'APP_DIRS': True, 'OPTIONS': { 'context_processors': [ 'django.template.context_processors.debug', 'django.template.context_processors.request', 'django.contrib.auth.context_processors.auth', 'django.contrib.messages.context_processors.messages', ], }, }, ]
Redisでキャッシュを実装したり、YubiKeyやLDAPを用いた認証を行ったりすることもできますが、ひとまず上記の設定を「settings.yaml」に記述しておきます。 続いてホスト側のCronを設定。
sudo vi /etc/cron.d/psono
以下の記述を末尾に追記しておきます。
30 2 * * * docker run --rm -v /var/local/docker/psono/settings.yaml:/root/.psono_server/settings.yaml -ti psono/psono-server-enterprise:latest python3 ./psono/manage.py cleartoken >> /var/log/cron.log 2>&1
続いてPsonoにアクセスするためのウェブクライアントを導入します。まずは下記コマンドでウェブクライアント用の設定ファイルを作成。
sudo mkdir -p /var/local/docker/psono-client sudo vi /var/local/docker/psono-client/config.json
設定ファイルの内容は以下。
{ "backend_servers": [{ "title": "Psono.pw", "url": "https://www.example.com" }], "base_url": "https://www.charolittle.tk/", "allow_custom_server": true, "allow_registration": true, "allow_lost_password": true, "disable_download_bar": false, "authentication_methods": ["AUTHKEY"], "saml_provider": [] }
Nginx-proxyとLet'sencryptでリバースプロキシとHTTPS対応を行うため、証明書を格納するディレクトリを作成しておきます。
sudo mkdir -p /var/local/docker/nginx-proxy/certs
コンテナを起動するための「docker-compose.yaml」ファイルを作成。
sudo vi /var/local/docker/docker-compose.yaml
docker-compose.yamlの内容は以下。volumes_fromオプションはバージョン3のdocker-compose.yamlでは使えなかったはずですが、記事作成時点で最新バージョンの1.27.3では利用できるようになっていました。
version: '3' services: psono-server: image: psono/psono-server-enterprise:latest container_name: psono-server ports: - "10100:80" volumes: - /var/local/docker/psono/settings.yaml:/root/.psono_server/settings.yaml - /var/log/psono:/var/log/psono sysctls: net.core.somaxconn: 65535 environment: VIRTUAL_HOST: examle.com,www.example.com LETSENCRYPT_HOST: examle.com,www.example.com LETSENCRYPT_EMAIL: [email protected] restart: unless-stopped psono-client: image: psono/psono-client:latest container_name: psono-client ports: - "10101:80" volumes: - /var/local/docker/psono-client/config.json:/usr/share/nginx/html/config.json environment: VIRTUAL_HOST: psono.example.com LETSENCRYPT_HOST: psono.example.com LETSENCRYPT_EMAIL: [email protected] restart: unless-stopped nginx-proxy: image: jwilder/nginx-proxy container_name: nginx-proxy ports: - "80:80" - "443:443" volumes: - /var/run/docker.sock:/tmp/docker.sock:ro - /var/local/docker/nginx-proxy/certs:/etc/nginx/certs:ro - /etc/nginx/vhost.d - /usr/share/nginx/html restart: unless-stopped letsencrypt: image: jrcs/letsencrypt-nginx-proxy-companion container_name: letsencrypt volumes: - /var/run/docker.sock:/var/run/docker.sock:ro - /var/local/docker/nginx-proxy/certs:/etc/nginx/certs:rw volumes_from: - nginx-proxy restart: unless-stopped mailhog: image: mailhog/mailhog:latest container_name: mailhog ports: - "1025:1025" - "8025:8025" restart: unless-stopped
あとは「/var/local/docker」で下記コマンドを実行してコンテナを起動。
docker-compose up -d
「docker ps」コマンドを実行し、コンテナがすべて起動していればOK。これでセットアップはすべて完了です。

ブラウザから「https://psono.example.com」にアクセスすると、ログイン画面が表示されました。まだアカウントを登録していないので「Register」をクリック。
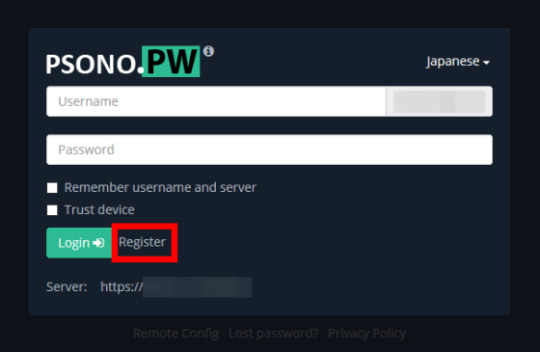
ユーザー名、メールアドレス、パスワードを入力して「Register」をクリック。

入力したメールアドレスにメールが届くので「Activate」をクリック。なお、今回はMTAにMailHogを利用しているので、メールはlocalhostに届きます。
アカウントの認証が完了したら「Back to home」をクリック。
Psonoのホーム画面が表示されました。
画面を右クリックして「New Folder」をクリックし、アカウント情報を分類するためのフォルダを作成。
フォルダ名を入力して「OK」をクリック。
フォルダが作成されました。
アカウント情報を登録するため、フォルダ上で右クリックして「New Entry」をクリック。
アカウントの種類、アカウント情報の名称、URL、ユーザー名、パスワードを入力して「OK」をクリック。
フォルダ下にアカウント情報を登録することができました。
項目を右クリックすることで、アカウント情報の共有やユーザー名、パスワードのコピー、項目の編集などを行うことができます。
Psonoユーザーにアカウント情報を共有するには「Share」をクリック。
アカウント情報に対する権限を設定し、共有するアカウントを選択して「OK」をクリック。
共有先のアカウントのPsono画面の「Pending Requests」を確認すると、先ほど共有したアカウント情報が表示されているので「Accept」をクリックします。
アカウント情報を登録するフォルダを指定して「OK」をクリック。
これでアカウント情報を共有することができました。
一度アカウント情報を共有したユーザーは「Trusted User」に表示されます。
また、Psonoを利用していない人にアカウント情報を共有するには、項目上で「Link Share」をクリック。
共有名や有効期限、パスフレーズなどを入力して「Create」をクリックします。
赤枠のボタンをクリックし、リンクをコピーして相手に共有すればOK。なお、記事作成時点では共有用リンクのサブドメインがPsonoサーバーのものになっており、ウェブクライアントのサブドメインに修正する必要がありました。
リンクにアクセスし、パスフレーズを入力して「Send」をクリックすると……
アカウント情報にアクセスすることができました。
アカウント情報の共有状況はPsonoウェブクライアントの「Activate Link Share」から確認することができます。
チームで同じアカウントを共有する場合はグループによる共有が便利です。ウェブクライアントの「Groups」から「Create New Group」をクリック。
グループ名を入力して「OK」をクリック。
「Edit」下のボタンをクリックしてグループを編集します。
グループのメンバーやその権限を設定して「Save」をクリック。
グループに追加されたユーザーは「Groups」メニューから「Accept」をクリックし、グループに参加。
グループに共有されたアカウント情報を登録するフォルダを指定して「OK」をクリック。
あとはアカウント情報の共有時に「Known Groups」からグループを選択すればOK。グループのメンバー全員にアカンと情報を共有することができます。
「Security Report」画面では、アカウントごとにパスワードの強度やパスワードが変更されていない期間などを確認することができます
PsonoにはFirefox・Chrome向けアドオンも用意されています。 Psono - Free Password Manager – Firefox (ja) 向け拡張機能を入手 https://addons.mozilla.org/ja/firefox/addon/psono-pw-password-manager/ Psono - Free Password Manager - Chrome ウェブストア https://chrome.google.com/webstore/detail/psono-free-password-manag/eljmjmgjkbmpmfljlmklcfineebidmlo 今回はFirefoxに導入してみます。Firefoxのアドオンページにアクセスして「Firefoxに追加」をクリック。
「追加」をクリック。
「OK」をクリック。これでアドオンのインストールが完了しました。
Firefoxの右上に表示されているPsonoのアイコンをクリックすると、ログインを求められます。ユーザー名、パスワード、PsonoサーバーのURLを入力して「Login」をクリック。
これでブラウザ上から��カウント情報を確認したり……
ウェブサイトのログイン画面とPsonoを連携したりすることができます。
なお、今回はウェブクライアントも自分で構築しましたが、Psonoが公式に用意しているウェブクライアントを利用することも可能。Psonoの利用に最低限必要なのは「Psonoサーバー」と「MTA」となっています。
https://i.gzn.jp/img/2020/09/21/psono/400.png
0 notes
Text
django account email confirmation
original source: https://medium.com/@frfahim/django-registration-with-confirmation-email-bb5da011e4ef
When we sign up on website its send a email for confirmation to active an account. Or confirmation email need to change password or change email of an account.
Here i will show you how to send a confirmation email when someone register on your web app that deploy on Django.
I will discuss about the normal way to build this. But there other option also to build this. Like django-registration, django-registration-redux, django-allauth application. Those application made this very easy, also integrated with authentication, account management, social account authentication etc.
Lets start
I have a project called mysite and an app called blog
This is my project directory
django_blog blog admin.py forms.py models.py urls.py views.py tokens.py templates signup.html acc_active_email.html django_blog settings.py urls.py manage.py
Configure settings
Firstly we configure email host server in settings.py for sending confirmation email.
mysite/settings.py
EMAIL_USE_TLS = True EMAIL_HOST = 'smtp.gmail.com' EMAIL_HOST_USER = '[email protected]' EMAIL_HOST_PASSWORD = 'yourpassword' EMAIL_PORT = 587
Added this lines in your settings.py file.
Here, I used gmail smtp host server, you can use others smtp server also. If you get error then follow this answer, its says that allow less secure apps and display unlock captcha
Token Generator
We have to create token that will use in email confirmation url.
blog/tokens.py
from django.contrib.auth.tokens import PasswordResetTokenGenerator from django.utils import six class TokenGenerator(PasswordResetTokenGenerator): def _make_hash_value(self, user, timestamp): return ( six.text_type(user.pk) + six.text_type(timestamp) + six.text_type(user.is_active) ) account_activation_token = TokenGenerator()
using this class we can create a unique token for confirmation. I have use django PasswordResetTokenGenerator class that used for password reset.
Django FORMS
I think best simple way to implement a user registration page on Django is using UserCreationForm. Here is my forms.py file.
blog/forms.py
from django import forms from django.contrib.auth.forms import UserCreationForm from django.contrib.auth.models import User class SignupForm(UserCreationForm): email = forms.EmailField(max_length=200, help_text='Required') class Meta: model = User fields = ('username', 'email', 'password1', 'password2')
I have import UserCreationForm forms and User models. Then added an extra field email in SignupForm. This email field take email address while registering for email confirmation.
blog/views.py
from django.http import HttpResponse from django.shortcuts import render, redirect from django.contrib.auth import login, authenticate from .forms import SignupForm from django.contrib.sites.shortcuts import get_current_site from django.utils.encoding import force_bytes, force_text from django.utils.http import urlsafe_base64_encode, urlsafe_base64_decode from django.template.loader import render_to_string from .tokens import account_activation_token from django.contrib.auth.models import User from django.core.mail import EmailMessage def signup(request): if request.method == 'POST': form = SignupForm(request.POST) if form.is_valid(): user = form.save(commit=False) user.is_active = False user.save() current_site = get_current_site(request) mail_subject = 'Activate your blog account.' message = render_to_string('acc_active_email.html', { 'user': user, 'domain': current_site.domain, 'uid':urlsafe_base64_encode(force_bytes(user.pk)), 'token':account_activation_token.make_token(user), }) to_email = form.cleaned_data.get('email') email = EmailMessage( mail_subject, message, to=[to_email] ) email.send() return HttpResponse('Please confirm your email address to complete the registration') else: form = SignupForm() return render(request, 'signup.html', {'form': form})
Update: For newer version of django add decode() when generate uid 'uid':urlsafe_base64_encode(force_bytes(user.pk)).decode() To know more see this
Here it got the form information using POST method, then valid it. Notice that i have write user.is_active = False so that user can’t login without email confirmation.
Then write email subject, message and send it by EmailMessage() function. Email message create by a template.
blog/templates/acc_active_email.html:
{% autoescape off %} Hi {{ user.username }}, Please click on the link to confirm your registration,http://{{ domain }}{% url 'activate' uidb64=uid token=token %} {% endautoescape %}
This template create a email body with activate link that will send for application.
Create Activate function
User will get an activate link to their email address. Now we have to active their account through activation link.
By clicking on activation link the user send to the activate view.
blog/views.py
def activate(request, uidb64, token): try: uid = force_text(urlsafe_base64_decode(uidb64)) user = User.objects.get(pk=uid) except(TypeError, ValueError, OverflowError, User.DoesNotExist): user = None if user is not None and account_activation_token.check_token(user, token): user.is_active = True user.save() login(request, user) # return redirect('home') return HttpResponse('Thank you for your email confirmation. Now you can login your account.') else: return HttpResponse('Activation link is invalid!')
Added this activate function after signup function in blog/views.py file. This function will check token if it valid then user will active and login. Notice that i have write user.is_active=True. Before confirming email this was False.
URLS
blog/urls
from django.conf.urls import url from . import viewsurlpatterns = [ url(r'^$', views.home, name='home'), url(r'^signup/$', views.signup, name='signup'), url(r'^activate/(?P<uidb64>[0-9A-Za-z_\-]+)/(?P<token>[0-9A-Za-z]{1,13}-[0-9A-Za-z]{1,20})/$', views.activate, name='activate'), ]
This is the urls for this app. Last url for email activate confirmation.
Sign up Template
Finally we have create the signup template, that user use for registration.
blog/templates/signup.html
{% block content %} <h2>Sign up</h2> <form method="post"> {% csrf_token %} {% for field in form %} <p> {{ field.label_tag }}<br> {{ field }} {% if field.help_text %} <small style="display: none">{{ field.help_text }}</small> {% endif %} {% for error in field.errors %} <p style="color: red">{{ error }}</p> {% endfor %} </p> {% endfor %} <button type="submit">Sign up</button> </form> {% endblock %}
0 notes
Link
In this post I want to talk about how can we send emails using Django and Gmail, I read a lot of articles about this but none of them is working for me, this is my way of doing this
Setup Django 💚
first let's install django
pip install django
start a django project
django-admin startproject send_gmail
start a django app
cd send_gmail python manage.py startapp send
add the app to settings.py installed app
# send_gmail/settings.py INSTALLED_APPS = [ ... send, ]
migrate and create a super user
python manage.py migrate python manage.py createsuperuser
check this post if you want to know more about how to create a virtual environment , or how to install Django and start your project
The Gmail part ✉
now you need to create a Gmail account and then click on Manage your google account

now click on the Security tab

make sure to enable two steps verification

now click on App passwords

you have to type your password again

click on select app choose *** other (Custome Name) *** and give a name to you app

the last step click on generate and Gmail will generate a key or an app password make sure to copy this key or save it in a text file

Edit your settings.py file
#gmail_send/settings.py EMAIL_BACKEND = 'django.core.mail.backends.smtp.EmailBackend' EMAIL_HOST = 'smtp.gmail.com' EMAIL_HOST_USER = '[email protected]' EMAIL_HOST_PASSWORD = 'key' #past the key or password app here EMAIL_PORT = 587 EMAIL_USE_TLS = True DEFAULT_FROM_EMAIL = 'default from email'
🎉🎉 now you are ready to send emails with Django and Gmail in production🎉🎉
For further exploration
for large apps don't use Gmail you can use SendGrid, Mailgun, Sendinblue...
0 notes
Link
I have my website hosted on GoDaddy and have decided to look into setting up an email account with @ mybusinessname.com … GoDaddy wants $11.99/month to provide this service.
My question is: Do I have to use GoDaddy for my @ mybusinessname.com email or can this be done elsewhere? If so are there suggestions on where to set this up at?
The 1 email address GoDaddy provides doesn’t allow for easy access with my other email accounts which makes it difficult to manage and I feel this is how they have it set up in hopes to get me to subscribe to this $11.99/mo plan. (This plan is up to 5 email addresses unlimited storage).
Thanks for your help!
Submitted April 16, 2020 at 06:39AM by kewlguy919 https://www.reddit.com/r/webhosting/comments/g2f2p0/email_hosting/?utm_source=ifttt
from Blogger http://webdesignersolutions1.blogspot.com/2020/04/email-hosting.html via IFTTT
0 notes
Text
Setting Konfigurasi Automatic Package Updates di CentOS 8
Setting Konfigurasi Automatic Package Updates di CentOS 8
Step by step
Setting automatic update dengan Dnf-automatic, install package
# dnf install dnf-automatic
Edit automatic.conf #vim /etc/dnf/automatic.conf
[commands] upgrade_type = default download_updates = yes [emitters] system_name = hakase-centos8 emit_via = motd [email] email_from = [email protected] email_to = root email_host = localhost
Setting automatic download package upgrade
su…
View On WordPress
0 notes
Text
Open edX smtp 設定教學
Open edX smtp 設定教學
之前提到過安裝 Open edX 線上教學平台,
它是一個功能強大的開源軟體,
今天就來教大家
Open edX smtp 設定教學
底下是Gandi 所提供的信箱設定,
以此作為範例來進行設定
release版本中
在資料夾 /edx/app/edxapp
以文字編輯器打開 lms.env.json,
找到底下三個欄位並修改為上圖所看到的SMTP設定
“EMAIL_HOST” : mail.gandi.net
“EMAIL_PORT” : 587
“EMAIL_USE_TLS” : true
接著在同個資料夾打開 lms.auth.json
設定正確的
“EMAIL_HOST_USER”
與
“EMAIL_HOST_PASSWORD”
將上述兩種設定同樣套到
cms.auth.json
cms.env.json
利用
edx/bin/superv…
View On WordPress
0 notes
Photo

Suit up your Business emails in a corporate way. Based on Malaysia data center starting at RM 20.56/m only with integrated office utilities & cloud storage. #gogetspace #Corporate #email_hosting
http://www.gogetspace.com/corporate-mail-hosting
0 notes
Text
Email hosting
I have my website hosted on GoDaddy and have decided to look into setting up an email account with @ mybusinessname.com ... GoDaddy wants $11.99/month to provide this service.
My question is: Do I have to use GoDaddy for my @ mybusinessname.com email or can this be done elsewhere? If so are there suggestions on where to set this up at?
The 1 email address GoDaddy provides doesn't allow for easy access with my other email accounts which makes it difficult to manage and I feel this is how they have it set up in hopes to get me to subscribe to this $11.99/mo plan. (This plan is up to 5 email addresses unlimited storage).
Thanks for your help!
Submitted April 16, 2020 at 06:39AM by kewlguy919 https://www.reddit.com/r/webhosting/comments/g2f2p0/email_hosting/?utm_source=ifttt from Blogger http://webdesignersolutions1.blogspot.com/2020/04/email-hosting.html via IFTTT
0 notes
Text
Email hosting via /r/webhosting
Email hosting
I have my website hosted on GoDaddy and have decided to look into setting up an email account with @ mybusinessname.com ... GoDaddy wants $11.99/month to provide this service.
My question is: Do I have to use GoDaddy for my @ mybusinessname.com email or can this be done elsewhere? If so are there suggestions on where to set this up at?
The 1 email address GoDaddy provides doesn't allow for easy access with my other email accounts which makes it difficult to manage and I feel this is how they have it set up in hopes to get me to subscribe to this $11.99/mo plan. (This plan is up to 5 email addresses unlimited storage).
Thanks for your help!
Submitted April 16, 2020 at 06:39AM by kewlguy919 via reddit https://www.reddit.com/r/webhosting/comments/g2f2p0/email_hosting/?utm_source=ifttt
0 notes
Link
I need one that receives every email sent to the domain so say email sent to [[email protected]](mailto:[email protected]) i receive it.
Submitted July 14, 2019 at 04:36PM by ddm50 https://www.reddit.com/r/webhosting/comments/cd9y65/email_hosting/?utm_source=ifttt
from Blogger http://webdesignersolutions1.blogspot.com/2019/07/email-hosting.html via IFTTT
0 notes
Text
Email Hosting
I need one that receives every email sent to the domain so say email sent to [[email protected]](mailto:[email protected]) i receive it.
Submitted July 14, 2019 at 04:36PM by ddm50 https://www.reddit.com/r/webhosting/comments/cd9y65/email_hosting/?utm_source=ifttt from Blogger http://webdesignersolutions1.blogspot.com/2019/07/email-hosting.html via IFTTT
0 notes
Text
Email Hosting via /r/webhosting
Email Hosting
I need one that receives every email sent to the domain so say email sent to [[email protected]](mailto:[email protected]) i receive it.
Submitted July 14, 2019 at 04:36PM by ddm50 via reddit https://www.reddit.com/r/webhosting/comments/cd9y65/email_hosting/?utm_source=ifttt
0 notes