#esptool.py
Explore tagged Tumblr posts
Visit Tumblr Blog
Explore Tumblr blogs with no restrictions, modern design and the best experience.
Last Seen Tumblr Blogs


Fun Fact
Tumblr has 16.74 million mobile monthly users in the US.
Text
ESP32 mit MicroPython unter Raspberry Pi OS Bookworm flashen – So geht’s!

Wenn du einen ESP32 mit MicroPython programmieren möchtest, ist der Raspberry Pi mit dem aktuellen Raspberry Pi OS Bookworm eine ideale Plattform. Die gute Nachricht: Die Programmiersoftware Thonny ist bereits vorinstalliert und bringt viele nützliche Funktionen mit. Doch bevor du direkt loslegen kannst, fehlt noch ein entscheidender Schritt – du musst zunächst ESP32 MicroPython Raspberry Pi flashen, also die MicroPython-Firmware auf deinen Mikrocontroller übertragen. In dieser Anleitung zeige ich dir Schritt für Schritt, wie du deinen ESP32 unter Raspberry Pi OS Bookworm für MicroPython vorbereitest. Dazu gehören die Installation der benötigten Tools wie esptool.py, das Herunterladen der MicroPython-Firmware und das eigentliche Flashen des Mikrocontrollers. Am Ende hast du ein vollständig eingerichtetes System und kannst direkt mit der Entwicklung eigener MicroPython-Projekte starten. Los geht’s! https://youtu.be/pLreMFLDCRw 💡 Hinweis: Die Idee zu diesem Beitrag stammt aus einem Kommentar unter meinem YouTube-Video, in dem ich zeige, wie man einen ESP32 unter Windows mit MicroPython flasht. Dort kam die Frage auf, wie das Ganze unter Raspberry Pi OS (Bookworm) funktioniert – und genau das zeige ich dir hier!
Virtuelle Umgebung für Python erstellen
Unter Raspberry Pi OS Bookworm ist das Erstellen einer virtuellen Python-Umgebung kein optionaler Schritt – es ist zwingend erforderlich, um Tools wie esptool installieren und verwenden zu können. Andernfalls kommt es zu Fehlermeldungen oder Einschränkungen, da systemweite Paketinstallationen bewusst eingeschränkt wurden. Schritt 1: venv installieren Stelle sicher, dass das Modul python3-venv installiert ist: sudo apt update sudo apt install python3-venv Schritt 2: Virtuelle Umgebung erstellen Erstelle dir ein neues Projektverzeichnis und wechsle hinein: mkdir ~/esp32-projekt cd ~/esp32-flash Darin erzeugst du die virtuelle Umgebung: python3 -m venv venv Schritt 3: Virtuelle Umgebung aktivieren Aktiviere die Umgebung mit: source venv/bin/activate Nach der Aktivierung erscheint links im Terminal der Name der Umgebung – z. B.: (venv) pi@raspberrypi:~/esp32-flash $ Jetzt kannst du alle benötigten Tools wie esptool installieren und verwenden – ausschließlich innerhalb dieser Umgebung.
esptool installieren
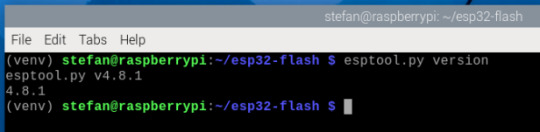
Nachdem du die virtuelle Umgebung aktiviert hast, kannst du nun das Tool esptool installieren. Dieses Werkzeug ist notwendig, um die MicroPython-Firmware auf den ESP32 zu übertragen. Installation mit pip Gib in der aktiven Umgebung folgenden Befehl ein: pip install esptool Das dauert nur wenige Sekunden. Danach steht dir der Befehl esptool.py direkt zur Verfügung. Installation testen Du kannst prüfen, ob esptool korrekt installiert wurde, indem du die Versionsnummer abfragst: esptool.py version Die Ausgabe sollte in etwa so aussehen:
Hinweis: Stelle sicher, dass du dich während dieser Schritte in der aktivierten virtuellen Umgebung befindest – erkennbar am (venv) in der Eingabezeile. Falls du das Terminal neu geöffnet hast, musst du die Umgebung erneut aktivieren: source ~/esp32-flash/venv/bin/activate Im nächsten Schritt zeige ich dir, wie du die passende MicroPython-Firmware für deinen ESP32 herunterlädst und mit esptool flashst.
MicroPython-Firmware herunterladen und ESP32-C3 flashen
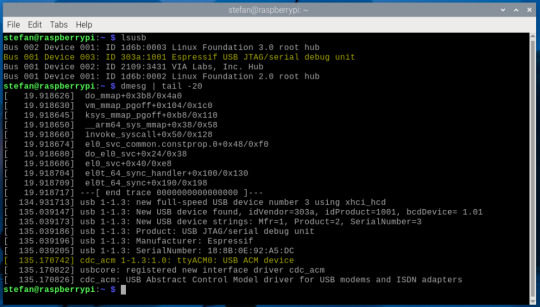
Jetzt, wo esptool installiert ist, kannst du die passende Firmware für deinen ESP32-C3 Super Mini herunterladen und auf den Mikrocontroller übertragen. Bevor es losgeht, müssen wir jedoch zuerst den richtigen seriellen Port ermitteln. Seriellen Port ermitteln Unter Linux kann das etwas unübersichtlich sein – aber mit dem folgenden Befehl bekommst du zuverlässig die zuletzt erkannten USB-Geräte angezeigt: dmesg | tail -20 Stecke deinen ESP32-C3 Super Mini ein und achte auf eine Zeile wie: ttyACM0: USB ACM device Das bedeutet, dein Board ist unter /dev/ttyUSB0 erreichbar (bei manchen Modellen auch /dev/ttyACM0). Merke dir diesen Pfad, du brauchst ihn gleich beim Flashen.
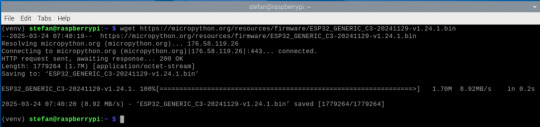
MicroPython-Firmware herunterladen Lade nun die passende MicroPython-Firmware für deinen ESP32-C3 herunter: 🔗 ESP32-C3 Firmware v1.24.1 (vom 29.11.2024) Du kannst die Datei direkt über den Browser herunterladen oder mit wget im Terminal: wget https://micropython.org/resources/firmware/ESP32_GENERIC_C3-20241129-v1.24.1.bin
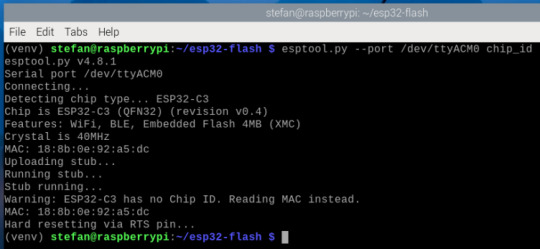
Verbindung testen: Geräteinformationen auslesen Bevor du die Firmware aufspielst, lohnt sich ein kurzer Check, ob dein ESP32-C3 korrekt verbunden ist. Mit esptool.py kannst du Informationen vom angeschlossenen Chip abrufen. Verwende dazu folgenden Befehl (achte wieder auf den richtigen Port, z. B. /dev/ttyACM0): esptool.py --port /dev/ttyACM0 chip_id Wenn die Verbindung klappt, bekommst du eine Ausgabe wie:
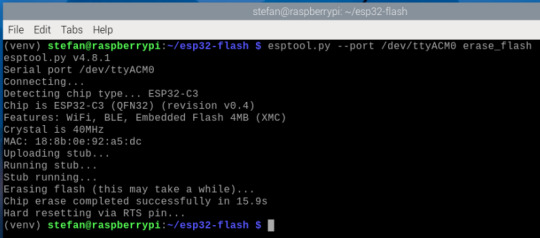
Flash-Speicher löschen (empfohlen vor dem Flashen) Bevor du die neue Firmware aufspielst, solltest du den internen Speicher deines ESP32-C3 vollständig löschen. Das sorgt für einen sauberen Zustand und verhindert Probleme mit alten oder beschädigten Daten auf dem Chip. Führe dazu folgenden Befehl aus (achte wieder auf den richtigen Port, z. B. /dev/ttyACM0): esptool.py --port /dev/ttyACM0 erase_flash Die Ausgabe sollte etwa so aussehen:
Nach dem erfolgreichen Löschen ist der Chip bereit für die neue MicroPython-Firmware. Firmware mit esptool.py flashen Jetzt geht’s ans Flashen. Achte darauf, dass der ESP32-C3 vorher in den Bootloader-Modus versetzt wird. Bei vielen Boards hältst du dazu beim Einstecken einen kleinen BOOT-Knopf gedrückt. Dann führst du folgenden Befehl aus – passe den Gerätenamen ggf. an (/dev/ttyUSB0, /dev/ttyACM0, ...): esptool.py --port /dev/ttyACM0 --baud 460800 write_flash 0 ESP32_GENERIC_C3-20241129-v1.24.1.bin Erklärung der Parameter: - --port /dev/ttyACM0 – Serieller Port deines ESP32-C3 - --baud 460800 – Übertragungsgeschwindigkeit (schneller als Standard) - write_flash 0 – Startadresse im Flash - ESP32_GENERIC_C3-20241129-v1.24.1.bin – die MicroPython-Firmware-Datei
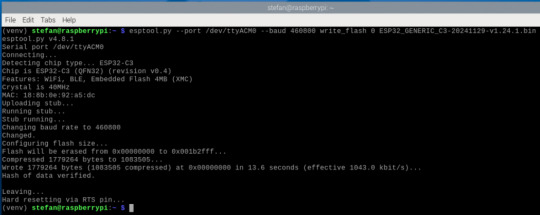
Wenn alles klappt, siehst du am Ende eine Ausgabe wie: Hash of data verified. Leaving... Hard resetting via RTS pin... Das bedeutet: Die Firmware wurde erfolgreich übertragen! Du kannst den ESP32-C3 jetzt kurz vom USB trennen und neu einstecken – oder direkt im nächsten Schritt Thonny öffnen, um dein erstes MicroPython-Skript hochzuladen. Testen des Mikrocontrollers in Thonny Nachdem dein ESP32-C3 erfolgreich mit MicroPython geflasht wurde, ist es Zeit für einen ersten Funktionstest – direkt in der Thonny-IDE.

Wichtig: Thonny aus der virtuellen Umgebung starten Da du esptool und weitere MicroPython-Tools in einer virtuellen Umgebung installiert hast, musst du Thonny ebenfalls aus dieser Umgebung heraus starten, damit alles funktioniert. Gib dazu im Terminal (bei aktivierter Umgebung) folgenden Befehl ein: (venv) stefan@raspberrypi:~ $ thonny Falls du die Umgebung zuvor verlassen hast, aktiviere sie erneut: source ~/esp32-flash/venv/bin/activate thonny Dein erstes MicroPython-Programm Kopiere folgenden Code in das Editorfenster von Thonny: from machine import Pin from time import sleep # LED ist an GPIO 2 angeschlossen led = Pin(2, Pin.OUT) while True: print("Hello World!") led.value(1) # LED einschalten sleep(1) led.value(0) # LED ausschalten sleep(1) Speichere das Skript z. B. als main.py und klicke auf „Ausführen“ (gr��ner Play-Button). Programm stoppen: Klicke auf den roten „Stop“-Button, um die Endlosschleife zu beenden. Öffne dazu Thonny, wähle unter „Interpreter“ deinen ESP32-C3 aus (z. B. MicroPython (ESP32)) und den richtigen Port (z. B. /dev/ttyACM0). Wechsle dann unten in das Shell-Fenster und gib folgenden Code ein: from machine import Pin from time import sleep # LED ist an GPIO 2 angeschlossen led = Pin(2, Pin.OUT) while True: print("Hello World!") led.value(1) # LED einschalten sleep(1) led.value(0) # LED ausschalten sleep(1) Read the full article
0 notes
Text
RP2040 USB host to program ESP chips through CDC chips
Historically, we've tested and programmed our Feather ESP8266 (https://www.adafruit.com/product/2821) and ESP32 boards (https://www.adafruit.com/product/3405) from a Raspberry Pi. We'd connect over USB and run esptool.py, which works fine but has more things that can go wrong: power flickering, SD card failures, etc. It's better to fully program it with a Pico RP2040 brain board. We can do that now because TinyUSB has support for USB CDC Serial chips (https://github.com/adafruit/Adafruit_TinyUSB_Arduino/tree/master/examples/DualRole/CDC/serial_host_bridge) like the FT232, CP210x, and WCH9102! We upload the stub and test firmware, then listen on the CDC for the self-test output. It works really fast and is much easier to manage.
#Adafruit#ESP8266#ESP32#RaspberryPi#esptool#USB#TinyUSB#PicoRP2040#FirmwareProgramming#CDCSerialChips
1 note
·
View note
Text
Getting the Amiga CD32 online
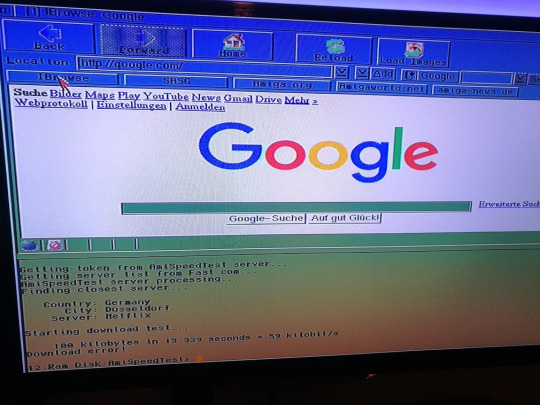
Yes, 59 kilobits per second of PURE INTERNET! But how did I get here? Well, follow me and I’ll show you.
The basic concept is to use the Amiga’s serial port to talk to an ESP8266 running a SLIP Router, which will then link to your wifi and the internet. The idea is that the CD32 and the ESP8266 (ESP-01) belong to a network of two, attached via the serial lines. Separately, the ESP-01 connects to your wifi and gets assigned an address as normal. The ESP firmware then shuffles data between the two networks, acting as a router:
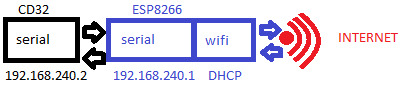
Yes, it’s rather convoluted but we’ll take it step by step!
Credit to Stephen Leary & co at exxos forum for doing the hard work!
What you’ll need
You will need some hardware:
Amiga CD32
ESP8266 ESP-01
TerribleFire TF330, or alternative Fast RAM, IDE & keyboard solution and a cable to break out the Tx/Rx on the ‘Aux’ port
ESP8266 programmer or FTDI 3.3 usb->ttl or similar
A bit of jumper wire
2x4 2.54mm pitch header (optional but recommended)
And a bunch of software
Roadshow TCP/IP stack (demo available)
should also work with AmiTCP, Genesis or Miami, but you’ll need to follow the instructions for those accordingly
Web browser like IBrowse (demo available)
AWeb is free but ancient
slip.device and installer script by Stephen Leary
or from aminet
esp_slip_router firmware
esptool.py and python
Hardware Setup
The first job is to flash the new firmware onto the ESP8266. This is apparently possible by using an Arduino as a programmer but I couldn’t get it to work. I did have a usb-TTL converter but that was 5v whereas the ESP is 3.3v and I didn’t want to let the magic smoke out, so I ended up buying a little programmer, as linked above.
Download & install the python, follow the instructions to install pip and esptool.py and then download the esp_slip_router firmware. Plug the esp-01 into the programmer and pop it into a usb socket, then fire up a terminal.
I used Windows; if you’re using Linux replace COM3 with /dev/ttyUSB0. COM port / tty device will need to be modified according to what your computer assigns it. In Windows, look in Device Manager. Make sure you’re running this from the esp_slip_router folder, where the ‘firmware’ subfolder lives.
python esptool.py --port COM3 write_flash -fs 8m 0x00000 firmware/0x00000.bin 0x10000 firmware/0x10000.bin
Now, this didn’t work for me, I got error messages about invalid headers. I tried all manner of things and it would not bloody work. Eventually I discovered that one of the pins needs to be grounded to put it in “programming” mode - this is where the bit of wire comes in handy.
Plug the ESP-01 into the programmer
Plug the programmer into the USB port
Connect GPIO0 to GND, There’s a little blue LED that should flash
Run esptool.py
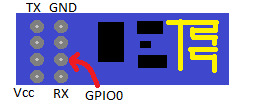
If it doesn’t work, unplug the thing from the USB port and try again. I didn’t need to keep GPIO0 grounded during the whole process, just initially to put it in programming mode - your mileage may vary.
With the thing finally flashed, I (badly) soldered a header onto the TF330 and plugged the ESP-01 in:
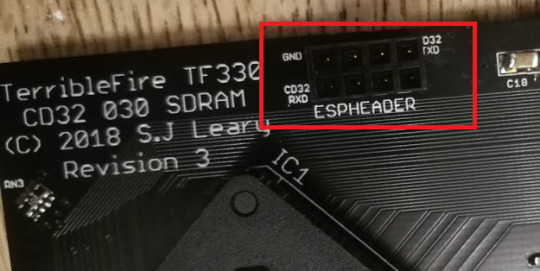
Note the direction! It points “away” from the board:
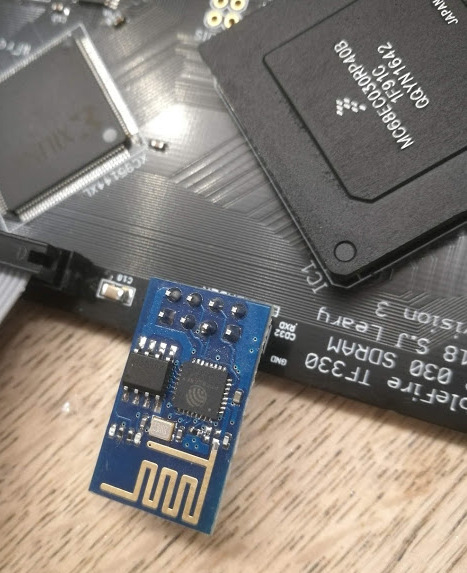
With this, we’re ready to start with the Amiga side of things.
Software Setup
You’ll need to transfer some software to the Amiga. I assume if you’re here then you already know how to do this and are using a CF or SD card on the IDE interface anyway.
Copy over the TCP/IP stack, browser, slip.device & setup scripts and telnet client. Install them in this order:
Install your TCP/IP stack
reboot
In a shell, go to the directory you unpacked tf3xxx_slip.zip ‘execute install_script’, and reboot
Note, I needed to remove this line from install_script to avoid getting errors:
echo >>Devs:NetInterfaces/Slip "interface=Slip"
At this point, the Amiga should be able to talk to the ESP over the serial connection. But that won’t do anything yet, as we have to configure the other side of the bridge. You can run c:showNetStatus if you want to check everything is fine so far:

Next, install your telnet client, and we’ll configure the esp_slip_router to connect to your wifi.
Make sue that local echo is on so that you can see what you’re doing, and that return issues a CR+LF:
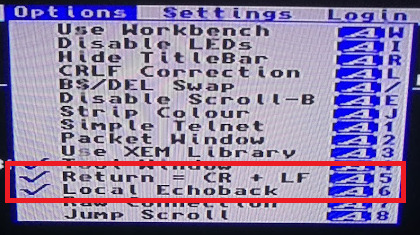
Connect to 192.168.240.1 port 7777, a special configuration telnet client running on the ESP.

You should see a command prompt like “CMD>”
set ssid YOUR_SSID_HERE
set password YOUR_PASSWORD_HERE
set use_ap 0
save
reset
The ESP will then reset itself. If you connect again and type “show”, you should see that the wifi-side of the router has been allocated an address on your home network:

That’s it, you can talk to the ESP8266 and it can talk to your wifi. Your CD32 is now online!
You can now fire up the browser of your choice and get surfing. The recently released IBrowse2.5 can handle modern-ish websites, such as this one! You’ll need to install AmiSSL 4.5 too.
What else can you do with an Amiga CD32 with a network connection?
A spot of IRC chatting
Transfer files via either Samba or NFS, or maybe FTP
Telnet into one of many Amiga BBS sites
Check your email
Impress your friends! Well, probably not that one
5 notes
·
View notes
Quote
Arduino:1.8.13 (Windows Store 1.8.42.0) (Windows 10), Kort:"ESP32 Dev Module, Disabled, Default 4MB with spiffs (1.2MB APP/1.5MB SPIFFS), 240MHz (WiFi/BT), QIO, 80MHz, 4MB (32Mb), 921600, None" Sketch uses 207921 bytes (15%) of program storage space. Maximum is 1310720 bytes. Global variables use 15228 bytes (4%) of dynamic memory, leaving 312452 bytes for local variables. Maximum is 327680 bytes. esptool.py v2.6 Serial port COM3 Traceback (most recent call last): File "esptool.py", line 2959, in File "esptool.py", line 2952, in _main File "esptool.py", line 2652, in main File "esptool.py", line 222, in __init__ File "site-packages\serial\__init__.py", line 88, in serial_for_url File "site-packages\serial\serialwin32.py", line 62, in open serial.serialutil.SerialException: could not open port 'COM3': WindowsError(2, 'Det g\xe5r inte att hitta filen.') Failed to execute script esptool Den valda seriella porten Failed to execute script esptool existerar inte eller så är din board inte ansluten. This report would have more information with "Show verbose output during compilation" option enabled in File -> Preferences.
no fucking source except alduino fuck you you bitch ass butt munching cuck im just trying to do some fucking school work but you give me this shit? no fuck off
0 notes
Text
M5StickC/ATOM on MacOS Catalina can't upload/ ESP32: Timed out waiting for packet header solution | M5Stack Community [はてなブックマーク]

M5StickC/ATOM on MacOS Catalina can't upload/ ESP32: Timed out waiting for packet header solution | M5Stack Community
Home Official Updates M5StickC/ATOM on MacOS Catalina can't upload/ ESP32: Timed out waiting for packet header solution M5StickC/ATOM on MacOS Catalina can't upload/ ESP32: Timed out waiting for packet header solution upload time out error log esptool.py v2.8-dev Serial port /dev/cu.usbserial-xxx...


from kjw_junichiのはてなブックマーク https://ift.tt/2DV6KwO
0 notes
Photo

Voor de handige doe-het-zelvers wellicht een leuk project: * https://www.superhouse.tv/episodes * https://www.superhouse.tv/37-installing-tasmota-using-tasmotizer/ Het installeren van Tasmota op een apparaat zoals een Sonoff wordt meestal gedaan met esptool.py, een krachtig opdrachtregelhulpprogramma, maar het kan een beetje verwarrend zijn als je er niet aan gewend bent. Nu is het gekoppeld aan een verbazingwekkende grafische interface genaamd Tasmotizer die u het gemak van aanwijzen en klikken biedt en enkele handige functies toevoegt voor het configureren van uw apparaten. Zie de link hierboven voor een stapsgewijze handleiding. SuperHouse: - https://www.superhouse.tv - https://twitter.com/superhousetv - https://www.facebook.com/superhousetv/ Jonathan Oxer: - https://www.facebook.com/jonoxer/ - https://twitter.com/jonoxer Steun me op Patreon om exclusieve kortingscodes, toegang tot Patron-only secties van de SuperHouse Discord en vroege toegang tot nieuwe https://is.gd/D3cGMJ
0 notes
Video
youtube
Прошивка Sonoff Touch: Tasmota & ESPurna + OpenHAB. Дешевые выключатели для умного дома. | Room31
Выключатели Sonoff Touch это отличная вещь для бюджетного умного дома. Но с родной прошивкой подключить их к альтернативным системам умного дома, т��ких как Openhab, Domoticz, Majordomo и др. нельзя. К счастью, это недоразумение можно легко исправить.
🔶 В этом видео: ◽ 00:27 Микро обзор Sonoff Touch ◽ 00:51 Подготовка к прошивке: паяние разъема ◽ 02:04 Схема подключения для прошивки ◽ 02:34 Установка Python на Windows ◽ 02:57 Установка ESPTool.py ◽ 03:18 Прошивка Sonoff Touch с помощью ESPTool.py (бекап, очистка, прошивка) ◽ 05:36 Прошивка Sonoff Touch с помощью NodeMCU PyFlasher (очистка, прошивка) ◽ 06:38 PuTTy в качестве Serial Monitor ◽ 06:58 Настройка WiFi в прошивке Tasmota ◽ 07:49 Настройка WiFi в прошивке ESPurna ◽ 10:20 Настройка MQTT в прошивках Tasmota и ESPurna ◽ 11:35 Настройка OpenHAB ◽ 15:40 Донастройка мелочей ◽ 17:34 Результат проделанной работы ◽ 18:30 Советы P.S.
🔶 Где взять устройства из этого видео?:
◽ WiFi выключатель Sonoff Touch: http://ali.pub/4nfd20
◽ USB-UART стик: http://ali.pub/4nfdjw
◽ Паяльник Ksger T12: http://ali.pub/4nfeme
🔶 Полезные ссылки по теме этого видео: ◽ Архив с файлами из видео: https://mega.nz/#!EiJiUS4I!FNK1aOgyislHi7QB1mAwNOuQuMwIa83Yia18GWBrNNc ◽ Прошивка ESPurna: https://github.com/xoseperez/espurna/releases ◽ Прошивка Tasmota: https://github.com/arendst/Sonoff-Tasmota/releases ◽ NodeMCU PyFlasher: https://github.com/marcelstoer/nodemcu-pyflasher/releases ◽ Питон: https://www.python.org/downloads/
🔶 Мои другие видео: ◽ 14. Прошивка Sonoff Touch: Tasmota & ESPurna + OpenHAB | Room31: https://youtu.be/AHicER0zTgE ◽ 13. Расширение OpenHAB для браузера Chrome: https://youtu.be/4SgWZxUGSO4 ◽ 12. Умный настенный светильник (бра) своими руками + Openhab: https://youtu.be/_RlpP1xVL8M ◽ 11. Умный дом своими руками. Arduino + MQTT + OpenHAB: https://youtu.be/tb-BMCLp_0Y ◽ 10. Увлажнители Xiaomi + Openhab: https://youtu.be/h7ex3zWCLDg ◽ 9. Умный дом и WiFi LED контроллеры для чайников. MagicHome + OpenHAB https://youtu.be/0Lg7y6yLOks ◽ 8. Подключение кондиционера к умному дому. Gree Smart + OpenHAB: https://youtu.be/cY6RfOjI-Ts ◽ 7. Настройка подключения OpenHAB к MQTT брокеру: https://youtu.be/5IrIg9eQcX0 ◽ 6. Установка MQTT broker на WINDOWS 10: https://youtu.be/FEoy5YkrBIE ◽ 5. Установка MQTT broker на Raspberry Pi: https://youtu.be/cgqFEyMQhsI ◽ 4. Установка openHAB на Windows 10: https://youtu.be/2R90hlC5Jzs ◽ 3. Установка openHAB на Raspberry Pi 3: https://youtu.be/D6Px3jDNxPM ◽ 2. Самодельное настенное крепление для планшета из трубы: https://youtu.be/u8zFNUIHgRg ◽ 1. Умный Дом - Начало: https://youtu.be/1WDVufuN90Q
🔶 Music by: ◽ Zero Chaotic, Zvykar - Warlike (Original Mix) ◽ Hexalyte - Silence ◽ Markvard - Perfect Day ◽ TheDiabolicalWaffle - Kaleidoscope [Argofox Release] ◽ Trip - Real Hypha ◽ Digital Math - The Musky Thrust [Argofox Release] ◽ Alexander Nakarada - Main theme overture the grand score
#SonoffTouch #Прошивка #OpenHAB #MQTT #Tasmota #ESPurna #Sonoff-Tasmota
0 notes
Photo
SOCINNO「IoT電子工作 スマートリモコン製作キット」をUbuntu 18.04で使う場合の追加作業 https://ift.tt/2SDJjLD
株式会社SOCINNOが提供する「IoT電子工作 スマートリモコン製作キット」は基礎からWi-Fi利用、クラウド接続まで順を追って丁寧に解説されている秀逸な教材である。
このキットをArduino IDE 1.8.9 + Ubuntu 18.04環境で使う際にいくつか追加で作業する必要があったので補足する。
以下、同キット向けのIoT電子工作ガイドの章立てに沿って説明する。
2-1 電子部品利用 > LED点滅
スケッチコンパイルエラー
スケッチコンパイル時に以下のようなエラーが発生する場合。
: Pyserial is not installed for /usr/bin/python. Check the README for installation instructions.Traceback (most recent call last): File "/home/neo/.arduino15/packages/esp32/tools/esptool_py/2.6.1/esptool.py", line 37, in <module> import serial ImportError: No module named serial exit status 1 Error compiling for board ESP32 Dev Module.
python-serialパッケージをインストールすればエラーが発生しなくなる。
$ sudo apt install python-serial
2-3 電子部品利用 > 温湿度センサ
スケッチコンパイルエラー
スケッチコンパイル時に以下のようなエラーが発生する場合。
: In file included from /home/ard/Arduino/libraries/DHT_sensor_library/DHT_U.cpp:22:0: /home/ard/Arduino/libraries/DHT_sensor_library/DHT_U.h:25:29: fatal error: Adafruit_Sensor.h: No such file or directory #include <Adafruit_Sensor.h> ^ compilation terminated. Using library DHT_sensor_library at version 1.3.4 in folder: /home/ard/Arduino/libraries/DHT_sensor_library exit status 1 Error compiling for board ESP32 Dev Module.
ライブラリマネージャから「Adafruit Unified Sensor」をインストールすればエラーが発生しなくなる。
3-2 Wi-Fi利用 > Webサーバ機能
スケッチコンパイルエラー
スケッチコンパイル時に以下のようなエラーが発生する場合。
: Multiple libraries were found for "WiFi.h" Blink:2:31: error: ESPAsyncWebServer.h: No such file or directory compilation terminated. Used: /home/ard/.arduino15/packages/esp32/hardware/esp32/1.0.2/libraries/WiFi Not used: /home/ard/opt/arduino-1.8.9/libraries/WiFi exit status 1 ESPAsyncWebServer.h: No such file or directory This report would have more information with "Show verbose output during compilation" option enabled in File -> Preferences.
以下の2つをダウンロードして[Sketch] > [Include Library] > [Add .ZIP Library…]でそれぞれインストールすればエラーが発生しなくなる。
https://github.com/me-no-dev/ESPAsyncTCP/archive/master.zip
https://github.com/me-no-dev/AsyncTCP/archive/master.zip
DHCPサーバ利用
IPアドレス情報をDHCPサーバから動的に受け取る場合は以下のIPアドレス設定は不要。(以降の章も同様)
IPAddress ip(192, 168, 1, 123); // IPアドレス(本機が利用するIP) IPAddress gateway(192, 168, 1, 1); // デフォルトゲートウェイ IPAddress subnet(255, 255, 255, 0); // サブネットマスク : void setup() { : WiFi.config( ip, gateway, subnet ); :
4-2 データ利用 > SPIFFSによるファイル操作
SPIFFSマウントエラー
プログラム実行時に以下のようなエラーが発生する場合。
E (36) SPIFFS: mount failed, -10025
SPIFFS.hだけでなくFS.hもincludeすればエラーが発生しなくなる。
#include <FS.h> <--- 追加 #include <SPIFFS.h>
それ以降
上記の対応を経て、無事リモコンが動作した。
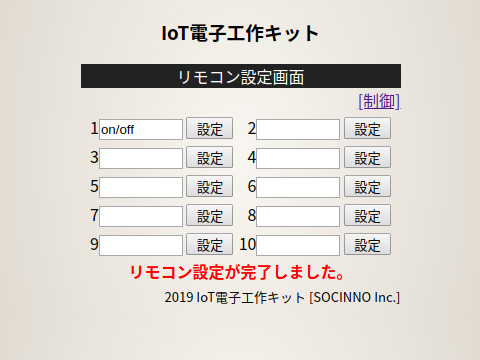
⦿リモコン設定(ON/OFF信号記録)

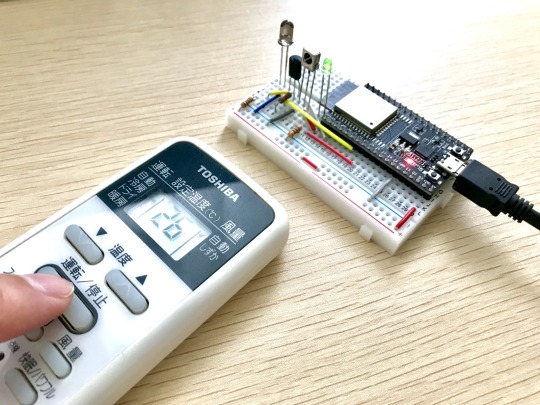
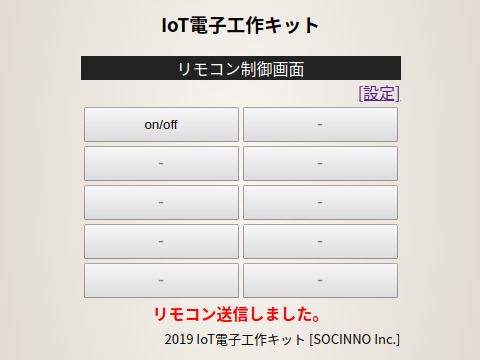
⦿リモコン操作(ON/OFF信号発信)

関連記事
IoT時代に対応すべく、電子工作を基礎から応用まで学習! 「IoT電子工作 スマートリモコン製作キット」発売 (@Press)
SOCINNO、電子工作を基礎から応用まで学習できる「IoT電子工作 スマートリモコン製作キット」発売 (IoTNEWS)
元記事はこちら
「 SOCINNO「IoT電子工作 スマートリモコン製作キット」をUbuntu 18.04で使う場合の追加作業」
July 25, 2019 at 12:00PM
0 notes
Text
Fehler mit esptool - TypeError: argument of type 'NoneType' is not iterable

Wie du den Fehler "TypeError: argument of type 'NoneType' is not iterable" mit dem Upload des esptool behebst, zeige ich dir in diesem neuen Beitrag. Traceback (most recent call last): File "esptool.py", line 37, in File "esptool__init__.py", line 1064, in _main File "esptool__init__.py", line 859, in main File "esptoolcmds.py", line 466, in write_flash File "esptoolutil.py", line 37, in flash_size_bytes TypeError: argument of type 'NoneType' is not iterable Failed to execute script 'esptool' du Chip is ESP32-D0WDQ6 (revision v1.1) Features: WiFi, BT, Dual Core, 240MHz, VRef calibration in efuse, Coding Scheme None Crystal is 40MHz MAC: 08:b6:1f:9d:16:18 Uploading stub... Running stub... Stub running... Changing baud rate to 921600 Changed. WARNING: Failed to communicate with the flash chip, read/write operations will fail. Try checking the chip connections or removing any other hardware connected to IOs. Configuring flash size... e to unhandled exception! Fehlgeschlagenes Hochladen: Hochladefehler: exit status 1
Mögliche Ursache des Fehlers
Der Fehler ist in meinem Fall mit dem CrowPanel 2.4" HMI aufgetreten. Dieses Gerät verfügt neben einem ESP32-D0WDQ6 auch über ein 2,4" TFT Display vom Typ ILI9341V. Wenn ich nun ein kleines Beispiel mit einer Textausgabe auf dem Display aufspielen möchte, dann wird dieses scheinbar erfolgreich ausgeführt, jedoch wird nichts angezeigt. Danach jedoch wird immer der Fehler geworfen. Wenn jetzt auf der Kommandozeile die Ausgabe "Erasing flash (this may take a while)..." erscheint, wird die Taste BOOT wieder losgelassen. esptool.py v3.0 Serial port COM12 Connecting...... Detecting chip type... ESP32 Chip is ESP32-D0WDQ6 (revision 1) Features: WiFi, BT, Dual Core, 240MHz, VRef calibration in efuse, Coding Scheme None Crystal is 40MHz MAC: 08:b6:1f:9d:16:18 Uploading stub... Running stub... Stub running... Erasing flash (this may take a while)... Chip erase completed successfully in 13.1s Hard resetting via RTS pin... Dann dauert es ca. 1 Minute und der Speicher sollte anschließend gelöscht sein und der nächste Upload sollte funktionieren. Nachfolgend habe ich ein kleines Programm mit der Ausgabe von "Hallo" auf dem Mikrocontroller installiert. Dieses ist recht klein, ergo dauert das Kompilieren und der Upload nicht so lange. esptool.py v4.6 Serial port COM12 Connecting..... Chip is ESP32-D0WDQ6 (revision v1.1) Features: WiFi, BT, Dual Core, 240MHz, VRef calibration in efuse, Coding Scheme None Crystal is 40MHz MAC: 08:b6:1f:9d:16:18 Uploading stub... Running stub... Stub running... Changing baud rate to 921600 Changed. Configuring flash size... Flash will be erased from 0x00001000 to 0x00005fff... Flash will be erased from 0x00008000 to 0x00008fff... Flash will be erased from 0x0000e000 to 0x0000ffff... Flash will be erased from 0x00010000 to 0x00056fff... Compressed 19744 bytes to 13604... Writing at 0x00001000... (100 %) Wrote 19744 bytes (13604 compressed) at 0x00001000 in 0.4 seconds (effective 420.9 kbit/s)... Hash of data verified. Compressed 3072 bytes to 146... Writing at 0x00008000... (100 %) Wrote 3072 bytes (146 compressed) at 0x00008000 in 0.0 seconds (effective 612.4 kbit/s)... Hash of data verified. Compressed 8192 bytes to 47... Writing at 0x0000e000... (100 %) Wrote 8192 bytes (47 compressed) at 0x0000e000 in 0.1 seconds (effective 841.2 kbit/s)... Hash of data verified. Compressed 290672 bytes to 162356... Writing at 0x00010000... (10 %) Writing at 0x0001c339... (20 %) Writing at 0x0002423e... (30 %) Writing at 0x00029904... (40 %) Writing at 0x0002eb61... (50 %) Writing at 0x00033df8... (60 %) Writing at 0x0003c5a5... (70 %) Writing at 0x00044666... (80 %) Writing at 0x0004c7f5... (90 %) Writing at 0x00051da4... (100 %) Wrote 290672 bytes (162356 compressed) at 0x00010000 in 2.6 seconds (effective 908.5 kbit/s)... Hash of data verified. Leaving... Hard resetting via RTS pin...
Quellenangabe
Die Lösung zum Fehler "'NoneType' is not iterable" mit dem esptool habe ich von der Seite https://randomnerdtutorials.com/esp32-erase-flash-memory/ entnommen. Dort gehts eigentlich nur darum wie der Speicher gelöscht wird. Jedoch bewirkt dieses zusätzlich das Fehlerhafte konfigurationen ebenso entfernt werden. Read the full article
0 notes
Text
Flashing MicroPython Firmware with esptool.py on ESP32 and ESP8266
This posts exhibits easy methods to flash MicroPython firmware on ESP32/ESP8266 boards utilizing the esptool.py. It really works on Home windows, Mac OS X, and Linux. For the official documentation, you possibly can go to the esptool.py GitHub web page.
Tip: for a neater technique to flash the ESP32/ESP8266 with MicroPython, we advocate studying this information to flash MicroPython with uPyCraft IDE. Nevertheless, we’ve just lately acquired feedback from our readers about having hassle putting in/utilizing uPyCraft IDE. For that cause, we’re posting an alternate technique utilizing the esptool.py software program.
Putting in esptool.py in your pc
To work with esptool.py, you’ll want both Python 2.7, Python three.Four or a more moderen Python set up on your system. We advocate utilizing Python three.7.X, so go to Python’s web site and set up it in your pc.
With Python three put in, open a Terminal window and set up the newest secure esptool.py launch with pip:
pip set up esptool
Observe: with some Python installations that command might not work and you’ll obtain an error. If that’s the case, attempt to set up esptool.py with:
pip3 set up esptool
python -m pip set up esptool
pip2 set up esptool
After putting in, you’ll have esptool.py put in into the default Python executables listing and you must have the ability to run it with the command esptool.py. In your Terminal window, run the next command:
esptool.py
If it was put in correctly, it ought to show an identical message (no matter your working system):
With esptool.py put in in your pc, you’ll be able to simply flash your ESP32 or ESP8266 boards with the MicroPython firmware. This publish is split in two elements, learn Half 1 or Half 2 relying on your board:
Half 1 – ESP32
Half 2 – ESP8266
Word: after putting in MicroPython firmware on your ESP32 or ESP8266, you possibly can return and use Arduino IDE once more. You simply have to add code utilizing Arduino IDE. Then, if you wish to use MicroPython once more, you must flash MicroPython firmware.
[Part 1 – ESP32] Downloading and Flashing the MicroPython Firmware on ESP32
To obtain the newest model of MicroPython firmware for the ESP32, go to the MicroPython Downloads web page and scroll all the best way right down to the ESP32 part.
You need to see an analogous net web page (see determine under) with the newest hyperlink to obtain the ESP32 .bin file – for instance: esp32-20181007-v1.9.Four-631-g338635ccc.bin.
Word: should you’re utilizing a unique board (like a PyBoard, WiPy, or different), go to MicroPython Downloads web page and obtain the correct firmware on your board.
Discovering the Serial Port Identify
It’s a bit totally different to seek out the Serial port identify in every working system, so for simplicity causes we advocate discovering your ESP serial port identify via the Arduino IDE. Comply with these steps:
Join your board to your pc
Open the Arduino IDE
Go to Instruments > Port
Save your ESP32 serial port identify (in our case it’s COM7)
Shut your Arduino IDE software program
Essential: for those who plug your ESP32 board to your pc, however you possibly can’t discover the ESP32 Port out there in your Arduino IDE, it may be certainly one of these two issues: 1. USB drivers lacking or 2. USB cable with out knowledge wires.
1. For those who don’t see your ESP’s COM port out there, this typically means you don’t have the USB drivers put in. Take a better take a look at the chip subsequent to the voltage regulator on board and examine its identify.
The ESP32 DEVKIT V1 DOIT board makes use of the CP2102 chip.
Go to Google and seek for your particular chip to seek out the drivers and set up them in your working system.
You possibly can obtain the CP2102 drivers on the Silicon Labs web site.
After they’re put in, restart the Arduino IDE and you must see the serial port within the Instruments > Port menu.
2. When you’ve got the drivers put in, however you possibly can’t see your gadget, double-check that you simply’re utilizing a USB cable with knowledge wires.
USB cables from powerbanks typically don’t have knowledge wires (they’re cost solely). So, your pc won’t ever set up a serial communication with your ESP32. Utilizing a a correct USB cable ought to clear up your drawback.
Discovering your MicroPython .bin file
After downloading the ESP32 .bin file, it must be in your Downloads folder. So, with your Terminal window, you’ll have to navigate to the Downloads folder utilizing the cd command:
cd Downloads
Record all information in your Downloads folder to make sure that’s the place the .bin file is situated. In Home windows, you employ:
dir
On Mac OS X or Linux, run the subsequent command:
ls
As you’ll be able to see within the previous screenshot, the ESP32 .bin file is situated within the Downloads folder: esp32-20190113-v1.9.Four-779-g5064df207.bin.
Erasing ESP32 Flash Reminiscence
Earlier than flashing the MicroPython firmware, it is advisable to erase the ESP32 flash reminiscence. So, with your ESP32 related to your pc, hold-down the “BOOT/FLASH” button in your ESP32 board:
Whereas holding down the “BOOT/FLASH” button, run the next command to erase the ESP32 flash reminiscence:
esptool.py –chip esp32 erase_flash
When the “Erasing” course of begins, you’ll be able to launch the “BOOT/FLASH” button. After a couple of seconds, the ESP32 flash reminiscence will probably be erased.
Word: if after the “Connecting …” message you retain seeing new dots showing, it signifies that your ESP32 shouldn’t be in flashing mode. It’s essential repeat all of the steps described earlier and maintain the “BOOT/FLASH” button once more to make sure that your ESP32 goes into flashing mode and completes the erasing course of efficiently.
Flashing MicroPython Firmware on ESP32 with esptool.py
Together with your ESP32 flash reminiscence erased, you possibly can lastly flash the MicroPython firmware. You want your serial port identify (COM7 in our case) and the ESP32 .bin file location. Substitute the subsequent command with your particulars:
esptool.py –chip esp32 –port <serial_port> write_flash -z 0x1000 <esp32-X.bin>
In our case, the ultimate command seems like this:
esptool.py –chip esp32 –port COM7 write_flash -z 0x1000 esp32-20190113-v1.9.Four-779-g5064df207.bin
Maintain down the “BOOT/FLASH“, earlier than operating the flash command. After a number of seconds that is what it is best to see:
Your ESP32 was efficiently flashed with MicroPython firmware!
Notice: in the event you obtain an error making an attempt to flash the firmware, run the command once more and be sure to are holding down the ESP32 “BOOT/FLASH” button.
[Part 2 – ESP8266] Downloading and Flashing the MicroPython Firmware on ESP8266
To obtain the newest model of MicroPython firmware for the ESP8266, go to the MicroPython Downloads web page and scroll all the best way right down to the ESP8266 part.
You must see an analogous net web page (see determine under) with the newest hyperlink to obtain the ESP8266 .bin file – for instance: esp8266-20180511-v1.9.Four.bin.
Observe: in case you’re utilizing a special board (like a PyBoard, WiPy, or different), go to MicroPython Downloads web page and obtain the proper firmware on your board.
Discovering the Serial Port Identify
It’s a bit totally different to seek out the Serial port identify in every working system, so for simplicity causes we advocate discovering your ESP serial port identify via the Arduino IDE. Comply with these steps:
Join your board to your pc
Open the Arduino IDE
Go to Instruments > Port
Save your ESP8266 serial port identify (in our case it’s COM4)
Shut your Arduino IDE software program
Necessary: when you plug your ESP8266 board to your pc, however you’ll be able to’t discover the ESP8266 Port out there in your Arduino, it may be certainly one of these two issues: 1. USB drivers lacking or 2. USB cable with out knowledge wires.
1. Should you don’t see your ESP’s COM port obtainable, this typically means you don’t have the USB drivers put in. Take a better take a look at the chip subsequent to the voltage regulator on board and examine its identify.
The ESP8266 ESP-12E NodeMCU board makes use of the CP2102 chip.
Go to Google and seek for your particular chip to seek out the drivers and set up them in your working system.
You possibly can obtain the CP2102 drivers on the Silicon Labs web site.
After they’re put in, restart the Arduino IDE and you need to see the serial port within the Instruments > Port menu.
2. When you’ve got the drivers put in, however you’ll be able to’t see your system, double-check that you simply’re utilizing a USB cable with knowledge wires.
USB cables from powerbanks typically don’t have knowledge wires (they’re cost solely). So, your pc won’t ever set up a serial communication with your ESP8266. Utilizing a a correct USB cable ought to remedy your drawback.
Discovering your MicroPython .bin file
After downloading the ESP8266 .bin file, it ought to be in your Downloads folder. So, with your Terminal window, you’ll have to navigate to the Downloads folder utilizing the cd command:
cd Downloads
Listing all information in your Downloads folder to make sure that’s the place the .bin file is situated. In Home windows, you employ:
dir
On Mac OS X or Linux, run the subsequent command:
ls
As you’ll be able to see within the previous screenshot, the ESP8266 .bin file is situated within the Downloads folder: esp8266-20180511-v1.9.Four.bin.
Erasing ESP8266 Flash Reminiscence
Earlier than flashing the MicroPython firmware, you’ll want to erase the ESP8266 flash reminiscence. So, with your ESP8266 related to your pc, hold-down the “BOOT/FLASH” button in your ESP8266 board:
Whereas holding down the “BOOT/FLASH” button, run the next command to erase the ESP8266 flash reminiscence:
esptool.py –chip esp8266 erase_flash
When the “Erasing” course of begins, you possibly can launch the “BOOT/FLASH” button. After a couple of seconds, the ESP8266 flash reminiscence shall be erased.
Notice: if after the “Connecting …” message you retain seeing new dots showing, it signifies that your ESP8266 is just not in flashing mode. You could repeat all of the steps described earlier and maintain the “BOOT/FLASH” button once more to make sure that your ESP8266 goes into flashing mode and completes the erasing course of efficiently.
Flashing MicroPython Firmware on ESP8266 with esptool.py
Together with your ESP8266 flash reminiscence erased, you’ll be able to lastly flash the MicroPython firmware. You want your serial port identify (COM7 in our case) and the ESP8266 .bin file location. Substitute the subsequent command with your particulars:
esptool.py –chip esp8266 –port <serial_port> write_flash –flash_mode dio –flash_size detect 0x0 <esp8266-X.bin>
In our case, the ultimate command appears like this:
esptool.py –chip esp8266 –port COM4 write_flash –flash_mode dio –flash_size detect 0x0 esp8266-20180511-v1.9.Four.bin
Maintain down the “BOOT/FLASH“, earlier than operating the flash command. After a couple of seconds that is what you must see:
Your ESP8266 was efficiently flashed with MicroPython firmware!
Notice: in the event you obtain an error making an attempt to flash the firmware, run the command once more and be sure to are holding down the ESP8266 “BOOT/FLASH” button.
Wrapping Up
We hope you’ve discovered this tutorial helpful. Your ESP32/ESP8266 ought to now be flashed with MicroPython firmware. To study extra about MicroPython learn: Getting Began with MicroPython on ESP32 and ESP8266.
For those who appreciated this submit, you may like our subsequent ones, so be sure to subscribe to the RNT weblog and obtain our free electronics eBooks.
Really helpful Assets
The post Flashing MicroPython Firmware with esptool.py on ESP32 and ESP8266 appeared first on Playtab Tech.
1 note
·
View note
Text
Flashing MicroPython Firmware with esptool.py on ESP32 and ESP8266
This posts exhibits easy methods to flash MicroPython firmware on ESP32/ESP8266 boards utilizing the esptool.py. It really works on Home windows, Mac OS X, and Linux. For the official documentation, you possibly can go to the esptool.py GitHub web page.
Tip: for a neater technique to flash the ESP32/ESP8266 with MicroPython, we advocate studying this information to flash MicroPython with uPyCraft IDE. Nevertheless, we’ve just lately acquired feedback from our readers about having hassle putting in/utilizing uPyCraft IDE. For that cause, we’re posting an alternate technique utilizing the esptool.py software program.
Putting in esptool.py in your pc
To work with esptool.py, you’ll want both Python 2.7, Python three.Four or a more moderen Python set up on your system. We advocate utilizing Python three.7.X, so go to Python’s web site and set up it in your pc.
With Python three put in, open a Terminal window and set up the newest secure esptool.py launch with pip:
pip set up esptool
Observe: with some Python installations that command might not work and you’ll obtain an error. If that’s the case, attempt to set up esptool.py with:
pip3 set up esptool
python -m pip set up esptool
pip2 set up esptool
After putting in, you’ll have esptool.py put in into the default Python executables listing and you must have the ability to run it with the command esptool.py. In your Terminal window, run the next command:
esptool.py
If it was put in correctly, it ought to show an identical message (no matter your working system):
With esptool.py put in in your pc, you’ll be able to simply flash your ESP32 or ESP8266 boards with the MicroPython firmware. This publish is split in two elements, learn Half 1 or Half 2 relying on your board:
Half 1 – ESP32
Half 2 – ESP8266
Word: after putting in MicroPython firmware on your ESP32 or ESP8266, you possibly can return and use Arduino IDE once more. You simply have to add code utilizing Arduino IDE. Then, if you wish to use MicroPython once more, you must flash MicroPython firmware.
[Part 1 – ESP32] Downloading and Flashing the MicroPython Firmware on ESP32
To obtain the newest model of MicroPython firmware for the ESP32, go to the MicroPython Downloads web page and scroll all the best way right down to the ESP32 part.
You need to see an analogous net web page (see determine under) with the newest hyperlink to obtain the ESP32 .bin file – for instance: esp32-20181007-v1.9.Four-631-g338635ccc.bin.
Word: should you’re utilizing a unique board (like a PyBoard, WiPy, or different), go to MicroPython Downloads web page and obtain the correct firmware on your board.
Discovering the Serial Port Identify
It’s a bit totally different to seek out the Serial port identify in every working system, so for simplicity causes we advocate discovering your ESP serial port identify via the Arduino IDE. Comply with these steps:
Join your board to your pc
Open the Arduino IDE
Go to Instruments > Port
Save your ESP32 serial port identify (in our case it’s COM7)
Shut your Arduino IDE software program
Essential: for those who plug your ESP32 board to your pc, however you possibly can’t discover the ESP32 Port out there in your Arduino IDE, it may be certainly one of these two issues: 1. USB drivers lacking or 2. USB cable with out knowledge wires.
1. For those who don’t see your ESP’s COM port out there, this typically means you don’t have the USB drivers put in. Take a better take a look at the chip subsequent to the voltage regulator on board and examine its identify.
The ESP32 DEVKIT V1 DOIT board makes use of the CP2102 chip.
Go to Google and seek for your particular chip to seek out the drivers and set up them in your working system.
You possibly can obtain the CP2102 drivers on the Silicon Labs web site.
After they’re put in, restart the Arduino IDE and you must see the serial port within the Instruments > Port menu.
2. When you’ve got the drivers put in, however you possibly can’t see your gadget, double-check that you simply’re utilizing a USB cable with knowledge wires.
USB cables from powerbanks typically don’t have knowledge wires (they’re cost solely). So, your pc won’t ever set up a serial communication with your ESP32. Utilizing a a correct USB cable ought to clear up your drawback.
Discovering your MicroPython .bin file
After downloading the ESP32 .bin file, it must be in your Downloads folder. So, with your Terminal window, you’ll have to navigate to the Downloads folder utilizing the cd command:
cd Downloads
Record all information in your Downloads folder to make sure that’s the place the .bin file is situated. In Home windows, you employ:
dir
On Mac OS X or Linux, run the subsequent command:
ls
As you’ll be able to see within the previous screenshot, the ESP32 .bin file is situated within the Downloads folder: esp32-20190113-v1.9.Four-779-g5064df207.bin.
Erasing ESP32 Flash Reminiscence
Earlier than flashing the MicroPython firmware, it is advisable to erase the ESP32 flash reminiscence. So, with your ESP32 related to your pc, hold-down the “BOOT/FLASH” button in your ESP32 board:
Whereas holding down the “BOOT/FLASH” button, run the next command to erase the ESP32 flash reminiscence:
esptool.py –chip esp32 erase_flash
When the “Erasing” course of begins, you’ll be able to launch the “BOOT/FLASH” button. After a couple of seconds, the ESP32 flash reminiscence will probably be erased.
Word: if after the “Connecting …” message you retain seeing new dots showing, it signifies that your ESP32 shouldn’t be in flashing mode. It’s essential repeat all of the steps described earlier and maintain the “BOOT/FLASH” button once more to make sure that your ESP32 goes into flashing mode and completes the erasing course of efficiently.
Flashing MicroPython Firmware on ESP32 with esptool.py
Together with your ESP32 flash reminiscence erased, you possibly can lastly flash the MicroPython firmware. You want your serial port identify (COM7 in our case) and the ESP32 .bin file location. Substitute the subsequent command with your particulars:
esptool.py –chip esp32 –port <serial_port> write_flash -z 0x1000 <esp32-X.bin>
In our case, the ultimate command seems like this:
esptool.py –chip esp32 –port COM7 write_flash -z 0x1000 esp32-20190113-v1.9.Four-779-g5064df207.bin
Maintain down the “BOOT/FLASH“, earlier than operating the flash command. After a number of seconds that is what it is best to see:
Your ESP32 was efficiently flashed with MicroPython firmware!
Notice: in the event you obtain an error making an attempt to flash the firmware, run the command once more and be sure to are holding down the ESP32 “BOOT/FLASH” button.
[Part 2 – ESP8266] Downloading and Flashing the MicroPython Firmware on ESP8266
To obtain the newest model of MicroPython firmware for the ESP8266, go to the MicroPython Downloads web page and scroll all the best way right down to the ESP8266 part.
You must see an analogous net web page (see determine under) with the newest hyperlink to obtain the ESP8266 .bin file – for instance: esp8266-20180511-v1.9.Four.bin.
Observe: in case you’re utilizing a special board (like a PyBoard, WiPy, or different), go to MicroPython Downloads web page and obtain the proper firmware on your board.
Discovering the Serial Port Identify
It’s a bit totally different to seek out the Serial port identify in every working system, so for simplicity causes we advocate discovering your ESP serial port identify via the Arduino IDE. Comply with these steps:
Join your board to your pc
Open the Arduino IDE
Go to Instruments > Port
Save your ESP8266 serial port identify (in our case it’s COM4)
Shut your Arduino IDE software program
Necessary: when you plug your ESP8266 board to your pc, however you’ll be able to’t discover the ESP8266 Port out there in your Arduino, it may be certainly one of these two issues: 1. USB drivers lacking or 2. USB cable with out knowledge wires.
1. Should you don’t see your ESP’s COM port obtainable, this typically means you don’t have the USB drivers put in. Take a better take a look at the chip subsequent to the voltage regulator on board and examine its identify.
The ESP8266 ESP-12E NodeMCU board makes use of the CP2102 chip.
Go to Google and seek for your particular chip to seek out the drivers and set up them in your working system.
You possibly can obtain the CP2102 drivers on the Silicon Labs web site.
After they’re put in, restart the Arduino IDE and you need to see the serial port within the Instruments > Port menu.
2. When you’ve got the drivers put in, however you’ll be able to’t see your system, double-check that you simply’re utilizing a USB cable with knowledge wires.
USB cables from powerbanks typically don’t have knowledge wires (they’re cost solely). So, your pc won’t ever set up a serial communication with your ESP8266. Utilizing a a correct USB cable ought to remedy your drawback.
Discovering your MicroPython .bin file
After downloading the ESP8266 .bin file, it ought to be in your Downloads folder. So, with your Terminal window, you’ll have to navigate to the Downloads folder utilizing the cd command:
cd Downloads
Listing all information in your Downloads folder to make sure that’s the place the .bin file is situated. In Home windows, you employ:
dir
On Mac OS X or Linux, run the subsequent command:
ls
As you’ll be able to see within the previous screenshot, the ESP8266 .bin file is situated within the Downloads folder: esp8266-20180511-v1.9.Four.bin.
Erasing ESP8266 Flash Reminiscence
Earlier than flashing the MicroPython firmware, you’ll want to erase the ESP8266 flash reminiscence. So, with your ESP8266 related to your pc, hold-down the “BOOT/FLASH” button in your ESP8266 board:
Whereas holding down the “BOOT/FLASH” button, run the next command to erase the ESP8266 flash reminiscence:
esptool.py –chip esp8266 erase_flash
When the “Erasing” course of begins, you possibly can launch the “BOOT/FLASH” button. After a couple of seconds, the ESP8266 flash reminiscence shall be erased.
Notice: if after the “Connecting …” message you retain seeing new dots showing, it signifies that your ESP8266 is just not in flashing mode. You could repeat all of the steps described earlier and maintain the “BOOT/FLASH” button once more to make sure that your ESP8266 goes into flashing mode and completes the erasing course of efficiently.
Flashing MicroPython Firmware on ESP8266 with esptool.py
Together with your ESP8266 flash reminiscence erased, you’ll be able to lastly flash the MicroPython firmware. You want your serial port identify (COM7 in our case) and the ESP8266 .bin file location. Substitute the subsequent command with your particulars:
esptool.py –chip esp8266 –port <serial_port> write_flash –flash_mode dio –flash_size detect 0x0 <esp8266-X.bin>
In our case, the ultimate command appears like this:
esptool.py –chip esp8266 –port COM4 write_flash –flash_mode dio –flash_size detect 0x0 esp8266-20180511-v1.9.Four.bin
Maintain down the “BOOT/FLASH“, earlier than operating the flash command. After a couple of seconds that is what you must see:
Your ESP8266 was efficiently flashed with MicroPython firmware!
Notice: in the event you obtain an error making an attempt to flash the firmware, run the command once more and be sure to are holding down the ESP8266 “BOOT/FLASH” button.
Wrapping Up
We hope you’ve discovered this tutorial helpful. Your ESP32/ESP8266 ought to now be flashed with MicroPython firmware. To study extra about MicroPython learn: Getting Began with MicroPython on ESP32 and ESP8266.
For those who appreciated this submit, you may like our subsequent ones, so be sure to subscribe to the RNT weblog and obtain our free electronics eBooks.
Really helpful Assets
The post Flashing MicroPython Firmware with esptool.py on ESP32 and ESP8266 appeared first on Playtab Tech.
0 notes
Text
Flashing MicroPython Firmware with esptool.py on ESP32 and ESP8266
This posts exhibits easy methods to flash MicroPython firmware on ESP32/ESP8266 boards utilizing the esptool.py. It really works on Home windows, Mac OS X, and Linux. For the official documentation, you possibly can go to the esptool.py GitHub web page.
Tip: for a neater technique to flash the ESP32/ESP8266 with MicroPython, we advocate studying this information to flash MicroPython with uPyCraft IDE. Nevertheless, we’ve just lately acquired feedback from our readers about having hassle putting in/utilizing uPyCraft IDE. For that cause, we’re posting an alternate technique utilizing the esptool.py software program.
Putting in esptool.py in your pc
To work with esptool.py, you’ll want both Python 2.7, Python three.Four or a more moderen Python set up on your system. We advocate utilizing Python three.7.X, so go to Python’s web site and set up it in your pc.
With Python three put in, open a Terminal window and set up the newest secure esptool.py launch with pip:
pip set up esptool
Observe: with some Python installations that command might not work and you’ll obtain an error. If that’s the case, attempt to set up esptool.py with:
pip3 set up esptool
python -m pip set up esptool
pip2 set up esptool
After putting in, you’ll have esptool.py put in into the default Python executables listing and you must have the ability to run it with the command esptool.py. In your Terminal window, run the next command:
esptool.py
If it was put in correctly, it ought to show an identical message (no matter your working system):
With esptool.py put in in your pc, you’ll be able to simply flash your ESP32 or ESP8266 boards with the MicroPython firmware. This publish is split in two elements, learn Half 1 or Half 2 relying on your board:
Half 1 – ESP32
Half 2 – ESP8266
Word: after putting in MicroPython firmware on your ESP32 or ESP8266, you possibly can return and use Arduino IDE once more. You simply have to add code utilizing Arduino IDE. Then, if you wish to use MicroPython once more, you must flash MicroPython firmware.
[Part 1 – ESP32] Downloading and Flashing the MicroPython Firmware on ESP32
To obtain the newest model of MicroPython firmware for the ESP32, go to the MicroPython Downloads web page and scroll all the best way right down to the ESP32 part.
You need to see an analogous net web page (see determine under) with the newest hyperlink to obtain the ESP32 .bin file – for instance: esp32-20181007-v1.9.Four-631-g338635ccc.bin.
Word: should you’re utilizing a unique board (like a PyBoard, WiPy, or different), go to MicroPython Downloads web page and obtain the correct firmware on your board.
Discovering the Serial Port Identify
It’s a bit totally different to seek out the Serial port identify in every working system, so for simplicity causes we advocate discovering your ESP serial port identify via the Arduino IDE. Comply with these steps:
Join your board to your pc
Open the Arduino IDE
Go to Instruments > Port
Save your ESP32 serial port identify (in our case it’s COM7)
Shut your Arduino IDE software program
Essential: for those who plug your ESP32 board to your pc, however you possibly can’t discover the ESP32 Port out there in your Arduino IDE, it may be certainly one of these two issues: 1. USB drivers lacking or 2. USB cable with out knowledge wires.
1. For those who don’t see your ESP’s COM port out there, this typically means you don’t have the USB drivers put in. Take a better take a look at the chip subsequent to the voltage regulator on board and examine its identify.
The ESP32 DEVKIT V1 DOIT board makes use of the CP2102 chip.
Go to Google and seek for your particular chip to seek out the drivers and set up them in your working system.
You possibly can obtain the CP2102 drivers on the Silicon Labs web site.
After they’re put in, restart the Arduino IDE and you must see the serial port within the Instruments > Port menu.
2. When you’ve got the drivers put in, however you possibly can’t see your gadget, double-check that you simply’re utilizing a USB cable with knowledge wires.
USB cables from powerbanks typically don’t have knowledge wires (they’re cost solely). So, your pc won’t ever set up a serial communication with your ESP32. Utilizing a a correct USB cable ought to clear up your drawback.
Discovering your MicroPython .bin file
After downloading the ESP32 .bin file, it must be in your Downloads folder. So, with your Terminal window, you’ll have to navigate to the Downloads folder utilizing the cd command:
cd Downloads
Record all information in your Downloads folder to make sure that’s the place the .bin file is situated. In Home windows, you employ:
dir
On Mac OS X or Linux, run the subsequent command:
ls
As you’ll be able to see within the previous screenshot, the ESP32 .bin file is situated within the Downloads folder: esp32-20190113-v1.9.Four-779-g5064df207.bin.
Erasing ESP32 Flash Reminiscence
Earlier than flashing the MicroPython firmware, it is advisable to erase the ESP32 flash reminiscence. So, with your ESP32 related to your pc, hold-down the “BOOT/FLASH” button in your ESP32 board:
Whereas holding down the “BOOT/FLASH” button, run the next command to erase the ESP32 flash reminiscence:
esptool.py –chip esp32 erase_flash
When the “Erasing” course of begins, you’ll be able to launch the “BOOT/FLASH” button. After a couple of seconds, the ESP32 flash reminiscence will probably be erased.
Word: if after the “Connecting …” message you retain seeing new dots showing, it signifies that your ESP32 shouldn’t be in flashing mode. It’s essential repeat all of the steps described earlier and maintain the “BOOT/FLASH” button once more to make sure that your ESP32 goes into flashing mode and completes the erasing course of efficiently.
Flashing MicroPython Firmware on ESP32 with esptool.py
Together with your ESP32 flash reminiscence erased, you possibly can lastly flash the MicroPython firmware. You want your serial port identify (COM7 in our case) and the ESP32 .bin file location. Substitute the subsequent command with your particulars:
esptool.py –chip esp32 –port <serial_port> write_flash -z 0x1000 <esp32-X.bin>
In our case, the ultimate command seems like this:
esptool.py –chip esp32 –port COM7 write_flash -z 0x1000 esp32-20190113-v1.9.Four-779-g5064df207.bin
Maintain down the “BOOT/FLASH“, earlier than operating the flash command. After a number of seconds that is what it is best to see:
Your ESP32 was efficiently flashed with MicroPython firmware!
Notice: in the event you obtain an error making an attempt to flash the firmware, run the command once more and be sure to are holding down the ESP32 “BOOT/FLASH” button.
[Part 2 – ESP8266] Downloading and Flashing the MicroPython Firmware on ESP8266
To obtain the newest model of MicroPython firmware for the ESP8266, go to the MicroPython Downloads web page and scroll all the best way right down to the ESP8266 part.
You must see an analogous net web page (see determine under) with the newest hyperlink to obtain the ESP8266 .bin file – for instance: esp8266-20180511-v1.9.Four.bin.
Observe: in case you’re utilizing a special board (like a PyBoard, WiPy, or different), go to MicroPython Downloads web page and obtain the proper firmware on your board.
Discovering the Serial Port Identify
It’s a bit totally different to seek out the Serial port identify in every working system, so for simplicity causes we advocate discovering your ESP serial port identify via the Arduino IDE. Comply with these steps:
Join your board to your pc
Open the Arduino IDE
Go to Instruments > Port
Save your ESP8266 serial port identify (in our case it’s COM4)
Shut your Arduino IDE software program
Necessary: when you plug your ESP8266 board to your pc, however you’ll be able to’t discover the ESP8266 Port out there in your Arduino, it may be certainly one of these two issues: 1. USB drivers lacking or 2. USB cable with out knowledge wires.
1. Should you don’t see your ESP’s COM port obtainable, this typically means you don’t have the USB drivers put in. Take a better take a look at the chip subsequent to the voltage regulator on board and examine its identify.
The ESP8266 ESP-12E NodeMCU board makes use of the CP2102 chip.
Go to Google and seek for your particular chip to seek out the drivers and set up them in your working system.
You possibly can obtain the CP2102 drivers on the Silicon Labs web site.
After they’re put in, restart the Arduino IDE and you need to see the serial port within the Instruments > Port menu.
2. When you’ve got the drivers put in, however you’ll be able to’t see your system, double-check that you simply’re utilizing a USB cable with knowledge wires.
USB cables from powerbanks typically don’t have knowledge wires (they’re cost solely). So, your pc won’t ever set up a serial communication with your ESP8266. Utilizing a a correct USB cable ought to remedy your drawback.
Discovering your MicroPython .bin file
After downloading the ESP8266 .bin file, it ought to be in your Downloads folder. So, with your Terminal window, you’ll have to navigate to the Downloads folder utilizing the cd command:
cd Downloads
Listing all information in your Downloads folder to make sure that’s the place the .bin file is situated. In Home windows, you employ:
dir
On Mac OS X or Linux, run the subsequent command:
ls
As you’ll be able to see within the previous screenshot, the ESP8266 .bin file is situated within the Downloads folder: esp8266-20180511-v1.9.Four.bin.
Erasing ESP8266 Flash Reminiscence
Earlier than flashing the MicroPython firmware, you’ll want to erase the ESP8266 flash reminiscence. So, with your ESP8266 related to your pc, hold-down the “BOOT/FLASH” button in your ESP8266 board:
Whereas holding down the “BOOT/FLASH” button, run the next command to erase the ESP8266 flash reminiscence:
esptool.py –chip esp8266 erase_flash
When the “Erasing” course of begins, you possibly can launch the “BOOT/FLASH” button. After a couple of seconds, the ESP8266 flash reminiscence shall be erased.
Notice: if after the “Connecting …” message you retain seeing new dots showing, it signifies that your ESP8266 is just not in flashing mode. You could repeat all of the steps described earlier and maintain the “BOOT/FLASH” button once more to make sure that your ESP8266 goes into flashing mode and completes the erasing course of efficiently.
Flashing MicroPython Firmware on ESP8266 with esptool.py
Together with your ESP8266 flash reminiscence erased, you’ll be able to lastly flash the MicroPython firmware. You want your serial port identify (COM7 in our case) and the ESP8266 .bin file location. Substitute the subsequent command with your particulars:
esptool.py –chip esp8266 –port <serial_port> write_flash –flash_mode dio –flash_size detect 0x0 <esp8266-X.bin>
In our case, the ultimate command appears like this:
esptool.py –chip esp8266 –port COM4 write_flash –flash_mode dio –flash_size detect 0x0 esp8266-20180511-v1.9.Four.bin
Maintain down the “BOOT/FLASH“, earlier than operating the flash command. After a couple of seconds that is what you must see:
Your ESP8266 was efficiently flashed with MicroPython firmware!
Notice: in the event you obtain an error making an attempt to flash the firmware, run the command once more and be sure to are holding down the ESP8266 “BOOT/FLASH” button.
Wrapping Up
We hope you’ve discovered this tutorial helpful. Your ESP32/ESP8266 ought to now be flashed with MicroPython firmware. To study extra about MicroPython learn: Getting Began with MicroPython on ESP32 and ESP8266.
For those who appreciated this submit, you may like our subsequent ones, so be sure to subscribe to the RNT weblog and obtain our free electronics eBooks.
Really helpful Assets
The post Flashing MicroPython Firmware with esptool.py on ESP32 and ESP8266 appeared first on Playtab Tech.
0 notes