#fbdevs
Explore tagged Tumblr posts
Visit Tumblr Blog
Explore Tumblr blogs with no restrictions, modern design and the best experience.
Last Seen Tumblr Blogs


Fun Fact
Tumblr is available in 18 languages.
Text
Linux update! (And a few Nvidia tips)
After a dreadful day of trying to make this work, I'm reporting that The Sims 2 finally works on my new Linux system! 😭❤️ Admittedly I have made my own life harder setting this up, but the most important thing I've learned from this experience and thought it might worth sharing:
Before you try to install TS2 on your Linux, make sure that you have your graphics card's driver updated!
When I first installed The Sims 2 on Linux it was incredibly laggy and choppy, because the default Nouveau driver didn't work well enough with my Nvidia card. After I installed the Nvidia driver from the built in driver manager, the game just straightup crashed.
Then I had to find out that Mint's driver manager couldn't install the newest driver for my card (RTX 3070), and even when installed, it didn't work. 😂
So if you have an Nvidia card and struggling or planning to install Linux in the future, below the cut are a few useful tips that I've discovered in the depths of the Internet:
Check what driver the official Nvidia site recommends for your GPU. - I did this and it showed driver version 570.
2. I think this is optional, but open your terminal and type the cmd: sudo apt update - this will trigger Linux to update its driver list.
3. Open Driver Manager, and see if the recommended driver (570 in my case is available). For me it was not available, only the 550, this was my issue.
3.1. If you can see your required driver, awesome, install it from the driver manager and skip to step 5. 3.2. If not, you have to use this PPA. -> Meaning you have to open your terminal and enter the following commands (when I list multiple commands to run, first type the first one, press enter, then type the next one, press enter etc.): sudo add-apt-repository ppa:graphics-drivers/ ppa sudo apt update You can also find installation guide on the link above, but it's basically this. 4. Now you have to restart your system, and repeat Step 3. of this list. The newest driver should show up in your Driver Manager now, install it.
5. After installing, open your terminal and type the following command: inxi -G -> this will allow us to check if the driver works properly. Shock, it did not for me :D When working properly, it should look like this:
Display: x11 server: X.Org v: 21.1.11 with: Xwayland v: 23.2.6 driver: X: loaded: nvidia gpu: nvidia,nvidia-nvswitch resolution: 1:1920x1080~60Hz 2: 1920x1080~60Hz When not working, it looks like this: Example 1: Display: x11 server: X.Org v: 21.1.11 with: Xwayland v: 23.2.6 driver: X: loaded: nouveau unloaded: fbdev,modesetting,vesa failed: nvidia
6. This is the thread that helped me fix this problem. You have to scroll down to the Nvidia Graphics troubleshooting tips.
7. I had to add this "kernel boot parameter": nvidia_drm.fbdev=1 into the system. On this link you can see how to add it either temporarily or "permanently" (meaning you don't have to add it every time you start your system, but it is removable).
To add it permanently, you have to type the following commands into your terminal:
sudo nano /etc/default/grub GRUB_CMDLINE_LINUX_DEFAULT="quiet splash nvidia_drm.fbdev=1" sudo update-grub
8. After you added it, reboot your system, and when it starts again, check if the parameter is there with the command: cat /proc/cmdline
9. If it's there, run the inxi -G command again, and see if it looks like it should.
10. If not, you might have to update the Kernel version of your Linux, which you can do in the Update Manager/View/Linux Kernels menu. I had to update mine from 6.8 to 6.11.
After all this you should be good to install the game, I made my life so much harder than it was necessarily so I hope my research on how to deal with an Nvidia Graphics card with Sims 2 on Linux is helpful to some of you. 😂
38 notes
·
View notes
Text
soo dvtm used to have an issue where it would change all colours based on the current colour of the interacted element (a good example is going between files, directories, symlinks etc. in ranger) unless TERM=dvtm-256color.
fine, sure. that's supposedly fixed.
however, while it works perfectly fine in an X session (and probably wayland ?? idk), it does NOT like fbdev or drm/modeset and produces the exact same bugged behaviour there.
this goes for the normal virtual console and a replacement like kmscon.
looks like i might have to start a kiosk like cage to run a terminal and then pretend that's still a tty
#daemon.md#techblr#we're over 24 hours and i would probably be done if i had picked like xfce or something#but no this is the be silly rice
3 notes
·
View notes
Link
0 notes
Text
Back in the day you used the generic low-level graphics API that all BIOSes have to implement, basically the BIOS could act as a terminal and talk to the display, in VGA mode.
Nowadays, you usually use the generic framebuffer TTY, which is another generic low-level API that's implemented either with fbdev (simple) or the kernel's Direct Rendering Manager (complex). DRM is the basis of almost all modern Linux graphics code, but both can run a simple framebuffer mode that the kernel uses to display virtual TTY's, with the added benefit of being able to do full colour, full resolution and maybe even inserting media if you're clever about it.
In both cases, The kernel has several virtual teletypes (TTY's) that it can direct to that basic text display device (framebuffer or VGA), that gets used to display the vTTY's.
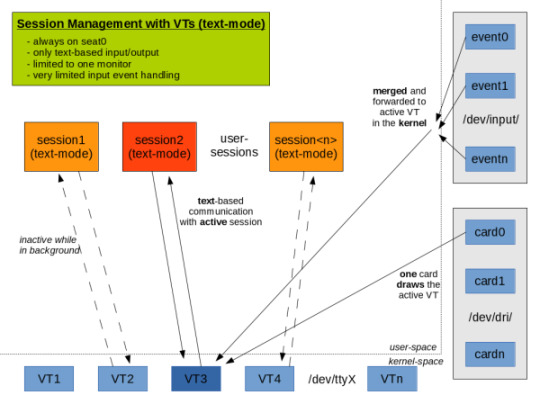
Managing all of this is a goddamn nightmare in the backgrounds involving a lot of pipes and modesetting and memory management but it usually works.
I ran my laptop vTTY only to save battery in university for a year or two so I spent a while poking around the userspace side of this, there's a good number of programs out there that can seize control of the framebuffer from the kernel and display media and documents without having to spin up a whole desktop environment.
Let's say I put a Linux installation on my laptop but don't install a GUI. Then I have to do everything through a terminal emulator. But how does that terminal emulator know how to like, render characters on the screen and so on? Or does a different part of the system handle that? What part?
63 notes
·
View notes
Photo

Yeni yazımıza göz atın https://www.teknoloskop.net/linux-suruculeri-kucuk-drm-destekleriyle-ileriye-yuruyor/
Linux sürücüleri küçük DRM destekleriyle ileriye yürüyor
Linux’un DRM/KMS sürücüleri yoluna devam ederken küçük boyutlarda dönüştürmeleri kullanıyor.
Intel’in açık-kaynak teknoloji sorumlusu Daniel Vetter DRM sistemlerin güncellemesini yazarken, DRM’nin küçük boyutlarda dönüşümlerini yazdı.
Son gelen güncellemeler, DRM sürücülerinin daha temel codları kaldırmasına olanak sağladı, bir yardımcı da basit görüntü işlerine yardım etti. Ayrıca fbdev, I/O desteği ertelendi, üretken desteği fbdev’e verildi. Artık DRM’ye daha çok yardımcı yardım edecek, daha kararlı ve daha üretken bir şekilde çalışacak.
0 notes
Text
Dupeguru music edition 5.6.0

DUPEGURU MUSIC EDITION 5.6.0 HOW TO
DUPEGURU MUSIC EDITION 5.6.0 UPDATE
DUPEGURU MUSIC EDITION 5.6.0 SERIES
DUPEGURU MUSIC EDITION 5.6.0 FREE
Network: Device-1: Intel Ethernet I219-V vendor: ASUSTeK driver: e1000e v: 3.2.6-k port: f040 bus ID: 00:1f.6
DUPEGURU MUSIC EDITION 5.6.0 SERIES
OpenGL: renderer: Mesa Intel HD Graphics 530 (SKL GT2) v: 4.6 Mesa 21.0.3 direct render: YesĪudio: Device-1: Intel 100 Series/C230 Series Family HD Audio vendor: ASUSTeK driver: snd_hda_intel v: kernel Graphics: Device-1: Intel HD Graphics 530 vendor: ASUSTeK driver: i915 v: kernel bus ID: 00:02.0 chip ID: 8086:1912ĭisplay: server: X.Org 1.20.13 driver: modesetting unloaded: fbdev,vesa Machine: Type: Desktop Mobo: ASUSTeK model: Z170-A v: Rev 1.xx serial: UEFI : American MegatrendsĬPU: Topology: Quad Core model: Intel Core i5-6500 bits: 64 type: MCP arch: Skylake-S rev: 3 L1 cache: 256 KiBįlags: avx avx2 lm nx pae sse sse2 sse3 sse4_1 sse4_2 ssse3 vmx bogomips: 25599 In the event that it is relevent/useful here is the output from sudo inxi -Fxxrzc0:Ĭode: Select all System: Kernel: 5.4.0-91-generic x86_64 bits: 64 compiler: gcc v: 9.3.0 Desktop: Cinnamon 5.0.7 wm: muffin dm: LightDMĭistro: Linux Mint 20.2 Uma base: Ubuntu 20.04 focal What is causing these messages, and how do I stop them?Īny assistance would be much appreciated. The 'Delay before starting the screensaver' in the screensaver settings is set to 'Never', which IIUC deactivates the screen saver. Going through huge.Code: Select all Dec 23 00:51:53 evergreen dbus-daemon: Activating service name='' >ĭec 23 00:51:53 evergreen dbus-daemon: Successfully activated service '>ĭec 23 00:51:53 evergreen cinnamon-session: WARNING: t+114045.56710s: Detected that screensaver has appeared on the busĭec 23 00:52:03 evergreen : Trying to connect to logind.ĭec 23 00:52:03 evergreen : Starting screensaver.ĭec 23 00:52:03 evergreen : Cinnamon Screensaver support not found in current theme - adding>ĭec 23 00:52:03 evergreen : Successfully using logindĭec 23 00:52:03 evergreen cinnamon-session: WARNING: t+114055.57181s: Detected that screensaver has left the busĭec 23 00:52:13 evergreen dbus-daemon: Activating service name='' >ĭec 23 00:52:13 evergreen dbus-daemon: Successfully activated service '>ĭec 23 00:52:13 evergreen cinnamon-session: WARNING: t+114065.54385s: Detected that screensaver has appeared on the busĭec 23 00:52:23 evergreen : Trying to connect to logind. DupeGuru Music Edition latest version: Eradicate duplicate files from your music collection.
DUPEGURU MUSIC EDITION 5.6.0 FREE
DupeGuru Music Edition, free and safe download. DupeGuru doesn't have separate editions anymore. Gecko Breeding Game.ĭupeGuru Music Edition. Sage 50 Premium Accounting Student Version Download.
DUPEGURU MUSIC EDITION 5.6.0 HOW TO
How to uninstall dupeGuru Music Edition Version 5.6.0 by Hardcoded Software? Learn how to remove dupeGuru Music Edition Version 5.6. DupeGuru Music Edition not only allows you to delete duplicate files but also move or copy them elsewhere.
DUPEGURU MUSIC EDITION 5.6.0 UPDATE
DupeGuru Music Edition offers a safe and rapid way to update huge numbers of files at the same time without any extra effort on your part. This program is like other dupeGuru, but specializes in music, with information about bitrate and other similar things.
Multiple options to select repeated files.
Advanced adjustments for searching tool.
Security measures implemented to detect corrupted files.
Analysis trough lables, file content or name.
With dupeGuru Music Edition you'll have these features: Luckily, we have dupeGuru Music Edition a program that helps you to find repeated tracks, to safely erase them. But at last, we forgot that and is easy to lose toe count of our songs. We try to have caution and organise our multimedia content in an efficient way disks, folders, names changed. With so many songs stored at our local drives, is very easy to have them repeated.
0 notes
Text
Audio hijack 3.5.7 license key

#Audio hijack 3.5.7 license key driver
#Audio hijack 3.5.7 license key manual
#Audio hijack 3.5.7 license key upgrade
#Audio hijack 3.5.7 license key driver
vesa: Ignoring device with a bound kernel driver (II) FBDEV: driver for framebuffer: fbdev (II) VESA: driver for VESA chipsets: vesa compiled for 1.13.0, module version = 0.4.3 (II) Module fbdev: vendor="X.Org Foundation" (II) Loading /usr/lib64/xorg/modules/drivers/fbdev_drv.so (EE) Failed to load module "modesetting" (module does not exist, 0) (WW) Warning, couldn't open module modesetting ABI class: X.Org Video Driver, version 13.0 compiled for 1.13.0, module version = 2.3.2 (II) Module vesa: vendor="X.Org Foundation" (II) Loading /usr/lib64/xorg/modules/drivers/vesa_drv.so (EE) Failed to load module "ati" (module requirement mismatch, 0) (EE) module ABI major version (12) doesn't match the server's version (13) ABI class: X.Org Video Driver, version 12.0 compiled for 1.12.2, module version = 7.0.0 (II) Module ati: vendor="X.Org Foundation" (II) Loading /usr/lib64/xorg/modules/drivers/ati_drv.so (=) Assigned the driver to the xf86ConfigLayout (=) Matched fbdev as autoconfigured driver 4 (=) Matched modesetting as autoconfigured driver 3 (=) Matched vesa as autoconfigured driver 2 (=) Matched ati as autoconfigured driver 1 (=) Matched ati as autoconfigured driver 0 ABI class: X.Org Server Extension, version 7.0 compiled for 1.13.0, module version = 1.0.0 (II) Module glx: vendor="X.Org Foundation" (II) Loading /usr/lib64/xorg/modules/extensions/libglx.so Initializing built-in extension XFree86-DRI Initializing built-in extension XFree86-DGA Initializing built-in extension XFree86-VidModeExtension Initializing built-in extension XVideo-MotionCompensation Initializing built-in extension X-Resource Initializing built-in extension DOUBLE-BUFFER Initializing built-in extension MIT-SCREEN-SAVER Initializing built-in extension COMPOSITE Initializing built-in extension XINERAMA Initializing built-in extension XKEYBOARD Initializing built-in extension BIG-REQUESTS Initializing built-in extension XInputExtension Initializing built-in extension Generic Event Extension (WW) Open ACPI failed (/var/run/acpid.socket) (No such file or directory) (II) config/udev: Adding drm device (/dev/dri/card0) If no devices become available, reconfigure udev or disable AutoAddDevices. (II) The server relies on udev to provide the list of input devices. (=) ModulePath set to "/usr/lib64/xorg/modules" (=) No monitor specified for screen "Default Screen Section". (**) |->Screen "Default Screen Section" (0) (=) Using system config directory "/usr/share/X11/" (WW) warning, (EE) error, (NI) not implemented, (?) unknown. (++) from command line, (!!) notice, (II) informational, Markers: (-) probed, (**) from config file, (=) default setting, To make sure that you have the latest version. Kernel command line: root=/dev/ram0 init=/linuxrc ramdisk=8192 real_root=/dev/sdc3 splash=silent,theme:Emergance console=tty1 quiet Current Operating System: Linux bigpopa 3.5.7-gentoo #1 SMP Wed Oct 31 09:44: x86_64 Build Operating System: Linux 3.5.7-gentoo x86_64 Gentoo Here's the first output from X at boot time :
#Audio hijack 3.5.7 license key manual
So I brashly go for a manual startx, and it works : I do get the graphical environment (with Radeon HD4870 1Gb). X doesn't start at boot time anymore, after I've upgraded some packages with emerge -pvDu world (x11-base/xorg-server-1.13.0-r1, x11-drivers/xf86-input-evdev, x11-drivers/xf86-input-keyboard-1.6.2, x11-drivers/xf86-video-fbdev-0.4.3, x11-drivers/xf86-video-vesa-2.3.2, x11-drivers/xf86-input-mouse-1.8.1, among others not related to x11.).īut, the weird thing, (I mean, weird to me.), is that, when I get thee window saying xorg couldn't start, do you want to read the output messages, (or so), and I go for yes, the window remain empty : no error message.
#Audio hijack 3.5.7 license key upgrade
Posted: Sun 8:29 am Post subject: X doesn't start at boot time, after upgrade Gentoo Forums Forum Index Desktop Environments X doesn't start at boot time, after upgrade Gentoo Forums :: View topic - X doesn't start at boot time, after upgrade
0 notes
Text
Linux graphic refs
This overview of DRM/KMS and fbdev coupled with Ch.8 (p.333) of John R Hall's Linux Game Programming* are useful intros for me.
The BetterOS article got picked up by HackerNews and, as is usual, spawned some excellent comments including one which linked to these more modern overviews of the mechanics of GNU/Linux graphics:
http://blog.mecheye.net/2012/06/the-linux-graphics-stack/
http://magcius.github.io/xplain/article/
http://blog.mecheye.net/2014/06/xdg-shell/
http://blog.mecheye.net/2016/01/dri/
* RIP
0 notes
Text
X Mplayer2 Download

Freeware
Feb 13, 2014 mplayer2 is a command-line video player that was developed from the initial MPlayer, providing you with the original functions and more, along with various improvements of. Hi, what a long absence, I'm still alive, MPlayerX too. Now I'm planning some, relatively, big feature into MPlayerX for the next major release. It may cost some time. Before doing it, I thought I'd better release once. So actually 1.0.1 isn't a exciting release, just a little step forward. MPlayerX is armed by FFmpeg and MPlayer, which means it could handle any media format in the world without extra plug-ins or codec packages. Dance on your fingers. Pinch, tap or swipe, MPlayerX provides you the easiest way to control the playback. Click to download the Control Script for Sofa. Dec 13, 2018 Download MPlayer. MPlayer is a movie player which runs on many systems. Login Social Sharing. Tech news in your inbox. Get TechSpot's weekly newsletter Facebook.

Windows
46.0 MB
57,533
Aug 28, 2019 Bandwidth Analyzer Pack analyzes hop-by-hop performance on-premise, in hybrid networks, and in the cloud, and can help identify excessive bandwidth utilization or unexpected application traffic. Download a free trial for real-time bandwidth monitoring, alerting, and more. NOTE: The MPlayer App is optimised for iOS 7 or later.Download the MPlayer App free of charge before your next Monarch flight to enjoy our exciting.
It plays most MPEG/VOB, AVI, Ogg/OGM, VIVO, ASF/WMA/WMV, QT/MOV/MP4, RealMedia, Matroska, NUT, NuppelVideo, FLI, YUV4MPEG, FILM, RoQ, PVA files, supported by many native, XAnim, and Win32 DLL codecs. You can watch VideoCD, SVCD, DVD, 3ivx, DivX 3/4/5, WMV and even H.264 movies.
Another great feature of MPlayer is the wide range of supported output drivers. It works with X11, Xv, DGA, OpenGL, SVGAlib, fbdev, AAlib, DirectFB, but you can use GGI, SDL (and this way all their drivers), VESA (on every VESA compatible card, even without X11!) and some low level card-specific drivers (for Matrox, 3Dfx and ATI), too! Most of them support software or hardware scaling, so you can enjoy movies in fullscreen. MPlayer supports displaying through some hardware MPEG decoder boards, such as the Siemens DVB, DXR2 and DXR3/Hollywood+.
MPlayer has an onscreen display (OSD) for status information, nice big antialiased shaded subtitles and visual feedback for keyboard controls. European/ISO 8859-1,2 (Hungarian, English, Czech, etc), Cyrillic and Korean fonts are supported along with 12 subtitle formats (MicroDVD, SubRip, OGM, SubViewer, Sami, VPlayer, RT, SSA, AQTitle, JACOsub, PJS and our own: MPsub). DVD subtitles (SPU streams, VOBsub and Closed Captions) are supported as well.
What's New:
After a long pause, we decided that it might be a good idea to make a new release. While we had our fun with the naming scheme with lots of 'pre' and 'rc' it seemed time to move on and with everyone incrementing major versions between weekly and monthly we hope to be forgiven for jumping ahead to 1.1.
This release is intended to be compatible with the recent FFmpeg 0.11 release. We hope it will be useful to distros and other users relying on FFmpeg 0.11. Everyone else is encouraged to follow Subversion HEAD to always get the latest features and bug fixes. You might still want to read the release announcement to get a short summary of any bigger changes and improvements.
Mplayer For Windows 7
Among the bigger news is that we found a maintainer for the X11 gmplayer GUI, so those holding out on it against our earlier recommendations will get a lot of bug fixes.
There is also support for more subtitle types (Bluray, DVB, DVB closed-caption for example), many improvements to -vo gl including output of 10 bit video, very basic but usable OpenGL ES support and much better SDL support which makes it a usable choice on OSX (particularly on older PowerPC variants much faster than corevideo or quartz). MPlayer will now also try much harder to handle intermittent network failures, for example trying to reconnect.
As part of the code cleanup efforts, the internal libfaad2 copy has been removed since the FFmpeg decoder is working well. Also the internal mp3lib copy is no longer used by default since the many alternatives (FFmpeg, libmpg123, libmad) avoid its recurring issues like incorrect decoding with newer compilers. However it can still be forced at runtime for easier tracking of regressions. Please do not rely on this since it will be removed in the future. If you do not actually need it consider disabling it at compile time with --disable-mp3lib.
As a first for this release, the tarballs are available in two variants: compressed with xz and compressed with gzip. Please get the xz variant if you can to save bandwidth, the gzip version is for everyone that cannot use it. Should you never have encountered xz compressed files, newer versions of tar can uncompress it via 'tar xJf MPlayer-1.1.tar.xz'.
What's New:
Upgraded gcc to 7.3, enabled lto in FFMpeg
Enabled dash demuxer in FFMpeg
Enabled libopenmpt in FFMpeg
Updated gnutls to 3.5.18
Updated libvpx (git)
Updated openh264 (git)
Updated kvazaar (git)
Updated x265 (hg)
Apps similar to MPlayer 6
8914 votes
iTunes is a free application for Mac and PC. It plays all your digital music and video. It syncs content to your iPod, iPhone, and Apple TV.
Freeware
Windows
182 votes
A highly portable and popular multimedia player for multiple audio and video formats.
Freeware
Windows/macOS/Linux
67 votes
Freeware media player that supports many features for advanced users who desire to watch video files at the best quality.
Freeware
Windows
Application/x-mplayer2 Chrome Download
thx
I needed a simple command-ling media player, and this was perfect! Extremely lightweight and very versatile. I use it for some custom clip management and window capture for streamers to use when broadcasting using the OBS Studio streaming/broadcasting software on Twitch. I take chat commands that create a text semaphore/trigger file, and when the script sees the trigger, it uses this Mplayer utility to play. I am just doing this for fun, and to help streamers offer a little something extra. if a streamer wants to rotate 8 different 'Hug' clips when a viewer runs the '!hug @somename' command in chat, there should be a utility that can launch the clips when the commands are run, then rotate the clips so if 4 or 5 people use the 'Hug' command to hug each other, it doesn't just play the same clip over and over. The fact that you can title the player window allows a streamer to have a few different windows captures set up. Maybe 1 for fullscreen clips with a chromakey filter, a regular fullscreen clip fo speciual event clips, and maybe ones for subscriber 'intro clips' they use when they join chat to announce their presence in style. Maybe another for 'accent clips/memes', so users can add commentary by launching clips at proper moments, like a '!rip' command that plays a rotation of funny 'I'm dead' clips when the streamer dies playing a game. The streamer just ads these 3 or 4 window capture sources to each scene they want clips to be available, then the script/utility launches each clip with the appropriate window title to have it play at the right size and location. I'd love to see someone actualy do this properly. I have it all working. I just needed a 'lighter' player that was flexible enough to support all the different clip types. I was using VLC Media Player, but it did noy play smoothly, often hitching/lagging for a split second when launching clips, making it seems rough and 'unfinished'. This gives a smooth and polished feel when playing the clips.
This is awesome. No more need to fire-up some heavy graphical user interface just to listen to audio streams! (Sorry I couldn't do this, due to a complete lack of free time here!) The only thing lacking, instructions how to install mplayer.exe and instructions concerning how to use with Cygwin. Basically, the mplayer.exe goes within your $PATH. I'm not sure where the other sub-folders should reside, but I simply created a symbolic link using Cygwin for my usage here. (ie. See below Cygwin Instructions) Initial execution of mplayer.exe seemed to search all of Windows fonts. Successive exections of mplayer.exe appeared to forgo the font searching, resulting in the usual quick start of the program. For cygwin users: 1) Unpackage the mplayer package to a folder. 2) Start cygwin and make sure you have a local bin folder (ie. /home/user/bin) within your path. If not, create the folder and modify your local $PATH to include your /home/user/bin folder, replacing the 'user' with your user name. 3) Type 'ln -s /place/where/you/unpackaged/mplayer/mplayer.exe /home/user/bin/' 4) If you prefer using .exe' command suffixes or are required to, and you have 'mplayer' aliases within you Linux bashrc and are copying the Linux bashrc over to Windows' Cygwin, then open the bashrc file within vim and type ':%s/mplayer /mplayer.exe /gc' without quotes. The command will aide in replacing the 'mplayer ' with 'mplayer.exe '. Most Cygwin users can skip this as Cygwin seems to recognize commands without the '.exe' suffix!
Nice work ! Version 37051 has not any more WMV bug. Really nice Job ! Don't stop working on mplayer, i use it everyday for a project i'll publish soon... Thanks again ;)
Application X-mplayer2 Downloads
Read more reviews >
0 notes
Text
Inxi: Identificar el hardware del sistema
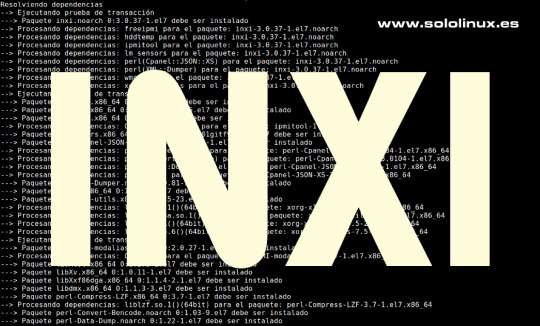
Inxi: Identificar el hardware del sistema. Inxi es un potente script bash, con la capacidad de identificar el hardware del sistema e imprimir los datos de una forma limpia y clara. Muestra información sobre el hardware del sistema (disco duro, tarjeta gráfica, de audio, de red, CPU, RAM, etc...), así como otros detalles del sistema como los drivers, Xorg, distribución linux, entorno de escritorio, kernel, procesos, tiempo de actividad, y muchos más. Su uso no está muy extendido por desconocimiento, pero seguro que si lo pruebas una vez se convertirá en tu herramienta perfecta. En este articulo tratamos de acercar al usuario la herramienta inxi, así como sacar el máximo provecho de la misma.
Inxi: Identificar el hardware del sistema
Inxi suele venir preinstalado en la mayoría de sistemas linux, si no es tu caso vemos como hacerlo. Debian, Ubuntu, Linux Mint, y derivados: sudo apt install inxi Centos, RHEL, Fedora, y derivados: #CentOS-RHEL sudo yum install inix #Fedora sudo dnf install inix Arch Linux, Manjaro, y derivados: sudo pacman -S inxi Open Suse, Suse, y derivados: sudo zypper install inxi Una vez instalada, puedes ejecutar la herramienta inxi en su forma básica. inxi Podrás ver una salida similar a: # inxi CPU: Quad Core Intel Xeon E3-1245 v5 (-MT MCP-) speed/min/max: 3681/800/3900 MHz Kernel: 3.10.0-1062.12.1.el7.x86_64 x86_64 Up: 7d 14h 40m Mem: 14477.7/64049.9 MiB (22.6%) Storage: 1.40 TiB (9.8% used) Procs: 195 Shell: bash 4.2.46 inxi: 3.0.37 Inxi también nos permite ampliar la información de forma detallada con su opción -F. inxi -F ejemplo de salida real...

Comando inxi -F Podemos ejecutar otras opciones para especificar lo que queremos identificar realmente. Vemos algunos ejemplos. Para identificar el sistema ejecutamos el siguiente comando. inxi -S ejemplo... System: Host: xxxx.xxxx.xxxx Kernel: 3.10.0-1062.12.1.el7.x86_64 x86_64 bits: 64 Console: tty 0 Distro: CentOS Linux release 7.7.1908 (Core) Saber que placa base, bios, y más. inxi -M ejemplo... Machine: Type: Kvm System: Supermicro product: SYS-5039MS-H12TRF-ON002 v: 0123456789 serial: S225408X6330575 Mobo: Supermicro model: X11SSE-F v: 1.01 serial: ZM163S009973 UEFI : American Megatrends v: 2.2 date: 05/16/2018 Quieres saber que cpu tienes? inxi -C ejemplo... CPU: Topology: Quad Core model: Intel Xeon E3-1245 v5 bits: 64 type: MT MCP L2 cache: 8192 KiB Speed: 2013 MHz min/max: 800/3900 MHz Core speeds (MHz): 1: 893 2: 879 3: 826 4: 821 5: 1765 6: 848 7: 851 8: 1508 Ahora identificamos la tarjeta gráfica... inxi -G ejemplo... Graphics: Card: Intel Mobile 945GM/GMS 943/940GML Express Integrated Graphics Controller Display Server: X.Org 1.18.4 drivers: intel (unloaded: fbdev,vesa) Resolution: [email protected] GLX Renderer: Mesa DRI Intel 945GM GLX Version: 1.4 Mesa 18.0.5 Detalles del hardware de audio. inxi -A ejemplo... Audio: Card Intel NM10/ICH7 Family High Definition Audio Controller driver: snd_hda_intel Sound: Advanced Linux Sound Architecture v: k4.15.0-74-generic Los dispositivos de red. inxi -N ejemplo... Network: Card-1: Marvell 88E8038 PCI-E Fast Ethernet Controller driver: sky2 Card-2: Intel PRO/Wireless 4965 AG or AGN Network Connection driver: iwl4965 Dispositivos de almacenamiento. inxi -D ejemplo... Drives: Local Storage: total: 1.40 TiB used: 139.99 GiB (9.8%) ID-1: /dev/sda vendor: Samsung model: MZ7LN512HMJP-00000 size: 476.94 GiB ID-2: /dev/sdb vendor: Samsung model: MZ7LN512HMJP-00000 size: 476.94 GiB ID-3: /dev/sdc vendor: Samsung model: MZ7LN512HMJP-00000 size: 476.94 GiB Identificamos el raid (si existe). inxi -R ejemplo... RAID: Device-1: md1 type: mdraid status: active raid: raid-5 report: 3/3 UUU Components: online: sda2~c0 sdb2~c1 sdc2~c3 Device-2: md0 type: mdraid status: active raid: raid-5 report: 3/3 UUU Components: online: sda3~c0 sdc3~c3 sdb3~c1 Las particiones del sistema. info -P ejemplo... Partition: ID-1: / size: 924.97 GiB used: 139.83 GiB (15.1%) fs: ext4 dev: /dev/md1 ID-2: /boot size: 1.93 GiB used: 168.6 MiB (8.5%) fs: ext4 dev: /dev/md0 ID-3: swap-1 size: 1024.0 MiB used: 0 KiB (0.0%) fs: swap dev: /dev/sda1 ID-4: swap-2 size: 1024.0 MiB used: 0 KiB (0.0%) fs: swap dev: /dev/sdb1 ID-5: swap-3 size: 1024.0 MiB used: 0 KiB (0.0%) fs: swap dev: /dev/sdc1 Los sensores. inxi -S ejemplo... Sensors: System Temperatures: ipmi cpu: 41 C mobo: 38 C Fan Speeds (RPM): ipmi cpu: 7700 fan-1: System Temperatures: lm-sensors cpu: 29.8 C mobo: 27.8 C Fan Speeds (RPM): lm-sensors N/A Información de uso. inxi -I ejemplo... Info: Processes: 193 Uptime: 7d 14h 50m Memory: 62.55 GiB used: 14.23 GiB (22.8%) Init: systemd runlevel: 3 Shell: bash inxi: 3.0.37 Canales de Telegram: Canal SoloLinux – Canal SoloWordpress Espero que este articulo te sea de utilidad, puedes ayudarnos a mantener el servidor con una donación (paypal), o también colaborar con el simple gesto de compartir nuestros artículos en tu sitio web, blog, foro o redes sociales. Read the full article
0 notes
Text
Gerd Hoffmann: VGA and other display devices in qemu
There are alot of emulated display devices available in qemu. This blog post introduces them, explains the differences between them and the use cases they are good for.
The TL;DR version is in the recommendations section at the end of the article.
standard VGA
qemu: -vga std or -device VGA
libvirt: <model type='vga'/>
&check VGA compatible
&check vgabios support
&check UEFI support (QemuVideoDxe)
&check linux driver (bochs-drm.ko)
This is the default display device (on x86). It provides full VGA compatibility and support for a simple linear framebuffer (using the bochs dispi interface). It is the best choice compatibility wise, pretty much any guest should be able to bring up a working display on this device. Performance or usability can be better with other devices, see discussion below.
The device has 16 MB of video memory by default. This can be changed using the vgamem_mb property, -device VGA,vgamem_mb=32 for example will double the amount of video memory. The size must be a power of two, the valid range is 1 MB to 256 MB.
The linux driver supports page-flipping, so having room for 3-4 framebuffers is a good idea. The driver can leave the framebuffers in vram then instead of swapping them in and out. FullHD (1920x1080) for example needs a bit more than 8 MB for a single framebuffer, so 32 or 64 MB would be a good choice for that.
The UEFI setup allows to choose the display resolution which OVMF will use to initialize the display at boot. Press ESC at the tianocore splash screen to enter setup, then go to "Device Manager" &rightarrow "OVMF Platform Configuration".
bochs display device
qemu: -device bochs-display
libvirt: <model type='bochs'/>
&cross not VGA compatible
&check vgabios support
&check UEFI support (QemuVideoDxe)
&check linux driver (bochs-drm.ko)
This device supports a simple linear framebuffer. It also uses the bochs dispi interface for modesetting, therefore the linear framebuffer configuration is fully compatible to the standard VGA device.
The bochs display is not VGA compatible though. There is no support for text mode, planar video modes, memory windows at 0xa0000 and other legacy VGA features in the virtual hardware.
Main advantage over standard VGA is that this device is alot simpler. The code size and complexity needed to emulate this device is an order of magnitude smaller, resulting in a reduced attack surface. Another nice feature is that you can place this device in a PCI Express slot.
For UEFI guests it is safe to use the bochs display device instead of the standard VGA device. The firmware will setup a linear framebuffer as GOP anyway and never use any legacy VGA features.
For BIOS guests this device might be useable as well, depending on whenever they depend on direct VGA hardware access or not. There is a vgabios which supports text rendering on a linear framebuffer, so software which uses the vgabios services for text output will continue to work. Linux bootloaders typically fall into this category. The linux text mode console (vgacon) uses direct hardware access and does not work. The framebuffer console (fbcon running on vesafb or bochs-drm) works.
virtio vga
qemu: -vga virtio or -device virtio-vga
libvirt: <model type='virtio'/> (on x86).
&check VGA compatible
&check vgabios support
&check UEFI support (QemuVideoDxe)
&check linux driver (virtio-gpu.ko)
This is a modern, virtio-based display device designed for virtual machines. It comes with VGA compatibility mode. You need a guest driver to make full use of this device. If your guest OS has no driver it should still show a working display thanks to the VGA compatibility mode, but the device will not provide any advantages over standard VGA then.
This device has (optional) hardware-assisted opengl acceleration support. This can be enabled using the virgl=on property, which in turn needs opengl support enabled (gl=on) in the qemu display.
This device has multihead support, can be enabled using the max_outputs=2 property.
This device has no dedicated video memory (except for VGA compatibility), gpu data will be stored in main memory instead. Therefore this device has no config options for video memory size.
This is the place where most development happens, support for new, cool features will most likely be added to this device.
virtio gpu
qemu: -device virtio-gpu-pci
libvirt: <model type='virtio'/> (on arm).
&cross not VGA compatible
&cross no vgabios support
&check UEFI support (VirtioGpuDxe)
&check linux driver (virtio-gpu.ko)
This device lacks VGA compatibility mode but is otherwise identical to the virtio vga device. UEFI firmware can handle this, and if your guests has drivers too you can use this instead of virtio-vga. This will reduce the attack surface (no complex VGA emulation support) and reduce the memory footprint by 8 MB (no pci memory bar for VGA compatibility). This device can be placed in a PCI Express slot.
vhost-user virtio gpu
There is a vhost-user variant for both virtio vga and virtio gpu. This allows to run the virtio-gpu emulation in a separate process. This is good from the security perspective, especially if you want use virgl 3D acceleration, and it also helps with opengl performance.
Run the gpu emulation process (see contrib/vhost-user-gpu/ in the qemu source tree):
./vhost-user-gpu --virgl -s vgpu.sock
Run qemu:
qemu \ -chardev socket,id=vgpu,path=vgpu.sock \ -device vhost-user-vga,chardev=vgpu \ [ ... ]
libvirt support is in the works.
qxl vga
qemu: -vga qxl or -device qxl-vga.
libvirt: <model type='qxl' primary='yes'/>.
&check VGA compatible
&check vgabios support
&check UEFI support (QemuVideoDxe)
&check linux driver (qxl.ko)
&check windows driver
This is a slightly dated display device designed for virtual machines. It comes with VGA compatibility mode. You need a guest driver to make full use of this device. If your guest OS has no driver it should still show a working display thanks to the VGA compatibility mode, but the device will not provide any advantages over standard VGA then.
This device has support for 2D acceleration. This becomes more and more useless though as modern display devices don't have dedicated 2D acceleration support any more and use the 3D engine for everything. The same happens on the software side, modern desktops are rendering with opengl or vulkan instead of using 2D acceleration.
Spice and qxl support offloading 2D acceleration to the spice client (typically virt-viewer these days). That is quite complex and with 2D acceleration being on the way out this becomes increasingly useless too. You might want pick some simpler device for security reasons.
This device has multihead support, can be enabled using the max_outputs=2 property. The linux driver will use this, the windows driver expects multiple devices instead (see below).
The amount of video memory for this device is configurable using the ram_size_mb and vram_size_mb properties for the two pci memory bars. The default is 64 MB for both, which should be plenty for typical use cases. When using 4K display resolution or multihead support you should assign more video memory though. When using small resolutions like 1024x768 you can assign less video memory to reduce the memory footprint.
qxl
qemu: -device qxl.
libvirt: <model type='qxl' primary='no'/>.
This device lacks VGA compatibility mode but is otherwise identical to the qxl vga device. Providing multihead support for windows guests is pretty much the only use case for this device. The windows guest driver expects one qxl device per secondary display (additionally to one qxl-vga device for the primary display).
cirrus vga
qemu: -vga cirrus or -device cirrus-vga.
libvirt: <model type='cirrus'/>.
&check VGA compatible
&check vgabios support
&check UEFI support (QemuVideoDxe)
&check linux driver (cirrus.ko)
Emulates a Cirrus SVGA device which used to be modern in the 90ies of the last century, more than 20 years ago. For the most part my blog article from 2014 is still correct; the device is mostly useful for guests which are equally old and are shipped with a driver for cirrus vga devices.
Two things have changed meanwhile though: Since qemu version 2.2 cirrus is not the default vga device any more. Also the cirrus driver in the linux kernel has been completely rewritten. In kernel 5.2 & newer the cirrus driver uses a shadow framebuffer and converts formats on the fly to hide some of the cirrus oddities from userspace (Xorg/wayland), so things are working a bit better now. That doesn't cure everything though, especially the available display resolutions are still constrained by the small amount of video memory.
ati vga
qemu: -device ati-vga.
&check VGA compatible
&check vgabios support
&cross no UEFI support
Emulates two ATI SVGA devices, the model property can be used to pick the variant. model=rage128p selects the "Rage 128 Pro" and model=rv100 selects the "Radeon RV100".
The devices are newer (late 90ies / early 2000) and more modern than the cirrus VGA. Nevertheless the use case is very similar: For guests of a similar age which are shipping with drivers for those devices.
This device has been added recently to qemu, development is in progress still. The fundamentals are working (modesetting, hardware cursor). Most important 2D accel ops are implemented too. 3D acceleration is not implemented yet.
Linux has both drm and fbdev drivers for these devices. The drm drivers are not working due to emulation being incomplete still (which hopefully changes in the future). The fbdev drivers are working. Modern linux distros prefer the drm drivers though. So you probably have to build your own kernel if you want use this device.
ramfb
qemu: -device ramfb.
&cross not VGA compatible
&check vgabios support
&check UEFI support (QemuRamfbDxe)
Very simple display device. Uses a framebuffer stored in guest memory. The firmware initializes it and allows to use it as boot display (grub boot menu, efifb, ...) without needing complex legacy VGA emulation. Details can be found here.
no display device
qemu: -vga none -nographic.
You don't have to use a display device. If you don't need one you can run your guests with a serial console instead.
embedded devices
There are a bunch of other display devices. Those are typically SoC-specific and used by embedded board emulation. Just mentioning them here for completeness. You can't select the display device for embedded boards, the qemu emulation simply matches physical hardware here.
recommendations
For the desktop use case (assuming display performance matters and/or you need multihead support), in order of preference:
virtio vga or virtio gpu, if your guest has drivers
qxl vga, if your guest has drivers
bochs display device, when using UEFI
standard VGA
For the server use case (assuming the GUI is rarely used, or not at all), in order of preference:
serial console, if you can work without a GUI
bochs display device, when using UEFI
standard VGA
On arm systems display devices with a pci memory bar do not work, which reduces the choices alot. We are left with:
virtio gpu, if your guest has drivers
ramfb
from https://www.kraxel.org/blog/2019/09/display-devices-in-qemu/ from http://thereallaptoplifestyle1.blogspot.com/2019/09/gerd-hoffmann-vga-and-other-display.html
0 notes
Photo

Bucaramanga mano... #FelizNavidad (en Cacique El Centro Comercial) https://www.instagram.com/p/BryTF-FBDEv/?utm_source=ig_tumblr_share&igshid=1kgntg5w5pek1
0 notes
Text
inxi - Informações sobre seu computador
inxi - Informações sobre seu computador
Colaboração: Rubens Queiroz de Almeida
Data de Publicação: 06 de abril de 2017
O aplicativo inxi permite obter, a partir da linha de comando, informações detalhadas sobre seu sistema.
Vejamos alguns exemplos:
$ inxi PU~Quad core Intel Core i5-2400 (-MCP-) speed/max~1604/3400 MHz Kernel~4.4.0-53-generic x86_64 Up~3:52 Mem~4505.8/7868.8MB HDD~2940.6GB(75.9% used) Procs~254 Client~Shell inxi~2.2.35
Temos acima informações sobre o processar, velocidade, versão do kernel, memória disponível, tamanho do HD e percentual usado e número de processos.
$ inxi -AG Graphics: Card: Intel 2nd Generation Core Processor Family Integrated Graphics Controller Display Server: X.Org 1.18.4 drivers: intel (unloaded: fbdev,vesa) Resolution: [email protected] GLX Renderer: Mesa DRI Intel Sandybridge Desktop GLX Version: 3.0 Mesa 12.0.6 Audio: Card-1 Intel 7 Series/C210 Series Family High Definition Audio Controller driver: snd_hda_intel Card-2 Logitech Webcam C270 driver: USB Audio Sound: Advanced Linux Sound Architecture v: k4.4.0-53-generic
O comando acima exibiu informações sobre as placas gráficas e de áudio.
$ inxi -C CPU: Quad core Intel Core i5-2400 (-MCP-) cache: 6144 KB clock speeds: max: 3400 MHz 1: 2364 MHz 2: 1970 MHz 3: 2091 MHz 4: 2178 MHz
A diretiva -C exibe informações completas sobre a CPU.
$ inxi -D Drives: HDD Total Size: 2940.6GB (75.9% used) ID-1: /dev/sda model: ST3320418AS size: 320.1GB ID-2: /dev/sdb model: SAMSUNG_HD502IJ size: 500.1GB ID-3: /dev/sdc model: WDC_WD10EARS size: 1000.2GB ID-4: /dev/sdd model: SanDisk_SDSSDA12 size: 120.0GB ID-5: USB /dev/sdf model: My_Passport_0820 size: 1000.2GB
A diretiva -D instrui o programa inxi a exibir informações completas sobre os discos rígidos instalados no sistema.
Se você quiser saber tudo, detalhadamente, sobre o seu sistema, utilize a diretiva -F:
$ inxi -F System: Host: darkstar Kernel: 4.4.0-53-generic x86_64 (64 bit) Desktop: Cinnamon 3.2.7 Distro: Linux Mint 18.1 Serena Machine: Mobo: ASUSTeK model: P8H77-M PRO v: Rev X.0x Bios: American Megatrends v: 0503 date: 03/15/2012 CPU: Quad core Intel Core i5-2400 (-MCP-) cache: 6144 KB clock speeds: max: 3400 MHz 1: 1698 MHz 2: 2114 MHz 3: 1965 MHz 4: 1698 MHz Graphics: Card: Intel 2nd Generation Core Processor Family Integrated Graphics Controller Display Server: X.Org 1.18.4 drivers: intel (unloaded: fbdev,vesa) Resolution: [email protected] GLX Renderer: Mesa DRI Intel Sandybridge Desktop GLX Version: 3.0 Mesa 12.0.6 Audio: Card-1 Intel 7 Series/C210 Series Family High Definition Audio Controller driver: snd_hda_intel Card-2 Logitech Webcam C270 driver: USB Audio Sound: Advanced Linux Sound Architecture v: k4.4.0-53-generic Network: Card: Realtek RTL8111/8168/8411 PCI Express Gigabit Ethernet Controller driver: r8169 IF: enp3s0 state: up speed: 100 Mbps duplex: full mac: 10:bf:48:7a:a0:cf Drives: HDD Total Size: 2940.6GB (75.9% used) ID-1: /dev/sda model: ST3320418AS size: 320.1GB ID-2: /dev/sdb model: SAMSUNG_HD502IJ size: 500.1GB ID-3: /dev/sdc model: WDC_WD10EARS size: 1000.2GB ID-4: /dev/sdd model: SanDisk_SDSSDA12 size: 120.0GB ID-5: USB /dev/sdf model: My_Passport_0820 size: 1000.2GB Partition: ID-1: / size: 72G used: 7.8G (12%) fs: ext4 dev: /dev/sdd2 ID-2: /home size: 917G used: 831G (96%) fs: ext4 dev: /dev/sdc1 ID-3: swap-1 size: 16.78GB used: 0.05GB (0%) fs: swap dev: /dev/sdb1 RAID: No RAID devices: /proc/mdstat, md_mod kernel module present Sensors: System Temperatures: cpu: 29.8C mobo: 27.8C Fan Speeds (in rpm): cpu: 0 Info: Processes: 257 Uptime: 3:56 Memory: 4523.5/7868.8MB Client: Shell (bash) inxi: 2.2.35
Para instalar em sistemas Debian GNU/Linux e derivados, digite:
$ sudo apt-get install inxi
0 notes
Text
Raspberry Pi 3 und IP-Kameras zur Videoüberwachung
Raspberry Pi 3 und IP-Kameras zur Videoüberwachung Hardware: Raspberry Pi 3, Digoo DG-WO2f, FosCam FI9826P, Digoo BB-M2 Das Angebote chinesischer Hersteller an billigen IP-Cams ist groß und obwohl man sich damit möglicherweise zum potentiellen Mitbetreiber eines Bot-Netzes macht und sich außerdem noch Zuschauer ins heimische Wohnzimmer holt, werden diese Cams massenhaft verkauft. Digoo z.B. wirft zum Beispiel seine Cloud-Cams mit minimalen Gewinnspannen auf den Markt, um mit dem dafür benötigten Cloudspeicher dem unbedarften Laien jeden Monat Geld aus der Tasche zu ziehen. Den Betrieb solcher Kameras sollte man nur über ein VLAN oder zumindest über NAT verbinden, da etliche dieser Billig-Cams bereits massenhaft gehackt wurden und über Backdoors verfügen. Zudem sind sie sehr geschwätzig und kontaktieren laufend Server, da sie als Cloudcams konzipiert wurden. Für dieses Projekt verwende ich diese billigen Kameras, da sie auch bei mir zuhause rumliegen...
Hinweis (10.10.2018)
In ZD-Net erschien am 9.10.2018 ein -> Artikel in ZDNet von Catalin Cimpanu, in dem er die Sicherheitsprobleme von Kameras des chinesischen Herstellers Hangzhou Xiongmai Technology Co., Ltd. beschreibt und auf die Anfälligkeit auch von DiGoo-Produkten hinweist. Insbesondere die Gefahr diese Kameras zum Werkzeug eines BotNetzes zu machen, sollte man beachten und beim Einsatz keine Verbindung zum Internet zulassen!
Streams der Kameras anzeigen
Als Erstes gilt es heraus zu finden, wie man an die Streams der Kameras kommt. Um die Kamerabilder auf den PC-Monitor zu bekommen, genügt bereits der Aufruf im Browser (z.B. Firefox mit dem AddOn Open in VLC media player und dem VLC-Player).
FosCam FI9826P
Für die FosCam FI9826P gibt man in die Adressleiste ein: [cce_bash]rtsp://<user>:<passwort>@<IP der Kamera>/videoMain [/cce_bash] Das AddOn öffnet den VLC Mediaplayer und videoMain liefert den Mainstream (hohe Auflösung). Für den Substream lautet der Aufruf [cce_bash]rtsp://<user>:<passwort>@<IP der Kamera>/videoSub [/cce_bash] Für unseren Zweck kann man auch den Link zum Snapshot verwenden: [cce_bash]http://<user>:<password>@<IP der Kamera>:<Port>/cgi-bin/CGIProxy.fcgi?cmd=snapPicture2&usr=<root>&pwd=<password>&; [/cce_bash]
Digoo DG-WO2f
Für die Digoo DG-WO2f lautet der Aufruf für den Main- und Sub-Stream mit den originalen Zugangsdaten: [cce_bash]rtsp://admin:dg20160404@<IP der Kamera>/onvif1 rtsp://admin:dg20160404@<IP der Kamera>/onvif2 [/cce_bash] Bei älteren Modellen ist das Passwort 20160404. Eine Verbindung über TELNET ist bei dieser Kamera mit dem User root und dem Passwort cxlinux möglich. Offene Ports dieser Kamera: Discovered open port 23/tcp Discovered open port 80/tcp Discovered open port 554/tcp Discovered open port 6670/tcp Discovered open port 7103/tcp Discovered open port 7101/tcp Discovered open port 5050/tcp Discovered open port 843/tcp Discovered open port 8001/tcp Discovered open port 3201/tcp
Digoo BB-M2
Bei diesem China-Billig-Modell erhält man Snapshots unter [cce_bash]http://<IP der Kamera>:81/snapshot.cgi?user=admin&pwd=admin& [/cce_bash] Hat man das Admin-Passwort oder den Port geändert, muss das angepasst werden. Streaming ist über http:// [cce_bash]http://<IP der Kamera>:81/videostream.cgi?loginuse=admin&loginpas=admin [/cce_bash] und rtsp:// möglich: [cce_bash]rtsp://<user>:<password>@<IP der Kamera>:10554/tcp/av0_0 rtsp://<user>:<password>@<IP der Kamera>:10554/tcp/av0_1 [/cce_bash]
Streams mit mplayer anzeigen
Um einen Stream auf einem eigenen Display oder dem Display eines anderen Rechners anzuzeigen, eignet sich der mplayer hervorragend. Meist ist er in der Distribution schon enthalten oder man installiert ihn einfach nach. [cc_bash]:~ $ sudo apt-get install mplayer [/cc_bash] Von einer lokalen Konsole auf einer grafischen Benutzeroberfläche des Raspberry startet man die Kamera-Streams mit [cce_bash]:~$ mplayer <Streamingadresse der Kamera> [/cce_bash] und aus einer SSH-Sitzung mit [cce_bash]:~$ mplayer -vo fbdev <Streamingadresse der Kamera> [/cce_bash] Damit lassen sich komplette Überwachungsdisplays aufbauen, da man mit mplayer die Streams mehrer Kameras auf dem Bildschirm verteilt anzeigen kann. Ich komme später noch darauf zurück.
Raspberry vorbereiten
Dazu habe ich -> hier schon auf etliche Seiten verwiesen, die sich damit sehr fundiert mit der Installation beschäftigen. Um sich Arbeit zu sparen falls etwas schief geht, erstelle ich vor jeder größeren Installation ein Image der SD-Karte des Pi. Unter Windows verwende ich das USB-Image-Tool ( -> hier) . Unter Ubuntu reichen die Bordwerkzeuge aus. zunächst muss mit [cc_bash]:~$ df -h [/cc_bash] der Gerätenamen der SD-Karte festgestellt werden. Die SD-Karte erkennt man zum einen an der Größe und an den beiden Partitionen, von denen eine mit boot benannt ist. Um den gesamten Inhalt der SD-Karte zu sichern, benutz man den Gerätenamen (z.B. /dev/sdc). [cc_bash]:~$ dd if=/dev/sdc of=/path/images.img bs=4M [/cc_bash] Damit erhält man ein image, das genauso groß ist wie die SD-Karte. Wer Platz sparen will/muss, kann daraus gleich ein ZIP-File erstellen, in dem die leeren Bereiche der SD-Karte sehr gut komprimiert werden. [cce_bash]:~$ dd if=/dev/sdc bs=4M | gzip > /home/<user>/<filename>.gz [/cce_bash] Das Kopieren des Images aus einem gzip-File auf die SD-Karte erfolgt mit: [cce_bash]:~$ gunzip /home/<user>/<filename>.gz | sudo dd bs=4M of=/dev/sdc [/cce_bash]
Motion detection auf Raspberry
Motion ist in allen mir bekannten Distributionen enthalten. [cc_bash]:~ $ sudo apt install motion [/cc_bash] Unter Debian benötigt man libav-tools, da ffmpeg warum auch immer damit ersetzt wurde. Die meisten anderen Distributionen verwenden weiterhin ffmpeg. [cc_bash]:~ $ sudo apt install libav-tools [/cc_bash] Die Konfiguration von motion befindet sich im Verzeichnis /etc/motion/ und besteht nach der Installation aus der Hauptkonfigurationsdatei motion.conf und aus Konfigurationsdateien camera_x.conf. Für den Betrieb einer einzigen Kamera kann man alle Konfigurationsparameter in der motion.conf unterbringen. Will man mehrere Kameras betreiben, stehen nur die Parameter in der Datei motion.conf, die universell gelten. Die kameraspezifischen Angaben stehen für jede Kamera in einer eigenen Datei. Im Verzeichnis /etc/motion muss dann auch noch das Unterverzeichnis conf.d angelegt werden. [cc_bash]:~$ sudo mkdir /etc/motion/conf.d [/cc_bash] Die Aufnahmen speichere ich auf einer USB-Festplatte, die ich an den Raspberry angesteckt habe. Die wird deshalb auch unter /home/pi/<UUID der HDD> ins Dateisystem eingebunden und bei den Kameras als target_dir angegeben. Es ist sicher eine gute Idee, z.B. eine NAS zu mounten, aber zur Demonstration genügt mir diese Variante Ich habe eine Hauptkonfiguration motion.conf und für die beiden Kameras eigene Konfigurationen erstellt. Die originale Datei sollte man sich irgendwo sichern, da ich hier alle Kommentare zwecks Übersichtlichkeit entfernt habe.
TIPP
Wenn die Bilder später von motion immer wieder mit mehr oder weniger großen verwaschenen Streifen oder auch mit nach unten gezogenen vertikalen gleichfarbigen Streifen aufgezeichnet werden, dann glaubt man dem Hersteller zu sehr! Mit der VLC-Erweiterung für den Firefox oder irgendeinem anderen Programm die Informationen zur Bildgröße der Kamera suchen und in motion korrekt eintragen. Die Werte von height und width müssen auch durch 8 ohne Rest teilbar sein. In VLC findet man die Original-Bildgröße des Streams im Menü Werkzeuge -> Codec-Informationen und kann mit den aufgezeichneten Bildern gegenprüfen.
motion.conf
[cce_bash]############################################################ # motion.conf ############################################################ daemon on process_id_file /var/run/motion/motion.pid setup_mode off logfile /var/log/motion/motion.log log_level 5 log_type all v4l2_palette 17 input -1 power_line_frequency -1 minimum_frame_time 0 auto_brightness off brightness 0 contrast 0 saturation 0 hue 0 roundrobin_frames 1 roundrobin_skip 1 switchfilter off smart_mask_speed 0 lightswitch 0 pre_capture 0 post_capture 0 event_gap 60 max_movie_time 0 emulate_motion off output_pictures on output_debug_pictures off quality 75 picture_type jpeg ffmpeg_output_movies on ffmpeg_output_debug_movies off ffmpeg_timelapse 0 ffmpeg_timelapse_mode daily ffmpeg_bps 400000 ffmpeg_variable_bitrate 0 ffmpeg_video_codec mpeg4 ffmpeg_duplicate_frames true use_extpipe off snapshot_interval 0 locate_motion_mode off locate_motion_style box text_right %Y-%m-%d\n%T-%q ; text_left CAMERA %t text_changes off text_event %Y%m%d%H%M%S text_double off movie_filename %v-%Y%m%d%H%M%S ipv6_enabled off quiet on camera /etc/motion/foscam1.conf camera /etc/motion/dgwo2f1.conf camera_dir /etc/motion/conf.d [/cce_bash] Die Konfigurationsdatei ist im Original gut kommentiert. Wichtig ist, daran zu denken, dass alle allgemein gültigen Parameter in der motion.conf stehen und die kameraspezifischen Parameter in alle Konfigurationsdateien für die einzelnen Kameras übernommen werden. Damit diese Konfigurationen eingebunden werden, benötigt man die letzten drei Zeilen der motion.conf.
foscam1.conf
In dieser Datei muss mindestens target_dir und netcam_url den eigenen Erfordernissen angepasst werden. [cce_bash]########################################################### # foscam1.conf FI9826P ############################################################ camera_id = 1 text_left FosCam_OG2 target_dir /media/pi/e156aff4-dab9-4e24-bbd8-1a40e0e4013b/motion-images picture_filename FOSCAM1_%v-%Y%m%d%H%M%S-%q snapshot_filename FOSCAM1_SS_%v-%Y%m%d%H%M%S-%q timelapse_filename %Y%m%d-timelapse rotate 0 width 1280 height 720 framerate 4 netcam_url http://<user>:<password>@<IP der Kamera>:<Port>/cgi-bin/CGIProxy.fcgi?cmd=snapPicture2&usr=<root>&pwd=<password>&; netcam_keepalive on netcam_tolerant_check off rtsp_uses_tcp on threshold 1500 threshold_tune off noise_level 32 noise_tune on despeckle_filter EedDl minimum_motion_frames 3 [/cce_bash]
dgwo2f1.conf
In dieser Datei muss mindestens target_dir und netcam_url den eigenen Erfordernissen angepasst werden. [cce_bash]########################################################### # Digoo DH-WO2f ############################################################ camera_id = 2 text_left DG_WOf2_1 target_dir /media/pi/e156aff4-dab9-4e24-bbd8-1a40e0e4013b/motion-images picture_filename DG_WO2f_1_%v-%Y%m%d%H%M%S-%q snapshot_filename DG_WO2f_1__SS_%v-%Y%m%d%H%M%S-%q timelapse_filename %Y%m%d-timelapse rotate 0 width 1280 height 720 framerate 4 netcam_url rtsp://<user>:<pasword>@<IP der Kamera>/onvif1 netcam_keepalive on netcam_tolerant_check off rtsp_uses_tcp on threshold 1500 threshold_tune off noise_level 32 noise_tune on despeckle_filter EedDl minimum_motion_frames 3 [/cce_bash]
Start der Aufzeichnung
Wir starten den Service motion [cc_bash]:~$ sudo service motion start [/cc_bash] und beobachten in einer zweiten Konsole das log-File [cc_bash]:~$ tail -f /var/log/motion/motion.log [/cc_bash] Bei der Fehlersuche hilft [cc_bash]:~$ systemctl status motion.service [/cc_bash] weiter. https://impuscatura.ro/wp/2018/05/02/raspberry-pi-3-und-ip-kameras-zur-videoueberwachung/
0 notes
Text
драйвера для компьютерных игр
драйвера для компьютерных игр
———————————————————
>>> Получить файл <<<
——————————————————— Все ок! Администрация рекомендует ———————————————————
Также в сюжете больше нет полицейского Таннера, главного героя предыдущих игр серии. Главный герой по кличке «Ти- Кей» (настоящее имя Тэрри Киддамс) приезжает из провинции в город Нью- Йорк, чтобы заработать деньги и уважение. ## Драйвера для игр на виндовс 7 - yrepirigesole’s diary X сервер записывает свои сообщения в файл /var/log/Xorg. Например, вот отрывок из вывода драйвера intel, когда он загружен. Matched intel as autoconfigured driver 5. Matched modesetting as autoconfigured driver 6. Matched vesa as autoconfigured driver 7. Matched fbdev as autoconfigured driver 8. ### Нужные Драйвера для Игр Windows 7 В плане производительности и стабильности новая ОС выг��ядит лучше, чем Windows 7. Microsoft оптимизировала код, позволив ей запускаться гораздо быстрее. Проще говоря, пользователям. #### Скачать драйвер для компьютерных игр - driverlib143 Это дополнительный инструмент для microsoft net framework, который как ранее писалось создан для того чтобы приложения windows были мультиплатформенными и запускались на всех версиях «окон». Рекомендуем скачать и установить их на новых, только что купленных ноутбуках и компьютерах, также на компьютерах с только что установленной операционной системой Windows. Но установить и забыть их недостаточно! Необходимо переодически следить за актуальностью версий этих компонентов и своевременно обновлять их. Это может быть Windows 7 с пакетом обновления 6 (SP6) либо Windows 8. Сделать прямой апгрейд до. Минимальные системные требования, предъявляемые. Чтобы справиться с потоком желающих, Microsoft будет обновлять ОС поэтапно. Торможение и позволит получить удовольствие от игры. Еженедельные новости. Дело в том, что скорее всего в. Не запускается программа. Лучшие и самые нужные программы и драйвера для нормального запуска компьютерных игр. Скачать чтобы шли игры. Это снова я. Форум поддержки. Дневник Виртуальный дневник Темы:. Что нужно сделать чтобы игры на пк играли идеально: 8:65. Представила драйвердля игры. Драйвера установи. Nvidia Phys. X — это технология (драйвер), которая дает реалистичную физику в новых играх для компьютеров на базе операционных систем Windows и других. Physx прорабатывает как движутся и взаимодействуют обьекты в игре. Без Physx окружение в современных играх было бы неживым, то есть трава бы не шевелилась, стены бы не разрушались, стекла не бились и т. При нарушении правил дорожного движения или стрельбе из машины при полицейских добавляется только «автомобильный» розыск. Статус разыскиваемости для персонажа дают при стрельбе на улице, либо если полиция увидела, как вы выходите из разыскиваемой машины. Бесплатные программы для обновления драйверов вашего компьютера. Скачать бесплатно драйверы для компьютера Windows. Nokia PC Suite – набор бесплатных программ на русском языке, служащих для управления телефонами фирмы Nokia с ПК. Зайди скачать Драйверы бесплатно. Большой выбор программ, а также обзоры, рейтинги и отзывы пользователей. Мгновенно составляет список всех подключенных к ПК устройств. В общем случае игры могут не работать по многим известным мне причинам. На компьютере, не установлены нужные драйверы или необходимое. Каталог торрентов » Софт » Драйвера. Название: Софт для запуска игр Год выпуска: 7565 Платформа: PC Windows XP/Vista/7 x86, x69 Язык интерфейса: Английский + Русский. Набор программ не гарантирует запуск игр если ваш компьютер не Так же на вашем компьютере должны быть установлены все драйвера для.
0 notes
Text
SMPlayer 17.8
SMPlayer is een opensourcemediaspeler die op verschillende platforms zijn werk kan doen. Hij speelt een reeks formaten af en ondersteunt verschillende outputdrivers, zoals X11, Xv, DGA, OpenGL, SVGAlib, fbdev, AAlib en DirectFB. Het programma kan ook beelden laten zien door gebruik te maken van hardware-mpeg-decoders, zoals de Siemens DVB, DXR2 en DXR3/Hollywood+. SMPlayer is een mediaspeler die op de achtergrond gebruikmaakt van MPlayer om beelden te laten zien, maar zelf ook functionaliteit toevoegt, zoals YouTube-ondersteuning, automatisch zoeken naar ondertitelingen en skins om het... http://dlvr.it/Pfjp2q
0 notes