#findutils
Explore tagged Tumblr posts
Visit Tumblr Blog
Explore Tumblr blogs with no restrictions, modern design and the best experience.
Last Seen Tumblr Blogs


Fun Fact
12.7% of mobile users access Tumblr.
Link
0 notes
Text
Life is easy with good tools
Get the latest open source tools for z/OS. Life is easy.
Photo by Matthias Speicher on Unsplash A group of us have been working on porting the latest Open Source tools to z/OS. I gave an intro to the z/OS Open Source Community a few months ago, and now I’d like to provide a simple example of how useful these tools can be. A very common problem is to perform a search and replace across a set of files in a directory tree. Maybe your manager said the…

View On WordPress
0 notes
Text
Porady Admina: find
W dzisiejszym tutorialu z cyklu Porady Admina przybliżę program find https://linuxiarze.pl/porady-admina-findutils-find/
0 notes
Photo
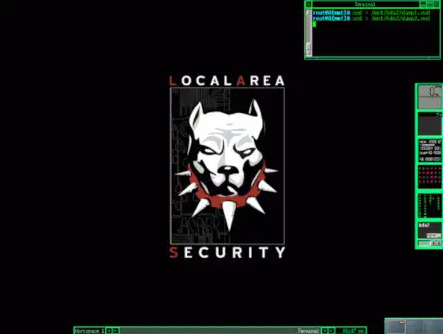
Web site: www.localareasecurity.com (not active) Origin: USA Category: Security Desktop environment: Fluxbox Architecture: x86 Based on: Knoppix Wikipedia: Media: Live The last version | Released: 0.5 | March 6, 2004
Local Area Security (L.A.S.) – live-CD Linux distribution for information security professionals. It contains over 250 security tools including all the usual suspects (Nmap, Nessus, etc.) as well as many other great tools less well known. The ISO images are meant to be burned on 185MB and 210MB miniCDs which they update around twice a month. The distribution was available in 2 different versions of L.A.S. to fit two specific needs – MAIN and SECSERV.
The project was started in 2002 to research information security related topics. During that time there was no real live-CD toolkit focused on information security. So Jascha, the project founder built one from a stripped down version of Knoppix called Model-K. Both of which were built from Debian Linux. Up until version 0.4 L.A.S. Linux was command line only. After that, FluxBox was added as the desktop since it is light weight and very feature filled.
A few of the tools that wewe available in the distribution: etherape, mozillafirebird, argus-server, argus-client, arpwatch, bfbtester, cabextract, cflow, dlint, farpd, recover, gtkrecover, nasm, nast, strace, ltrace, sudo,valgrind, pnscan, isic, splint, sendip, scli, scanssh, rarpd, wellenreiter,router-audit-tool, httpush, bass, scansort, scanerrlog, idsa / idsaguardgtk, crank (for fun), ccrypt, ntfstools, pasmal, bruth, hlfl, less, smbfs, smstools, LinNeighborhood, snmp, snmpd, driftnet, Dillo, admsmp, admsnmp,arptool, di, hammerhead, flawfinder, foremost, md5deep, binutils, findutils,file, gall, libpst, libdbx, rda, ntreg, memfetch, stegdetect, mkpersistenthome, mkdosswap, pv, cscope, scanlogd, cgrep, bsed, vlad, warscan, zodiac, angst, hackbot, mieliekoek.pl, screamingcobra.pl, cmospwd, macchanger, vomit, atmelwlandriver, wlcardconfig, sshstart-knoppix.
0 notes
Text
Welcome to our guide on how to install Netdata on RHEL 8 / CentOS 8. Netdata is a powerful real-time and distributed health and performance monitoring tool for Applications and infrastructure systems. Netdata can be used on physical servers, Virtual Machines, containers, and IoT devices. It gives you modern interactive web dashboards for viewing your server metrics with support for various data stores for persistent storage. Features of netdata Here are the key features of Netdata monitoring tool. Auto-scaling of chart units IP access lists for filtering access to netdata Enhanced VMs and containers monitoring Highlighted time-frames across all charts of the dashboard Dashboard snapshots, for loading/saving of selected time-frames Timezone conversion at the dashboard to allow comparing charts with server logs Zero maintenance, configuration, and dependencies It is easily customizable, extensible, and embeddable Scales to infinity Time-series back-ends supported – it can archive its metrics on graphite, opentsdb, Prometheus, JSON document DBs, in the same or lower detail. Install Netdata on RHEL 8 / CentOS 8 We’re going to build and install Netdata on RHEL 8 / CentOS 8 from source. Let’s kickoff by ensuring all dependencies are installed. Login to your server run below commands. sudo dnf -y install git zlib-devel libuuid-devel libmnl gcc make git autoconf automake pkgconfig curl findutils Next is to clone Netdata code from Github. git clone https://github.com/netdata/netdata.git --depth=100 Start the build and installation of Netdata on RHEL 8 / CentOS 8 $ cd netdata/ $ sudo ./netdata-installer.sh ^ |.-. .-. .-. .-. . netdata | '-' '-' '-' '-' real-time performance monitoring, done right! +----+-----+-----+-----+-----+-----+-----+-----+-----+-----+-----+-----+---> You are about to build and install netdata to your system. It will be installed at these locations: - the daemon at /usr/sbin/netdata - config files in /etc/netdata - web files in /usr/share/netdata - plugins in /usr/libexec/netdata - cache files in /var/cache/netdata - db files in /var/lib/netdata - log files in /var/log/netdata - pid file at /var/run/netdata.pid - logrotate file at /etc/logrotate.d/netdata This installer allows you to change the installation path. Press Control-C and run the same command with --help for help. Press to build and install netdata to your system when propmted. The installation is automated and no further input is required from you. You should get output like below if installation was successful. --- Check KSM (kernel memory deduper) --- Memory de-duplication instructions You have kernel memory de-duper (called Kernel Same-page Merging, or KSM) available, but it is not currently enabled. To enable it run: echo 1 >/sys/kernel/mm/ksm/run echo 1000 >/sys/kernel/mm/ksm/sleep_millisecs If you enable it, you will save 40-60% of netdata memory. --- Check version.txt --- --- Check apps.plugin --- --- Basic netdata instructions --- netdata by default listens on all IPs on port 19999, so you can access it with: http://this.machine.ip:19999/ To stop netdata run: systemctl stop netdata To start netdata run: systemctl start netdata --- We are done! --- ^ |.-. .-. .-. .-. .-. . netdata .-. .- | '-' '-' '-' '-' '-' is installed and running now! -' '-' +----+-----+-----+-----+-----+-----+-----+-----+-----+-----+-----+-----+---> enjoy real-time performance and health monitoring... Netdata service should be started automatically after installation. $ systemctl status netdata ● netdata.service - Real time performance monitoring Loaded: loaded (/usr/lib/systemd/system/netdata.service; enabled; vendor preset: disabled)
Active: active (running) since Sat 2019-03-09 09:15:37 EAT; 5min ago Process: 13839 ExecStartPre=/bin/chown -R netdata:netdata /var/run/netdata (code=exited, status=0/SUCCESS) Process: 13837 ExecStartPre=/bin/mkdir -p /var/run/netdata (code=exited, status=0/SUCCESS) Process: 13835 ExecStartPre=/bin/chown -R netdata:netdata /var/cache/netdata (code=exited, status=0/SUCCESS) Process: 13833 ExecStartPre=/bin/mkdir -p /var/cache/netdata (code=exited, status=0/SUCCESS) Main PID: 13841 (netdata) Tasks: 23 (limit: 11510) Memory: 37.3M CGroup: /system.slice/netdata.service ├─13841 /usr/sbin/netdata -P /var/run/netdata/netdata.pid -D -W set global process scheduling policy keep -W set global OOM score keep ├─13913 /usr/libexec/netdata/plugins.d/go.d.plugin 1 └─13922 /usr/libexec/netdata/plugins.d/apps.plugin 1 Mar 09 09:15:37 rhe8.local systemd[1]: Starting Real time performance monitoring… Mar 09 09:15:37 rhe8.local systemd[1]: Started Real time performance monitoring. Accessing Netdata UI Netdata by default listens on all IPs on port 19999, if you have firewalld service, allow access to this port within LAN. sudo firewall-cmd --permanent --add-rich-rule 'rule family="ipv4" \ source address="192.168.122.0/24" port protocol="tcp" port="19999" accept' If the Server is not exposed to the internet, you can allow access from any IP. sudo firewall-cmd --add-port=19999/tcp --permanent Reload firewalld to apply changes. sudo firewall-cmd --reload Access Netdata Web dashboard on server IP address and port 19999. If you’re a fan of Grafana, check our tutorial on How to Monitor Linux Server with Netdata and Grafana.
0 notes
Text
シェルスクリプトで名前にスペース(空白)を含むファイルがxargsでうまく処理できない場合の対処
ファイル名にスペースが含まれている場合のあるある記事ですが、findだけでなくgrepやtarについても触れてみました。 #プログラミング初心者 #プログラミング初学者 #shell #shellscript #bash
はじめに チームメンバから「名前にスペースを含むファイルをxargsでうまく取り扱えない」という相談を受けました。 調べたらすぐに解決する あれ だと思ったのですが、 find ではなく grep の実行結果を xargs に渡していたので、なるほどあまり見ないケースだなと思ったついでにエントリをまとめました。 検証環境 $ uname -moi x86_64 MacBookPro16,1 Darwin $ bash -version | head -n 1 GNU bash, バージョン 5.0.18(1)-release (x86_64-apple-darwin19.5.0) $ grep --version grep (BSD grep) 2.5.1-FreeBSD $ find --version find (GNU findutils)…

View On WordPress
0 notes
Video
youtube
We are in our new Linux environment and create some more packages. Check - To test C builds Gawk - To manipulate text diffutils - To check for changes findutils - To find files and directories GRUB - The boot manager Please follow me on twitter http://twitter.com/kalaspuffar My merchandise: https://ift.tt/3aqGTZF Outro music: Sanaas Scylla
0 notes
Link
0 notes
Text
Porady Admina: xargs
W dzisiejszym, pierwszym w 2023 roku tutorialu z cyklu Porady Admina zajmiemy się programem xargs https://linuxiarze.pl/porady-admina-findutils-xargs/
0 notes
Text
findutils version 4.4.2 for OS X
The formula for findutils was recently updated to version 4.4.2.
To install findutils on your Mac, open your Terminal application and run the following commands;
brew update brew install findutils
The updated formula is as follows:
1 2 3 4 5 6 7 8 9 10 11 12 13 14 15 16 17 18 19
require 'formula' class Findutils < Formula url 'http://ftp.gnu.org/pub/gnu/findutils/findutils-4.4.2.tar.gz' homepage 'http://www.gnu.org/software/findutils/' md5 '351cc4adb07d54877fa15f75fb77d39f' def options [['--default-names', "Do NOT prepend 'g' to the binary; will override system utils."]] end def install args = ["--prefix=#{prefix}", "--disable-debug", "--disable-dependency-tracking"] args << "--program-prefix=g" unless ARGV.include? '--default-names' system "./configure", *args system "make install" end end
Currently findutils has no dependencies in homebrew.
See which packages depend on findutils.
0 notes
Text
xargsにパイプで渡した標準入力が空だった場合にエラーが出ないようにする
はじめに xargs コマンドは非常に便利です。 パイプでつなぎ、前のコマンドを1つずつ(あるいはいくつかの束ずつ)処理していくときに 簡潔に記述できかつ高速です。 ただ、パイプの前のコマンドの実行結果が空になると想定しない挙動をする場合があります。 問題と対処について紹介します。 検証環境 $ uname -moi x86_64 x86_64 GNU/Linux $ bash -version | head -n 1 GNU bash, version 4.2.46(2)-release (x86_64-redhat-linux-gnu) $ xargs --version | head -n 1 xargs (GNU findutils) 4.5.11 何も考慮せず xargs を使ってみる。 なにか具体的な例を考えたいので、 seq コマンドで生成した数列を xargs…
View On WordPress
0 notes
Text
GCPのGoogle Container Registryのイメージを一括削除する方法
はじめに
GCP上の Google Container Registry 内に不要なDockerイメージがあるため、削除したいと思いました。
Dockerイメージを削除するためには、すべてのタグ(というかハッシュ。ビルド履歴)を削除する必要がありmさう。
対象のDockerイメージに4000以上のタグが付与されているため、できる限り一括かつ並列で削除擦る方法を探してみました。
検証環境
$ uname -moi x86_64 MacBookPro16,1 Darwin $ bash -version | head -n 1 GNU bash, バージョン 5.0.17(1)-release (x86_64-apple-darwin19.4.0) $ xargs --version | head -n 1 xargs (GNU findutils) 4.7.0
準備
GCP上のリソース…
View On WordPress
0 notes
Text
xargsを使う際には`echo`は書かなくてもよいことをmanページから知った
はじめに
小さなことですが、 xargs の man ページを見ていて気づいたことが 2つ ありました。
検証環境
$ bash -version | head -n 1 GNU bash, version 4.2.46(2)-release (x86_64-redhat-linux-gnu) $ xargs --version | head -n 1 xargs (GNU findutils) 4.5.11
man ページの一部抜粋
一部抜粋します。 以下のようなことが書いてありました。
xargs reads items from the standard input, delimited by blanks (which can be protected with double or single quotes or a backslash) or newlines, and…
View On WordPress
0 notes