#fix expired evaluation Configuration Manager
Explore tagged Tumblr posts
Visit Tumblr Blog
Explore Tumblr blogs with no restrictions, modern design and the best experience.
Last Seen Tumblr Blogs


Fun Fact
Tumblr’s reach among the 26-to-35-year-olds in the US is 11%.
Text
Upgrade Expired Evaluation Configuration Manager to Full Version
When you install Configuration Manager as an evaluation version. It becomes read-only after 180 days. Before or after this period, you will need to activate the product from the Site Maintenance page in Setup and have it upgraded to a full installation. This can be done at any time before or after the 180 days. In this article, we shall discuss how to Upgrade Expired Evaluation Configuration…
#Configuration Manager evaluation expired fix#Configuration Manager evaluation license upgrade#Configuration Manager evaluation to licensed version#convert SCCM evaluation to full version#expired Configuration Manager upgrade steps#fix Configuration Manager expired trial#fix expired evaluation Configuration Manager#fix SCCM trial expiration#full version upgrade SCCM#Microsoft Windows#SCCM evaluation version upgrade process#SCCM license upgrade guide#SCCM upgrade expired to full installation#upgrade Configuration Manager evaluation to full version#upgrade evaluation installation Configuration Manager#upgrade SCCM evaluation to full installation#Windows Server#Windows Server 2019#Windows Server 2025
0 notes
Text
Create Discount Codes in Bulk Shopify: Generate and Export with Ease
Managing discount codes efficiently is essential for maximizing the impact of your promotional campaigns on Shopify. Whether you’re running a seasonal sale, a flash sale, or a loyalty program, generating and exporting discount codes in bulk can save you time and ensure your promotions are executed seamlessly. Here’s a detailed guide on how to create discount codes in bulk shopify and export them with ease.
1. Access Your Shopify Admin Panel
Begin by logging into your Shopify admin panel. This is where you will set up and manage all aspects of your discount codes. Navigate to the Discounts section from the admin dashboard to start the process.
2. Install a Bulk Discount Code Generator App
To efficiently create discount codes in bulk, you’ll need a dedicated app. Shopify’s App Store offers several options that simplify the bulk discount code creation process:
Bulk Discount Code Generator: Allows you to generate a large number of discount codes quickly and efficiently.
Discount Code Generator & Manager: Provides comprehensive tools for creating, managing, and exporting discount codes.
Install one of these apps to facilitate the bulk generation of discount codes.
3. Configure Your Bulk Discount Code Generator
Once you have installed your chosen app, configure it to meet your specific needs:
Set Discount Parameters: Define the type of discount (percentage, fixed amount, or free shipping), the value or percentage of the discount, and whether it applies to specific products, collections, or the entire store.
Code Format: Choose how your discount codes will be formatted. Options typically include random strings or predefined patterns.
Usage Limits: Set limits on how many times each code can be used and whether it is a one-time use per customer.
Expiration Dates: Specify the start and end dates for the discount codes to align with your promotional schedule.
4. Generate Discount Codes in Bulk
With your settings configured, proceed to generate your discount codes:
Enter the Number of Codes: Specify how many discount codes you need. The app will create a list of unique codes based on the parameters you set.
Generate Codes: Click the generate button to produce your discount codes. This process is usually quick, allowing you to create thousands of codes in a matter of minutes.
5. Export Discount Codes
Once your codes are generated, you’ll need to export them for distribution:
Access Export Function: Most bulk discount code generator apps have an export feature that allows you to download codes in a CSV file format.
Download the CSV File: Click the export button to save the file to your computer. This file will contain all the discount codes along with their details, such as discount value and expiration dates.
Verify the Codes: Open the CSV file to ensure that all codes are correctly formatted and contain the necessary details.
6. Distribute Discount Codes
Effective distribution of your discount codes is crucial for a successful promotion. Here’s how to do it:
Email Campaigns: Send the discount codes to your email list. Segment your list to target different customer groups with relevant offers.
Social Media: Share discount codes on your social media channels to drive traffic and engage with your audience. Use eye-catching posts and stories to create urgency.
Website Pop-ups: Implement pop-ups or banners on your website to notify visitors of the promotion and provide them with discount codes.
Affiliate and Influencer Partnerships: Share unique codes with affiliates and influencers to extend your reach and boost your promotional efforts.
7. Track and Analyze Performance
Monitor the effectiveness of your discount codes using Shopify’s built-in analytics tools:
Redemption Rates: Track how often the discount codes are used to gauge their appeal and effectiveness.
Sales Impact: Analyze how the discount codes affect overall sales and revenue.
Customer Engagement: Evaluate how customers are responding to the discount codes and whether they are leading to increased engagement.
8. Optimize Future Campaigns
Based on your analysis, make adjustments to optimize future discount code campaigns. Learn from successful strategies and areas needing improvement to enhance the effectiveness of your promotions.
9. Automate for Efficiency
Consider using Shopify’s automation features or third-party apps to manage and distribute discount codes automatically. Automation can save time and reduce manual effort, making it easier to handle large-scale promotions.
Conclusion
Creating and exporting discount codes in bulk Shopify is a powerful way to streamline your promotional efforts and save time. By using bulk discount code generator apps, configuring your settings, and distributing codes effectively, you can run successful promotions that drive sales and engage customers. This approach ensures that your discount campaigns are executed efficiently, allowing you to focus on growing your business and enhancing customer satisfaction.
1 note
·
View note
Text
Are you looking for a way to install VMware Player / VMware Workstation on your Kali Linux Machine?, If so, then this tutorial is for you. VMware Inc. provides a free version type 2 hypervisor namely VMware Player and a commercial one VMware Workstation. In this article we will guide you through the installation of Vmware Player and Workstation on Kali Linux system. The VMware Workstation provides some advanced features unlike VMware Player. Some of the features only available in the Pro version of Vmware Workstation are: UEFI Secure Boot Support Snapshots Create/Manage Encrypted VM Virtual Network Customization (NAT, network rename) Virtual Network Simulation (Packet Loss, Latency, Bandwidth) Remote vSphere Host Power Control Create Linked Clones Create Full Clones Encrypt VMs At times when guys do install VMware Player then try to run it, they get some Kernel modules needed messages. I installed VMware workstation and it automatically fixed that for me. You can install trial version of VMware Workstation Pro for testing purposes and evaluation if you are not ready to pay for a license key yet. One advantage of installing VMware Workstation is that it will install VMware Player for you which you can use after your evaluation period expires. Before you begin installation process update your system: sudo apt update sudo apt upgrade -y sudo reboot Step 1: Download VMware Workstation on Kali Linux Use the links below to download either edition of VMware Workstation: VMware Workstation Player # Download using curl cd ~/Downloads curl -O https://download3.vmware.com/software/player/file/VMware-Player-Full-16.2.1-18811642.x86_64.bundle VMware Workstation Pro # Download using wget cd ~/Downloads curl -O https://download3.vmware.com/software/wkst/file/VMware-Workstation-Full-16.2.1-18811642.x86_64.bundle If downloading from the website, select VMware Workstation Player / Pro for Linux and hit get link. If you don’t already have an account with VMware, create one by filling signup form. It’s a quick process. Installing Required Build Tools: sudo apt update sudo apt install build-essential linux-headers-$(uname -r) libaio1 libcanberra-gtk-module Agree to start installation: The following additional packages will be installed: linux-compiler-gcc-10-x86 linux-headers-5.9.0-kali5-common linux-kbuild-5.9 The following NEW packages will be installed: linux-compiler-gcc-10-x86 linux-headers-5.9.0-kali5-amd64 linux-headers-5.9.0-kali5-common linux-kbuild-5.9 The following packages will be upgraded: build-essential 1 upgraded, 4 newly installed, 0 to remove and 129 not upgraded. Need to get 13.0 MB of archives. After this operation, 62.3 MB of additional disk space will be used. Do you want to continue? [Y/n] y Step 2: Install VMware Workstation on Kali Linux Once the file is downloaded to your local hard drive. Navigate to its location using the terminal. For example, mine is located in Downloads Folder. cd ~/Downloads Then make it executable: # VMware Player chmod +x VMware-Player-Full-16.2.1-18811642.x86_64.bundle # VMware Workstation Pro chmod +x VMware-Workstation-Full-16.2.1-18811642.x86_64.bundle Now install Vmware Player and Workstation on Kali Linux: # VMware Player sudo ./VMware-Player-Full-16.2.1-18811642.x86_64.bundle # VMware Workstation Pro sudo ./VMware-Workstation-Full-16.2.1-18811642.x86_64.bundle The installer will start extraction and installation process from the terminal: Extracting VMware Installer...done. Installing VMware Player 16.1.2 Configuring... [######################################################################] 100% Installation was successful. Launch VMware Workstation and start using it.
0 notes
Text
How to use S G Optimizer plugin in wordpress
If you’re looking for the SiteGround SG Optimizer plugin review, you have landed on the right page.
SG Optimizer is a custom caching and performance improvement plugin for WordPress users developed by SiteGround.
This plugin will help you speed up WordPress site within just a few clicks and achieve better scores in Google PageSpeed Insights and GTMetrix.
Recently, the SiteGround team added many features to the SG Optimizer Plugin, including frontend optimization, media optimization, and server environment optimization.
With these changes, it’s now one of the best caching plugins for WordPress users, especially SiteGround customers.
In this article, I have reviewed the SG Optimizer plugin and shared the best settings to achieve better performance.
Table of Contents
SG Optimizer Plugin Review
I used SuccessPixel.com to evaluate the SG Optimizer plugin’s performance, instead of setting a demo site because this site is already hosted on SiteGround hosting.
Currently, I’m using the SiteGround GrowBig plan with GeneratePress Premium and 15 WordPress plugins.
So you can see the real-life performance of SG Optimizer and how it stands against the top caching plugins such as WP Rocket.
SG Optimizer Performance Test
I analyzed the page speed of SuccessPixel.com before and after installing the SG Optimizer plugin, and the results are shocking.
➤ Before

GPSI Mobile Score Before Installing SiteGround SG Optimizer

GPSI Desktop Score Before Installing SiteGround SG Optimizer
GTMetrix Score Before Installing SiteGround SG Optimizer
➤ After

GPSI Mobile Performance Score After Installing SG Optimizer
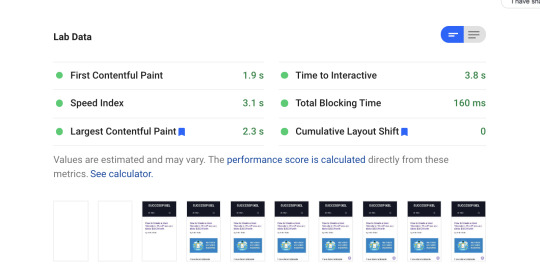
GPSI Mobile Performance Lab Data After Installing SG Optimizer

GPSI Desktop Performance Score After Installing SG Optimizer
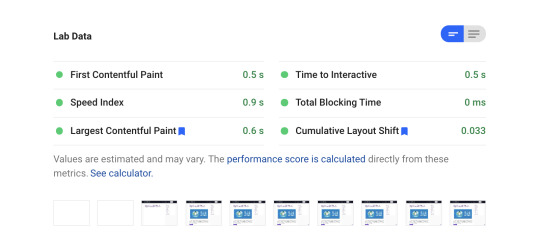
GPSI Desktop Performance Lab Data After Installing SG Optimizer
GTMetrix Score After Installing SiteGround SG Optimizer
You can see a clear difference in the website performance after adding SG Optimizer to my site.
The Best Settings for SG Optimizer Plugin
To ensure the fastest site speed and best user experience, you need to enable a few options in the SG Optimizer plugin.
Don’t worry!
Setting up the SG Optimizer plugin is quite simple.
You just need to toggle the options under each tab to activate the specific modules.
Let’s see how to do that and speed up your WordPress site.
1. SuperCacher Settings
SuperCacher is a custom caching solution developed by SiteGround.
Enabling the SuperCacher improves the site speed and also handles more hits.
SiteGround offers three different levels of caching:
NGINX Direct Delivery
Dynamic Cache
Memcached
The SiteGround Startup plan users can access only the SuperCacher level 1.
However, the GrowBig and GoGeek plan users can access all three levels of SuperCacher.
SiteGround claims that a website using all three levels of SuperCacher can handle 100x more hits than a regular site without a caching mechanism.
If you haven’t a SiteGround user yet, I recommend you to pick either GrowBig or GoGeek plan.Buy SiteGround WordPress Hosting
Now, let’s discuss the best SuperCacher settings for your site.
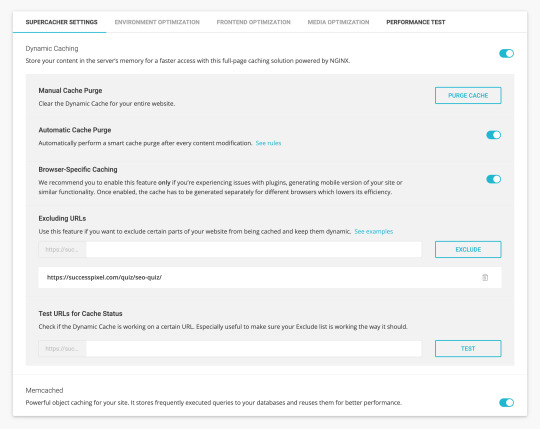
SG Optimizer SuperCacher Settings
Please note that the SuperCacher Level 1, i.e., NGINX Direct Delivery is available on all SiteGround WordPress hosting plans.
With NGINX Direct Delivery SiteGround serves most of the static resources, including images, JS, and CSS on your website directly through NGINX to achieve the fastest page speed possible.
You can enable this option by visiting your SiteGround account and navigating to the Site Tools > Speed > Caching.
The Dynamic Caching and Memcached options are available in the SiteGround account as well as under SG Optimizer SuperCacher Settings.
The dynamic caching is a full-page caching solution powered by NGINX that stores your content in the server’s memory for faster access.
Memcached is an advanced object caching solution that stores frequently executed queries to the databases and reuses them to achieve better performance.
I recommend you to get the benefit of both caching solutions to improve your page loading speed.
2. Environment Optimization
The Server Environment Optimization tab helps you configure various options to ensure the best performance.
➤ Enable HTTPS
This option helps you enable a proper HTTPS configuration and forces a secure connection to the site.

SG Optimizer Enable HTTPS
You can also fix the insecure content errors by rewriting the insecure requests for resources.
➤ WordPress Heartbeat Optimization
Enabling this option allows the SiteGround SG Optimizer to control WordPress Heartbeat API.
The WordPress Heartbeat API checks for the page edits every 15 seconds or scheduled tasks after every 60 seconds.
Such activities generate high CPU usage when you are logged into the WordPress admin panel or have multiple tabs open for a longer period.
The SG Optimizer WordPress Heartbeat Optimization option allows you to run these checks less frequently or disable them.

SG Optimizer WordPress Heartbeat Optimization
➤ DNS Pre-fetch for External Domains
DNS pre-fetching for external domains saves DNS lookup time for resources loaded from these domains.
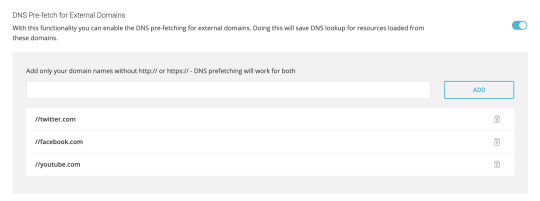
SG Optimizer DNS Pre-fetch for External Domains
If you embed tweets, YouTube videos, Vimeo videos, Facebook Like Box, Amazon affiliate links, or any content that requires external resources to be fetched to render a web page, add these domains under the DNS pre-fetch option without HTTP:// or HTTPS://.
➤ Scheduled Database Maintenance
Enabling the Scheduled Database Maintenance option clean up your database to keep it small and optimized.
If you activate this option, SG Optimizer will execute the following tasks every 48 hours:

SG Optimizer Scheduled Database Maintenance
Perform Database Optimization for MyISAM tables.
Remove all page and post revisions.
Delete all automatically created post and page drafts.
Delete all posts and pages in your Trash permanently.
Delete all comments marked as Spam.
Delete all expired Transients.
You’ll find more options such as PHP Version Selector, Gzip Compression, and Browser Caching.
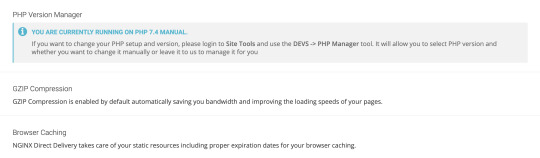
SG Optimizer PHP Version Manager Gzip Compression Browser Caching
By default, SiteGround offers the most stable PHP version and enables Gzip Compression & Browser Caching for every site to ensure the best server environment.
3. Frontend Optimization
This tab allows you to optimize the frontend code to ensure faster speed without compromising on mobile aesthetics.
Here are the best settings for SG Optimizer Frontend Optimization.
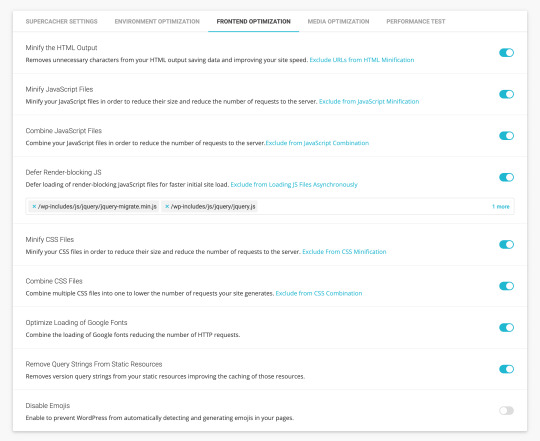
SG Optimizer Frontend Optimization
➤ Minify the HTML Output
This option removes unnecessary characters from the HTML output saving data and enabling faster site loading time.
➤ Minify JavaScript Files
This option helps in the minification of the JavaScript files to reduce their size and the number of requests to the server.
➤ Combine JavaScript Files
Combining the JavaScript files is another great way to reduce the number of requests to the webserver.
➤ Defer Render-blocking JS
You can defer the loading of non-critical render-blocking JavaScript files to ensure faster initial site load.
This way, users don’t need to wait for a long time before the page loads in their browser.
If you find any render-blocking JS file in the Google PageSpeed Insights report, include it under the box provided below the Defer Render-blocking JS option.
➤ Minify CSS Files
Minification of CSS files reduces their size and the number of requests to the server.
➤ Combine CSS Files
If CSS minification breaks your site’s layout, combine multiple CSS files into one file to lower the number of requests to the server.
➤ Optimize Loading of Google Fonts
Adding Google Fonts generate extra HTTP requests.
However, you can combine the loading of Google fonts, reducing the number of HTTP requests.
I recommend you to use system fonts or host Google Fonts locally to improve the website performance.
➤ Remove Query Strings From Static Resources
Enabling this option removes query strings from the static resources improving the caching of those resources.
You don’t need to edit the .htaccess file or install an additional plugin to get this functionality.
➤ Disable Emojis
Disabling emojis prevents WordPress from automatically detecting and creating emojis in your pages.
Since emojis are engaging elements, I suggest turning this option OFF.
4. Media Optimization
This tab allows you to optimize media content, including images and videos, with some advanced features.
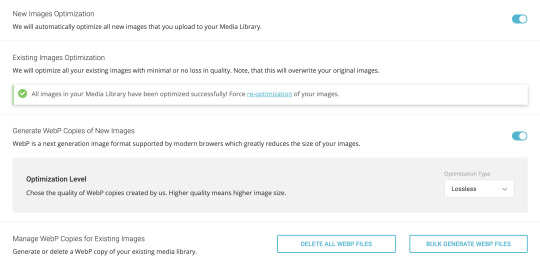
SG Optimizer Image Optimization
➤ New Images Optimization
SG Optimizer plugin automatically compresses all new images that you upload to the Media Library if this feature is turned ON.
As a result, your images consume less space and get downloaded faster when the client requests these images.
➤ Existing Images Optimization
Enabling this option optimizes all existing images on your website with minimal to no loss in quality.
Please note that this action will overwrite your original images.
➤ Generate WebP Copies of New Images
WebP is a next-generation image format with superior lossless and lossy compression. Most modern browsers, including Google Chrome and Safari support WebP.
You can create WebP copies of new images to reduce the image sizes served in the browser.
SG Optimizer allows you to choose the optimization type, i.e., lossless or lossy, depending on the desired image quality and page speed.
➤ Manage WebP Copies for Existing Images
This option allows you to generate or delete WebP copies of your existing media files in bulk.
➤ Lazy Load Media
Lazy loading is a major speed optimization technique that loads images and other media files only when they are needed to be visible in the browser.
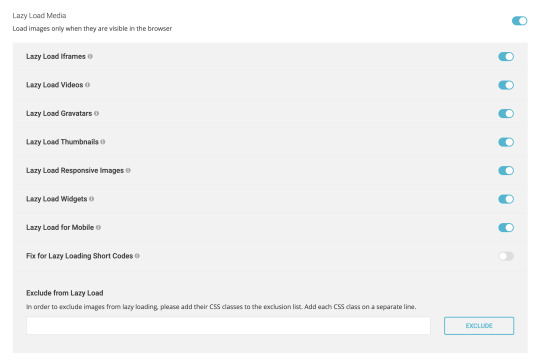
SG Optimizer Lazy Load Media
SG Optimizer plugin allows lazy loading for responsive images, videos, iframes, Gravatars, thumbnails, widgets, and mobile media library.
You can also fix lazy loading for short-codes or exclude images from the lazy load.
5. Performance Test
Once you have optimized your website using the SG Optimizer plugin, you can test its performance with a built-in tool powered by Google PageSpeed.
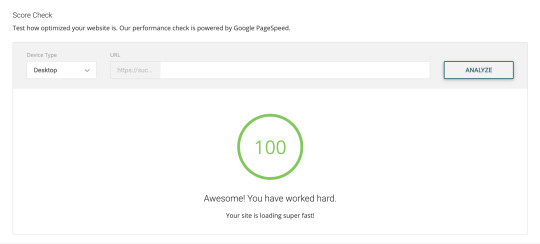
SG Optimizer Performance Score Check
You can analyze the homepage or any URL for desktop vs. mobile speed with this feature.
SG Optimizer vs WP Rocket vs Other Plugins
Adding SG Optimizer plugin to your WordPress site can eliminate a bunch of plugins, including WP Rocket, WP-Optimize, WP Super Cacher, and ShortPixel.
SG Optimizer offers an all-in-one solution for Caching, Environment Optimization, WordPress Heatbeat Optimization, DNS Pre-fetch, Image Optimization, Code Minification, and Frontend Optimization.
Plus, it’s available in the official WordPress plugin library for free of cost.
Non-techies may need to install multiple WordPress plugins to achieve the functionalities mentioned above.
While a few plugins are freely available across the web and in the WordPress plugin library, others come with premium fees.
Overall, SG Optimizer is the best WordPress caching and performance optimization plugin.
Since the SG Optimizer plugin is designed to work best with SiteGround servers, I recommend you to purchase SiteGround WordPress hosting to achieve the best possible performance.
The post How to use S G Optimizer plugin in wordpress appeared first on The Coding Bus.
from WordPress https://ift.tt/2EvbWrP via IFTTT
0 notes
Text
Atlassian Crowd 3.4 Release Notes
The Atlassian Crowd team is pleased to bring you Crowd 3.4 , which comes with some great new features.
Get the latest version
Crowd SSO 2.0
We’re proud to present you SSO 2.0 - Crowd’s single point of access for Jira, Jira Service Desk, Bitbucket, and Confluence across different domains with one common login page.
The SSO 2.0 functionality is available for Crowd Data Center only. If you are not a Crowd Data Center license holder, you can create your evaluation license for Crowd Data Center and take Crowd for a spin. You can get your free Crowd Data Center evaluation license from Atlassian license evaluation page.
For more information, see Crowd SSO 2.0.

Crowd's new clothes
Crowd 3.4 is released with fresh new look thanks to the implementation of Atlassian Design Guidelines (ADG) in Server. ADG in Server is based on the new Atlassian design and contains updates to color palette, typography and icons but doesn't include any of the navigation changes that are unique to Atlassian cloud products. These design changes are implemented via an upgrade to AUI.

Managing direct group members got refreshed
Crowd 3.4 brings you refreshed screen where you manage direct group members. We've introduced a totally new search box, dynamic table, and an easy way to quickly add and remove your users. Enjoy!

Known issues & Security considerations
Infinite-authentication-loop in Confluence and Jira
If you’re using SAML authentication with Crowd in Confluence or Jira and you encounter a restricted area in one of these applications, you’ll be redirect to Crowd to authenticate. Once you authenticate in Crowd, you’ll be redirected back to your application. Since you don’t have permissions to access that particular area, the application redirects you again to Crowd this way creating an infinite loop. The Crowd team is currently working on a solution to this issue.
Protection against brute-force attacks
If you’re using an external directory with Crowd, it will protect you against such brute-force attacks as submitting many passwords or passphrases to a log in page. However, for internal directories, there’s no limit for passwords attempts by default. To enable the maximum password attempts, in your directory click the configuration tab and set the maximum password attempts to >0. See Configuring an Internal Directory.
Issues in Release
Improvement: Support MatchMode.ENDS_WITH for CrowdService.search
Improvement: Allow reading of database connection parameters via environment variables
Improvement: Upgrade AUI to 7.X (ADG3)
Improvement: Fully update to the new look and feel
Fixed: Duplicated group names break incremental sync
Fixed: Local group with same name breaks incremental sync
Fixed: Insufficient Session Expiration of user sessions - CVE-2018-20238
Fixed: Password expiry mail notifications are sent to inactive users
Fixed: Crowd does not correctly log abnormal terminations of password expiry mail sending
Fixed: Password expiry mail notification sending fails for users with null email
Fixed: Screenshots in Crowd documentation are pre-ADG makeover and should be updated
Source
0 notes
Text
15 Critical Website Fixes to Make Before Launching a Mobile App
Your target market has gone mobile. Mobile users spend up to 12% of their time browsing on their device, which works out to 87 hours a month or 1,044 hours a year spent on their phone; 90% of that time is spent using mobile apps.
Which is why having a mobile app can be so valuable for your business. No wonder everyone seems to be jumping on the bandwagon. Even 67% of small businesses now have a mobile app.
The problem is, many apps are just awful extensions of already bad websites. While you might feel the urge to dive straight into developing your own and racing it to the market, it’s a huge mistake. Mobile apps are a gateway to your site. So trying to implement them without some critical website optimization can directly impact the amount of time and money it takes to create the app.
Here are 15 website tweaks you should make before considering a mobile app.
Speed Optimization
Speed is critical to the user experience. Which means that if you want your website and your mobile app to provide a great user experience, the first thing you need to do is optimize your site speed.
Here are the tweaks you need to make, to do so:
1. Minify
Minification reduces the size of your website CSS, JavaScript, and HTML content. It works by removing any unnecessary website code, such as:
Unnecessary code in your JavaScript;
Unused spaces in your CSS;
Unnecessary line-breaks in your HTML.
If you use WordPress, there are plenty of plugins available that will take care of this process for you, including Fast Velocity Minify and Autoptimize.
2. Compress
Text compression can also boost speed, especially on text-heavy websites such as blogs. Most Content Delivery Networks support the sending of compressed files so you can set up default compression through a tool such as Gzip.
If you don’t host your own website, you can use Check GZIP Compression to see if compression is already set up. If it’s not, the easiest way to install it is through a plugin such as W3 Total Cache, WP Super Cache or WP Rocket.
3. Maximize Caching
HTTP caching is when a browser stores copies of resources so that they can be re-accessed faster. Using an HTTP cache header, you can define when, how, and how long a response should be cached.
You can configure your server to attach the HTTP Cache-Control header and modify it for how long you want data cached. One way to do this is to add the header directly into your code.
Here is an example of a PHP header with a Cache-Control setting of max-age equal to 84,600 seconds (1 day):
header('Cache-Control: max-age=84600')
By setting a max-age expiration header, you will ensure repeat visitors are not slowed down accessing resources they downloaded before. Aim for caching as many resources for the longest period of time as securely possible. Then provide validation tokens for efficient revalidation of the resources that got updated.
4. Reduce JavaScript Load Time
JavaScript can cause delays, especially if you have large bundles of it. On an average mobile phone, processing these bundles can take 5–10x longer than on a desktop. You can combat this with code splitting.
Code splitting breaks your JavaScript bundles into pieces to deliver them faster and only as users need it. It can be applied at a route level or component level with tools such as React, Parcel, and Webpack.
5. Optimize Images
Visuals are important for user engagement, but the last thing you want is for them to slow down the user experience. Thankfully, there are plenty of tools on the market that will help you compress and optimize your images.
Here are a number of options to choose from:
One-off optimization tools:
ImageOptim
XNConvert
Automated optimization:
Imageflow
Imagemin
Thumbor
Hosting and optimization:
Akamai
Cloudinary
Fastly
6. Format Animated Content
The GIF format is popular for animations, but it was actually never intended as an animation platform. By switching to a more suitable video format, you can greatly reduce file size and speed up page times.
You can use the FFmpeg tool to convert animation GIFs into mp4 files. You can also use the Effective Type API tool to identify slow bandwidths, and automatically convert from delivering your animated images to much smaller JPEGs. While it does remove some of the user experience, it’s better than the site failing to load or operating unreasonably slowly.
7. Reduce Plugins
WordPress has over 54,000 plugins. While it is the largest platform on the market, even competing options still offer plugins in the thousands. There are plugins for practically anything you can dream up these days — ecommerce plugins like BigCommerce for WordPress, email marketing plugins like Mailchimp, and conversion rate optimization plugins like OptinMonster. Many of them add valuable functionality.
The problem is, too many plugins can slow down your site speed. First, make sure you don’t have anything installed that you’re not using. Next, uninstall any plugins for services that you can integrate with your website through other means. Google Analytics is a prime example. There is no reason to use a plugin for this integration when you can do it with an API key.
Finally, if you still have a lot of plugins look for some all-in-one solutions that can replace handfuls of niche ones. For instance, don’t use separate plugins for minification, compression, and caching when there is one solution for all three. However, perform your due diligence as some all-in-one plugins like Jetpack slow down your site more than any others.
How many plugins are too many? Here’s a general rule of thumb:
No more than five if you have shared or budget cloud hosting;
No more than 20 if you use cloud hosting, VPS hosting, or a dedicated server.
8. Use AMP
Accelerated Mobile Pages (AMP) refers to an open-source web programming language that delivers static content instantly to mobile devices. It’s basically a lean, stripped down version of HTML built specifically for speeding up non-interactive web pages on mobile devices.
Because it’s a stripped down version, you do trade-off some functionality for this rapid speed. Here are two potential drawbacks to be aware of:
JavaScript is limited to an off-the-shelf AMP library;
Lazy load functionality is enabled (images load as you scroll down to them);
Lead generation may be impacted, as AMP often removes opt-in forms.
On the other hand, one of the biggest advantages (other than the improved speed) is that Google’s mobile-first indexing tends to promote AMP pages in search results. There are plenty of plugins to choose from for enabling AMP, including AMP, AMP for WP – Accelerated Mobile Pages, and AMP WP – Google AMP For WordPress.
9. Address Redirects and Broken Links
Redirects and broken links can kill your user experience as well as slow down your site speed.
Redirects
You’ll want to minimize redirects as much as possible, as they impact page speed and even the overall load time of your site. The delay tends to become even more noticeable when users are on mobile devices.
You can use a free tool such as Screaming Frog to check your website for any redirects. Once you’ve found some, remove any that aren’t needed and make changes to any that need to be updated.
If you have a secure site, you can also use HSTS to remove the SSL redirect.
Broken Links
Thankfully, there are also free tools you can use to find and fix broken links across your website. Two examples are:
Broken Link Checker
Xenu
Once you identify the broken links, you can either update them with the right URL or remove the linkage.
Both of these checks should be a routine part of your website management as redirects and broken links can crop up again over time.
10. Continually Test
We’ve covered nine significant methods for optimizing your page speed before introducing a mobile app. While this should significantly increase your site performance, you could still have more opportunities for improvement.
There are hundreds of tools for testing your website page speed and mobile readiness, but the best place to start is with Google’s PageSpeed Insights tool.
It will give you a current page speed score for both your desktop and mobile versions of your site and make specific suggestions on how you can improve.
The next step is to use Test My Site to further analyze mobile page speed and friendliness.
All you need to do is enter your website URL, and it will scan your site and evaluate. You can also get a free report containing optimization advice in exchange for submitting your email.
Site speed also provides huge SEO benefits. In addition to writing high-quality, long-form content and getting backlinks, site speed has a major impact on increasing website traffic.
In early 2019, I conducted a personal case study where I wrote as many guest posts as I could in 15 days. In that timeframe, I received 247 backlinks and a 372% increase in organic traffic.
However, this pales in comparison to the impact site speed has had on my mobile traffic. By boosting my mobile speed from 33 to 75+ over the same time period, I saw my mobile rankings increase 1,775% according to Google Analytics data.
UI Optimization
Speed may be at the top of the UX hierarchy, but it’s not the only factor. There are other components to consider, such as:
How easy it is to find what you’re looking for;
How well the site fits your mobile screen;
How simple it is to use;
How attractive it looks.
You can use the following site tweaks to streamline and maximize the user interface.
11. Simplify Your Structure
Your website needs to be intuitive and easy for users to navigate, especially when they’re trying to do so on the small screen of a mobile device.
Make sure your hierarchies are streamlined and that you have no more than one nested content level. Your ideal site structure should look like this:
Homepage
Categories (or sections)
Sub categories (only for larger sites)
Individual pages and posts
Focus on what your users are typically looking for and map out the common paths they will take. Then you can arrange categories in a hierarchy that will make the most sense to your audience.
You should also use knowledge base software to create a central resource or knowledge base for any users seeking answers to common questions.
This is about the simplest design tweak you can do that makes a lasting impact for both desktop and mobile usage.
12. Focus on Content Design
Designing your content around mobile can be a bit trickier, but it’s crucial for a successful mobile experience. A bad website design can kill your content on your app.
The bottom line is that you need your content to shine through with as few distractions as possible. To do this, you may need to remove elements such as tables, graphs, and other clunky elements that don’t translate well to the small screen.
You also need to strip down features such as headers, footers, menus, and sidebars so that they can be hidden or collapsed on smaller screens. Disable any hover-effects for your content as many mobile devices don’t have this functionality.
You don’t want to use too much text either. You can cut down on text by using tools such as Grammarly’s goals and audiences to help you create more concise copy that’s on point. Or, even better, focus on replacing text with more video content to maximize your mobile experience.
13. Reduce Banners and Sliders
Sliders have been popular for a while, but people typically add 5-6 high-quality images to a slider, which increases the overall load time of your website. Plus, studies show sliders annoy users and reduce visibility, especially on mobile.
Banners can result in similar problems, especially if they have any embedded text within the image. If you currently have any banners with text you should render the text with HTML & CSS instead of embedding it into the image. This will make it more flexible and easier to see on a smaller screen.
14. Optimize Forms and Touch Points
If your website has forms on it, pay attention to the field types, lengths, and labels. Everything should be clearly visible on any device. Enable functionality so that if a user taps on a field to enter information, the view zooms-in to the correct spot.
Check to see if you have field types that require a different keypad or touchscreen, such as a ZIP code, phone number, or electronic signature. If so, you should set the field to trigger the correct keyboard when tapped on, so users don’t have to switch manually.
Make sure all touch points and buttons will be visible and large enough to easily tap with a finger on a small screen. The standard recommendation is that they should be roughly 48 x 48 dp in size. Place text inside of the buttons rather than above or below it for easy identification.
15. Streamline Checkout
If you run an ecommerce website, this final tweak is for you.
About half of all ecommerce traffic comes from mobile devices, but when it comes to buying more people still do it on their desktops. This is likely because the entire flow of ordering, checking out, and paying is not properly optimized for mobile devices.
To identify where your process needs improvement, go through all of the steps across multiple devices and screen sizes and identify any pain points. The issue may be something we’ve already covered such as difficult form navigation or too small touch points.
However, even with these optimized, if you require a lot of data, it can still be painful to enter it all from a mobile device.
You can remedy this in one of the following ways:
Allow users to create profiles that will save and pre-populate their checkout information including shipping address and credit card number
Integrate with other payment gateways, such as PayPal that won’t require them to re-type their information.
Conclusion
Phone screens are getting larger, and tablets are getting more sophisticated, so it’s no wonder more of your audience is logging on and interacting through a mobile device.
A mobile app can be a great way to further engage with your users. But only if you optimize your website first to ensure a smooth user experience.
Featured image via Unsplash
Add Realistic Chalk and Sketch Lettering Effects with Sketch’it – only $5!
Source p img {display:inline-block; margin-right:10px;} .alignleft {float:left;} p.showcase {clear:both;} body#browserfriendly p, body#podcast p, div#emailbody p{margin:0;} 15 Critical Website Fixes to Make Before Launching a Mobile App published first on https://medium.com/@koresol
0 notes
Text
15 Critical Website Fixes to Make Before Launching a Mobile App
Your target market has gone mobile. Mobile users spend up to 12% of their time browsing on their device, which works out to 87 hours a month or 1,044 hours a year spent on their phone; 90% of that time is spent using mobile apps.
Which is why having a mobile app can be so valuable for your business. No wonder everyone seems to be jumping on the bandwagon. Even 67% of small businesses now have a mobile app.
The problem is, many apps are just awful extensions of already bad websites. While you might feel the urge to dive straight into developing your own and racing it to the market, it’s a huge mistake. Mobile apps are a gateway to your site. So trying to implement them without some critical website optimization can directly impact the amount of time and money it takes to create the app.
Here are 15 website tweaks you should make before considering a mobile app.
Speed Optimization
Speed is critical to the user experience. Which means that if you want your website and your mobile app to provide a great user experience, the first thing you need to do is optimize your site speed.
Here are the tweaks you need to make, to do so:
1. Minify
Minification reduces the size of your website CSS, JavaScript, and HTML content. It works by removing any unnecessary website code, such as:
Unnecessary code in your JavaScript;
Unused spaces in your CSS;
Unnecessary line-breaks in your HTML.
If you use WordPress, there are plenty of plugins available that will take care of this process for you, including Fast Velocity Minify and Autoptimize.
2. Compress
Text compression can also boost speed, especially on text-heavy websites such as blogs. Most Content Delivery Networks support the sending of compressed files so you can set up default compression through a tool such as Gzip.
If you don’t host your own website, you can use Check GZIP Compression to see if compression is already set up. If it’s not, the easiest way to install it is through a plugin such as W3 Total Cache, WP Super Cache or WP Rocket.
3. Maximize Caching
HTTP caching is when a browser stores copies of resources so that they can be re-accessed faster. Using an HTTP cache header, you can define when, how, and how long a response should be cached.
You can configure your server to attach the HTTP Cache-Control header and modify it for how long you want data cached. One way to do this is to add the header directly into your code.
Here is an example of a PHP header with a Cache-Control setting of max-age equal to 84,600 seconds (1 day):
header('Cache-Control: max-age=84600')
By setting a max-age expiration header, you will ensure repeat visitors are not slowed down accessing resources they downloaded before. Aim for caching as many resources for the longest period of time as securely possible. Then provide validation tokens for efficient revalidation of the resources that got updated.
4. Reduce JavaScript Load Time
JavaScript can cause delays, especially if you have large bundles of it. On an average mobile phone, processing these bundles can take 5–10x longer than on a desktop. You can combat this with code splitting.
Code splitting breaks your JavaScript bundles into pieces to deliver them faster and only as users need it. It can be applied at a route level or component level with tools such as React, Parcel, and Webpack.
5. Optimize Images
Visuals are important for user engagement, but the last thing you want is for them to slow down the user experience. Thankfully, there are plenty of tools on the market that will help you compress and optimize your images.
Here are a number of options to choose from:
One-off optimization tools:
ImageOptim
XNConvert
Automated optimization:
Imageflow
Imagemin
Thumbor
Hosting and optimization:
Akamai
Cloudinary
Fastly
6. Format Animated Content
The GIF format is popular for animations, but it was actually never intended as an animation platform. By switching to a more suitable video format, you can greatly reduce file size and speed up page times.
You can use the FFmpeg tool to convert animation GIFs into mp4 files. You can also use the Effective Type API tool to identify slow bandwidths, and automatically convert from delivering your animated images to much smaller JPEGs. While it does remove some of the user experience, it’s better than the site failing to load or operating unreasonably slowly.
7. Reduce Plugins
WordPress has over 54,000 plugins. While it is the largest platform on the market, even competing options still offer plugins in the thousands. There are plugins for practically anything you can dream up these days — ecommerce plugins like BigCommerce for WordPress, email marketing plugins like Mailchimp, and conversion rate optimization plugins like OptinMonster. Many of them add valuable functionality.
The problem is, too many plugins can slow down your site speed. First, make sure you don’t have anything installed that you’re not using. Next, uninstall any plugins for services that you can integrate with your website through other means. Google Analytics is a prime example. There is no reason to use a plugin for this integration when you can do it with an API key.
Finally, if you still have a lot of plugins look for some all-in-one solutions that can replace handfuls of niche ones. For instance, don’t use separate plugins for minification, compression, and caching when there is one solution for all three. However, perform your due diligence as some all-in-one plugins like Jetpack slow down your site more than any others.
How many plugins are too many? Here’s a general rule of thumb:
No more than five if you have shared or budget cloud hosting;
No more than 20 if you use cloud hosting, VPS hosting, or a dedicated server.
8. Use AMP
Accelerated Mobile Pages (AMP) refers to an open-source web programming language that delivers static content instantly to mobile devices. It’s basically a lean, stripped down version of HTML built specifically for speeding up non-interactive web pages on mobile devices.
Because it’s a stripped down version, you do trade-off some functionality for this rapid speed. Here are two potential drawbacks to be aware of:
JavaScript is limited to an off-the-shelf AMP library;
Lazy load functionality is enabled (images load as you scroll down to them);
Lead generation may be impacted, as AMP often removes opt-in forms.
On the other hand, one of the biggest advantages (other than the improved speed) is that Google’s mobile-first indexing tends to promote AMP pages in search results. There are plenty of plugins to choose from for enabling AMP, including AMP, AMP for WP – Accelerated Mobile Pages, and AMP WP – Google AMP For WordPress.
9. Address Redirects and Broken Links
Redirects and broken links can kill your user experience as well as slow down your site speed.
Redirects
You’ll want to minimize redirects as much as possible, as they impact page speed and even the overall load time of your site. The delay tends to become even more noticeable when users are on mobile devices.
You can use a free tool such as Screaming Frog to check your website for any redirects. Once you’ve found some, remove any that aren’t needed and make changes to any that need to be updated.
If you have a secure site, you can also use HSTS to remove the SSL redirect.
Broken Links
Thankfully, there are also free tools you can use to find and fix broken links across your website. Two examples are:
Broken Link Checker
Xenu
Once you identify the broken links, you can either update them with the right URL or remove the linkage.
Both of these checks should be a routine part of your website management as redirects and broken links can crop up again over time.
10. Continually Test
We’ve covered nine significant methods for optimizing your page speed before introducing a mobile app. While this should significantly increase your site performance, you could still have more opportunities for improvement.
There are hundreds of tools for testing your website page speed and mobile readiness, but the best place to start is with Google’s PageSpeed Insights tool.
It will give you a current page speed score for both your desktop and mobile versions of your site and make specific suggestions on how you can improve.
The next step is to use Test My Site to further analyze mobile page speed and friendliness.
All you need to do is enter your website URL, and it will scan your site and evaluate. You can also get a free report containing optimization advice in exchange for submitting your email.
Site speed also provides huge SEO benefits. In addition to writing high-quality, long-form content and getting backlinks, site speed has a major impact on increasing website traffic.
In early 2019, I conducted a personal case study where I wrote as many guest posts as I could in 15 days. In that timeframe, I received 247 backlinks and a 372% increase in organic traffic.
However, this pales in comparison to the impact site speed has had on my mobile traffic. By boosting my mobile speed from 33 to 75+ over the same time period, I saw my mobile rankings increase 1,775% according to Google Analytics data.
UI Optimization
Speed may be at the top of the UX hierarchy, but it’s not the only factor. There are other components to consider, such as:
How easy it is to find what you’re looking for;
How well the site fits your mobile screen;
How simple it is to use;
How attractive it looks.
You can use the following site tweaks to streamline and maximize the user interface.
11. Simplify Your Structure
Your website needs to be intuitive and easy for users to navigate, especially when they’re trying to do so on the small screen of a mobile device.
Make sure your hierarchies are streamlined and that you have no more than one nested content level. Your ideal site structure should look like this:
Homepage
Categories (or sections)
Sub categories (only for larger sites)
Individual pages and posts
Focus on what your users are typically looking for and map out the common paths they will take. Then you can arrange categories in a hierarchy that will make the most sense to your audience.
You should also use knowledge base software to create a central resource or knowledge base for any users seeking answers to common questions.
This is about the simplest design tweak you can do that makes a lasting impact for both desktop and mobile usage.
12. Focus on Content Design
Designing your content around mobile can be a bit trickier, but it’s crucial for a successful mobile experience. A bad website design can kill your content on your app.
The bottom line is that you need your content to shine through with as few distractions as possible. To do this, you may need to remove elements such as tables, graphs, and other clunky elements that don’t translate well to the small screen.
You also need to strip down features such as headers, footers, menus, and sidebars so that they can be hidden or collapsed on smaller screens. Disable any hover-effects for your content as many mobile devices don’t have this functionality.
You don’t want to use too much text either. You can cut down on text by using tools such as Grammarly’s goals and audiences to help you create more concise copy that’s on point. Or, even better, focus on replacing text with more video content to maximize your mobile experience.
13. Reduce Banners and Sliders
Sliders have been popular for a while, but people typically add 5-6 high-quality images to a slider, which increases the overall load time of your website. Plus, studies show sliders annoy users and reduce visibility, especially on mobile.
Banners can result in similar problems, especially if they have any embedded text within the image. If you currently have any banners with text you should render the text with HTML & CSS instead of embedding it into the image. This will make it more flexible and easier to see on a smaller screen.
14. Optimize Forms and Touch Points
If your website has forms on it, pay attention to the field types, lengths, and labels. Everything should be clearly visible on any device. Enable functionality so that if a user taps on a field to enter information, the view zooms-in to the correct spot.
Check to see if you have field types that require a different keypad or touchscreen, such as a ZIP code, phone number, or electronic signature. If so, you should set the field to trigger the correct keyboard when tapped on, so users don’t have to switch manually.
Make sure all touch points and buttons will be visible and large enough to easily tap with a finger on a small screen. The standard recommendation is that they should be roughly 48 x 48 dp in size. Place text inside of the buttons rather than above or below it for easy identification.
15. Streamline Checkout
If you run an ecommerce website, this final tweak is for you.
About half of all ecommerce traffic comes from mobile devices, but when it comes to buying more people still do it on their desktops. This is likely because the entire flow of ordering, checking out, and paying is not properly optimized for mobile devices.
To identify where your process needs improvement, go through all of the steps across multiple devices and screen sizes and identify any pain points. The issue may be something we’ve already covered such as difficult form navigation or too small touch points.
However, even with these optimized, if you require a lot of data, it can still be painful to enter it all from a mobile device.
You can remedy this in one of the following ways:
Allow users to create profiles that will save and pre-populate their checkout information including shipping address and credit card number
Integrate with other payment gateways, such as PayPal that won’t require them to re-type their information.
Conclusion
Phone screens are getting larger, and tablets are getting more sophisticated, so it’s no wonder more of your audience is logging on and interacting through a mobile device.
A mobile app can be a great way to further engage with your users. But only if you optimize your website first to ensure a smooth user experience.
Featured image via Unsplash
Add Realistic Chalk and Sketch Lettering Effects with Sketch’it – only $5!
Source from Webdesigner Depot https://ift.tt/2GDLJXI from Blogger https://ift.tt/2GBUrpr
0 notes
Text
Migration to Redis Cluster
At Houzz, we use Redis as the de-facto in-memory data store for our applications, including the web servers, mobile API servers and batch jobs. In order to support the growing demands of our applications, we migrated from an ad hoc collection of single Redis servers to Redis Cluster during the first half of the year.
To date, we have gained the following benefits from the migration:
Ability to scale up without the need to modify applications.
No additional proxies between clients and servers.
Lower capacity requirement and lower operational cost.
Built-in master/slave replication.
Greater resilience to single point of failures.
Functional parity to single Redis servers, including support for multi-key queries under certain circumstances.
Redis Cluster also has limitations. It does not support environments where IP addresses or TCP ports are remapped. Although it has built-in replication, as we ultimately discovered, few client libraries, if any, have support for it. For certain operations such as new connection creation and multi-key operations, Redis Cluster has longer latencies than single servers.
In this post, we will share our experiences with the migration, the lessons we learned, the hurdles we encountered, and the solutions we proposed.
Functional Sharding
Some of our applications use Redis as a permanent data store, while others use it as a cache. In a typical setting, there is a Redis master that processes write requests and propagates the changes to a number of slaves. The slaves serve only read requests. One of the slaves is configured to dump the memory to disk periodically. The dumps are backed up into the cloud. We use Redis Sentinel to do automatic failover from failed masters to slaves. Our applications access Redis through HAProxy.
Historically we scaled up the Redis servers by “functional” sharding. We started with a single shard. When we were about to run out of capacity, we added another shard and moved a subset of the keys from the existing shard to the new one. The new shard is typically dedicated to keys for a specific application or feature, e.g., ads or user data. Code that accessed the moved keys was modified to access the new servers after the move. For example, the marketplace application would access shards that store data about the products and merchants in the marketplace, while the consumer-oriented applications would access shards that store user data such as activities and followed topics. The same process was repeated for several years and the number of servers grew to several dozens. The process remained mostly manual due to the need to modify the applications.
The Redis servers ran on high-end hosts that had a large memory capacity. Such hosts would typically also have a large number of processors. Since each Redis server is a single process, only a small fraction of processors are utilized on each host. In addition, there is imbalance in memory and CPU usages across the shards due to the manual partitioning. Some shards have a large memory footprint and/or serve a high requests per second.
The large memory footprints are problematic to operations such as restart and master-slave synchronization. It can take more than 30 minutes for a large shard to restart or to do a full master-slave sync. Since all our client requests depend on Redis accesses, it poses a risk for a severe site-wide outage should all replicas of the large shard go down.
In the beginning of the year, we evaluated options to scale up the Redis servers with fewer manual processes and a shorter time to production.
Redis Cluster vs. Twemproxy
One option we considered was Redis Cluster. It was released by the Redis community on April 1, 2015. It automatically shards data across multiple servers based on hashes of keys. The server selection for each query is done in the client libraries. If the contacted server does not have the queried shard, the client will be redirected to the right server.
There are several advantages with Redis Cluster. It is well documented and well integrated with Redis core. It does not require an additional server between clients and Redis servers, hence has a lower capacity requirement and a lower operational cost. It does not have a single point of failure. It has the ability to continue read/write operations when a subset of the servers are down. It supports multi-key queries as long as all the keys are served by the same server. Multiple keys can be forced to the same shard with "hash tags", i.e., sub-key hashing. It has built-in master-slave replication.
As mentioned above, Redis Cluster does not support NAT’ed environments and in general environments where IP addresses or TCP ports are remapped. This limitation makes it incompatible with our existing settings, in which we use Redis Sentinel to do automatic failover, and the clients access Redis through HAProxy. HAProxy provides two functions in this case: It does health checks on the Redis servers so that the client will not access unresponsive or otherwise faulty servers. It also detects the failover that is triggered by Redis Sentinel, so that write requests will be routed to the latest masters. Although Redis Cluster has built-in replication, as we discovered later, few client libraries, if any, have support for it. The open source client libraries we use, e.g., Predis and Jedis, would ignore the slaves in the cluster and send all requests to the masters.
The other option we evaluated was Twemproxy. Twitter developed and launched Twemproxy before Redis Cluster was available. Like Redis Cluster, Twemproxy automatically shards data across multiple servers based on hashes of keys. The clients send queries to the proxy as if it is a single Redis server that owns all the data. The proxy then relays the query to the Redis server that has the shard, and relays the response back to the client.
Like Redis Cluster, there is no single point of failure in Twemproxy if multiple proxies are running for redundancy. Twemproxy also has an option to enable/disable server ejection, which can mask individual server failures when Redis is used as a cache vs. a data store.
One disadvantage of Twemproxy is that it adds an extra hop between clients and Redis servers, which may add up to 20% latency according to prior studies. It also has extra capacity requirement and operational cost for monitoring the proxies. It does not support multi-key queries. It may not be well integrated with Redis Sentinel.
Based on the above comparison, we decided to use Redis Cluster as the scale-up method going forward.
Building the cluster
Before we could migrate to Redis Cluster, we needed to bring Redis Cluster to functional parity to functional shards. We implemented most of the improvements in our client libraries (e.g., the Predis library for PHP clients). We also built automation tools for cluster management in our infrastructure management toolkit salt.
As mentioned earlier, the main missing features in the client libraries for Redis Cluster are master-slave replication, health checks and master-slave failover.
We replaced the active health checks in HAProxy with passive mark down and retries in the PHP client library. When the client gets an error from a Redis server, e.g., connection timeout or unavailability due to loading, the client marks the server down in APC and retries another server. Since APC is shared by all PHP processes in the same web server, the marked down Redis server will not be accessed by another client until it expires from APC a few seconds later.
We also added support for cluster master-slave replication in the client library. It started out as a straightforward refactoring, but ended up with considerable complexity as it interacted with the passive health checks and retries in partial failure modes, especially in pipeline execution. I will discuss this in more detail later in the post.
Other improvements we made to the Predis library include:
Support multi-server commands such as mset and mget
Reduction of memory usage of cluster configuration such as slot-to-server maps
Bug fixes including memory leak fixes, etc.
Added pipeline support to the Java Redis library Jedis.
Figures 1 and 2 show the Redis system architectures before and after the migration to Redis Cluster, respectively.
Figure 1. Functional shards

Figure 2. Redis Cluster

In addition to the client library improvements, we built tools to further automate the creation and maintenance of Redis Cluster.
There is an existing tool (redis-trib.rb) to create a cluster from a set of Redis servers. We built tools to place the masters and slaves in a more deterministic way than what redis-trib.rb does.
For example, we place the servers of the same shard across availability zones for better fault tolerance.
For data persistence, we enable one server per shard to dump its memory to disk and upload the dumps to the cloud storage periodically. Memory dump is a resource intensive operation, therefore, we chose a slave vs. the master for dumping and distributed the masters and dumping slaves evenly across hosts for load balancing.
Another desirable feature of the layout is to have servers in the same shard to have the same port number, which eases manual operations during debugging.
We built a toolkit to implement the desired layout during cluster creation as well as subsequent additions of new cluster nodes. Figure 3 shows an example layout of our Redis Cluster.
Since automatic failover can happen in the cluster from time to time, our toolkit periodically collects the cluster status and reconfigures the servers when necessary.
Figure 3. Example layout of Redis Cluster

Before the migration, we ran a set of performance tests to compare the latency of Redis Cluster vs. functional shard under various conditions.
Figure 4 shows the latencies with non-persistent connections on cluster vs. functional shard. While there is a significant difference for the multi-key commands, we do not expect such cases to be common in practice for Redis Cluster since all Redis accesses in the same client session will be able to share the same connection to the cluster.
Figure 4. Latencies with non-persistent connections

Figure 5 shows the latencies with persistent connections on cluster vs. functional shard. The latencies are measured when there is only one client accessing Redis. In practice, there will be multiple clients and the actual latency per request will the increased by the processing time of the requests that are queued in front of this request. The queues will be shorter in Redis Cluster since the workload is distributed across a larger number of processes.
Figure 5. Latencies with persistent connections

The live migration
According to the Redis Cluster documentation, no automatic live migration to Redis Cluster is currently possible and we have to stop the clients during the migration. Stopping the clients is not an option for us because it means shutting down the whole site.
We built our own live migration tool based on the append-only-file (AOF) feature in Redis. The AOF, when initially created, consists of a sequence of commands that can be replayed on a second server to reconstruct the data set in the first server that creates the file. Commands that the first server receives after the AOF is created will be appended to the file, hence the name “append only file”. Redis can be configured to rewrite the file when it gets too big. After the rewrite, the commands at the end of the old file may be re-ordered.
Our automatic live migration process involves the following steps:
Pick a slave in the functional shard that has dumping disabled.
Enable AOF in the picked slave but disable AOF rewrite, so that subsequent commands will not be re-ordered in the file.
Write a certain key, e.g., “redis:migration:timestamp”, to the functional shard to serve as a bookmark for later use.
Copy the AOF from the functional shard slave to all the hosts in the cluster.
Replay the AOF on each master in the cluster, using the “redis-cli --pipe” command.
Extract the new commands in the functional shard AOF that were added after the last bookmark, and store them in a delta file.
Repeat steps 3 - 5 with the new delta file instead of the full AOF.
When the number of new commands in the delta file drops below a certain threshold, we make a live configuration change to the clients so that they will start to access the cluster instead of the functional shard.
We continue to repeat steps 3 - 7 after the configuration change, until the number of new commands in the delta file drops to a lower threshold.
The live migration of each functional shard took from a few minutes to a few hours, depending on the size of the shard. The process went smoothly modular a few errors from the functional shard slave due to overloading from the AOF writes.
Post migration outage
After we migrated about ¾ of the functional shards to the cluster, something unexpected happened. We created the cluster with the same capacity as the functional shards. However, the size of our data grew faster than we expected.
The Redis cluster was overcommitted in memory and started to swap in early May. An issue with a backup script resulted in high volumes of disk reads and writes, and triggered the first failover when a Redis master on the same host tried to access the swap space. The failover then triggered a sequence of cascading events.
Slaves were unresponsive during failover, triggering cross-shard slave migrations, i.e., healthy slaves changed their masters. The failovers and cross-shard migrations resulted in an imbalanced distribution of masters and dumping slaves across hosts. The hosts with more dumping slaves were overloaded when the slaves started to dump, and more failover/cross-shard migrations followed. Redis clients repeatedly retried when servers were unresponsive, and eventually held up all web server processes and caused site outages.
Recovery and resolution
It took three weeks to fully recover from the outage. During the process, we performed many operations such as resizing and resharding the cluster for the first time in production. We learned lots of lessons and made quite a few improvements to the error handling code in our client library.
The first step to recovery was to rebalance the cluster, i.e., to bring it back to the balanced layout as illustrated in Figure 3. Next, we added 50% more hosts to the cluster.
We ran into several issues while resharding the cluster, i.e., migrating data from existing servers to new servers. For a short period of time during the migration of a key, clients kept receiving “MOVED” responses from both the source and the destination servers of the migration, therefore kept retrying between the two servers until they eventually had stack overflow.
To contain the issue to the affected processes only, we applied a limit on the number of retries in this situation so that the affected processes would not generate too much load in the clients or servers. We also made the passive healthy checks in the client library more robust. The entire resharding process took 12 hours, during which a small percentage of requests failed while the site was functioning overall.
After the resharding, the old Redis servers reported a drop in their data size, but their memory usage did not drop, nor did their swap usage. Since they still had data stored in the swap space, they could have spikes in latencies and client timeouts. We learned that the unchanged memory usage was a result of fragmentation in jemalloc, the memory allocator used in Redis, and that the only way to defragmentation is to restart the servers.
The last step in our recovery process was to rolling-restart all the old servers. For each shard, we first restarted a slave, then force a failover to the restarted slave, causing the old master and the other slaves to resynchronize data from the new master. Resynchronization has the same effect as restart on memory usage. After the resynchronization was completed, all servers in the shard had their memory defragmented and their swap space freed.
The rolling restart was a rigorous stress test on the clients and servers, and prompted us to make more improvements in the error handling of the client library. One improvement is to have different timeout values for masters vs. slaves, and to never mark down a master in the passive health checks. Masters are more heavily loaded than slaves during failover and are a single point of failure for write operations. Therefore, we would rather try a bit more when a master is slow, than give up too soon.
Open Questions
Clustering is a relatively new technology in Redis. Through the experience of building, migrating, and resharding Redis Cluster, we learned about its limitations as well as its potential.
While the ability to automate scaling in Redis Cluster opens up many new opportunities, it also brings up new questions. Will we be able to scale infinitely? What’s the best way of supporting a mixture of permanent store use case and cache use case? How can we minimize the impact of resharding and rolling restart on production traffic? We look forward to experimenting and learning more about Redis Cluster.
If you’re interested in joining us, we’re hiring! Check out opportunities on our team at houzz.com/jobs.
0 notes
Text
Crowd 3.3 Release Notes
The Atlassian Crowd team is pleased to bring you Crowd 3.3 , which comes with some great new features:
Get the latest version
Delegated group level administration
In Crowd 3.3, as a system administrator you can assign users to be group-level administrators of other groups. These users will be able to manage groups by adding and removing other users and groups from them.
Groul Level administration is currently available only for the Crowd Data Center license holders. If you're not such a user, you can create your evaluation license for Crowd Data Center and take Crowd for a spin. See the Atlassian license evaluation page.

Crowd (heart) email
With version 3.3, we're introducing support for email notifications regarding password expiration. When configuring internal directory you may define remind periods, which mean how many days before password expiration reminder will be send to user.
Multiple server alert addresses
From now on, Crowd lets you configure multiple server alert email addresses, so whenever some alert occur, every of these emails receive notification.
Issues in Release
New Feature: Group level admin permission
New Feature: Notify users by email when their passwords are about to expire and when they are already expired
Improvement: Support StartTLS for LDAP Connection
Improvement: XML Backup using one locale cannot be restored to another machine using a different locale.
Improvement: The default crowd.properties file for clients should include the cookie name
Improvement: Support for multiple email addresses in Server alert email
Improvement: Get Crowd System Info from REST API
Improvement: Increase the varchar for attribute_value field
Fixed: Crowd does not always auto add application groups when SSO is enabled
Fixed: Audit Log Shows Updates to Null/Empty Fields When Using Oracle DB
Fixed: Removing group on Crowd keeps the group under "Default Group Memberships"
Source
0 notes
Text
Update 1701 for Configuration Manager Technical Preview Branch – Available Now!
Hello everyone! We are happy to let you know that update 1701 for the Technical Preview Branch of System Center Configuration Manager has been released. Technical Preview Branch releases give you an opportunity to try out new Configuration Manager features in a test environment before they are made generally available. This month’s new preview features include: UEFI inventory data – Hardware inventory can now determine whether the device is UEFI-enabled. Express files support for Windows 10 Cumulative Update – Configuration Manager can support Windows 10 Cumulative Update using Express files. This functionality is only supported in Windows 10 version 1607 with a Windows Update Agent update included with the updates released on January 10, 2017 (Patch Tuesday). For more information see https://docs.microsoft.com/sccm/core/get-started/capabilities-in-technical-preview-1612#express-installation-files-support-for-windows-10-updates. Validate Device Health Attestation Data via Management Point – You can now configure management points to validate health attestation reporting data for cloud or on-premises health attestation service. Updated Content Library Cleanup Tool – The command line tool (ContentLibraryCleanup.exe) used to remove content that is no longer associated with any package or application from a distribution point (orphaned content) has been updated with fixes for known issues. Host software updates on cloud-based distribution points – Beginning with this preview version, you can use a cloud-based distribution point to host a software update package. Support for Microsoft Azure Government cloud added to Operations Management Suite (OMS) Connector feature – You can now configure an OMS connector for the OMS workspace on Microsoft Azure Government cloud. Additional boundary groups improvements – Clients now find software update points using Boundary Group associations. We’ve also made several improvements to operating system deployment, many of which were the result of your User Voice feedback: Support for more applications for the Install Applications task sequence step Expire standalone media Support for additional content in stand-alone media Configurable timeout for Auto Apply Driver task sequence step Package ID is now displayed in task sequence steps Windows 10 ADK tracked by build version Default boot image source path can no longer be changed Update 1701 for Technical Preview Branch is available in the Configuration Manager console. For new installations please use the 1610 baseline version of Configuration Manager Technical Preview Branch available on TechNet Evaluation Center. We would love to hear your thoughts about the latest Technical Preview! To provide feedback or report any issues with the functionality included in this Technical Preview, please use Connect. If there’s a new feature or enhancement you want us to consider for future updates, please use the Configuration Manager UserVoice site. (adsbygoogle = window.adsbygoogle || ).push({}); Click to Post
0 notes