#freenas os download
Explore tagged Tumblr posts
Visit Tumblr Blog
Explore Tumblr blogs with no restrictions, modern design and the best experience.
Last Seen Tumblr Blogs


Fun Fact
Tumblr has been banned in Indonesia for providing people with access to pornographic content.
Text
FreeNAS Free Operating System For PC
FreeNAS Free Operating System For PC
FreeNAS is an operating system that can be installed on virtually any hardware platform to share data over a network. The app is the simplest way to create a centralized and easily accessible place for your data. Use this Free Operating System with ZFS to protect, store, and back up all of your data. It is used everywhere, for the home, small business, and the enterprise.
This is a practical and…
View On WordPress
#attached storage#free operating system#FreeNAS OS#freenas os download#NAS Server#NFS Protocol#privacy-protection#server os#storage os#system-optimization
0 notes
Text
Archer 15-1263 Manual

Good day Experts I purchased myself an Iomega Media Network Hard drive a while ago. As Murphy's Law goes the hard drive has subsequently failed on me and it is out of its warranty. I have gone out and purchased a new drive to replace the faulty one. After doing so and connection drive NAS drive up to the network, it doesn’t seem to find anything.
Jul 15, 1999 View and Download Radio Shack 15-1112B manual online. High Gain In-Line Signal Amplifier. 15-1112B amplifier pdf manual download. View and Download Radio Shack ARCHER 15-1275 owner's manual online. Video Colour Processor. ARCHER 15-1275 media converter pdf manual download. Archer 15-1263 Manual. Microvellum Toolbox Keygen. Simulation Exam Keygen Download. Elna Contessa 130 User Manual; Virtual Dj Le Crack Ddj.
I went and a bit of research and due to the fact that the new drive doesn’t have an “OS “ / firmware installed on, it doesn’t pick it up. I would have thought that the “OS” / firmware would be installed on a chip on the chassis somewhere instead of it being on the hard drive itself.
Anyway, this brings me to my question. I would like to be able to “revive” my Iomega Media Network Hard Drive. What will I require to do so? Please see below link for reference to my drive. It doesn’t necessarily have to be the same “OS” / firmware as before, anything will do. I would like to just get the chassis working again on my LAN.
Thank you in advance for any assistance in this matter. Kind regards, Arno. Hi SysExpert Thank you for your post. Leica wild t2 manual woodworkers. I managed to get as far as what you did with Iomega themselves. I even got the GPL Open Source Code (below link).
Jan 03, 2012 This tutorial uses unsupported features of the IOMEGA Storcenter ix4-200d. It worked for me but use it at your own risk! It should work (again, it is. View and Download Iomega StorCenter Pro NAS 150d manual online. StorCenter Pro NAS 150d Server pdf manual download. Aug 31, 2012 Can FreeNAS be installed on an external Iomega NAS drive? The IOMEGA alreday has some torrent software running on it but I want to. Install FreeNAS onto Iomega nAS?
However, after downloading it, I have no idea of getting it onto the drive and to make it work. With regards to getting a duplicate drive to make an image; I borrowed my friends drive, which is the same as mine and was kind enough to let me open up his chassis and connect it to my PC.
However upon doing this, Windows could not pick the drive up. It seems to be formatted differently. So I got to another dead-end. Any further suggestions from anyone else please? Ciao mustekkzn.
If you want to image the entire physical disk drive, then this an be done with any software package capable of performing a bit-level copy of the entire disk drive. The software doesn't care what is on the disk, all it sees are 1s and 0s. However, the problem is more complicated, so you need to specifically tell us what you desire. If you clone a disk, do you want to put the clone in the appliance and expect it to work? At very least the serial number won't match, so the firmware in the system will have to deal with a foreign disk which may or may not work in the first place. HI dlethe I see what you mean; in my personal opinion I dont think I wil be able to clone/image these drives. As I mentioned before I connected my friends drive up and Windows could not detect his drive.
I think its due to the fact it is running Linux. As per your previous post. I have to be honest, I didnt try and play any further with the drive, a specially after seeing that Windows did not pick it up. Do you think I would be able to clone these drives using Acronis in Windows? With regards to my last post, do you think I could use something like FreeNas or anytihng simular. My goal is to 'recycle' my Iomega chassis with new internal hard drive and to be able to use it as n NAS device again. Thank you very much for your assistance in this matter.
Kind regards, mustekkzn. You can clone the disks with any software package that does a bit-level copy. There is no magic at all. This is no different then cloning a disk drive that has windows and another non-windows partition You are free to stick this disk drive in any computer running linux, windows, Mac OS, FreeNas, whatever. It is formatted to standard 512-bytes/sector. I do not use acronis, but if it has a bit-level copy for entire disk, then it will clone the drive.

Otherwise some freebies like clonezilla or the runtime product that another expert suggested will work. Just thought to give you guys an update. I started off trying to use Ghost image the two drives, however, I straight away had a problem identifying which drive is which and I didn’t want to run the risk of overwriting my friends drive. With that said, I moved over to Acronis, which was easier to distinguish which drive is which. However, it took forever to do. Upon completing the drive still didn’t work, it has to be something to do with serial numbers or something as per previous post. I will have to admit defeat on this as I can’t be spending any more time on this.
I will just have to use this drive as a standard hard drive then. Before I end off, I would like to just confirm if anyone else has used FreeNas and if they would know if it will work in my scenario.
Kind regards, mustekkzn.
This tutorial uses unsupported features of the IOMEGA Storcenter ix4-200d. It worked for me but use it at your own risk! It should work (again, it is unsupported) on the ix2 Storcenter as well. Tutorial tested on IOMEGA Storcenter ix4-200d firmware 3.1.14.995 The aim of the tutorial is to be able to add programs to you NAS without having to go too deep in the system. This is also helpful to compile natively on the NAS without needing to cross compile for your architecture. SSH into your NAS See my other post: 2.
Directory Structure on the NAS The Lifeline OS (Iomega's OS) does put most of the root file system in read only mode. It is not much use to try to put stuff there anyway because the partitition is very small You can type: df Filesystem 1K-blocks Used Available Use% Mounted on rootfs 45548 12% / /dev/root.old 6613 2119 4494 33% /initrd none 45548 12% / /dev/md0vg/BFDlv 41 16% /boot /dev/loop0 524 6953 99% /mnt/apps /dev/loop1 4959 2230 2473 48% /etc /dev/loop2 216 216 0 100% /oem tmpfs 255748 0 255748 0% /mnt/apps/lib/init/rw tmpfs 255748 0 255748 0% /dev/shm /dev/mapper/md0vg-vol1 16774 20% /mnt/system /dev/mapper/2602b0cevg-lv43ec31bd 41% /mnt/pools/A/A0 to see the partitions and their mountpoint. The idea seems to be that third party programs should be installed in the /opt/ directory, which has ample storage (16GB) whereas root (/) only has 50MB. Use ipkg ipkg is intalled by default in the Iomega storcenter. We just need to specify the right place to find the packages: vi /etc/ipkg.conf src cross src cross Then type: ipkg update to build the list of available packages. The problem of this setup is that you won't be able to install some packages because installation will fail because part of the filesystem is readonly. Thanks to ipkg, there is an easy fix: ipkg install ipkg-opt This installs the binary /opt/bin/ipkg-opt.
The idea is then to use this binary instead of the regular ipkg: as a result all packages will be installed in /opt/ and you won't run into problems with the read only filesystem. The only drawback is that /opt/bin/ is not in your path. There is a simple remedy for that: PATH=/opt/bin:$PATH Note: this is not persistent (if you start another shell, you will need to do that again). Also, as a one time persistent thing, I recommand to do vi /etc/ld.so.conf and add /opt/lib/ at the end. That's the main problem with /opt installed software: you might end up to get duplicated libraries between /lib and /opt/lib (ldd and ldconfig are your friends).
You also need to do: mv /opt/etc/ipkg.conf /opt/etc/ipkg.conf.old ln -s /etc/ipkg.conf /opt/etc/ipkg.conf so that you config in /etc/ipkg.conf remains useable with /opt/bin/ipkg and /opt/bin/ipkg-opt Then type: /opt/bin/ipkg update to setup the list of available packages for /opt/bin/ipkg /opt/bin/ipkg-opt 4. Install utilities and optware-devel First install the utilities you miss to do some actual linux stuff: ipkg-opt install zip unzip bzip2 gzip If you want a full gcc toolchain to compile your own applications from source. Ipkg-opt install optware-devel The compilation can be slow but this allows you to natively compile on your NAS (I think it is simpler because there is no need to set up cross compiling on another box).
Install armel/debian compiled software Unfortunately, you will soon discover that some of the packages you want are not available for ipkg. You can then either compile your own software (see next point) or get some ready-made debian archives. In this case, I suggest to use the following command (for example for libsigc-2.0-dev): cd /opt/tmp/ wget dpkg -instdir=/opt/ -admindir=/opt/dpkg/ -i libsigc-2.0-dev2.0.18-2armel.deb Note: do not use /tmp/ as the space available there is very small.
Note2: be careful to choose packages compiled for your architecture (armel in my case)! The above command will install your soft as if /opt/ was the root directory (you will end up with /opt/usr/lib directories and the like). As a result, you might need to add stuff in your PATH or edit /etc/ld.so.conf. Be careful not to make a mess of your system or you will soon end up with several times the same library (with different versions) at different locations.
You will need to sort this manually(ln, rm.) 6. Compile from source For example, a very classic install for libnfnetlink: cd /opt/tmp/ wget tar -xvf libnfnetlink-1.0.0.tar.bz2 cd libnfnetlink-1.0.0 PATH=$PATH:/opt/bin./configure -prefix=/opt/ make make install Note: to get bzip2 to work I had to do before the tar -xvf: ln -s /opt/bin/bzip2-bzip2 /opt/bin/bzip2 Another example using svn cd /opt/tmp/ PAH=/opt/bin:$PATH svn checkout xmlrpc-c cd xmlrpc-c/./configure -prefix=/opt make make install Don't forget the -prefix=/opt to specifiy you want to install your package.

When compiling from source, you run into the usual complation problems you can get with linux (libraries/includes not found etc.). It gets even more annoying because default stuff does not work well anymore (package manager is not where expected etc), and sometimes you end up having to specify the complie flags yourself. For example, I recently had to edit the configure script of a source tarball to add: sigcLIBS='-L/opt/lib/ -lsigc-2.0 -L/lib/' sigcCFLAGS='-I/opt/usr/include/sigc-2.0/ -I/opt/usr/lib/sigc-2.0/include -I/opt/include/ncurses' libcurlLIBS='-L/opt/lib/ -lcurl' libcurlCFLAGS='-I/opt/include/' libtorrentLIBS='-L/opt/lib/ -ltorrent' libtorrentCFLAGS='-I/opt/include/' -dev packages can be difficult to find with ipkg, this is where you often need to get a.deb package or compile the library from source just to get the header files right. Conclusion As you noticed, it is just a matter of using the tools (and using them right). It just gets a little bit more complicated because the usual package manager does not work out of the box, the procedure is unsupported by the hardware vendor and precompiled packages can be difficult to find for armel.
Iomega Storcenter Pro 150d
Actually, I may have an interest in the package so I looked into it a bit. In this case, you can run: /opt/bin/ipkg-opt files sabnzbdplus after installing. You'll see that the soft is in: /opt/share/SABnzbd# do cd /opt/share/SABnzbd./SABnzbd.py -s 0.0.0.0:8080 to start you need to put 0.0.0.0 so that the web service can be accessed from other computers (it is just accessible locally otherwise). Then, point your browser to or even you might want to look at: for the startup scripts and Sickbeard/Couchpotato install. Johan wget -passive-ftp -P /tmp/ -2012-05-18 14:52:00- Resolving ipkg.nslu2-linux.org.
140.211.169.161 Connecting to ipkg.nslu2-linux.org 140.211.169.161 :80. HTTP request sent, awaiting response. 200 OK Length: 517504 (505K) text/plain Saving to: `/tmp/Packages' 100% 517,504 387K/s in 1.3s 2012-05-18 14:52:03 (387 KB/s) - `/tmp/Packages' saved 504 Johan.
I suppose you have an IOMEGA storcenter. Did you look at my tutorial:?
You need to add your command to /opt/init-opt.sh to have it start automatically at boot. Rc2.d is not run at boot in an IOMEGA storcenter. All the config files have to be in /opt: most of the file system is cleaned/refreshed on reboot. Where were the files that are gone? Are you saying that /opt/bin/unzip is gone?
Iomega Storcenter Ix2-200
Archer 15-1263 Manual Installation
If you are just typing unzip at the invite, make sure /opt/bin is in the PATH (to do that, PATH=$PATH:/opt/bin). I don't have unrar on my system, but I guess the problem is the same.
Anonymous Thanks, another problem occured after the tut. From 1) after editing the sohoprocs the ix4 wont but up anymore and hangs on 75%. I can restore from usb stick and it wil work again. Tried it several times now als i with other firmware but stil crashes at 75%.
3) where exactly do i put the path command? If i do this in cosole and i close the console, the patch is gone after reboot. 2)if the path is set, the programs wil work. But settings still wont be saved.
The files are in /opt/. I'am just looking into linux the past 2 days, its al new to me. Finally i decided what i want to do with my ix2, but i am somehow stuck. I am trying to set up a mysql server. So far i have been able to install it and i copied the startup-script to /etc/init.d/mysql.server update-rc.d mysql.server defaults created the correct symlinks, calling the script manually /etc/init.d/mysql.server start starts the server just fine, but booting won't. /opt/bin is not added to PATH either, but the script should do it by PATH=/sbin:/usr/sbin:/bin:/usr/bin:/opt/bin:$PATH Any ideas what causes this? Starting the Server manually works, but doing so manually everyday (tiny appartement, NAS is shut down over night) can't be the only solution.
Archer 15-1276 Manual
Anonymous Hi Vince, Please can you help me? I'm trying to install openjdk-6-jre-headless, openjdk-6-jre, openjdk-6-jdk following your clue but I'm receiving the following error: root@ix2-200:/var/cache/apt/archives# dpkg -instdir=/opt/ -admindir=/opt/dpkg/ -i openjdk-6-jre6b18-1.8.13-0+squeeze2armel.deb (Reading database. Dpkg: serious warning: files list file for package `openjdk-6-jre-headless' missing, assuming package has no files currently installed. Dpkg: serious warning: files list file for package `openjdk-6-jre' missing, assuming package has no files currently installed. 24210 files and directories currently installed.) Preparing to replace openjdk-6-jre 6b18-1.8.13-0+squeeze2 (using openjdk-6-jre6b18-1.8.13-0+squeeze2armel.deb). Dpkg (subprocess): unable to execute new pre-installation script: No such file or directory dpkg: error processing openjdk-6-jre6b18-1.8.13-0+squeeze2armel.deb (-install): subprocess pre-installation script returned error exit status 2 dpkg (subprocess): unable to execute new post-removal script: No such file or directory dpkg: error while cleaning up: subprocess post-removal script returned error exit status 2 Errors were encountered while processing: openjdk-6-jre6b18-1.8.13-0+squeeze2armel.deb Regards, Pierre.
I can't get past the last part of step 3. I don't have the cloud edition. Its a problem with libidn.so.11? Can I install this manually? Root@NAS:/# /opt/bin/ipkg update Downloading wget: error while loading shared libraries: libidn.so.11: cannot open shared object file: No such file or directory An error ocurred, return value: 1. Collected errors: ipkgdownload: ERROR: Command failed with return value 127: `wget -passive-ftp -q -P /opt/ipkg-ExgmfJ root@NAS:/# ipkg-opt install optware-devel Installing optware-devel (6.8-10) to root. Downloading wget: error while loading shared libraries: libidn.so.11: cannot open shared object file: No such file or directory Nothing to be done An error ocurred, return value: 22.
Collected errors: ipkgdownload: ERROR: Command failed with return value 127: `wget -passive-ftp -q -P /opt/ipkg-o9cx3g Failed to download optware-devel. Perhaps you need to run 'ipkg update'?
Archer 15-1263 Manual Pdf
Anonymous hi guy, I have a similar problem that: AQuablogMarch 30, 2013 at 6:57 PM at the stage: '4. Install utilities and optware-devel'. An error ocurred, return value: 22. Collected errors: ipkgdownload: ERROR: Command failed with return value 127: `wget -passive-ftp -q -P /opt/ipkg-zA0d3x Failed to download libidn. Perhaps you need to run 'ipkg update'? - I try to fixe it with: ipkg install libidn but it doesn't work: root@storage:/# ipkg install libidn Installing libidn (1.25-1) to root. Downloading wget: error while loading shared libraries: libidn.so.11: cannot open shared object file: No such file or directory Nothing to be done An error ocurred, return value: 22.
Collected errors: ipkgdownload: ERROR: Command failed with return value 127: `wget -passive-ftp -q -P /opt/ipkg-qWMRlA Failed to download libidn. Perhaps you need to run 'ipkg update'? Root@storage:/# do you have an idea? Have a nice day.
0 notes
Text
TrueNAS Core will soon replace FreeNAS—and we test the beta

Earlier this week, network-storage vendor iXsystems announced the release of TrueNAS 12.0-BETA1, which will replace FreeNAS later in 2020. The major offering of the new TrueNAS Core—like FreeNAS before it—is a simplified, graphically managed way to expose the features and benefits of the ZFS filesystem to end users. In the most basic environments, this might amount to little more than a Web front-end to ZFS itself, along with the Samba open-source implementation of Microsoft’s SMB network file-sharing protocol.
Although this might be sufficient for the majority of users, it only scratches the surface of what TrueNAS Core is capable of. For instance, more advanced storage users may choose to share files via NFS or iSCSI in addition to or in place of SMB. Additional services can be installed via plug-ins utilizing FreeBSD’s jail (containerization) facility, and the system can even run guest operating systems by way of FreeBSD’s BHyve virtualization system—all managed via Web interface alone.
TrueNAS Core will be what FreeNAS is now—the free, community version of iXsystems’ NAS (Network Attached Storage) distribution. End users—and system administrators who aren’t looking for paid support—can download FreeNAS or TrueNAS Core ISOs directly from iX, burn them to a bootable optical disc or thumbdrive, and install them on generic x86 hardware like any other operating system.
We’ve been kicking the tires on early versions of TrueNAS Core since its announcement in March, and we see no evidence of any FreeNAS functionality slipping away behind “premium only” paywalls. The dividing lines between TrueNAS Core and TrueNAS Enterprise are no different than those between earlier versions of FreeNAS and TrueNAS itself.
Due to the sheer breadth of TrueNAS Core’s offerings, we can’t walk you through everything it’s capable of in a single article. But we will hit the major highlights along the way—we’ll install the distribution and set up a storage pool on eight physical disks, join TrueNAS Core to a Windows Active Directory domain, set up some file shares, and play with ZFS snapshot and replication facilities.
The user interface has come a very long way in the six years since our 2014 review of FreeNAS. The modern TrueNAS interface has been entirely rebuilt from scratch, along much more coherent lines. If you’ve tried and given up on old versions of FreeNAS, it’s worth taking a second look at how far it has come.
Installation
If these options seem overwhelming, installing and managing your own storage distribution may not be for you.
Jim Salter
Once you’ve decided to install, the next question is where you want the root and boot filesystem to go.
Jim Salter
This wasn’t our first TrueNAS Core test run, so we’re given the option to upgrade or install fresh. We chose the fresh install.
Jim Salter
FORMAT! EVERYTHING!
Jim Salter
Last chance to abort! It’s a little odd that we’re not told about the preference for “flash media” until the “oh no” screen, but okay.
Jim Salter
You’ll need to set a root password before rebooting. There is no strength check here; if you want to use “poop” as your password, the installer won’t complain.
Jim Salter
TrueNAS supports either UEFI or BIOS boot. Both modes worked on our Linux KVM virtual machine, and directly on the metal of the Storage Hot Rod.
Jim Salter
That’s the whole install—pop the install medium out of the system and reboot.
Jim Salter
The first-boot phase of a TrueNAS Core installation is the simplest OS installation we’ve ever seen. TrueNAS Core doesn’t ask you to do the complicated stuff during the original installation; all it wants to do is slap the operating system onto a boot disk and have done with it. You pick a disk (or USB thumb drive) to act as the boot-and-root medium, set a password, and pick UEFI- or BIOS-style boot—that’s it.
All of the interesting stuff—like configuring the rest of your disks as actual storage devices or creating and exposing network shares for them—happens later.
First boot
This ASCII splash screen hangs around for five seconds; if it hasn’t received input by then it falls through to a standard boot.
Jim Salter
The only thing most users will need to do at the text console is configure the network interface (which defaults to DHCP).
Jim Salter
You might think you’d WANT to “remove the current settings of this interface”—but if you do, it just returns you to the menu. So, uh, don’t?
Jim Salter
Don’t forget to configure your default route (and DNS) as well as the IP address, if you leave DHCP mode.
Jim Salter
There isn’t much to do on your first reboot after installing TrueNAS Core—little or no configuration is ever done at the physical machine. By default, the system will assign configurations to any live network interfaces by DHCP. If you don’t want to issue a specific DHCP reservation for the TrueNAS system at your router, you’ll need to manually set an IP address in the text-based menu here.
Once you’ve got your TrueNAS Core system living at its “forever IP address,” it’s time to walk away, sit down in front of the computer or mobile device of your choice, and browse to the TrueNAS Web interface to get the real configuration work done.
Source link
قالب وردپرس
from World Wide News https://ift.tt/2CQOALY
0 notes
Text
Breathe new life into your old PC
Don’t be so quick to dump that old computer! Despite being slow, clunky, and prone to crashes, your old desktop or laptop might just be perfectly usable — after a few light upgrades that will breathe new life into it and enable you to use it for other computing needs.
As mentioned, you have to make a few upgrades on your old PC. You may want to try a lighter OS, for example. Keep in mind that the latest version of Windows or MacOS won’t work optimally without a fast processor, so a Linux-based OS, which comes in a variety of options called “distros,” would be a better option. It will make your computer feel brand new without exhausting its hardware.
Popular distros options such as Ubuntu, elementary OS, and PinguyOS can be easily installed. Plus, they have similar interfaces to Windows and come with a boatload of software packages. The best part is they require a minimum of 4GB of RAM, so you won’t have to invest much at all.
Once you’ve upgraded your old PC, you can start using it as a NAS server, a dedicated privacy computer, or a digital media hosting platform.
Make a NAS server
Network-attached storage (NAS) is a server for your home or small business network that lets you store files that need to be shared with all the computers on the network. If your old PC has at least 8GB of RAM, you can use it as your own NAS.
Simply download FreeNAS, a software accessible on Windows, MacOS, or Linux, that enables you to create a shared backup of your computers. FreeNAS has access permissions and allows you to stream media to a mobile OS, like iOS and Android.
But if you’d rather convert your PC into a private cloud for remote access and data backup, Tonido is a great alternative. Compatible with Mac, Windows, and Linux, this free private cloud server turns your computer into a storage website, letting you access files from anywhere on any device.
Tonido offers up to 2GB of file syncing across computers, and there are even Tonido apps for iOS and Android.
Secure your online privacy
Install The Amnesic Incognito Live System (TAILS) on your old computer and enjoy your very own dedicated privacy PC.
TAILS routes all your internet traffic and requests through TOR Project, a software that makes it difficult for anyone to track you online. All of this Linux-based software’s integrated applications like a web browser, Office suite, and email software are pre-configured for robust security and privacy protection.
Kick your media up a notch
Looking for a way to listen to music and podcasts or watch videos on other PCs or mobile devices? Server software like Kodi can help.
Kodi brings all your digital media together into one user-friendly package so you can use your old PC as an audio and video hosting platform. From there, you can play files on other devices via the internet. There are remote control apps for both iOS and Android, and even an app for Kodi playback on Amazon Fire TV.
Kodi works on any Windows, MacOS, and Linux computer, and even on even rooted Android and jailbroken iOS devices.
Technical Dr. Inc.'s insight:
Contact Details :
[email protected] or 877-910-0004 www.technicaldr.com
0 notes
Text
How to Set Up Plex (and Watch Your Movies on Any Device)

Plex Media Server is a user friendly approach to store all of your pictures, shows, along with other websites in 1 location--and allow it to be available from any device, if you are at on-the-go or home. If you're trying to find a no-headache means to watch your pictures anywhere, this is it.
What Is Plex Media Server?
Following is a frequent scenario that all too many men and women find themselves in. You've got networking files--music, videos, TV shows, as well as photographs--but you do not have a simple means to readily access them in your own abundant and diverse apparatus.
Can you replicate your Blu-ray rips on to your notebook? What on your phone--would you convert the files so they are compatible and smaller? Can you fling displays to your TV through your desktop computer and Chromecast? Can you upload all of your photographs to your iCloud accounts to send them to your TV through Apple TV?
For serious geeks with a great deal of experience handling their websites, it is a massive pain to find all your apparatus talking and obtaining the exact same collection. It does not have to be like that, however. Plex is a social media server system which eliminates virtually every issue you encounter while handling a sizable personal media group.
The Plex version is easy: you park your entire media on one computer using the Plex server applications installed, and then you put in Plex on on all of your other devices. Then, from some one of these devices, you are able to remotely access your entire media library and then observe it without a hassle.

Further, since the Plex version is really a server/client one, you do not need to think about copying files to a different devices and addressing problems such as playback quality, video resolution, along with other specifics. Your Plex host will, transcode all of your websites articles on the fly, in order that it functions correctly on whatever device you are using. Want to see your TV show from the backyard in your iPhone? No issue. Want to see it on your notebook at your in-laws' home? Also no difficulty. Wish to hook your new smart TV right in your media collection with no extra hardware? Purchase the ideal TV and that is no issue either. In a nutshell, running Plex is similar to running your very own personal and polished streaming support, where you are the sole curating the library.
Not only do you receive on-demand streaming to all of your apparatus but also you get absolutely amazing metadata and artwork to go along with it.

Let us take a better look at everything you want to begin and then jump directly into preparing your media set for Plex, installing Plex-- also--everybody's favourite part--obtaining your Plex networking collection.
What You’ll Need
Plex is a very polished solution, and as soon as you get this up and running it is about as hassle free as it gets. Nevertheless, but the most crucial issue would be to enter the experience with a transparent image of everything you want and how all of the bits of your Plex installation work together.
Home Is Where The Server Is
First of all, you will need a pc that houses all of the documents and runs Plex Media Server. You are able to set up Plex on Windows, Linux, OS X, and even on dedicated host software such as FreeNAS and on NAS hardware such as the Synology platform (it is possible to view all of their supported platforms to the Media Server program here). However, no matter what platform you pick, it will need to become a computer that has always switched on. There is no use in using a extensive streaming option for all your private media demands if, once you proceed to get it, the material is offline.
In addition to always being on, you are going to need the server pc to have a nice quantity of processing capability to manage the aforementioned transcoding. The more customers you expect to be seeing at the same time, the greater hardware you desire. Plex media server still works on old hardware but it is going to automatically disable transcoding when the hardware is inadequate, and playback will probably endure and stutter on really obsolete or under-powered hardware.It is possible to read over their hardware hints here.
Last, you will need a good deal of hard disk space--enough to save all of the pictures, TV shows, music, and photographs you've got.
If you already have any hardware lying around you are not employing, by all means give it a chance. Worst case scenario, you discover that document playback is disappointing. Finest case scenario, you realize that the old hardware works good and you avoid buying any new equipment.
A Client For Every Device
The machine only 1 half of this Plex system. The other half would be your "customer" program, or the program you do all of the viewing from. As you're able to play with the media from the host's online control panel, it is like watching Netflix on your internet browser--many men and women prefer to sit down in their living room or see on their mobile devices. And for this, you want the Plex customer to access the machine.

1 thing that's been a source of continuing confusion about Plex is whether or not it's totally free--and a major quantity of the confusion hinges on how the mobile programs have an "activiation fee".
The Plex networking server applications has ever been free. The majority of the customer programs have always been liberated. Some of these client programs have a minimal one time activation charge several dollars (e.g. the iOS Plex customer program costs $4.99).
Plex has two means of managing the paid programs. If you simply want one program, you might want to simply activate that single program. Should you require many programs across multiple programs and that you would like the top features, you may think about the Pass subscription for $4.99 per month or a $149.99 daily pass.
You may read more about that programs are paid, that are liberated, also the gaps among a free Plex subscription and also a top notch one here. To assess stage accessibility and obtain a client program on your system, have a look at the Plex downloads page here.
Now that we have looked at the overall guidelines for choosing a device on your Plex server, and also the best way to have the client applications, let us look at the very significant step of organizing your own media.
Step One: Consolidate and Organize Your Media
Plex works best when your entire media content is well organized and at precisely the exact same location. To this end, you must have your entire media on precisely the exact same device you are installing the Plex host applications--if it is an old desktop computer, a dedicated storage server on your cellar, or even a NAS device, all of your media ought to be on it.
Further, you would like to arrange your media into a fresh folder structure that retains major media types split and simple for both you and Plex to parse through.
If you have already spent any time in organizing your networking, particularly in the event that you've utilized media centre software such as XBMC/Kodi previously, then there is a great chance you have already got an ideal (or almost perfect) folder arrangement set up.
Here’s a simple example of a best-practice directory structure for Plex:
/Media/
/Movies/
/MovieName (Year)/
MovieName (Year).ext
/Music/
/ArtistName - AlbumName/
Track# - TrackName.ext
/TV Shows/
/ShowName/
/Season 01/
ShowName - s01e01.ext
/Photos/
/Album Name/
Image.ext
From the above directory structure, you notice that the significant media classes are split into different sub-folders (such as Films and TV Shows) and that every media type includes a fairly straight forward design convention. Films go in folders named after the film; best practice would be to incorporate the year in parentheses to lower confusion. Music is organised at a straight forwards Artist Name/Album Name arrangement. TV shows are coordinated with the title, year, and episodes are labeled with both stats together with all the "sXXeXX" arrangement. Pictures are even simpler--Plex simply reads the record name the folder off and heaps up the pictures inside.
While the above instances pay nearly 99 percent of this land you will find you want a little additional advice when naming DVD .ISO documents or other less common formats. Should you require extra help cleaning up your websites check out that the Plex manual to networking preparation here.
Step Two: Install Plex Media Server
A last notice on organizing your own media for Plex: when you have used or are currently using another media centre software (such as XBMC), do not be worried about your metadata. You may safely run XBMC and Plex entirely in parallel with no danger to a metadata, as neither program employs the identical metadata files.

The basis of the set up, superbly organized media apart, is your Plex Media Server program. For our tutorial now we are going to be installing it on a Windows machine however, little nuances apart, the setup method is practically equal across all platforms since the vast majority of the approach is performed from inside the Plex online control panel.
Run the installer and unwind for a moment. After the installer is finished, Plex will automatically establish, and should load the internet control panel to you. If it doesn't, start your internet browser and browse to http://127.0.0.1:32400/ on such computer.

On the off probability that you've got an older Plex accounts from prior experiments using the stage, sign up in. Otherwise, click on the "Subscribe" link and register for a brand new account.
Following your very first sign in, you're going to find a rundown of all of the characteristics of this Plex Pass superior support. While we have been believe the superior service is really good, let's not get ahead of ourselves--utilize Plex for awhile to ascertain whether you would like to purchase it. Close out the popup window to come back to the server installation.
The very first step would be to name your waiter. By default, the host is called after the system name of the device on which it's installed.

Next, it is time to add websites to your own library.

Let us start off by incorporating some picture files. Select "Films" and then, at the drop down menu which appears, name your picture library and choose a language. For the majority of people departing the default title of "Films" ought to suffice.

Now it is time to stage Plex in the real documents, choose "Browse for networking folder" and choose the folder which houses your picture files. When you've chosen the folder(s), click on "Insert library" to finish the procedure.
Repeat the following steps for TV shows, songs, or photographs. It is not required to populate each of the libraries, ofo class--if you are utilizing Plex solely for TV displays, then go on and dismiss all of the other library entrances.
The last step of the primary server setup would be to permit remote access to a own media server and send anonymous information to Plex. Both are assessed by default, and we advise that you leave them assessed unless you've got a pressing reason to assess them.
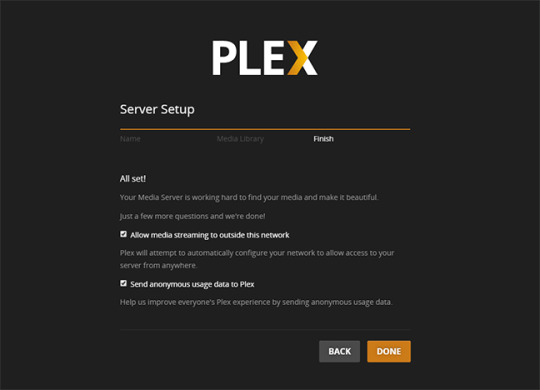
Now you're going to be kicked to the internet control panel to your Plex server. Based on how fast your system is functioning, you might see "Updating libraries..." or else you might already have articles to exhibit similar to this.

Even though you are able to navigate through all of your media libraries directly from the Plex control panel (and also watch content directly in the internet browser), it is more helpful for checking in on your library and not as helpful for really enjoying your articles. Let us look at how it is possible to get Plex using a distant client.
Step Three: Access Your Plex Media Server from Elsewhere
At this time we have done all of the hard job (and it was not even that tough). As soon as you've the true Plex media server ready to go, it is completely smooth sailing. Just how eloquent? Since your whole library has been stored on a single central server, then you can readily tap into it in any pc, smartphone, or other apparatus and find the specific same experience--the very same media, same meta information, same lately added recordexactly the same database monitoring what shows you have watched and which ones you will need to catch upon.
Look for the program on your phone/tablet/TV's app shop, install it, and start it. Again, we are using the iOS program, but they are all basically synonymous. Just click "Sign In" and apply the very same credentials you made when you install your server.

Boom. You're instantly connected to a media collection. Can you see the way the display on our iPhone mirrors, down to the series names, the screenshot you simply saw of this media server control panel?

Let us do this and then pick "TV shows".

Why not, we will pick a year and an event.

With but a Couple of taps after logging in, we are seeing an episode with no hiccup:
And that is all there's to it! When you've got local media along with a desire to see that local media anywhere in your home (or even away from home) and on any other device, Plex Media Center is an all-purpose solution which makes enjoying your films, TV shows, and even family photographs and videos, a complete cinch.
0 notes
Text
A quick NAS with class: 5 months with the Synology DS-412+ Expensive yet brisk system stockpiling has huge amounts of elements—and gigabit Ethernet speed.
Last year, when Ars distributed our two-section DroboFS audit (Part 1, Part 2), one of the solicitations we continued hearing was for a comparable top to bottom survey of other home-situated system joined capacity (NAS) items, especially those from Synology. A couple of months prior, I bought a Synology DS-412+ to supplant my DroboFS (which I have since passed on to my folks) and I've been living with it since.
In with the new
Different contenders in the home NAS space incorporate QNAP, NetGear, and Iomega, however I ran with Synology predominantly because of their notoriety for execution. The DroboFS was the very meaning of "simple to utilize," however after over a year the moderate read and compose speeds just turned out to be excessively. In the wake of scouring discussions and surveys to discover a substitution, I continued returning to the then-recently discharged DS-412+.
Synology separates its models over a few lines, and every gadget's expected target market can be divined by analyzing the model assignment. Units starting with a "RS" are "RackStation" models, proposed to be mounted in standard server farm 19-inch racks; "DS" units are "DiskStation" models, which sit on the floor or on a work area as opposed to in a rack. The principal number after the DS or RS is the greatest number of circle drives the gadget underpins (however achieving that number for a few models requires an outside development sound). The following two digits are the year the model entered creation, with all models marked down today having either 11, 12, or 13 (yes, a couple models now convey a 13—don't inquire). The last character shows anything unique about the model—a "+" if it's a business-class unit with additional oomph, a "j" for passage level models which organize reasonableness over execution, or a "thin" for units which acknowledge 2.5" hard plate drives.
The DS-412+, then, is a four-inlet independent unit, delivered in 2012, with an accentuation on execution. It contrasts from the prior DS-411 model it's supplanting by having a speedier CPU (a 2.1GHz Intel Atom D2700 versus a 1.6GHz ARM) and four times the RAM (1GB versus 256MB). The extra RAM and CPU are both helpful, not only to provide more pull for quicker document exchanges additionally to give the client more headroom for running applications on the NAS. A decent library of both official and homegrown applications develops the gadget's usefulness, as well.
A word on cost
I'll simply ahead and ruin the completion of this audit now: the main thing I really need to gripe about with this NAS is the cost. You'll pay in any event $650 for it before charges and delivering, contingent upon the trader you purchase from—and that is with no circles in it. It wouldn't be at all hard to part together an a great deal more effective little frame figure white-box server for significantly less cash; hurl in a couple of hard circle drives and a free working framework like FreeNAS and you have yourself a superbly serviceable capacity framework.
What you're conceivably surrendering while running with a home-assembled gadget is support, a guarantee, usability, and—at any rate on account of Synology—a solid programming environment. For somebody substance to be his own sysadmin, the possibility of adding a frankenNAS to the storage room in the lair isn't really that overwhelming; truth be told, in case you're that sort of individual, you may have stopped perusing as of now and backpedaled to building your RAID-Z vdevs or whatever it is that you parents do. An immense portion of customary individuals, however, can't or don't have any desire to manage home-constructed servers. Such servers can be a great deal like venture autos—quick and enjoyable to tinker with, however frequently bearish, time-sucking beasts.
A NAS gadget like the Synology exchanges time for extra cost, and it arrives prepared to go. There are diverse models at various costs; in the event that you don't require as much space yet at the same time need the interface, you can get a two-narrows unit rather; in the event that you realize that will require a LOT of space, you can run with an eight-sound unit, or pick the five-inlet unit and include a development skeleton later. For me, the four-inlet DS-412+ met the sweet spot for execution and cost.
(Take note of: This is not a survey unit, and Synology wasn't required in this audit. This is a NAS that I purchased with my own well deserved dollars and which I've been utilizing each day for a while—generally by viewing a scene or two of "Dim's Anatomy" with my better half while we have supper, additionally for more genuine attempts.)
Physicality
The DS-412+ is a moderately little gadget. It's generally cubular (that is my pledge and I'm adhering to it) and all dark with a unique finger impression drawing in lustrous complete on the removable drive cove cover. It has four drive straights with minimal plastic removable caddies in which you secure your plates for simple inclusion and removal.In option to the four inner drives, the DS-412+ has USB 3 and eSATA ports for appending extra drives, which can be utilized essentially for additional outer stockpiling or which can be brought under the NAS's administration and used to extend existing NAS volumes or include new ones.
The unit isn't particularly overwhelming, and the clamor level of the NAS itself is low; its fans are tranquil, and relying upon the sorts of plates picked, you could without much of a stretch arrange the NAS on or beneath your work area and never see it. Notwithstanding, I have it socked away in my storage room in light of the fact that the circles I picked are very noisy; when the NAS is occupied, I can hear them granulating ceaselessly even through a shut entryway. This is my own blame, however, in light of the fact that I ran with plates that organize unwavering quality and execution over calm operation. I settled on the correct decision for me, however it may not be the correct decision for you.Choosing circles
To round out the DS-412+, I got four 2TB Western Digital RE4-GP undertaking class SATA plates. The decision to run with the more dependable endeavor class drives was a simple one; I'd encountered presumably one circle disappointment each three or four months with my DroboFS, which was populated with 2TB Western Digital Green plates. Notwithstanding having a more extended guarantee, the RE4-GPs have better vibration resistance (imperative when you have a few circles pressed into a little space) and, most critical of all, default bolster for cutting edge mistake recuperation control, or "Time Limited Error Recovery" in Western Digital speech.
ERC/TLER is indispensably essential for any turning circle drive utilized as a part of a RAID set, since it controls the measure of time a hard plate drive controller holds up when it experiences a read or compose mistake before it reports the blunder to the host framework and starts endeavoring to recoup from it. Without ERC, a plate drive in a RAID set which keeps running into an awful division on read could get itself dropped from the RAID set altogether by the RAID controller, which could thusly trigger a full RAID re-work to a hot extra (with the execution affect that acquires) or could just leave the RAID set in a corrupted state. With ERC, however, the RAID controller is offered time to recoup from little read and compose mistakes by revamping the particular erroring tracks from alternate circles, instead of rebuilding the whole RAID set since it supposes the plate is awful. Single-part blunders and remaps are entirely normal, and without a circle that backings ERC you risk a modest, effortlessly recoverable mistake changing into a framework affecting occasion. (Try not to stress if so much discussion over RAID is befuddling—we'll quickly examine what RAID is and how it applies in Synology-arrive in a minute.)
Venture class drives may be needless excess, notwithstanding. I obtained the gadget in late April 2012, so at the time Western Digital hadn't yet discharged its WD Red NAS drives; in the event that they had been accessible, I would likely have run with them. They offer a decent bargain between the unwavering quality and additional firmware components of big business class drives, and the lower cost of shopper review outfit. There are obviously other drive makers out there other than Western Digital; while nobody else has yet started offering a hard plate drive promoted particularly for customer and independent company NAS gadgets like the WD Red, any circle drive which has a decent guarantee and backings ERC will make a fine choice.Setting up
Synology gadgets have a phenomenal Web interface, which we'll talk about in the blink of an eye, however the underlying setup requires the establishment of the Synology Assistant application, which looks on your LAN for crisp Synology boxes. The Synology Assistant goes ahead a plate with the gadget, yet as with most included programming, you will in all likelihood be in an ideal situation downloading the most current adaptation from the Synology bolster website. Once began, the right hand will sniff around your system and present you with a rundown of Synology units it has detected.My unit sent without a rendition of the Disk Station Manager (DSM) programming introduced, thus it showed up in the rundown of accessible NAS units as "Not introduced." Clicking on it began the setup procedure, amid which you can set up the gadget's name, change its default head secret key, and segment its crashes into at least one usable volumes of space. The procedure was unremarkable, with the exception of the graphical oddities experienced under OS X. This did not rouse certainty. Luckily, however the installer looked somewhat odd, the introduce procedure fell off with no issues.Though the Synology gadget bolsters a scope of various drive setups, you can check a solitary box in the colleague to forego all that conceivably complex circle arrangement stuff and essentially make a solitary Synology Hybrid RAID volume. I carefully picked this. The gadget then started the way toward applying the design decisions I made.Once it was done, I could start up a program and go to http://diskstation:5000, where I was welcomed with the completely staggering (and stunningly utilitarian) Synology DiskStation Manager.Hybrid RAID and other volume decisions.
0 notes
Text
Rufus 2.13.1081
Rufus is a useful utility, that helps format and create bootable USB flash drives, such as USB keys/pendrives, memory sticks, etc. It can be especially useful for cases where you need to create USB installation media from bootable ISOs (Windows, Linux, UEFI, etc.), to work on a system that doesn't have an OS installed, to flash a BIOS or other firmware from DOS or when you need to run a low-level utility. Non exhaustive list of ISOs Rufus is known to work with: Arch Linux, Archbang, BartPE/pebuilder, CentOS, Damn Small Linux, Debian, Fedora, FreeDOS, FreeNAS, Gentoo, GParted, gNewSense, Hiren's Boot CD, LiveXP, Knoppix, KolibriOS, Kubuntu, Linux Mint, NT Password Registry Editor, Parted Magic, Partition Wizard, Raspbian, ReactOS, Red Hat, rEFInd, Slackware, Super Grub2 Disk, Tails, Trinity Rescue Kit, Ubuntu, Ultimate Boot CD, Windows XP (SP2+), Windows Vista, Windows Server 2008, Windows 7,Windows 8, Windows 8.1, Windows Server 2012, Windows 10, Windows Server 2016 * Download Links * Details * What's New Download Rufus Download Free Download Free Portable Last Update: April 06, 2017 Current Version: 2.13.1081 License: Freeware Languages: Multiple Languages Supported Operating Systems: Windows XP / Vista / 7 / 8 / 8.1 / 10 (32-Bit, 64-Bit) Developer: Pete Batard Homepage: Akeo.ie ChangeLog http://dlvr.it/NqHk2z
0 notes