#gasoline engine compression tester
Explore tagged Tumblr posts
Visit Tumblr Blog
Explore Tumblr blogs with no restrictions, modern design and the best experience.
Last Seen Tumblr Blogs


Fun Fact
Tumblr has been providing a Korean-language service since 2013.
Text

Gasoline oxidation stability tester
Gasoline oxidation stability tester is an automated unit. It detects the oxidation stability of finished gasoline under accelerated oxidated environment. Integrated standard water bath ensures reliable operation and accurate results. The unit conforms to ASTM D525 standard test method for gasoline.
0 notes
Text
Engine Repair Instruction Full Guide
Engines are the heart of any vehicle, powering everything from your daily commute to long road trips. Knowing how to repair an engine can be a game-changer, whether you're an enthusiast who loves getting your hands dirty or someone looking to save money on mechanic bills. This guide will walk you through the entire process of engine repair, from diagnosing problems to reassembling your engine and ensuring it runs smoothly.

Understanding the Basics of an Engine
Before diving into the repair process, it’s crucial to understand how an engine works. Most vehicles use an internal combustion engine, which combines fuel and air, ignites it, and transforms that explosion into mechanical energy.
Components of an Internal Combustion Engine
The main components include:
Cylinder Block: The engine's core where combustion occurs.
Cylinder Head: Houses the valves and spark plugs.
Pistons: Move up and down to create the force needed to turn the crankshaft.
Crankshaft: Converts the pistons' up-and-down movement into rotational motion.
Camshaft: Controls the opening and closing of the valves.
Valves: Regulate the flow of fuel and air into the engine and exhaust gases out.
How an Engine Works: A Simple Explanation
An engine works by pulling in a mixture of air and fuel, compressing it, igniting it with a spark (in gasoline engines), and then expelling the exhaust gases. This cycle—intake, compression, power, and exhaust—happens in each cylinder and repeats hundreds of times per minute.
Tools and Equipment Needed for Engine Repair

Whether you're performing a basic repair or diving into more complex work, having the right tools is essential.
Essential Tools for Basic Repairs
Socket Set: For removing and tightening bolts.
Wrenches: Different sizes for various engine parts.
Screwdrivers: Flathead and Phillips for screws and clips.
Pliers: For handling wires and small parts.
Torque Wrench: Ensures bolts are tightened to the correct specifications.
Specialized Equipment for Advanced Engine Work
Engine Hoist: For removing the engine from the vehicle.
Cylinder Hone: Prepares cylinders for new piston rings.
Compression Tester: Checks the health of each cylinder.
OBD-II Scanner: Diagnoses engine codes and issues.
Safety Gear and Precautions
Gloves: Protect your hands from cuts and chemicals.
Safety Glasses: Shield your eyes from debris.
Work Boots: Offer protection against heavy parts or tools.
Diagnosing Engine Problems
Accurately diagnosing engine problems is the first step in any repair process. Understanding the symptoms can save time and prevent unnecessary work.
Common Symptoms of Engine Issues

Check Engine Light: Indicates a problem detected by the car's computer.
Strange Noises: Knocking, tapping, or grinding sounds can signal internal damage.
Excessive Smoke: Blue smoke might mean burning oil, while white could suggest a coolant leak.
Loss of Power: Often linked to fuel or air delivery issues.
Step-by-Step Diagnostic Process
Listen and Observe: Note any unusual sounds, smells, or behaviors.
Check Engine Light Codes: Use an OBD-II scanner to retrieve error codes.
Perform Compression Test: Assesses the health of your engine’s cylinders.
Inspect Fluids: Look for contamination or leaks in oil, coolant, and other fluids.
Step-by-Step Guide to Reassembly
Prepare Your Workspace: Ensure that your workspace is clean, organized, and well-lit. Lay out all the parts and tools you'll need in the order of reassembly. Keep the engine manual handy for specific torque specs and sequences.
Install the Crankshaft: Place the crankshaft back into the engine block, ensuring it is seated correctly. Use assembly lube on the main bearings to prevent damage during the initial startup. Torque the main caps to the manufacturer's specifications.
Insert the Pistons: Install the pistons and connecting rods. Be sure to align the piston rings correctly and use a ring compressor to insert the pistons into the cylinder bore. Attach the connecting rods to the crankshaft and torque the rod bolts to spec.
Install the Camshaft and Timing Components: If your engine uses a timing chain or belt, install it according to the timing marks on the camshaft and crankshaft gears. This step is crucial for ensuring the engine's valves open and close at the correct times.
Attach the Cylinder Head: Place the cylinder head gasket on the engine block, followed by the cylinder head. Torque the head bolts in the correct sequence and to the proper specifications. This ensures a good seal and prevents head gasket failure.
Install Valves, Lifters, and Pushrods: If applicable, install the engine's valves, lifters, and pushrods. Make sure they are properly aligned and that the lifters are seated correctly in their bores.
Reassemble the Valve Train: Install the rocker arms and adjust the valve lash according to the engine manual. Proper valve lash is critical for engine performance and longevity.
Reattach External Components: Begin reattaching external components like the water pump, oil pump, timing cover, oil pan, and intake manifold. Replace any gaskets and seals during this process to prevent leaks.
Reconnect the Fuel and Ignition Systems: Reinstall the fuel injectors, spark plugs, and ignition wires. Ensure all electrical connections are secure and properly routed to avoid short circuits or malfunctions.
Final Checks: Before moving on, double-check all connections, bolts, and components. Make sure nothing is left loose or unconnected.
Applying Proper Torques and Specifications
Every engine has specific torque settings for each bolt. Over-tightening can strip threads or warp components, while under-tightening can lead to leaks or parts coming loose. Use a torque wrench and follow the manufacturer's specifications closely.
Double-Checking Work for Mistakes

It's easy to miss a step or make a mistake during reassembly. Double-check your work:
Ensure all components are installed in the correct order.
Verify all bolts are torqued to spec.
Check for any leftover parts or tools in the engine bay.
Testing the Repaired Engine
With the engine reassembled, the next step is testing it to ensure everything is functioning properly.
Preparing for Initial Startup
Before starting the engine, perform a few preparatory checks:
Prime the oil system: This can be done by cranking the engine with the fuel system disabled until oil pressure is achieved.
Fill the engine with fresh oil and coolant.
Double-check all electrical connections and fuel lines.
Checking for Leaks and Unusual Noises

Once you start the engine, pay close attention to any unusual noises or leaks:
Oil Leaks: Check around the oil pan, valve covers, and front and rear seals.
Coolant Leaks: Inspect the radiator, hoses, and water pump area.
Unusual Noises: Listen for knocking, tapping, or whining sounds, which could indicate an issue with the timing components or internal parts.
Fine-Tuning and Adjusting the Engine
After the initial startup, the engine may require some adjustments:
Timing Adjustments: Use a timing light to set the ignition timing.
Idle Speed: Adjust the idle speed according to the manufacturer’s specifications.
Fuel Mixture: On carbureted engines, you may need to adjust the air-fuel mixture for optimal performance.
Common Engine Repair Mistakes to Avoid
Engine repair is complex, and mistakes can be costly. Here are some common errors to watch out for:
Misalignments and Incorrect Torques
Misaligned timing components can lead to poor engine performance or damage.
Incorrectly torqued bolts can cause leaks, parts failure, or engine damage.
Overlooking Small Parts and Connections
Small parts like washers, clips, or gaskets are easy to overlook but crucial for preventing leaks and ensuring proper function.
Electrical connections: Double-check that all sensors and connectors are properly seated.
Skipping Diagnostic Steps
Skipping steps in the diagnostic process can lead to unnecessary repairs or missed issues. Always perform thorough diagnostics before and after repairs.
Maintaining Your Engine After Repair
Proper maintenance is key to ensuring the longevity of your newly repaired engine.
Importance of Regular Maintenance
Regular maintenance, such as oil changes, air filter replacements, and coolant checks, is essential to keep your engine running smoothly and prevent future problems.

Tips for Extending Engine Life
Use high-quality oil and filters.
Avoid hard driving until the engine is fully warmed up.
Regularly check and maintain fluid levels.
When to Seek Professional Help
While DIY repairs can save money, some issues are best left to professionals, especially if you encounter complex problems or lack the necessary tools and expertise.
Dealing with Advanced Engine Repairs
Some engine repairs are too complex for the average DIYer. Here's when to consider professional help:
Understanding When It’s Beyond DIY
Extensive internal damage: Cracked blocks or severely worn bearings usually require professional expertise.
Advanced electrical issues: Problems with engine management systems often need specialized diagnostic tools and knowledge.
Overview of Complex Repairs: Timing Belt, Engine Rebuilds
Timing Belt Replacement: Involves precise alignment of engine components and is critical for preventing engine damage.
Engine Rebuilds: This is a time-consuming and complex task that often requires professional machining and specialized tools.
Working with a Professional Mechanic
When the repair is beyond your capabilities, working with a professional mechanic ensures that the job is done correctly and safely. They have the tools, experience, and resources to handle complex engine repairs.
Cost Considerations in Engine Repair
Engine repair costs can vary widely depending on the scope of work, parts required, and whether you do it yourself or hire a professional.
Estimating Costs for DIY vs Professional Repair
DIY Repairs: Typically cost less but require an investment in tools and time.
Professional Repairs: Can be expensive but come with the assurance of experience and often a warranty.
Budgeting for Tools, Parts, and Time
Consider the cost of any special tools or equipment you might need, as well as the cost of replacement parts. Factor in the time required, especially if the vehicle is your daily driver.
Understanding the Cost of Mistakes
Mistakes can be costly. Stripping a bolt, breaking a part, or incorrect assembly can lead to additional expenses. Always weigh the risks before starting a major repair.
Conclusion
Recap of Key Points
Engine repair is a rewarding but challenging task that requires careful planning, the right tools, and attention to detail. Whether you’re fixing a minor issue or performing a complete rebuild, following the correct procedures is crucial for success.
Encouragement for DIY Enthusiasts
For those who love working on their vehicles, engine repair can be a satisfying and cost-effective way to maintain your car. With patience and persistence, even complex repairs can be tackled with confidence.
Final Thoughts on Engine Repair
Always approach engine repair with a clear plan and the right resources. Don’t hesitate to seek professional help when needed, and remember that regular maintenance is the best way to avoid major repairs.
FAQs
How do I know if my engine needs repair?
Common signs include unusual noises, excessive smoke, loss of power, and a check engine light. Regular diagnostics can help catch issues early.
Can I repair my engine without professional help?
Basic repairs like replacing gaskets or sensors can often be done at home with the right tools. However, more complex tasks like engine rebuilds may require professional expertise.
What are the signs of a failing engine?
Signs include knocking noises, excessive oil consumption, smoke from the exhaust, and persistent overheating.
How long does it take to repair an engine?
The time required varies greatly depending on the complexity of the repair. Simple repairs might take a few hours, while a full rebuild could take several days or longer.
2 notes
·
View notes
Text
Explain What Diesel Engine Specialty Tools
A diesel engine is a powerful and efficient machine that requires specialized tools for maintenance and repair. These tools, known as diesel engine specialty tools, are essential for performing tasks that are unique to diesel engines. They enable mechanics to diagnose, repair, and maintain diesel engines effectively, ensuring optimal performance and longevity. In this essay, we will explore the importance of diesel engine specialty tools and how they contribute to the smooth operation of these powerful engines.
The first paragraph should introduce the topic and explain what diesel engine specialty tools are. It should also mention their significance in maintaining and repairing diesel engines.
Diesel engine specialty tools are a set of specific instruments designed to perform tasks that are unique to diesel engines. These tools go beyond regular hand tools and are essential for diagnosing, repairing, and maintaining diesel engines. Diesel engines have different requirements and components compared to gasoline engines, such as fuel injectors, glow plugs, and high-pressure fuel systems. Without the proper tools, mechanics would face difficulty in accessing and working on these components, ultimately leading to improper repairs and increased downtime for the engine.
The second paragraph should delve into the various diesel engine specialty tools and their functions. It should provide examples of common tools used by mechanics for diesel engine repairs and maintenance.
There is a wide range of diesel engine specialty tools available to mechanics. Some common tools include injector pullers, glow plug wrenches, compression test kits, fuel pressure gauges, and diesel injector testers. These tools allow mechanics to remove and install injectors, test glow plugs for functionality, measure compression levels, diagnose fuel injection issues, and check fuel system pressure. Each tool serves a specific purpose and provides accuracy and efficiency in performing diesel engine maintenance and repairs.
The third paragraph should emphasize the importance of diesel engine specialty tools in diagnosing and repairing diesel engines. It should highlight how these tools help mechanics identify and rectify issues promptly, ensuring the engine operates optimally.
Diesel engine specialty tools play a crucial role in diagnosing and repairing diesel engines. Through the use of these tools, mechanics can identify and isolate specific problems, eliminating the need for trial-and-error or costly guesswork. The accuracy and precision provided by these tools help minimize downtime and reduce overall repair costs. Additionally, these tools ensure that repairs are done correctly, reducing the risk of future failures or malfunctions. Without the use of specialty tools, mechanics would struggle to identify and rectify issues effectively, leading to performance degradation and potentially catastrophic failures.
The final paragraph should conclude the essay by reiterating the significance of diesel engine specialty tools in optimizing engine performance and reliability.
In conclusion, diesel engine specialty tools are essential for maintaining and repairing diesel engines effectively. These tools enable mechanics to diagnose issues accurately, perform repairs efficiently, and ensure optimal engine performance and longevity. Without the use of these specialty tools, mechanics would face difficulty in accessing and working on diesel engine components properly. Therefore, investing in diesel engine specialty tools is crucial for any mechanic or technician working with diesel engines, as they contribute to the smooth operation and reliability of these powerful machines.
0 notes
Text
Helping The Others Realize The Advantages Of Gas Train
Gas Train for Burners Each systems entail transducers which have been only clamped on into the pipe and programmed With all the pipe dimension and timetable and can be employed to estimate stream. These meters can be used to evaluate Virtually any dry fuel which includes normal gasoline, nitrogen, compressed air, and steam. Clamp-on meters are offered for measuring liquid stream as well. Coriolis meters[edit] DC-AC Converter – The DC equipped by battery pack is converted to AC and supplied to the electrical motor. This energy transfer is managed by a classy motor Handle mechanism (also known as Powertrain Electronic Manage Device) that controls the frequency and magnitude from the voltage equipped to the electrical motor in an effort to handle the pace and acceleration According to driver’s instructions communicated by using acceleration/brakes. They can be a custody transfer meter, viewed as new engineering, extremely correct with superior turndown capabilities, and impartial of fluid Qualities. They're also highly-priced to set up and unsuitable for more substantial pipe measurements. They are also employed as auxiliary burners to offer extra heat for industrial processes for example drying, curing and calcining. These may be both natural or made fuel types. Every revolution is related to a specific volume, as well as the meter reads in cubic ft (or cubic meters). Optimistic displacement meters have adequate precision and large turndown. However, they've transferring elements, so soaked gasoline and dirty gas are problematic when working with them. The “A” Series meters weigh 25% fewer than other competitor equivalents, earning the meters attractive for his or her scaled-down physical appearance and lightweight. They're also developed and examined per ANSI B109.1 and they are appropriate with primary AMR/AMI gadgets. The final component would be the firing amount valve. This valve is operated by a modulating motor and may modify In keeping with enter through the modulating Manage. It could also be termed a butterfly valve. They're not installed on an on/off burner. In this article, we investigate the basic principles of electric powered auto powertrain. For the video clip clarification pay a visit to our YouTube channel Honeywell American Meter diaphragm meters established the typical for durability and accuracy in gas measurement. Real OEM substitution sections from Honeywell Gasoline Depot deliver the exact same match, end, structural integrity and corrosion resistance as the original Honeywell solution, extending the company lifestyle of the meter and safeguarding your financial commitment. The AGA seven calculation alone is a simple ratio and is also, in essence, a density correction approach to translating the quantity or level of gasoline at flowing disorders into a volume or price at base situations. The meters tend to be made use of at pipeline meter stations in higher-stream and substantial-force programs wherever the slightest inaccuracy can negatively effect the bottom line. This meter design is exceptionally exact, contains a substantial turndown ratio, and it has fantastic rangeability, however it is high-priced. Now you are able to style and design your own private train and buy on the internet with our On the web Purchase Variety. Decide on your locomotive type, choose quantity and colour of one's autos, and decide which selections you'd like incorporated and get quick pricing proper on the shape! A significant Instrument for identifying discipline functionality, Honeywell Gas Depot offers the two digital and analog differential strain testers to measure tension fall across meters, filters, valves, together with other gas method components. Industrial use: They are able in light-weight industrial purposes, measuring gas amounts with minimal pressure and minimal movement level. Unlike turbine circulation meters, they are unsuitable for top-pressure gases in substantial industrial purposes. diaphragm gas meters
0 notes
Text
What Does a Mechanic Do? | brucebuddenautomotive.com.au
Regular car service and maintenance is crucial to your vehicle's overall health. In addition to repairing your vehicle's major systems, it is important to maintain regular preventive maintenance. Without regular maintenance, your car's performance could suffer and its lifespan could be shortened. A routine tune-up at a reputable mechanic is crucial to keep your car running at peak performance.
car service
It is best to have your car serviced on a regular basis to ensure optimum car performance. Regular servicing will keep your car in excellent condition and save you money on repairs in the long run. It will also improve fuel efficiency, handling and the engine's performance. It will also reduce the risk of breakdowns.
A simple oil and filter change usually takes less than an hour. However, an interim service can take up to two hours, depending on the number of components that need to be checked. A full Car repairs can take up to 3 hours. It will take longer if more detailed services are required, but will be cheaper overall.
A basic car service includes checking the tires, fluid levels, and other amenities of the car. A full service will also include a visual inspection and certain technical checks. It will also inspect and repair all electronics. The battery will also be checked. It will be necessary to have a full service once in a while.
A full service also includes checking your car's lubricants. These fluids are important for the performance of the engine. They can break down and lose their efficiency over time. Replacing them early will prevent further damage to the vehicle and prevent a costly accident.
mechanics repairs
Mechanics are trained to inspect, diagnose and repair vehicles, including cars and trucks. Many mechanics also repair electrical systems. Some are employed in dealerships while others operate their own businesses. These professionals typically work full-time hours and are often on call for overtime or weekend work. Earning manufacturer-specific certifications can give you the edge in the job market. There are various training programs available, including the Automotive Technical Institute.
Mechanics use specialized diagnostic tools to assess the condition of gasoline and diesel-powered vehicles. They are trained to identify malfunctions through visual and auditory means. In addition, they use complex testing equipment, such as engine analyzers and compression testers. These tools can help mechanics determine what repairs are needed and which components may be salvageable.
The job of an automotive mechanic varies greatly, depending on their specialty. Some specialize in a particular area of automobile repair, such as engine or transmission. Some work on trucks, buses, and other commercial vehicles. Other jobs focus on municipal and construction vehicles. Many high schools offer automotive training programs. However, employers prefer mechanics with a higher level of education and training.
Tech Finder is an online service that connects you with mechanics repairs who specialize in your vehicle's make and model. The program also offers scheduling options so you can schedule a convenient appointment with a mechanic. You can also chat with the mechanic and keep track of your order history. This site supports multiple languages and allows you to save multiple cars at the same time.
mechanics
Mechanics perform general inspections and repair work on gasoline and diesel powered vehicles. They use visual and auditory examination methods to diagnose malfunctions and make necessary repairs. They may also use sophisticated test equipment such as engine analyzers and compression testers, voltmeters, and ohmmeters to determine the extent of repairs.
There are many different types of auto repairs, from oil changes and tire pressure checks to overhauling the transmission or diagnosing electronic problems. Many of these repairs are covered under the original warranty or a manufacturer's service campaign. Some warranties even specify who must perform the repairs. Therefore, it's a good idea to familiarize yourself with basic maintenance.
Mechanics can be employed by auto dealerships, service stations, and independent mechanics. Independent mechanics can work on their own or offer mobile services to vehicle owners. In many cases, they will need to discuss details of a repair with a customer. Mechanics may also be responsible for advising owners on how to maintain their vehicles.
#Car repairs#mechanics repairs#car service#mechanics in dapto#Car repairs Dapto#car service in dapto
0 notes
Link
0 notes
Text
2021 Chevy Colorado ZR2 review: A rough-and-tumble midsize truck
New Post has been published on https://appradab.com/2021-chevy-colorado-zr2-review-a-rough-and-tumble-midsize-truck/
2021 Chevy Colorado ZR2 review: A rough-and-tumble midsize truck
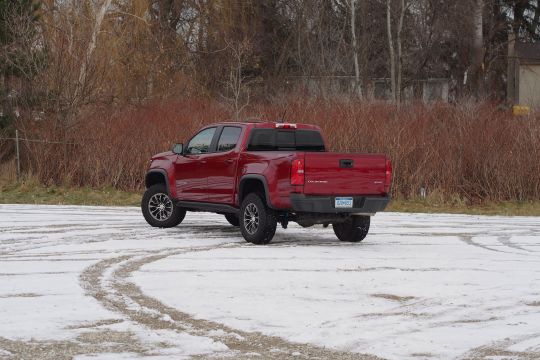
Not everyone loves the Colorado ZR2’s updated grille, but it’s certainly more aggressive than before.
Craig Cole/Roadshow
The Chevrolet Colorado is an oldie but a goodie. Yeah, this midsize truck feels outdated, but despite a few deficits here and there it remains a solid option in a segment rife with less-than-stellar competitors. If you need enhanced off-road capability or the open-bed hauling convenience only a pickup truck can offer, but don’t want or need a full-size rig, this Chevy is a decent choice.
Like
Manageable dimensions
Decent performance
Off-road hardware
Don’t Like
Full-size pickup fuel economy
V6 could be smoother
Annoying rock rails
To keep things fresh, the Colorado received a few enhancements for 2021. Mainline models gain a reworked — and arguably more handsome — front end, an 8-inch infotainment screen is standard on the LT trim and higher and 17-inch wheels are now included at no extra charge. The off-road-ready ZR2 model features similar improvements, though its face is noticeably more aggressive, looking somewhat like the boxy Silverado 1500’s prow, for better or worse. Finally, three new exterior colors are available across the range including Cherry Red Tintcoat, which is what you see here.
What sets the ZR2 apart from lesser Colorados is its off-road hardware. The suspension benefits from a 2-inch lift and the track, both front and rear, is 3.5 inches wider. Keeping things under control while bombing through the desert, clambering over boulders or just cruising your local Home Depot parking lot is a set of Multimatic Dynamic Suspensions Spool Valve dampers. These shocks help manage the Colorado ZR2’s starchy springs, which deliver a firm on-road ride. While the truck laughs at pothole impacts and large bumps, you feel practically every expansion joint on the highway. Its Goodyear Wrangler Duratrac tires are mounted on stylish, multicolor 17-inch wheels and should provide ample grip while trail-bashing, even if they broadcast plenty of noise on pavement.
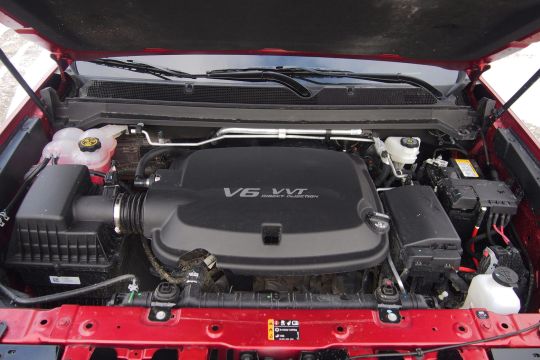
The Colorado is offered with three different engines, two of which are available in the ZR2. This example features the 3.6-liter gasoline V6, which cranks out 308 horsepower and 275 pound-feet of torque. For all you compression-ignition aficionados out there, a 2.8-liter Duramax diesel is offered. Lower-trim Colorados can be had with a four-cylinder gasoline engine, though it’s probably best to avoid this malnourished option. Matched to a quick-witted and polished eight-speed automatic transmission, the V6 has no trouble moving this midsize truck with reasonable authority. The turbocharged Ford Ranger may have more low-end grunt and a Honda Ridgeline’s V6 might be smoother, but this Chevy’s engine gets the job done with little fanfare.
The Colorado may be more maneuverable than a full-size truck, but it’s no more efficient. As it sits, this example is rated at 16 miles per gallon in the city and 18 mpg highway. Combined, it should return 17 mpg, a figure I topped by about 0.4 mpg in real-world driving. It’s always great when you can exceed a vehicle’s combined fuel-economy rating without even trying, though this Chevy should probably be more efficient than it is. I mean, a Silverado 1500 TrailBoss with the top-dog 6.2-liter V8 has the same combined fuel economy score and it even beats the Colorado on the highway, returning an advertised 19 mpg. What’s the point of getting a midsize truck if a traditional half-ton is more economical?

It can feel a little buzzy at times, but this 3.6-liter V6 engine gets the job done.
Craig Cole/Roadshow
If you tow or haul significant loads on the reg, you’ll probably also want a burlier truck than this Chevy. The Colorado ZR2’s maximum payload rating is just 1,350 pounds and it can only drag up to 5,000 pounds. The Ranger and Jeep Gladiator’s peak figures easily eclipse the Chevy’s — hell, the car-based Ridgeline can haul 233 pounds more, even if its towing capacity is the same. It is worth noting, however, that non-ZR2 Colorados are more capable. Their maximum payload rating is a more-competitive 1,550 pounds and they can tow up to 7,700 pounds when fitted with the diesel engine.
When it’s time to go trail-bashing, the ZR2 has a leg up over all of its midsize rivals except, perhaps, the Gladiator. Locking differentials front and rear help it get out of tough situations. It’s also graced with plenty of underbody shielding and other features like hill-descent control. Rock rails along each sill are great for protecting the body from jagged terrain, though coupled with that elevated ride height they make getting into and out of this truck challenging if you don’t want to soil your pant legs with dirt or mud. A pair of bright red recovery hooks punctuates the ZR2’s front end and is at the ready should you get in too deep while off-roading.
The ZR2 is available with a variety of appearance-enhancing options groups, but if additional capability is what you crave, consider the $5,750 Bison package. This upgrade turns an already capable truck into a real mountain goat. It gets you a bunch of kit from American Expedition Vehicles including a special front bumper with provisions to mount a winch, boron-steel skid plates for added underbody protection, unique fender flares, special 17-inch wheels and more.

The Colorado’s interior is a no-frills zone.
Craig Cole/Roadshow
The Chevy Colorado’s fundamentals are mostly impressive, but its interior and tech are what bely its advanced age. For better or worse, this truck’s interior is basically the same as it was five or six years ago, which means you get plenty of so-so hard plastics and leather that feels more like vinyl than anything shucked off a living creature. The dashboard’s overall layout is also as conservative as a Southern Baptist, with no frills or interesting design flourishes to be had. The advantage of this simple, honest layout, however, is that all the secondary buttons and knobs are easy to reach and see, with the climate controls being mounted up high and the seat-heater switches in an obvious place.
The Colorado is comfortable, with the front chairs adjusting nicely to accommodate taller folks, even if the cushions are quite flat. The crew-cab body’s rear bench seat is a bit on the upright side, par for the midsize-truck course, but it can fit a couple of 6-foot-tall adults without much trouble. The lower cushions also flip up, revealing a storage cubby for stashing things away from prying eyes.
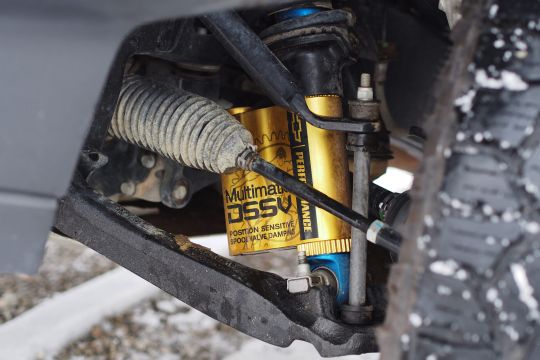
These Multimatic dampers help make the ZR2 model an accomplished off-roader.
Craig Cole/Roadshow
Like its overall interior design, this truck’s tech is behind the times. Sure, my tester’s 8-inch dashboard screen is nice enough, home to a speedy and clean infotainment system that’s a pleasure to use, but integrated navigation costs an additional $995, even on the high-end ZR2 model. Fortunately, if you don’t feel like shelling out an extra grand of hard-earned scratch, Apple CarPlay and Android Auto are ready, willing and standard across the board.
But no matter how much you spend, you cannot get push-button start in this truck. Instead, every Colorado comes with an old-fashioned stick-and-twist key. For you kids that aren’t familiar, you take a thin piece of metal, jab it into a receptacle on the steering column and turn it to fire the engine up. Similarly, blind-spot monitoring, rear cross-traffic alert and lane centering are not offered, but at least keyless entry is available on even the most-basic Work Truck model, and you can get the Colorado with remote start.
Despite its years, the Colorado is still a good midsize truck.
Craig Cole/Roadshow
Speaking of money, a base, rear-wheel-drive version of this truck with the four-cylinder engine starts at 26 grand and change. With many more features and a crew-cab body, the Colorado ZR2 tested here checks out for a much-steeper $44,890, including $1,195 in destination fees. The sole option padding that figure is the paint job, which costs $495.
The Chevy Colorado’s gray hairs are certainly showing, but despite its age, this truck remains a good option — one I prefer in some ways to the Ranger and Gladiator. For general-purpose use, the Honda Ridgeline is still the best all-around midsize pickup in my humble opinion, but if you want something with more rugged looks and a lot more off-road capability, the ZR2 could fit the bill.
0 notes
Text
The Compressor Tester Chronicles

New Ideas Into Compressor Tester Never Before Revealed
The compressor tester is a rather basic non-invasive diagnostic tool used to look at the state of the pistons in a gasoline engine. Box compressor tester is extraordinarily utilised to decide on the compression strength of the box. Hopefully if you’re doing your own boost leak test you’re knowledgeable about your compressor. Compression tester is just one of the very best thing that comes hand in hand when there’s a particular problem with certain components that depend on the car pressure. A compression tester will be able to help you determine precisely what is necessary to fix the engine in your vehicle. Not among the most accurate compression testers in the current market, it does its job though.
Things You Should Know About Compressor Tester
Even the very long hose of 25 isn’t only powerful in reaching hard-to-reach spaces but is also simple to discover in a cluttered compartment. A tire pump simply didn’t have sufficient flow to check mine. Therefore, instead of leaping to an incorrect conclusion, it’s far better to ascertain if your AC compressor is actually responsible. A Copeland Scroll compressor handles liquid better than every other compressor, which makes it the most dependable selection for grueling refrigeration applications. Low compression results from a few unique problems. Utilizing a vacuum gauge It’s possible to examine cylinder compressions by employing a vacuum gauge, in case you have one or if one is fitted to your vehicle.
The post The Compressor Tester Chronicles appeared first on Cheap Heating and Air Conditioning Repair.
from Cheap Heating and Air Conditioning Repair http://bit.ly/2GidK4p
0 notes
Text
Unrestored Original 1970 Buick GSX Balances Luxury & Performance
In the 1950s and 1960s, before Japanese, German, and other foreign makes gained a significant foothold in the United States, brand loyalty among American car buyers was at its peak. Successive generations were very likely to buy the same brand their parents and grandparents bought. New York’s Stoldt family was no exception, so there was little doubt that Eric Stoldt, owner of the gorgeous Saturn Yellow GSX featured here, would feel a special affinity for Buick.
“My father bought new a 1961 Invicta convertible that he still owns today,” he recalls. “It’s original and has never been restored. He joined the Buick Club of America (BCA) when it was just beginning in 1966. Shortly after I was born, I was attending car shows and flea markets, such as Hershey. My father had many other Buicks that I remember growing up, but he gravitated toward the 1961 models. Over time we built a father-son collection of 1961 Buicks.”
In 1970, the GSX package added $1,195 to the bottom line and the optional Stage 1 engine cost another $199. All GSXs came with Rallye wheels and a black side stripe that wrapped up onto the rear fiberglass spoiler.
In addition to joining the BCA at its inception, Stoldt’s father and mother were very involved with their local Long Island Buick club. It was at one of this club’s initial meets where he saw a GSX for the very first time. “In the early 1980s I saw a 1970 GSX in white and fell in love. I already had a passion for the 1961 models at a young age, but after seeing that GSX, I knew I wanted to own one. Years later, after getting my driver’s license, I acquired some GSs and Grand Nationals, but I sold them so I could save money for a GSX. Every time I had enough money, however, they seemed to be a little more out of my reach. I did look at a few over the years but couldn’t find one in the condition I was hoping for.”
That changed in 2001 when Stoldt got a lead on a Saturn Yellow GSX from friend Jim Shiels. A pal of Shiels had seen a GSX he described as “an incredible, all original creampuff” at a show in Maine, but unfortunately did not get the owner’s name or contact information. A short time later, however, he saw an ad in a local Maine newspaper for what sounded like the same car. He passed the information along to Shiels, who in turn gave it to Stoldt.
A 455 was standard in the GSX, a Stage 1 455 optional. The Stage 1 engine featured 10.5:1 compression and a more aggressive cam.
Stoldt says, “I called, and the owner answered the phone right away. He said he had just gotten in from a business trip and had other calls on his machine he wanted to contact first. I finally persuaded him to have me be the first to look at it. It was 4 p.m., and I told him I would be at his doorstep at 7 a.m. the next day. I contacted my good friend Marty Jablonski, and within an hour we were on the road to Maine. We got a hotel, but I couldn’t sleep, and 7 in the morning couldn’t come fast enough. As soon as we saw it, Marty and I looked at each other and we knew this was one hell of a car. We went through it, checking the originality and numbers, confirming it was completely original.”
Though it wasn’t exactly what Stoldt was looking for (his ultimate dream car is an Apollo White, four-speed GSX) he couldn’t resist this particular car’s combination of incredible originality and magnificent condition. He quickly made a deal with the seller, and the car was his.
The GSX interior was both luxurious and sporty, with bucket seats and full instrumentation. A 15-inch-diameter, vinyl-covered Rallye steering wheel was standard. Of the 678 GSXs made in 1970, 479 came with an optional Turbo Hydramatic 400 and this center-console shifter.
It’s believed that all 1970 GSXs were made late in the model year, and this one certainly was. It was built the second week of May in Buick City, the Flint assembly plant with roots going all the way back to 1903, when a Flint wagon maker bought David Dunbar Buick’s fledgling gasoline engine shop and produced the very first Buick automobiles.
Like each of the 678 GSXs made in 1970, it came equipped with several features otherwise optional for Buicks and a number of things unique to the GSX. Quick-ratio steering, larger front and rear stabilizer bars, higher rate springs, heavy-duty shock absorbers, and stiffer control arm bushings all contribute to better handling. Stopping prowess comes courtesy of power-assisted front disc and rear drum brakes.
Back in the day, many a street racer was likely surprised by the performance of a GSX. In a 1970 Motor Trend road test, the testers rocketed one from zero to 60 in 5.8 seconds and through the quarter-mile in 13.38 seconds at 105.5 mph.
A larger-capacity radiator cools either the standard 455ci engine or optional Stage 1 455. The Stage 1 mill, which powers our feature car, came in 400 of the 1970 GSXs. It was rated at 360 hp and 510 lb-ft of torque and differed from the base 455 by virtue of a higher compression ratio (10.5:1 vs. 10.0:1) and a more aggressive camshaft profile (0.490/0.490-inch lift, 316/340 degrees duration, and 90 degrees overlap versus 0.3891/0.4602 lift, 290/322 degrees duration, and 67 degrees overlap).
All GSXs came with dual sports mirrors, a hood-mounted tach, G60-15 raised-letter Goodyear Polyglas GT tires on 15×7 Rallye rims, front and rear spoilers, and black stripes on the hood and sides. Four-speed cars got a Hurst shifter, while TH400 automatics had a center-console-mounted shifter. A 15-inch diameter vinyl-covered Rallye steering wheel, Rallye clock and gauges, and bucket seats add to the interior’s appeal.
Stoldt’s car was sold new at Kutner Buick, which was located on Castor Avenue in Philadelphia, from approximately 1949 through 1994. As happened with a number of 1970 GSXs, Kutner held onto the car for several months before selling it. The first owner enjoyed the car sparingly and obviously took exceptional care of it. It was in Pennsylvania for just a few years before the original owner moved to California and then Oregon. After he passed away, his widow brought the car to Florida, where she sold it to a dealer. That dealer then sold it to a prominent collector at a Zephyrhills auction. That collector shipped the Buick to his home in Maine, and eventually sold it to Stoldt.
After getting the GSX home to Long Island, Stoldt meticulously cleaned it inside and out, taking great care not to detract from its originality. The car had been driven a little more than 60,000 miles, and the only significant parts that had been changed were the tires and battery. Virtually everything else, including the paint, interior, complete engine assembly, drivetrain, and even the exhaust, were original to the car. In the intervening years he has done nothing more than basic maintenance like changing all of the fluids, and a rebuild of the original carburetor and brake system. He replaced the circa-1978 tires with correct Goodyear Polyglas reproductions and, more recently, installed a Gardner reproduction exhaust setup in place of the original system, which was in pretty sad shape after 40-plus years of service.
Stoldt has enjoyed showing the car occasionally. One of the more memorable events was a Buick Performance Group (BPG) meet in Ohio, where the organizers managed to gather 99 GSXs together. At another BPG event, the GSX was used at an instructional seminar to help the judges understand what the cars really looked like when they left the factory.
In the 17 years Stoldt has owned his GSX, he has added about 2,500 miles to the odometer, bringing the total to a little more than 63,000. In keeping with the intent of the people who designed and engineered it, the car provides a wonderful combination of comfortable, competent driving and spirited performance.
“It handles well for what it is,” Stoldt tells us, “with a comfortable but firm ride. Something else that I’ve noticed is it’s a little bit quieter and more refined-sounding than other big-block muscle cars from that era. But when you put your foot into it, there’s more than enough power to put you back in the seat and get you a little bit sideways. In its day it was quite a performance car, and it’s still a lot of fun to drive nearly half a century later! I’m proud to be the caretaker of one of Buick’s pieces of history in its original form. After all, they’re only original once!”
At a Glance 1970 GSX Stage 1 Owned by: Eric Stoldt Restored by: Unrestored original Engine: 455ci/360hp Stage 1 V-8 Transmission: M40 Turbo Hydramatic 3-speed automatic Rearend: 12-bolt with 3.42 gears and positraction Interior: Black Madrid- and Laredo-grain vinyl bucket seat Wheels: 15×7 chrome-plated Rallye Tires: G60-15 Goodyear Polyglas GT Special parts: 63,190 miles and unrestored original; Stage 1 package, hood tach, front spoiler/molded fiberglass rear wing, twin door sports mirrors, power front disc brakes, heavy-duty suspension, heavy-duty cooling, air conditioning
Lessons From an Original Car
Unrestored cars are full of interesting tidbits, such as the two different finishes on the bolts retaining this relay. Although they are from the same supplier (possibly MNP corporation in Utica, Michigan, as indicated by the “M’ head marking) one is plated with silver cadmium while the other was protected with black phosphate.
Poor body paint coverage on the back side of the headlamp surrounds is characteristic of factory production and something rarely seen on restored cars.
The spring ring battery cable clamp and weak paint coverage on portions of the front fender are factory original.
The black side stripe and red accenting stripes were painted on. This unrestored example shows us how imprecise they were.
The unrestored trunk shows an overspray pattern and a torsion bar that’s slightly larger in diameter in a GSX to support the extra weight of the trunk-mounted spoiler.
All GSXs came with power front disc/rear drum brakes. Booster and master cylinder cover were cadmium plated, and the master was painted black.
Cowl Tag Decoded
The cowl tag indicates that the car is a 1970 GS 455 two-door hardtop coupe (70 44637) produced in the Flint plant (FL1) during the second week of May (05B) with black trim (188) and Saturn Yellow exterior paint (Q Q). The number in the upper right (246075) is the body sequence number. Though the GSX package was not coded into the car’s VIN or indicated separately on the cowl tag, the paint code tells you this car is a GSX because Saturn Yellow was not available on anything other than a GSX.
The post Unrestored Original 1970 Buick GSX Balances Luxury & Performance appeared first on Hot Rod Network.
from Hot Rod Network https://www.hotrod.com/articles/unrestored-original-1970-buick-gsx-balances-luxury-performance/ via IFTTT
0 notes
Text
Essential Start-Up Tips for Small Engines

If your small engine doesn’t start, the common suspects are a plugged or corroded carburetor, bad gasoline or bad ignition coil. These problems can be fixed easily, quickly and cheaply. You don’t need a small engine repair Sudbury professional to fix this. This way, you will save yourself money and avoid the hustle of taking the lawn mower or any other machine to the service center.
Listed below are basic explanations and tests to help you understand how to order parts and replace a carburetor, a recoil starter, and an ignition coil. It’s possible to replace the defective parts in some hours as long as you have the basic hand tools.
Checking the basics
Remove the machine’s air filter and then shoot a burst of aerosol lubricant (preferably petroleum based) directly into the throat of the carburetor. Try starting the engine. If it starts and then dies, you will automatically know that you are facing a fuel problem.
Engine issues are caused by very simple things. If the machine has a shut-off valve, check it to ensure it’s on. Ensure your engine has fresh gas. In case the gas is over thirty days old, replace it using stabilized and fresh gas. Then, check the air filter and ensure it is not clogged.
When you have confirmed that the tank contains fresh gas, have primed the carburetor as well as set the choke but the engine doesn’t start you need to remove its spark plug. A spark plug that contains wet gas shows that the engine is receiving fuel. Dry the plug using compressed air and check it for oil deposits or carbon builds up signs. Examine the gap to ensure it’s within the required specifications.
if you doubt the plug’s condition, just replace it. A dry plug indicates that you have a fuel problem or a messed up the carburetor. Consider shooting a substitute fuel into the throat of the carburetor and start the engine. If it doesn’t start, your ignition system probably has an issue, most likely the ignition coil. But if the engine manages to start, and then it dies, this will prove that your ignition is working, and the issue is fuel starvation.
The fuel filter should be checked first. Disconnect the fuel line that connects the carburetor to the filter. Gas will run out. If gas doesn’t run out, be sure to replace the filter, but when the gas flows freely through the filter, the problem could be inside the carburetor.
It’s a bit tricky to test an ignition coil. To get it right, you require a spark tester for small machines. Holding a spark plug boot near an engine with the aim of checking for spark is not a reliable test. This is because a bad coil still produces sparks in the open air, but it can fail if the cylinder is under compression. In case you own various small engines, it's better to buy a tester and learn how to use it. But because a tester’s cost is similar to the cost of purchasing a new coil it might be better to replace the coil without doing the tests.
Finding the right parts
Take a digital photo of your engine model including the date of manufacture and serial numbers or any other engine data included on the label. You will require this information to order parts. Most garden and lawn tool manufacturers use various engine brands for specific model meaning you cannot purchase parts based on the mower’s model number. Instead, you require the serial number, engine model, and manufacture date to find the right parts.
Replacing the ignition coil
To successfully replace an ignition coil, begin by removing the coil retaining screws. Once they are loosened, the coil snaps against the magnet on the crankshaft. Take the coil away from the magnet. If you are sure you don’t have a spark or it's weak, get a new coil and install it.
Replacing the recoil starter
Take out the engine cover that retains screws and then lifts it off the engine. Remove the hex-head screws on the recoil assembly, lift it off and drop in the new one. Consider reversing this procedure to re install.
When the starter rope breaks, you can purchase recoil rebuild kit. The kit contains dogs, dog springs, and a new rope. It can be tricky to set the spring extension; if you don’t do it right the spring will break, and you have to replace the entire unit. It’s better to skip the rebuild and replace the whole recoil assembly. Another ideal option will be to let the small engine repair Sudbury professionals handle the tricky tasks.
0 notes
Text
INDA Expects Strong Booth Traffic for Exhibitors Oct. 10-12 in Chicago
Preview the Newest Improvements Coming to Filtration 2017 on the INDA Celebration Site
With the Filtration® 2017 Global Convention & Exposition much less than a month away, engineers, merchandise builders and organization administrators can now preview quite a few of the merchandise introductions and improvements that will be released Oct. 11-12 in Chicago on the INDA web site for the celebration.
The “Product Preview” feature on the Filtration 2017 web page features new products and solutions that some of the 140-in addition exhibitors will showcase at this year’s celebration at Chicago’s Navy Pier. Exhilaration is mounting for Filtration 2017 and INDA is anticipating a robust turnout of about 1,500 sector individuals with a new before day and continued development in the filtration segment.
Between the improvements that will be introduced in air and liquid filtration are filter pockets that assist lower power use, multi-layer filters from new artificial products, filter assembly programs engineered for extreme obligation efficiency, and new intelligent gear that helps make pleats in hefty obligation products.
Product or service Previews
A sample of the exhibitor improvements that individuals will see on the demonstrate floor at Filtration 2017 include things like:
Allied Group (Booth 625): A new line of 100 p.c glass coalescing filters for the compressed air and gasoline industries produced utilizing the vacuumed fashioned (cast) process Bdtronic (Booth 814): A new atmospheric strain plasma gadget to optimize the floor tension on a huge range of products in conventional and high-efficiency applications Bondex (Booth 624): A new technologies for the industrial filtration industry that combines the advantages of needle loom fiber entangling with hydro-entangling technologies to provide sector leading dust selection efficiency Franklin Adhesives & Polymers (Booth 612): A new economical filter adhesive that is a self-foaming, two-section polyurethane potting compound supplying high strength without having requiring unique drinking water, air or nitrogen injection gear Raleigh Precision Items (Booth 426): The new 2V Filter Assembly Technique is a special 4-piece building engineered to securely keep filter media packs Truetzschler Nonwovens (Booth 115): A new line including a drum dryer/oven as nicely as a foulard, a can dryer and a warm flue unit TSI Inc. (Booth 817): New design 8130A Automated Filter Tester for the screening of particulate respirator filters, disposable filtering facial area items and a huge assortment of filter media TTG Inc. (Booth 305): New “Ultima” merchandise line of High definition membranes in electrical power and cement applications that do not contaminate underneath high-peak use
Convention Highlights
In addition to the quite a few organization possibilities to produce gross sales and qualified prospects at the exhibition, Filtration 2017 will feature a highly effective instructional element to learn from planet-renowned pro speakers.
Major have to-attend classes include things like the keynote lunch on latest development activity in filtration by Phil Whitaker, President and CEO, AAF Flanders a panel on the Industrial World wide web of Items (IIoT) in Filtration a panel dialogue on the ISO 16890 criteria as nicely as classes on air purification, media structure and measuring air filter power effectiveness.
Filtration 2017 kicks off on Oct. 10 with the one-working day acclaimed Nonwoven Filter Media Training Training course prior to the exposition on Oct. 11-12. The sector reception will be Oct. 11, from 5 to 6 p.m., on the demonstrate floor.
On the internet registration for Filtration 2017 is open up at http://ift.tt/2iJVMQi.
About INDA
INDA, the Affiliation of the Nonwoven Materials Market, serves hundreds of member firms in the nonwovens/engineered materials sector in world-wide commerce. Considering that 1968, INDA situations have helped customers join, learn, innovate, and develop their firms. INDA instructional classes, industry information, take a look at methods, consultancy, and problem advocacy assist customers realize success by furnishing them the info they need to have to far better plan and execute their organization methods.
For extra info, stop by inda.org or simply call +1-919-459-3700.
The post INDA Expects Strong Booth Traffic for Exhibitors Oct. 10-12 in Chicago appeared first on Filtration Products.
from Filtration Products http://ift.tt/2zipxOU
0 notes
Link
For Camper Mobile Motorcycle Gasoline Engine Maintenance Compression Tester Kit For Automobile Gasoline Engines
0 notes
Link
0 notes
Link
0 notes
Link
0 notes