#gcpdeployment
Explore tagged Tumblr posts
Visit Tumblr Blog
Explore Tumblr blogs with no restrictions, modern design and the best experience.
Last Seen Tumblr Blogs


Fun Fact
Users from the US are the majority of Tumblr visitors.
Text
Deploy a Spring Boot Java app to Kubernetes on GCP-Google Kubernetes Engine

Kubernetes is an open source project, which can run in many different environments, from laptops to high-availability multi-node clusters, from public clouds to on-premise deployments, and from virtual machine (VM) instances to bare metal. You'll use GKE, a fully managed Kubernetes service on Google Cloud Platform, to allow you to focus more on experiencing Kubernetes, rather than setting up the underlying infrastructure. In this post , i will show you the steps to deploy your simple react application to GCP app engine service . Before going for actual deployment you should consider below pre-requisites - GCP account – You need to create at least Free tier GCP account by providing your credit card details which will be valid for 3 months. You can create it using https://cloud.google.com/ Github project - Spring boot project on github (https://github.com/AnupBhagwat7/gcp-examples) Below are the steps to deploy application to App Engine - - Package a simple Java app as a Docker container. - Create your Kubernetes cluster on GKE. - Deploy your Java app to Kubernetes on GKE. - Scale up your service and roll out an upgrade. - Access Dashboard, a web-based Kubernetes user interface. 1. GCP Setup Go to Google cloud console(https://console.cloud.google.com/) and click to open cloud shell -

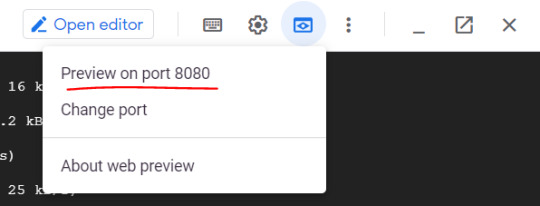
Run the following command in Cloud Shell to confirm that you are authenticated: gcloud auth list This command will give you below output - Credentialed Accounts ACTIVE ACCOUNT * @ To set the active account, run: $ gcloud config set account `ACCOUNT` Now run the below command to get the list of projects present under your GCP account - gcloud config list project If project is not set then you can do it by using below command - gcloud config set project 2. Package your java application Get the application source code from github - git clone https://github.com/AnupBhagwat7/gcp-examples.git cd gcp-demo-springboot-app Now run the project in gcp cloud shell - mvn -DskipTests spring-boot:run once the application is started , you can click on web preview as shown below -
You will be able to see your application launched in browser as below -

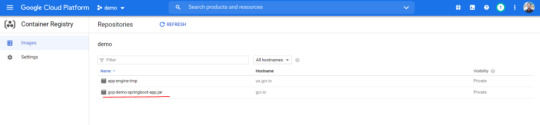
3. Package the Java app as a Docker container Next, you need to prepare your app to run on Kubernetes. The first step is to define the container and its contents. You need to take below steps to package your application as a docker image - Step 1: Create the JAR deployable for the app mvn -DskipTests package Step 2: Enable Container Registry to store the container image that you'll create gcloud services enable containerregistry.googleapis.com Step 3: Use Jib maven plugin to create the container image and push it to the Container Registry mvn -DskipTests com.google.cloud.tools:jib-maven-plugin:build -Dimage=gcr.io/$GOOGLE_CLOUD_PROJECT/gcp-demo-springboot-app.jar Step 4: If all goes well, then you should be able to see the container image listed in the console by navigating to CI/CD > Container Registry > Images. You now have a project-wide Docker image available, which Kubernetes can access and orchestrate as you'll see in next steps .
Step 5: You can locally test the image with the following command, which will run a Docker container as a daemon on port 8080 from your newly created container image: docker run -ti --rm -p 8080:8080 gcr.io/$GOOGLE_CLOUD_PROJECT/gcp-demo-springboot-app.jar Step 6: You can go to web preview feature of cloud shell to check if docker container is started successfully .You will see response in browser -

4. Deploy your application to Google Kubernetes Step 1: Create a cluster You're ready to create your GKE cluster. A cluster consists of a Kubernetes API server managed by Google and a set of worker nodes. The worker nodes are Compute Engine VMs. First, make sure that the related API features are enabled gcloud services enable compute.googleapis.com container.googleapis.com Create a cluster named springboot-java-cluster with two n1-standard-1 nodes using below command - gcloud container clusters create springboot-java-cluster --num-nodes 2 --machine-type n1-standard-1 --zone us-central1-c This will take few minutes to create a cluster. You can see all the clusters by navigating to Kubernetes Engine > Clusters

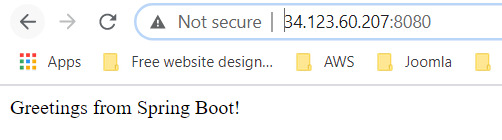
It's now time to deploy your containerized app to the Kubernetes cluster. You'll use the kubectl command line (already set up in your Cloud Shell environment). The rest of the tutorial requires the Kubernetes client and server version to be 1.2 or higher. kubectl version will show you the current version of the command. Step 2: Deploy app to Kubernetes cluster A Kubernetes deployment can create, manage, and scale multiple instances of your app using the container image that you created. Deploy one instance of your app to Kubernetes using the kubectl run command. kubectl create deployment springboot-java --image=gcr.io/$GOOGLE_CLOUD_PROJECT/gcp-demo-springboot-app.jar To view the deployment that you created, simply run the following command: kubectl get deployments To view the app instances created by the deployment, run the following command: kubectl get pods At this point, you should have your container running under the control of Kubernetes, but you still have to make it accessible to the outside world. Step 3: Allow external traffic By default, the Pod is only accessible by its internal IP within the cluster. In order to make the springboot-java container accessible from outside the Kubernetes virtual network, you have to expose the Pod as a Kubernetes service. In Cloud Shell, you can expose the Pod to the public internet with the kubectl expose command combined with the --type=LoadBalancer flag. The flag is required for the creation of an externally accessible IP. kubectl create service loadbalancer springboot-java --tcp=8080:8080 O/P: service/springboot-java created The flag used in the command specifies that you'll be using the load balancer provided by the underlying infrastructure. Note that you directly expose the deployment, not the Pod. That will cause the resulting service to load balance traffic across all Pods managed by the deployment (in this case, only one Pod, but you'll add more replicas later). The Kubernetes Master creates the load balancer and related Compute Engine forwarding rules, target pools, and firewall rules to make the service fully accessible from outside of Google Cloud. To find the publicly accessible IP address of the service, simply request kubectl to list all the cluster services. kubectl get services O/p: NAME TYPE CLUSTER-IP EXTERNAL-IP PORT(S) AGE kubernetes ClusterIP 10.3.240.1 443/TCP 44m springboot-java LoadBalancer 10.3.250.58 34.123.60.207 8080:32034/TCP 85s Notice that there are two IP addresses listed for your service, both serving port 8080. One is the internal IP address that is only visible inside your Virtual Private Cloud. The other is the external load-balanced IP address. In the example, the external IP address is aaa.bbb.ccc.ddd. You should now be able to reach the service by pointing your browser to http://34.123.60.207:8080
Step 4: Scale your application One of the powerful features offered by Kubernetes is how easy it is to scale your app. Suppose that you suddenly need more capacity for your app. You can simply tell the replication controller to manage a new number of replicas for your app instances. kubectl scale deployment springboot-java --replicas=3 O/P: deployment.apps/springboot-java scaled kubectl get deployment NAME READY UP-TO-DATE AVAILABLE AGE springboot-java 3/3 3 3 23m Step 5: Roll out an upgrade to your service At some point, the app that you deployed to production will require bug fixes or additional features. Kubernetes can help you deploy a new version to production without impacting your users. You can launch editor in CLOUD Shell and update the controller to return a new value as shown below-

Use Jib maven plugin to build and push a new version of the container image. mvn -DskipTests package com.google.cloud.tools:jib-maven-plugin:build -Dimage=gcr.io/$GOOGLE_CLOUD_PROJECT/springboot-java:v2 In order to change the image label for your running container, you need to edit the existing springboot-java deployment and change the image from gcr.io/PROJECT_ID/springboot-java:v1 to gcr.io/PROJECT_ID/springboot-java:v2. You can use the kubectl set image command to ask Kubernetes to deploy the new version of your app across the entire cluster one instance at a time with rolling updates. kubectl set image deployment/springboot-java springboot-java=gcr.io/$GOOGLE_CLOUD_PROJECT/springboot-java:v2 Step 6: Rollback to previous version Perhaps the new version contained an error and you need to quickly roll it back. With Kubernetes, you can roll it back to the previous state easily. Roll back the app by running the following command: kubectl rollout undo deployment/springboot-java This marks the end of this tutorial. Thanks for following. Github link - https://github.com/AnupBhagwat7/gcp-examples/tree/main/gcp-demo-springboot-app Read the full article
0 notes