#god watching yt tutorials would help right..
Explore tagged Tumblr posts
Visit Tumblr Blog
Explore Tumblr blogs with no restrictions, modern design and the best experience.
Last Seen Tumblr Blogs


Fun Fact
Tumblr has 4 main sources of revenue.
Text
okok ive also used OBS to record a tf2 clip (and other clips for other games) but for some reason it makes the file really fucking huge, like i had recorded a 2 min long clip using the snipping tool and it would be able to send on discord easily, whereas with obs a 30 second clips is too large so uh idfk
possibly i just need to fuck around more with the settings,
does anyone know any editing softwares that are free and won't come after your ass to ask if you wanna end your free trial after a week that I can use?
#i have tried lowering the quality from medium to low but it kinda makes the video look like shit so idk#god watching yt tutorials would help right..
8 notes
·
View notes
Text
youtube
R. Kelly - I Believe I Can Fly (963Hz) R. Kelly - I Believe I Can Fly (963Hz)· R · 1998 · Provided to YouTube by JREAM · ℗ 2020 JreamStarwalker FEV... Only taking song requests on my Discord Server (with no exceptions) with thousands of requests I receive in the YT Comments on a daily basis. #RKelly #IBelieveICanFly #JREAM #R #432Hz #TikTok -------------------------------------------------------------------------------------------------------- ➥ Channel Donations https://ift.tt/8KXqwDe ➥ 432Hz/528Hz Tutorial https://youtu.be/vwsGZQLRX3w ➥ JREAMSPACE Discord https://ift.tt/H0Q8Yo9 ➥ Connect With JREAM https://ift.tt/5xTY1jP https://www.twitter.com/JreamStarwalker -------------------------------------------------------------------------------------------------------- Fair Use: https://ift.tt/h4ESk9Q *Copyright Disclaimer: This is not a pirated video or somewhere along those lines, and the video is actually copyrighted. This means video cannot be monetized, ads are put automatically by YouTube, and ad revenue is paid to copyright owner (to the artist). So, it's not something different than streaming the album on Spotify. As the producer of this video, I do not claim any credit for the audio playing in this video; and I DO NOT own any rights to the music playing in this video. If any artist, producer or label wants this video to get taken down, please contact us on our email "[email protected]" and we will delete it immediately. Thank you. When Ivan Yanakiev heard an instrument tuned to 432Hz, he said, it was like he’d heard God speak. For him, it is not just pleasant to the ear, but very helpful in unlocking mysteries on the level of consciousness itself. He wanted 432Hz to be spread around the world. If you can realize that you are listening to a lot of intervals, you can still hear the music in the silence, the beauty in the silence. The power of the interval can reprogram the subconscious mind in a positive way. This is extremely effective because no matter what the message an artist is trying to send both negative or positive, your subconscious mind can only understand, innerstand, and overstand 3, 6, & 9 aka frequency, energy, & vibration. Whether what you're manifesting through this music is negative or positive, words without action and thought have no meaning, no purpose which is why that can't manifest. When the words, thoughts, & actions are in the trinity, that reality is set to come in fruition. You get these full benefits in the mainstream music that's mostly negative only if your mouth doesn't talk 100x as much as your ears listen. Saying the words that come out of your mouth that are negative as you put, thought, feeling/emotion to it can convert into energy which your subconscious can pick up negatively. Listening to the majority of the mainstream 432Hz music can unlock the right brain hemisphere when you have everything that was said above in check. You can now unlock the creative part of your brain which is what you need to become limitless no matter what message it sends. Once you realize it's true power, it would influence you more & more to listen to more positive music which in any frequency outside of 440Hz is better than 432Hz negative music since not only are you getting the benefits from the sound vibrations, but you're combining your though, feeling/emotion into it full of positive radiant energy. Pure Love & Elevation to You & Your Soul Tribe. via YouTube https://www.youtube.com/watch?v=8-9KCDxBpT4
0 notes
Text
Making a little collection post about these things that have helped me since the supply chain got fucked up really bad and also just in general! A lot of these are YT videos but some have supplementals I’ve added. DON’T WAIT until you need something to learn how to do it if you can avoid it. But this is not a list of “apocalyptic how-to’s”, we aren’t learning to make paper from scratch or sew our own clothes, we can’t all can our own veggies (and canning materials are short anyway), this is a list of depression-era-style fixes and right-to-repair concepts!
I know a lot of people who just can’t be assed to fix anything and that’s fine because then I get to have it and I do want to fix it.
Bonus Negotiating tip for "getting to yes” on FB marketplace: say “thanks in advance, God bless” at the end of your initial message. Don’t forget to capitalize God. 😉 ● How to Darn Socks by Last Minute Laura - I want to add to this that it’s okay if you don’t do this perfectly or if it seems ugly when you’re finished, it’s probably still going to work fine! Embroidery needles and thread (sometimes in the form of a kit) are EASY to find at thrift stores, and especially used art supply stores. Related: 50 Hand Embroidery Stitches by Handiworks ● Simple Guide to Electronic Components and Soldering Basics by BigClive - Soldering is so so so handy to have some basic knowledge and skill in. I use it to do Gameboy mod kits but it also helped me feel confident in replacing little burnt out fuses, capacitors, etc. If I could have found a replacement relay I would have fixed my kettle! Pick up a multimeter if you can! Learn to use it! Related: Soldering Is Easy comic by MightyOhm, and pretty much any Nintendo repair video, I recommend starting out on doing a simple shell swap or a gameboy IPS kit and going from there when it comes to electronics. Do not do a Joycon shell or a DS first.
● How to Replace an iPhone SE Screen by JerryRigEverything - There are a ton of videos or written tutorials for almost models of devices. I put this not because no one has ever heard of replacing your phone screen (lol) but because it is increasingly difficult to repair devices and with EXACTLY the right parts.You will often have to find your year model or even serial number and then do research on which parts are compatible/behave - usually someone will already have done the legwork so you’re like “aha this is the battery that will work in my 1st gen Paperwhite ereader”. Many phones and devices have pain in the ass adhesives so you “can’t” fix them. Do yourself a favor and get a good, plastic safe spudger and prying tools. Related: iFixit kits which are better than ever, Jailbreaking with Hexxa Plus ● Fix a KitchenAid Mixer that isn’t Spinning by ereplacementparts - I bring in this one because sometimes a scary, seemingly broken expensive item can be bought for very little and fixed very easily. There’s a YT video for like EVERYTHING. You will quickly learn to recognize how things GET broken and what their most likely problem is. I buy “untested” vintage point and shoot cameras all the time and usually they literally just need a new battery lol. Lots of things just need cleaned or need new grease or something, or have a broken trace/burnt fuse/broken plastics etc. See Soldering above. ● Oil Change on a TW200 by tdubskid - This is just to stand in as an example of some regular maintenance and familiarity with your vehicles. Not everything is as easy as a good ol’ Tdub but it’s worth getting the owner’s AND service manual for your vehicles so you can at least take care of it well so that it needs LESS maintenance and know when it is need of maintenance and how urgent it is even if you cannot perform it yourself. Plus, again, tons of YT videos and forum threads. Note: I highly recommend that if your vehicle is under warranty of any kind you don’t do your own oil changes/service or get service anywhere except certified dealerships until that warranty expires. Related: How to Change a Tire (plus jacking it up) by Chrisfix (this is a great full walkthrough! I KNOW most people have never done this - and check your spare once in awhile too)
● Learn to use hand tools and power tools safely. Go ask a family member or a friend to show you how to use them, I’m sure anyone who has them would LOVE to help you and show you what they’re working on. Get a manual impact philips screwdriver and a regular old rubber mallet and thank me later. See if someone’s grandpa is getting rid of their extra wrenches and sockets. Pick up cheap name brand power tools and their accompanying (watch the voltage) batteries and chargers when you can. People will act like you have to “pick a system” and have all one brand but who gives a fuck dude, I don’t. Get a little metal/wood hacksaw and a metal/wood file. Get safety goggles and some coated grip work gloves. Get a cheap soldering iron and some lead-free solder wire (and a fan lol.) Get a set of torx bits/drivers. Don’t be afraid to ask people how to do things. Give away or sell your tools when you don’t use them anymore. Last one but this is very important: Put stickers all over your toolboxes!
#tutorial list#helpful list#tools#how to#collection post#now someone do one for computers please#I am bad at taking care of my PC because this is the first time I've had one lol
23 notes
·
View notes
Text
me trying to make a gif part 2 (thrilling finale, buildup ver.)
ok good news and bad news: good news being withheld for Spoilers (not that it’s that hard to guess anyway lol), bad news explained first bc, chronologically, it is first
so yesterday i mentioned in the tags of that post that i had seen that krita has an animation feature so i was gonna try importing the frames into that and then exporting it as a gif. easier said than done, as it turns out
i started by opening the file i made yesterday with 62 layers as the frames and importing that into krita, which worked fine (i didn’t know you could actually open .psd files in clip stuido ((this typo is so fucking stupid it made me laugh so im leaving it)) and krita, so that’s pretty neat, i wonder if it works the other way around too) but i ran into problems when i tried to convert those layers into frames in an animation. because, like, the layout of the program has the layers displayed in one tab, and the animation timeline in another, like so:
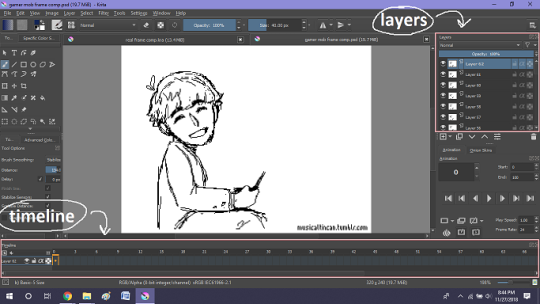
(do u like how im using pictures now, i thought of that yesterday after i published the other post and realized hey, visual reference would probably make my plight a lot easier to understand!! so enjoy these educational diagrams from now on)
so my goal was to get the frames from the layers into the timeline, and i still don’t know if i did it right bc lbr krita is not very intuitive at all,,.,, i mean i watched a video tutorial abt how to animate in krita which was v helpful (it’s the one by jesse j james on yt fuckin SHout out) but it was about animating from scratch, not importing an animation you’ve already done elsewhere
so like, the way krita’s animation thing works, from what i could piece together as i bumbled my way around w/ it, is that each layer in the layers tab is a separate timeline in the,,, timeline tab
i want them all to be in the same timeline, not separate ones, and there’s no way to combine them in the timeline tab bc doing that just overwrites whatever layer you’re pasting it down onto, and also if you define the number of frames for that timeline (62 for this project) it just puts the single image of that layer for all of the frames instead of just one of them, so you’d have to go through and delete all the other frames you don’t want it to be, which would be such a fuckin pain
so i found a workaround, which is so tedious that it can’t be the right way to do it, but basically i started w/ layer 1 and defined 62 frames & then emptied frames 2-62, like this

(that blue box is the frame, btw, even tho it says 0, which actually kind of annoys me like why doesn’t it start the first frame on 1????)
from there i went up to layer two and selected that in the timeline, but for some reason the frame doesn’t show up automatically?

& i couldnt fuckin figure out how to make it into like, an Official Timeline Layer or whatever tf bc like, u see on layer 1 how theres that little lightbulb-looking icon on the right? that’s for turning on onion skin which only applies when you actually have frames with things drawn on them, so basically layer 2 in the layers tab has a drawing but in the timeline it doesn’t?
i didn’t find out what the actual reason for this is or how you’re /supposed/ to make the frame appear in the timeline, but what i did was right click on layer 2′s timeline & select “create blank frame” which magically made the frame i want appear

but it’s on top of the layer 1 frame, and i want it to be the frame after. also it’s still in a different timeline. this is the only easy fix in this whole damn process, u can literally just click & drag the frame from layer 2 to layer 1 and put it wherever u want on the timeline

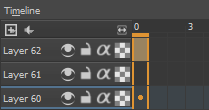
and then u just delete layer 2 and that’s it, frame transferred!! then i just had to do that for 60 more layers and after [unspecified amount of time but it was a fuckin while ok] my timeline looked like this!

(the gaps near the end are held frames, to save me time so i didn’t have to copy a bunch of frames that were exactly the same)
krita is great because as far as i know ur animation can have an unlimited number of frames, at the risk of your own pc’s processing power, which is a definite upside to SOME expensive art programs i know (clip studio, i’m talking abt csp) and u can pick the frame rate too (cough photoshop elements 5.0 even tho u dont technically have an animation feature & it’s a miracle u can even make gifs at all) so once i finally got all the frames situated all nice and in order like on the same timeline, playing it was great! played at the right speed, looped perfectly, it was a dream come true right
well, time to export it as a gif
ha
haha
hoooo oo o
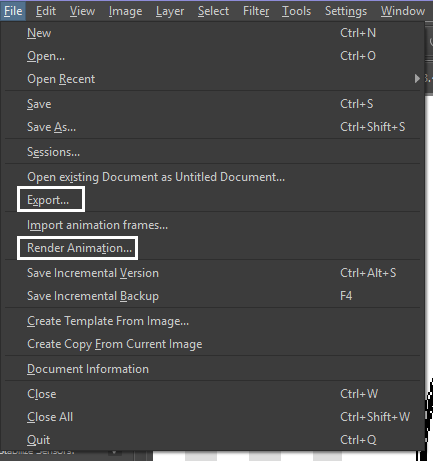
so u got 2 options for exporting ur animation, u can either hit “export,” which lets u save it as different file types, one of which being gif, or you can hit “render,” which gives you gif and video options
well
i tried export first, bc that seemed like a good idea, but the “””gif””” it made was distinctly not a gif, despite its claim to be one?? this is what i got:

notice: 1. it is not moving, and 2. the black bars to the sides?? those are supposed to be transparent. they’re transparent in the file i made so why didn’t they register as transparent in the export, when gifs have transparency capabilities??

so That was some real live bullshit but i still had the “render” option, right? export was wrong, so rrender must be the correct option to go to that will produce the results i am wanting to see produced in front of me like a silver dinner platter with a correctly functioning gif under the lid, that’s what i want to see and “Render Animation...” is gonna Give me that silver platter righWRONG ok look at this shit rn ok Look
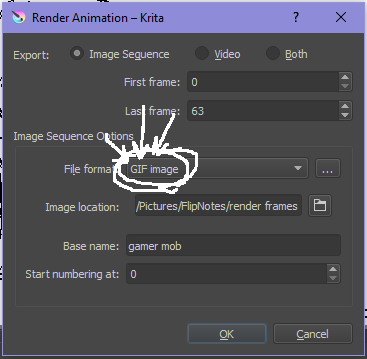
it says GIF it says it RIGHT THERE right??? right?????? then WHY


?????????????
and it also gave me all This bullshit
like did i ask?? did i fucking ask???? i already have all the individual frames why do i need even M o re i mfjgjgk
((rationally ok yea thats v useful for if ur making the animation in krita and want to export the frames to use elsewhere, but like uhhh 1. again, they’re not transparent & 2. i should have the option of saying i don’t want these??? bc *meme voice* i don’t want these)
so in the end i could find NO correct method of exporting animations as a gif in krita bc every ooption that says gif is fuckign LYING to ur face there are NO gifs in krita, aliens made the progam who looked at gifs and went “hmm i thikng this is how a gif works “ and just made jpegs instead but somehow got on the computers good side and got it to lie for them about it being a gif so thats why it says gif on the file still even tho its not a gif illimati confinr
so what is the conclusion to this? well i said there was good news too, and this is the portion where i divulge that sweet nectar (i type dthis 2 seconds ago and @ me what the fuck)
so after wasting a good 2 hours trying to figure out krita i gave up and watched some good old [youtuber name redacted bc what if it shows up in search & ppl see this dumbass post in there but it rhymes with fjackfsepticfeye] to relax into accepting my fate that i’ll never be able to upload my animations to tungle except in poor quality loopless video form, making me into a laughing stock on my own art blog, but THEN i had a stroke of genius, in my Brain
so if u read yesterday’s post u might remember that flipnote studio, the animation program i use on my ds, to animate, has the option to export files as gifs, both animated and sequential (meaning either as one fully animated gif or each individual frame separately), which is super convenient, but as i mentioned yesterday, any time i tried to open the folder with those files on my laptop, it crashed immediately
WELL today i thought “hey, how about instead of opening the folder in the sd card when it’s plugged in, how about i copy that folder from the sd card to my flash drive, and try to open it there, in case it’s the card’s hardware that’s causing the problem, not corrupted files”
so i tried that and it FUCKING WORKED THANK GOD GLORY HALLELUJAH
so now instead of spedning A THOUSAND YEARS trying and failing to force art programs to bend to my will i can just export the animations straight from my ds and drag them onto my computer Just As God Intended oh GOD im so fucking happy
here’s the gif in the end, i’m gonna post it to my art blog too but this is the Green Version bc i animate in green bc of some default settings in flipnote that i got used to, plus it makes me feel like i’m just sketching so nothing really has to be finalized so i’m comfortable while i work, and also it’s just nice ok it’s a Nice Green

(there’s a few frames at the end that are like the extra scraps from while i was working dw i got rid of those in the final version that i’m posting to my art blog later. also i added my blog url to that one too it’s aaaaaall good)
the only downside to this method is that i can’t change the canvas size to be 540px wide to fit with tumbrl s image dimensions but whatever i can just post them in a text post and fix the html to display it at its original size instead of the resizing bullshit tmurbl pulls constantly ugh. anyway it works great on desktop but it’s inevitably gonna look like shit on mobile no matter what i do *Big Ass Shrug*
anyway thats the end of my success story uhh i can’t make the like comment & subscribe joke again bc i already did that in the last post so like bye i guess thanks 4 watchign & have a great day i’ll see u in my next fvideo
https://www.youtube.com/watch?v=YYob4uDjEKI&t=0s
(^that’s my outro music)
#this started out so boring like a tutorial (but made by someone who doesn't know what the fuck theyre talking abt)#& then things derail Real Quick#that's why this is the ''buildup ver.''#retag later#talkin bout stuff#today posts#rieley's wips#(me: i can't mention this youtuber by name in case my post shows up in search#me: *adds a link to the post rendering that effort for naught*#me: *leaves it anyway bc it's funny*)#pls listen to the outro musi c it's rly good & tunmgmldnr wouldnt let me embed the video & idk how to do it thru html & too lazy to look it#up :(
2 notes
·
View notes