#have to swap triangle and circle for menu and magic
Explore tagged Tumblr posts
Visit Tumblr Blog
Explore Tumblr blogs with no restrictions, modern design and the best experience.
Last Seen Tumblr Blogs


Fun Fact
130K people were victims of a chain letter scam that affected Tumblr in May 2011.
Text
thinking about last night when i went into a ruins graveyard, see like. maybe three skelly boys and goes 'okay i can move and try to take on one-' and then ending up having to run to every corner of that map because-

me: me: im going to run around and throw fireballs at them, am i?
#lori plays games#dorkous screenshots#uhhh#lori plays Kings Field IV#yes im playing a old fromsoft game until their AC6 game comes out#also dw ive gotten far after that point tho#the game is surprisingly fun?? for a PS2 engine????#controls are funky i have to rebind the way camera controls work#have to swap triangle and circle for menu and magic#honestly it does make me want to go back to elden ring but.......................................my mood for games tend to swing so yEAH;;
1 note
·
View note
Text
Photoshop Tools for Beginners
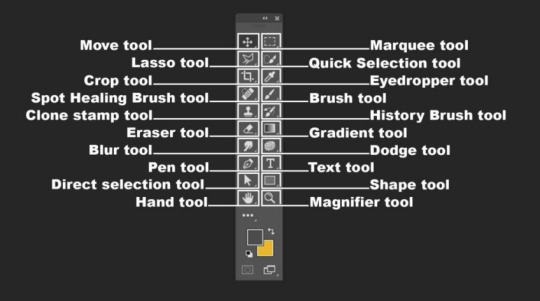
Photoshop is one of the most powerful softwares for designers and photo editors and of course what’s Photoshop without it’s tools right? In this short guide blog, you will come to know about the common Adobe Photoshop tools and it’s uses! Here, you will get a basic concept about the different tools present in the toolbar in Photoshop software and the contents in the menu.
CROP TOOL
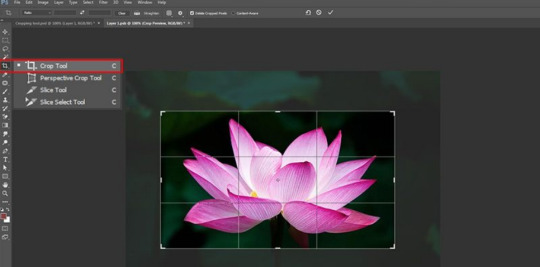
The cropping tool is a valuable feature of Photoshop, using which you can eliminate any unnecessary element from the image. You can simply leave out an element that you feel unnecessary in the picture. When you prepare an image for printing or posting online, you need to change its size, or remove the empty spaces from it. It comes handy in these cases. This is one of the most important photoshop editing tools that the editors should be using.
HEALING BRUSH
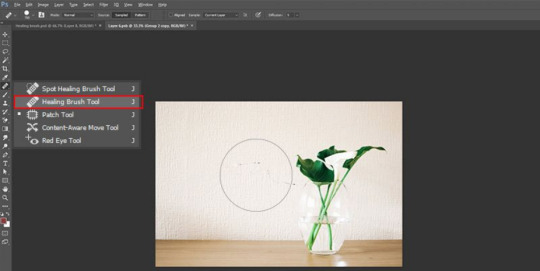
In order to remove small specs and scratches in the image, you can use the healing brush tool. It works like a paintbrush and allows the users to make the image more perfect. The healing brush comes useful while removing blemishes in Photoshop. You can copy a part of the image that seems to be perfect over the scratches and specs. As a result, these elements are eliminated from the image and blend the sections accurately. The areas that are replaced will look natural when you use this tool properly. Therefore, nothing in the image will look out of place or as if nothing happened!
MOVE TOOL
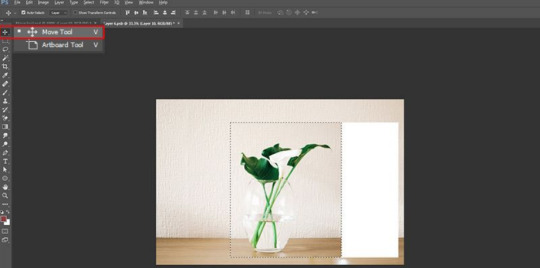
Using this, you can simply move certain objects around the canvas in a given layer. This is one of the most important Photoshop functions. You need to drag after clicking on the canvas in order to use the tool. When you drag the layer in Photoshop will move along, according to the movement of your mouse.
MARQUEE TOOL

Considerably one of the most useful photo editing tools in photoshop, It comes with simple features, and can perform a number of tasks. You can select particular areas of any image using the tool, copy them, cut and crop the areas. You can choose four different shapes with the tool. These are ellipse, rectangle, single column and single row.
PENCIL & PAINTBRUSH
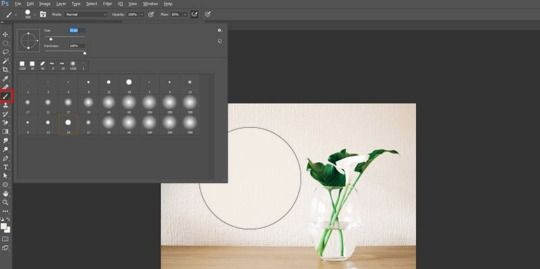
This is one of the extensively used photoshop elements editing tools. You can choose different types of paintbrushes in Photoshop. You may choose a standard paintbrush, or use airbrush styles in the process. The brush tool enables you to paint different types of shapes as well!
CLONE STAMP
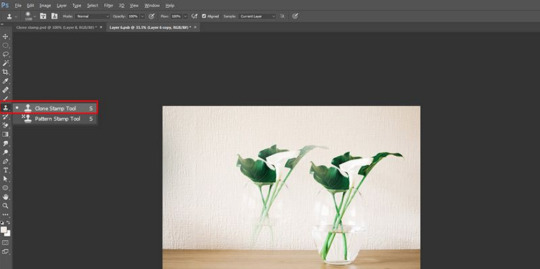
Using a clone stamp, you can create a sample part of a particular image and paint other areas using it. This is an important tool, used for image editing, more especially for blending backgrounds. You can simply select the colour from one area and use it to paint another area.
PEN TOOL

In case you are interested in drawing vector graphics like I am, you can use the pen tool! This is one of the most commonly used photoshop tools for beginners. You can also use this in creating various paths.
THE HIDDEN TOOL

The Toolbar hosts many tools, each of which is visually depicted through an icon. Apart from tools that meet the eyes, a number of other tools are also available. Using them you can further improve your image editing skills. It can be made apparent by clicking and holding on a given icon. Alternately, you can right click in Windows or Control click in Mac on the icon to view and access extra tools. A menu would fly out displaying the additional tools that you can work with. Some of these are being discussed below.
LASSO
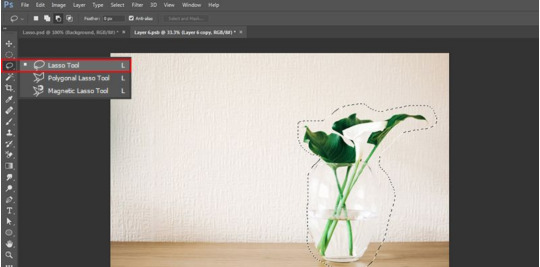
This free-form selection tool has to be dragged around the desired objects on the canvas for selecting them. Clicking on the tool icon will let you access other sub-tools. The polygonal lasso allows selecting objects on the canvas by clicking on strategic areas for creation of interlinked points in polygonal shape. The magnetic lasso behaves like regular lasso and additionally carries out edge detection for spontaneously snapping to them.
PATCH TOOL
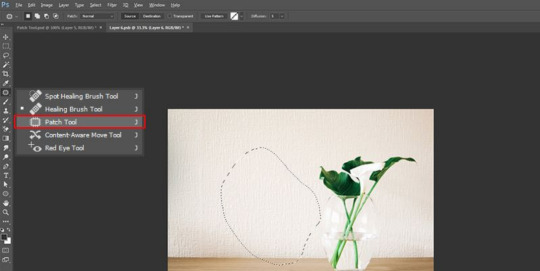
This facilitates drawing of a freeform outline around the defective region to select the same. The defect can be repaired subsequently by getting the selection outline dragged over the region whose texture you prefer.
EYEDROPPER
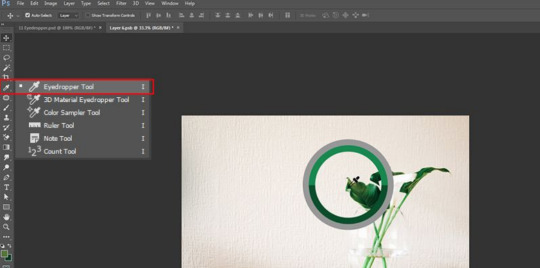
You have to click the desired area of the canvas with eyedropper tool for sampling the color on the clicked point. It would automatically convert the foreground color to the color which was sampled by clicking the canvas part.
ERASER TOOL
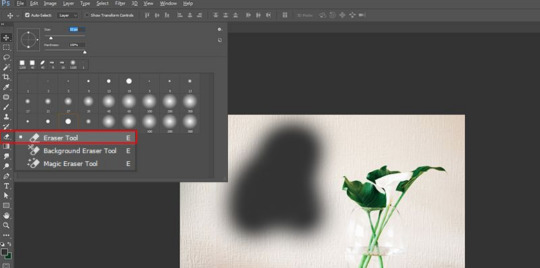
The functions exactly as the paintbrush. The difference lies in the fact that instead of painting, it erases the portion over which it is moved.
TYPE TOOL
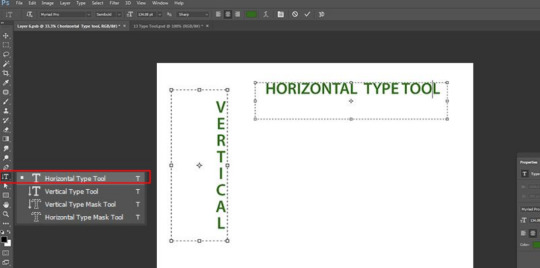
You can type in horizontal manner with this. The hidden tools under the ‘Type tool’ offer additional functionality of typing in vertical manner as well as creation of text masks in horizontal or vertical direction.
HAND TOOL
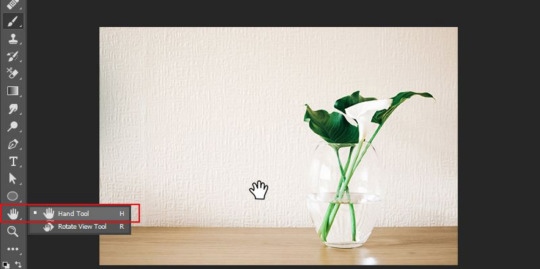
Clicking and dragging around the Photoshop canvas is facilitated by this. This would be ineffectual if the complete canvas sits flush with the screen. After zooming in, you can easily move around using this. It also proves handy when the image is so big that it fails in fitting the screen at normal level.
ROTATE VIEW TOOL

You can visualize and subsequently edit a picture from various angles by using the ‘Rotate View’ tool which actually reorients the canvas at desired angle.
ZOOM TOOL

Just click at a particular point on the Photoshop canvas and then zoom out or in using this. When you normally use this, it is programmed to zoom in only. For zooming out, you need to press down the option key and then start using the zoom tool in normal mode.
COLOR SELECTION
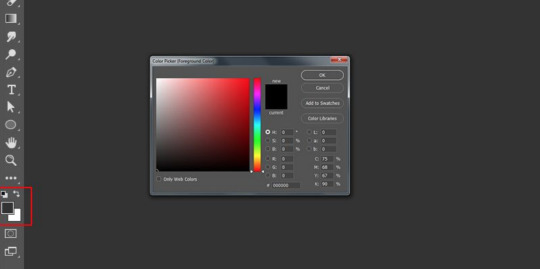
The colors that you have working with on Photoshop canvas can be managed using ‘Color selection’ tools. Foreground color is the color that sits on the top and would be used by brushes. Background color is in the back and is used when anything from the background is removed or extended. Shortcut functions can be accessed by clicking on any of the 2 smaller icons that sit on the top. One icon, that sits on the left, is represented by a black square atop a white square. Click on it would result in setting of the colors in background and foreground to defaults. Clicking on another icon in the shape of double headed curved arrow would result in swapping of the colors in background and foreground. When you click on any color in the background or foreground, a color picker would pop up which can be used for setting the color that you exactly need.
DODGE BURN, SPONGE
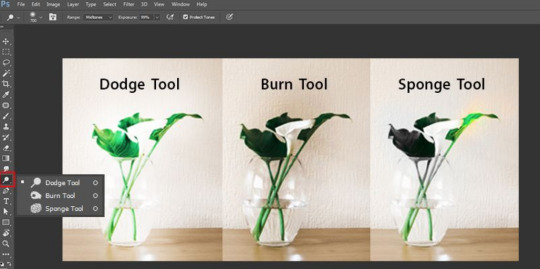
You can lighten the areas in the picture by retouching and painting over them with Dodge tool. You can darken the areas in the image by painting over them with Burn tool. Color saturation can be increased or decreased over selected regions of image by painting over with Sponge.
MAGIC WAND TOOL
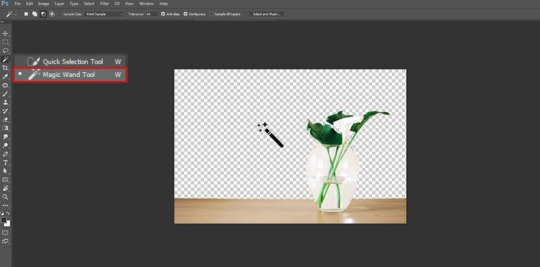
When you click on an area with this tool, the spot gets selected and other similar areas. Generally, it is used to eliminate backgrounds from the photos. In case you are willing to do photo clipping using photoshop, you will find this feature useful!
SHAPE TOOL
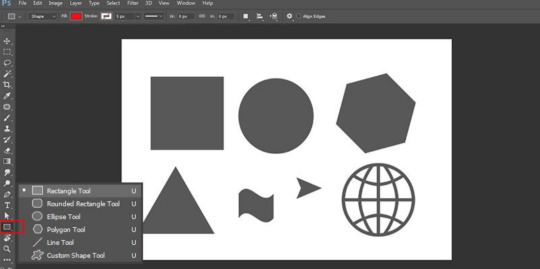
You can use the shape tool to create rounded triangles, circles, vector rectangles, polygons, circles, custom shapes and lines. When you design shape masks in your photos, you will find this tool handy.
3D MATERIAL DROP
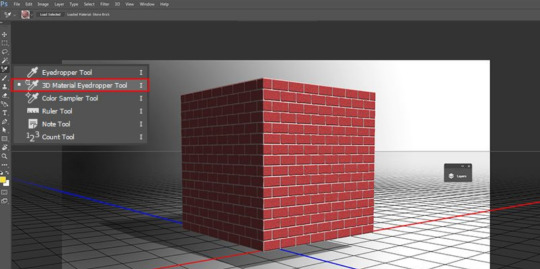
It is extensively used in 3D modeling. It is necessary to have knowledge on the photoshop editing techniques, which will enable you to integrate the necessary changes in the images. You can create a sample from one area of your image and use it in other areas to create similar features, like 3D layer or mesh.
SMUDGE, SHARPEN, & BLUR TOOLS
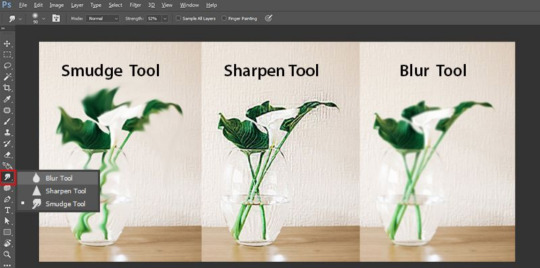
These are among the important photo retouching tools in photoshop, and all of them work like the paintbrush. However, they create different effects on your image. If you are willing to blur a particular area, you can use the blur tool. The sharpen tool can be used to sharpen the area, while you can use the smudge tool to smear the surrounding areas. In case you are integrating blended colours in your image, the smudge tool will come extremely beneficial.
HISTORY BRUSH
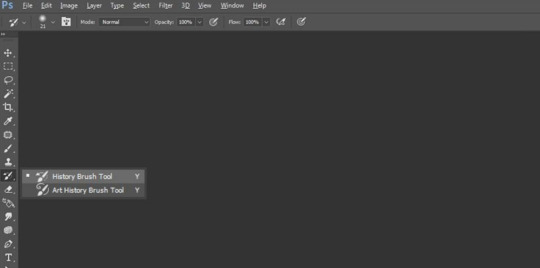
It allows you to paint back and keeps a record of all your activities. By default, the number of records is fixed at 50. Using the history brush, you can paint elements of the past in the present image.
Now that you are well aware of the different Photoshop tools and functions, it will be easier for you to incorporate them into your photo enhancement work to get outstanding and exceptional outcomes! Hoped this helped you guys!
0 notes
Text
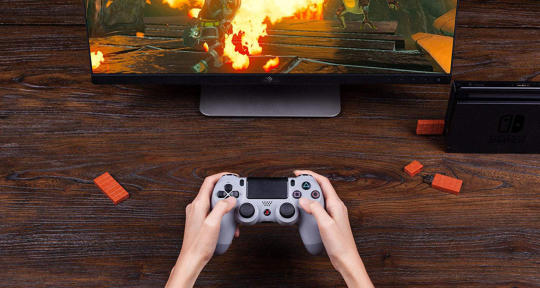
The Best Nintendo Switch Controllers We've Tried So Far
New Post has been published on https://gamerszone.tn/the-best-nintendo-switch-controllers-weve-tried-so-far/
The Best Nintendo Switch Controllers We've Tried So Far
Since shortly after the Nintendo Switch‘s launch, I’ve been on the hunt for new Switch controllers. It’s a versatile little console, allowing for a wide range of different controller options, from playing with your PS4 and Xbox One controller to pads that resemble the classic controllers of the past. The Switch Pro controller is an obvious and great choice, but it’s also expensive, and in my experience, the D-Pad leaves a lot to be desired.
Thankfully, there are a ton of options from third-party companies like 8Bitdo and PDP that help account for personal preference while also introducing new features not found in first-party Nintendo Switch controllers. They aren’t all winners, but I have tested and identified some solid options worth considering if you need something a little different at a more affordable price.
We’ll keep this article updated as we test new controllers, adapters, and more. In the meantime, read on for an overview of the best Nintendo Switch controllers we’ve tried and can vouch for. Note that all pricing indicated below is subject to change–Amazon slashes the price on these products regularly, so you may see a discount when clicking through that we haven’t listed here.
Quick look: The best Nintendo Switch controllers we’ve tested
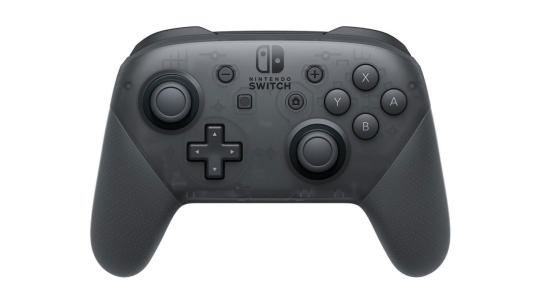
Nintendo Switch Pro Controller
The best first-party Switch controller
The Good:
The best ergonomics of any controller I’ve used
Buttons are satisfying to press
Features NFC/Amiibo support, HD rumble, and motion controls
The Bad:
D-Pad is prone to incorrect inputs
$70 price tag is a bit steep
First off, we can’t talk about the best Nintendo Switch controllers on the market without talking about Nintendo’s first-party option, the Switch Pro controller. It’s a great pad with very few faults. For me, it has the best ergonomics among Nintendo, Microsoft, and Sony’s first-party controllers. It’s the perfect size for my large hands, and the triggers are shaped just right for resting fingers. The face buttons feel good to press; the +, -, Home, and Screenshot buttons click wonderfully; and the analog sticks have a good amount of tension. The one problem I have with the Pro Controller is the D-Pad. It’s prone to incorrect inputs, which is most noticeable when playing puzzle games like Tetris 99 or fighting games like Mortal Kombat 11. This usually happens when you press a direction on the pad, but you’re a little off-center, causing an input in the wrong direction. It’s not something that breaks the experience completely, but when I’m playing a game that relies particularly heavy on the D-Pad, I always opt for a different controller.
The Pro Controller also boasts a lot of features that most third-party controllers rarely include. This includes NFC/Amiibo support, HD rumble, and motion controls. These things aren’t required for the vast majority of games, but every now and then, a certain utilization of them can put a smile on your face–HD rumble is used excellently in Super Mario Odyssey, for example. However, the Pro Controller’s price tag is also $70 USD, which is more expensive than both the DualShock 4 and latest Xbox One controller. There’s no doubt the Pro Controller is an excellent pad, but when there are great options at cheaper prices, it’s hard to justify buying a second, third, and/or fourth for your friends to use.
$70 at Amazon
8Bitdo Wireless Bluetooth Adapter
The best way to use PS4 and Xbox One controllers on the Switch
The Good:
Enables use of a DualShock 4, Bluetooth-enabled Xbox One, Wii U Pro, Wiimote, DualShock 3, and any compatible 8Bitdo controller
Easy to set up
The Bad:
Some games can cause abnormal vibration, which requires firmware updates to fix
Can’t wake up the Switch from Sleep Mode
The first time I plugged the 8Bitdo Bluetooth adapter into my Switch’s dock, it felt like black magic. I was using my DualShock 4 on a Nintendo platform, hitting Circle when it asked for A, Cross when it asked for B. And when it asked for X? You guessed it: Triangle. There was definitely a period of getting used to what buttons I should be pressing for each input the Switch requested, but once this passed, the adapter proved an excellent way to use not just the DualShock 4, but a wide array of Bluetooth-enabled controllers that don’t already connect to the Switch directly.
Of course, any controller you’ll use with this adapter won’t include features like HD rumble, motion controls, or Amiibo support. These losses are negligible for the vast majority of experiences, especially when using your favorite Bluetooth controller is the trade-off. One downside to this adapter, however, is a rumble issue that crops up with certain games. Most recently, I’ve experienced this with Fire Emblem: Three Houses, where your controller will vibrate abnormally even if you turn off rumble in the Switch’s system settings. This issue has been fixed for games like Splatoon 2 and Crash Bandicoot: N Sane Trilogy, though this requires you to plug the adapter into a computer to update the firmware.
$20 at Amazon
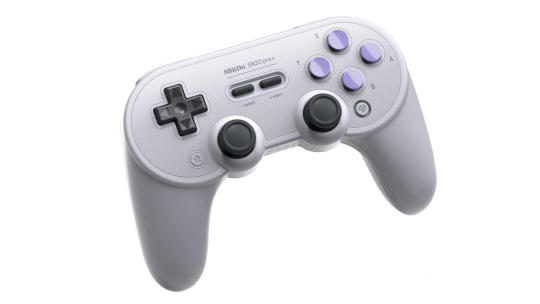
8Bitdo SN30 Pro Plus
The best Switch controller for customization
The Good:
Extensive button mapping and macro customization
Adjustable dead-zones for analog sticks and triggers
Customizable rumble functionality
Removable, rechargeable battery
Allows for the use of two AA batteries
Also doubles as an excellent option for classic games
The Bad:
The 8Bitdo SN30 Pro Plus is one of the more exciting Switch controllers. Not only does it feature a design inspired by the SNES, it also features extensive customization for button mapping, analog sticks, trigger inputs, and vibration adjustments. It allows you to swap button inputs, invert the X and Y axis on your analog sticks, and more. You can even create macros of up to 18 inputs. All of this customization must be done on a computer, but 8Bitdo’s customization software is a breeze to use. The one downside is that there are no extra buttons or paddles on the controller, so the remapping is restricted to swapping buttons.
My personal favorite thing about this controller is the fact that it includes a removable, rechargeable battery and also allows for disposable batteries. As someone who is currently sitting next to a box of dead PS3 controllers, I’m happy to know there is a great alternative to the Switch’s Pro controller that I’ll be able to use long after its rechargeable battery dies.
$50 at Amazon
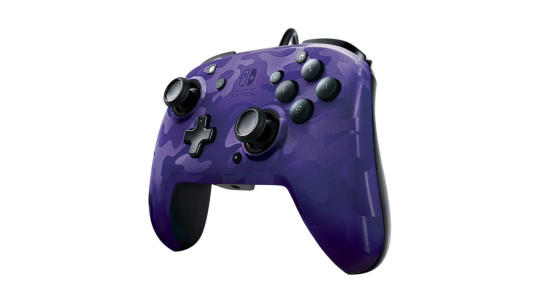
PDP Faceoff Deluxe+ Controller
The best budget Switch controller
The Good:
Great D-pad
Excellent ergonomics
Remappable paddles
Audio port works great for voice chat-enabled games and listening with headphones
The Bad:
Can hit paddles by accident in some cases
Can’t wake the Switch up from Sleep Mode
When I learned the Switch had a Pro controller alternative that included an audio port, boasted remappable paddles, and only cost $25, I didn’t expect much in the way of quality. The PDP Faceoff Deluxe+ wired controller exceeded my expectations and is now one of my favorites to use with the Switch. Holding it, it feels very similar to Nintendo’s Pro controller. I don’t think any of these controllers beat the Pro controller in pure ergonomics, but this PDP pad comes close. The general shape is the same, but the sticks and triggers come up a touch higher. I like the raised height of the triggers, but I feel like they could have been reshaped a bit to better fit the natural curve of your fingers.
Nevertheless, this hardly ruins the experience. The inclusion of remappable paddles is a fantastic addition. You can map any button to these paddles, and I found it incredibly useful for games that assigned sprint to a face button. In The Legend of Zelda: Breath of the Wild, I’m able to sprint, jump, and glide, all while controlling the camera with my thumb firmly planted on the right stick. Of course, this can present some problems in certain games. When switching from Breath of the Wild to Super Mario Maker 2, I would instinctively squeeze the paddle while making some jumps. And unfortunately, there’s only one configuration profile and no way to turn the paddles off, so if you don’t want to use them, you’ll have to go through the short process of mapping them to each other–this makes it so there’s no input when pressing them. It’s a minor issue, but an annoying one nonetheless.
Thankfully, the PDP Faceoff Deluxe+ feels good enough to use to deal with the occasional accidental button press. Its analog sticks have a similar tension to the Pro controller’s, and it has a great D-Pad. The 3.5mm audio port is a good option for voice chat in supported games (e.g. Fortnite), though I spent most of my time using the port to listen through my favourite pair of headphones. This works really well, with the ability to control your volume on the controller itself and within the Switch’s menu. And with its wired connection, you don’t have to worry about its battery dying. Because that wired connection powers the Switch, however, you won’t be able to turn the console on from Sleep Mode–you’ll have to hit the Power button on your docked Switch before starting to play. As long as you’re okay these few inconveniences, then I can wholeheartedly recommend the Faceoff Deluxe+.
$25 at Amazon
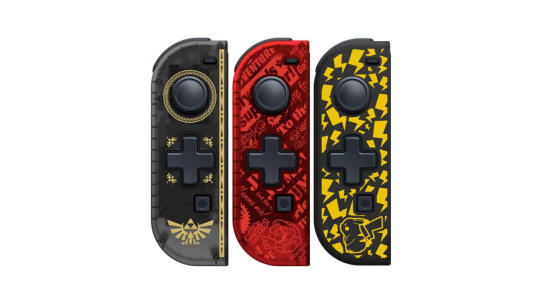
Hori D-Pad Joy-Con
Best Switch controllers for handheld mode
The Good:
The best, most convenient option for a D-Pad in handheld mode
Very comfortable for games that excel with a D-Pad
The Bad:
Restricted to handheld use only
Incompatible with most cases and grips
Perhaps the most disappointing thing about the Switch is the lack of a proper D-Pad on its left Joy-Con. It’s not an automatic dealbreaker, with games like Breath of the Wild and Super Smash Bros. Ultimate not utilizing the D-Pad for anything super demanding, but when the situation calls for it, the Hori D-Pad Joy-Con feels a lot more precise and comfortable when playing in handheld mode.
The D-Pad on Hori’s Joy-Con is softer than what I usually look for, but it’s hard to deny just how pleasant the experience is. I didn’t realize how much I missed a D-Pad until I used this to play games like Mortal Kombat 11, Tetris 99, and Super Mario Maker 2. These games, as well as many others, have since been a lot more enjoyable in handheld mode.
There are a few things that are important to note, however. First off, this Joy-Con can’t be used wirelessly, so you’re restricted to using it in handheld mode. Secondly, it’s incompatible with most cases and grips. This is because the latch button protrudes out further than Nintendo’s official Joy-Cons. I took a pair of scissors and cut out a space for it on my cheap Orzly grip case, but I likely won’t be doing the same to my more expensive accessories.
Zelda Edition: $20 at Amazon Mario Edition: $20 at Amazon Pikachu Edition: $20 at Amazon
8bitdo M30 Bluetooth
The best classic controller on Nintendo Switch
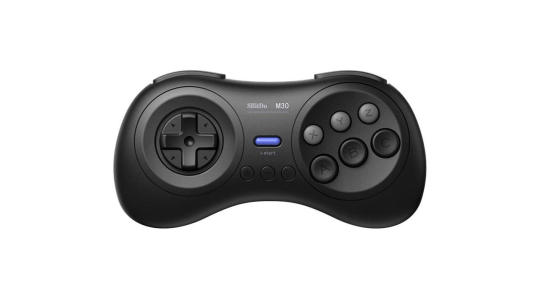
The Good:
Fantastic D-Pad and ergonomics
Connects directly to Nintendo Switch
Also compatible with Windows, Mac, Android, and Raspberry Pi
The Bad:
Not suitable for all games
8Bitdo’s M30 controller might just be one of my favorite pads ever. As a Sega Genesis kid, I’ve always held a special place in my heart for the six-button controller, which is what the M30 emulates and improves on. Its ergonomics have been shaped differently to make it more comfortable to hold than the Sega original, and the D-Pad is by far my favorite of any 8Bitdo controller. Classic titles, platformers, and fighting games are the obvious choice for the M30, but I’ve also found myself enjoying Super Smash Bros. Ultimate with it. It’s definitely not going to work with every game, especially those that rely on a second analog stick, but it’s a controller I’ll always go to if it’s possible to do so.
$30 at Amazon
8Bitdo N30 Bluetooth
The best NES controller for Nintendo Switch
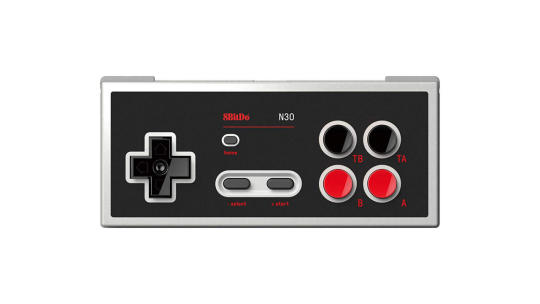
The Good:
Better shoulder buttons than the subscription-exclusive NES Joy-Cons
Includes a Home button
Connects directly to Nintendo Switch
Also compatible with retro receivers and USB adapters
The Bad:
Not suitable for all games
The 8Bitdo N30 isn’t going to be for everyone. It’s an NES-style controller that is great for very specific games, like everything in the Switch Online NES library and very few others. I prefer the NES controller’s shape and button layout for that console’s games, but in trying to find other uses for the N30, I was largely unsuccessful. Even modern Tetris games like Tetris 99 and Puyo Puyo Tetris require more than the D-Pad and B and A buttons–the extra two face buttons on the N30 are restricted to Turbo. The N30 includes shoulder buttons for L and R, which does extend the number of games it can be used with (e.g. New Super Mario Bros. U Deluxe and Mario Kart 8 Deluxe), but the options are still limited.
I mostly use my N30 in conjunction with a retro receiver that lets me use it with real NES hardware and RetroUSB’s AVS. It’s my new favorite pad for that console. It’s also an excellent option for the Switch, but it’s not necessary to enjoy any game, NES or not. However, if you are looking for that very specific NES experience, I can wholeheartedly recommend the N30. Nintendo’s own NES Switch controllers are good, but they have inferior shoulder buttons and need to be charged the same way as your Joy-Cons–not to mention, the Nintendo Switch Online subscription that’s required before you can even purchase them. With all this considered, the N30 is perfect for the job.
$30 at Amazon
8Bitdo SN30 Bluetooth
The best SNES controller for Nintendo Switch
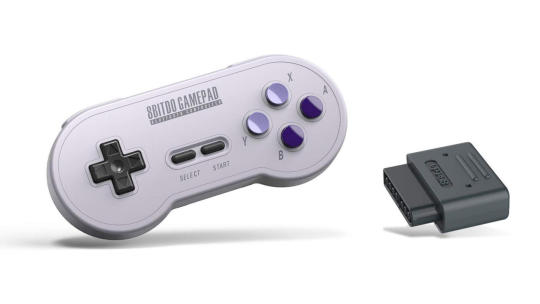
The Good:
Connects directly to Nintendo Switch
Comes with a retro receiver for SNES use
Also compatible with USB adapters
The Bad:
Not suitable for select games
The SN30 Pro Plus discussed earlier might be the best Switch controller on this list, and with its SNES-style layout, it’s great for classic games. However, if you’re looking for something a bit more authentic to the SNES experience, then the basic SN30 is your best alternative. Like both the M30 and N30, it doesn’t work with every game, but there are plenty of great options with the Switch’s excellent selection of platformers and fighting games. And if a recent FCC filing indicates anything, we could be seeing SNES games on the Switch in the future.
The SN30 also comes with a retro receiver that can be plugged into a SNES. If you still have a Super Nintendo–or an Analogue Super NT–then this is an awesome option to play classic games on that console. And as a bonus, this retro receiver can also be connected via USB, as long as you have an extra USB-C cable attached.
$40 at Amazon
Source : Gamesport
0 notes