#how RecyclerView works in Android OS
Explore tagged Tumblr posts
Visit Tumblr Blog
Explore Tumblr blogs with no restrictions, modern design and the best experience.
Last Seen Tumblr Blogs


Fun Fact
Tumblr was the first site to host the blog for President Barack Obama in 2011.
Text
Understand How RecyclerView Works on Android OS: A Detailed Blog
Do you want to know how RecyclerView works in Android OS? Read the informative blog on our website!
In this blog, we start by exploring the basic concepts behind RecyclerView, discussing its role in managing large lists efficiently by recycling views as they scroll off the screen. We'll also cover the differences between
RecyclerView and its predecessor, ListView, highlight the advantages that RecyclerView offers in terms of performance and flexibility.
To get more details, visit our website and read the blog or get in touch with our tech experts!
0 notes
Text
Introduction to Android Jetpack
Most Android apps now use the support libraries to help users add all kinds of updated widgets and to address compatibility issues across Android devices and OS versions. You’d be hard-pressed to find an Android app that doesn’t use something from them, and they’re included as a dependency in template projects made in Android Studio. Widgets as fundamental as RecyclerView are included in them.
The support libraries are great to use, but they have evolved quite a bit over the years and the names have become somewhat confusing. There are com.android.support:support-v4 and com.android.support:support-v13, for example. Looking at the names alone, do you know what classes are in them? The names are supposed to designate what version of Android they support, but, as they have evolved, the minimum version has increased to API Level 14.
Google has realized that this variety of ever-changing libraries is very confusing for new (and old) developers and has decided to start over. Consequently, it has created Android Jetpack as a way of both providing guidance and also as a recommended set of libraries and tools. Through Jetpack, Google provides components that form a recommended way to architect your app. Furthermore, Google hopes that Jetpack will eliminate boilerplate code and simplify complex tasks while still providing backwards compatibility.
Note: If you’re new to Android Development or Kotlin, it’s highly recommended that you start with Beginning Android Development with Kotlin to learn your way around the basic tools and concepts.
To help address version confusion, Google is also resetting all of the Jetpack-related libraries to version 1.0.0 and starting their package names with a base name of androidx. Moreover, each component will be in its own library, though it’s important to note that Google is still working on transitioning libraries to the new package names.
There are also a couple of other resources in Jetpack, including the Android KTX library, which makes it easier to use Kotlin with Android. And, finally, Android Studio 3.2 Canary 14+ now has a Migrate to AndroidX option to convert your existing code and libraries to androidx (but I would recommend you wait until they are out of alpha, since pretty substantial known issues exist in the Canary 14 and 15 conversions).
Jetpack is broken up into four main areas: Architecture, Foundation, Behavior and UI. Most of the items in Jetpack are a re-arrangement and categorization of existing libraries, but a few of the items are new. By the end of this article, you should have a good sense of Jetpack’s features and where to find more information on each of them.
Jetpack: Architecture
The Architecture area of Jetpack includes eight different libraries and tools that help you architect your app and manage the data used by and displayed in the app. Most of these are existing libraries. However, there are three new libraries: Navigation, Paging, and WorkManager. Beginning with the newest libraries:
Navigation
Navigating between activities and/or fragments has never been easy. Now, with the Navigation library and the navigation viewer built into Android Studio, you can visually design how your screens are connected to one another. Many people have noticed that this is similar to Storyboards in Apple’s Interface Builder for iOS app development.
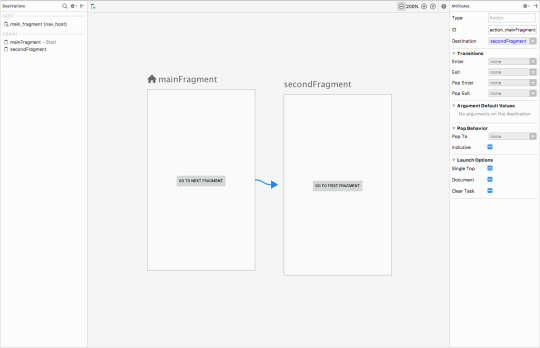
Using Navigation, you visually connect one screen to another using “destinations”. You create a navigation graph that will have a starting destination that can have actions to go to other destinations. The great thing about this is that you can define animations in the visual editor. The library even handles deep linking into your app. Passing data between destinations can be done in a safe way with a new plugin called safeargs. You can define what arguments the Fragments in the navigation graph accept from within the navigation file itself.
Here is a screenshot of two fragments with an action between the two. You can set up your app to navigate to the second fragment from inside a button click listener in the first fragment.
Note: As of this writing, the Navigation libraries do not work well with the androidx versions of the support libraries. They work sufficiently with the existing support libraries but not the new ones. Be sure to check the release notes on each version of Android Studio 3.2 to see when this has been addressed.
You can find more information about Navigation here: Navigation.
Paging
Have you ever had to deal with large amounts of related data? Maybe too much for you to download at once? The Paging library will help by providing ways to handle the paging of data in a RecyclerView.
The Paging library uses several key classes: PagedList, PagedListAdapter, and DataSource. PagedList is a list that loads data lazily from a DataSource, allowing the app to load data in chunks or pages. PagedListAdapter is a custom RecyclerView.Adapter that handles pages with a DiffUtil callback.
For the DataSource, you will use one of three different subclasses: PageKeyedDataSource, ItemKeyedDataSource, or PositionalDataSource.
You can find more information here: Paging.
WorkManager
Over the years, there have been several systems built into Android for handling background jobs or alarms. They differ on different versions of Android and you have to write a lot of code to handle the different versions of the OS.
WorkManager solves this problem and gives you one library for creating deferrable, asynchronous tasks and defining when they should run. You can define one-time jobs or repeating jobs.
You can find more information here: WorkManager.
Data Binding
This library has been around for awhile. Data Binding lets you bind your data to your layout in XML, so that, when you change your data in running code, the views defined by the layout are automatically updated. Moreover, when your UI changes, your data objects are updated.
You can find more information here: Data Binding.
Lifecycle
The Lifecycle library helps you listen for lifecycle events in other components besides an activities and fragments. This allows you to have lifecycle-aware logic in places other than just an Activity or Fragment. The library works by using annotations on methods so you get notified for the events that you are interested in.
You implement LifecycleObserver, annotate methods and add this observer to a lifecycle owner, which is usually an Activity or Fragment. The LifecycleObserver class can get the current lifecycle state by calling lifecycle.getCurrentState() and can use this information to avoid calling code when not in the correct state.
A LifecycleOwner is an object that has Android lifecycle events. The support library Activity and Fragment classes already implement the LifecycleOwner methods. A LifecycleOwner has a Lifecycle object that it can return to let the observer know what the current state is.
You can find more information here: Lifecycles.
LiveData
The LiveData library uses the Observer pattern for data but handles it in a lifecycle-aware manner. You get the benefits of automatic UI updates when data changes without calling UI elements when the UI is not in the correct state.
LiveData is the class that implements the observer pattern, holds that data, and notifies listeners when that data has changed.
You can find more information here: LiveData.
Room
If you have ever struggled working with the SQLite database in an Android app, you will appreciate what the Room library does for you. You create several simple classes that define your data and how to access them, and the Room library will do most of the rest. The only SQL code you have to write is for queries, which are usually pretty straightforward. And you gain compile-time checks of your SQL code when using Room.
There are three important classes you need to use with Room: Database (this contains your main entry point and holds a reference to the database object for the app), Entity (you create one for each table in the database), and DAO (this contains the methods for retrieving and managing the data).
You can find more information here: Room.
ViewModel
While the Room library persists your data in permanent storage, the ViewModel class allows you to hold onto data in device memory in a lifecycle-aware manner. One of the nice features of a ViewModel is that it can survive the re-construction of an Activity or Fragment over a configuration change such as a device rotation. The system will hold onto that ViewModel re-associate it with the Activity or Fragment. ViewModels are also where you can load data in the background and use LiveData to notify listeners that the data is ready.
You can find more information here: ViewModel.
Jetpack: Foundation
The Foundation area of Jetpack involves core system components, Kotlin extensions and Testing Libraries. This includes the AppCompat library, which you’ve probably been using for awhile, and the new Kotlin KTX extension library for easier development in Kotlin.
Testing is very important and has it’s own section to with frameworks to let you test your app, for both UI testing or unit testing.
Android app codebases are getting bigger and bigger, so you’ll want to visit the Multidex section of Foundation to see how to handle the 64K method limit.
You can find more information about what’s available in Foundation here: Foundation.
AppCompat
The AppCompat library in Jetpack Foundation consists of all of the components from the old v7 libraries. This includes:
AppCompat
Cardview
GridLayout
MediaRouter
Palette
RecyclerView
Renderscript
Preferences
Leanback
Vector Drawable
Design
Custom tabs
And even a few others…
You can find more information here: AppCompat.
Android KTX
Android KTX is the only new library in Foundation and is a set of Kotlin extensions designed to streamline the development of Android apps when using Kotlin.
There are several KTX modules that are linked to other libraries in Jetpack. For instance, if you are working with the Navigation library, then you could use:
android.arch.navigation:navigation-common-ktx
android.arch.navigation:navigation-fragment-ktx
android.arch.navigation:navigation-runtime-ktx
and android.arch.navigation:navigation-ui-ktx
SharedPreferences is an example of how using KTX can make your code simpler. Take a look at the Kotlin code below:
sharedPreferences.edit() .putBoolean("key", value) .apply()
Compare that with the KTX-based code:
sharedPreferences.edit { putBoolean("key", value) }
The KTX code is streamlined a bit and removed the need to add apply().
And here’s a SQLite example without KTX:
db.beginTransaction() try { // insert data db.setTransactionSuccessful() } finally { db.endTransaction() }
And the corresponding KTX version:
db.transaction { // insert data }
KTX streamlines a SQLite transaction into a simple function call with a trailing lambda.
You can find more information here: Android KTX.
Test
The Test part of Foundation includes the Espresso UI testing framework and AndroidJUnitRunner for unit testing. Unit tests are for writing small tests on the logic within your code, usually at the level of individual methods. They should run fast and help you test a specific piece of logic. Espresso is used for the testing of UI elements.
You can find more information here: Testing.
Multidex
As you build out your app and include more and more libraries, your app can grow large enough that you need to use the Multidexing capabilities of Android. Once your app includes more than 65,536 methods across all classes, you will need to have the system split your .dex file (basically, a .zip file of classes) into multiple .dex files.
You can learn more about multidexing and how to use it here: Multidex.
Jetpack: Behavior
The Behavior area of Jetpack features libraries that help you interact with your user through the UI, including using video or sound. It includes many components such as media, notifications, permissions, downloading, sharing and the new Slices library.
You can find more information here: Behavior.
Notifications
Android Notifications have been around since the beginning but have changed over time. They have become more expressive and can contain buttons and images. Since Android 5.0 Lollipop, a notification called a heads-up notification can be displayed. You can even use notifications on Android Wear and TV for controlling media.
You can find more information here: Notifications.
Permissions
This part of the Behavior area showcases how to use and request permissions. Since Android 6.0 Marshmallow, permissions are now required to be requested and given before certain elements of a device’s components can be accessed, such as contacts, location and camera information. You declare permissions in the manifest, and you must deal with both cases of a user accepting or denying your permission request.
You can find more information here: Permissions.
Sharing
The Sharing part of Behavior explains how to share content and the ShareActionProvider class and how to use it. You will can share information with other apps and receive information from other apps. You can create a share action, share files and use ContentProviders for sharing data.
You can find more information here: Sharing.
Media
The Behavior area of Jetpack includes the MediaPlayer and AudioManager classes. You can play media and sounds, use the MediaPlayer in a service, and control the device volume. Android supports various media formats. You can also use the ExoPlayer library, which Google uses for it’s own media players in apps such as YouTube.
You can find more information here: Media.
Download Manager
The DownloadManager service helps you download files in the background. Avoid dealing with connection problems, retrying and even system reboots by using the DownloadManager service. Since the DownloadManager is a system service, you can just start a download and listen for a broadcast event to handle the finished download. No need to worry about network issues or crashes.
You can find more information here: Download Manager.
Slices
The Slices library is new and lets you create UI templates to share your data through the system in rich, flexible layouts. One of the examples Google gave at Google I/O was a weather app that can show more data depending on the space it has to show. Currently, it is only used by the Google Search App but should extend to the Google Assistant.
You can make your app data available to these apps using Slices so that a user can find information from your app by using Google Search or the Assistant.
You can find more information here: Slices
Jetpack: UI
Most of the UI libraries in Jetpack are based on existing code. They include: animations, fragments, palettes, layouts, Emojis, Android Auto, Wear and TV. The EmojiCompat library is the newest of the libraries and gives you up-to-date emojis and the fonts needed to use them.
You can find more information about the UI area here: UI.
Animation
This part of Jetpack includes APIs for the different types of animations available on Android. The Jetpack site documentation covers the old as well as new ways to use animations. Vector graphics and vector animations are included as well.
There is also a physics-based animation system that includes spring and fling animations. You can setup transitions between activities as well as property and object animations. You can also set a layout to animate any updates you make to the layout.
You can find more information here: Animations.
Emoji
EmojiCompat handles emoji characters and uses downloadable font support. This allows your app to stay up to date with the latest emojis without depending on the Android OS. Whenever you update this library dependency, you will have the latest emojis. There is a concrete Span class called EmojiSpan that is used to create emojis in your text.
You can find more information here: Emoji.
Fragment
The Fragment support class has moved into this part of Jetpack. It includes the different kinds of fragments, such as: DialogFragment, ListFragment, and PreferenceFragmentCompat. An important part of a Fragment is the lifecycle, and the Fragment class included in Jetpack is well-integrated with the Lifecycle class in Jetpack: Architecture.
You can find more information here: Fragments.
Layout
A Layout defines the Views and ViewGroups in your app. In the Jetpack Layout documentation, you learn how to declare layouts in XML and in code. It also describes some of the more common layouts, such as LinearLayout, RelativeLayout and the newer ConstraintLayout. Moreover, you’ll pick up tips on more specific features like creating lists of items with RecyclerView, as well as the card layout CardView.
You can find more information here: Layouts.
Palette
The Palette library allows you to pick colors for themes and from images to make your UI’s match your images. You can also create a palette and choose different colors using the Palette.Builder class. Some of the types of colors produced are: Light Vibrant, Vibrant, Dark Vibrant, Light Muted, Muted and Dark Muted.
You can find more information here: Palettes.
TV
If you are building your app for Android TV, then the TV part of Jetpack is for you. You can control TV Hardware and controllers and create a navigation system that works for TVs. There is the leanback theme that is used for TV layouts and the Leanback library helps with TV controls. You can setup a D-pad controller to let users navigate the TV UI.
You can find more information here: TV.
Wear
Wear OS is the version of Android for wearable devices. You can create an app that plays media, controls your media from a watch, or create a standalone watch app or watch face.
You can find more information here: Wear.
Auto
Jetpack helps you develop apps for Android Auto — audible only, messaging, working with hardware and more. You can provide audio playback for the car as well as messaging. You can test Auto apps on the car screen using the Desktop Head Unit (DHU), which is a testing tool that allows you to test without the hardware.
You can find more information here: Auto.
Where to Go From Here?
As you can see, there is quite a lot included in Google’s new Android Jetpack package. All of the libraries you know and love can be found there, as well as several new ones.
In this article, you were introduced to the four main parts of Jetpack: Architecture, Foundation, UI and Behavior. Some of the new libraries, like the Navigation library, will change the way you write your apps, making it easier than ever. WorkManager solves a long standing problem of reliably running jobs at different times on different OS versions. Paging will help with larger data sets and let you use RecyclerViews and adapters with less code. The Android KTX library makes working in Kotlin even easier and will continue to evolve. Slices are new and, as you learn more, you should be able to make available more of your data outside of your app. With the Emoji library, you can have all of the latest and best emojis available.
Hopefully this post provided a good overview of what is available in Jetpack and will get you excited about using something new. The main Jetpack page is located here: Android Jetpack
If you would like more in-depth information on Jetpack Navigation, you can find a screencast here. We also have screencasts on LiveData, ViewModel, and Paging Library. Finally, you can find a short introduction to WorkManager in our Background Processing course here.
Let us know what part of Android Jetpack you are most looking forward to using in the discussion forum below!
The post Introduction to Android Jetpack appeared first on Ray Wenderlich.
Introduction to Android Jetpack published first on https://medium.com/@koresol
0 notes
Text
The Quest for Q: What's new in Android
The Quest for Q: What’s new in Android
Later this year, Android Q is going to appear on some of the 2.5 billion devices running on Android. The announcement of Android Q isn’t brand new from Google I/O – there has been a public beta since March – but Google has given us more information about what’s in store in version 10.0 of the Android operating system, and the Android platform as a whole.
New Features in Q
My personal favorite feature coming in Q is live captioning. Google announced that they’ve developed a way to perform speech-to-text processing entirely on-device, without any audio ever leaving the device. Users with hearing loss or who are in an environment where they cannot hear their phone will be able to enable live captions in Android Q (this feature is not yet enabled in Beta 3). Any audio that contains speech that gets played on the device — no matter which app is playing it — will be transcribed to text and displayed on screen. This works across the entire operating system, and app developers don’t need to do anything to support live captions in their app.
Another feature that users have been asking for a while is OS-level support for dark mode. Dark mode lets developers change bright white backgrounds for darker backgrounds. This not only increases usability at night where you might accidentally blind your users, but also helps save battery on many Android devices because OLED display technology uses less power for pixels on the display that are dark or completely black. Many first-party apps from Google already support dark mode on existing versions of Android, but it is becoming a system-wide toggle in Q. You can start designing for and implementing night mode right now.
There are also so many other subtle changes to things like permissions, notifications, and privacy that will most likely go unnoticed to many users, but are greatly improving the security and the overall user experience of the operating system. For example, there are some new changes to notifications that bring AI-powered suggested actions to some notifications, and also changes to the prioritization and user-controls for how notifications are displayed. Google has a blog post that describes all of these features in more detail.
What’s New for Developers
As an Android developer, I’m even more excited by what Google has announced for Android Jetpack and their developer tools.
One exciting change this year is Google’s push towards making Android a Kotlin-first platform. This which means that if you’re using Kotlin in your app, you’ll get access to new and concise APIs that take advantage of Kotlin’s language features. And if you’re just getting started with a new app, Google suggests that you should use Kotlin instead of Java. This Kotlin-first paradigm manifests itself in a lot of Google’s Jetpack libraries. For example, coroutines are now supported by Room, LiveData, and ViewModel — which were some of the first Android architecture components announced two years ago at I/O.
Google is also introducing new libraries that are designed for – and sometimes written in – Kotlin. There are a number of new libraries that Google is working on, including View Bindings, CameraX, Benchmark, Security, and biggest of all, Jetpack Compose.
Jetpack Compose is a completely new UI toolkit built entirely in Kotlin. It’s entirely decoupled from the existing UI APIs, and isn’t built off of View at all. Instead, it provides an API reminiscent of Flutter, React, and Anko. These APIs let you create a declarative UI that reactively responds to changes to your app’s state to update what’s on screen. Here’s an example of what this might look like — the following code is from one of the slides at I/O, and lets you implement a list in 6 lines of code instead of breaking out a RecyclerView:
@Composable fun NewsFeed(stories: LiveData<List<StoryData>>) { ScrollingList(stories.observe()) { story -> StoryWidget(story) } }
Jetpack Compose is completely interoperable with existing layouts and views, so you’ll be able to migrate to it gradually — much like how you can gradually introduce Kotlin into a Java project. The library still very early in development, and there is not yet an alpha version you can use yet. In the meantime, you can see Jetpack Compose being developed in AOSP. You can also read more about the new Jetpack libraries on Google’s blog.
These libraries have seen much more rapid changes than the APIs built into the OS itself recently, and that’s an extremely good thing for developers. Even the brand new alpha versions of Jetpack libraries that have been announced or released this week at I/O support API levels as low as 14, which represents more than 99% of active devices on the Play Store. You don’t need to wait for users to be on Q to use these new APIs like you would have in the past.
Android Trends from I/O
Google I/O marks a continuation of a trend from Google. As Android is maturing, each version brings more polish and fewer overhauls than the last. These changes will ultimately benefit users, but nothing coming in the Q release of Android is as drastic as features like runtime permissions, material design, or multi-window from previous versions. Many new features that will impact users the most — like Google Lens, off-device machine learning, and updates to Google apps like the Assistant — are being distributed in Google Play or are Pixel-exclusives instead of ending up in the open-source portion of the Android operating system.
As a platform, however, Google is paying more attention to what developers are doing, and continue to empower them with libraries based on what developers are asking for. These libraries are decoupling the APIs that developers are using from the framework itself, which helps fix device-specific bugs, and lets developers use more effective APIs much more quickly than in the past. It’s a welcome ideology, and I’m looking forward to see where it takes us in the future.
The Quest for Q: What's new in Android published first on https://johnellrod.weebly.com/
0 notes
Text
Android RecyclerView Tutorial with Kotlin
Update note: This tutorial has been updated to Kotlin, Android 26 (Oreo) and Android Studio 3.0 by Rod Biresch. The original tutorial was written by Darryl Bayliss.
Recycling is one of those things that is good for the planet, and it’s a common sense way to make sure we don’t find ourselves buried in our own rubbish or without sufficient resources in the future.
A few Android engineers thought about the benefits of recycling and realized that an OS can also run more efficiently if it recycles. The result of this inspiration was millions of eco-Warriors and recycling enthusiasts rejoicing when the RecyclerView widget was introduced into Android Lollipop — or something like that. :]
There was even more celebration when Google announced a support library to make this clean, green, recycling machine backwards compatible all the way to Android Eclair (2.2), which was released back in 2010!
In this tutorial, you’re going to experience the power of RecyclerView in action and learn:
The purpose of a RecyclerView
The components that make up a RecyclerView
How to change the layout of a RecyclerView
How to add some nice animations to your RecyclerView
You’re also going to blast off into outer space with the sample app Galacticon. You’ll use it to build out a feed of daily astronomy photos from a public NASA API.
Prerequisites: You should have a working knowledge of developing for Android with Kotlin before working through this tutorial. If you need a refresher, take a look at some of our introductory tutorials! Also, you will need Android Studio 3.0 or greater.
Heading to Cape Canaveral: Getting Started
Download the starter project and open it up in Android Studio. There isn’t much to it yet, nor is the almighty RecyclerView anywhere to be seen.
Click the Run app button at the top and you’ll see something that resembles outer space in all the wrong ways:
It’s empty, but that’s ok. You wouldn’t learn much if all the work was done for you! Before you can add that amazing astrophotography from NASA, you’ll need to do some set up work.
Obtaining The (API) Keys to the Shuttle
You’ll use the Astronomy Picture of the Day API, one of the most popular web services provided by NASA. To ensure it doesn’t fall victim to unsolicited traffic, the service requires you to have an API key to use it in an application.
Fortunately, getting a key is as simple as putting your name and email address into api.nasa.gov and copying the API key that appears on the screen or the email sent to you.
Once you’ve acquired your API key, copy it and open the strings.xml file in your project. Paste your API key into the api_key string resource, replacing INSERT API KEY HERE:
Space Oddity: Learning About RecyclerView
You’re about to blast off into outer space to explore the vastness of RecyclerViews, but no competent commander heads into the unknown without preparation. You have questions, and you need answers before you go any further. Consider this section as your mission brief.
A RecyclerView can be thought of as a combination of a ListView and a GridView. However, there are extra features that separate your code into maintainable components even as they enforce memory-efficient design patterns.
But how could it be better than the tried and tested ListView and GridView you’re used to? Could it be some kind of alien technology? The answers, as always, are in the details.
Why You Need RecyclerView
Imagine you’re creating a ListView where the custom items you want to show are quite complicated. You take time to lovingly create a row layout for these items, and then use that layout inside your adapter.
Inside your getView() method, you inflate your new item layout. You then reference every view within by using the unique ids you provided in your XML to customize and add some view logic. Once finished, you pass that view to the ListView, ready to be drawn on the screen. All is well…or is it?
The truth is that ListViews and GridViews only do half the job of achieving true memory efficiency. They recycle the item layout, but don’t keep references to the layout children, forcing you to call findViewById() for every child of your item layout every time you call getView().
All this calling around can become very processor-intensive, especially for complicated layouts. Furthermore, the situation can cause your ListView scrolling to become jerky or non-responsive as it frantically tries to grab references to the views you need.
Android engineers initially provided a solution to this problem on the Android Developers site with smooth scrolling, via the power of the View Holder pattern.
When you use this pattern, you create a class that becomes an in-memory reference to all the views needed to fill your layout. The benefit is you set the references once and reuse them, effectively working around the performance hit that comes with repeatedly calling findViewById().
The problem is that it’s an optional pattern for a ListView or GridView. If you’re unaware of this detail, then you may wonder why your precious ListViews and GridViews are so slow.
First Contact: RecyclerView and Layouts
The arrival of the RecyclerView changed everything. It still uses an Adapter to act as a data source; however, you have to create ViewHolders to keep references in memory.
When you need a new view, it either creates a new ViewHolder object to inflate the layout and hold those references, or it recycles one from the existing stack.
Now you know why it’s called a RecyclerView!
Another perk of using RecyclerViews is that they come with default animations that you don’t have to create or add yourself — they just work.
Thanks to the requirement for a ViewHolder, the RecyclerView knows exactly which animation to apply to which item. Best of all, it just does it as required. You can even create your own animations and apply them as needed.
The last and most interesting component of a RecyclerView is its LayoutManager. This object positions the RecyclerView’s items and tells it when to recycle items that have transitioned off-screen.
Layout Managers come in three default flavors:
LinearLayoutManager positions your items to look like a standard ListView
GridLayoutManager positions your items in a grid format similar to a GridView
StaggeredGridLayoutManager positions your items in a staggered grid format.
You can also create your own LayoutManagers to use with a RecyclerView if you want an extra bit of customization.
Hopefully that answers all your questions, commander. Now, onto the mission!
Preparing for Launch: Creating the RecyclerView
To create the RecyclerView, you’ll break the work into four parts:
Declare the RecyclerView in an activity layout and reference it in your activity Kotlin file.
Create a custom item XML layout for your RecyclerView to use for its items.
Create the view holder for your view items, hook up the data source of the RecyclerView and handle the view logic by creating a RecyclerView Adapter.
Attach the adapter to the RecyclerView.
Step one should be familiar. Open up the activity_main.xml layout file, and add the following as a child of the LinearLayout:
<android.support.v7.widget.RecyclerView android:id="@+id/recyclerView" android:layout_width="match_parent" android:layout_height="match_parent" android:scrollbars="vertical"/>
Here you’re setting up the layout and telling the RecyclerView to match its parent.
Note: You’re using the v7 support library for backwards compatibility with older devices. The starter project already adds the RecyclerView Support Library as a dependency in your app’s build.gradle file. If you want more information on how to do it yourself, check out the Android developer website.
Open MainActivity.kt and declare the following property at the top of the class:
private lateinit var linearLayoutManager: LinearLayoutManager
In onCreate(), add the following lines after setContentView:
linearLayoutManager = LinearLayoutManager(this) recyclerView.layoutManager = linearLayoutManager
Android Studio should prompt you to import kotlinx.android.synthetic.main.activity_main.* for recyclerView. You may wonder how do we have a reference to recyclerView without first finding the view, i.e. findViewById()? The project has been configured to use Kotlin Android Extensions plugin. This plugin enables the ability to import views in a layout as “synthetic” properties.
import kotlinx.android.synthetic.main.activity_main.*
The recyclerView is now an extension property for Activity, and it has the same type as declared in activity_main.xml. The plugin removes a lot of boilerplate code and reduces the risk of potential bugs.
Phase one of ignition is complete! You’ve declared and allocated memory for two parts of the puzzle that RecyclerViews need to work: The RecyclerView and its Layout Manager.
Ignition Phase 2: Laying out the RecyclerView Items
Phase two of ignition involves creating a custom layout for the item you want your RecyclerView to use. It works exactly the same as it does when you create a custom layout for a ListView or Gridview.
Head over to your layout folder and create a new layout with the name recyclerview_item_row and set the root element as a LinearLayout. In your new layout, add the following XML elements as children of your LinearLayout:
<ImageView android:id="@+id/itemImage" android:layout_width="wrap_content" android:layout_height="wrap_content" android:layout_gravity="center" android:layout_marginTop="8dp" android:layout_weight="3" android:adjustViewBounds="true" /> <TextView android:id="@+id/itemDate" android:layout_width="wrap_content" android:layout_height="wrap_content" android:layout_gravity="top|start" android:layout_marginTop="8dp" android:layout_weight="1" tools:text="Some date" /> <TextView android:id="@+id/itemDescription" android:layout_width="wrap_content" android:layout_height="wrap_content" android:layout_gravity="center|start" android:layout_weight="1" android:ellipsize="end" android:maxLines="5" />
No rocket science here: You declared a few views as children of your layout, and can now use them in your adapter.
Adapters: Rocket Fuel for Your RecyclerView
Right-click on the com.raywenderlich.galacticon folder, select New \ Kotlin File/Class, and name it RecyclerAdapter and select Class for Kind. At the top of the file below the package declaration, import the support library’s version of RecyclerView:
import android.support.v7.widget.RecyclerView
Make the class extend RecyclerView.Adapter so it looks like the following:
class RecyclerAdapter : RecyclerView.Adapter<RecyclerAdapter.PhotoHolder>() { }
Android Studio will detect that you’re extending a class that has required methods and will underline your class declaration with a red squiggle.
To resolve this, click on the line of code to insert your cursor, then press Option + Return (or Alt + Enter on a PC) to bring up a context menu. Select Implement Methods:
Confirm you want to implement the suggested methods by clicking OK:
These methods are the driving force behind your RecyclerView adapter. Note how there is still a compiler error for the moment– this is because your adapter and the required methods are actually defined using your ViewHolder class, PhotoHolder, which doesn’t exist just yet. You’ll get to define your ViewHolder and see what each required method does shortly, so just hang tight, Commander!
As with every adapter, you need to provide the corresponding view a means of populating items and deciding how many items there should be.
Item clicks were previously managed by a ListView’s or GridView’s onItemClickListener. A RecyclerView doesn’t provide methods like this because it has one focus: ensuring the items inside are positioned properly and managed efficiently.
The job of listening for actions is now the responsibility of the RecyclerView item and its children. This may seem like more overhead, but in return, you get fine-grained control over how your item’s children can act.
At the top of your RecyclerAdapter class, add a variable photos to hold your photos in the primary constructor:
class RecyclerAdapter(private val photos: ArrayList<Photo>) RecyclerView.Adapter<RecyclerAdapter.PhotoHolder>() {
Nice job, Commander! Your adapter now knows where to look for data. Soon you’ll have an ArrayList of photos filled with the finest astrophotography!
Next, you’ll populate the stubbed methods that were added by Android Studio.
The first method, getItemCount(), is pretty simple and should be familiar from your work with ListViews or GridViews.
The adapter will work out how many items to display. In this case, you want the adapter to show every photo you’ve downloaded from NASA’s API. To do that, add update getItemCount() to the following:
override fun getItemCount() = photos.size
Next, you’re going to exploit the ViewHolder pattern to make an object that holds all your view references.
Velcro For All: Keeping Hold Of Your Views
To create a PhotoHolder for your view references, you’ll create a nested class in your adapter. You’ll add it here rather than in a separate class because its behavior is tightly coupled with the adapter. First, import synthetic properties for the recycler view item so you can reference the view properties:
import kotlinx.android.synthetic.main.recyclerview_item_row.view.*
Add the following code at the bottom of the RecyclerAdapter class:
//1 class PhotoHolder(v: View) : RecyclerView.ViewHolder(v), View.OnClickListener { //2 private var view: View = v private var photo: Photo? = null //3 init { v.setOnClickListener(this) } //4 override fun onClick(v: View) { Log.d("RecyclerView", "CLICK!") } companion object { //5 private val PHOTO_KEY = "PHOTO" } }
So what did you do here?
Made the class extend RecyclerView.ViewHolder, allowing it to be used as a ViewHolder for the adapter.
Added a reference to the lifecycle of the object to allow the ViewHolder to hang on to your View, so it can access the ImageView and TextView as an extension property. Kotlin Android Extensions plugin adds in hidden caching functions and fields so that views are not constantly queried.
Initialized the View.OnClickListener.
Implemented the required method for View.OnClickListener since ViewHolders are responsible for their own event handling.
Added a key for easier reference to the particular item being used to launch your RecyclerView.
You should still have a compiler errors with onBindViewHolder and onCreateViewHolder methods. Change the holder: ? argument on onBindViewHolder to have a type RecyclerAdapter.PhotoHolder.
override fun onBindViewHolder(holder: RecyclerAdapter.PhotoHolder, position: Int) { TODO("not implemented") //To change body of created functions use File | Settings | File Templates. }
Then add a RecyclerAdapter.PhotoHolder return type to the onCreateViewHolder method and remove the safe call operator (i.e. ?) of the parent argument type.
override fun onCreateViewHolder(parent: ViewGroup, viewType: Int): RecyclerAdapter.PhotoHolder { TODO("not implemented") //To change body of created functions use File | Settings | File Templates. }
You should now be able to build and run the app again, but it’ll look about the same because you haven’t told the RecyclerView how to associate the PhotoHolder with a view.
Assembling The Pieces
Sometimes there are no ViewHolders available. In this scenario, RecylerView will ask onCreateViewHolder() from RecyclerAdapter to make a new one. You’ll use the item layout — PhotoHolder — to create a view for the ViewHolder.
The inflate code could simply be added to onCreateViewHolder(). However, this is a nice opportunity to show a really cool Kotlin feature called Extensions.
First, add a new Kotlin file named Extensions.kt to the project and then add the following new extension function to the new file:
fun ViewGroup.inflate(@LayoutRes layoutRes: Int, attachToRoot: Boolean = false): View { return LayoutInflater.from(context).inflate(layoutRes, this, attachToRoot) }
Replace the TODO("not implemented") line between the curly braces in onCreateViewHolder() with the following:
val inflatedView = parent.inflate(R.layout.recyclerview_item_row, false) return PhotoHolder(inflatedView)
Here you inflate the view from its layout and pass it in to a PhotoHolder. The parent.inflate(R.layout.recyclerview_item_row, false) method will execute the new ViewGroup.inflate(...) extension function to inflate the layout.
And with that, you’ve made it so the object holds onto those references while it’s recycled, but there are still more pieces to put together before you can launch your rocketship.
Start a new activity by replacing the log in ViewHolder’s onClick with this code:
val context = itemView.context val showPhotoIntent = Intent(context, PhotoActivity::class.java) showPhotoIntent.putExtra(PHOTO_KEY, photo) context.startActivity(showPhotoIntent)
This grabs the current context of your item view and creates an intent to show a new activity on the screen, passing the photo object you want to show. Passing the context object into the intent allows the app to know what activity it is leaving.
Next thing to do is to add this method inside PhotoHolder:
fun bindPhoto(photo: Photo) { this.photo = photo Picasso.with(view.context).load(photo.url).into(view.itemImage) view.itemDate.text = photo.humanDate view.itemDescription.text = photo.explanation }
This binds the photo to the PhotoHolder, giving your item the data it needs to work out what it should show.
It also adds the suggested Picasso import, which is a library that makes it significantly simpler to get images from a given URL.
The last piece of the PhotoHolder assembly will tell it how to show the right photo at the right moment. It’s the RecyclerAdapter’s onBindViewHolder, and it lets you know a new item will be available on screen and the holder needs some data.
Add the following code inside the onBindViewHolder() method:
val itemPhoto = photos[position] holder.bindPhoto(itemPhoto)
Here you’re passing in a copy of your ViewHolder and the position where the item will show in your RecyclerView, and calling bindPhoto(...).
And that’s all you needed to do here on the assembly — just use the position where your ViewHolder will appear to grab the photo out of your list, and then pass it to your ViewHolder.
Step three of your ignition check protocol is complete!
Countdown And Liftoff: Hooking up the Adapter And RecyclerView
This is the moment you’ve been waiting for, the final stage before blast off! All you need to do is hook your adapter up to your RecyclerView and make sure it retrieves photos when it’s created so you can explore space — in pictures.
Open MainActivity.kt, and add this property at the top:
private lateinit var adapter: RecyclerAdapter
Next, underneath the assignment of recyclerView.layoutManager, add the following:
adapter = RecyclerAdapter(photosList) recyclerView.adapter = adapter
Here you’re creating the adapter, passing in the constructors it needs and setting it as the adapter for your RecyclerView.
Although the adapter is connected, there’s one more thing to do to make sure you don’t have an empty screen.
In onStart(), underneath the call to super, add this code:
if (photosList.size == 0) { requestPhoto() }
This adds a check to see if your list is empty, and if yes, it requests a photo.
Next, in receivedNewPhoto(), update the method so it looks like the following:
override fun receivedNewPhoto(newPhoto: Photo) { runOnUiThread { photosList.add(newPhoto) adapter.notifyItemInserted(photosList.size) } }
Here you are informing the recycler adapter that an item was added after the list of photos was updated.
Now you’re ready to commence the ignition sequence, er…I mean run the app.
Run the app, load up the emulator and before long, Galacticon should look something like this:
That’s not all. Tap on the photo, and you should be greeted with a new activity that brings that item into focus:
But that’s still not all! Try rotating your device or emulator (function + control + F11/F12) and you’ll see the image in full screen glory!
Depending on the size of the image and your device screen it may look a little distorted, but don’t worry about that.
Congratulations! You have a working RecyclerView and can take your journey amongst the stars.
Taking A Spacewalk: Adding Scrolling support
If you head back to MainActivity on your device and try to scroll down, you’ll notice something is amiss — your RecyclerView isn’t retrieving any new photos.
Your RecyclerView is doing exactly as it’s told by showing the contents of photosList. The problem is that the app will only retrieve one photo when you load the app. It has no idea when or how to grab more photos.
So next, you’ll retrieve the number of the photos and the last visible photo index while scrolling. Then you’ll check to see if the last photo is visible and if there are no photos already on request. If these are both true, then your app goes and downloads more pretty photos!
This patch will require a spacewalk, so break out your spacesuit and get ready for a zero gravity experience.
In MainActivity.kt, add this property with custom accessor below to MainActivity:
private val lastVisibleItemPosition: Int get() = linearLayoutManager.findLastVisibleItemPosition()
This uses your RecyclerView’s LinearLayoutManager to get the index of the last visible item on the screen.
Next, you add a method that inserts an onScrollListener to your RecyclerView, so it can get a callback when the user scrolls:
private fun setRecyclerViewScrollListener() { recyclerView.addOnScrollListener(object : RecyclerView.OnScrollListener() { override fun onScrollStateChanged(recyclerView: RecyclerView?, newState: Int) { super.onScrollStateChanged(recyclerView, newState) val totalItemCount = recyclerView!!.layoutManager.itemCount if (!imageRequester.isLoadingData && totalItemCount == lastVisibleItemPosition + 1) { requestPhoto() } } }) }
This function gives the RecyclerView a scroll listener that is triggered by scrolling. During scrolling, the listener retrieves the count of the items in its LayoutManager and calculates the last visible photo index. Once done, it compares these numbers (incrementing the index by 1 because the index begins at 0 while the count begins at 1). If they match and there are no photos already on request, then you request a new photo.
Finally, hook everything to the RecyclerView by calling this method from onCreate, just beneath where you set your RecyclerView Adapter:
setRecyclerViewScrollListener()
Hop back in the ship (build and run the app again). Scroll down and you should see quite an improvement!
Excellent work, your RecyclerView now updates to show the latest photo requested by your app. The great thing is that receivedNewPhoto() handles most of the work because you told it to notify your adapter about new items.
That earns an intergalactic thumbs up for upcycling code!
Layout Changes
Now that your RecyclerView is up and running, it’s time to trick out your spaceship.
Wouldn’t it be cool if your RecyclerView could change its layout? Good news: RecyclerView’s item positioning is separated into a layout manager.
Add a property for a GridLayoutManager to the top of MainActivity.kt:
private lateinit var gridLayoutManager: GridLayoutManager
Note that GridLayoutManager is a built-in layout manager, but it could just as easily be custom.
In onCreate(), initialize the LayoutManager below the existing Linear Layout Manager:
gridLayoutManager = GridLayoutManager(this, 2)
Just like you did with the previous LayoutManager, you pass in the context the manager will appear in, but unlike the former, it takes an integer parameter. In this case, you’re setting the number of columns the grid will have.
Add this method to MainActivity:
private fun changeLayoutManager() { if (recyclerView.layoutManager == linearLayoutManager) { //1 recyclerView.layoutManager = gridLayoutManager //2 if (photosList.size == 1) { requestPhoto() } } else { //3 recyclerView.layoutManager = linearLayoutManager } }
This code checks to see what LayoutManager your RecyclerView is using, and then:
If it’s using the LinearLayoutManager, it swaps in the GridLayoutManager
It requests a new photo if your grid layout only has one photo to show
If it’s using the GridLayoutManager, it swaps in the LinearLayoutManager
Next, you need to make some changes to lastVisibleItemPosition to help it handle the new LayoutManager. Make it look like the following:
private val lastVisibleItemPosition: Int get() = if (recyclerView.layoutManager == linearLayoutManager) { linearLayoutManager.findLastVisibleItemPosition() } else { gridLayoutManager.findLastVisibleItemPosition() }
Here you ask the RecyclerView to tell you what its LayoutManager is, then you ask that LayoutManager to tell you the position of the last visible item.
To use the grid layout, make use of the Options menu button that is already available in the app. Add the following code underneath onStart():
override fun onOptionsItemSelected(item: MenuItem): Boolean { if (item.itemId == R.id.action_change_recycler_manager) { changeLayoutManager() return true } return super.onOptionsItemSelected(item) }
This checks the ID of the item tapped in the menu, then works out what to do about it. In this case, there should only be one ID that will match up, effectively telling the app to go away and rearrange the RecyclerView’s LayoutManager.
And just like that, you’re ready to go! Load up the app and tap the button at the top right of the screen, and you’ll begin to see the stars shift:
Star Killer
Sometimes you’ll see things you just don’t like the look of, perhaps a galaxy far, far away that has fallen to the dark side or a planet that is prime for destruction. How could you go about killing it with a swipe?
Luckily, Android engineers have provided a useful class named ItemTouchHelper that gives you easy swipe behavior. Creating and attaching this to a RecyclerView requires just a few lines of code.
In MainActivity.kt, underneath setRecyclerViewScrollListener() add the following method:
private fun setRecyclerViewItemTouchListener() { //1 val itemTouchCallback = object : ItemTouchHelper.SimpleCallback(0, ItemTouchHelper.LEFT or ItemTouchHelper.RIGHT) { override fun onMove(recyclerView: RecyclerView, viewHolder: RecyclerView.ViewHolder, viewHolder1: RecyclerView.ViewHolder): Boolean { //2 return false } override fun onSwiped(viewHolder: RecyclerView.ViewHolder, swipeDir: Int) { //3 val position = viewHolder.adapterPosition photosList.removeAt(position) recyclerView.adapter.notifyItemRemoved(position) } } //4 val itemTouchHelper = ItemTouchHelper(itemTouchCallback) itemTouchHelper.attachToRecyclerView(recyclerView) }
Let’s go through this step by step:
You create the callback and tell it what events to listen for. It takes two parameters, one for drag directions and one for swipe directions, but you’re only interested in swipe, so you pass 0 to inform the callback not to respond to drag events.
You return false in onMove because you don’t want to perform any special behavior here.
onSwiped is called when you swipe an item in the direction specified in the ItemTouchHelper. Here, you request the viewHolder parameter passed for the position of the item view, then you remove that item from your list of photos. Finally, you inform the RecyclerView adapter that an item has been removed at a specific position.
You initialize the ItemTouchHelper with the callback behavior you defined, and then attach it to the RecyclerView.
Add the method to the activity’s onCreate(), underneath setRecyclerViewScrollListener():
setRecyclerViewItemTouchListener()
This will attach the ItemTouchListener to the RecyclerView using the code you just wrote.
Run the app once more and swipe across one of your items, you should see it begin to move. If you swipe the item far enough, you should see it animate and vanish. If other items are visible, then they will reorganize themselves to cover the hole. How cool is that?
Where To Go From Here?
Nice job! You’ve been on quite an adventure, but now it’s time to head back to Earth and think about what you’ve learned.
You’ve created a RecyclerView and all the components it needs, such as a LayoutManager, an Adapter and a ViewHolder.
You’ve updated and removed items from an Adapter.
You’ve added some cool features like changing layouts and adding swipe functionality.
Above all, you’ve experienced how separation of components — a key attribute of RecyclerViews — provides so much functionality with such ease. If you want your collections to be flexible and provide some excitement, then look no further than the all-powerful RecyclerView.
The final project for this tutorial is available here.
If you want to learn more about RecyclerViews then check out the Android documentation to see what it can do. Take a look at the support library for RecyclerViews to learn how to use it on older devices. If you want to make them fit with the material design spec then check out the list component design specification.
Join us in the forums to discuss this tutorial and your findings as you work with RecylerViews!
Until next time, space traveler!
The post Android RecyclerView Tutorial with Kotlin appeared first on Ray Wenderlich.
Android RecyclerView Tutorial with Kotlin published first on http://ift.tt/2fA8nUr
0 notes