#i made my Firefox browser on my computer tell everyone that i am using Microsoft Edge
Text
How to center and nice-size an image in an AO3 fic using a work skin
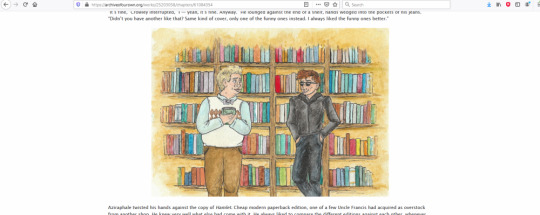
Maybe someone can use this? In my fic for the DIWS Good Omens Mini Bang, I embedded some images from my wonderful illustrator. The centered images will never be wider than the text, no matter the screen size, but they also are never stretched larger than their native size (I resized ‘em to 800px wide in my trusty paint program for faster downloading). Here’s how one looks on my giant monitor and on my phone screen:

If you have never done AO3 skins before then I promise they are not actually scary! You have the option of doing relatively complicated things with them, but this thing is simple.
Anyway this is how I center my images.
Step one: make a skin.
In your AO3 dashboard, click “Skins” in the menu (left or top of page, depending on if you’re on a big or small screen). This takes you to the Site Skins page, which are for if you want to make all of AO3 look different to just you. You want a Work Skin, though, which makes your fic look different to everyone, so click My Work Skins.

Click Create Work Skin in the top right and you’ll get an editor that’s similar to when you’re posting a fic! You only need to set two things. One, give it a title that makes sense to you (the title won’t be visible to people reading your fic). Two, paste some stuff into the big “CSS” box.
This is the stuff to paste:
.centered {
margin-left: auto;
margin-right: auto;
text-align: center;
}
.centered img {
max-width: 100% !important;
}
That was the stuff to paste! Just toss both of those two blobs in the big editor and click Submit. Now you have a skin!
Step two: use the skin in your work.
Open up the work you want to do this in. Find the Select Work Skin box (just under the Choose A Language box) and select the skin you just made. Yay! Sorry, the Homestuck and Undertale ones are just there for everyone and that’s how it is. (Nothing against Homestuck or Undertale. I just don’t like unneeded entries in lists.)
Step three: center your image.
This is the most complicated bit, only because I can’t give you an exact thing to copy-paste. But I can give you a basic template! Don’t try to paste this into Word or a similar word processing program. The quote marks could get turned into “smart quotes” (like the ones I typed there, just now -- see how the opening and closing quotes are different from each other?). If you need to save it off for later, Notepad or another very simple plain-text editor will be perfect, because it will keep the quotes as not smart quotes.
Find the spot in your AO3 work where you want the centered image to be. It would be between two blocks of text which are wrapped with <p> tags, so something like this...
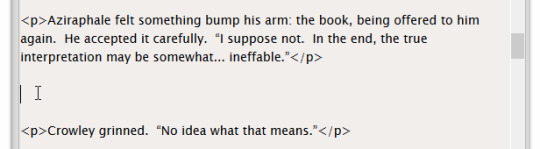
Into that space, you’re gonna hit Enter a couple of times (which I’ve already done in the screenshot) and then paste this block:
<p class="centered">
<img src="BANANA" alt="ORANGE" />
</p>
That was the block to paste. Before you’re done, you need to change two things!
BANANA goes away. Inside the quote marks where BANANA used to be, you need to put the URL of your image. This URL must start with http or https (preferably https), or else it won’t work. I can’t give specific instructions on how to get this, because it depends on where the image is hosted! If it’s only on your computer, or attached to an email, it can’t be embedded. It has to have been put somewhere on the web, like Flickr, Photobucket, or Google Drive. It will work to embed from Tumblr, but I don’t trust Tumblr not to change everything up and bork all the old image URLs, thus breaking your embedded images on an arbitrary date in the future. (Any image host could theoretically do this, but -- well. We’re all familiar with Tumblr, right?)
ORANGE also goes away. Inside the quote marks where ORANGE used to be, you optionally can (I recommend you do!) put a brief (200 characters or fewer) description of the image. This is text which is invisible when viewing your fic in a normal browser -- it’s there for screen reader technologies, used by people who are blind or otherwise have trouble seeing a screen. Their screen reader software will literally read out to them, so that they can hear it with their human ears, the description you put here. Don’t start it with “image of” or “picture of”, because the screen reader tells the human that it’s an image already. Here is a pretty user-friendly guide on how to write alt text! If you’re more technically-inclined, the W3C has more involved docs. Remember, the screen reader is going to say out loud whatever you put here, so don’t make it super long, or else you’ll force people who are using screen readers to wait through the long description for your story to continue.
A finished version of the banana/orange block might look like this:
<p class="centered">
<img src="https://www.my-nifty-example-website.com/prettypicture.jpg" alt="Two dogs having a tea party wearing fancy hats" />
</p>
Step four: do it again if needed.
If you have more images to center in the same work, just repeat step 3 for each! Step 2 has to be done once per work. Step 1 might be done once ever (and then you just keep pulling that same skin into many works), or you might do it multiple times (if you want other changes in the skin that are special to only this one work). I do a different skin every time I have a fic that needs a skin, but that’s because I do extra fancy things that are different for each fic.
You never have to do either step 1 or step 2 more than once per work, even if it’s multi-chapter. In future chapters of the same fic, just do step 3 again.
Step five: preview and/or temporary draft is your friend
I am an IT professional with a (technically expired but work with me here) Microsoft certification in HTML5/CSS and seven years of writing this stuff for pay under my belt. Even I don’t post without previewing. Preview and saving as a draft without publishing are both your friends.
Some fun(?) notes
What you are doing here is using cascading style sheets. The AO3 skin is a very simple stylesheet, which is a series of rules that your readers’ browsers will use to apply to text in your story. There are standards that all your normal sort of browsers (Firefox, Chrome, Safari, Edge, Opera...) are supposed to follow when they see these rules, so that no matter which browser someone uses, a webpage will look as similar as possible.
A skin created from the above steps defines a class named “centered” and tells the browser how “centered” should look. Then, in your fic, if you apply the class named “centered” to something in the big editor -- like, say, the <p>aragraph tag that wraps around your image -- then the style from your skin will be applied.
The magic of cascading style sheets is that you can define your class exactly once and then use it many times. If you decide you want to change all the places you used it -- maybe you want every centered image in your 87-chapters-long heavily-illustrated fic to have a green border? -- you have to change exactly one place: your skin. The change will bubble down to every single place you used it.
Skins do not allow all the features of true CSS (no media queries; I am sad), and you can’t put comments in your skin (the editor strips them out). Browser-specific overrides also do not work (if you don’t know what this means, that’s okay, you have to go to extra work to try to use them in the first place). But they’re still pretty cool.
A lot of people will just put <center> tags around their thing, and use width=“100%” or some other number, but that is technically not standard HTML, hasn’t been for a very long time, and sooner or later Chrome is going to get clever and stop respecting it. (Google’s developers like to make Chrome very clever and change how it does things just because they feel like it. It makes my day job rather more difficult. Ask me about SameSite cookies!! Actually, don’t. Never ask me about that thing.)
For portrait-oriented illustrations -- taller than they are wide -- I like to float the image to the right of the text and have it take up no more than 50% of the width of the screen (as seen near the end of this chapter). But that is a more complicated thing than this one, and I am keeping it simple today. Maybe I’ll show how to do the nice floaty at some point.
For any-oriented illustrations, you could have a small resized version which links out to a larger version as a click-to-zoom thing. That is also a little more complicated, so it isn’t in this post.
Questions and clarifications welcome.
That is how to center and nice-size an image in an AO3 fic using a work skin! I hope you are having a good day.
#ineffablefool original post#man idk how i would even tag this thing#i'll worry about that later#not good omens#look you don't understand i love html and css this is fun for me#i don't get to do it very often at my job since they promoted me so i hafta get my kicks where i can
42 notes
·
View notes
Last Seen Blogs


teenidolchris
Chris Coley

time-traveling-speedster
Catching up on Superman and Lois

behindstars
behind stars

crgins-blog
The Orginal Paladins