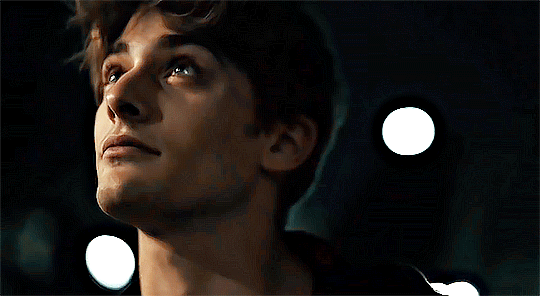
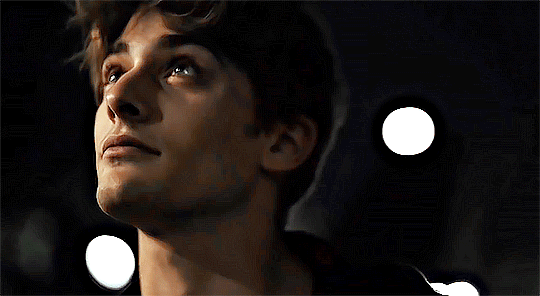
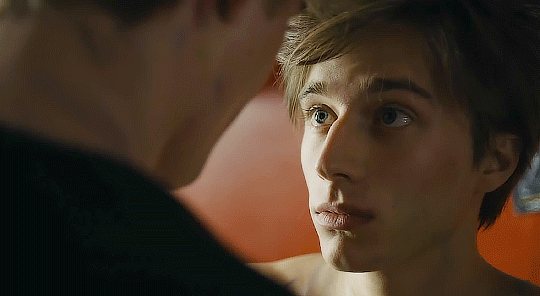
#i’m not sure why the coloring gets weird on my gifs after i export them
Text


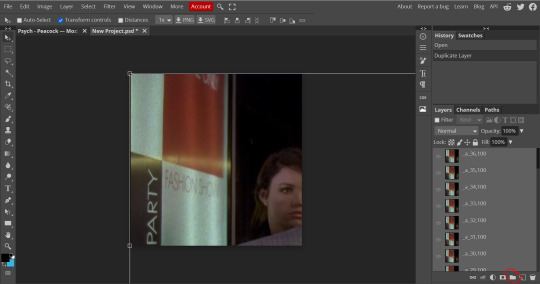
#nct#nct 127#johnny#johnny suh#kpopccc#awekslook#aleksbestie#jadeblr#userbexrex#foraddy#userresa#ninqztual#useroro#userjsuh#gifs#rhi’s creations#i’m not sure why the coloring gets weird on my gifs after i export them#so i hope these look ok#i literally dk what to do abt it#100 notes
295 notes
·
View notes
Text
🌻 a gif tutorial by: me! 🌻
i know there are so so many WONDERFUL tutorials out there, but i can’t say no to a very kind anon so!!! here we go. hopefully this is helpful for someone out there! if anyone doesn’t do well with picture tutorials and would find it more helpful for me to do a video, i would also be happy to try that too!!
this is definitely not the fastest way to do it, i’m sure, just the way i’ve always done it and i’m bad at learning new things so ldkjfoiw also i’m using photoshop cc 2021 (tho this method should work for any version of photoshop i think) and i use video frames to layers to gif just as an fyi
step 1: get whatever media you’re giffing! i use torrents and direct downloads. that’s how i’ve always giffed, i’ve never tried capping so i can’t help with that. sorry!
step 2: make clips of the scenes your fc is in! i have a folder dedicated to the character the fc is playing and keep all my clips in there. when i do movies, i typically only do about 12 clips at a time because it just feels less overwhelming for me. when i do a show, i only clip one episode at a time for the same reason. i use quicktime to clip, but i know some people use VLC and i’m sure there are other options out there to try, too! again, this is just what i’ve always used so i’m comfortable with it and know how it works.
when i clip, i try to start the clip a few seconds before the scene my subject is in and a few seconds after just to make sure i’m getting every single frame.
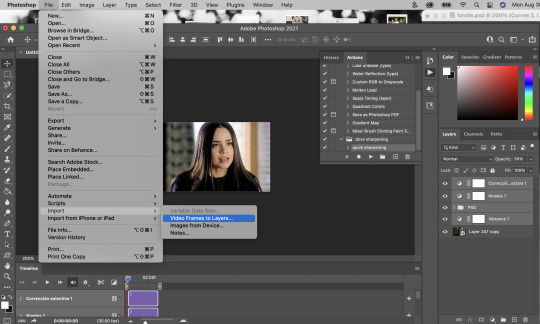
step 3: import video frames to layers! so once you have photoshop open, go to file > import > import video frames to layers
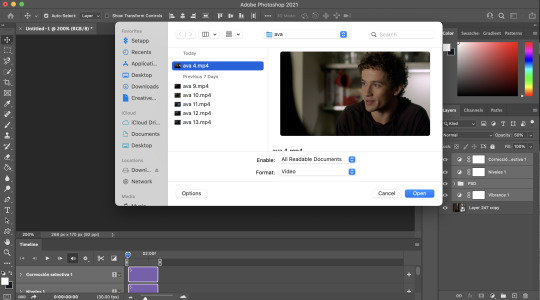
then go to your folder where you have all your clips saved and choose the one you want. i took this one out of my trash because the rest of the gifs i have to do in this episode are in the dark and that was gonna be too annoying to me lkdjfkslofw so i’m just re-making one i already did a few days ago. i’m giffing sofia carson and you can see that my clip starts on someone else’s face so i can make sure i have every frame of hers!
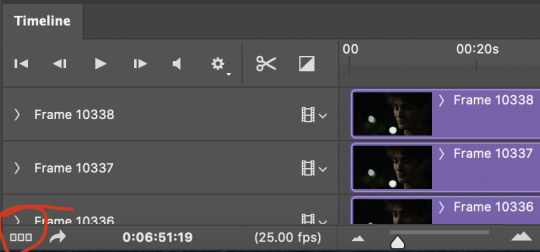
step 4: select the range for your gif! just like with clipping, i try to get a few frames before and a few frames after of the fc i’m working on so that i don’t miss anything. if you aren’t interested in giffing them in every single second (which is totally fine, i know a lot of people prefer not to!) then you don’t need to be as concerned with it

because i’m using a direct download, i’m not going to limit my frames to every 2. it’ll be really fast and choppy. if you screen recorded, i would suggest limited to every 2 frames and then going through and deleting each duplicate frame (when i giffed via screen recording, i found that every 6 frames or so was a duplicate). this will make sure your gif is smooth and exactly the same as one made from a direct download. it IS time consuming though, so i recommend doing a direct download/torrent if possible! if you ever need help finding downloads or need something torrented and converted for you, please feel free to message me and i’ll be happy to help!!
step 5: delete the frames you don’t need! this is the time to delete any extra frames at the beginning, end, and any duplicates
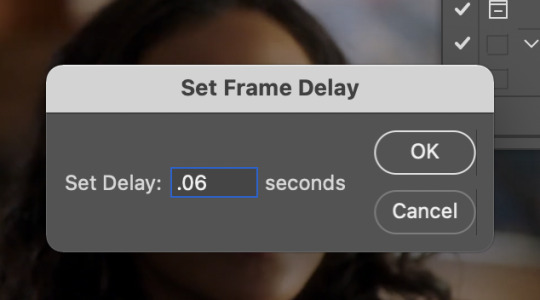
step 6: set your speed! you can do this later if you want, but i like to do it as soon as all my extra frames are deleted. my personal preference is typically .06 seconds for most of my gifs. if they’re on the shorter side (under 35 frames), i’ll do .07-.09. i know some people have very strong feelings on gif speed lskdfjpwe i do not. it’s all about what feels best for you! .06 is where i feel my gifs feel the best, but there are plenty of beautiful gifs that are slower or faster!
step 7: crop it! as you can see above, i set my W x H ratio to 268px x 170px. this is a size i really like, but you can make yours smaller or larger. i do suggest using the W x H ratio setting to set it to your specific pixel measurements because it cuts out having to resize after cropping.
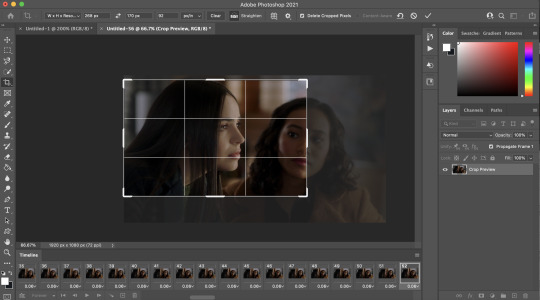
also, i have a few hundred frames in this one particular gif that i’m going to cut down in the next step. however, i know that she remains pretty much in the same place throughout the frames which is why i’m cropping them all at once. if it’s a gif where you get a few hundred frames that you’re going to turn into multiple gifs and the person moves around a lot, definitely only crop one gif at a time!
step 8: delete the frames you aren’t using! everyone has a different way of deciding how many frames their gifs are. for me, if they’re talking, i actually go and watch the segment i’m giffing to see what they’re saying, read their lips as i go through each frame, and crop it there. it’s a little more time consuming i guess but i feel like it gives me the best results. totally optional, though! if the person is NOT talking, then i typically just try to make it between 60-80ish frames and base it on facial expressions or body language. sometimes it’s more, sometimes it’s less! again just comes down to what your preference is.

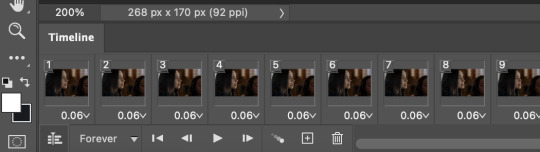
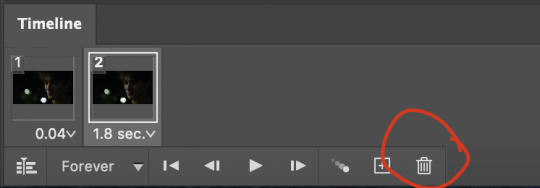
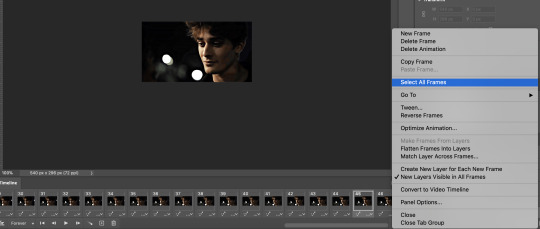
step 9: convert to timeline! basically just press that lil highlighted button down there next to the “forever” and convert to timeline. pretty self explanatory
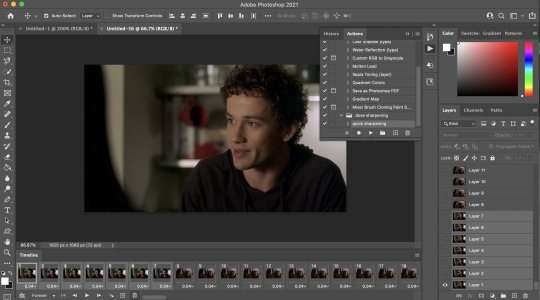
step 10: sharpening! this is where i use my sharpening action which is linked right here. i’ve been using it for a while now and i really love it! i’ve tried other sharpening actions since i made it and they just don’t make me as happy as this one lol
hit play on your action:
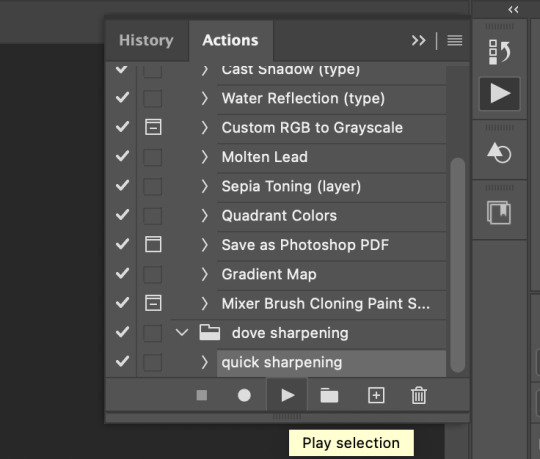
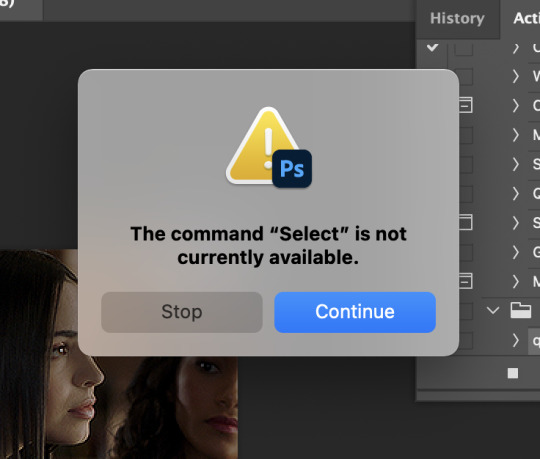
for my action, i get this popup twice and just hit “continue” and it keeps going through the steps with no problem
step 11: COLORING!!! get your psd and slap it on! i have different one base psd that i use for almost everything and will edit it to fit whatever scene/show/movie i’m working on. i’ll also save different versions of it based on the media i’m giffing. for example, the lighting on liv & maddie is SUUUUUPER different from the writing on pll: the perfectionists. so i have a “liv” psd and a “loralie” (name of my char that i use sofia for, idk why i named the first psd after liv and not my char but whatever ldkfjsoi) psd. same base, same layers, just different levels. i also will often combine psds! i’ll put my base down and then add layers from other psds or create new ones to fit whatever scene i have going!
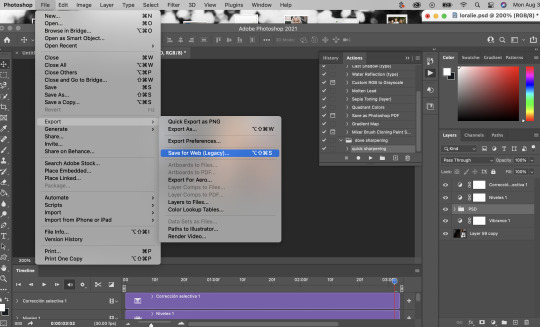
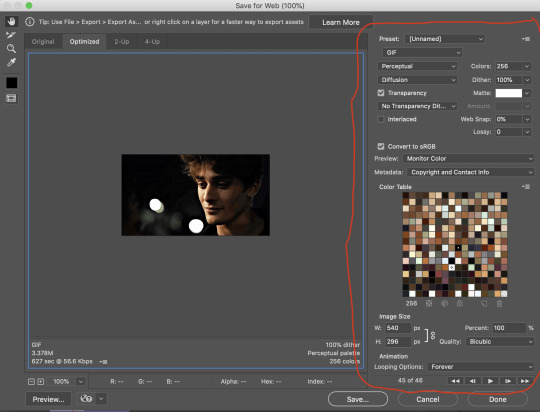
step 12: save your gif! go to file > export > save for web (legacy)...
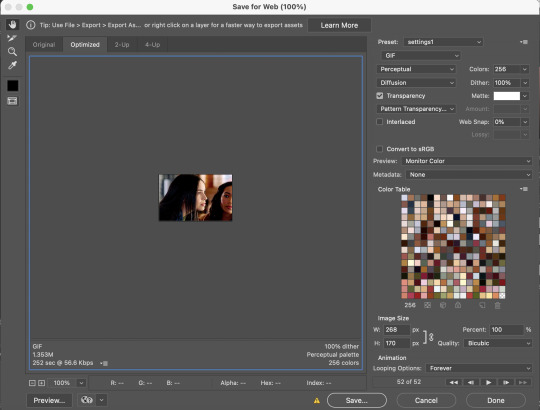
people use different settings for saving their gifs, too. these are my personal settings. i really like them and feel they work for my gifs. feel free to copy them or play around with your own settings! just make sure it’s always on the 256 colors
step 13 (optional): preview! i like to hit the preview button just to make sure i like my gif before i save it. if i don’t like it (coloring looks off, too fast/too slow, feels like it cuts off in a weird place) i’ll hit cancel and undo everything until i’m back to wherever i need to fix it.
step 14: save your gif, yay!! YOU DID IT!!!! save that beautiful gif and feel so proud of yourself!!

step 15 (optional): if you’re making multiple gifs from the segment you imported, go back and cntrl/cmmnd + z everything until you’re back to having allllll the frames again. delete the frames of the gif you just made (in this case, it would be 52) and start again from step 8!
i hope this made sense and was helpful for anyone! please let me know if there’s anything you need clarification on!!
35 notes
·
View notes
Text
MY GIF-MAKING TUTORIAL
for @sunshinesquash
i use photopea.com for making gifs so if you have photoshop i’m not sure how much different these tools will be, but i hope this can help!! i also have a windows computer so if you have a mac my recording technique might not work :’( all the tools i use are pretty simple and basic so if you can’t afford to download a lot of software dont worry!
recording:
when you’re finding videos to use for gifs, you want to use the highest quality footage u can find! you normally always want to use 1080p, but if you can only find 720p then make sure its not too grainy!
for the actual recording, i use the (windows + g) shortcut. once you click that this should pop up!

if this is your first time opening the game bar, it might just show only the top bar - if that happens, click on the second icon! when the capture sidebar shows up click on the third icon and the recording will begin :] make sure that your recording is 4-5 seconds max, otherwise it will be too big for photopea to handle and there will be too many frames!
opening the recording:
all your recordings from the windows game bar will automatically show up in videos > captures.
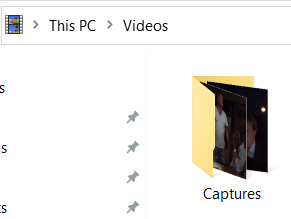
open photopea, and then click file > open and locate your recording!
when it’s opened photopea should look like this:

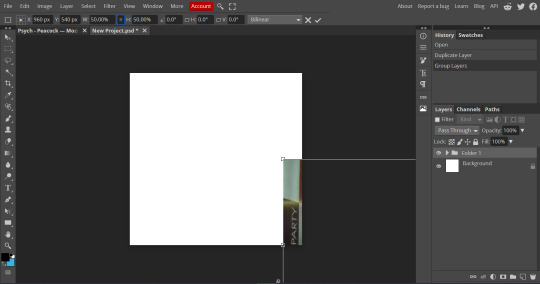
this image size is 1920 x 1080 which is way too big for photopea to load your final gif and for tumblr to accept! because of this you’ll click file > new and get to a pop-up that looks like this:

the size that i normally make my gifs is 540 x 540 which is what i’m going to use for this tutorial! you can always go for other dimensions - whatever you’re comfortable with :]. click create!
ok now comes the complicated part :
select all of the frames that you’re going to work with until they become highlighted grey. make sure the folder is not selected!

right click on the highlighted area so an options bar pops up!
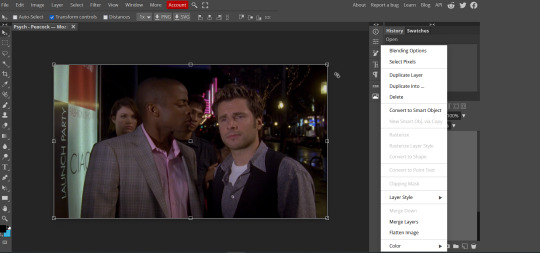
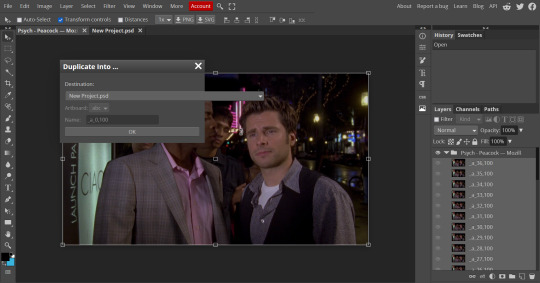
click on ‘duplicate into...’ and select the drop down menu and click on ‘new project.psd’. there will be a ‘new project’ and a ‘new project.psd’ option - ‘new project.psd is the one you want to click on! ‘new project.psd’ is the 540x540 project that you created.
next, click on the tab that says ‘New Project.psd’ and it should show you something like this:
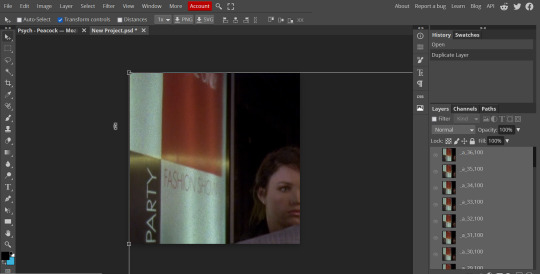
the frames are really zoomed in because of the different dimensions, so we’re going to fix that! make sure all of your frames are still highlighted and then click on the little folder button that i circled:
now all of your frames are going to be under a single folder. make sure ‘transform controls’ on the top menu is selected! now single click on the edge of the selected frames:

now a new menu is going to show up where it used to say ‘transform controls’ was! make sure the little hamburger button in between the dimensions is selected.

replace the 100% with 50% and now your dimensions will look like this!
now just drag that box of frames onto the white area! (make sure only the folder is selected on the side bar):

sharpening + color:
now you’re going to open that folder and then select all your frames again (make sure the folder is not highlighted):

now click filter > noise > and type in 1%.

im adding noise here because it helps smooth out the gif and makes sure there arent any wavy/grainy lines!
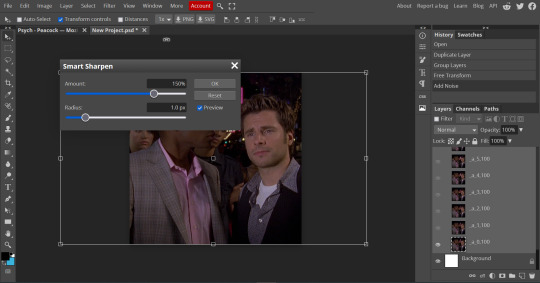
after you click ‘ok’ then click filter > sharpen > smart sharpen. you don’t have to change any settings here! just click ‘ok’ with the default settings.
now your base gif is ready for coloring!
all your coloring tools will be under layer > new adjustment layer.
always remember that whatever settings/coloring that i use may be different from the way you want to do it! gif-making always starts with exploring and experimenting with your style :]
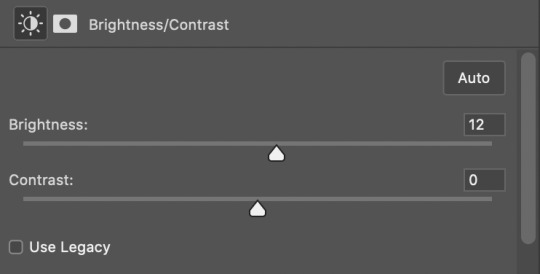
the first type of adjustment layers that i always start with are the ones that deal with adjusting brightness! depending on how dark your gif is you will either want to start with ‘brightness/contrast’ or ‘levels’. (you can also use curves but levels are easier to control for me.)
if you have a super dark gif, you’re going to want to start with ‘brightness/contrast’. no actual adjustments will be made to this layer but you’re going to make its type ‘screen.’

BE CAREFUL WITH THIS LAYER! doing ‘screen’ with brightness/contrast will often whitewash characters of color so for this gif we’re going to just use ‘levels’! (there are ways to get the original skin tone back when using this layer, so if it’s completely necessary depending on the scene, you’re going to have to work a lot with coloring adjustment layers to make sure not to oversaturate or whiten when doing this. you’ll get there with practice, but for this tutorial we’re going to work with safe adjustments!)
if the gif becomes too bright because of ‘screen’ in brightness/contrast you can adjust the opacity!
whenever you use brightness/contrast you’re also going to use a levels layer because just this layer can remove a lot of the depth
now let’s open the levels layer!
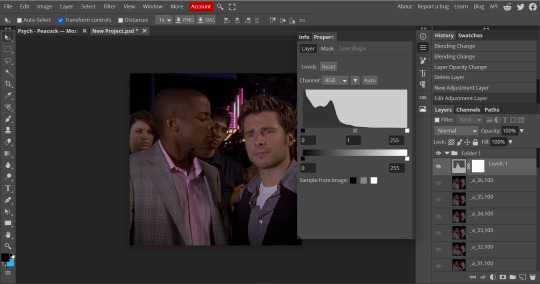
you’ll see the three squares that you can adjust - the black is shadows, the grey is mid-tones, and the white is highlights. when working with characters of color don’t brighten the mid-tones, this will also whitewash them! dragging the squares to the left will brighten, and to the right will darken. each scene will require different adjustments so explore and figure out what’s right! make sure when brightening, that you remember to give it enough depth.

now the gif has proper lighting!
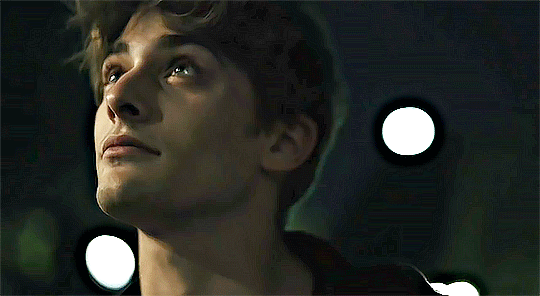
after your brightening layers, you’re going to look at the scene and check whether you need a photo filter layer! if your scene has a strange filter - for example, cw shows often use a weird dark yellow filter: this is where a photo filter comes in.
for this tutorial im going to show how to use the photo filter! shawn’s face has a yellow tint so we’re going to try this out. (there are ways to get rid of the yellow in selective color, but for this tutorial we’re going to start with photo filter.)
photopea automatically provides a yellow color photo filter which is not what we want for this scene! (if you have an especially blue scene this might help though!)

click on the orange square and drag the color picker to the opposite color of the one you’re trying to get rid. we’re getting rid of yellow, so we’ll select blue.
now, we’re going to adjust the density so it doesn’t look so blue. now it looks perfect!

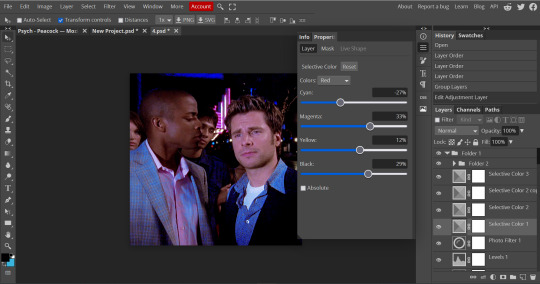
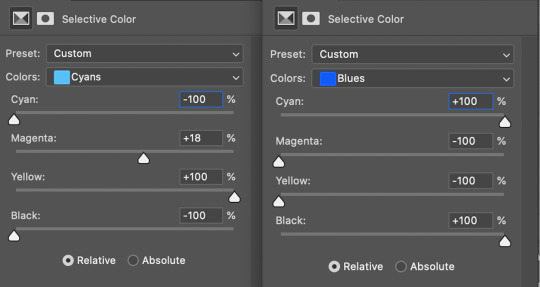
now we’re going to go to my favorite tool: selective color :]
you can see hints of blue, and pink in the scene already - so we’re going to really bring those out!!

click on the drop down that will bring up a list of colors! we’re going to especially go for cyan and blue. when i really need to bring out blue, i drag the cyan fully over to 100% and the yellow to -100%

if you look at the gif now, you can see that the blue is starting to come out! duplicate that selective colors layer until the blue becomes saturated enough, but not grainy. i duplicated mine’s three times for this gif!

now that you see how to manipulate the colors with selective colors, experiment and see what you can do! i felt like the skin tones were too pale so i messed with the reds :] you may think differently, that’s why coloring is subjective not objective!
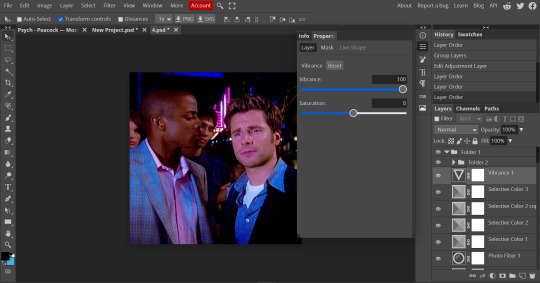
one of my other favorite tools to use is the vibrance tool! make sure not too saturate your colors too much so be careful with this layer!
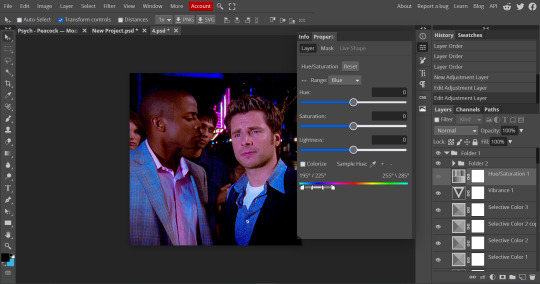
another really fun tool to use is the hue/saturation tool! if you have a very prominent stable color that isnt too grainy, you can manipulate it to another totally different color! this gif may not do too well, since the blue isn’t completely solid, but we can still test it out!
click on the drop down to the color you want to manipulate and have fun with it! i could make the blue a little cyan here without making it too grainy so this is what we ended up with :]

this is going to be the end of the tutorial for now but always feel free to ask me if you need some more advice. if some of it was confusing dm me or i can always make a video of my process!
[VERY IMPORTANT: REMEMBER that photopea.com is a website so it’s always prone to crashing. always ALWAYS save your psd’s after you’re done editing. a psd will save all your coloring and frames! go to file > save as psd. to export your frames as a gif go to file > export as > gif > save! if photopea starts lagging, it might be the time to open it in another tab and start making your other gifs there.]
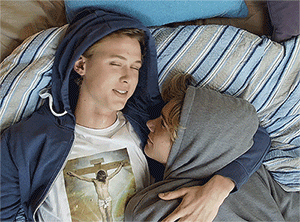
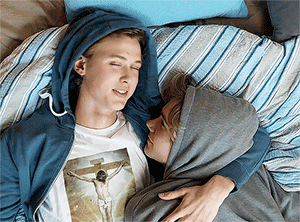
this is our before and after coloring!:

#husband.message#*mystuff#gif tutorial.#i hope this could help a little bit!!!!#ok for anyone to rb!!!
21 notes
·
View notes
Photo
so here’s my disclaimer: I hardly know what I'm doing. This is my glued together homemade giffing method that I’ve created over months of just random experimentation and bits and pieces from all kinds of tutorials. there are probably better or more correct ways to do a lot of these things! this also isn’t a completely universal tutorial, some of the specifics are geared towards giffing skam, specifically skam france.
I gif in photoshop cc 2020 on a macbook. Some things like keyboard shortcuts and little things about the photoshop interface will probably vary if you are on a pc/ other version of photoshop!
this is very long and very unprofessional, but I hope there is something in here that someone will find helpful!
we’ll be going from this:
to this:

up to date as of October 25, 2020
downloading clips
selecting what part you’re going to gif
cropping
my action for resizing, converting to a smart object, and sharpening
coloring
exporting and setting the delay
tldr tips
1. downloading clips
4k video downloader (which you can get for mac or pc here) is great for things posted to youtube, especially from skam france because all the clips are on their youtube with no weird geoblocks or anything! it’s really easy, you just have to open the clip in youtube, copy the link, and go into the program and hit paste link. I like to put on smart mode first and set the destination folder so all my clips go into the place I want.
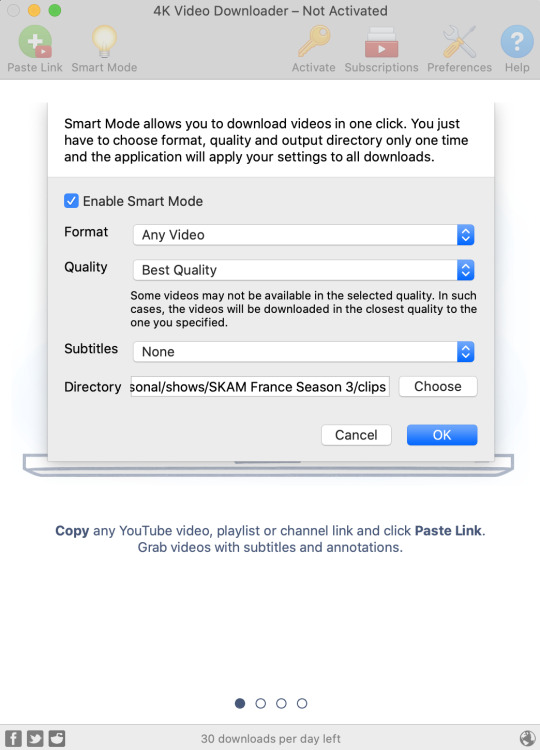
There is a 30 video per day download limit, so if you’re thinking you really want to gif lots of stuff from the show, and want a big chunk or a full season it’s definitely worth hunting for a mega or google drive with full episodes to download because it’s just less hassle! I might come back to this post later and compile a list of all of those, but for now if you type “[remake] no subs google drive” or “[remake] no subs mega” into a google search, you’ll probably find something! the all of skam website has no subs for several remakes, but not all!
If you don’t have enough space on your computer to be keeping full seasons, I know there are methods to get screencaps without having to download (generally for giffing movies and regular tv I think this is a common method), but I’ve never done it so I’ll redirect you to this tutorial that explains it! you should probably just go there for the whole thing tbh it’s much more coherent than this, but I digress.
2. selecting the piece of the video you want to gif
now that you’ve got your episode or clip you’ll want to just open it in photoshop! if you go the screen capping route the way to do that is a bit wonky, so you can keep following the tutorial I linked above and join back in here at coloring if you like!
if the timeline at the bottom doesn’t pop up automatically you can go to window > timeline and turn it on! now you can use the scrubber bar thing to find the moment you want to gif!
The advantage of this over screen capping is you can scrub with more precision. the arrows circled in blue below let you jump only one frame, where in screen capping I'm pretty sure you can only go by ten second or one minute intervals.
I usually drag the scrubber as close as I can to the start of the shot/moment I want to use, fiddle with the arrows circled in blue below to jump forward or back one frame at a time until I'm at the first frame I want. I move the left grey handle to the scrubber and then I hit the play button and let the whole shot/moment play. Pause and repeat the shuffling with the arrows until you’ve landed on the last frame you want to use and move the other grey handle.
the moment you want to use should be between your handles (it’ll look like what I have circled in red), and if you hit play, you should see the thing you want to gif playing on loop above the timeline. the speed will probably be weird, but we’ll deal with that at the end.

now I recommend doing command or control + s to save your gif as a psd (photoshop document). this is a working, editable file which means if photoshop crashes you can open your file right back up and keep working as long as you’re hitting command or control + s at regular intervals as you work. later we’ll go through exporting in gif format that can actually be uploaded to tumblr.
3. cropping
next I crop out any logos or black space at the top and bottom. Just click on the crop tool on the lefthand side of the screen, drag the edges and hit enter when you’re done. you can of course crop out more than just that, but regardless of what you crop out, now is the time to do it.
you can set an aspect ratio for your crop at the top of the screen if you’d like to be positive that all the gifs in your set will be the same:

4. my trusty action: resizing, converting to a smart object, and sharpening with one click
Now is when I use an action I made that does all the resizing, converts to a smart object, and sharpens. I’ll take you through the steps so you can conceptually get what’s going on, but I highly recommend using the actions window to record your process as you follow along so you have this action as well. It easily shaves at least 5-10 minutes off of the whole process, and these steps will be the same every time.
here’s how you make an action: go to window > action and open the action panel. click the plus symbol to start recording a new action:
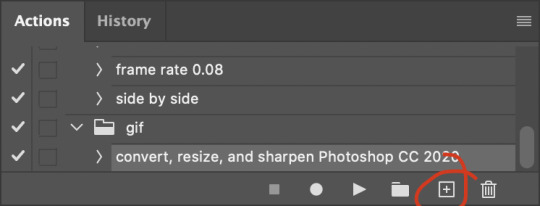
in the window that pops up, give it a name and hit record:

now just continue with the steps below, and it will save them!
first you flatten frames to clips (I think it says flatten to layers on older versions of photoshop). this is in the menu at the top right corner of your timeline:
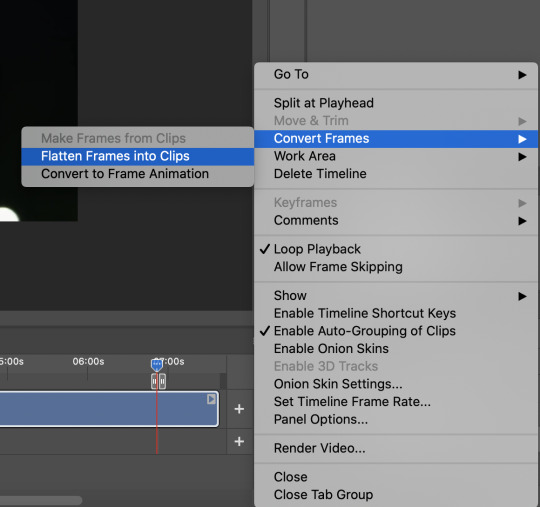
next you convert to frame animation by clicking on the symbol in the bottom left, circled in red:
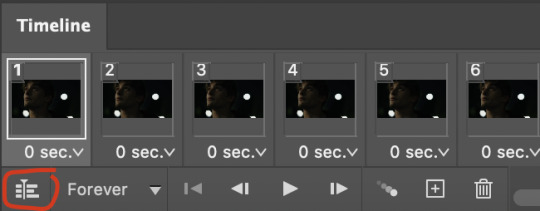
if there is more than one thing in the frame animation, delete the extra one. you don’t need to keep the last one but it won’t let you remove it until there are other frames in there. also go into your layers and delete video group 1 and its contents. don’t ask me why these steps are necessary, I don’t really know, but I’ve noticed it sometimes gets wonky if you don’t do this:

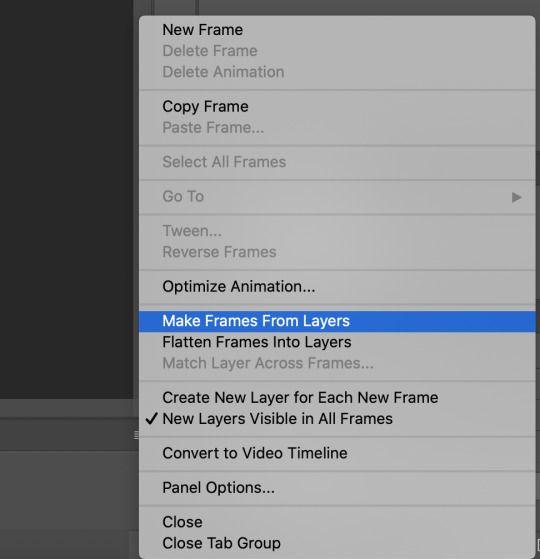
now you want to make frames from layers and delete that first frame that was there before:
then we return to the timeline:
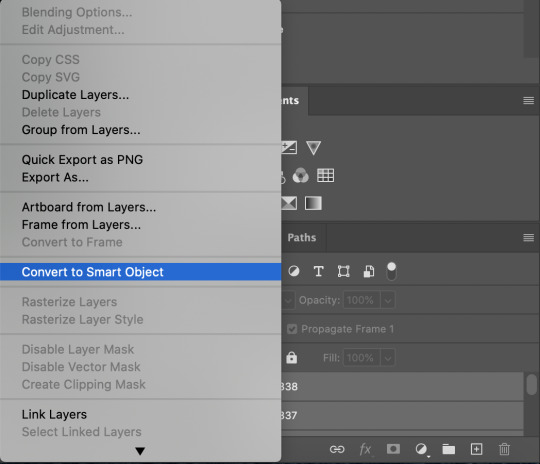
use command + option + a (control + alt + a for pc I'm pretty sure) to select all layers and then right click within your layers window and select convert to smart object. It’s important to convert to smart object after you go back to the timeline, or the gif won’t move:
next I resize. gifs for tumblr should be 540 pixels wide. for recording your action you should just go into image > image size and only change the width to 540 in case you ever have gifs cropped to different aspect ratios. don’t touch the height, let constrain proportions figure it out!

now, here’s what our base gif looks like, no sharpening, no coloring:
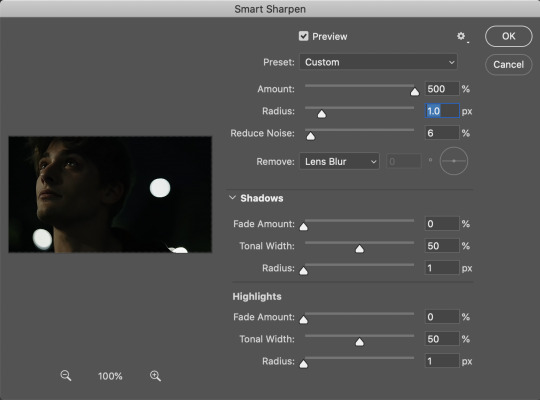
now to sharpen. go to filter > sharpen > smart sharpen. this is up to personal preference, but my go to settings are:
this is what we have after sharpening:

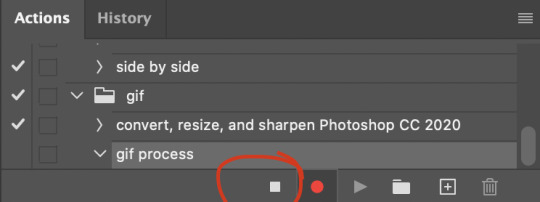
now is when you can stop recording your action.
just press the stop button in the action window:
this action is pretty much universal and after I select the moment the gif will be and crop however I want, I use it on every gif I make! so although this initial setup is tedious, now you’ll never have to do these steps again, and the process is magically much quicker.
5. it’s time to jump into coloring!
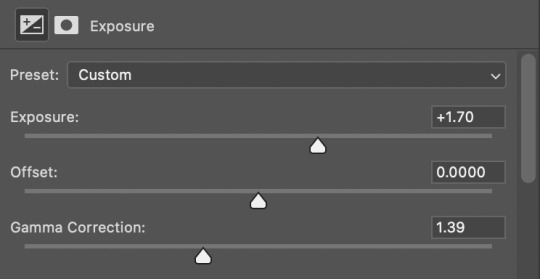
I typically start with exposure and sometimes some brightness/contrast. with really dark gifs like this, you kind of have to make it worse before you make it better. I did this:
now the gif looks like this:
we have some static and some ugly bits, and this is where selective color comes in to fix it! boost blacks like this:
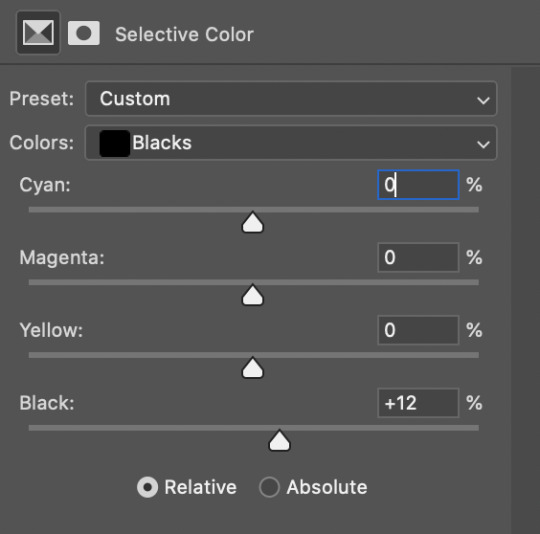
and now your gif looks like this:

the skin tone is looking a little sickly and weird, so I go into the yellows and reds in my selective color layer to fix it! I also messed with the greens here because I didn't want color in the background (that part is totally optional and just up to your preference):
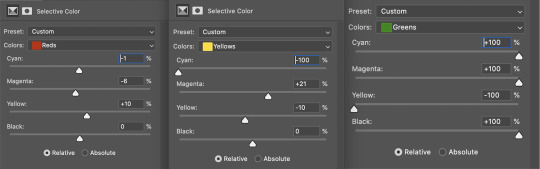
now we have this:
to really take the color 100% out of the background, I did one more separate selective color layer for cyan (again, I just felt like it but this is optional!):

and now the finished gif:
there’s lots of fun extra things you can add like text and tints and overlays and all that I won’t get into, but feel free to reach out for help on those types of things!
this gif was certainly not the most complicated to color. some ridonkulously dark clips (*cough cough* vendredi 20h27 *cough cough*) take tons and tons more effort than this and a lot of the time you’ll want to use color balance layers and vibrance layers and all of that to mess with your coloring.
with all of this coloring business, I really just learned by doing. I don’t know all the technical purposes of each type of adjustment layer, and I tend to stay away from curves just because I find them confusing and annoying. The bottom line is that you should always experiment and find out whatever coloring works for you and run with it! I’m sure every gif maker you talk to does things at least a little differently!
I highly recommend taking the time to go through all the types of adjustment layers and just move the sliders around to see what they do! That’s honestly one of the best ways to learn and decide what you like!
6. now to export and adjust the delay!
the keyboard shortcut for exporting on mac is command + option + shift + s, control + alt + shift + s for pc, otherwise you can go to file > export > save for web
my settings are here:
the settings only need to be configured once! otherwise just hit save and follow the pop ups to choose where to save and what name you want to give your gif. Since you saved as a psd way back, that will be the name it’s automatically given, but call it whatever you want!
then I adjust my delay by opening the gif I just exported (not the psd, the .gif file) and using one of my delay actions. I’ve made an action for each delay between 0.05 (real time) and 0.08 (really slow mo for certain super short shots, typically for more ~artsy~ sets).
all my action does is select all frames:
adjust the delay (which will differ based on whether you want them slowed down and by how much):

for reference, this is a 0.05 delay:
and this is a 0.08 delay
now you just export the same way you did before!
remember if you’re recording this as an action, you don’t want to touch the file name, just say yes when it asks if you want to replace the file. if you always save your gifs to the same place, your action will now enable you to override any gif with the incorrect delay with the correct one with one click!
7. tldr: the main tips
for downloading 4k video downloader works well for non geoblocked youtube videos, the all of skam website is another place you can look to download with no subs, here’s the screen capping method if you don’t want to download
The main way I combat dark lighting is to bump exposure to the right, gamma correction to the left, and then enhance black in a selective color layer. The amount of these three adjustments will vary gif to gif. I know lots of people use curves, but I find them really confusing for some reason, so this is my method! As my graphics teacher likes to say: there are always at least 3 different ways to reach the same result!
there’s a little bit of additional coloring on this one, but here’s another before and after example so you can get an idea of how those steps get you a better lit result without making the lighter parts super over exposed:

besides those three steps, you have free rein to use the other selective color channels, as well as color balance, vibrance, hue/saturation, etc. to restore color that was lost or to change the colors altogether! mess around with it and have fun experimenting!
7a. bonus coloring tip:
sometimes you can make use of selective color to completely alter an isolated color in your gif. You can get very adventurous with this, but here's a simple example of changing blue tones to teal (I got away with these gifs being longer because they were in rows of two in the set I posted them in. I'm too lazy to trim frames so I can put them here at 540 px without going over the 10mb limit so just ignore the quality ok):
7b. actions, actions, actions!
if you find yourself doing a certain thing over and over, always record it as an action. the amount of time they will save you is honestly really impressive.
You can duplicate actions, so, for example, if you have different sharpening preferences for different shows or scenes, you can duplicate your gif process action and go into the steps, double click smart sharpen, and alter it however you want!
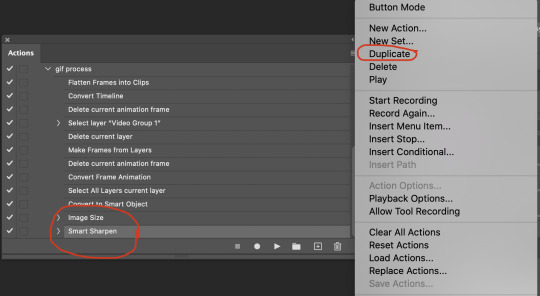
This could also be good to do for the different widths for tumblr if you ever do sets with rows of two or three! Duplicate actions is also how I made my actions that set delay at 0.05, 0.06, 0.07, and 0.08!
when in doubt, always make an action! it’s worth minimizing the tedious bits of the process as much as possible so you can focus on the fun part of seeing your awesome gifs come to life! any little task you find yourself doing often, make an action!
and for now that’s all I have. if any of this made no sense, if you want to suggest a correction or addition I could make, if you’re ever curious how I did something on any gifs I post, or if you have any other sort of questions, feel free to send me an ask or a dm! if I can’t answer your questions I’ll be happy to try to direct you to someone who can or a tutorial to help! again, I'm no expert, not even close, but I hope at least one person will find one thing in this mess that helps.
#this got . so long omg#mystuff#mytutorial#gif tutorial#tutorial#resources#fellow gif making peeps feel free to correct me or give input on how to improve or add to this tutorial!
31 notes
·
View notes
Last Seen Blogs

macrodubai
Macro Dubai

fuxepovumega
Untitled

clayton990
Untitled

pduffmancom
pduffman
junniiart
JUNNIIPIE!!!