#i'd just use the mount model for the image
Text
MOST FUCKABLE FF14 MAN ROUND 3
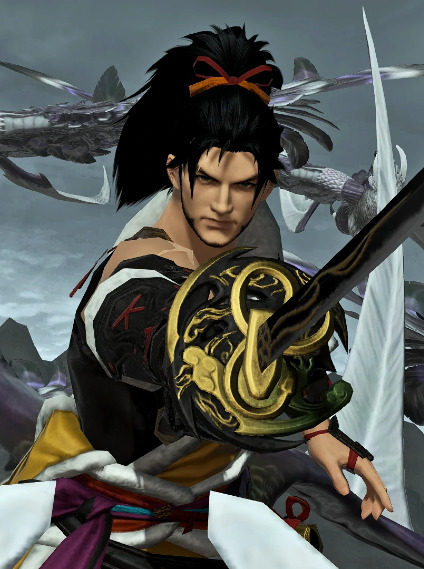
#round three#hien#midgardsormr#decided since y'all are so determined to ride papa drago#i'd just use the mount model for the image#good luck hien#you're gonna need it#mod reaper#ffxiv#ff14#final fantasy xiv#final fantasy 14#messed this up 2 times#had to make this post 3 times in total#LOL#stormblood spoilers
47 notes
·
View notes
Text
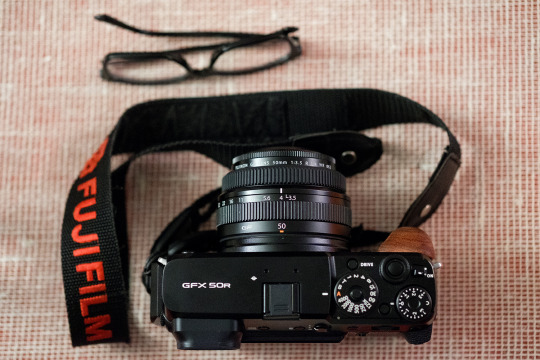
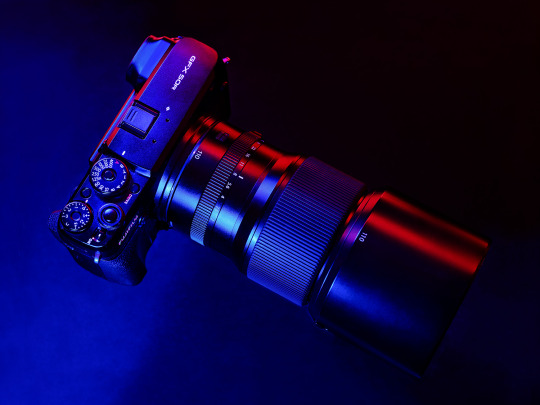
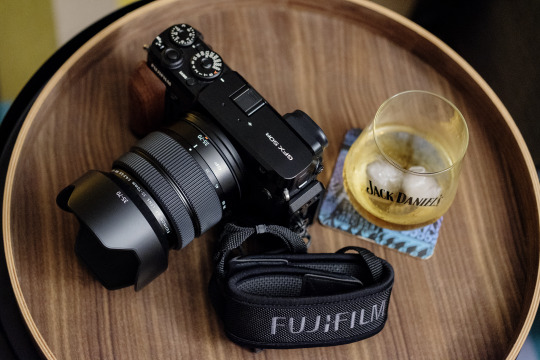
I went Full-Fuji! (GFX One Year Review)
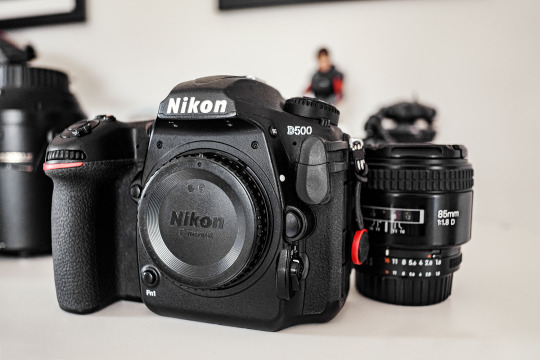
One year ago, I decided to ditch my Nikon DSLRs for a Fujifilm GFX 50R.
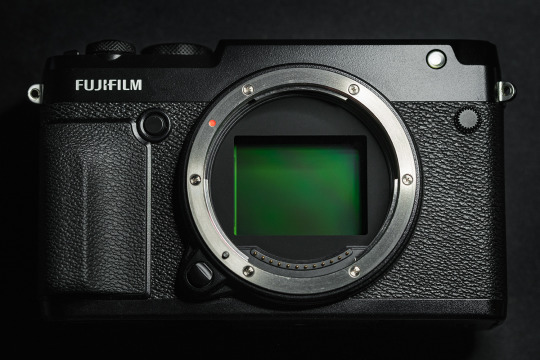
The GFX's sensor is larger than a full-frame sensor with a crop factor of 0.79
A little over a year ago, I still was using a few Nikon DSLRs to do just about anything. For portraits and landscape, I had a very respectable D810. Enough megapixels to provide some room for cropping and a decent dynamic range for most situations. For action and hobby-wildlife I had a D500. A durable mini-tank with performance that to this day would be hard to dismiss even in the light of mirrorless flagship innovation.
However, the question of my camera-future slowly crept into my mind. Was it time to change and upgrade into the Nikon Z system? Switching to a Z7 would indeed have been a sensible move, adapting older lenses while getting the sensor of the D850 in a smaller, cheaper body with an ecosystem of native lenses with the optical quality up to specs for the next decade. On paper and elsewhere, it should have been the obvious choice. Yet my answer to this question was a resounding "no" and I went against reason to set my sights on a Fujifilm GFX 50R. I took that model over the S because I enjoy the rangefinder form factor.
In hindsight, the smartest of all moves would probably have been to remain with what I had, adhering to the ancient photographic wisdom: "lenses are more important than cameras". My kits could have kept me satisfied for probably another 10 years if we are being honest. I could have stayed within the F mount ecosystem and could have taken advantage of its downright insane price drops to get top-of-the-line lenses for peanuts instead of selling the farm on a whim, however carefully considered it might have been.
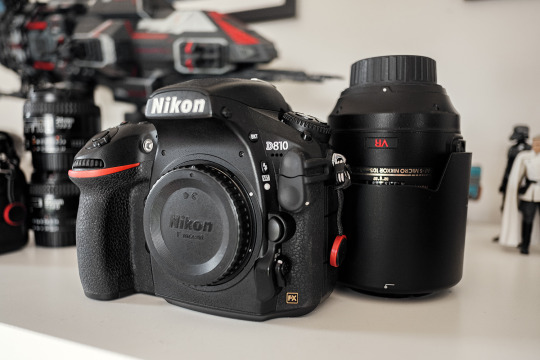
These old and trusty Nikon DSLRs got sold off to finance the 50R
The truth is that after fifteen years of walking the beaten paths camera-wise, I wanted to shake things up. I longed for a change of pace. I felt confident enough in my practice to know what type of photography I would want to engage in for the foreseeable future. I also felt confident enough that I'd be able to answer the call of the occasional assignment using a camera system that would have a non-negligible amount of drawbacks. The challenge even seemed like a fun new variable to add to contracts. Thus, the choice I made for my photographic future has been one born out of love rather than made from a place of reason.
When I think of good photographic memories involving the process — how photography is approached with mind and body — I immediately have two very different ideas jumping to mind and each has an ideal type of tool that best suits it. Neither of these are about efficiency. Neither of these are about performance beside niche-performance, perhaps. But that, is more of an acquired taste and it also comes at a price, but we'll see about that later.
The first idea is an instinctive and spontaneous approach, form of feral and visceral active meditation, akin to Daido's rabid dog method; roaming the streets clear of thoughts and letting the subconscious take the helm. Shooting, shooting, shooting and discovering everything later. No plan, only image-taking. No clear framing, no image-reviewing, no judgement to pass, no threads to weave. Only arrange and make sense later, if there's any of that to find.
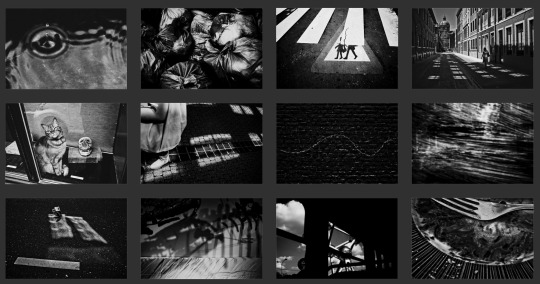
Results using the "rabid dog" method, using a Fujifilm X100, 2014
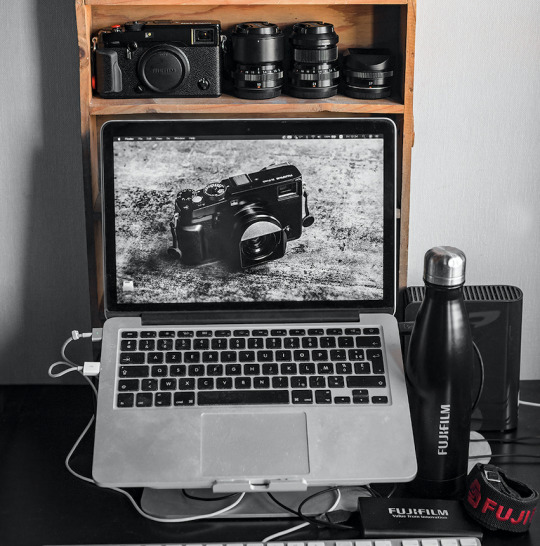
For this type of photography, the Fujifilm X100 was the tool that instantly clicked with me. The "poorman's Leica" is an apt way to describe what the X100 represented when it came out. I got the original 12mp camera in 2012 as a fun but capable toy to bring along my Nikon D700, until the shutter release button (which also is the on/off switch) broke off in 2020 after one power-up too many. I have since replaced it with a Fuji X-Pro 2 with the XF 18mm F2, 27mm F2.8 and 50mm F2 lenses. To this day, such small Fuji bodies are my tool of choice for this kind of photographic mood (and of course, for family pictures).

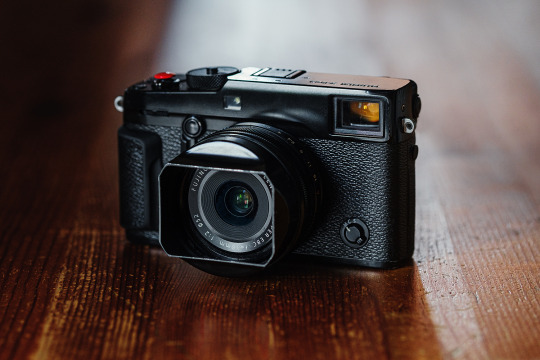
Fuji X100 later replaced by the X-Pro 2 as street photography go-to.
The second photographic process that I tend to naturally gravitate towards stems from my first year of photography school, during which all projects had to be done using film and would have us deal with the whole process (that is to say; shooting, developing, printing, framing, and displaying our work ourselves). It is with nostalgia that I look upon the memories from that time.
There sure is something inherently different in figuring out what to do with the exposures one has left on their film than being able to inconsequentially shoot within two hours three thousand pictures through which you can almost immediately browse. The latter is of course more practical and a welcome technological improvement, but the former brings an unhurried and deliberate focus that I find both refreshing and appealing.
When I think of my strongest recollection of touching the quintessence of the analog experience, the days of using my Mamiya 645 immediately come to mind. Such sluggish, heavy-as-a-couple-bricks box-machines compel one to being careful and purposeful every step of the way. I need that too.
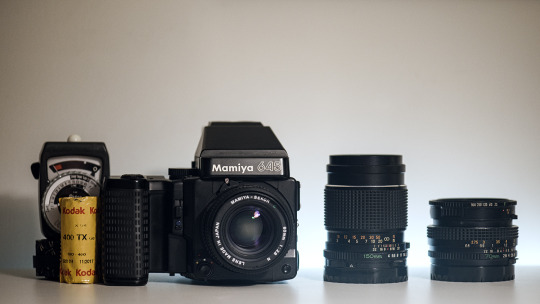
Mamiya 645 Super, since sold to finance GF lenses.
I have for the longest of time considered getting a more serious medium format camera but some quick-math with the price of film, chemicals and photographic paper made me realize that digital medium format was actually much more worth the investment while most definitely retaining some of the core characteristics of its analog counterparts. My love for the film process couldn't hold up against all the advantages of going digital, especially when buying second-hand.
Using medium format always felt like journeying inwards. It has allowed me to spend long hours in daydreaming-states paradoxically laced with an acute awareness of my surroundings. When thinking about medium format, I can recall the soul-washing quality of some of the winds that swept my cheeks while I was standing next to the tripod waiting for the exposure of the 50iso film to finish.
States of contemplation. Another kind of active meditation?
Of course, any camera can provide this type of feeling, but of all of the digital cameras available, medium format is the one type that will weigh you down the most and dictate the pace you work at.
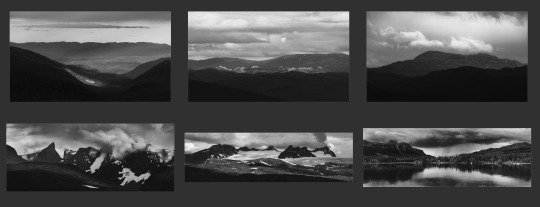
Telepanoramas created with the Fujifilm GFX 50R
Notice how these two ideas are almost the ends of a spectrum?
The first one is nervous and agitated, highly reactive, while the other is composed, meticulous and invites introspective fugue-states, yet they both share one vital element in the way that I approach them in that they take the practical considerations out of the picture to leave more space for what is going on within me.
The setting up of the camera or lack thereof becomes an excuse for something else. Maybe it isn't a surprise, that my adhd-ridden brain experiences this inexorable attraction for both these approaches. For they are in essence, two sides of the same coin, with each side matching different, specific and fluctuating needs.
Let's dive in!
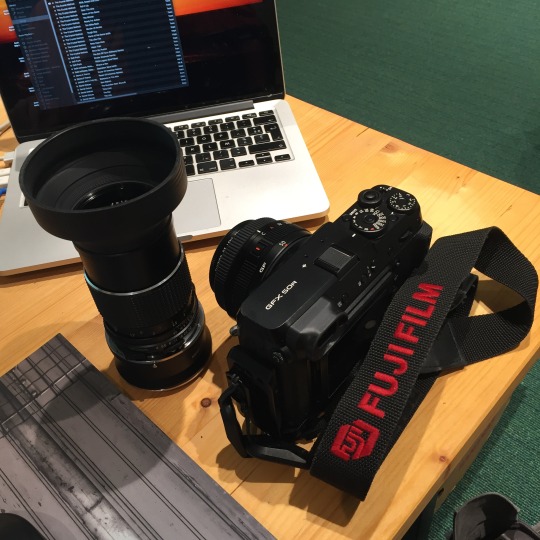
After selling my DSLRs, I started looking for a good second-hand candidate. After a month or so, I found a barely used GFX 50R sold with a 50mm 3.5, a couple additional batteries and an L-bracket to boot. The price was rather attractive for the bundle, so it seemed like the time to take the leap. After a short but excruciating wait for the package to arrive, I finally was able to join the larger-than-35mm-sensor club.
How it started
My first few months with the camera had me immediately blown away by the difference in output. The higher resolution and the sensor's qualities made the (very much existing) noise hardly noticeable when downsized to small printing or screen-viewing sizes. What also immediately struck me, was the looks of the images the camera produced. Images taken with the GFX feel more "3D" to me.
It is a very peculiar and hard to describe feeling. I suspect it is a combination of factors; the depth of field of the larger sensor and the very smooth transitions between what's in focus and what is not that it permits, the colour depth, and the quality of the optics. I've seen many Youtube reviews, read forum threads or been in discussions on Discord about GFX cameras where people (who more often than not don't own one) will maintain that these qualities don't exist at all. After a year in the system I can confidently state that they're wrong.
I can't really put my finger on what causes these differences as I am not as tech-savvy as I could be, but it is still clear as day. To use a pretty apt analogy, I would say that the difference between full-frame and (crop) medium format is akin to the difference between aps-c and full-frame cameras. Are they deal-breaking? Not necessarily. For some people they can be. Are they noticeable? Definitely. It is especially funny to me to see medium format cameras being dismissed by such a many full-frame shooter who at the same time, is constantly bashing aps-c sensors.


Don't you love to pixel-peep? Omnomnom (imagine with 102mp!)
This being said, I will always fully stand by the statement that full-frame cameras are the more sensible choice as they are better all-rounders by design. High-res cameras like Sony's A7RV or equivalent are also better high-iso performers than the aging IMX161 sensor that the GFX 50 series uses, which sees its operational limit at around 6400iso (but the GFX 100 would be another matter entirely). A top-tier full-frame camera is evidently more practical, lighter and cheaper without any deal-breaking image quality difference to what the medium format niche can offer. When all costs are factored in, the choice would seem self-evident. If you consider medium format, it should be understood that you know this before committing to any bigboy sensor. Or don't heed this and make people who buy second hand happy, as GFX gear loses almost one third of its value once it hits the second hand market (a consequence of too many people jumping on the medium format bandwagon only to realise — way too late — that it wasn't for them).
Are we cooking yet?
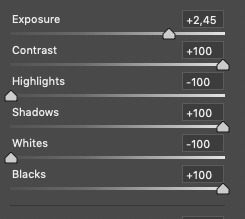
I need to talk about the GFX's files for a little bit; I'm a raw shooter only — which hopefully you'd have guessed — (in my opinion anyone buying into a medium format to shoot jpeg must have cognitive issues or too much money, or possibly both) and I have to say that when I opened the raw files to give the sliders their very first +100/-100 or +3/+4 EV from base iso (or any combination of these) I was utterly floored by how well the files could handle such an ungodly beating.
This isn't a joke, I promise.
This type of camera makes the slider memes come true, to a point where for the first few months, my ability to edit properly was severely impaired by the glee I experienced while pushing everything way too far. I believe it is not an uncommon symptom at the start of a medium format journey. It takes a while to come back from that and simply be able to tell yourself "ok here, maybe less dynamic range would be a good edit". I'm getting better at this as I consciously try to avoid overcooking.

Clean recovery? Can do!
On the image-taking side of things, the major change for me with regards to file-handling is that I'm almost systematically exposing for highlights now. Adding 3EV and boosting shadows in post when shooting at low iso is inconsequential in terms of image quality as there won't be any visible noise whatsoever on the output, unlike my aps-c cameras that will show noise even at base iso. Similarly to many other aspects medium format manages well, this is something I got used to very quickly.
To adapt or to not adapt, that was the question, here's my answer:
At first, I tried adapting my old Mamiya 645 lenses to the 50R. It was useful in the sense that it allowed me to enjoy different fields of view at no cost but it quickly felt like a plaster on a wooden leg. I'm not someone who enjoys the manual focusing as a default and I've grown more and more intolerant of the optical flaws of older lenses as time went by. I realised that it wasn't a viable long term solution for me and quickly chose to sell all my Mamiya cameras and lenses to finance native glass for the GFX.
My experience adapting? It was alright but not at all ideal.
Which lenses then?
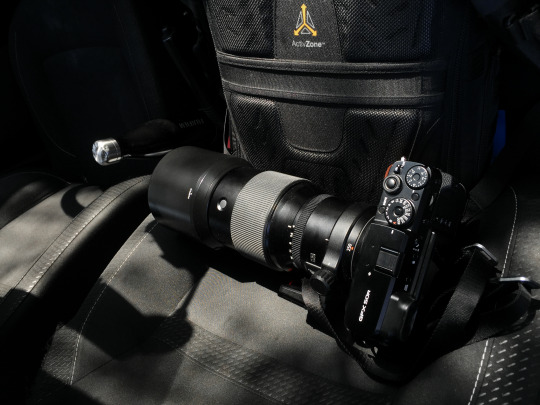
Getting into the GFX system I promised myself I would make no compromise whatsoever on optical quality and directly aimed for the 250mm F4 (mainly for tele-landscapes) and 110mm F2 (mainly for portraits). The grind felt long but it really wasn't, as I managed to secure both lenses from the second hand market within 6 months. It is only later that I added the 35-70mm "kit" lens to my arsenal to fill the wide-angle gap I had. As I seldom feel the need to shoot wider than short-tele fields of views, this is more of a lens of convenience.
The difference between adapting older lenses and using native glass was night and day to me. Two things made this the better choice in my view: first, I've been actively seeking the "clinical" quality of modern optics. I do not care much for the "character" of older lenses especially not if the word is used to help one overlook a lens' unforgivable flaws. Second, while there sure are lenses worth adapting out there, this come at a cost for the adapting to be worth it (the cost of an AF-capable adapter and of course the cost of the lenses themselves) which I saw as a waste of my limited resources. I told myself I wasn't going to make compromises, remember?
One year after switching, I am now knee-deep into the system, having sold most of my Nikon gear as well as my Mamiya medium format film-cameras to acquire some of the incredibly hard to resist GF lenses.
After a year of transforming a heap of dormant gear and side-gig revenue into new lenses, I also noticed that the representation I had about the worth of money also changed radically when gear was concerned.
A little over a year ago, an XF lens priced 800€ definitely seemed like a steep investment I'd try to find alternative choices for. Nowadays, 800€ is a mere budget lens in my mind. Seeing the price tags of GF lenses doesn't make my head spin anymore and this is somewhat worrisome for the thrifty Dutchman living in the back of my brain.
With the announcement of the 500mm F5.6 lens being in development (a focal length I definitely miss from my Nikon days, I'm a sucker for ultra-telephoto landscape photography), I fear I will manage to push my monetary boundaries further back yet, which I will help achieve by selling my X-T3 video-oriented kit.
APS-C: you're dead to me.
An unforeseen consequence of my GFX switch was that my aps-c cameras were pretty much relegated to the bottom gear drawer and seldom used barring a few notable exceptions (such as a wedding gig) where the need for its autofocusing speed was greater than the need for image and file quality.
To reuse the analogy I made earlier; my X-Pro 2 and X-T3 have become to me what a micro-four-thirds camera would be to a full-frame camera user. Getting into Fujifilm's medium format system prompted me to think about how I use my cameras and to what end. The realisation that there is a clear split in my photographic approaches I evoked at the very beginning of this article is the result of that thought process.
Although I will sell my X-T3 because it feels superfluous and I want to stop my video gigs completely, (and because my need for GFX lens money is still great), I would never part with my X-Pro 2 nor the few XF lenses that I have as they serve a totally different purpose to that of the GFX's.
Having a compact, fast, discreet yet still capable camera that can be casually put into a pocket is an advantage that I would be a fool to part with. The X-Pro is a more practical choice for street-photography, documentary in less-than-favourable conditions, as well as for family pictures, when packing a brick of a camera and two bricks worth of lenses for a walk in the park in suboptimal weather would be met with a tired roll-eye from my spouse.
My dear X-Pro, I'm Never Ever Gonna Give You Up
Of course there have been many occasions for which I have chosen to take the challenge and went into these situations with the GFX. However, I wouldn't want the GFX to be the only option at my disposal in such cases.
For example, during the last wedding I shot, when the dining room got darker and the guests started moving around a lot (and dancing), the switch to aps-c cameras was absolutely necessary because of how difficult it was to consistently get acceptable results in poor light and with subjects making erratic movements. When you are held under a result-delivering imperative, you have to be able to honour it.
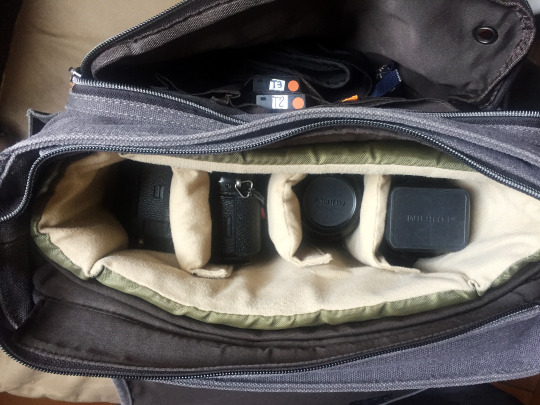
Packing a Fuji GF or Fuji X kit can be a slightly different experience
"Megapickles don't matter!"
This was an idea that I lived by just a few years ago. I changed my mind. I still believe that megapixels don't matter when you don't have them. Just like one should shoot with the camera one has / is able to afford. It doesn't matter in the grand scheme of things but all these technical niceties just make one's life more comfortable. Cropping, denoising through file reduction algorithms, or enjoying detail endlessly because one can, these are just the icing on the cake. I just happen to like my cakes with more icing than cake now.
Regarding resolution specifically, it's been another area in which there seems to be no possible coming back. Nowadays, every time a manufacturer announces a new camera and I discover they plan to fit it with a 24MP sensor I dismiss the information entirely. It doesn't register anymore. 32-36 is the new 24 in my mind now and it's sometimes difficult to come back from those expectations.
This being said I have no issue using lower resolution aps-c that I own and could perhaps even have fun with a X-Pro 1 because then the output quality wouldn't be my prime concern. It is only concerning new releases that my interest dips firmly for "low" MP cameras.
Did I tell you that medium format AF sucks?
Before I conclude this one-year review, let me hammer this point in with a two-handed mace; it can't be understated, especially for the GFX 50 series which uses contrast detection — the autofocus will throw you back to the early 2000s. Be ready to be stuck on single point, single AF mode because that's the only thing that will be consistent enough.
Then let's not forget other factors that add to the bad and make it worse; the shutter lag is half a second, the sensor readout speed is 1/4th of a second, and the time the shutter takes to clear the large sensor in combination with the camera's high resolution means you'll need higher shutter speeds in order to get rid of motion blur when shooting handheld (count about one stop faster than usual). Those would be valid reasons as to why a less niche camera system makes more sense for a lot of people.
The final comment:
Despite its sometimes dramatic drawbacks, I definitely have found the pleasure I sought when I originated this system switch. The change and the adapting my process is engaging and makes me think more about what I do, what I use, when and why. This is a win on its own.
All in all I feel like I am still at the very start of my journey though I've had the opportunity to test my GFX 50R in a wide array of situations in the past year (portrait, landscape, documentary) it seems like the way forward is clear and also opened for plunging deeper into this incredibly fun (but needlessly expensive) rabbit hole.
The upcoming 500mm, the prospect of finding an original GFX 100 (with its weirdly appealing tiltable EVF) are ideas that will — for the foreseeable future — definitely keep pulling me back in (and emptying my pockets).
Fun! Fun! Fun!
8 notes
·
View notes
Text

Hi, before I explain my post, I want to say something important.
• What you see my blog has become a major overhaul. And despite the changes, I decided that my 2nd account will be now my artwork blog with a secret twist.
⚠️NEW RULE! (W/ BIGGER TEXT!)⚠️
⚠️ SO PLEASE DO NOT SHARE MY 2nd ACCOUNT TO EVERYONE! THIS SECRECY BLOG OF MINE IS FOR CLOSES FRIENDS ONLY!⚠️
• AND FOR MY CLOSES FRIENDS, DON’T REBLOG IT. INSTEAD, JUST COPY MY LINK AND PASTE IT ON YOUR TUMBLR POST! JUST BE SURE THE IMAGE WILL BE REMOVED AND THE ONLY LEFT WAS THE TEXT.
⚠️ SHARING LINKS, LIKE POSTS, REBLOG POSTS, STEALING MY SNAPSHOT PHOTOS/RECORDED VIDEOS/ARTWORKS (a.k.a. ART THIEVES) OR PLAGIARIZING FROM UNKNOWN TUMBLR STRANGERS WILL IMMEDIATELY BE BLOCKED, RIGHT AWAY!⚠️
😡 WHATEVER YOU DO, DO NOT EVER LIKED & REBLOG MY SECRET POST! THIS IS FOR MY SECRET FRIENDS ONLY, NOT YOU! 😡

Okay? Capiche? Make sense? Good, now back to the post…↓
#Onthisday: Jul 30th, 2018
Title: Cuteness Girl Member - Kelly
Reddy's sibling Kelly 🐿️🎀 wants in to enroll at the "Cuteness Defender Academy" (which, we'll meet him soon), just make sure that these two were accompanied. And also, she will be Reddy's friendly team with her customize "Cuteness Mecha Armor", the "Beargguy II". Now called "Chipggal"! 🐿️🤖
BTW: I'd changed the modeled name CPMK-02 (CPMK short for "Chipmunk"), instead of KUMA-02. 😉
IMPORTANT NOTE: There will be couple of "Cuteness Members" who wore the armor custom "Beargguy", so pls bear with me. 😊
Previous:
• Cuteness Member - Reddy (Dec 17th, 2017)
Chipggal Kelly
Based on: KUMA-02 Beargguy II [CLICK ME!]
Armament(s):
• Flower Chest Beam Cannon
A beam cannon that is mounted on her flower torse, it can be fired when the centered opens.
• Beam Cannon/Beam Saber
Mounted in both paws, besides functioning as ranged beam weapons, they can also generate beam sabers for melee combat.
Special Equipment(s) / Feature(s):
• Extendable Arm
The Chipggal Kelly retains the Acguy and her extendable arms for striking down enemy suits.
• Ribbon Shuriken
Like Beargguy Giggles P, Chipgguy Kelly can also her bow used as a shuriken throw improvised. Swinging hard and it can inflict through opponent(s) and like both Giggles's and Kelly's, it can act like a boomerang back'em fort.
Kelly (HTF OC) - owned by HTFMegaman (dA; last active on Dec 2023)
Custom Beargguy Armor (Gundam Build Fighters Try) - Gundam series © Bandai Namco Filmworks, Inc. (SUNRISE), Sotsu
2 notes
·
View notes
Text
Chook & Sosig Walk the Plank | Part 2
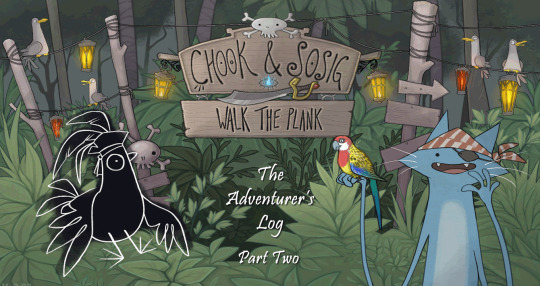
The Adventurer's Log
Part 2 and finale x2. Yes twice.
I left off last time needing to find some ink for a pen to give to Cow to write a calming poem to placate a seagull. I love the sentences games can make you write.
I wasn't quite sure at first where to get ink but then I remembered there was a mounted squid at the Adventurer's Guild. Sure enough, I was able to, er, stab the pen into it and that got me the ink. Ick.
I had one more thing I wanted to do before I brought Cow the inky pen and that was show the parrot to everyone! Mostly everyone commented on how angry and/or bitey he seemed. However, the goblin at the bottle mail centre was properly appreciative.

Sky goblin <3.
Then I back to the Sea Shrine to see Cow and get the poem.
He mentioned before he'd turned some of his marketing spiels into poetry instead and I suspect something like that happened here, but we never get to get any even snippets of the poem he wrote for our angry seagull and I'm disappointed in that. Even just a line or two of seemingly terrible poetry? No? No.
It did work on the seagull though who fell asleep. Or maybe it was that boring. Either way I got the bit of flyer from it which had the location of the Haunted Cove, location of the treasure, so off I went.

It was quickly exciting because I found a dragon!
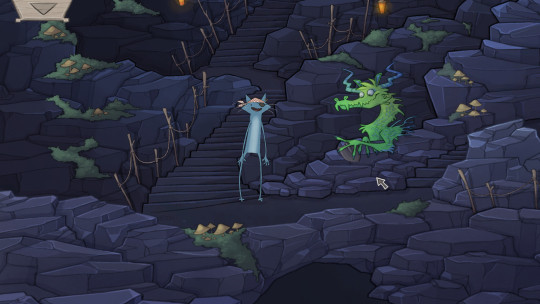
Hebble found his dragon model and as the rest of the players were fine with this Exley just has to have a dragon in his setting.
The dragon had a shovel head, I couldn't seem to talk to the dragon yet until I'd gone further in and found a cave with a good ol' X marking the spot and a pole. I grabbed the pole and then I don't know if that changed things or if I'd been clicking the wrong space, but then I was able to talk to dragon. It had decided to make a new hoard of shovels. Gold and such is just so common. However, they were willing to give it to me if I could find something else rare to start a new hoard with.
Cow's shop back at Cape Codnapper had been selling Galaxy Princess Dolls that seemed good and hoardable. So I went back there, and along the way discovered that the chalk drawing that had been there had had more added... Just an observation for now.
As for Cow and the Galaxy Princess Doll he had only ever found one and sold it already. To waitstaff Hebble at the tavern as it turns out, so off I went again.
Of course Hebble wasn't willing to just give up the doll but Barkeep Cow hated it because Hebble was just using it for internet clout and getting even less work done than usual. So, he had Sosig put a dislike on his latest Galaxy Princess Doll post to make him give up on the whole thing because he's all about that praise.
Very silly but it worked. Hebble moved on to other things and let me have the doll.
The dragon was happy with the doll and I was able to combine the pole and the shovel head back into its proper shovel-y form and dig up at that X. Chest time! We're a real pirate now!

Of course the chest was being guarded by a Min ghost who was buried and cursed to guard this chest until her head is returned. As a psychic in life her skull would have a third eye. These players really like putting themselves into their characters... If I could bring her skull back to her she'd be able to leave.
I knew that skull. It was back to Cape Codnapper and Fortune-teller (attemped) Hebble again. He was trying all sorts of other divination tactics including tea leaf reading, which netted me the used up tea leaves. None of it was working. He was willing to give me the skull but only if I could make him a potion that would enhance his psychic abilities, or y'know, maybe give him some at all. He gave me a recipe and the bottle to put it in and it was time to go again.
This is where I did not realize something and that led to me getting stuck for a bit. You're meant to click each of the images to be told what they are. I didn't realize you could click on them and just went based off what I saw.
I knew the pot was likely the goblin soup - it was.
I guessed the spirit in a bottle may be one of the cocktails at the tavern. There was skeleton rum that seemed like it would fit the bill. I was right about that and having 'stolen' a dragon's hoard I was proven hero enough to be able to buy cocktails and was able to get that.
At first I thought the stones were like runestones, so I tried going back to the Forsaken Atoll to talk to Viking Min. No such luck.
I found the mushrooms in the Haunted Cove, but I couldn't take them because Sosig didn't know what they were and didn't want to go around picking up strange unknown mushrooms. While I glared at the recipe going look, look! Also your an adventure game protagonist; pick up all the things!
Thinking maybe those weren't the right mushrooms despite appearances I went to the goblins and was able to add the rum and as it turned out, the tea leaves. Ah, the stones and card were showing that I needed a divination related item. Which I confirmed later when actually checking the images.
I still didn't know what to do and ended up part way through another quest line. See, I decided to talk to Chook and get a hint and was told about steam being needed to power a place on the Secret Reef. As it turned out the baby seagull that had been nesting in Fortune-teller Hebble's kettle had left leaving the kettle free for the taking.
I took it and went to the Secret Reef and put it on the stove finally putting the lit fire and dripping tap to use. It made steam, powering a contraption that then opened a shower curtain revealing the Fabulous Mermaid.

Hebble again. Hebble just grabbing up all the roles.
This character had found a way to the Sea Goddess and was granted a wish to become a mermaid. Unfortunately for him, he's just not getting visitors and wants more. He's gotta show off and get attention. So, he gave me posters to put up in return for information on the Sea Goddess' location. I needed to put them up at the Goblin Isle, the tavern and Cow's shop.
I got the ones done at Goblin Isle and Cow's shop done just fine, but got stuck on the one at the tavern because it needed to go on the bulletin board but would cover Barkeep Cow's poster which had a picture of him on it and Cow didn't want that. So I needed to figure out a way to deal with that and was unsuccessful at that moment.
However, while getting the poster done at Codnapper I had to talk to Fortune-teller Hebble again and that led me to looking at the recipe once more while I was there anyway and then I discovered I could examine the pictures which informed me of the mushrooms, which I could then go get and finally make that potion and get the skull.
Side rant: I'm kind of irked at that recipe situation. A puzzle's rules should be consistent. Why was I allowed to add the rum and tea leaves without examining the images first for confirmation? Those images were a lot more abstract than the mushrooms which were exactly the same as their respective image, but I couldn't even take them. It should have either let me take everything but not be able to add them to the pot without checking the recipe images individually or let me be able to figure it out solely based on the imagery as I did. This mix was just frustrating, especially with the most obvious item being the one that was the problem, and it felt like being punished for taking the harder route.
Okay, back to business.
I brought Min's skull back thus freeing her from being bound to chest protection duty, leaving Sosig free to loot!

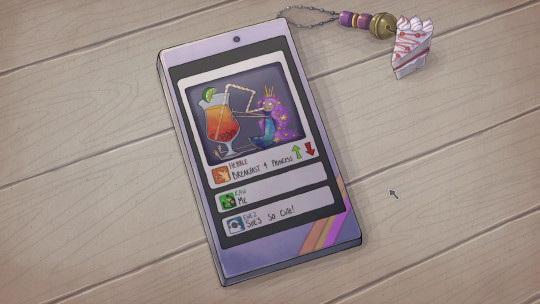
Mmm Multi Meow brand cat food. Sosig's favourite.
And it turned out that was one of two endings. I got more player chat in which Exley revealed he had a different treasure planned for each of them. Chook kind of mocked Sosig's tastes, but he just loooves Multi Meow. And so I got credits!
BUT
I wanted to get the Sea Goddess ending, so I reloaded right before bringing Min back her skull and set off again.
I still needed to work out that poster so I went back and tried things and it turned out I needed to put the poster on the board and then use the scissors to cut the face out so that Cow's face would still show. That was enough to keep him happy.
Reporting back to Mermaid Hebble had him giving me the location of the Sea Goddess' island. But when trying to get close a fog would rise and I'd be shoved out.
So I went back to Viking Min to finally get some more info out of her. She had been putting together a special figurehead along with a hagstone (rock with a hole in the middle) that would allow a ship to see clearly and pass through the fog. However, she hadn't finished the figurehead nor found a hagstone, I'd need a chisel -- she dropped one in a lobster pot that needed a winch to get it back up -- and the hagstone.
I tried to go for the chisel, but the cord for the winch was missing, so I also needed to find something for that too. After a bit of looking I found rope at the Secret Reef. I don't know if it newly appeared or if I just missed it before. Either way I got the chisel up and was able to finish the figurehead.

It took me a little more wandering and checking beaches for the hagstone before I landed back at the Adventurer's Guild where I was then reminded of a stone tablet and Hebble's mini office cannon... Which I had played with before and it would shoot at said stone tablet--simply didn't have enough force. I talked to Hebble about it and discovered it had a higher powered mode that was voice activated but Hebble refused to use it.
I kind of stumbled on this solution by accident. I was showing the parrot again as you do and that led to my parrot mimicking his voice and so having learned it, I was able to use him with the cannon to activate it.

And blam! One newly made hagstone for me. I took it back to the figurehead and was ready to go. The fog was no longer a problem and I landed at the Undersea Palace.

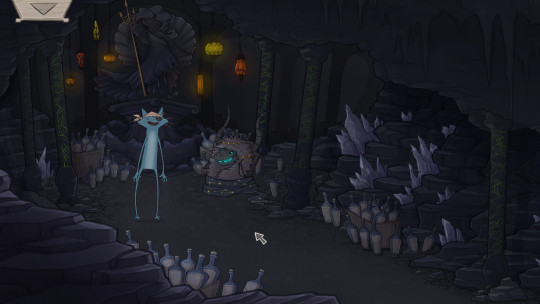
Along the way down the stairs I found various secretive clams of a tight lipped variety. And at the bottom...
Sea Goddess Hebble. Taking. Every. Role.
Cow wanted that role, but Hebble beat him to it. Exley seems perpetually exasperated. Min is clearly not doing a great job of keeping Hebble in line.
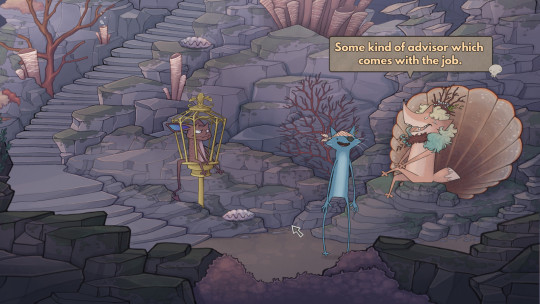
Anyway, I got some conversation with the Sea Goddess and found out he imprisoned his advisor that came with the job because he was trying to make him do work like taking people's prayers and wishes. The horrors.
Poor goblin. I had a chat with him too and found out there was some kind of problem at the bottle mail centre, presumably caused by the Sea Goddess, so the wishes weren't coming in. He's also hungry and would really like some meat.
The tavern has loads of meat and a meat eating contest, though that's only on Mondays and it's Friday. Still, it was something to keep in mind. But, I first went to check out the bottle mail centre.
Goblin Queen Min told me to talk to the goblin with the bottle who was supposed to be in charge of the deliveries, but something had gone wrong. Talking to the goblin I found out that the weathervane used to guide mail to the Sea Palace was broken. It needed a pearl from the Sea Palace itself to be able to find the way. I'm gonna assume one of those clams has a pearl I could get for him. Very subtle work, Sea Goddes Hebble.
I was correct. And I could have gotten the pearl earlier. I just needed to use the chisel to open the clams until I found the right one. Easy peasy, except Sosig got a case of butterfingers and dropped the pearl into the coral. Not a problem either; some of the coral bits had bubbles coming out and could be squeezed to cause other bits to expel their stuff. I just had to move the pearl along until it got shot back out onto the ground.
I was able to fix the weathervane, so the mail was up and running again. When I went back to the Undersea Palace there were bottles everywhere, which Hebble was stalwartly trying to ignore except for some fanart and fanfic. Gotta keep stroking that ego. There was also a threatening letter though... something to do with fish, stinky dead fish.
I still needed to get some meat for the poor goblin. I ended up checking back at Codnapper again to discover that expanding chalk drawing had expanded all the way to Chook, who was the one who had been drawing it. She was done and gave me the chalk and then I knew immediately what to do:
Change the date on the meat contest chalkboard at the tavern to Friday. Bring on the meat!

I brought the meat back to the very relieved goblin who would be happy to offer me his secretarial duties now.
I wasn't entirely sure where to go from here, but in the end more searching around the bottles had me find the threatening letter. It was from someone who wanted to send fermented fish as part of a viking ritual in honour of the Sea Goddess.
Obviously that had to have come from Viking Min and when I went back there was a indeed a big ol' bucket o' fish waiting.

Stinky smelly fish. Min would only send them once she was assured the letter had been received by the Sea Goddess, so back I went again. The goblin was only too happy to stamp the letter to verify it had been seen and received.
Min accepted it and off went the fish! And I was automatically sent back to the Sea Palace to see the results.
Fish, fish everywhere. There were still some fish drifting down as well... Sea Goddess Hebble was horrified and wanted nothing to do with this and gave up the job, relinquishing the throne to none other than Sosig!

Victory! Sea Goddess Sosig and a freed goblin advisor/secretary!
And some more banter back around the table.

Hebble had to concede defeat. Chook offered her services as advisor. Cow though that'd be fun too. I love that the dragon figure appeared on the table too after the earlier shenanigans.

Party time for future sessions!
And that's the other ending! All done now!
The end!
Time: 2:52
--
Final Thoughts
In general it was a fun, chill, breezy sort of game. For the most part I found it fairly easy and where I did have some hiccups they didn't last too long. Plus there's the hint system through Chook if you do need a little extra nudge.
I enjoyed the framing device and setting. It was entertaining to see which characters the players made too while running into them in different places and situations and also what they retained from themselves--quite a lot in general. They might not be the best actors but they're having a good time.
There were some things I would have liked to see more results of like the poem, but this was also, by my understanding, a one-person endeavour, so there's only going to be so much that can reasonably be done. More of a 'it would have been nice, but' kind of want.
I also really liked the art, especially the background art. It's a lovely charming looking game. And there were a few extra things to look at that were more for flavour than any puzzle solutions, and I do always appreciate the extras.
Just a nice 2-3 hours with some fun humour.
2 notes
·
View notes
Text
L2 Certification Attempt
After obtaining my L1 attempt, I had originally planned to fly for an L2 attempt on the same rocket. However, I attended a VRA club night where a swap meet was being held and ended up with a Rocketry Warehouse (now Madcow) Broken Arrow 54. Sometimes a great deal is a great deal.

This was a pretty big step up from the cardboard and plywood construction I was used to, being entirely filament-wound fibreglass. Its large diameter/length ratio combined with its small split fins also made it intimidating. This kit is also intended only for dual-deploy, which is something I had never done before. I decided it was a good opportunity to challenge myself.
Build
The kit was pretty bare-bones, meaning I had to source a retainer and much of the hardware for it. I ordered a 38mm Aeropack retainer, and then I began the build.

The process was relatively simple, with through-the-wall fins like all my previous builds. However, this time they did not fit into divots in the centering rings, so I 3D printed a fin jig to hold them in place while the epoxy cured.
Speaking of epoxy, I moved away from the 5-minute Araldite I had used for previous builds in favour of a more serious adhesive. I used JB Weld for anything motor-adjacent because of its thermal tolerance, and Epiglue for all other structural attachments and fin fillets. This was recommended to me by a friend in Perth who flies truly ridiculous rockets and has used it on flights of up to Mach 2. It is also available from a local marine supplier, meaning I didn't have to pay through my nose to get hold of Rocketpoxy or West Systems. I was very pleased with how nicely it went on and how strong it was.
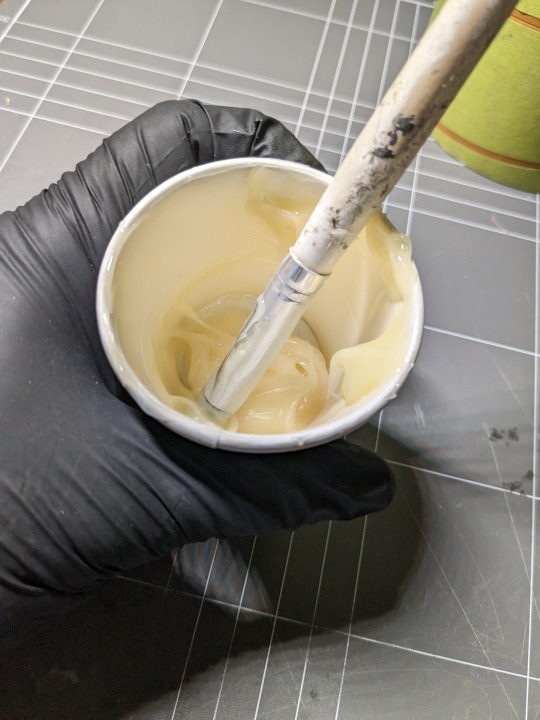
By this time I'd also nailed down my epoxy application and filleting methods - I use cheap silicone sculpting and grouting tools which can simply be cleaned with acetone after I'm done. For filleting, I also found that mixing the epoxy in a ziploc bag and piping it on like icing worked a treat.
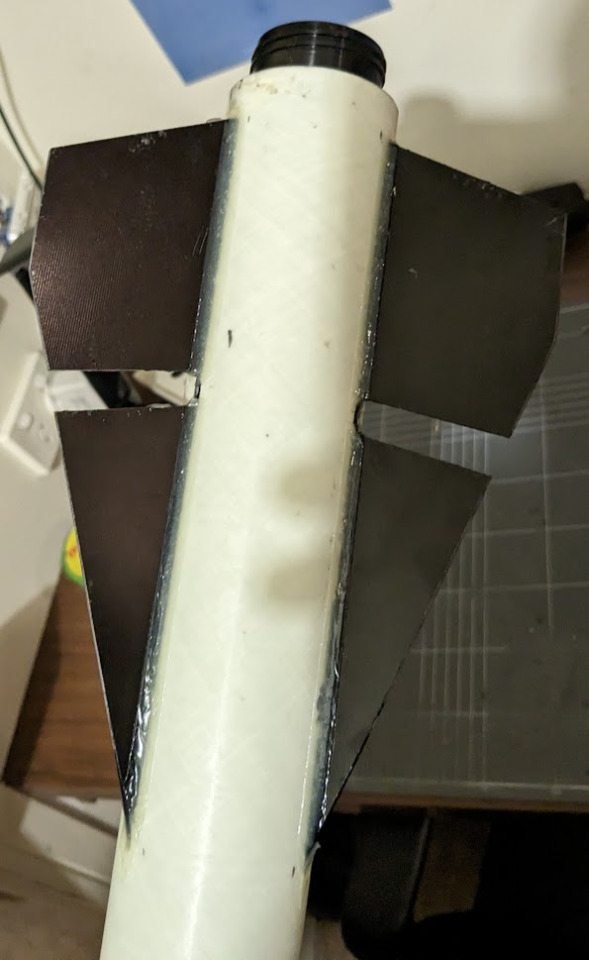
My work gets cleaner with every set of fillets I lay down. These ones don't look fantastic, and the split fins were something I had never dealt with before, but that didn't matter for reasons that became apparent shortly after the epoxy had set.
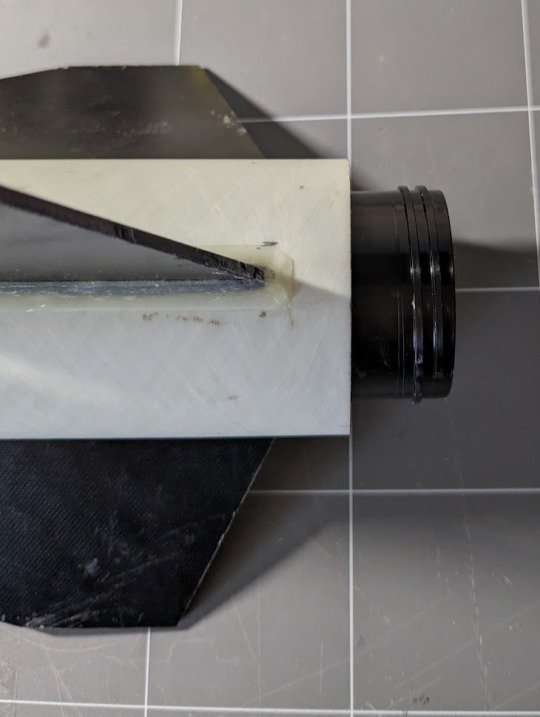
The morning after I applied these fillets, I got up to continue working on the rocket when I noticed that something had shifted overnight. The motor mount tube was somehow at an angle, as shown in the image above. I know I installed it perfectly level, but I didn't secure it while it set so I think it slipped as it cured. In my defense, I was quite sick and not firing on all cylinders when I had completed all the work up until now, but the realisation of what I'd managed to do was pretty disappointing and a bit of a knock to my confidence. Some measurements and a bit of trig suggested that the offset was only a degree or two, but the image suggests otherwise. I consulted some friends who are far more experienced flyers than I, and the consensus was a mix between 'send it' and Do Not Fly That Rocket, with more in favour of flying it than not. I looked at my OpenRocket sim for stability characteristics, and read some old Rocketry Forum posts about this model, all which pointed to it being rather squirrelly. In hindsight, I feel like I made the right decision, as I just couldn't ignore my gut feeling. I decided to rip it apart and rebuild it completely.
I did not take photos during this phase due to being completely covered with fibreglass dust, but I ended up using a diamond Dremel cutting wheel to first cut the fin can off, then cleanly slice the fins out of the body. I cannibalised a small section of the avionics bay tube to use as a coupler to reattach the aft section. I was then able to epoxy the whole thing back together, sand it all down, and it looked no different - apart from the motor mount being at the correct angle of zero degrees. I re-filleted the fins with a larger radius than before, as I wasn't happy with how they looked initially. I was very pleased with this effort, and confident to a) present this rocket to an RSO and b) fly it safely.
I also took the opportunity during this rebuild to modify the rocket to be motor-eject capable, by removing the bulkhead to which the recovery harnessing would be attached. I cut a small divot in the forward centering ring and attached a looped piece of kevlar around the motor tube before reinstalling it. This 'leash' provides the anchor point for a longer recovery harness to be attached to. I am very glad I did this, as not long after I was informed that my university club possessed a grand total of two (2) grams of black powder. Traditional dual-deploy would no longer be an option. More on that later.
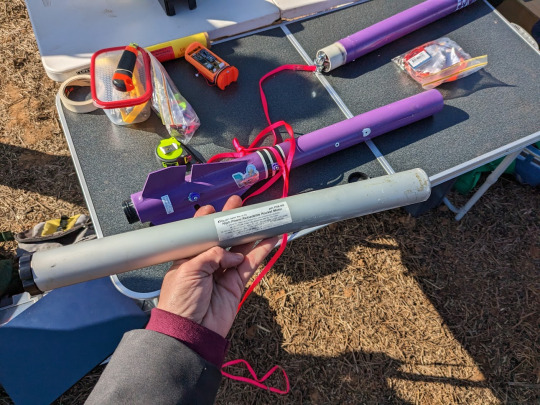
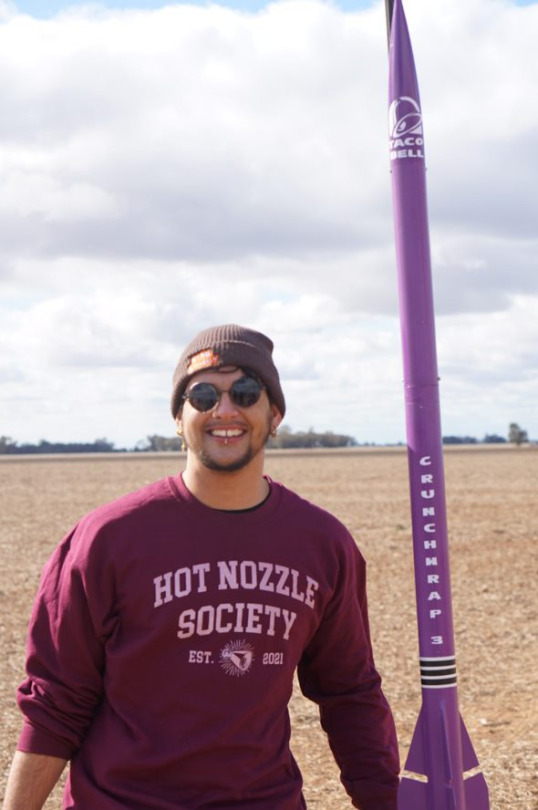
To finish off the construction, I 3D printed rail guides from ABS and bolted them to the body, with a bit of JB Weld in there for good measure. I drilled pressure relief holes in the forward and aft sections of the body, and another in the avionics bay for altimeter readings. I then drilled a more smaller holes and installed screws to pin the nosecone to the forward section, and the forward section to the avionics bay. Since the flight would no longer be traditional dual-deploy, the rocket would not need to separate at these points. Finally, I gave it a purple paintjob and the name of CRUNCHWRAP 3.
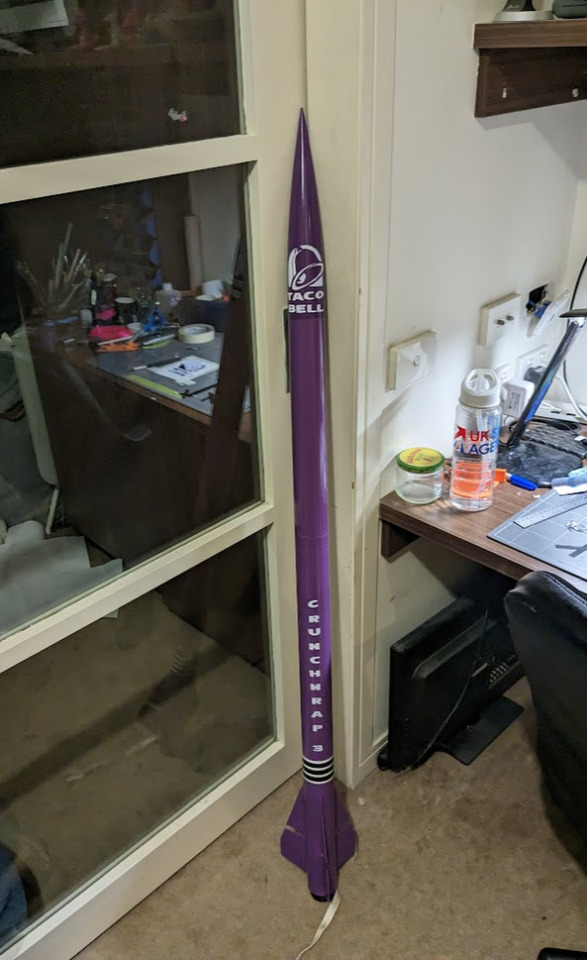
At some point, Taco Bell might see these and send me a cease and desist. I am going to keep building and flying them until they do.
Recovery
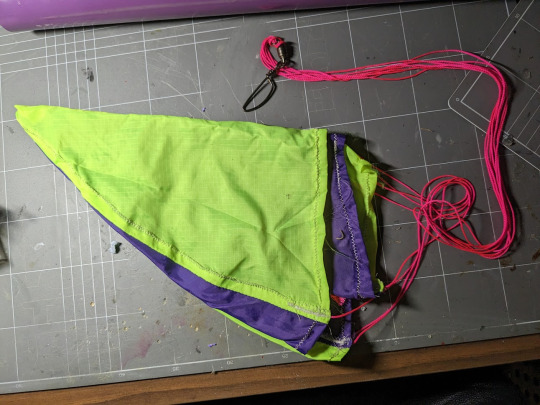
With a proper dual-deploy ejection now out of the question, I turned to my backup plan. My team calls it the 'poor-man's dual deploy', even though it's arguably actually more expensive than using black powder. This involves deploying a drogue with the motor charge, then using a JollyLogic chute release device to deploy the main at whatever altitude you have chosen. There is a substantial risk of the harnessing becoming tangled using this method, but I didn't really have a choice. I used a 4.5m nylon shock cord, tied to the anchored kevlar leash. I divided the cord into thirds, tying a loop at each third. I attached the drogue to the forward-most loop, and the main to the aft loop. Both chutes were on quick links and swivels to reduce the risk of tangling as much as possible. Each of these chutes were wrapped in their own nomex protector, and then placed in the aft section of the rocket with their harness. I used a 36' (91-ish cm) main chute from Loc Precision, and a 40cm 4-gore drogue which I sewed using Scott Bryce's fantastic Spherical Parachute Pattern Generator.

Avionics
Although it ended up not being needed, I decided to send the flight computer I got hold of along for the ride. I thought it would be cool to get an altitude reading to compare with the simulated apogee. A buddy of mine in the US was getting rid of a few bits and pieces, so I bought his RRC2+ off him with the intent of flying it for my L2 attempt. First, though, it needed somewhere to live.
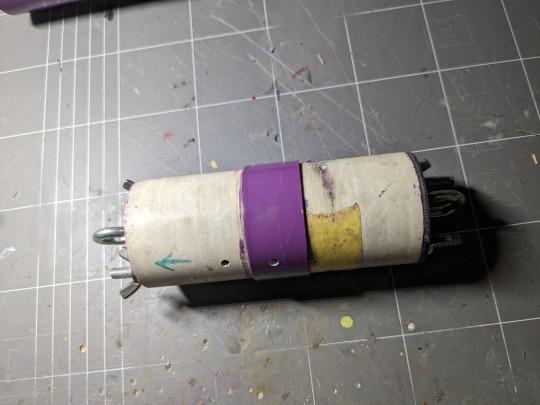
I found the supplied parts for the av-bay were a little lacking, so I added some modifications - the main one being drilled holes for two threaded rods to pass through. I used two for redundancy, since the idea of a single rod made me a little uneasy. I used wingnuts on these so I could fasten them nice and tight without the need for a spanner. It was also missing enough eye bolts, so I grabbed some from Bunnings.
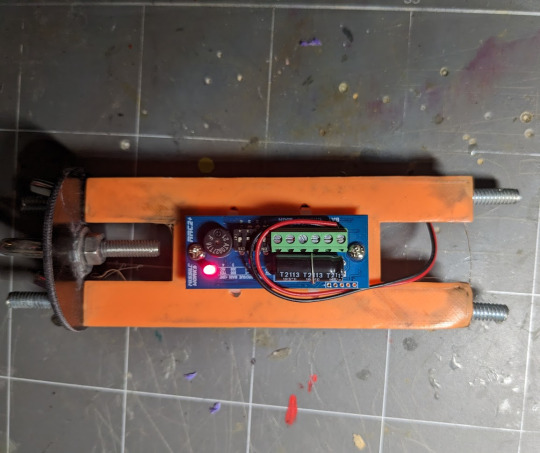
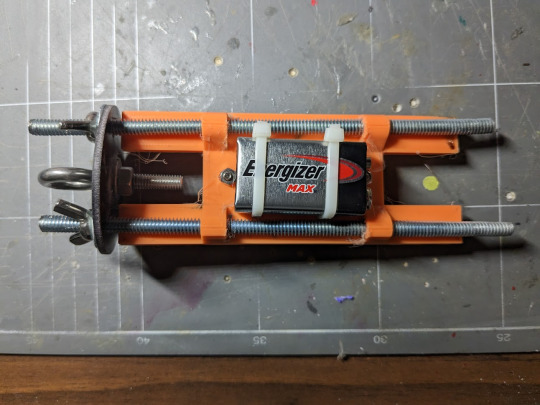
I then designed and 3D printed a sled to fit onto the threaded rods and provide a mount for the battery and the flight computer. A very simple setup. The sled looks objectively awful since the printer was having a bit of a sook at the time, but the actual functionality was not affected and it serves its purpose just fine.
Motor
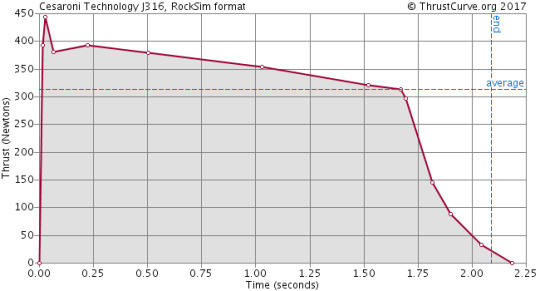
With an unbelievably limited amount of motors available in Australia at the time of writing, I had to work with what I could get hold of. I was lucky enough to snag was a CTI J-316 (pink!!) through my university team, which is a 38mm 5 grain reloadable motor with an adjustable delay of up to 17 seconds. Unfortunately, we didn't have a 5-grain case so I made do with a 6-grain case and a spacer. I only became aware of that the night before the launch, so I had to very quickly revise my recovery packing technique to account for the now limited real estate inside the body.
It provided an average thrust of roughly 316N, with a max of 450N, over a burn time of about 2.1sec, for a total impulse of roughly 650Ns. A pretty tame J motor, but still far more powerful than anything I'd ever flown before.
Simulation
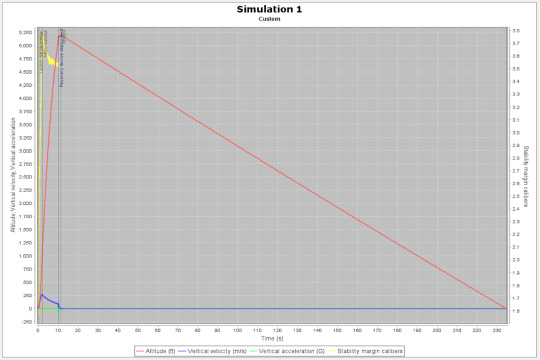
After carefully weighing every single component of the rocket and entering them into OpenRocket, I simulated the flight on the motor above. The entire vehicle weighed 2.7kg, with a length of 1.41m. It was simulated to hit Mach 0.77, and fly to an apogee of 5191ft.
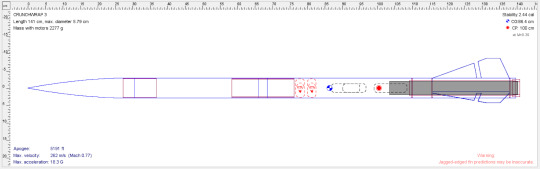
Theoretically, the centre of pressure and centre of gravity would be 0.86m and 1m respectively from the tip of the nose cone. This would give a stability calibre of 2.44 at Mach 0.3 - however, this rocket is quite a bit faster than that. Also, the 'rule of thumb' which says a rocket's CG should be roughly 1.5 body diameters in front of the CP is not as helpful on rockets with a length/diameter ratio of over 10, such as this one (which is 24). Here, the CG should be roughly 10% of the overall length in front of the CP, which it was, almost (9.6%). The stability calibre off the rod was predicted to be only a little over 1.5 (6%), but given that it would be going 31m/s I was confident this would be fine as long as it didn't launch into a strong wind gust. At motor burnout, stability would be up near 3.8 (15%), which I was happy with.
I set the motor delay to the full 17 seconds for the simulations, as anything shorter would have the recovery devices deployed before apogee. This would a) cut the flight short and more importantly b) place a huge amount of strain on the harnessing and chutes due to a very high deployment speed. With the full delay, deployment would be at 11.3m/s, which the harness and drogue could handle easily. Ground hit was simulated to be a brisk but not destructive 6.8m/s.
As an aside, OpenRocket includes a little disclaimer about 'jagged edge fin predictions may not be accurate'. I bore this in mind through the whole process, but based on others I'd seen fly and forum posts I'd read online, I was comfortable with what I was doing.
Flight
L2 certifications require passing a written exam with two sections - technical knowledge and the Tripoli safety code. I had already passed the exam (100%, don't mind if I do) at a previous date, so all I had to do was install my motor, altimeter, and recovery gear. I didn't even have to drill out a delay. After a quick field CG test and a visit to the RSO tent, I was ready to rack up.
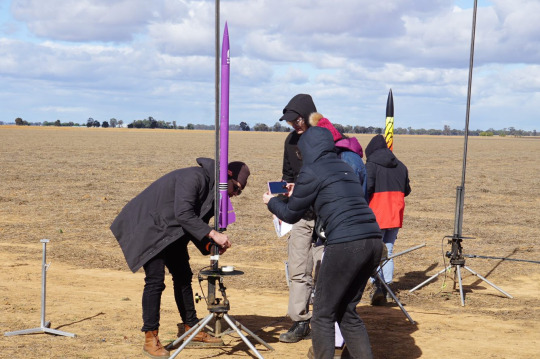
A few new recruits to our team came out to the launch day, so I enjoyed an opportunity to show them how to set up for flight, install an igniter, and test for continuity.
After a small delay to clear the range and ensure the skies were clear overhead, the LCO hit the button.
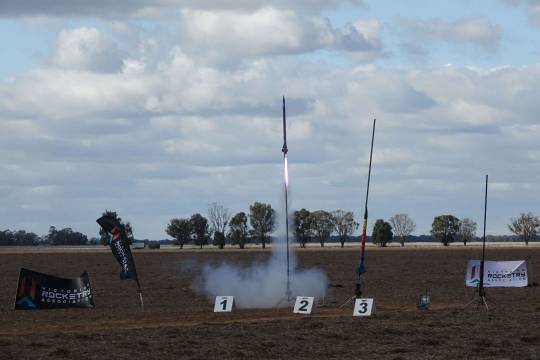
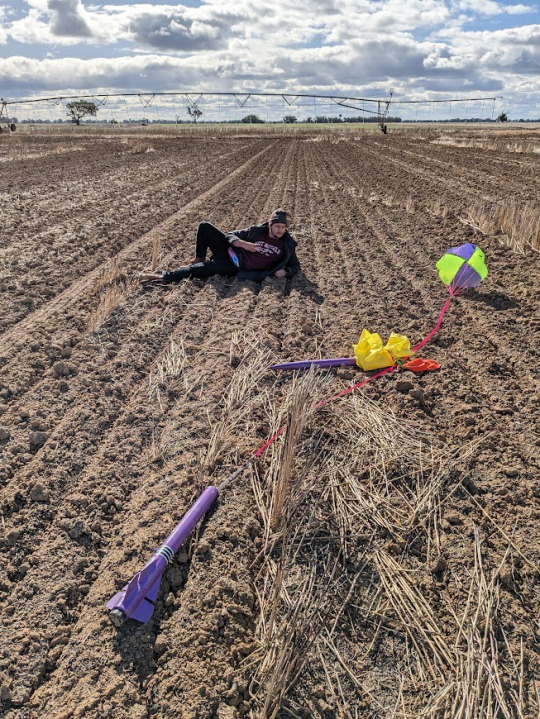
The rocket flew straight and fast on a frankly gorgeous purple flame, and almost instantly got high enough that we struggled to keep a visual on it. A puff of smoke indicated the ejection charge had blown, and then I was able to see the fluoro yellow gores of the drogue as it opened. The rocket began to drift slowly as it came down, as there was a fairly stiff breeze blowing at the time. I had programmed my chute release to 500ft, and it performed as intended. The main chute deployed and thankfully none of the recovery gear got tangled. I watched it gently descend, albeit with a decent drift going on, and set itself down in a field about 800m away. After a gentle stroll (read: powerwalk to warm up, it was freezing), we arrived at the rocket. It had been dragged a little and the chute had become tangled on the ground, but all was intact. One quick pitstop at the RSO tent later, I had my L2!
Upon reflection....
Things to improve
Use a much smaller drogue. The one I flew was about twice as big as it needed to be, and it was far too windy for such a chute. I simply didn't have a smaller one, although making one would have only taken about an hour.
I didn't get any useful readings from my altimeter. I don't believe I set it up properly, so I need to make sure I learn to do that and fly it as a passenger on at least one more flight before I use it as a deployment computer. I am disappointed that I couldn't get a figure to compare with the simulation.
Use a proper stand to rest the rocket on, perfectly horizontally, during construction. This would have avoided the whole debacle of the motor mount slipping and me consequentially having to rip it apart and rebuild.
Things that went well:
Being absolutely prepared and packing my car the night before, and bringing spares of most components, made launch prep a breeze
That was the first flight of my homemade drogue, and upon inspection afterwards there was no damage. I can now be confident that others of the same design and similar construction that I have planned for bigger rockets will perform in a similar way.
The recovery technique worked as intended, with no tangling. This is probably not a viable option for rockets going any higher, but it's nice to have in the back pocket for projects of this scale if black powder and/or avionics access might be an issue
I am also extremely relieved that this certification only took me one shot, rather than the three that my L1 took. I think it reflects well on my progress.
Next:
Fly it again with proper dual deploy, if I can get my hands on some black powder
Scratch build of a rocket of similar scale
...... L3?
2 notes
·
View notes
Last Seen Blogs