#i'm hoping i'll maybe get some writing done on some of the bloggies!
Text
🧜🏾♀️🐚🐠
#TONIGHT'S THE NIGHT!!!#meeting some friends to go see the little mermaid as a lil treat for this week being another bananas shit show 😌😌😌#but it's a long weekend!! and i'm at my boss's dog/housesitting while she's away so!!#i'm hoping i'll maybe get some writing done on some of the bloggies!#either way!! hope you all have a great friday! 💞💞💞#00. // OUT OF AMMO ( OOC POST. )
4 notes
·
View notes
Text
Crafting Wings
I finally remembered today that tumblr is a blog, and that in addition to whatever fandom nonsense I reblog, I can also post bloggy things on it. Obvious, right?
I am making a set of dragon wings for an event coming up in mid-June. They are of course inspired by Simon Snow and will be red dragon wings (though the pattern I bought from them is technically for a wyvern). I'm hoping that posting progress updates here will help me stick to it and actually get it done in time. I'm breaking it down into teeny tiny easy peasy steps and only looking at the very next step to try to keep the overwhelm and executive dysfunction at bay. This is likely to lead me down a path of "If I'd thought about it earlier, I could have..." But you know what? I always end up there anyway.
So first, I spent a long long long long long (long long long...) time trying to decide how to make these wings. I really wanted articulated wings, bonus if I could move them without obviously pushing or pulling or something. But looking at how people had made that happen was overwhelming. They require so much time and skill and I am prone to procrastination and crying and quitting when I mess up. I finally settled on this DIY Mechanical Wing kit by Chimera Wings. That would give me the frame for the wings, but they also have a sewing pattern (with printed AND video instructions) to make the covers for them!
This is what the contents of the kit looked like when I got it:

And this is the completed build! I almost didn't post this because I don't like the way I look, but you know what? Fuck that. I built something cool (using very simple, easy-to-follow instructions, sure) and I don't want to have to find a better fancier more flattering way to film that, so. I'm getting over it.
You can tell that I kinda struggle with the wing on my right side. I clearly need to stretch my arms out before wearing these. Truly. I tried it after I stretched and it's no big deal. Or maybe I'll add some sort of pulley after all. (HAH. Like I'll have time for that.)
Otherwise, the kit and wings are fantastic. It was so easy to put together and they feel very cool to wear. I should probably go write them a review...
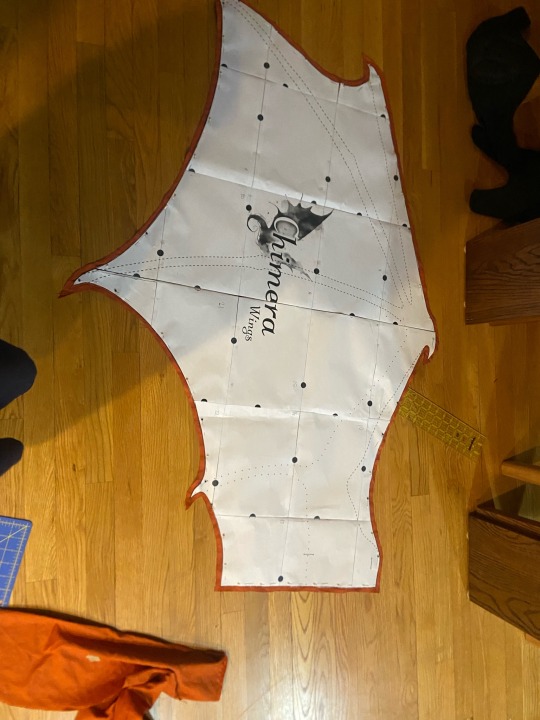
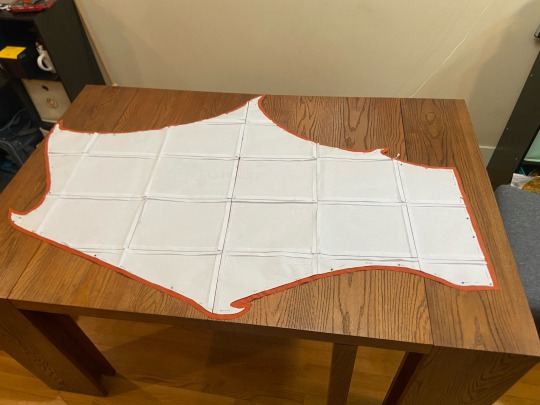
I didn't actually takes pics of the next step, but I printed out the pattern on regular 8.5x11 paper and taped it together. It... was not very well done, but I'm hoping I got it close enough to not have messed up the pattern dimensions. After taping and then cutting out the completed pattern, I could move on to working with actual fabric!
I'm making a mock-up out of old sheets first because I have never once done any sewing project successfully the first time. I decided to mock-up only one wing instead of both, so this will surely be my downfall when I move onto the real deal.
The next two pictures are the front and back pieces for a single wing. I decided to cut them separately instead of at the same time by folding the fabric in half because every time I do more than one layer at a time, at least one of the layers comes out real fucked up. I blame being a lefty in a right-handed world. Scissors are of the devil.
The next step was to make buttonholes that are actually strap holes. I have a little baby basic machine, and it has some limitations. I discovered one of these limitations during my buttonhole test runs. As you can see, the machine-provided "buttonhole" stitches are just... lacking. I messed with a screw that controls the length of these stitches, but for some reason it can only be used to balance out the stitch lengths, not make them overall longer or shorter. I have no control for generally change stitch length. I only have the options presented to me on my stitch chooser knob. Alas, I have less than optimal buttonholes.
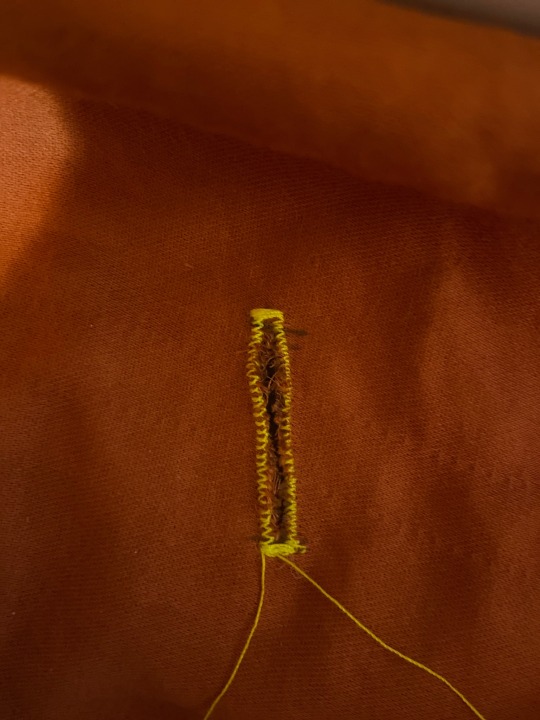

Pictured above: (Left) One very sad buttonhole test. (Right) A second buttonhole test in which one side is almost respectable and the other should be ashamed to call itself a buttonhole stitch.
Finally, I gave up and balanced the stitch lengths and just went with it. When I do the real deal, I will likely go use my friend's much fancier machine. For the mock-up, this is sufficient. The next three pictures show, with increasing zoom and blurriness, the completed buttonholes.


I am intentionally using very bright, contrasting thread so that when I inevitably fuck up, I can hopefully see the point of fuck up more clearly so as to rectify it on my next attempt.
And that brings us up to speed! Next Step: Pin the pieces together. That's it. That's the whole step. How many days will it take to overcome executive dysfunction and do it? Only time will tell.
As long as I can remember to update regularly, future posts should be quite short.
#yes#i also read butthole every single time#it is an unfortunate word#chimera wings#articulated wings#simon snow#dragon wings#diy craft#sewing#cosplay#i know i'm missing some very obvious tags here
11 notes
·
View notes
Last Seen Blogs

stranded-inmiddle-of-nowhere
lost girl

robgraceca
BHGRE Desert Lifestyle Properties

pastortim517-blog
PastorTim517

backlink1004
제목 없음

ish-85-blog
Evol Genius Artwork & Music