#idk there’s too many encoding formats
Note
I still believe the craziest form of computer program storage format from the 1980s is the cassette tape. Logical I get it but to store entire programs on little tape (that I only remember using to play music) is just crazy to me. Idk
Agreed, cassette tape for data storage was really clever. The concept had its heyday was the 1970s in a wide variety of encoding schemes for different computer platforms. It did persist into the 80s, mostly in Europe, while the US switched to floppy disks as soon as they were available for systems. The majority of my Ohio Scientific software is on cassette.
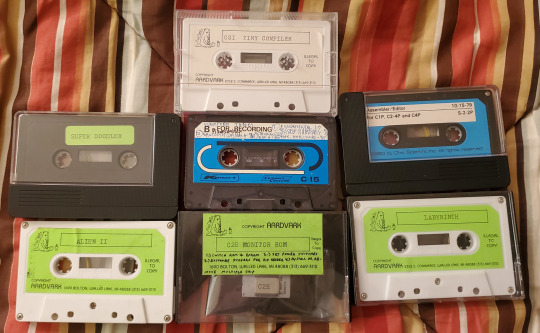
Talking with UK vs. US Commodore 64 users in particular will highlight the disparity in which storage mediums that were commonplace. I've got a few pieces of software on tape for mainly the VIC-20, but I rarely bother to use it, because it's slow and annoying. To be fair, Commodore's implementation of data storage on tape is pretty rock solid relative to the competition. It's considered more reliable than other company's but Chuck Peddle's implementation of the cassette routines are considered quite enigmatic to this day. He didn't document it super well, so CBM kept reusing his old code from the PET all the way through the end of the C128's development 7 years later because they didn't want to break any backward compatibility.

The big thing that really made alot of homebrewers and kit computer owners cozy up to the idea was the introduction of the Kansas City Standard from 1976. The idea of getting away from delicate and slow paper tape, and moving towards an inexpensive, portable, and more durable storage medium was quite enticing. Floppy disk drives and interfaces were expensive at the time, so something more accessible like off the shelf audio tapes made sense.
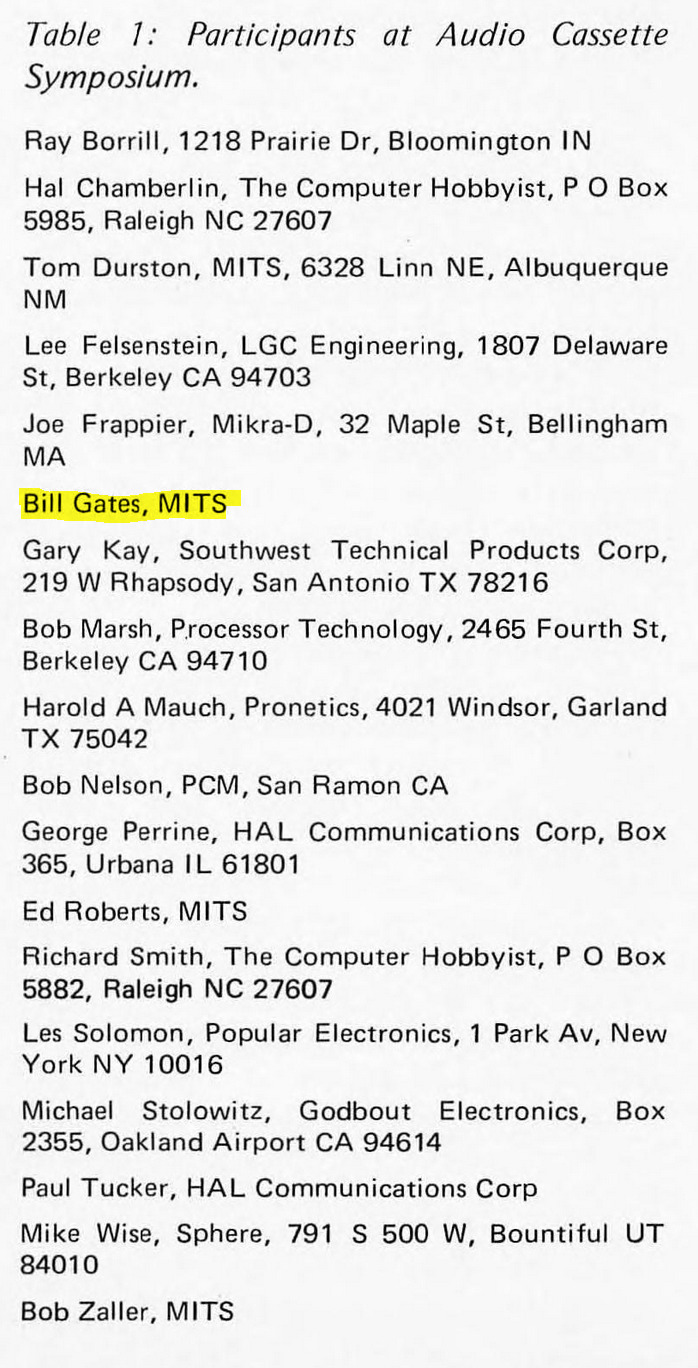
I've linked two places you can read about it from Byte Magazine's February 1976 issue below (check the attribution links).
You might recognize a familiar name present...
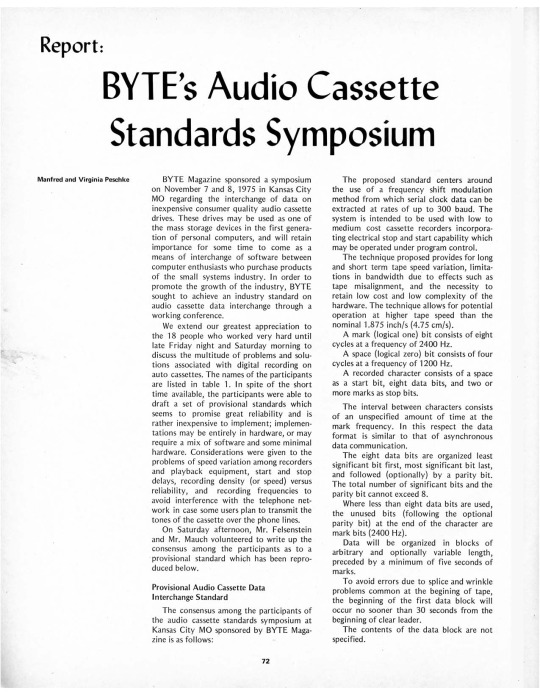
There are a few ways to encode binary data on tape designed to handle analog audio, but the KCS approach is to have 1's be 8 cycles of 2400Hz tone, and 0's be 4 cycles of 1200Hz tone. I say cycles, because while 300 baud is the initial specification, there is also a 1200 baud specification available, so the duration of marks vs spaces (another way of saying 1's and 0's), is variable based on that baud rate. Many S-100 computers implemented it, as do a few contemporary proprietary designs.
The big 3 microcomputers of 1977 that revolutionized the industry (Apple II, Commodore PET 2001, and Tandy TRS-80 Model I) each have their own cassette interface implementation. It kept costs down, and it was easy to implement, all things considered. The Apple II and TRS-80 use off-the-shelf cassette deck connections like many other machines, whereas the original variant of the PET had an integrated cassette. Commodore later used external cassette decks with a proprietary connector, whereas many other companies abandoned tape before too long. Hell, even the original IBM PC has a cassette port, not that anybody bothered to use that. Each one used a different encoding format to store their data, rather than KCS.
Here's a sample of what an OSI-formatted tape sounds like.
And here's a Commodore formatted tape, specifically one with VIC-20 programs on it.
I won't subject you to the whole program, or we'd be here all day. The initial single tone that starts the segment is called the "leader", I've truncated it for the sake of your ears, as well as recorded them kinda quietly. I don't have any other tape formats on hand to demonstrate, but I think you get the idea.
You can do alot better than storing programs on tape, but you can also do alot worse -- it beats having to type in a program every time from scratch.
273 notes
·
View notes
Text
Gif tutorial (Avisynth, Photoshop and Topaz)
okay so I’ve gotten a lot of questions asking me how I get my gifs so nice and smooth and HD and normally I don’t really go into depth because it’s kind of a combination of stuff I’ve learnt over time. My old gif tutorial only outlines using photoshop and is like over a year old so here’s an updated version.
Everything below the cut
So I’m going to break this tutorial down into 3 key parts, avisynth, photoshop and topaz. So you can pick which section that applies for you and each tutorial is basically independent.
Avisynth
disclaimer: not recommended to start out using avisynth, learn and familiarise using photoshop to make gifs first.
some background - why I use avisynth is because it’s a way to downscale the video without/next to no loss at all, so the quality is retained. Definitely check out brandinator’s tutorial and explanations here as he’s basically the innovator for avisynth gifs. He’s also super friendly so if you have any issues definitely hit him up. His tutorial basically explains everything and I guess I’ll just outline what it’s telling you to do.
Drag your video file onto normalwebmrange.bat and a command prompt will pop up
if your file does not work with normalwebmrange, then useless lossless intead
Type in your start time and hit enter, do the same for the end time (must be in hh:mm:ss format, i.e. 00:00:03 for it to start at 3 seconds)
Then after all the frames are done processing resizer.html will automatically open up in your browser
From here you figure out the sizing of your video (please refer to brandinator’s video here because it explain it really well)
For the following steps just refer to the rest of the video because its visually easier to learn off
When you copy your code across, dont include the crop line of code just in case you want to move things around in photoshop later
What do all the options in the resizer.html mean?
GIF size - Here you just plug in the value that you intend for your gif. Refer here for the tumblr post width guides. I personally use:
540 x [anything] for single gifs
268 x 350 for double gifs
177/178 x 250 for triple gifs
Opacity - This slider is just so you can see which part of the video will be shown in your given dimensions and is really useful as a preview to see if everything you want in your gif is visible for that dimension so you can go back and tweak your size if necessary
Resizing - In the bottom right hand corner of the video itself you can click and drag to resize the video so that you can find the desired size/zoom for your given dimensions
Pre-processor - Okay this is the important one and where all the smooth and HD quality comes from. In the first box you are given these options
Use for standard video formats (mp4, avi, mkv etc)
None (choose none for every video that is not a .ts file)
IVTC (tbh idk what this does, but you don’t need it)
1 in 5 Dupe (some videos have a duplicate frame for every 5th frame and this fixes it, kind of rare to use)
Only use for .ts files
Basically the 30 and 60 is talking about 30fps or 60fps, recommend that you choose 30fps for single gifs because you’re going to find it hard to fit anything of substance under 3mb for single gifs. Double gifs can be either 30/60 at your own discretion. Triple gifs can definitely be 60fps without worries about cutting out frames. The fast and slow options are the encoding speed once you’ve saved the avs, slow renders at a better quality but its barely noticeable so you can use fast every time
qtgmc 30 fast
qtgmc 30 slow
qtgmc 60 fast
qtgmc 60 slow
In the second box you can pick between resamplehq, debilinear and dithertools. All you need to know is that you choose debilinear every time and for every video format
Didn’t want to make another comparison gif so just reusing this one again, it’s slowed down so you can really see the different between 30fps and 60fps which you don’t normally feel too much if the gif is faster but definitely makes a difference. Notice the quality differences also between the first two, thats what avisynth helps with the most; making sure the quality loss is minimal

Photoshop
if you haven’t used avisynth to cut/resize your video then you can do that in photoshop, although I recommend that you cut the video first in another editing program so there’s less loading time and strain on photoshop itself (I use to use Adobe Premiere for this)
Refer here for the sites that I use to download my videos from.
Importing/Resizing
Import it into Photoshop (File > Import > Video Frames to Layers)
Match the settings to these

Select the part you want with the slider on the right and hit okay
Once it’s all into Photoshop, make sure you have the timeline/animation window open (Window > Timeline) and you should be able to see all the frames of your gif
If you’ve used avisynth you only need to crop it (Image > Canvas Size; and input in the desired size of your gif) otherwise you’ll need to crop it and then down size it to the desired gif size (Image > Image Size; setting width to either 540, 268, 177/178). Remember to set it to Bicubic and locking the width when you resize it


delete all the unwanted frames from your gifs
Sharpening
At this point I normally apply topaz (so refer below) otherwise you can do standard sharpening now
Select all your frames and layers and then convert it to a video timeline (bottom left of the timeline window)

Convert your layers to a smart object (Filter > Convert to Smart Object)
Then use Smart Sharpening (Filter > Sharpen > Smart Sharpen)
These are the settings that I used before, feel free to tweak them to whatever you like. (Note that .ts files resized with avisynth rarely need to be sharpened at all because sometimes they already look over sharp, and thus we use topaz to clean them up)

After you’re happy with your sharpening, flatten the layers back to frames, make sure your gif is on the first frame (top right hand corner of the timeline (Convert Frames > Flatten Frames to Clips) and then create the frames again (Convert Frames > Make Frames from Clips)
Click the bottom left again to change your video timeline back to frame view and delete the first frame (it should be blank) and your first layer (it should be the one thats still a smart object)
Now everything should look like it did before you did your sharpening except now your gif will be sharpened
Colouring
I’m not really going to tell you how to colour your gifs because everyone does them differently and it’s also kind of each individual’s signature thing, like often I can tell who’s gif it is just by the way its coloured. Things to note here that too many colours and over saturation will lead to your gif file being extremely large. If you want to lower the file size of your gif it’s helpful to note that darkening the blacks and/or brightening the whites helps a lot. Colouring overall can drastically change your gifs so much. Here’s an example


of course you don’t want to change the colours so heavily every time but its just an example of what’s possible
Timing
To change timing (speed) for your gif you just need to select all your frames and then click on the arrow at the bottom of any of the frames and someone will pop up for you to input the time. Generally this is what I use for my gifs
0.02/0.03/0.04 for 60fps
0.04/0.05/0.06 for 30fps
Exporting
After all your colouring and timing is done you just need to export your gif (File > Export > Save for Web (Legacy)), double check that your gif is less than 3mb (in the bottom left) and also here are my export settings. Never lower the colours unless your gif is black and white or you’ll probably lose quality
200212 update: gif size limits have been increased and can reach up to 8mb but have exponential loss in quality the larger the file size. The optimal size is to remain under 3.5mb-4mb, another larger and you’ll start to notice a loss in quality.

Topaz
I’m not going to tell you where and/or how to download topaz because you can probably look that up yourself, there are a bunch of tutorials how on tumblr/youtube etc so you can sort that out. I use Topaz Denoise and Topaz Clean. Topaz Denoise does exactly what you think it does, it removes the noise from your gifs and it helps clean everything up. Topaz Clean is basically the same principle of sharpening but it’s a lot nicer and doesn’t over sharpen like smart sharpening does most of the time. Topaz takes a lot longer than regular sharpening because it processes it frame by frame so if you don’t want to bother and wait for it that’s alright.
Following the same two steps as the sharpening section of the photoshop tutorial, you’ll have a video timeline and a smart object
Then apply Denoise first (Filter > Topaz Labs > Topaz Denoise)
Play around with the settings as you see fit
Then do the same for Clean (Filter > Topaz Labs > Topaz Clean)
After you’re happy with the settings you’ll need to flatten the frames back (refer above to the sharpening section), and then just put on your psd like normal
Sometimes topaz isn’t as noticeable but when compared to original and smart sharpening it’s more noticeable
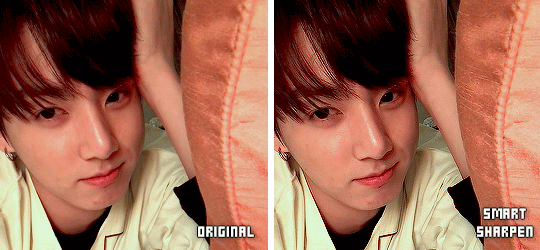
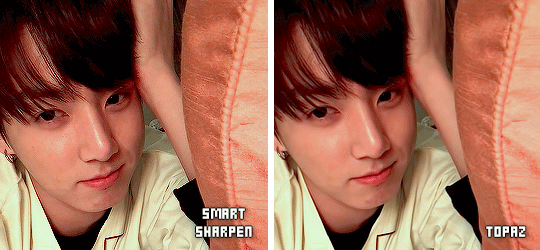
Smart Sharpen, while it does sharpen the gif also increases how grainy it is so for gifs which are originally grainy it’s not a good solution. Meanwhile topaz sharpens it without increasing the grain and can also reduce it. (The gifs above aren’t that grainy so smart sharpening doesn’t look that bad)
Here’s another example of how topaz removes the noise from gifs

Wrap-up
Okay so this is a pretty comprehensive post about everything and anything I know about photoshop and gif-making in general, it outlines all the little steps I take to make my gifs look really nice and just for an overall comparison to show you that the little things really add up

and slower for you to notice the framerate

Additional Video Tutorial Resources:
Basic gif tutorial (photoshop only)
Gif Tutorial
How I adjust for coloured lighting
Colouring tutorial - levels + exposure
Blurring text/captions
If you have any other questions on this or felt like I’ve missed something feel free to send me an ask. Happy Gif-ing!
#text#tutorials#okay this is was longer than i thought it would be#i really hope it covered everything#hmu if you think i missed anything#i proof read it but i probably missed smth so cut me some slack#ive been @ this for like 1387201 hours#long post#this is the most comprehensive thing i've written in my life
1K notes
·
View notes
Last Seen Blogs

cogumelodigital
cogumelos digitais

zerkj0
>>GIVE INTO THE RIDE

pussyverson
Samia Is My Name

terraweek
Terra Week 2018

sleuthy-scientist
The Sexy Sleuthy Scientist