#iprouting
Explore tagged Tumblr posts
Visit Tumblr Blog
Explore Tumblr blogs with no restrictions, modern design and the best experience.
Last Seen Tumblr Blogs


Fun Fact
12.7% of mobile users access Tumblr.
Text


Gain insights into NAT and SNAT concepts for secure and efficient network address translation. Strengthen your network security posture with advanced NAT solutions. https://www.dclessons.com/nat-snat-concepts
#NAT#SNAT#NetworkAddressTranslation#StaticNAT#IPRouting#NetworkingBasics#ITConcepts#NetworkSecurity#InternetProtocol#TechEducation#ITTraining
0 notes
Text
Porady Admina: ip
W dzisiejszym wpisie z cyklu Porady Amina zajmiemy się poleceniem ip https://linuxiarze.pl/porady-admina-iproute-ip/
0 notes
Text
🔑 What are Unroutable IP Addresses?
Non-routable IP addresses, also known as private IP addresses or internal IP addresses, are reserved address ranges that cannot be directly accessed or routed on the public internet. These address ranges are set aside to be used within private networks, such as home or office local area networks (LANs).
Read on 👉 https://www.valevpn.com/post/what-are-unroutable-ip-addresses
IPAddresses #NonRoutableIPs #PrivateIPAddresses #NAT #IPv4 #IPv6 #InternetSecurity #NetworkCommunication #InternetPrivacy #VPN #SecureInternet #InternetProtocol #InternetConnection #OnlineSafety #NetworkAddressTranslation #IPAllocation #DataSecurity #InternetTechnology #IPRouting #IANA #RFC1918

0 notes
Photo

Welcome to the last chapter in a 3 chapter series of articles about routers and routing . 1. How Does a Router work 2 . The Routing Table 3. IP Routing Link in bio Or visit tecparam.com @blank_zone27 #tech20 #latestblogpost #newblog #routing #tech2020 #network #networked #subset #iprouting #routingtable https://www.instagram.com/p/CCbRyeTJDtT/?igshid=sybtnkrmhywn
0 notes
Text
How to login 192.168.1.1?
https://192-168-1-1-ip.club/ visit for how to login 192.168.1.1 and admin page username, passwords.
1 note
·
View note
Text
As of OpenShift 4 release, Red Hat Enterprise Linux CoreOS (RHCOS) is the the recommended and supported operating system running on all OpenShift Container Platform machines. RHCOS combines the quality standards of Red Hat Enterprise Linux (RHEL) with the automated, remote upgrade features from Container Linux. RHCOS does not ship with package managers such as yum or dnf. This OS features transactional upgrades using the rpm-ostree system where updates are delivered by means of container images and are part of the OpenShift Container Platform update process. Without OS package manager and support for direct download and installation of RPM packages the only way to run tools not pre-packaged with the OS is through containers. The good thing is CoreOS comes with a script called toolbox that launches a container to let you bring in your favorite debugging or admin tools. Running toolbox container in OpenShift 4 RHCOS machines You can start the toolbox container using the toolbox script provided. But first access the OpenShift node from where you want to run admin tools in the container. You can use oc debug command or SSH. ### Access node with SSH ### $ ssh core@NodeIP ### Access node with oc debug command ### $ oc debug node/ Access with oc debug example. $ oc debug node/node01.ocp.computingpost.com Starting pod/node01ocpcomputingpostcom-debug ... To use host binaries, run `chroot /host` The prompt comes from a special-purpose tools container that mounts the node root file system at the /host folder, and allows yoy to inspect the files from the node. You need to start a chroot shell in the /host folder as shown in the command output. This will enable you to use host binaries in the shell. chroot /host You’ll see output like below: chroot /host Pod IP: 10.10.30.235 If you don't see a command prompt, try pressing enter. sh-4.2# chroot /host sh-4.4# To start the toolbox container use the following command. # /usr/bin/toolbox The first time you run the script it will download the toolbox container image to your node. Trying to pull registry.redhat.io/rhel8/support-tools... Getting image source signatures Copying blob ec1681b6a383 done Copying blob c4d668e229cd done Copying blob 6b1688d3542f done Copying config 50b63c2aff done Writing manifest to image destination Storing signatures 50b63c2aff8c13f9f8594c9eaf5fc961f39c74df6d9c6ddde8ca705f78f3c14d It will then spin a container using Podman container runtime. Spawning a container 'toolbox-core' with image 'registry.redhat.io/rhel8/support-tools' Detected RUN label in the container image. Using that as the default... command: podman run -it --name toolbox-core --privileged --ipc=host --net=host --pid=host -e HOST=/host -e NAME=toolbox-core -e IMAGE=registry.redhat.io/rhel8/support-tools:latest -v /run:/run -v /var/log:/var/log -v /etc/machine-id:/etc/machine-id -v /etc/localtime:/etc/localtime -v /:/host registry.redhat.io/rhel8/support-tools:latest Run telnet / tcpdump in OpenShift v4 CoreOS Servers Once you��re in the container shell, you can use yum package manager to install debug and administration tools you want. ### Install network tools ### yum -y install iproute net-tools ### Install telnet ### yum -y install telnet ### Install tcpdump ### # yum -y install tcpdump ### Install any other tool ### yum -y install Using telnet: # telnet Using tcpdump: Identify interface name – You need network tools installed. # ip link show | head 1: lo: mtu 65536 qdisc noqueue state UNKNOWN mode DEFAULT group default qlen 1000 link/loopback 00:00:00:00:00:00 brd 00:00:00:00:00:00 2: ens3: mtu 1500 qdisc mq state UP mode DEFAULT group default qlen 1000 link/ether 00:1a:4a:16:01:73 brd ff:ff:ff:ff:ff:ff 7: ovs-system: mtu 1500 qdisc noop state DOWN mode DEFAULT group default qlen 1000 link/ether 4e:66:b9:32:0d:26 brd ff:ff:ff:ff:ff:ff 8: br0: mtu 1450 qdisc noop state DOWN mode DEFAULT group default qlen 1000
link/ether 72:d6:df:e8:13:48 brd ff:ff:ff:ff:ff:ff 9: vxlan_sys_4789: mtu 65000 qdisc noqueue master ovs-system state UNKNOWN mode DEFAULT group default qlen 1000 link/ether 4a:c4:7f:c1:85:f7 brd ff:ff:ff:ff:ff:ff Using tcpdump. # tcpdump This example is for capturing packets from any interface destined to port 443. We’re saving the output to a path in Node file system, accessible on /host directory. # tcpdump -i any port 443 -s 0 -vv -s 0 -w /host/tmp/testpacketname.pcap You can replace any with interface name, e.g: -i ens3 To end the capture press Control-C. Running tcpdump capture from a container Open a debug shell or SSH to a Node where the target Pod is running: $ oc debug node/ ##OR## $ ssh core@NodeIP Identify the ID of the target Pod’s Process ID using the crictl ps command: # crictl ps My container ID is 51a17d9a4b376. Let’s save this as variable. container_id="51a17d9a4b376" Get container PID: container_pid=$(crictl inspect --output yaml $container_id | grep 'pid:' | awk 'print $2') Confirm value: # echo $container_pid 1124033 # ps 1124033 PID TTY STAT TIME COMMAND 1124033 ? Ss 0:00 /bin/sleep 3650d You can the start the tcpdump in the container’s network namespace using the command below. # nsenter -n -t $container_pid -- tcpdump ### Example ### # tcpdump -i any port 443 -s 0 -vv -s 0 -w /host/tmp/testpacketname.pcap Please note that tcpdump needs to be installed in the container before running the commands.
0 notes
Text
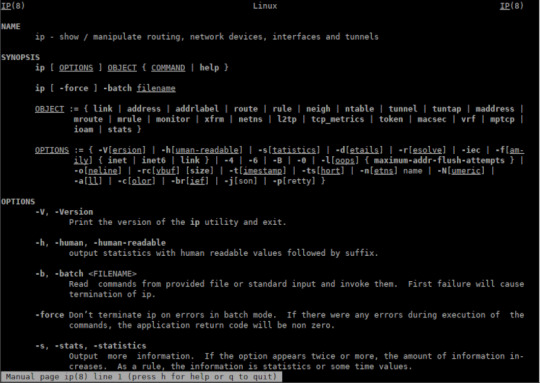
Linux Ağ Arayüzü Yapılandırma Komutu-ip

IP, birçok görevi gerçekleştirmek için kullanılan çok güçlü bir yardımcı programdır. ifconfig ve route komutu gibi birden çok eski yardımcı program daha önce bu işlevleri gerçekleştirmek için kullanılıyordu. Bu yazıda ip komutunu kullanarak ağ arayüzlerini ve rotalarını yapılandırmak için farklı örnekler paylaşacağım . İsterseniz daha önce paylaştığımız ağ arayüzünü ifconfig komutu ile yapılandırma yazısına aşağıdan ulaşabilirsiniz. https://www.siberguvenlik.web.tr/index.php/2019/12/07/linux-ag-arayuzu-yapilandirma-komutu-ifconfig/ ÖNEMLİ NOT: ip komutu kullanılarak yapılan tüm değişiklikler sadece geçerli oturum için uygulanır ve kalıc�� olarak yeniden başlatılmaz. Genellikle günlükleri aktarmak veya sunucuya erişmek için ağı geçici olarak etkinleştirmek üzere linux rescue modunda veya acil durum modunda geçici ağ atamaları yapmak için ipkomutunu kullanıyoruz . ip komutu birçok Linux dağıtımında kullanılabilir durumdadır. Eğer yüklü değilse aşağıdaki komutları kullanarak yükleyebilirsiniz. Redhat tabanlı sistemler için # sudo yum -y install iproute Debian tabanlı sistemler için # sudo apt -y install iproute Tüm Arayüzlerin IP Yapılandırma Bilgilerini Görüntüleme # ip addr show komutu ile mevcut tüm arayüzlerin IP adresini görüntüleyebilirsiniz.

Yukarıdaki çıktıya göre makinemde eth0, docker0 ve loopback arayüz de dahil olmak üzere 3 arayüz vardır. Arayüzlere atanmış IP adresleri ve arayüzlerin MAC adresleri gibi bilgiler ayrıca arayüzlerin UP-DOWN durumu da görüntülenmiştir. Örneğin eth0 arayüzü etkin (UP) iken docker0 arayüzü etkin değildir (DOWN) Belirli Bir Arayüzün IP Yapılandırma Bilgilerini Görüntüleme Sadece bir arayüzün Ip bilgilerini görüntülemek için ip addr show komutu ile birlikte dev paramatresi ile birlikte ilgili arayüz belirtilir. Aşağıdaki resimde sadece eth0 arayüzünün bilgileri görüntülenmiştir.

Bağlantı Durumunu Kontrol Etmek Ağ arayüzlerinin etkin mi yoksa devre dışı mı olduğunu kontrol etmek için ip link komutu kullanılır. Aşağıdaki resimde görüldüğü üzere eth0 arayüzü UP docker0 arayüzü DOWN durumdadır.

Sadece bir arayüzün durumunu görüntülemek için ip link show dev eth0 komutu kullanılır.

Arayüzleri Devre Dışı Bırakma ve Etkinleştirme ip link set eth0 down komutu ile eth0 arayüzü devre dışı bırakılabilir. Aşağıdaki resimde ilgili komutla arayüz devre dışı bırakılmış ve sonra da durumu görüntülenmiştir.

Şimdi de ip link set eth0 up komutu ile arayüzü tekrar etkin duruma getirelim. Aşağıdaki resimde ilgili komutla arayüz etkinleştirilmiş ve sonra da durumu görüntülenmiştir.

Arayüze IP Adresi Atanması ip addr add komutu ile belirtilen arayüze IP adresi atanır. Aşağıdaki örnekte eth0 arayüzüne 192.168.1.67 IP adresi atanmıştır.

Arayüze Atanan IP Adresinin Silinmesi ip addr del komutu ile belirtilen arayüze atanan IP adresi silinir. Aşağıdaki örnekte eth0 arayüzüne atanan 192.168.1.67 IP adresi silinmiştir.

Arayüze Atanan Tüm Bilgilerin Silinmesi Yukarıdaki örnekte sadece atanan IP adresinin nasıl silineceğini gördük. IP adresi, alt ağ maskesi yayın adresi gibi bilgileri tek seferde silmek için ip addr flush komutu kullanılır. Aşağıdaki örnekte eth0 arayüzüne atanan tüm bilgiler silinmiştir.

Arayüzün Ayrıntılı İstatistiklerini Görüntülemek ip link show komutu -s parametresi ile kullanılırsa ilgili arayüzün ayrıntılı istatistik bilgileri görüntülenir. Aşağıdaki örnekte eth0 arayüzünün ayrıntılı istatistik bilgileri görüntülenmiştir.

Mevcut Rotaları Görüntüleme ip route list komutu ile mevcut rotalar görüntülenir. ip route ve ip route show komutları da aynı çıktıyı verir.

Yönlendirme Tablosuna Varsayılan Rota Ekleme ip route add default komutu ile yönlendirme tablosuna yeni bir varsayılan rota girişi eklenir.

Varsayılan Rotayı Yönlendirme Tablosundan Silmek ip route delete default komutu ile yönlendirme tablosuna ekleneni varsayılan rota girişi silinir.

Read the full article
0 notes
Photo

Our practice exams material ensures success on the final for 300-101 Exam- Implementing Cisco IP Routing (ROUTE v2.0) visit@ https://www.troytec.com/300-101-exams.html #300_101
0 notes
Video
youtube
We are in our new linux environment and create some more packages. Less - read files gzip - for compression iproute - to change network device configuration make - a build system libpipeline - to give piping functionallity man-db - the manual database. Please follow me on twitter http://twitter.com/kalaspuffar My merchandise: https://ift.tt/3aqGTZF Outro music: Sanaas Scylla
0 notes
Link
running Ubuntu?
USN-4357-1: IPRoute vulnerability
https://usn.ubuntu.com/4357-1/
0 notes
Text
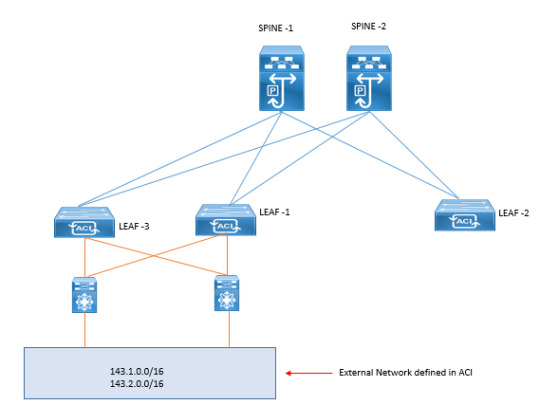
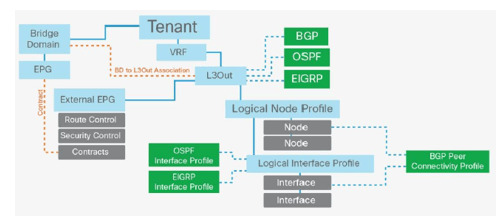
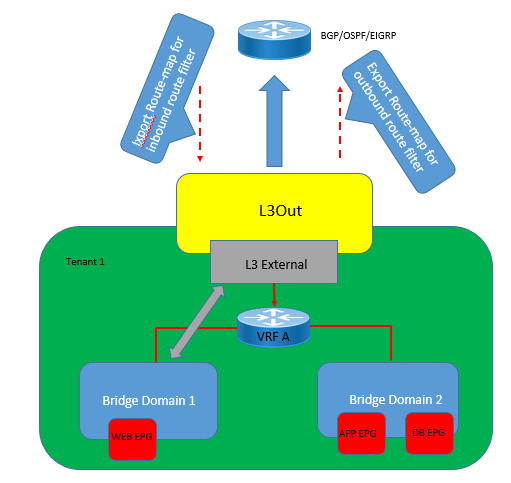
Delve into the complexities of Layer 3 outside external routed networks for seamless connectivity and efficient data routing. Enhance your understanding of network architecture essentials. https://www.dclessons.com/layer-3-outside-external-routed-networks
#Layer3#ExternalNetworks#RoutedNetworks#DClessons#NetworkingBasics#NetworkRouting#OutsideNetworks#ITTraining#NetworkInfrastructure#TechEducation#RoutingProtocols#IPRouting
0 notes
Text
Original Post from Security Affairs Author: Pierluigi Paganini
Trend Micro researchers spotted a piece of Linux cryptocurrency miner, dubbed Skidmap that leverages kernel-mode rootkits to evade the detection.
Skidmap is a new piece of crypto-miner detected by Trend Micro that target Linux machines, it uses kernel-mode rootkits to evade the detection.
This malware outstands similar miners because of the way it loads malicious kernel modules to evade the detection.
The crypto-miner set up a secret master password that uses to access any user account on the system.
“These kernel-mode rootkits are not only more difficult to detect compared to its user-mode counterparts — attackers can also use them to gain unfettered access to the affected system. A case in point: the way Skidmap can also set up a secret master password that gives it access to any user account in the system.” states the analysis published by TrendMicro. “Conversely, given that many of Skidmap’s routines require root access, the attack vector that Skidmap uses — whether through exploits, misconfigurations, or exposure to the internet — are most likely the same ones that provide the attacker root or administrative access to the system.”
Experts noticed that several routines implemented by Skidmap require root access, suggesting that its attack vector is the same that provided the attackers with root or administrative access to the system.
The infection chain sees the Skidmap miner installing itself via crontab, then the malicious code downloads and executes the main binary. The malware decreases the security settings of the target systems by configuring the Security-Enhanced Linux (SELinux) module to the permissive mode or by disabling the SELinux policy and setting selected processes to run in confined domains. The miner also set up backdoor access to the infected system.
Skidmap also provides attackers with backdoor access to the infected machine.
“Skidmap also sets up a way to gain backdoor access to the machine. It does this by having the binary add the public key of its handlers to the authorized_keys file, which contains keys needed for authentication.” continues the report.
“Besides the backdoor access, Skidmap also creates another way for its operators to gain access to the machine. The malware replaces the system’s pam_unix.so file (the module responsible for standard Unix authentication) with its own malicious version”
The main binary checks whether the system runs on Debian or RHEL/CentOS, then drops the miner and other for the specific Linux distro.
Trend Micro experts revealed that the Skidmap miner has notable components designed to obfuscate its activities and ensure that they continue to run. Samples of these components are:
A fake “” binary that replaces the original, once executed it will randomly set up a malicious cron job to download and execute a file.
Another component is “kaudited,” s file installed as /usr/bin/kaudited that drops and installs several loadable kernel modules (LKMs). The kaudited binary also drops a watchdog component used to monitor the mining process.
Trend Micro also described the “iproute” module that hooks the system call getdents that is normally used to read the contents of a directory, with the intent of hiding specific files.
The last component is “netlink,” a rootkit that can fake the network traffic statistics and CPU-related statistics to hide the activity of the malware.
“Skidmap uses fairly advanced methods to ensure that it and its components remain undetected. For instance, its use of LKM rootkits — given their capability to overwrite or modify parts of the kernel — makes it harder to clean compared to other malware.” Trend Micro concludes. “In addition, Skidmap has multiple ways to access affected machines, which allow it to reinfect systems that have been restored or cleaned up,”
window._mNHandle = window._mNHandle || {}; window._mNHandle.queue = window._mNHandle.queue || []; medianet_versionId = "3121199";
try { window._mNHandle.queue.push(function () { window._mNDetails.loadTag("762221962", "300x250", "762221962"); }); } catch (error) {}
Pierluigi Paganini
(SecurityAffairs – Skidmap miner, Linux)
The post Skidmap Linux miner leverages kernel-mode rootkits to evade detection appeared first on Security Affairs.
#gallery-0-6 { margin: auto; } #gallery-0-6 .gallery-item { float: left; margin-top: 10px; text-align: center; width: 33%; } #gallery-0-6 img { border: 2px solid #cfcfcf; } #gallery-0-6 .gallery-caption { margin-left: 0; } /* see gallery_shortcode() in wp-includes/media.php */
Go to Source Author: Pierluigi Paganini Skidmap Linux miner leverages kernel-mode rootkits to evade detection Original Post from Security Affairs Author: Pierluigi Paganini Trend Micro researchers spotted a piece of Linux cryptocurrency miner, dubbed…
0 notes
Text
IP Migration Expert
IP Migration Expert
of this role is to be assigned to delivery programmes as part of the programme senior leadership structure in the capacity as a NPI Network Design Engineer. In conjunction with the Consultant team TPM team Engineering Competence team be responsible and accountable for
Ensure efficient IPRouting Products and Solutions presentations PoC Demos to Customers < li>
The solution architecture is ‘right first time’ and meets contracted compliance levels < li>
Review and validate engineering requirements against product capabilities. Identify issues and options to resolve < li>
Ensure hardware software and firmware versions are identified for solution < li>
Ensure pre existing limitations and defects are identified and taken into account in ensuring that the solution can be engineered to meet requirements < li>
Supports solution Network Consultant in development of solution and customer design reviews < li>
Identify Technical skill gaps of other organization involved in the project and perform workshop OJT if required < li>
Reviews and approves Methods of Procedures prior to implementation< li>< ul>Qualifications < strong>
Tertiary level education preferably Bachelors or Masters degree or equivalent with at least 5 years experience in the Telecommunications solution definition design integration delivery field< li>
IP MPLS Certification< li>< ul> * راتب مجزي جداً. * مكافأت و حوافز متنوعة. * توفير سكن مؤثث أو بدل سكن. * أنتقالات أو توفير بدل عنها. * توفير تذاكر السفر لمن يشغل الوظيفة و عائلته. * نسبة من الأرباح الربع سنوية. * أجازات سنوية مدفوعة الراتب بالكامل. * مسار وظيفي واضح للترقيات. * بيئة عمل محفزة و مناسبة لحالة الموظف. * تأمين طبي للموظيف و عائلته. * تأمينات أجتماعية. التقدم و التواصل مباشرة دون و سطاء عند توافر الألتزام و الجدية التامة و المؤهلات المطلوبة علي: [email protected]
0 notes
Photo

192.168.l.l admin password 192.168.1.1 is the router login IP of TP-Link,Linksys and NETGEAR, 192.168.1.1 belongs to the IP address of the C class address,192.168.l.l belonging to the reserved IP, specifically for router settings.192.168.1.1 router admin login. Default username and password list for all routers. How to find your router's username, password and IP address easily.192.168.0.1. Subnet Mask: 255.255.255.0. Wireless. Wireless Radio: Enable. Name (SSID):, TP-LINK_015040. Channel: Auto (Current channel 6). Mode: 11bgn mixed. Channel Width: Automatic. MAC Address: 00-0A-EB-01-50-40. WDS Status: Disable. WAN. MAC Address: 00-0A-EB-01-50-41. IPRouter Passwords. If you ever get caught having forgotten your password, a useful piece of information is that all routers have default passwords. ... Select your router brand from the following list to display all default router usernames and passwords: 2WIRE, 3COM ... admin, admin. BenQ, http://192.168.1.1, admin, admin.Simple Steps to login 192.168.1.1 IP address. Hit enter button and 192.168.l.l admin page loads in few seconds. Provide Username and Password details of your Wifi router. Generally, you can Find Default Router Username and Password details provided backside of your router or router package box. https://192168ll-adminn.com/
0 notes
Text
Настройка коммутатора D-Link DES-3200
Для примера возьму коммутатор D-Link DES-3200-18 С1 с прошивкой 4.36.B012. Команды аналогичны для коммутаторов с разным количеством портов, они могут немного отличатся лишь при разной версии прошивки и ревизии.
Создадим аккаунт администратора: create account admin ИМЯ config admin local_enable
Включение шифрования пароля: enable password encryption
Включение возможности восстановления пароля: enable password_recovery
Параметры serial порта: config serial_port baud_rate 115200 auto_logout never
Включения доступа через web интерфейс: enable web 80
Отключение управления коммутатором по SSH: disable ssh
Включение доступа по telnet: enable telnet 23
Включение отображения в постраничном режиме: enable clipaging
Настройка ширины окна терминала: config terminal width 80
Настройка количества отображаемых строк терминала: config terminal_line default
Отключение логирования вводимых команд: disable command logging
Удаление стандартного VLAN: config vlan default delete 1-18 config vlan default advertisement enable
Создание отдельного VLAN для управления коммутатором: create vlan core tag 50 config vlan core add tagged 25,26 advertisement disable
Создание VLAN для пользователей: create vlan local_smart tag 51 config vlan local_smart add tagged 25,26 config vlan local_smart add untagged 1-24 advertisement disable
Отключение инкапсуляции тегов VLAN в теги VLAN второго уровня: disable qinq
Отключение авто настройки VLAN и назначение всем портам PVID клиентского VLAN: disable gvrp config port_vlan 1-24 gvrp_state disable ingress_checking enable acceptable_frame admit_all pvid 51
Назначение IP адресе коммутатору в VLAN для управления: config ipif System ipaddress 192.168.1.100/24 vlan core config ipif System dhcp_option12 state disable disable autoconfig config autoconfig timeout 50
Добавление шлюза по умолчанию: create iproute default 192.168.1.1 1 primary
Включение ограничения broadcast трафика для всех портов: config traffic control 1-24 broadcast enable multicast disable unicast disable action drop threshold 100 countdown 0 time_interval 5 config traffic control auto_recover_time 0 config traffic trap none config traffic control log state enable
На всякий случай отключеним зеркалирование портов: disable mirror
Настройка логов: config log_save_timing on_demand disable syslog config system_severity trap information config system_severity log information
Настройка сегментации трафика, запрет хождения между портами: config traffic_segmentation 1-24 forward_list 25,26 config traffic_segmentation 25-26 forward_list all
Разрешение больших jumbo frame пакетов и настройка портов: enable jumbo_frame config ports 1-24 speed auto flow_control disable learning enable state enable mdix auto config ports 25,26 medium_type copper speed auto flow_control disable learning enable state enable mdix auto config ports 25,26 medium_type fiber speed auto flow_control disable learning enable state enable
Разрешение управлением коммутатора только с указанных IP адресов:
1 2 create trusted_host network 192.168.1.1/24 snmp telnet ssh http https ping create trusted_host network 172.16.100.100/32 snmp telnet ssh http https ping Настройка snmp трапов:
1 2 3 4 5 6 7 8 disable snmp traps disable snmp authenticate_traps disable snmp linkchange_traps config snmp linkchange_traps ports 1-18 disable config snmp coldstart_traps enable config snmp warmstart_traps enable config rmon trap rising_alarm enable config rmon trap falling_alarm enable Включение и пример настройки SNMP:
1 2 3 4 5 6 7 8 9 10 11 12 13 enable snmp config snmp system_contact [email protected] delete snmp community public delete snmp community private delete snmp user initial delete snmp group initial create snmp group public v1 read_view CommunityView notify_view CommunityView create snmp group public v2c read_view CommunityView notify_view CommunityView create snmp community public view CommunityView read_only create snmp group комьюнити v1 read_view CommunityView write_view CommunityView notify_view CommunityView create snmp group комьюнити v2c read_view CommunityView write_view CommunityView notify_view CommunityView create snmp community комьюнити view CommunityView read_write disable community_encryption Отключение IGMP MULTICAST VLAN:
1 2 disable igmp_snooping multicast_vlan config igmp_snooping multicast_vlan forward_unmatched disable Включение автоматического назначения PVID портам (стандартно включено):
1 enable pvid auto_assign Настройка и отключение PORT SECURITY:
1 2 3 config port_security system max_learning_addr no_limit disable port_security trap_log config port_security ports 1-18 admin_state disable max_learning_addr 32 lock_address_mode deleteonreset Время хранения (сек) mac адреса в таблице:
1 2 config fdb aging_time 300 config block tx ports 1-18 unicast disable Разрешим нулевые IP для связки адресов mac + ip:
1 config address_binding ip_mac ports 1-18 allow_zeroip enable Можно включить фильтрацию NetBios на портах, так сказать запретить доступ к расшареным дискам:
1 2 config filter netbios 1-18 state enable config filter extensive_netbios 1-18 state enable Настройка фильтрации вредных DoS пакетов:
1 2 3 4 5 6 7 8 9 10 config dos_prevention dos_type land_attack action drop state enable config dos_prevention dos_type blat_attack action drop state enable config dos_prevention dos_type tcp_null_scan action drop state enable config dos_prevention dos_type tcp_xmasscan action drop state enable config dos_prevention dos_type tcp_synfin action drop state enable config dos_prevention dos_type tcp_syn_srcport_less_1024 action drop state enable config dos_prevention dos_type ping_death_attack action drop state enable config dos_prevention dos_type tcp_tiny_frag_attack action drop state enable config dos_prevention trap disable config dos_prevention log disable Блокировка DHCP серверов на всех портах кроме входящего:
1 2 3 4 config filter dhcp_server ports all state disable config filter dhcp_server ports 1-16,18 state enable config filter dhcp_server illegal_server_log_suppress_duration 30min config filter dhcp_server trap_log enable Защита от BPDU флуда:
1 2 3 4 5 6 enable bpdu_protection config bpdu_protection recovery_timer 300 config bpdu_protection trap none config bpdu_protection log attack_detected config bpdu_protection ports 1-16,18 state enable config bpdu_protection ports 1-18 mode drop Включение функции SAFEGUARD ENGINE:
1 config safeguard_engine state enable utilization rising 98 falling 90 trap_log enable mode fuzzy Отключение отправки сообщений на электронную почту по SMTP:
1 disable smtp Настройка SNTP параметров времени:
1 2 3 4 enable sntp config time_zone operator + hour 2 min 0 config sntp primary 192.168.1.1 secondary 0.0.0.0 poll-interval 40000 config dst disable Отключение управлением мультикаст трафиком и немного стандартных параметров:
1 2 disable igmp_snooping disable mld_snooping Параметры ARP:
1 2 3 4 config arp_aging time 20 config gratuitous_arp send ipif_status_up enable config gratuitous_arp send dup_ip_detected enable config gratuitous_arp learning enable Настройка уведомлений о изменении температ��ры:
1 2 3 4 config temperature threshold high 79 config temperature threshold low 11 config temperature trap state disable config temperature log state enable Сохранение конфигурации:
1 save all
0 notes
Text
Cisco 2960S Switch - Ip Routing
Login to switch and goto enable mode.
sdm prefer lanbase-routing
0 notes