#its almost time to try proper dslr photos again
Text


Hand stack (left) and free stack from today, 5 months old!
#dogblr#rory borealis#stacks#stacked photos#oh my god shes looking nice#she's holding her stack so well#its almost time to try proper dslr photos again#instead of just video screenshots#im sooooo excited for her first show#(im wearing boots indoors because its my lunch break and i only have 10 mins for dog activities)#(im not a heathen i usually remove my boots at the door)#i need to remember to lean back while free stacking her#i need her to lean forward a bit more#still im super pleased
37 notes
·
View notes
Text
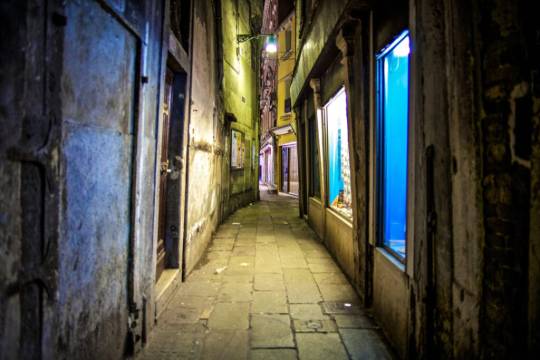
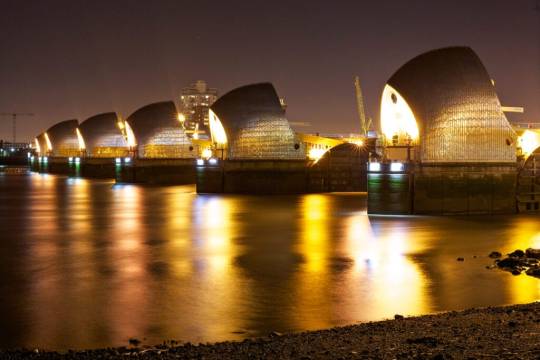
Night Photography Made Easy
Long exposure photography can create dynamic, and sometimes, surreal images full of motion. Whether there is a sense of tranquility, apprehension with regard to the unexpected, or an element of surprise, night images can also evoke a true sense of emotion.
Photographers who specialize in night photography are indeed a special breed. This should not be so surprising when one realizes how much in-depth understanding of light is necessary to capture that perfect photograph. Additionally, there are some rather basic tips any newbie night photographer should know. This, and more, will be covered in this edition of “After Hours Photography,” with a few night photography exercises tossed in to allow you to practice that which is covered. After all, practice - and I do mean a lot of it - will enable you to create magical night imagery!
First thing first, and that is - Know Your Camera! Whether shooting landscapes, or urban settings, trundle through the darkness not only looking for the perfect scene, but experimenting along the way. A thorough understanding of your camera, and what all of the buttons do, is essential for night photography. The last thing you will want, with little light with which to work, is to fumble with your camera and its controls. Not knowing can only make for stressful, difficult photography.
** Take a moment, and have a look at your camera controls. Pay close attention to the Mode Dial. This is where you will set how you will photograph. M = Manual, and this is where I assume you have your camera set. Most DSLR’s today only allow you to keep the shutter open for 30 seconds. For longer exposures than 30 seconds, you will need to know B, or Bulb.
The Exposure, or Shutter Speed dial will be essential to locate, as well as Aperture. If you choose to experiment with ISO (ASA), you will need to be familiar with this button. A more in depth explanation will follow a bit later.
After this, the Playback function may be important to you, and the LCD Screen can be your illuminated guide to all you need to know to make proper image taking decisions.
Invest in a Camera with Low Light Capabilities
Must you buy a top of the line DSLR? If you can, great. If not, what is essential is a camera with Manual Mode, film or a memory card, and a tripod.
Additionally, you will find a wider-aperture prime lens will allow more light in while capturing an image, and bring down noise levels. For instance, a 24mm f/1.4 is fantastic for night photography, but can be a bit pricey. If you are just starting out, consider a 50mm f/1.8 lens, which is typically reasonably priced. The difference between f/2.8, and f/1.8, is quite remarkable as the wider aperture allows an abundant amount of light in for ideal night images.
Cable Release. Remote Control. Self-Timer!
With long exposure photography, even the press of the shutter button can cause slight camera movement. The result will be image blur. If you want a clear, crisp image then do not take the chance by pressing the shutter release button with your finger.
The use of a cable release, remote control, or self-timer (10 seconds is good) will fix this.
Tripod! Tripod! Tripod! or any Steady Surface.
Night photography requires a slow shutter speed, which means the camera must experience no movement to avoid camera blur. None. Nada. Zilch!
There is no human being around who can hold any camera firmly steady below 1/60th of a second. Once the exposure time is below 1/60, a tripod or firm surface is most definitely required. Go ahead, try it, and see what happens.
The truth of the matter is, I rarely carry a tripod while exploring a busy city at night. I find them cumbersome, and a nuisance when amongst the crowds. I am no super-human to hold my camera steady, so I use what is around me - walls, railings, poles, benches, and even the pavement. Typically, more interesting composition is possible using these things. Sometimes, a little breath control is necessary as well. Yes, I hold my breath! Just be creative.
Lens Hood, or some means of shielding a lens from let’s say, the light light from a light post. Night scenes with bright lights, like cities, require a lens hood to prevent lens flares, or streaks, from the light.
Flash Light, or even Light from a Mobile Phone.
While you want to be able to find your camera controls with your eyes closed, some sort of light will be a great help to see the camera buttons, and equipment in the dark.
Turn Off Auto Focus
As much as you may love auto-focus, when you are in a low light situation this may not work as nicely as you hope. Manual focus is the way to go.
Turn out the lights in the room where you are so that you are in complete darkness, then gracefully make your way to the door. Do you reach, and touch, in various places to find your way? Your camera’s auto-focus is doing something very similar, and often can not “grab onto” anything to achieve true focus.
Is it difficult? Sure it can be, though with enough practice, focusing will become easier over time. One trick is to put the focusing ring at infinity ( ∞ ), then adjust from there, if necessary.

Turn OFF the Image Stabilizer!
When shooting from a tripod, leaving your image stabilizer turned on can often work against you, especially if there is motion in your chosen scene. Perhaps this motion are moving vehicles, moving water, or leaves rustling in the wind. The image stabilizer attempts to stabilize these movements, which results in blurring the entire image.
Do not confuse image stabilization with holding your camera steady. Seriously, can your camera make you not move?
Exposure Tools
The metering systems in all cameras are designed for use in daylight conditions. Therefore a meter reading can only be used as a "starting point". There are a few factors in night photography that make camera meters unreliable.
There are features on all DSLR cameras that make photography at night possible. Due to the lack of lighting exposing the image generally takes much longer. This is where the slower shutter speed settings become a valuable asset. Most cameras have shutter speeds up to 30 seconds. Often indicated as 30" on the camera.
B or Bulb setting - Once the shutter dial is adjusted to "B" or BULB, the shutter will stay open as long as the shutter button is pressed and will not close until the shutter button is released.
On film cameras, one way to see this effect in practice is to open the back of the camera when there is no film in it. Then, set the shutter dial to "B" and press the shutter button. The shutter will stay open until you decide to release it. This operation cannot be seen in the same way with a digital camera but the effect can be viewed on the LCD screen after an image is taken. Using this setting may take a small bit of practice because we automatically tend to release the shutter button as soon as we press it. As your confidence with long exposure techniques increases you will want to move beyond that and take photos with shutter speeds of several minutes of more.
T or Timed setting This setting is used in a very similar way to the "B" setting and the same effects can be achieved. The difference between the two though is that using "T" the shutter is pressed once and released to open the shutter. The button is then pressed again to close it. The advantage of this over the "B" setting is that your hands are free, and the risk of camera shake is reduced. Unfortunately, very few cameras have this setting.
When using either setting the timing is done manually by the you. Rather than depending on a cameras shutter timer, you must count off the desired seconds (or minutes) the shutter is to remain open. Often, I use the “stopwatch” on my iPhone. The risk of camera shake, especially with the "B" setting is extremely high.
In order to avoid blur from camera shake using either the B or T setting, some sort of remote release is almost essential.
ISO Setting: It is a common belief that the lower the available light, the faster the ISO rating needs to be to record enough light. Usually this is true, however, fast ISO settings are not always necessary for night photography.
Normal ISO settings (100 to 400 ISO) can be used successfully. The exposures needed would just be longer, sometimes for several seconds. Hence, the need for a sturdy support such as a tripod!

Play with the Aperture
In addition to shutter speed (which determines exposure time), you can play around with the aperture size of your digital camera. There are two scenarios here. If you set a long exposure, try to use a small aperture, such as f/16 to avoid overexposing any stationary lights. in the picture. On the other hand, if you set a short exposure, try using a larger aperture such as f/3.5 to avoid limited motion in your shot.
The more you practice, the more you will know how to develop your own nighttime photographic style.
Artificial Lighting (White Balance)
With night photography, the lighting you are using is all artificial except for any residual daylight at dusk or dawn. To complicate matters different man-made lighting sources give off different color casts. A typical night image may have numerous different types of light sources lighting the scene. These would be of different strengths and colors. This fact often adds to the impact of the night photograph.
The color casts given off by artificial lighting can be changed through the use of the White Balance setting on a digital camera.
Have you ever taken a photo at night, and there is a yellow/orange hue dominating the color? This is because your white balance setting is set to daylight, or cloudy. Change your white balance to the “light bulb,” and see the difference. If you are a bit more advanced, you can manually adjust the color temperature right in the camera.
Composition
Now that you have all the necessary tools to confidently head out into the night, let’s touch upon composition. Part of the appeal of long exposure photography is that it helps you practice your composition skills. Keep in mind that composition is key, and when using a tripod, it is best to adjust the height either above, or below, eye-level. Stand on higher ground to get a broad perspective of your scene, or use a smaller tripod to look slightly upward for a majestic feel.
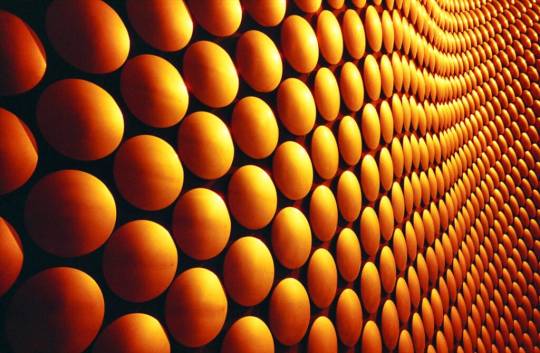
Find Interesting Elements to Create an Artistic Interpretation
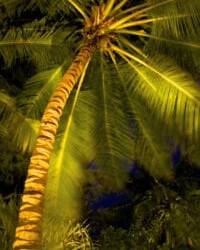
As you observe a scene, you will find that the elements of your composition comes in all shapes and sizes. Perhaps there is a rugged, or funky-looking, tree, a group of jagged rocks alongside calm waters, or an architectural feature in the city. These elements do not take away from your main subject, but instead adds a focal point that draws the viewer into the entire image.
No matter where you find yourself, play around with your surroundings, and don’t give up if you do not see the ideal composition right away. Move around! Avoid eye level, get high, get low, turn sideways: whatever it takes to create a stunning image. Do not expect to create fabulous night images without experimenting, and learning by trial and error.
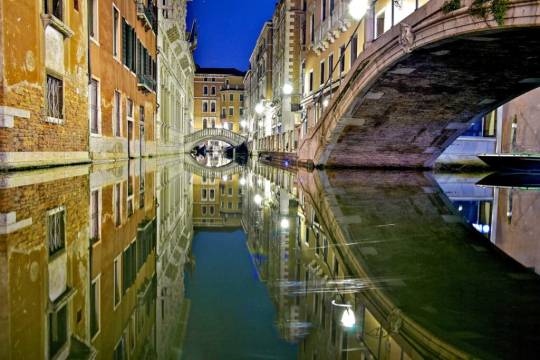
Follow the Lines
It would be better for you to apply the same rules that are applied to landscape pictures. Lead with lines into the main part of the scene so that the viewers are lured by your impression through the darkness. You can consider the streetlights, the light from moving traffic, or even brightly lit fences as lines.
After all, lines and curves and shapes are prominent aspects of photography – from architectural to fashion. Follow them to compose your image. Frame it so that a line literally starts at one corner of the frame and extends diagonally. Instantly, you are following the rule-of-thirds, which is essential to any good photograph.
Know your Light
Light is the main ingredient of any photograph. Without it, we all would have a lot of empty frames to show off to everyone.
Choose any one particular area, and have a walk around during various times of the day, or night. Notice, at these different times, how the light is different, and how it effects a potential scene. Make a note of this, and again walk around, but this time with your camera. Take some photographs during these different times, and compare the difference in light, and how the light affects your scene.
Here are the four lighting situations you will most often see used in long exposure photography:
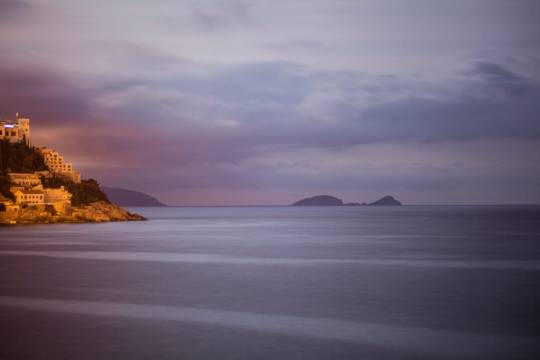
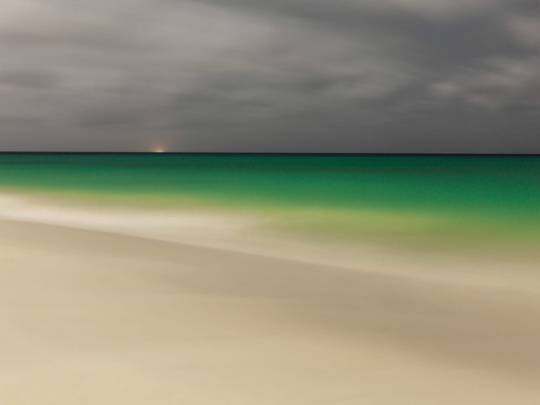
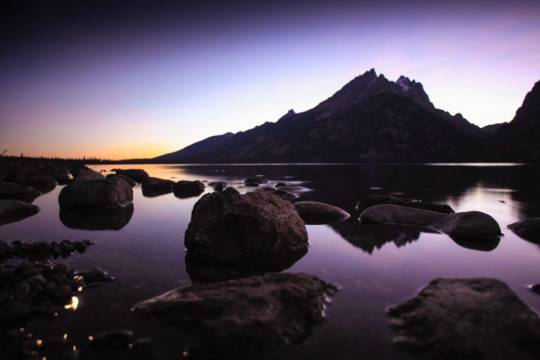
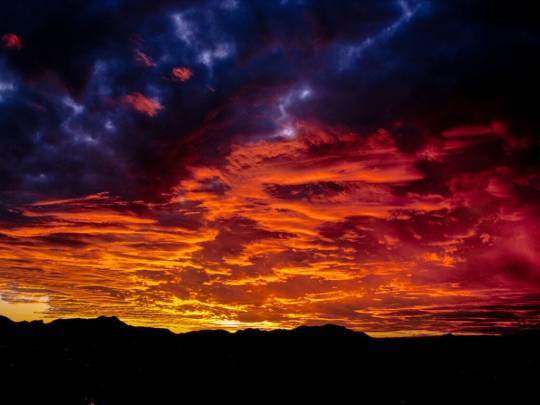
Sunset or sunrise. It’s fairly obvious why. These are beautiful times to take photos. A good time to take long exposure photos is when the sun is below the horizon (before sunrise or after sunset) as there is less contrast and the light levels are lower, allowing longer shutter speeds.
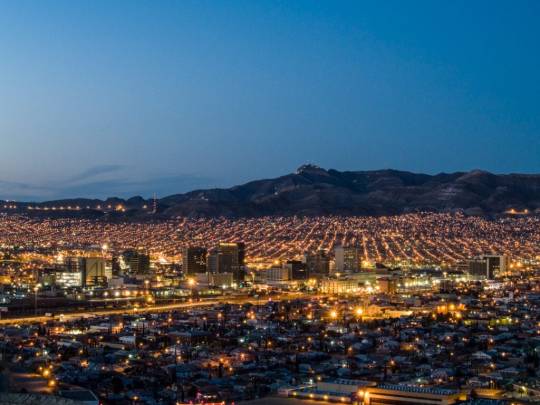
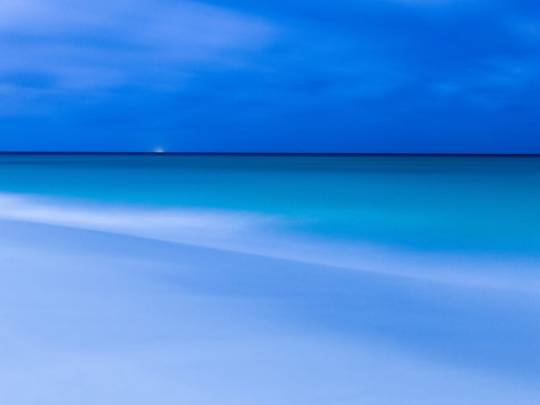
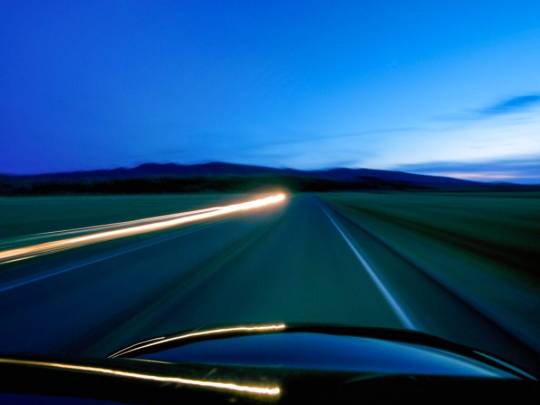
Twilight. Also known as the blue hour because of the color of light at this time. This is the period between sunset and night (or night and sunrise) when light levels are low and the fading light illuminates everything in a brilliant glow.
Overcast days (for landscape photography). This is popular with photographers who use nine or ten stop neutral density filters to obtain long shutter speeds during the day. If the sun was out, especially during the spring and summer months, the light would be too harsh for good landscape photography. But on a cloudy day, moving clouds add interest to the sky.
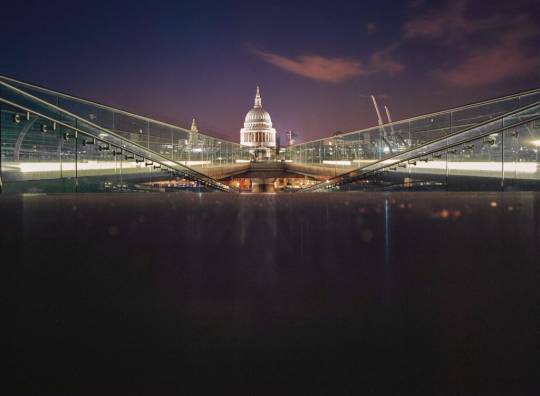
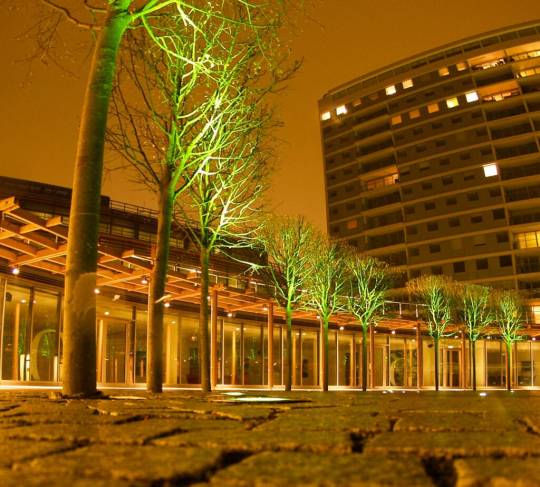
Sunny weather (for architectural photography). Some photographers take long exposure photos of buildings during the day. A requirement is that there are clouds in the sky. Moving clouds create the contrast between the buildings and the changing sky that you need for a successful long exposure photo.
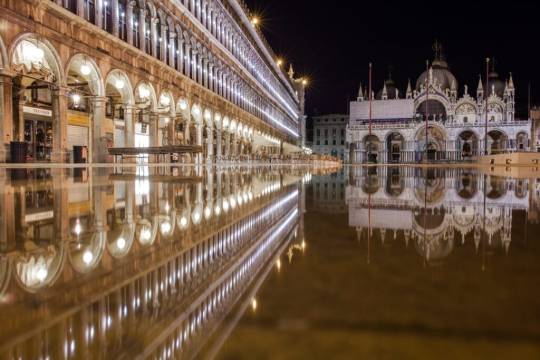
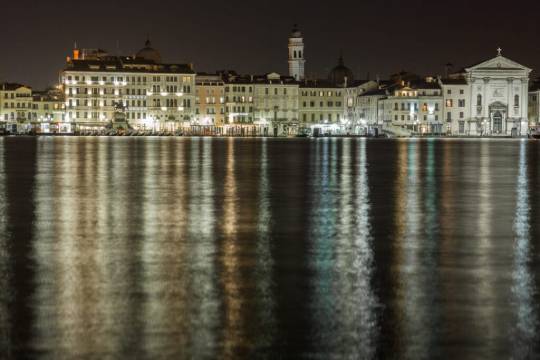
Look for Interesting Lighting Sources
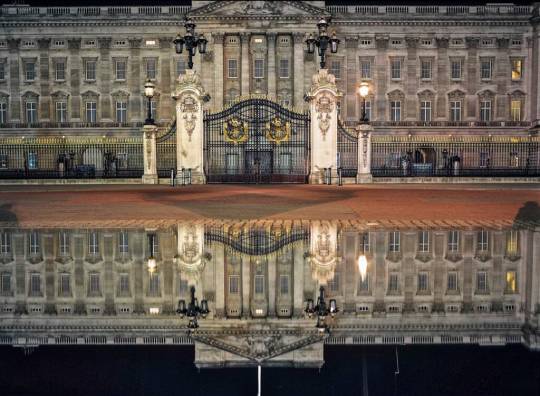
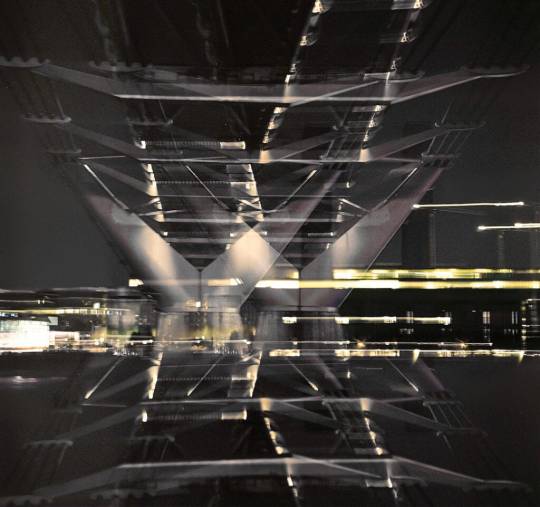
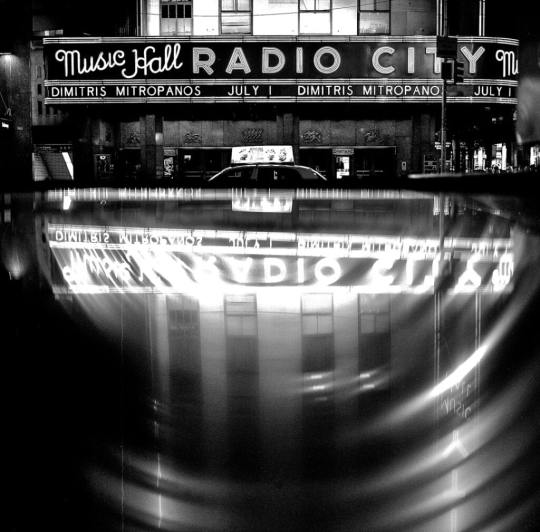
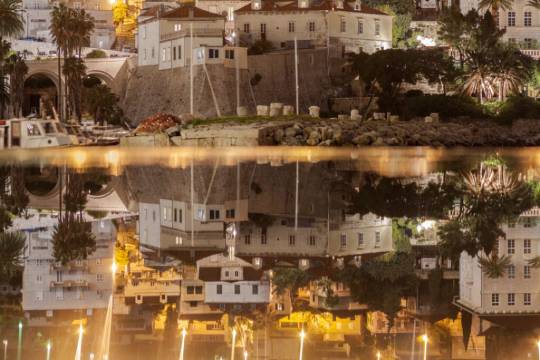
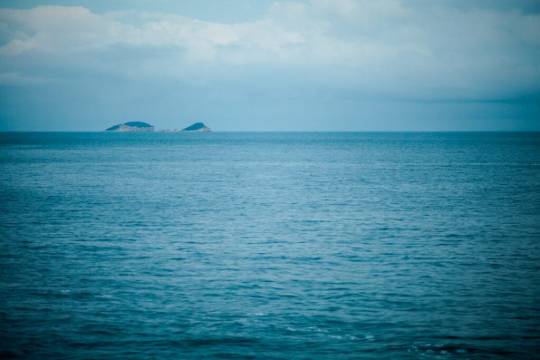
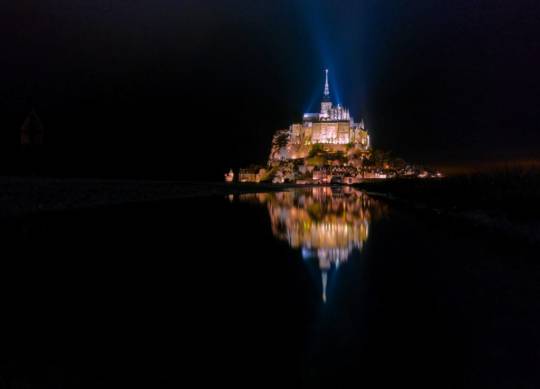
Look for bridges, piers, city buildings, boats, the stars and moon. All of these emit light that’s excellent for reflecting off the surface of the water. Experiment with different locations to get different colors and shapes.
For instance, light from the sky will reflect and brighten up the water smoothly and uniformly. But look at the reflections of buildings and you see something more abstract. Geometric shapes appear because of the angularity of the buildings. Whether you want the simplicity of a clear night sky to light up the ocean or lake or the complexity that man-made structures brings, find interesting lights to enhance the look of the water.
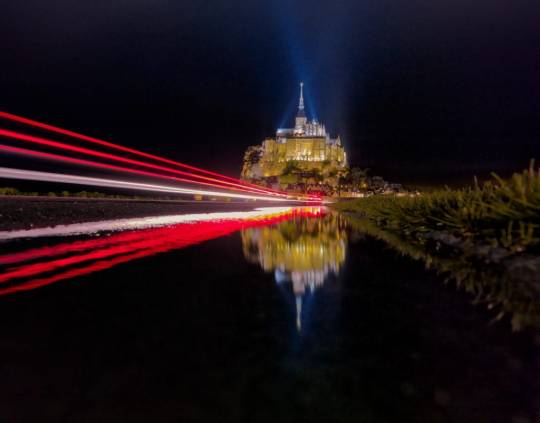
Capture Motion
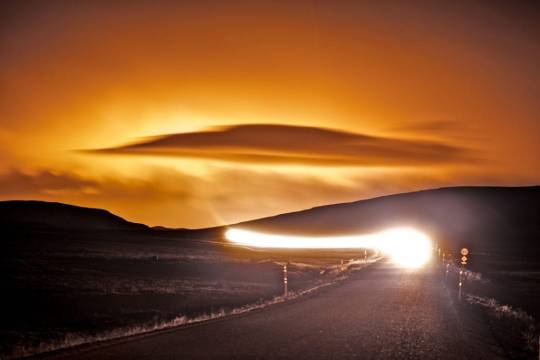
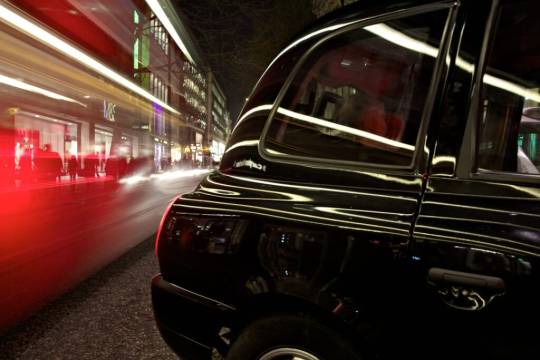
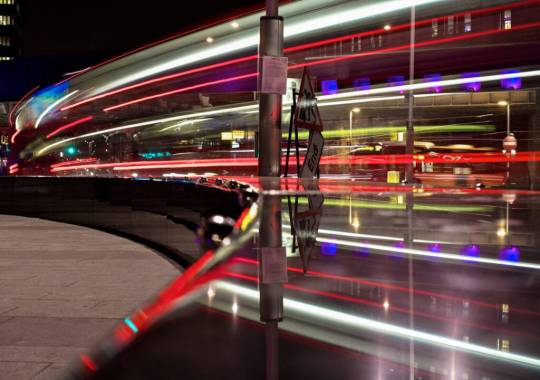
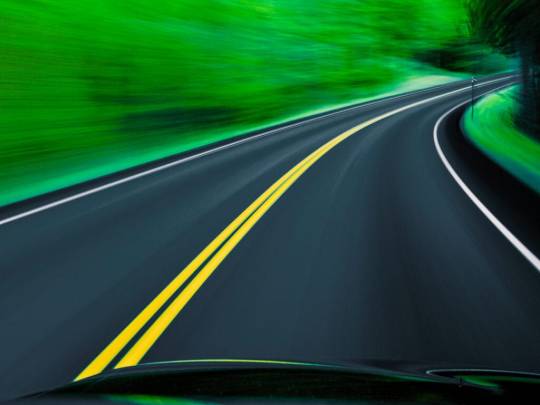
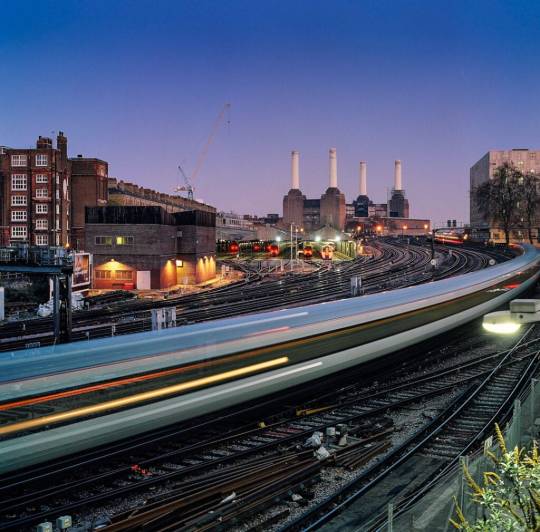
With a long exposure, you have many creative options when it comes to photography. This includes capturing motion. For example, have you ever wondered how professional photographers shoot pictures of trails of car lights as they zoom down the highway at night? It is all due to long exposures. Try to keep this in mind the next time you’re taking a night photo – you don’t have to restrict yourself to still images.
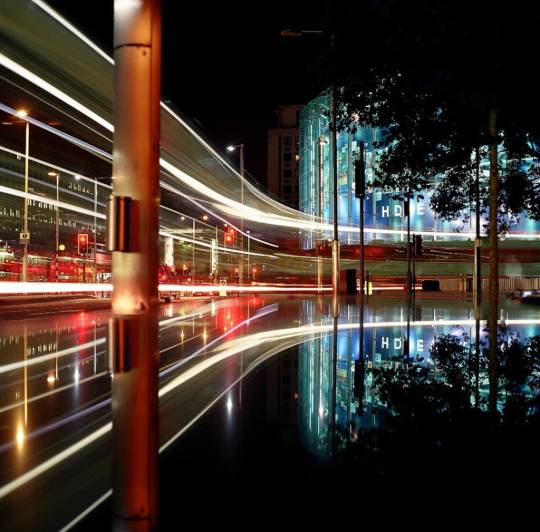
With extremely low light levels, moving subjects such as people walking will not register in the image so long as there is very little light shining upon them. Cars are a good example of using this technique.
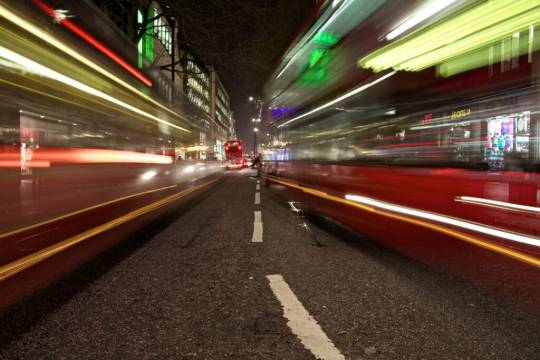
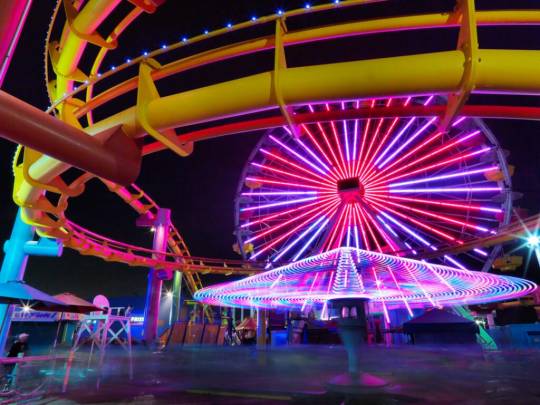
With long shutter speeds and moving cars, the headlights and taillights will register as streaks. The cars themselves will not register on the image. This effect can also be used at fairgrounds where amusements lighting can be recorded while moving.
Fast Shutter Speed - If you want the movement in your night photos to be clear an in focus, use fast shutter speeds. Because of the low light, a larger aperture/higher ISO will be needed
Slow Shutter Speed - If you want to blur the motion, use slow shutter speeds, smaller apertures, and a lower ISO.
Remember that when you lower the ISO, you should be setting a longer exposure to maximize the available light you’re working with. Nighttime images also tend to look very grainy because photographers bump up the ISO to compensate for the lack of light. But in doing so, you limit yourself to the amount of time you can expose a scene. The longer you leave the shutter open, the more the motion of your subject will appear.
So, there you have it - the basic tools to get you started with night photography. It may seem a bit intimidating at first, but I guarantee, with practice, you can produce absolutely fabulous night images. Of course, daytime is fantastic for photography, but it is after hours when the magic begins.
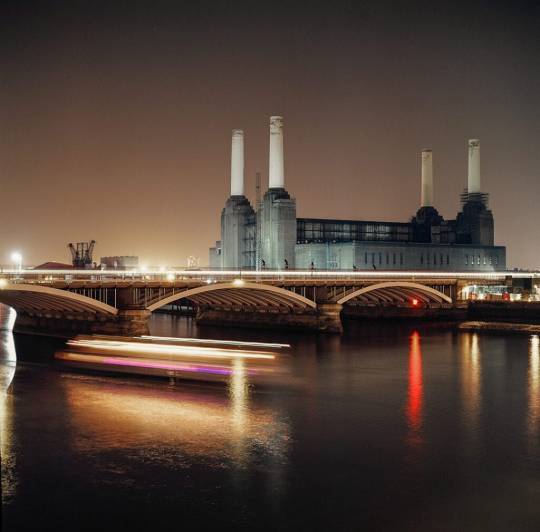
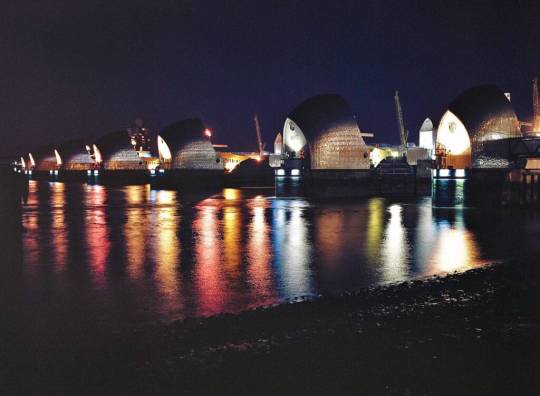
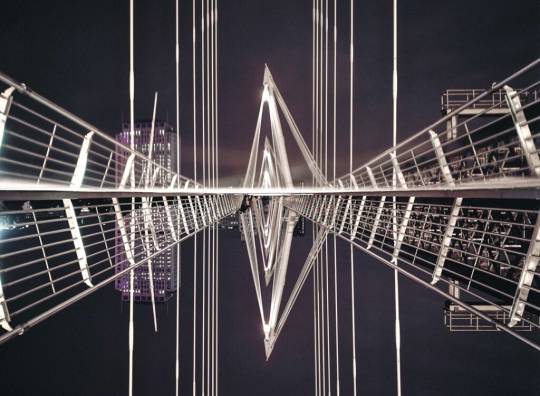
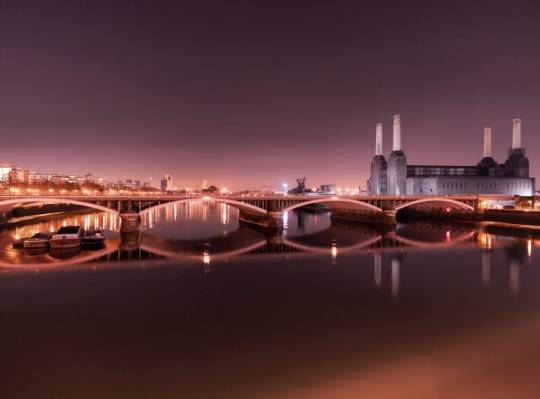
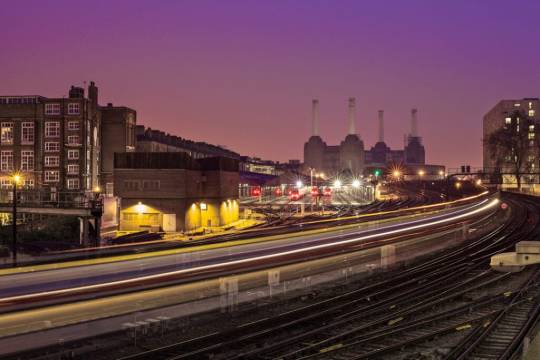
Shadows become wildly different, and the twinkling lights of any urban setting, large or small, create an ambience like no other. I often photograph London at night. This bustling cosmopolitan city becomes almost vulnerable after the sun goes down, and there is a tranquility about her during this time like no other. The architecture shows off beautifully as it is illuminated in the night sky, not to mention the mystery of what might be around the corner.
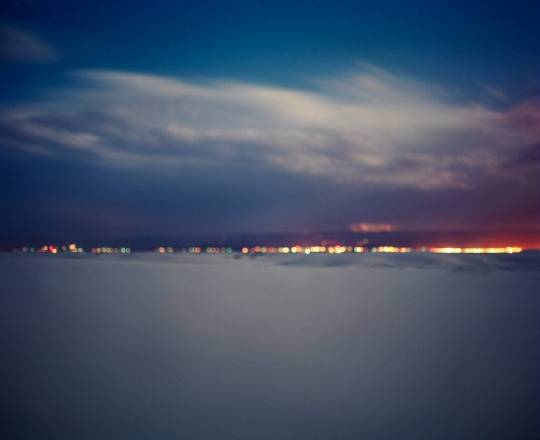
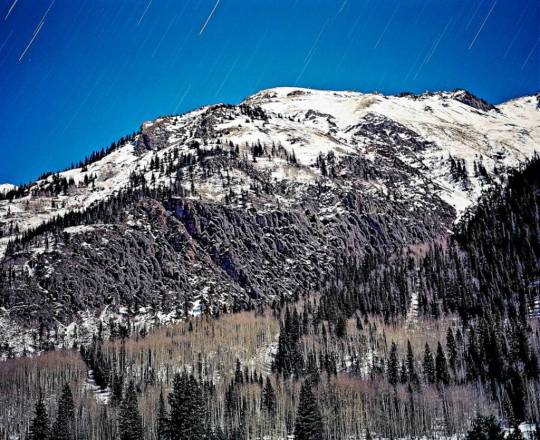
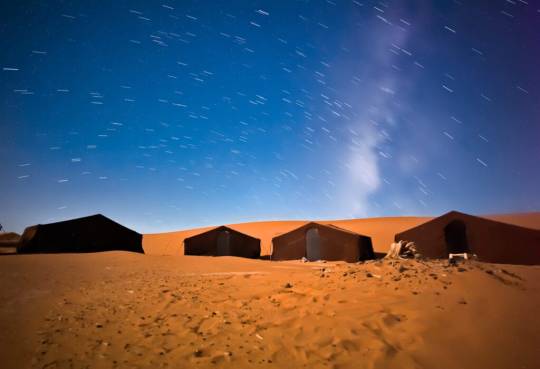
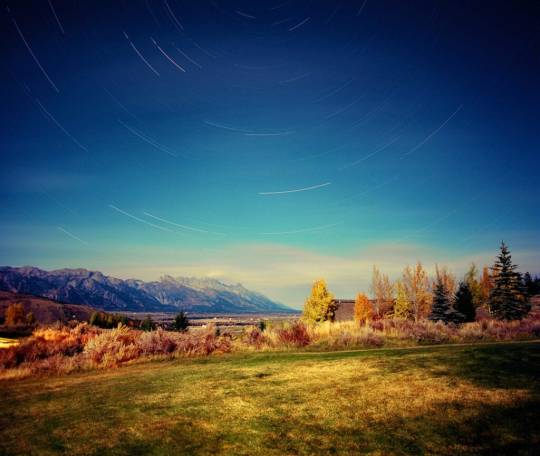
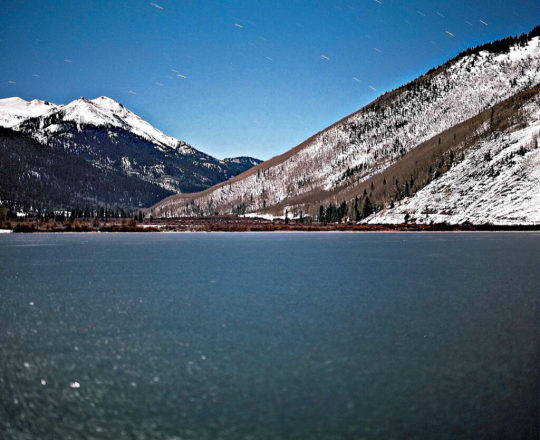
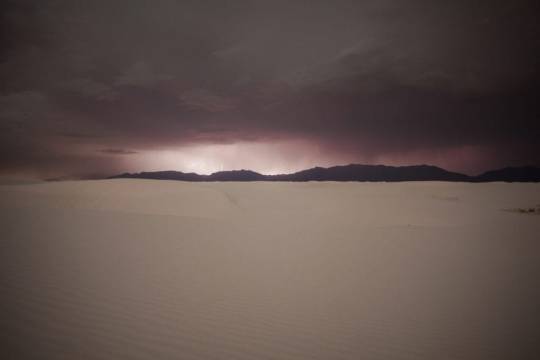
Landscapes, too, offer brilliant opportunities during the night hours. There is a bit more difficulty as there may be very little light, unless the full moon shines brightly above. The solitude of nighttime landscape images can evoke emotions that can create beautiful stories. Mountain ranges, or rolling rivers, and the calmness of lakes offer a sense of serenity that I completely adore.

Read the full article
0 notes
Text
Days 8-10: Northern Lights and the Blue Lagoon
On Thursday morning Chris and I woke up relatively early (9:30-ish, around sunrise), and got breakfast at our hostel. After that we got on the road, driving north from Reykjavik to Akranes, a mountainous peninsula about 20 minutes up the coast. To get there, we drove through Hvalfjörður Tunnel, a 6-kilometer stretch of road that spans the length of the Hvalfjörður fjord. On the other side of the tunnel we took some pictures with our Jimny, and then continued up the road to Borgarnes, a small fishing community framed by mountains roughly 25 miles away from Reykjavik. The mountain views of Iceland are the stuff of legend.
After taking a requisite amount of amazing scenery photos, we turned around and drove back down to Keflavik Airport to pick up John, another of my friends from high school who’s currently studying abroad in Prague. We picked him up, and proceeded out of the greater Reykjavik area towards Lake Thingvellir to give him an initial sense of the climate and lack of density of this crazy country. About 20 minutes outside the city, arctic force winds infused with stinging hail forced us to turn back. We got John checked into our hostel, then went out for dinner at Noodle Station, Reykjavik’s cheapest meal at $16 per person, for some Icelandic pho noodles with spicy peanut sauce over beef and chicken. Not exactly traditional Nordic fare, but under the circumstances, a perfect meal with which to warm up.
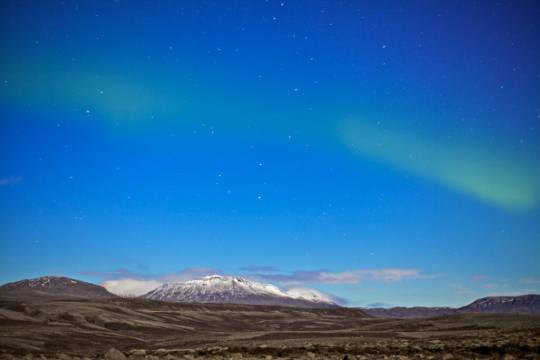
Nothing could have prepared us for what happened next. After dinner, we drove out of the city in anticipation of seeing the Northern Lights. We did. They’re best shown through photos since not much I write here will be able to convey the sheer wonder we felt. Smartphone cameras don’t do much to capture them, but luckily Chris brought his DSLR for long exposures, some of which will shortly follow this post. Seeing them in person was really, truly life-affirming stuff. It was a moment of almost unimaginable sincerity and true natural beauty I won’t soon replicate. “Well that’s one of the coolest things I’ve seen in my entire life,” already a running line of the trip, was uttered many times by all of us that night. We went to several different places with varying degrees of light, culminating in an area about 20 minutes outside Reykjavik where we saw a solid bar of Aurora Borealis that spanned the entire sky.
We later found out that Auroras occur when when the Sun sends off small particles into space. These particles are mainly electrons, with charge and energy, which means they contribute to electricity. Earth has a protective shield of energy around it called a magnetic field, which forms an elongated sphere around the Earth called the magnetosphere. The Earth’s magnetic field keeps off most of the Sun’s solar wind. At high-latitude areas (polar areas), the magnetic field is vertical. It does not keep off particles of the solar wind which can come from the magnetosphere and hit the particles of the air (Earth's atmosphere). When they hit, the atmosphere is heated and excited and the excess energy gets away, a phenomenon which can be seen as moving lights in the sky above 100 km altitude typically, best viewed in places like Iceland between October and April (Wikipedia). Without a doubt, seeing the Northern Lights was one of the coolest things I’ve ever personally experienced and it’s not something I’ll ever forget. That alone was worth this entire trip. We got back to our hostel at around 1am and fell asleep shortly thereafter, all of us thoroughly in disbelief at our good fortune.
Friday morning we got up at around 10:30, ate breakfast, and drove to the Blue Lagoon, a geothermal spa about 40 minutes outside Reykjavik on Iceland’s Southern Peninsula. The Blue Lagoon is man-made, fed by the water output of the nearby geothermal power plant Svartsengi. Superheated water is vented from the ground near a lava flow and used to run turbines that generate electricity. After going through the turbines, the steam and hot water passes through a heat exchanger to provide heat for a municipal water heating system. Then the water is fed into the lagoon for recreational and medicinal users to bathe in. The water is renewed every two days, and is rich in minerals like silica and sulfur. Bathing in the Blue Lagoon is reputed to help some people suffering from skin diseases such as psoriasis. At a perfect 99-102 degrees Fahrenheit, it contrasted amazingly with the 27 degree temperatures outside (Wikipedia).
The Blue Lagoon is also probably one of the ritziest places I’ve ever been. It’s so fancy, they sell Canada Goose jackets in their gift shop. Skincare products made from the algae and silica of the lagoon cost up to $350 for three small tubes of ointment. It’s Fancy with a capital F. It was also easily the most relaxing part of the trip- sitting in the turquoise water with a silica mud mask, sipping a beer, framed by Icelandic mountains and lifeguards wearing parkas... it was quite an experience, to say the least.
We ended up staying for around four hours, before drying off, piling back into our Jimny, and driving back to Reykjavik, this time driving through the Reykjanesfólkvangur, a nature preserve filled with lava formations, crater lakes, and geothermic fields. It was at this point in our trip that we discovered that Iceland makes some seriously killer 70s-esque pop music, most notably the 2015 Helgi Björnsson classic “Ég fer á Land Rover frá Mývatni á Kópasker” which became a running theme song for the last two days of the trip. They also make amazing Christmas music, like “Snaefinnur Snjokarl,” an Icelandic rendition of “Frosty the Snowman.” Between Icelandic pop and Icelandic Christmas music, the rest of our trip was filled with some seriously thematic tunes.
Once we got back to Reykjavik, we opted to go to Noodle Station again. It was that good (and that cheap, compared to the rest of Iceland’s dinner options). John had an early flight the next morning so he opted to turn in early after dinner, while Chris and I headed back out of town to try to see some more Northern Lights. We got just as lucky on our second night, and yet again saw some truly unbelievable, mind-bendingly beautiful sights.
Yesterday morning we got up, checked out of our hostel, and drove over to Hallgrímskirkja, Iceland’s largest church and one of the country’s tallest structures. Commissioned in 1937 and fully completed/consecrated in 1986, it has a distinct art deco style that beautifully accentuates the country’s wild weather and landscapes. In keeping with its Lutheran denomination, the interior of the church is extremely ascetic and minimalist, but in a beautiful, Scandinavian way. After checking out the church we drove over to the Sun Voyager, a massive sculpture of a stylized longship built in the 90s to commemorate Reykjavik’s 200th anniversary as a proper city. From there we went to get some coffee and breakfast sandwiches at Café Babalú, before embarking on the 40 minute drive back down to the airport where we made a bittersweet farewell to our Jimny, drank two beers, ate two more sandwiches, and boarded our flight back to Boston.
As I write this, sitting at home in Newbury, I am again overcome by feelings of immense gratitude and thankfulness for my sheer luck- for being alive in general, being alive in such privileged circumstances, and having the great fortune to be able to see such amazing things and have such incredible experiences. This trip is not one I’ll soon forget, and I’ll carry the memories and lessons I’ve taken from it with me always. Thanks to all who followed along with my journey! Peace.
3 notes
·
View notes
Text
EvaluationProject two was all about identity whether that be your identity or exposing other peoples identities at different lengths. the assignment Brief stated that we had to “It’s not the destination, but the journey” “The ‘process’ is the journey by which you end up at your final outcome. This is an essential part of any creative discipline and enables ideas to be developed and refined. This ‘evolution’ should hopefully produce a more successful outcome.” i Felt that my main piece has related to the brief in someway i did follow what the brief stated, i did generate my ideas and research quite bit what i was going to do and how i did it. The creative process i followed to look at different forms of identity and decide whether or not my final outcome was going to portray my own identity or others. In the end i deiced to portray my own as i was struggling on ideas or what i would preform best at. Over time a lot of artists have used there own emotions and feelings to build the fundamental bricks of there projects. To come up with my ideas i would generally just sit there and think while listening to music and jot the odd idea down this is just how my brain generated its ideas the best. I also experimented with different techniques like doubles exposures, slow shutter speeds and long exposures to get to my final outcome. The sources of inspiration i used i guess you could say came from myself and how i really feel about myself and the world that I’ve been born into along with the overindulgence of the society that i live in. other sources of inspiration that i used were photographers like Gillian wearing and Adrian Piper. i took inspiration from Gillian due to the fact that she asked random people to write there current feelings or thoughts onto paper and she would photograph them after i reflected on this and decided i would take some form of inspiration and write on peoples bodys using my feelings and thoughts instead of paper. I also took inspiration from Adrian piper because of her philosophy on basic human nature and society and usage of ostracism which really helped me come up with my final outcome.the planning that i used to come up with my final outcome was pretty much using my primary research and mind map from the beginning of the assignment. The things i had to think about when planning or executing my shoot were the basic fundamentals of lighting, angles and composure. I also had to think about the layout of the wiring on the models body that i used to make sure you could see the majority of the writing which was actually quite hard to achieve, thats also where the stylistic decisions also came into play because i had to really think about the composure and the way the models were set up which i experimented with a lot. I didn’t use any post production techniques as i shot on film because i feel like film links with my identity more than DSLR does. My images that i decided to use are portraying my own identity, i decided to use two separate models because i wanted the images to reflect how i feel that i have two personality's one that i have in front of my friends and loved ones and one that i kind of keep to myself and don’t share with other people. I chose to write my thoughts onto other people because I felt that it kind of linked with identity because I’m reflecting my own identity onto other peoples bodies which is there own personal front or identity that they put on or demonstrate, This is how i would personally say i connected the theme of identity with my final piece and in my opinion i fell that i demonstrated this quite well. I used symbols and words to express my own identity, for example for the first image i wrote Ciggies and Tinnies on Rubys body due to the fact that i numb my feelings and emotions a lot thought the use of alcohol as its and easier option. i wrote ciggies because i smoke a lot because I’m very stressed out and feel like it represents not really caring about life because i smoke cause i fear of growing old. I also outcast on her chest because that's how i feel a lot of the time that I’m out-casted from society and don’t feel as accepted as most people are which has been the case ever since i was young.I stated the word Punk as well because i perceive to my friends a lot of the time that i live a bit of punky life style because I’m not phased or don’t care where in actual fact i do. I wrote rest on her hand because i never get to rest or shut off and spend most of my life awake because I’m constantly thinking of the past and present or problems that have absolutely nothing to do with me which have quite and affect on me. I painted a mask black and put it on her face to represent how i mask my feelings to everyone and how i feel. I also drew a question mark on the mask because i want to question identity because what really is identity, does anyone actually really have one or are they just trying to fit into some stereotype that there actually not. I also wrote a comfort in being sad which was a line taken from Nirvana- frances farmer will have her revenge on seattle, which meant quite a lot to me when i first heard it because it spoke wonders to me as i couldn’t agree more as a lot of people can’t seam to get out of the mind set of being sad because maybe they don’t actually won’t to because what do you have to worry about when being happy?? is a stress free life really good for the human brain. I also chose to add the antichrist symbol into the image because I’m a strong believer against religion as i think it is on of the biggest downfalls of humanity and was only set in place to control society before we had a proper democracy set in place, being a anti Christ also offers free will which is the devils temptation which i would rather chose then having my life planned out for me. The other image i chose to use was of my close mate Boris i took many photos of him as i did Ruby to try and find the best one i also had a really cool double exposure of him but you can’t really see the writing and symbols on his body so i decided not to use it. For the image that i chose to use of Boris i started off by writing suffocation of the soul on his chest because that's the sort of affect i feel that my anxiety and other issues have on me as they are constantly suffocating me and stopping me from being the person that i actually am. I also wrote damaged goods on him as I’ve had things damage me in my past and things that still damage me in the present which i think a lot of people suffer from. I also drew the Anarchy sign on his body as I’m a slight anarchist and don’t completely agree with democracy but who really does. also being a part on the sub culture of anarchy means being a social outcast which I’m deffinelty fit into. I understand that in art and photography that profanity is maybe frowned upon or not entirely accepted but i asked Boris to pose like this because its how i feel toward the world and a lot of people that i come across, this may come across a bit self profound but its how i feel. what made me choose what i did was i felt that i could preform the best if i related it on my personal reasons which i kind of struggles with and procrastinated as I’m not a very open person and am quite reserved which i meant i struggled with this assignment and epically the evaluation but if i had chosen anything else it probably wouldn’t have been done to my best ability. I feel that both of my images go together and tell a story about my own identity. I'm quite satisfied with my final piece if anything I’m almost quite shy about it but i like the look of the final outcome i feel that it links quite well with the assignment of identity and that there's a lot of hidden messages in there even to the point of the colour of the image but the true satisfaction is up to the viewer of the image. I think my weakness of this project were the generation of ideas as it doesn’t seem like i had a lot but my mind was pretty set on what i wanted to do from the get go which explains the lack of ideas. My strengths i would say would be the framing and lighting of the images as i didn’t have much to work from as i wasn’t in a proper studio and didn’t have a lot of space and had to make do with what i had. If i was to do it again i wouldn’t have left everything so last minute and would have tried to generate more ideas. But overall I’m quite happy with the final outcomes.
0 notes
Text
The Great American Eclipse 2017
Back in August 2016, when the news of this Great Eclipse first started to be a subject of discussion in the media and on social networking, it was not something that had interested me greatly. I was well aware how easily Mother Nature could ruin these sorts of things and how you had to be in a very specific area to even see totality of an eclipse. Not to mention any drive to that small area would be a ten hour drive at minimum. I was also not confident in my photographic abilities by any means. Sure, I thought I took decent pictures but certainly not enough to bother spending the money to go specifically to photograph it. Additionally, I lacked understanding of how great this phenomenon could be in person compared to videos of similar events. I had even probed my father about going and his feelings on it were quite lackluster. Needless to say, I had determined that I was going to watch this one from the sidelines in my home state of Maryland.
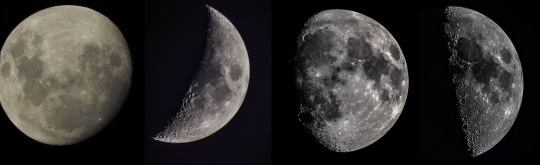
Then, in November of 2016, something changed. I was 4 months into owning a Nikon D810 and learning it is such an amazing piece of gear. The sky seemed like - literally - the limit and I began to dabble in astrophotography. As it turned out, it wasn’t that difficult and I quickly became obsessed with it. I felt good enough about my ability that I bought an astrotracking mount, a Skywatcher Adventure. The forecasts were good so, while I waited for it to arrive with next day shipping, I skimmed through a few online tutorials quickly before bed that night. The next day when it arrived, I went out and took my first try at the constellation Seven Sisters (left side of below image). I was not largely impressed with myself but the fact that some nebulous blue was poking through all the noise inspired me as it meant that a novice like me could image these heavenly bodies without a huge telescope. Just a week later I was able to make the image on the right with just a little more thought and refinement. Cross my ‘t’s and dot my ‘i’s sort of stuff.
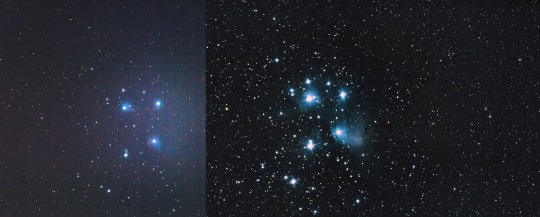
I was content with this image. And honestly deep sky astro is not really a passion of mine; I just did it to say that I could. Satisfied, I set my sights on the moon. I have always taken photos of the moon just to do it. In fact, I had used it so commonly as a target for evaluation of cameras and new lenses that I can track my photos all the way back to 2015 (far left) when I first had my long time point and shoot of preference, the venerable Nikon Coolpix P90, then when I got my Nikon P900 mid 2015 (left middle), and D7200 in later 2015 (middle right), and D810 and tracking (right) sometime in 2016.
I suddenly found myself interested enough in the moon to want to see it in it’s more rare form, totality. I had bounced it off my dad again sometime in June 2017. Turns out, in the midst of all the growing media attention he had had a change of heart and thought maybe it’d be worth seeing after all.
We planned for Charleston, South Carolina and made reservations. On August 19th the forecasts deteriorated to thunderstorms. We were keeping an eye on the weather and were able to make a shift before the media began reporting the same observation. We lucked out and were able to get a hotel in Clemson, SC. Forecasts showed partly cloudy with 3% chance of rain there and in the surrounding areas.
The big day came and, on Monday morning at 1:00 AM, we started our 10 hour drive down to SC. There was quite a bit of traffic and we arrived around 11:00 am. Upon arrival, I decided to try a more scenic and less crowded location just 7 miles south of Clemson instead (though, in hindsight, we should have stayed at Clemson as it remained clear there throughout the day). I also opted not to bother with landscapes as it was simply too weird an angle for my Sigma 20mm Art to capture. It was up to the task and certainly wide enough but the perspective looked quite strange.
I began to feel rather stressed out as I began to set up, not just for photographing totality but to see and enjoy the eclipse properly for myself with my own eyes. Often I find that I get so obsessed that I don’t enjoy myself as much as I could have without the camera. For example, my attempt to get the meteor shower just a week prior had ended badly. I had bought tracking equipment and even made a custom DSLR cooler only to have picked the wrong spot for clear weather due to incorrect forecasts. I did not get to enjoy the meteors with my own eyes as I was too busy trying to get to a location that the camera could see them. All this culminated in a lot of self doubt for this attempt at totality.
By ~11:45 am I was all set up. For this shoot, I wanted to use my tracking mount to follow the sun as the 500/4 AF-i lens weighs nearly 11 pounds and it is difficult to constantly change the ball head position to follow the ever moving sun across the sky. One thing that is hard to notice is how fast the sun moves. It is almost unnoticeable until you try to frame it with telephoto lens; within several minutes it is out of the lens view again. This tracker has a motor that follows it across the sky as it moves and takes the lens with it. Having never set it up in daylight, it took some time to acquire the sun but once I did, it tracked very well. My custom hand controller made keeping alignment prim and proper quite flawless. Focusing with a Modified Hartmann mask was very easy and quick and worth the extra hours to make the night before.

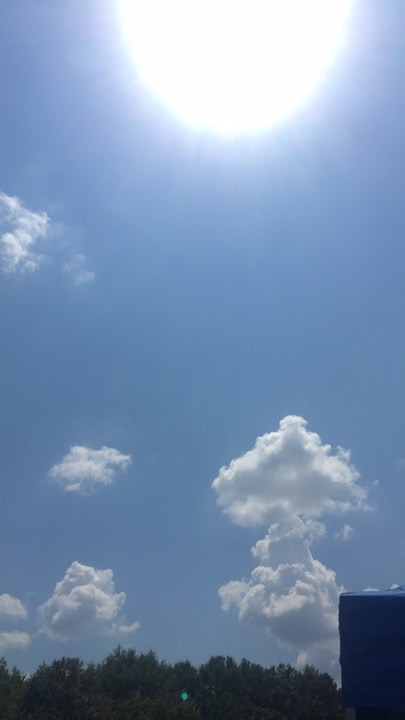
At 1:09 pm, the first glimpses of the moon beginning to transit the sun appeared in my view finder. I started taking exposures at 1/4000 7 1/8000 with bracketing 9 stops up. It was exposing well and I was quite overjoyed that I was actually here in South Carolina imaging the moon blocking out the sun! Things were going quite well at this point. However, by 1:40 pm this had all changed: clouds began to roll in and almost continuously block our line of sight with only intermittent windows, seconds at a time, through which to see the unfolding eclipse. The clouds got worse and worse, growing more voluminous and stationary. I had never seen two layers of clouds form and move in perpendicular directions over such flat terrain. In Maryland, clouds only move west to east. These moved east to west and north to south. I was flabbergasted and saddened by this as the outlook was becoming so very bleak.
At 1:59 am, just 39 minutes before the main event, I expressed my misery over this sudden clouding with a contact from Reddit, John Kraus, whose launch photography is something I quite admire. He, in turn, reported that he was having better luck and was just several miles away at Williamston, SC. He was even nice enough to send me a photo and stay in contact with me even while busy with his own imaging.
The time was 2:00 pm and packing up in 10 minutes, driving 20, and setting back up seemed impossible. I was stressed and indecisive about relocating. Typically as soon as you move or put your camera away fate messes with you and changes things back to optimal conditions. I figured the clouds would clear just to be cruel. However, fate reached out and talked to me in that moment of angst: a huge rain drop landed on my tripod leg right before my eyes. It was then I knew I had no choice. It was going to rain! With lightning speed I packed up my gear, practically ripping it into pieces and messily tossing it into bags and bins. Running around with my huge 500/4 Nikkon AF-i 11 lb monster around my neck, I began hauling things back to the car. Other parties were doing the same, backing up and asking where we were headed. One even joked alongside me, talking as I hauled my bin of gear to the car. As soon as we jumped in the car it began to down pour like a monsoon. So much for that 3% chance of rain, you pesky weather forecasters!
The race was on. We flew down back roads and raced ever closer to the huge hole in the sky that was now visible just a few miles ahead of us down what I think was 85. At 2:28 pm the GPS said we still had 12 minutes to our destination with totality only 10 minutes away! Checking my Google Maps app, it was clear we would not make it to Williamston in time. My father saw an exit ahead, the last before a several mile stretch to Williamston, when suddenly the sky cleared. Fearing it’d be the only chance I had, I stuck my whole camera and lens out the window and began firing away shots (to my amazement, I captured several images this way). I told him to take the ramp since we were simply out of time. We were not alone in this revelation.

Suddenly, every car began to turn towards the ramp almost simultaneously as if the sudden sunlight had infected every mind it touched with some sort of brain washing or connected us all in some sort of Borg hive mind. All had come to the same decision. “This is the only exit close enough and the sky is now clear.. there's 3 minutes left till the main event... this is it! Our only chance.” In amazing, unplanned choreography 2 lanes of traffic and those already driving on the shoulder suddenly all converged on a singular point on the exit ramp. It was something you’d imagine Tesla hopes its autopilot could one day do when all cars are autonomous. We were unable to obtain a spot on the exit ramp. Turning up into the main drag, a row of gas stations and restaurants lined this small reststop-like exit. The small traffic jam was growing larger by the second as more and more vehicles flooded into this last bastion of clear sky for those that were rained out in other directions.
The saturation and hues began to drain as the sunlight drew white with totality’s impending arrival. It was as if someone had begun to drag the Lightroom vibrancy slider to the left into the far negatives. Meanwhile, everyone stared up paying no mind to the surrounding world. It was all so surreal, strange, and just out of this world. The only thing I have ever seen like it has been Yom HaShoah and when the Sirens sound to honor the fallen.
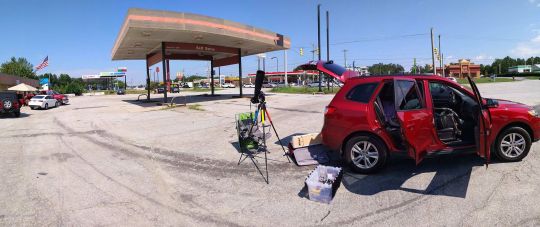
I jumped ship while attempting to park in a gas station parking lot with just my camera my old backup gitzo metal tripod. There was no time for anything else or to put my ballhead back on my Carbon Fiber Gitzo. I began to set up near some other folks on their nice wide paved pad in the middle of the grass. In hindsight, I can only imagine I was standing atop their septic tank, why else would there be a large concrete box stick up out of a grassy field beside a building?
As I set up one of the workers came out and began to yell at me claiming that this area and parking was for customers only. I told her that I did not park here and that I walked. She went on complaining until I promised I’d come buy something afterwards. I found it quite strange she was so concerned with me becoming a customer and yet being so nasty to me. I suppose she targeted me specifically as I had the biggest lens of all. It was just so odd that she seemed quite blind to the fact that there was a huge traffic jam on the road, in the parking lot, and people just standing outside their cars on the main road. How could anyone be so concerned with someone buying a candy bar while something so rare and magical was happening around them? I simply told her I promise I'll be in to get a candy bar, and informed her that no right-minded person is going to be crazy enough to pump gas while this amazing display is going on, and that if she did not like it she could call the cops but there'd be no way for them to get here as the roads were a frozen stream of cars whose owners abandoned them to view this event. I was called a smartass, not surprisingly. However, I was amazed that she turned her back on the beginning of totality and went back inside, oblivious and uncaring of the events just outside the door 10 feet from her cash register.
I ended up setting up with only 50 seconds to go, and I began firing away letting my intervalometer and automatic bracketing do the work. I had switched my AF-i lenses clutch to Auto focus so it was still focused from the previous site. Finally able to look around and enjoy the event, to the west I could see the shadow racing towards us at ~1500+ mph. All those clouds I had hated moments ago for raining on us suddenly made it clear how quickly the eclipse moves. Coast to coast in 94 minutes. The loathed clouds turned ever darker the closer they were. On the far horizon the clouds lit up like sunset. All around everyone was bathed in white glowing light that was ever dimming as the great shadow descended upon us. Totality arrived abruptly. It is like the opposite of the scene from Forrest Gump when the sun suddenly comes out after the rain. Expected, yet unexpectedly.
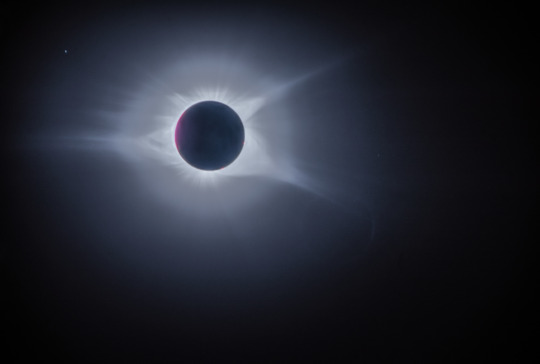
Totality was indescribable. Looking up at the sun and seeing the many solar prominences poking out around the edge of the completely black moon; how quickly it all shifted from very bright white to black and dark; the stars and planets shining brightly in the sky while the clouds on the horizon shown like daytime; the qualia of this experience are impossible to explain. You’ll never know till you see it yourself. It went on so shortly that before you knew it you could see the shadow leaving and the light returning from west to east. I kept firing my camera and waited until the last minute to put my filter back on. I was happy to see I got a nice diamond ring shot and several other great shots. In hindsight, I wish I had changed my exposure times a little more but auto bracketing 9 stops worked well enough for this noob’s first time. And to be honest in a lot of ways I am glad I did not. I was able to enjoy it, watch it myself. The timer did the work while I beheld the amazement.
I came back to reality and I found myself suddenly quite sad. My dad ended up in the next parking lot down, an abandoned gas station 100 yards or so away. I wish I had known the exact time. I wish I knew I had time to run down and be near him. I felt bad for the greed to see it in my camera over seeing it with him. I called him and discussed it with him while we were both still in awe. I talked to a few people nearby, gave out my website. I wish I had business cards! Maybe it is time for those now. Then I headed down to start shooting near him till it faded out totally and the moon was invisible again at ~4:10 pm. I took this picture before packing up, everyone else gone, this small rest stop exit empty again. The traffic jams cleared and the horde of zombie-like sky starers all returned to their tasks. Just me and another photographer remained till the very end. In the back left you can see where I shot totality, and where I ended up. To the far left are the cars of other photographers that watched it till the very end.
Here are some images I put together quickly before the hype dies down too much.


0 notes
Last Seen Blogs
karenfordonte
Caring For Donte

gemwinplayvip
Gemwin Vip

bootsmadeforblogging
if the apocalypse comes, beep me.
l-6-n-n
Lynn-wood

retratocomalma
Retrato com Alma