#laravel 5.8 install
Explore tagged Tumblr posts
Visit Tumblr Blog
Explore Tumblr blogs with no restrictions, modern design and the best experience.
Last Seen Tumblr Blogs


Fun Fact
Tumblr was the first site to host the blog for President Barack Obama in 2011.
Text
Sponzy Nulled Script 5.8

Download Sponzy Nulled Script – Monetize Your Content Creatively If you're looking for a powerful yet cost-effective solution to launch a creator-support platform, Sponzy Nulled Script is the perfect tool for you. Whether you're building a Patreon-style website or looking to monetize content through subscriptions and donations, this script is a game-changer. Enjoy full access to premium features without any licensing restrictions. Get the latest version for free right here and empower your online journey today! What Is Sponzy Nulled Script? Sponzy Nulled Script is a premium PHP-based platform that enables creators to receive financial support from fans and subscribers. With seamless payment integrations, customizable layouts, and multi-language support, Sponzy allows you to create a community-focused platform that rivals the best in the business. The nulled version gives you complete access to its premium functionalities for free—no subscriptions, no hidden charges. Technical Specifications Script Type: PHP Laravel Framework Responsive Design: Fully Mobile-Optimized Database Support: MySQL 5.7+ Latest Version Compatibility: PHP 8+ Security: Integrated reCAPTCHA, CSRF Protection Powerful Features & Unique Benefits The Sponzy Nulled Script comes loaded with high-end features that give you a competitive edge: 1. Multi-Currency & Payment Gateway Support Integrate with PayPal, Stripe, and even cryptocurrency gateways to offer a seamless payment experience worldwide. 2. Membership Tiers Create different support plans with varying benefits to attract a wider range of supporters—from casual fans to superfans. 3. Real-Time Notifications Keep users engaged with real-time alerts for messages, tips, and subscription renewals. 4. GDPR-Ready and SEO-Friendly Built to meet modern data privacy regulations while optimizing your platform for search engines right out of the box. 5. Monetization Tools Enable tipping, subscriptions, and pay-per-view content—all built into the system with intuitive admin control. Why Choose Sponzy Nulled Script? Unlike many open-source alternatives, Sponzy Nulled Script is professionally designed and continuously updated. The nulled version saves you hundreds of dollars while providing the exact same user experience. It’s ideal for entrepreneurs, influencers, bloggers, and creative professionals who want to launch a content support platform without financial risk. How to Install Sponzy Nulled Script Download the script from our website. Upload it to your server using FTP or cPanel. Create a new MySQL database and import the included SQL file. Open the installation URL and follow the on-screen setup process. Log in to your admin panel and start customizing your platform! Use Cases of Sponzy Nulled Script Content Creators: Monetize exclusive videos, blogs, or artwork. Influencers: Offer membership perks to loyal followers. Nonprofits: Receive recurring donations without complex setups. Writers & Journalists: Launch subscription-based content easily. FAQs About Sponzy Nulled Script Q: Is it safe to use the nulled version? A: Yes, we ensure all scripts are scanned for malware and viruses before making them available. However, always use a secure hosting environment. Q: Can I update the script? A: Updates are manual, and you may need to download the latest version from our website when available. Q: Does it support RTL languages? A: Absolutely. Sponzy Nulled Script supports both LTR and RTL, making it perfect for global use. Q: Can I integrate custom themes? A: Yes, the script supports theme customization and development for a personalized user experience. Final Thoughts The Sponzy is more than just a content monetization tool—it’s your gateway to building a thriving digital community. Whether you're just starting out or scaling an established brand, Sponzy delivers professional-grade features without the professional-grade price tag. Don’t miss this opportunity to download it for free and unlock unlimited potential!
Looking for more premium resources? Check out our collection like avada nulled for even more web design flexibility. For a powerful eCommerce theme, try woodmart nulled—a must-have for modern online stores.
0 notes
Text
Laravel One To One Relationship
Laravel One To One Relationship
[vc_row][vc_column][vc_column_text]In this chapter, we will learn how to use Laravel One To One Relationship. I am using windows OS & latest version of Laravel Framework which is 5.8 now and it needs PHP version 7.1.3 or higher. Make sure you have this PHP version installed in your system. You can use your PHP version too.[/vc_column_text][vc_column_text]
# Requirements
Laravel installed in your…
View On WordPress
1 note
·
View note
Text
Laravel 6.0: What You Should Know

Since the inception of Laravel 5.0 around 4.5 years ago, the Laravel ecosystem has blossomed into something that leaves users nothing to complain about, to say the least. Laravel Nova, Laravel Horizon, Laravel Echo, Laravel Scout, and Laravel Passport are just some of the tools that have been introduced since then. At the time of this writing, we’re on Laravel 5.8 and Taylor Otwell has decided to skip past 5.9 on to 6.0 on the 3rd of September. Previously, Taylor has stressed that this won’t be a major paradigm shift for Laravel and the most significant change will be the transition to semantic versioning. However, this doesn’t mean that there aren’t plenty of new features worth talking about.
Let’s dive into some of the smaller changes first.
The Smaller Things
Authorization

Authorization messages can now be made easier for users to understand. Before Laravel 6.0, the infrastructure wasn’t in place to easily give a specific response to a user when they were given an authorization-related error. The status code could be given fairly easily, but giving a custom error message was more complicated back then. Giving a custom messaged required the developer to create a new file and write their own exceptions.
Now, to get a customizable authorization response, you can simply use the Gate::inspect method when linking to the function that enables you to receive the response. Delivery of the message to the front-end is also easy to organize. Simply add $this->authorize or Gate::authorize to a suitable route or controller.
No More Default Front-End

The typical front-end setup you are given when you first start a Laravel project is now gone. This means the Vue and Bootstrap code you would usually see, would have now been removed. What it’s been replaced with is unknown. Perhaps, it hasn’t been replaced. Strangely, the make:auth command, used to provide the login system scaffolding is now not a part of the original Laravel install either. To be honest, the rationale behind this change is unclear to me. However, given Laravel’s versioning adjustment, it makes sense that third-party technologies like Vue and Bootstrap that haven’t recently undergone the same changes could cause conflict. Though, this is merely speculation.
If you want access to the old UI, you can extract a composer package that contains it with the CLI: composer require laravel/ui and php artisan ui vue --auth.
Lazy Collections

This is one of the more interesting additions. If you’re new to Laravel, Collections are tools that make it easier for you to manipulate arrays. Eloquent, one of the two main tools in Laravel used to communicate with databases, returns its queries as Collection instances. Check out the docs for Collections if you think you’re gonna lack context in a moment. https://laravel.com/docs/5.8/collections
So, what are Lazy Collections? Traditional Collections are often used for working with large amounts of data. When they run into data-heavy files, they’ll try and store all of that data at once. This may sound quick and convenient but the downside is that this is very memory-taxing. Lazy Collections solve this problem by only storing the part of the file they need, and thus, save memory usage and boost performance.
If you understand how lazy loading works then you’ll be familiar with my previous explanation. Lazy loading works the same way. When you make a request to the server with lazy loading implemented, the browser will only return the part of the web page it knows you’re going to use immediately. Then, when the user scrolls down the page or clicks on an internal link, the server will provide you the necessary content it knows you need. This way, only memory that is needed at that particular moment is being used. This method increases speed. Lazy Collections is kind of like lazy loading but with arrays from a database and not content on a webpage.
The Bigger Things
Laravel Ignition
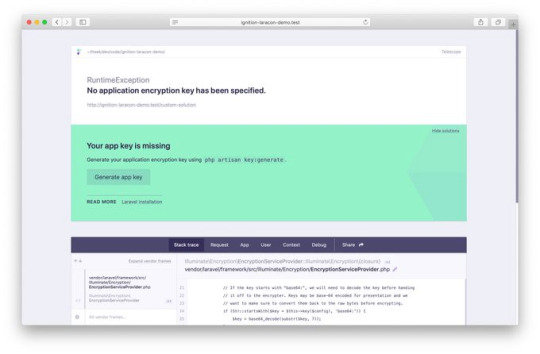
So yeah, the new error page for Laravel is called Ignition and it looks awesome. It’ll be the default error page for Laravel when 6.0 releases. However, if you don’t feel like making the switch to 6.0 just yet, that’s fine, you can still install Ignition on previous versions. Let’s talk about what Ignition brings to the table.
With Whoops (the current default Laravel error page), stack traces and relevant code snippets are shown in an error page, but this doesn’t always lead the developer to the solution. Worse, sometimes the stack traces just reference compiled paths. This can it make it difficult to find the necessary non-compiled files to fix because they aren’t listed anywhere on the error page. Thankfully, this isn’t a problem with Ignition, it can display to you the non-compiled file where the problem actually exists. By clicking on a pencil icon, you can go directly to the file in your chosen editor.
The second coolest feature of Ignition is that it can display potential solutions when displaying an error message. Most error pages just leave you with the error. For example, if the error is that you misspelled a property name, Ignition will tell you that the property has been misspelled and offer you the correct spelling. Solution suggestions can be way more sophisticated than this, I’ll link you to the source down below. Your suggestions are even customizable!
You wanna know the coolest feature? These solution suggestions are actually runnable!

Yes, really. Take a look at this short demo by one of the creators, Freek Van der Herten.
https://youtu.be/EZu0-CwTU9Q
Also, you can add your own runnable solutions too! This is great as Ignition is open source so people in the Laravel community will undoubtedly contribute their own solutions for everyone to use.
There’s a bunch of other cool features too such as creating your own tabs (yes Ignition has tabs) and sharing your error messages with other people. This is done using Flare, a tool that comes with Ignition.
For everything about Laravel Ignition and Flare, visit https://freek.dev/1441-ignition-a-new-error-page-for-laravel.
Laravel Vapor

Another big one. Laravel Vapor is a serverless deployment platform for Laravel. But wait, why do we need a deployment platform? We already have Laravel Forge, right? As beloved as Forge is amongst the Laravel community, it does have its limitations. It doesn’t have autoscaling to deal with large sudden increases in traffic that prevent your site from crashing. Also, configuration is required when OS or PHP updates occur. Vapor has autoscaling, so, you don’t have to worry about sudden spikes in your traffic causing website downtime. In addition, because of the serverless structure of Vapor, it also handles all the updates you may stress about when using Forge.
Vapor’s website is very clean looking and everything seems easy to find. When you deploy a project, you can see the different stages of the deployment process loading on the UI. I find this to be very reassuring and comforting. You can also rollback your application with a click of a button. Just click on “rollback” and it’ll do just that. Pretty neat. Same deal if you want your app to undergo maintenance. Just click on the “maintenance mode” button.
Another cool feature of Laravel Vapor is that you’re able to set alarms. What do I mean by that? For example, to know when your website traffic suddenly blows up, you can set a certain amount of HTTP requests per minute, and if your website hits that limit, the alarm will go off, informing you of the surge in traffic. Taylor Otwell showcases this and other conditionals in his Laravel Vapor demo which I’ll link to below.
There’s so much to cover with Laravel Vapor and the Laravel update itself. Because of this, I didn’t really want to dive into the complexities too much in this post. To learn more about the technical aspects of Laravel 6.0, you can take a look at the release notes here https://laravel.com/docs/6.0/releases. For more info on Laravel Vapor, visit this video by Taylor Otwell https://www.youtube.com/watch?v=XsPeWjKAUt0&t=362s.
1 note
·
View note
Photo

How to use and install Ckeditor with image upload in Laravel 5.8 ☞ http://bit.ly/2Zp2DmM #php #laravel
1 note
·
View note
Photo

How to use and install Ckeditor with image upload in Laravel 5.8 ☞ http://go.thegeeknews.net/978d1f4217 #php #laravel
1 note
·
View note
Photo

A Complete Guide to Laravel 5.8 Installation ☞ http://tech.edupioneer.net/faed174886 #Laravel #Codequs #Morioh
1 note
·
View note
Text
How to telescope installation and configuration in laravel?
Hello to all! Now in this article, i will talk about laravel telescope installation. i will use how to install telescope laravel? So in this article i will goes to detailed descriptive on telescope installation and configuration step by step. I will look at example of telescope installation and configuration. So Let’s start with laravel telescope tutorial.
So now in this tutorial, i will show you how to telescope installation and configuration in laravel 5.8 ,laravel 6, laravel 7 and laravel 8 version.
Laravel Telescope is a debug assistant for laravel project. Whenever you will write code it is very hard to debug and find the error in your application manually. Telescope will provides access to the requests coming into your application, exceptions, log entries, database queries, model watch, catch, redis, queued jobs, mail, scheduled tasks and more in one place.
So, now here i will give you a very simple step of how to install telescope in your laravel app and also how it looks after install.
Read Also : PHP AngularJS CRUD with Search and Pagination Example From Scratch
Install Laravel Telescope Package
Install telescope for with following command:
composer require laravel/telescope
you can also install for specific environment:
composer require laravel/telescope --dev
Read Also : How to Autocomplete Textbox in Laravel 8 with Ajax?
Install Telescope
after install this package, we have to also install telescope by using following command that will create migration files and configuration file.
php artisan telescope:install
now let’s run following command to create tables for telescope.
php artisan migrate
now you are ready to run telescope. so let’s run project:
php artisan serve
open bellow url
localhost:8000/telescope/requests
Read Also : How to Get Selected Option Text in Vue JS ?
What features provide by telescope?
Requests
Commands
Schedule
Jobs
Batches
Cache
Dumps
Events
Exceptions
Gates
Logs
Mail
Models
Notifications
Queries
Redis
Views
Thanks For reading. Hope it will help you . Also you can follow us on Facebook
0 notes
Text
Vanguard - Advanced PHP Login and User Management
New Post has been published on https://intramate.com/php-scripts/vanguard-advanced-php-login-and-user-management/
Vanguard - Advanced PHP Login and User Management

LIVE PREVIEWGet it now for only $35
Vanguard is PHP application, written in Laravel PHP framework, that allows website owners to quickly add and enable authentication, authorization and user management to their website. It is designed following latest security and code standards and it is ready for high availability websites. Although it is written in Laravel, it can be used to provide secure login, authentication, authorization and complete user management for any PHP powered website. Vanguard also comes with fully documented JSON API which allows you to easily authenticate users from your mobile (or any other) application.
It comes with almost three hundred automated tests (functional and unit), that cover all vital parts of the application and the API and ensures it’s maintainability and stability.
Version 5.0.1
Features
Secure user registration and login
Social Authentication using Facebook, Twitter and Google+
Password reset
Two-Factor Authentication
Remember Me feature on login
Login with email or username
Google reCAPTCHA on registration
Authentication Throttling (lock user account after few incorrect login attempts)
Interactive Dashboard
Unlimited number of user roles
Powerful admin panel
Unlimited number of permissions
Manage permissions from admin interface
Assign permission to roles
Easily check if user has permission to perform some action
JSON API to build any kind of applications around Vanguard
Super easy installation using installation wizard
User Activity Log
Avatar upload with crop feature
Built using Bootstrap 4
Active Sessions Management (see and manage all your active sessions)
Admins can impersonate users
Full unicode support
Client side and server side form validation
Fully customisable from settings section
Complete and detailed documentation
Fully object oriented and commented PHP and JavaScript code.
Localization support – Translate the application to any language (English, Serbian and German translations included)
Runs on PHP 7.2.5+
Flexible Plugin System
Security
CSRF Protection – all forms include CSRF token
Session Protection – highly secure Laravel session mechanism
Highly secure one-way password hashing
Server Requirements
PHP >= 7.2.5
BCMath PHP Extension
OpenSSL PHP Extension
PDO PHP Extension
Mbstring PHP Extension
Tokenizer PHP Extension
Ctype PHP Extension
XML PHP Extension
JSON PHP Extension
GD PHP Extension
Fileinfo PHP Extension
Demo and Documentation
Demo link: https://demo.vanguardapp.io
Admin Credentials
Username: admin
Password: admin123
Documentation and Support: https://milos.support-hub.io/
Discount Notifications
Subscribe to receive notifications about discounts and updates: https://vanguardapp.io/#subscribe
Changelog
Check the docs for upgrade guide.
April 8, 2020 – Version 5.0.1
Fixed installation wizard
April 5, 2020 – Version 5.0.0
Fixed custom login redirect issue Upgraded to Laravel 7 Switched to Laravel Sanctum for API authentication Replaced API transformers with Laravel's API Resources Changed API response format
September 16, 2019 – Version 4.0.1
Fixed password reset email issue Fixed avatar upload issue Updated registration and email verification flow
September 13, 2019 – Version 4.0.0
Added Plugin Support Upgraded to Laravel 6
April 1, 2019 – Version 3.2.1
Fix installation issue
March 30, 2019 – Version 3.2.0
Upgraded to Laravel 5.8 Replaced deprecated Larvel str_ and array_ helper functions
October 30, 2018 – Version 3.1.0
Upgraded to Laravel 5.7 Fixed issue with API when country_id field is null Fixed Notifications Settings update bug Improved Two-Factor Authentication by adding one more step for phone verification Added Impersonate feature
June 14, 2018 – Version 3.0.1
Minor bug-fix release to address a few mostly UI related bugs. List of changed files available inside the upgrade guide.
May 17, 2018 – Version 3.0.0
Complete frontend re-write with Bootstrap 4 Remove additional step for Twitter authentication since Twitter can provide an email now Update sizes of the avatars retreived during social authentication
March 13, 2018 – Version 2.2.0
Upgrade to Laravel 5.6 Fix issue with Authy secret key and config caching Fix issues with registration history chart Fix installation issue on PHP 7.2
December 19, 2017 – Version 2.1.1
Added ability to configure dates format across the app Added automatic session invalidation and log out of the user if he is banned by the administrator Added device info on session list page Updated dashboard chart to display data in last 365 days (instead of for current year) Extracted model factories to different files (important for testing purposes only) Fixed autoload include issue for existing websites
November 08, 2017 – Version 2.1.0
Upgrade Laravel to version 5.5 Fix glitch on User Acivity search
September 14, 2017 – Version 2.0.2
Fix avatar update issue when admin is updating avatar for some other user Disable API authentication for banned and unconfirmed users Fix country update issue which occures on some MySQL versions
August 25, 2017 – Version 2.0.1
Fix installation issues from previous version Update documentation
August 23, 2017 – Version 2.0.0
Add fully tested JSON API Fix some minor glitches related to translation
May 1, 2017 – Version 1.3.3
Fix incompatibility issues between laravel-jsvalidation package and Laravel Framework version 5.4.19+ Fix issue where country is set to null after user logs in
April 12, 2017 – Version 1.3.2
Removed zizaco/entrust package and replaced with Vanguard's native mechanism for handling roles and permissions $user->can() method now use Laravel's default authorization mechanism. For checking if user has permission defined by Vanguard, you should use $user->hasPermission('...').
March 06, 2017 – Version 1.3.1
Fixed installation issue Fixed issue with FORCE_SSL
February 18, 2017 – Version 1.3.0
Laravel 5.4 upgrade IMPORTANT: Fixed potential security issue with user avatar upload Fixed issue to don't allow banned users to log in via social networks Expanded and updated automated tests to cover all bugs and issues from above
September 30, 2016 – Version 1.2.1
Fixed bug when creating/updating users from admin panel without selected country Fixed small typos on delete user confirmation popup
September 27, 2016 – Version 1.2.0
Updated to Laravel 5.3 InnoDB is now forced storage engine for MySQL database Slightly improved design E-Mail templates updated (now using Laravel 5.3 Notifications feature) Fixed default country value Fixed n+1 problem for activity page (added missing eager loading) Fixed translation glitches Added IIS configuration file PHP 5.6.4 is now minimum PHP version required (Laravel 5.3 requirement) PHP XML extension is now requirement (Laravel 5.3 requirement) Updated and extended documentation Dropped support for HHVM, since Laravel 5.3 does not support it
March 30, 2016 – Version 1.1.2
Add missing middleware to redirect user to install page if Vanguard is not installed
March 29, 2016 – Version 1.1.1
Added German translation files Add translation for few missed strings Fix some small bugs
March 15, 2016 – Version 1.1.0
Add localization support Use social network profile image as default avatar after social auth Fix problems with pagination while browsing search results for users and activities Handle missing email from non-twitter social provider
February 18, 2016 – Version 1.0.4
Updated documentation Added option to allow redirect to custom page after login Disable access to login page for authenticated users
February 4, 2016 – Version 1.0.3
Updated documentation Fixed css glitches Added more tests
January 25, 2016 – Version 1.0.2
New design for error pages Updated installer to require Fileinfo extension
January 22, 2016 – Version 1.0.1
Add missing configuration placeholder file
January 21, 2016 – Version 1.0.0
First release
LIVE PREVIEWGet it now for only $35
0 notes
Photo

How to use and install Ckeditor with image upload in Laravel 5.8 ☞ https://morioh.com/p/9ed42aa30e8d #Laravel #Ckeditor #image #Morioh
0 notes
Photo

Laravel Tutorial : Build a Basic Laravel Website | Laravel 5.8| (Part 1/2) | Eduonix Eduonix brings this exclusive Laravel tutorial for you in which you will learn how to create a basic Laravel website Using the all-new Laravel 5.8. This part ... source
#create website#Eduonix#Laravel#laravel 5#laravel 5 tutorial#laravel 5.4#laravel 5.8#laravel 5.8 tutorial#laravel counter#laravel from scratch#laravel installation#laravel php#laravel project#laravel series#laravel tutorial#laravel tutorials#model view controller#mvc#php#php framework#tutorial#website tutorial
0 notes
Photo

How to use and install Ckeditor with image upload in Laravel 5.8 ☞ https://morioh.com/p/9ed42aa30e8d #Laravel #Ckeditor #image #Morioh
0 notes
Photo

How to use and install Ckeditor with image upload in Laravel 5.8 ☞ https://morioh.com/p/9ed42aa30e8d #Laravel #Ckeditor #image #Morioh
0 notes
Link
#laravel#laravel developers#laravel development#laravel installation#full stack developer#full stack development#Full stack
0 notes
Photo

A Complete Guide to Laravel 5.8 Installation ☞ http://dev.geekwall.in/4b272c9b19 #php #programming
2 notes
·
View notes
Text
Membuat Ajax Crud Laravel 5.8

Mari kita main-main dengan Laravel 5.8. Disini kita akan membuat AJAX CRUD di Laravel 5.8. Kita anggap anda sudah bisa menginstall apache server, dll di PC anda, bisa menggunakan Xampp atau lebih mudah lagi menggunakan Laragon. Pertama-tama kita Install Laravel 5.8, masukkan ini di console anda : composer create-project --prefer-dist laravel/laravel laravelunik Kedua, seting konfigurasi .env : DB_CONNECTION=mysql DB_HOST=localhost DB_PORT=3306 DB_DATABASE=nama_data_base DB_USERNAME=root DB_PASSWORD= Ketiga, migrasi database ke tabel : php artisan migrate Keempat, silahkan anda install Paket Yajra Datatables di Laravel anda, lakukan perintah berikut di console anda : composer require yajra/laravel-datatables-oracle Kelima, selanjutnya, silahkan anda buka file config/app.php, dan sesuaikan dengan kode berikut di service provider dan alias : config/app.php 'providers' => , 'aliases' => Selanjutnya, jalankan perintah berikut di console anda : php artisan vendor:publish Ke-enam, menambahkan Route di web.php, silahkan anda buka routes/web.php dan sesuaikan kode seperti berikut : Route::resource('ajax-crud-list', 'UsersController'); Route::post('ajax-crud-list/store', 'UsersController@store'); Route::get('ajax-crud-list/delete/{id}', 'UsersController@destroy'); Silahkan anda buat controller dengan memasukkan kode berikut di console : php artisan make:controller UsersController Sekarang, silahkan anda buka file app/Http/Controllers/UsersController.php dan edit seperti berikut : ajax()) {return datatables()->of(User::select('*'))->addColumn('action', 'DataTables.action')->rawColumns()->addIndexColumn()->make(true);}return view('list');}/*** Store a newly created resource in storage.** @param \Illuminate\Http\Request $request* @return \Illuminate\Http\Response*/public function store(Request $request){ $userId = $request->user_id;$user = User::updateOrCreate(,); return Response::json($user);}/*** Show the form for editing the specified resource.** @param \App\Product $product* @return \Illuminate\Http\Response*/public function edit($id){ $where = array('id' => $id);$user = User::where($where)->first();return Response::json($user);}/*** Remove the specified resource from storage.** @param \App\Product $product* @return \Illuminate\Http\Response*/public function destroy($id){$user = User::where('id',$id)->delete();return Response::json($user);}} Read the full article
0 notes
Photo

How to use and install Ckeditor with image upload in Laravel 5.8 ☞ https://morioh.com/p/9ed42aa30e8d #Laravel #Ckeditor #image #Morioh
0 notes